Situated on the slopes suburban areas differ from the land plots located on the plains. Due to the characteristics of the soil and changes in relief, owners have to face the need to implement additional work. In most cases, to solve existing problems, it is necessary to resort to the installation of retaining walls, terracing and the construction of special structures that help strengthen the soil layer.
Land on a slope - what can be done
A detailed study of many nuances and a thoughtful approach allow us to obtain original solutions. Incorrigible flaws at first glance turn into a highlight, as a result of which a summer cottage located on a slope acquires attractive advantages, admirable neighbors.
To ensure that the efforts expended are not wasted, before starting work it is advisable to study the area from the point of view of its further planning. Particular attention should be paid to functionality.

The buildings built into the slope look very original. Such tactics expand the range of architectural solutions by implementing additional exits to the adjacent territory from different levels.
At the planning stage, it is advisable to decide on the locations:
- outbuildings, the operation of which requires the supply of electricity;
- gas or water pipes(toilet, summer cuisine, bath).
Preliminary marking of areas for:
- flower beds;
- gazebos;
- canopy;
- recreation areas.
The slope can also be used to arrange a cellar.

In the photo - making retaining walls
Careful study of level differences and protrusions may prompt non-standard solution in the field of landscape design.
Some corners seem to be created by nature for:
- waterfalls;
- streams;
- light openwork.
Rocky areas are ideal for creating rock gardens that recreate a mountain landscape.
Coping with steep slopes
The predominant part of summer cottages is used for planting trees, ornamental and agricultural plants.
Realization of the set goals is impossible without reducing the steepness of the slope.
- To solve this problem, they most often resort to this simple method transformation of the relief, such as terracing.
- When developing a terrace plan, it is important to work out how to connect individual areas.
- Level paths or stairs can be used as the latter.
- Climbing up and down steep steps can cause fatigue. As a result, it is highly desirable that the height difference between elements does not exceed 10 cm.
- Staircases designed for heavy loads should be wide.
Advice: during construction, give preference monolithic structures, erected using the formwork method from a concrete mixture.
- Decoration with stones and tiles begins after the main work is completed.
Tip: For the construction of small stairs, use wood and natural stones, secured with cement mortar or dry laid.

The transformation of the landscape begins after drawing up a site plan. A sketch created on the ground will also come in handy. Steeper slopes require more terraces.
Advice: when arranging the latter, you should not forget about the level of difference. The value of this indicator should tend to a minimum.

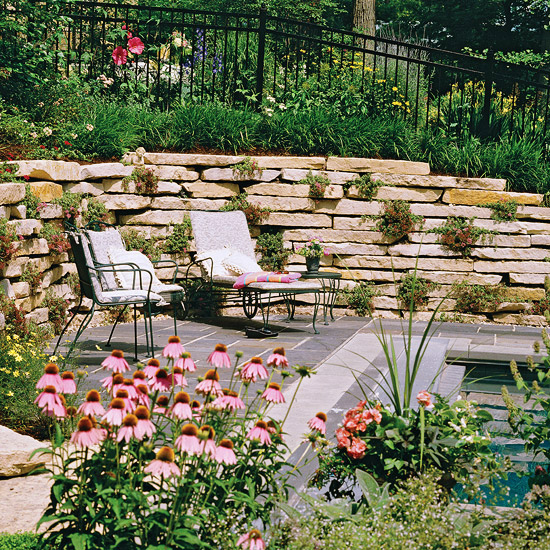
Support structures
To enhance the stability of the terraces being built, supporting walls are used, the main function of which is to hold the soil and redistribute the pressure it exerts. Let's look at different materials:
| Wood |
|
| Stone | In practicality supporting walls people were convinced of it from stone several centuries ago. The basis of the method, which does not require a solution, was the selection of stones of appropriate shapes and sizes. Implementation this method in practice, it requires creative thinking and perseverance. The price of work depends on the volume. |
| Concrete | Individuals who are far from construction can resort to the pouring method monolithic concrete. The arrangement of supporting walls from natural stone, fixed with a solution. |
| Blocks and bricks | The instructions allow the construction of supporting walls from such materials. Before installation begins, work related to the creation must be completed. monolithic foundation. Most often, the tape variety is used for these purposes, which attracts owners with its high degree of reliability. With its help, high terraces are built, which are characterized by large differences. |

Excess moisture problem
Effective functioning of supporting walls is impossible without a drainage system. Excess moisture is successfully combated by a drainage layer, for the construction of which sand and crushed stone are used.
They cope with the task:
- drainage pipes laid towards the slope of the terraces (1 pipe is laid for every 2.5 m);
- if required, drainage trays can be used.

Backfilling of the terrace is carried out in the following order:
- the drainage layer is covered with an infertile layer of soil;
- Vegetable soil follows on top.
Remember, the possibility of ground settlement cannot be ruled out. The occurrence of this complication is most likely during the first few days.
Advice: it is advisable to start work related to the improvement of the site after filling up the settled soil.
Conclusion
Dacha plots on a slope can be turned into interesting territories using the terrace method. You will not only add useful space to yourself, but also make your place original. You just need to strengthen the slope in advance with the help of supports.
The video in this article will help you find Additional information on this topic.

OLYMPUS DIGITAL CAMERA
beautiful landscaping garden retaining wall
A beautiful dacha is the dream of every summer resident. For a resident of a modern metropolis, a dacha is almost the last refuge of nature and an opportunity to bring their creative impulses and fantasies to life. Everyone wants their plot to be unique and comfortable, so that the eye is pleased with their favorite beds and flower beds, and the neighbors look with envy and delight.
Of course, you can hire a landscape designer, but it’s much more interesting and pleasant to do beautiful dacha. Each of us has a craving for creativity, which we are not always able to realize, so why lose the unique opportunity to express ourselves and do everything on our site the way we want. Let everything at your dacha be the way you want it. Photos of beautiful dachas on our website will help you generate new ideas in dacha design.
How to make it beautiful at the dacha? The main advantage of any dacha and its decoration are. It is important to plant the plants correctly because large plot they will be viewed from all sides and your mistakes will be much more noticeable. Water, air, heat and light are the main factors on which the development and growth of plants depends. They are closely interrelated and do not replace each other. Therefore, in order to make the dacha beautiful, you need to create appropriate conditions for the plants. Plants indoors in poor light require low temperatures. Better to plant more unpretentious plants one species rather than trying to grow exotic but capricious species. How to make your cottage beautiful
Shrubs are less demanding to care for, so they are perfect for decorating your garden. Excellent decoration Your site can become a pond, which, if necessary, can be used for irrigation, because the water in the pond warms up perfectly in the sun. A forest corner looks great in a dacha. A shady space will give you a lot of joy on hot summer days. How to make it beautiful at the dacha
When creating a beautiful dacha with your own hands, do not forget to choose plants that are suitable specifically for your site. Moisture-loving plants planted in dry soil may wither and die. Most plants do not like excess moisture as well as lack of it. With very strong and frequent watering root system The plant begins to suffer due to the lack of oxygen, as a result of which it weakens, the plant gets sick and soon dies. Therefore, soils that can retain water after watering or rain are not used for growing flowers or special soil drainage is created.
For the garden it is necessary to prepare a sunny area and Special attention It is worth paying attention to paving, do not use recycled materials. This will be especially important if your garden is visible from the second floor; you risk spoiling the view from the window for yourself and your neighbors. Smooth and beautiful paths will make you personally feel like spring and autumn. It is during this period that they will be responsible for the attractiveness of your dacha.
Your site cannot boast of extensive smooth surfaces? Are you wondering how your land can be used beneficially? I want to spend time in paradise? This is not an easy task, but it is all the more interesting for real professionals. After all, it is on the intricate hills and extraordinary reliefs that the imagination of designers can manifest itself in all its colors.
Create a project
If you contact the company with a request to design your garden, you will be provided with a project that will take into account all the nuances of the upcoming work. The project will outline everything desired areas, defined architectural forms and selected necessary plants. And only then, a previously inconspicuous garden, can turn into the embodiment of the best works of landscape design, which you can admire and be proud of for many years.
If you look closely at already finished works designers working on multi-level areas, you begin to involuntarily understand that there are no trifles in this. Particular care must be taken in choosing materials and plants, as well as furniture and decorative attributes. It is very interesting for clarity in the future and just for history to take photos before the start of work and after its completion.
Geological plasticity of the site
Very often it is the initial state that dictates the conditions for further work. But it was precisely for difficult-to-work, multi-level areas that experts came up with geological plastics - this is the distribution of soil and the construction of retaining walls to regulate and prepare the soil topography for future work. This allows you to divide the entire site into different zones in advance and makes their arrangement easier.
The most, perhaps, serious problems problems that arise when renovating this type of dacha are soil erosion and difficulties with watering. But, if you approach the design professionally, then they can be minimized and even turned into advantages.


Decor
On any natural slopes, stones and wood look very beautiful, so when decorating a multi-level area, you need to adhere to the laws of nature. Focus on alpine slides, dry streams and any structures made of natural stone And climbing plants, which do not require further complex care. Then the landscape design of the garden plot will look very harmonious.
Garden paths inside the dacha, in order not to deviate from the general idea, would be nice to make from flat stones or wooden blanks. Choose plants with strong root systems. It is best to provide mechanical water supply for irrigation.
Advantages and disadvantages of a site on a slope, rules for planning a problem area, placement functional zones, basic techniques for landscaping.
Advantages and disadvantages of a site on a slope

Many people prefer to purchase only horizontal plots of land for their summer cottages, counting on their ease of operation. However, plots on slopes provide more opportunities for the formation of original appearance and the implementation of non-standard ideas. Therefore, you should not be upset if you have at your disposal an area located at an angle to the horizon.
Its undoubted advantages include the following:
- Cottages on a slope are always different from each other.
- Proper arrangement of the site will allow you to obtain a picturesque example of landscape art.
- By placing the house at the very top, you can view the entire area from the window.
- On such land it is possible to build design elements inaccessible to flat areas - alpine slide, waterfall or cascade.
- If the slope is directed south, you can collect on it good harvest fruits and vegetables due to better sun exposure.
- It is difficult to grow a lawn on a steep slope.
- The arrangement will require significant financial investments.
- It is necessary to water the plantings frequently, because... Water does not stay well on the slope.
- Buildings are built only on top, due to the danger of erosion of the foundation.
- Unstable areas may slip.
- Moving on sloped terrain is tiring.
- Small children should not play on steep slopes.
Creating a project for a site with a slope

Landscaping of the territory begins with the analysis of various indicators, which will create optimal scheme placement of elements and develop a sequence of construction work.
The following characteristics need to be assessed:
- Surface relief. The location of zones (residential, recreational, garden), placement of communications, etc. depends on it.
- Dimensions and geometry of the site. This characteristic influences the planning style.
- Possibility of leveling the territory using terracing.
- Soil type. It is often necessary to import fertile soil for growing vegetable and garden crops.
- Depth groundwater. Information is needed to create a drainage system to drain rain and flood water.
- Predominant wind direction. Ignoring this factor can lead to the death of green spaces that do not survive well in very cold or very hot weather. It is necessary to select appropriate plant varieties or provide protection from winds.
- The location of the inclined area in relation to the cardinal directions and the illumination of the area. Characteristics have a great influence on crop yields. You need to choose the right plants.
- Systems of measures to strengthen soil on slopes. These include planting vegetation with an extensive root system that creates turf, mechanical strengthening of the soil, and planting plants with strong roots.
- Houses and additional outbuildings (showers, gazebos, garage, etc.). The main object on the territory is residential premises. The breakdown of the allotment begins with it.
- Rest zone. The placement depends on the decision of the dacha owner to concentrate entertainment areas in one place or scatter them throughout the dacha.
- Enclosing fence. A hedge of 2-3 rows of trees or trimmed bushes looks beautiful.
- Territory for vegetable garden and garden. Sites for them are prepared depending on the steepness of the slope.
- Terracing or other methods of leveling the surface. The resulting flat areas are used as lawns, and swimming pools are installed in the hollows.
- Underground and aboveground communications.
The plan is drawn up in a regular, landscape or mixed style. Best suited for angled areas landscape style, in which the elements are arranged freely and naturally. Regular and symmetrical shapes are excluded, which adds to the attractiveness of the dacha. Regular style designed for flat areas, and mixed combines the features of the first two.
The diagram is drawn at the selected scale, usually 1:100. Divide the sheet into 1x1 cm squares, each of which corresponds to 1 m2 of area. Orient the sketch according to the cardinal directions. Cut out figures of buildings from cardboard on the same scale (residential building, shower, garage, front garden, garden, etc.) and place them on the plan at your discretion, taking into account building codes and other requirements. We recommend indicating entrances and exits to buildings to avoid bitter disappointments. After obtaining satisfactory results, you can begin work on landscaping the dacha.
The landscape of a site with a slope is formed according to its own rules. Each zone is located depending on its purpose, size, terrain, etc. Often the arrangement of the territory is influenced by the possibility of creating terraces - horizontal platforms that are easy to operate.
Terracing

Leveling is usually carried out on slopes with a slope of more than 15 degrees. If the slope is slight, no surface modifications are required. In areas with an average slope, you will need to build supports for the terrace. If the angle is very large, serious construction works using heavy equipment. The number of platforms and their sizes depend on the angle of inclination. Stairs are used to move from one level to another.
Terracing begins with determining the steepness of the slope and is carried out in several stages:
- Marking horizontal areas. Their dimensions should be such that the elements of the site - a house, a flower bed, a vegetable garden - can be freely placed. They can be located in different sequence- in one row, in a checkerboard pattern, asymmetrically, it all depends on the wishes of the owner.
- Formation of horizontal platforms. Work starts at the top, gradually moving down to the base. The cut soil is moved to the lower areas. Typically, the height of the walls of the structure does not exceed 0.6-0.8 m, and the width - 4-5 m. On small plots, 2-3 levels are equipped, on large ones - from 5 or more.
- The partitions are subject to overturning and shearing forces, so the structure must withstand such loads. To increase the strength and durability of the walls, a foundation is needed, the dimensions of which depend on the size of the partition, as well as on the characteristics of the soil.
- In order for the support to withstand large vertical loads, create drainage system, which prevents the base from being washed away by water.
- When building using the “dry” method, sprinkle the stones with soil and seeds. After a short period of time the wall will have a very beautiful view. But without cement mortar protective structure doesn't resist well a large number water that appears on the site during rain or melting snow.
- Brick walls are very beautiful and durable. Partitions can be made blank, sparse, winding or zigzag, etc.
- Wooden structures look very beautiful, but their service life is short, even after treatment with special preparations.
- Walls made of concrete can be built up to 3 m high, which is much more than those made of stone or brick (0.8 m). It is possible to use ready-made panels or pour formwork.
Residential and auxiliary buildings

It is quite difficult to erect buildings on sloping areas. This requires a large amount of work to be done on the basement and underground parts of the building. Ideally, the building should protect the area from prevailing winds and not obscure green spaces.
During construction, use our recommendations:
- Place buildings in such a way that there is the shortest distance between them.
- It is recommended to build houses in the north or northwest of the plot.
- If the site is facing south, build the house at the very top. If to the east and west - also above all elements of the dacha, at its northern border.
- If the territory slopes to the north, erect the building in the middle of the plot, closer to the western side.
- In any case, do not build a house at the bottom of a slope to avoid flooding. The façade of the building must face the street.
- Often 5-7 m of free space is left between the building and the road, which is filled with flowers and low shrubs.
- The location of the windows is important. Openings facing southeast and southwest provide illumination throughout the day, while openings facing north create shading that cools the room in hot weather.
- By the size of the shadow cast by the house, you can determine the geometry of the recreation area and car parking.
- The gazebo is usually located in the very beautiful place, With good review. The children's playground is located on the lawn under the windows of the room where adults most often gather during the daytime. A barbecue area is left on the edge.
Green areas

Plantings look especially beautiful on sloping terrain.
Plants are planted according to certain rules:
- Vegetables and fruits are grown on the sunny side, where they take root well.
- Do not plant trees closer than 5 m from buildings so that they do not become damp from lack of light.
- WITH north side buildings, plant spreading fruit trees - apple trees, pears. You can also place an apple and cherry tree on the east side of the building. In this case, in summer there will be a large shaded area near the house.
- Plant shrubs near the garage, as well as around compost heaps and other unsightly places.
- On the south side of the house, plant heat-loving plants - grapes.
- Grow vegetables in the middle of the area where there is no shade. Provide the same conditions to the flower garden.
- Avoid tall bushes along the edges of the garden; they give a long shadow. You can grow raspberries on the south side of the garden; they provide almost no shade.
Creation of a drainage system

The layout of a site with a slope must necessarily indicate a drainage scheme, which is necessary to maintain a constant water balance and quickly remove rainwater and moisture that appears in the spring when the snow melts. Danger from excess moisture consists in the formation of gullies.
The steeper the angle of inclination, the faster the water will wash it away. Even small streams eventually wash away deep gullies, which leads to the formation of deep ravines. The installation of drains begins after the completion of the construction of the main buildings, communications, and green plantings.
Drainage can be open or closed. The last option has an advantage, because saves usable area. Access roads and paths can be arranged above them.
The drainage system is a system of trenches and receiving collectors. Highways are dug along the slope. The most effective option is considered to be one in which the ditches are arranged in a herringbone pattern. In this case, additional outlets are adjacent to the central trench, which removes moisture outside the site or into the receiving collector.
The depth of the trenches is 0.3-1 meter. The bottom must have a slope of at least 2 mm over a length of 1 m. Cover it with sand in a 10 cm layer, then cover it with geotextile overlapping the walls. Pour crushed stone on top in a layer of 15-20 cm.
Place pieces of perforated paper on the prepared pillow. drainage pipe and connect them together. Cover the pipe with crushed stone and cover it with geotextile. Fill the remaining space with sand or soil.
Decorating the site

The multi-level arrangement of individual sections allows you to implement original ideas. A good option for non-standard territory, the Alpine style is considered big amount rough stones and bright colors.
Using these elements, you can solve the following problems:
- Design of zones;
- Strengthening the soil with boulders;
- Snow retention;
- Decoration of the site.
There should be no free clearings left in the dacha. Fill the strips with lawn or ground covering plants that prevent soil from being washed away. You can grow a lawn on a sloping slope.
Track layout

To move around the site, consider the location of the paths.
They are subject to the following requirements:
- The width of the paths and the height of the steps throughout the entire area should be the same to avoid injuries when ascending and descending. To smooth out differences in the heights of the paths, make them winding.
- The maximum permissible angle of the path is 45 degrees. With these parameters, be sure to make a railing. Make treads 25-30 cm wide, risers 15 cm high.
- With a large slope land plot On the stairs, be sure to provide rest areas, after which the direction of movement should change.
- Considered the most affordable wooden staircase. In this case, the riser is made of boards secured on the sides with pegs, and the tread is formed by compacted soil.
- A staircase made of brick, stone or concrete will be more durable. In the latter case, use formwork.
- A section of stairs with 10 steps or more should rest on concrete base, which will not let her slide.
- The dimensions and shape of the stairs depend on functional purpose site and do not necessarily meet accepted standards.
Slope strengthening

To prevent the soil from sliding, the soil must be strengthened. The following methods are used for this:
- Natural fortifications. Used when small corners(up to 15 degrees). It is recommended to plant areas on slopes with creeping plants, and near the base with lilac, rose hips, and willow. The roots of these plants intertwine and form a strong frame.
- Use of geomaterials - geotextiles or geogrids. The material is laid on the surface and covered with soil. After a short period of time, a layer of turf and other vegetation appears, which reliably prevents the soil from sliding. The service life of the geomaterial is more than 50 years.
- embankment. This is the creation of barriers from soil, which is taken from the base and poured on top of the slope. Used on large areas, because takes a lot usable space. Periodically, soil must be added to increase the height of the embankment.
- Retaining walls made of wood or stone. They not only strengthen the slopes, but also create convenient terracing. Most often, this method is used on hilly areas with any elevation difference. Partitions up to 0.8 m are easy to build yourself. Massive walls, capable of withstanding heavy loads, are built using heavy equipment.
- Gabions. This special designs factory-made, filled with pebbles, stones and other materials. If the contents are sprinkled with soil, in the spring shoots will appear above the structure, which will camouflage it.
A dacha plot located at an angle to the horizon, which is not attractive at first, will, with the right approach, become a beautiful and comfortable recreation area. To get a good result, it is necessary to study the peculiarities of using the problem area, which should be taken into account at the stage of developing a summer cottage arrangement project.
Not all owners of suburban areas can boast of their correct and convenient shape. It often happens that the plot is quite narrow, but on it you want to create both a comfortably decorated yard and beautiful garden, and a gazebo with a barbecue would not be out of place. But there is no need to despair, even narrow and small areas can be arranged so that they appear wider and more voluminous, and are functionally in no way inferior to the areas correct form. And how to achieve such an effect, and what techniques will help us with this, we will now discuss.
The easiest way to have a beautiful front lawn
You've certainly seen the perfect lawn in a movie, on an alley, or perhaps on your neighbor's lawn. Those who have ever tried to grow a green area on their site will no doubt say that this is a huge amount of work. The lawn requires careful planting, care, fertilization, and watering. However, only inexperienced gardeners think this way; professionals have long known about the innovative product - liquid lawn AquaGrazz.
When arranging a narrow area, you need to take into account its specifics, and proper planning changes will make it possible to correct all its shortcomings. When planning the design of a small and long plot, it is necessary to use its entire area, including even those zones and remote corners that seem non-functional. With this approach, it will be possible to arrange a long plot wisely, using every centimeter of the territory.
Unfortunately, when designing a long plot of land, owners often make the same type of mistakes.
For example, it is quite common when designing such a site to have tall trees along the fence, which only aggravates the appearance of the site, making it even longer and narrower.
To achieve the right effect and make the area of the site visually wider, you need to plant tall trees at the end of it. And in the foreground place low-growing trees and shrubs.
In this way, you will adjust the shape of the site, giving it the appearance of a residential area, and not a walking alley (as in the photo). There is no need to try to maintain the visual integrity of a narrow site. From a sense of integrity, the disproportionate shapes of the site will attract attention even more.
- It would be more correct to develop the design of the site in such a way that the territory is clearly divided into certain zones.
- A variety of architectural forms will help you achieve this effect. For example, you can divide the site into zones and divide them among themselves with fences, ornamental plants, pergolas or small gazebos.
Proper division of the site into zones will help to conditionally expand it and blur the real boundaries of the territory.
- You need to start zoning a narrow area by dividing it into two large zones.
- One of these zones can be seeded lawn grass, and in the second make a covering, for example, from pebbles.
- The division of the site into zones must be done in such a way that the rest of the territory is visible in perspective.
- Zones should not be separated by blank walls.
What the zoning of such a site looks like, look at the photo:

When arranging the design of a long section, there is no need to use straight lines and strict forms, especially along it.
- It is better to make the paths winding and winding, and when transitioning from one zone to another, tiles can be laid on them with different patterns or textures.
- Give flower beds and flower beds rounded and irregular shapes. This will visually expand the area of the yard and garden and give them the desired volume. See the photo below for an example.
- It is advisable to make all zones on the site unusual in shape. A recreation area or pond will attract more attention if it is made in the shape of an irregular circle or oval.
- It is advisable to use the same forms for other objects - paths, bushes and trees with a ball-shaped crown. This will serve as a counterbalance to the elongated shapes of the site.
- The fence around the perimeter of a narrow area cannot be made monotonous. It is better to make it multi-level and complement it with low or climbing plants. An example of such a fence in the photo:
Edges and mixborders located on the sides of transverse garden paths will help add volume to an elongated yard.
You can also expand the site with transverse lines, which can be borders, hedges and flower beds.
A narrow yard area will look wider if the paths of the zones are different.
Remember one fundamental point - all the lines in landscape design running along the site lengthen it even more, and the transverse design expands it and brings balance.
Techniques that bring distant areas closer
You can correct a narrow area using fairly simple techniques.
If you have a tall tree growing in the far corner of your plot, then on the other side, in a straight line from it, plant the same tree, but smaller. Two identical trees different sizes located in opposite corners will visually shorten the length of the section.
A long area can be visually brought closer by placing a small gazebo surrounded by flowers in its far corner.
If it is not possible to build a gazebo, you can use an alpine slide, multi-tiered flower bed or fountains to achieve this effect.
The photo shows an example of this design:

On a long-shaped site, it is advisable to make at least three accents that will attract the eye and distract from the shape of the site.
Such accents can serve not only
- flower beds and gazebos,
- sculptures and secret gates.
If there is a need to build any utility rooms on the site, it is better to place them in the background.
All distant elements of the landscape of a narrow area should be bright and rich, and the foreground should be kept in cool and restrained colors.
Trees and shrubs that are bright and large will also visually expand the area of the site. yellow leaves and yellow-orange flowers (as in the photo).
Multi-level design of the site
The multi-level arrangement of elements on the territory of a narrow area is another way to properly design it. Different levels will create the effect of placing objects on different heights, which will visually expand and increase the area.

Creating such levels - improvised terraces - is not an easy process, in which you will need to invest both money and time, but the result will please you.
- If the location of the main objects allows, then it is better to raise the central part of the territory or its distant part.
- Raising the central part will visually limit the view of the rest of the area and thereby reduce its length.
- Proper creation of levels, regardless of their location, will create the impression of independent terraces, thereby breaking the integrity of the site, leaving other areas out of sight.
The upper level can be used as a recreation area, rock garden or rock garden. And if you make a terrace on the farthest side of the plot, then visually the plot will not seem so long.
An example of multi-level design in the photo.