Despite the fact that you are used to resorting to the help of a plumber to install a particular system in your own bathroom, sometimes you have to look for a solution to the problem of how to disassemble the mixer. This is especially useful when the faucet or shower in the cabin is leaking, and there is no way to call a plumber here and now. The first reason that forces you to solve the problem of how to disassemble the mixer in the bathroom is the breakdown of the water supply device.
- 1 Some features of devices in the bathroom
- 2 Valve type
- 3 Lever mixer
- 4 Ceramic version
- 5 What will parsing give?
Some features of devices in the bathroom
It should be noted that the installation of the mixing device takes place at two points - on the sink and on the bathtub, or in the shower cabin. Often, installation can be limited to just one shower, when there is no sink either. This option is the most economical and suitable for summer cottages. Mixers on the main tap are mounted directly on the bathroom and can have two or one valve for adjustment.
The most famous manufacturing firms are grohe and frap. The most common single-lever models that mix hot and cold water. This faucet has one spout, a ball valve, plus a shower head. In addition, the system has a lever that switches the water from the spout to the shower hose.
Valve type
A device of this type, be it grohe or frap, can be seen in detail in the video on the internet. Thanks to such a mixer, it is possible to regulate not only the temperature regime of the water supply, but also its pressure. Before discussing how to disassemble a mixer in a "valve" type bathroom, you should highlight its components:
- Frame;
- Spout;
- Valves through which switching occurs;
- Bux crane.
In turn, this type of mixers are divided into models with a tee (valve and faucet are mounted precisely and directly into the body) and with nozzles, when the connection is made through the nozzles.
To determine how to disassemble a grohe and frap mixer, you can first study the video on the Internet, as well as stock up on a screwdriver and an adjustable wrench.
Before proceeding with the analysis of the system, it is necessary to turn off the water supply, both hot and cold. Then unscrew the screw located under the valve plug. This principle is the same regardless of the mixer model, be it grohe or frap. After that, using an adjustable wrench, it is necessary to turn off the tap, called the axle box. After that, the procedure should be repeated for the second valve.
If nothing is alarming in the operation of the mixer, then it is necessary to disassemble a product of this type in order to make sure that the axle box is not worn out. This must be done even if the device is installed in a shower cabin or it is a ball valve system.
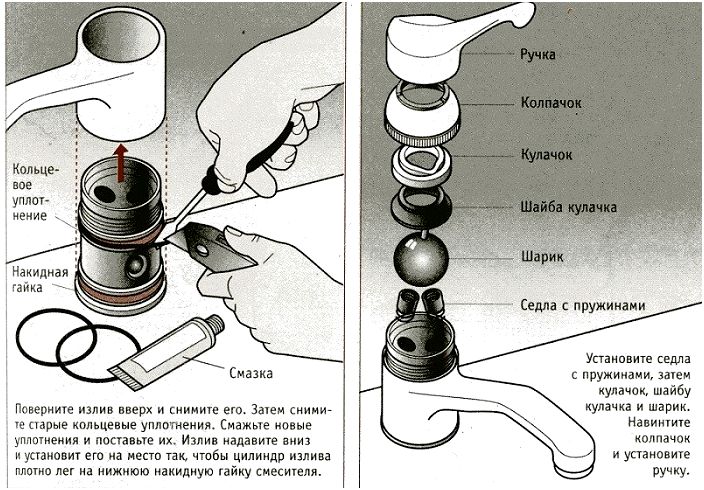
Lever mixer
In addition to the valve mixer, we will consider some plan for disassembling a lever mixer, which has a more complex system, but is also often installed on a ball valve. The movement of the ball can be controlled by means of a rod. At the same time, it should be noted that the repair of the ginger system is an extremely rare phenomenon, if such a system fails, it must be replaced.
Below is a series of actions, thanks to which you can disassemble the lever device, be it grohe and frap:
- Remove the plug on the lever. This can be done in the shower with a screwdriver.
- Unscrew the screw using the hexagon.
- Remove the lever from the housing, and under it the housing cover using a screwdriver.
- Next, we make the same manipulation with the cam washer.
- We take the ball out of the saddle.
- Now the tap, grohe and frap, are disassembled.
Ceramic option
The third type of device, which is available in the grohe range, etc., is the ceramic mixer. Often it comes complete with a shower, and its disassembly is carried out through the following steps:
- Removing the plug with a screwdriver.
- Removing the screw with a hex wrench.
- Remove the control lever for the tap and shower.
- Unscrew the nut and remove the cartridge.
What will parsing give?
Often, the mixing system is designed in such a way that its analysis for repair purposes does not lead to any positive results. This is due to the fact that most mixers do not have the ability to repair as such. Nevertheless, having carried out a timely disassembly of the system, it is possible to prevent total breakdown, since, for example, the wear of parts such as a gasket will be visible immediately. In addition, during disassembly, various defects are visible, such as excessive accumulation of lime. By removing lime from the components, it will be possible to significantly extend the life of the device.
A ceramic-type mixer, based on a special cartridge, deserves a separate discussion. If it breaks down, it must be borne in mind that it cannot be repaired.
It should be noted that disassembly of the mixer, regardless of the manufacturer (grohe, etc.), is a purely mechanical phenomenon. Accordingly, subject to a competent approach, even an amateur can disassemble a bathroom faucet of any type.