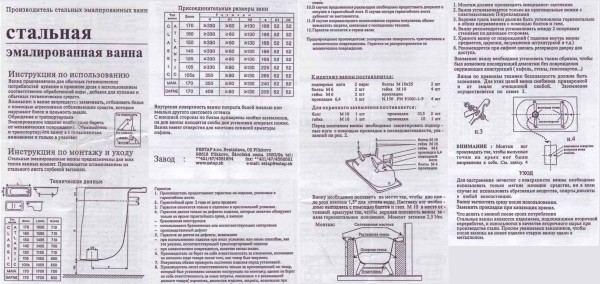
Renovation in the bathroom can often be complicated due to the very small size of this room. All repair work in this room is carried out in stages and you need to carefully monitor the correctness of the actions performed. After all, a wrong action or the slightest mistake can interrupt the repair process and force you to redo everything from the very beginning. As for the direct installation of a steel bathroom, it is possible only after you thoroughly prepare and carefully consider your actions. In advance, it should be noted that the steel bathroom must be attached to the walls from three sides, while the cast-iron models have a fairly stable support and can be installed anywhere.
Installing a steel bathtub yourself is quite simple.
Bathroom preparation and assembly of future supports
Before you start installing a steel bathtub, you need to properly level the floor, increase its moisture resistance with waterproofing, and also carry out finishing. The best option for finishing the bathroom floor is considered to be tiles. It should be understood that tiles laid with a comb-like masonry method may not withstand the installation of heavy plumbing and may crack. That is why a very important factor is the correct laying of the floor tiles, and they should be laid on solid cement, without the formation of voids.
Also a very important factor is the absence of finishing tiles on the walls. Their finishing should take place after the installation and connection of plumbing elements.
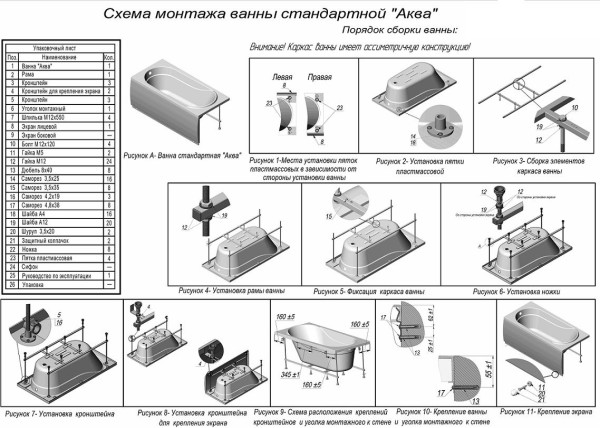
Now for the supports. They are a must when purchasing steel bathtubs. In most cases, the supports have special self-adhesive pads, which greatly facilitate fastening. Much less often, manufacturers of bathtubs offer to fix their products with tightening bolts. The fact is that this type of fastening can significantly reduce the life of your bathroom, since if the bolts are tightened too tightly, the enamel can be damaged. The assembly of the supports takes place in three stages:
- First you need to stuff the plastic tips onto the studs.
- Then screw the clamping nuts to the handpieces.
- After that, it is already possible to screw the studs with tips into the future supports.
In order for you to be able to properly attach the adjusting feet, you definitely need to turn the steel bath upside down and in this position glue the self-adhesive pads to its surface at a decent distance from each other. Before pasting, the surface of the bathroom must be degreased. It should be noted that one of the supports is best installed near the drain hole, while the second must be sent to the opposite edge of the bath.
Steel bath installation instructions
It is very easy to attach the self-adhesive pads. All you need to do is remove the special protective film, then press the pad tightly to the desired place (marked with a marker) as hard as possible and hold for a couple of seconds. Immediately after that, you can start screwing in the fastening bolt, which is located in the middle of the pair support and the bottom.
Fitting and installation
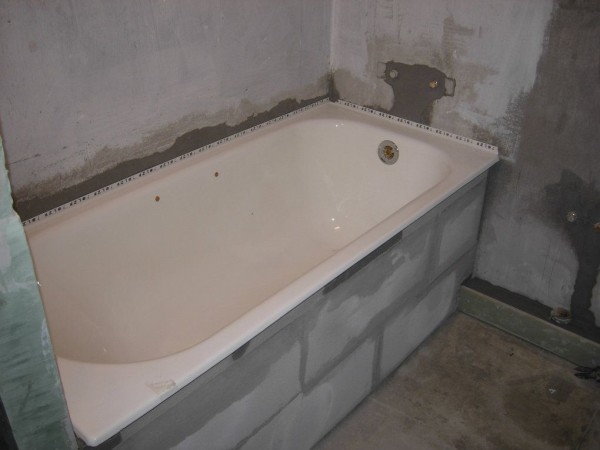
Finally, we come to the most crucial moment - how to fix the bath. To begin with, you must introduce it into the bathroom and put it on its legs in the place where you are going to install it. After you put the bathroom, you need to measure its slope using a building level. In case of severe skewing, you need to adjust the legs. Do not forget that the bathroom does not have to be perfectly level.
The side with the drain should be slightly lower so that the water in the bath does not stagnate.
The fixing of the bathtub to the wall occurs only after the completion of all fitting and adjustment work. The edges of the bathtub, which will be in contact with the wall, are pasted over with special construction tape, after which the bathtub moves close to the walls, and the gaps are sealed with polyurethane foam. After the foam hardens, it must be cut off with a sharp knife (you can use a clerical knife). The resulting seam must be thoroughly treated with a sealant. Now you can remove the construction tape and deal with the drain connection.
Installation example of a steel bath
Installation on grooves
The options for installing a bathroom on grooves are also quite common today. In this case, the fastening of the bathroom to the walls is enhanced by the presence of a groove made with a perforator. The sides of the bathroom from three sides are threaded into the strobe, after which all the following stages of fastening occur in the same way as in the previous case.
Some developers increase the stability of the bathtub by using metal corners that are fixed to the wall with dowels on both sides of the sides. The support of the metal corners will not only prevent the tub from tipping over to its side, but also the bottom from sinking.
Another additional support may well serve as a wooden frame. It is installed under a steel bathtub, and then closed with a blank screen. Such a system will also be reliable and durable, even taking into account the fact of the presence of wood.
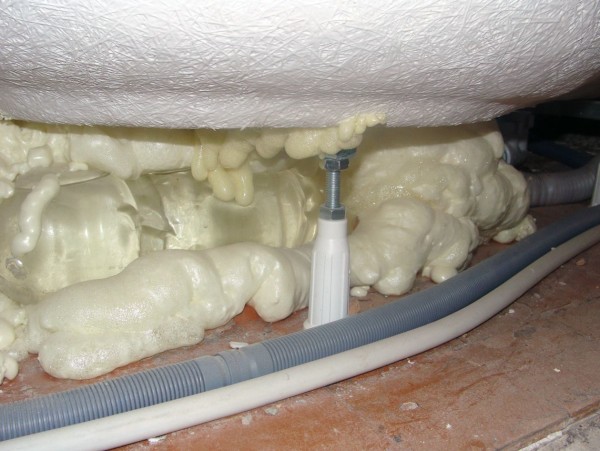
When installing the bath, all the gaps are filled with polyurethane foam.
Installation on brickwork
A more reliable mounting option for a bathtub can be ordinary brickwork under the bottom and brick posts on the sides. In this case, the bath will be supported not only on the bottom, but also on the sides.
Before installing the bathtub on brickwork, you need to prepare its location. To do this, all the measurements you need are taken from the sanitary ware: these are the width, height and length of the bath model you purchased. You need to consider everything, down to the millimeter. So, the height of the brick posts should be equal to the distance from the inner wall of the sides to the floor. In the same way, the length and width must be calculated, otherwise the bath may become uneven. It should be noted that the width and thickness of the brick must be taken into account separately.
Installing a bathtub on brickwork
When installing brick posts on the wall and on the floor, a special marking is made with a marker, this is necessary so that you clearly see the boundaries of the future brickwork. Installation of the structure begins with the creation of central supports, after which the distant columns (located against the wall) are laid out, and only after that, the columns on the sides of the front of the bath. The installation of the bath itself can only be carried out after the grout has hardened and the brickwork has become stable.
The steel structure weighs much less than the cast-iron structure, so that it can be lifted and installed on the masonry with the efforts of only two people. It is necessary to adhere the bathroom body to the brick using polyurethane foam, which is applied to the bottom of the bathroom. Until the foam has frozen, you should have time to adjust the slope of the bath towards the drain. Before attaching the bathroom to the wall, you should check the drain slope several times by drawing and draining water. If suddenly the water does not leave immediately, but stagnates, you need to increase the angle of inclination. That's it, the brick installation of the bathroom is complete.
We really hope that our article will help you cope with such a task as fixing a steel bathtub. This task is not difficult at all, but it will require a lot of attention and quality work from you. We wish you good luck!