Midori-tsumi- pinching the growth point. By shortening the shoot, you provoke the laying of new buds below the pinching point, thus obtaining dense paws with many branches. Depending on what type of tree you are working with, the time of work changes:
- for hardwoods - the pinching begins during the period of active growth of shoots and lasts until mid-summer. The remaining branch has 2-3 leaves (buds). They finish work at the end of July so that the overgrown branches are prepared for winter;
- for conifers - the pinching begins when the branch is in the “candle” mode, but the needles have already moved away from it at an angle of 45 °.

Kiri-modoshi- trimming all the shoots of the last year to form dense brushes. It is carried out at the beginning of sap flow, before the buds bloom.

Hamu-siri- thinning needles - applies only to pine trees... All the needles of the previous year are plucked out, and the remnants are thinned by half or less (depending on how many shoots you want to get).
Fyuse-zukuri- special techniques for changing the shape and direction of growth of shoots.
For these purposes, the branches are bent in the right direction at the required angle and fixed.


When bending, the main task is not to damage the tree, therefore, at the slightest crackle, the slope is reduced, and the branch is fixed. Bamboo spacers, soft copper wire, twine, burlap are used to protect the branches from damage. They carefully monitor that the harness does not grow into the bark - as soon as the branches thicken, they are tied up. Full fixation of the branch occurs after 2-3 seasons.
Shite- barrel bending technique. Such niwaki styles like moegi, kengai, shakai require that the barrel is not in a vertical plane. To shape, use spacers, tension, bending to the ground, followed by fixation with pegs.

The trunk can be formed in two ways:
- setting the right direction for a young seedling from year to year (for example, planting a plant at an angle);
- by changing the shape of the rootstock in an adult tree (usually used to reinforce existing bends).
There is a risk that an unnatural barrel position could lead to root system it will not hold, so the braces are installed as follows:
Where to start?
For a beginner bonsaist, we advise you to start practicing on the trees and shrubs growing on the site. Nivaki can be formed from both young and long-growing trees. Start work in early spring before the buds bloom. At this time, the shape of the tree, natural curves, strong and weak shoots are clearly visible. For bonsai, choose a healthy plant that can withstand the stress caused by the cardinal interference with its life.
Operating procedure:
- cut off all diseased, broken and dry branches from a tree or shrub;
- choose the style in which the nivaki will be formed, giving Special attention the age of the tree and the natural shape of the trunk;
- decide where the front side of the composition will be, mark the branches of the first order (base) and the uppermost branch, crowning the nivka.
Skeletal branches should emphasize the levels as much as possible - for this they are placed in a plane parallel to the ground, using the techniques described above.
After that, all unnecessary shoots are removed, leaving those on the skeletal branches that will form the crown in the future. If necessary, stretch marks are installed, directing the growth of the shoots in the desired direction.
The next stage begins only next year:
Examples of Elementary Nivaki
Jasmine... The shrub gives abundant growth, and without corrective pruning, after a few years it has an unsightly neglected appearance. What can be done? Remove all excess growth, leaving a few of the strongest vertical shoots. Pull them together with a soft wire - at the top you get a compact "cap", which in spring will turn into a wonderful white cloud with a delicate aroma.

Spirea... The wildly blooming "Rich Bride" - great stuff for bonsai. Leaving a few skeletal branches, twist them together, and cut off any excess at the root. Give the stems the desired height, side shoots shape into a ball.


Lilac... An ordinary bush can become a masterpiece of a barefoot garden with a little work:
- cut out all the shoots and remove the core branches under the root, leaving one, the strongest or curved shoot;
- cut it to a height of no more than 1.5 m;
- using the fyuse-zukuri technique, form a crown from young shoots in the form of a bowl, shell or cap at the top of the main branch;
- try to direct the growth of young upper shoots parallel to the ground, tying a load to them;
- be sure to remove all excess growth at the root and adjust the top growth point.

After flowering, remove all dry candles without fail - this stimulates an increase in flower stalks for next year.
Maple... The bright red leaves of this plant are good on their own. But if you give the tree the desired shape, you will get a unique composition that will decorate the coast. artificial reservoir or alpine slide ... Plant two young seedlings next to each other, which can be intertwined with each other, or you can grow a tree in the Sokan style - with a forked trunk.

Don't be afraid to experiment! For an enthusiastic person, there is no such plant that could not be turned into a masterpiece to the envy of all neighbors.
Do it yourself - a complex and lengthy procedure that requires experience and attention. The key to the success of the project is right choice plants. This is carried out taking into account climatic features and maintenance requirements. Experienced gardeners choose coniferous and deciduous varieties as a basis - pine and maple, which require minimal maintenance. The main thing is to ensure the minimum required temperature regime.
Those who want to create a beautiful composition with their own hands can use the following green spaces as a basis:
- Sprouts of common lilac.
- Siberian larch.
- Pine.
- Siberian spruce.
- Juniper sprout.
- Kalina.
- An ear of azalea.
- Bobovnikov.
- Low almonds.
- Ussuri pear.
- Purple barberry.
- High-quality mock-orange and so on.
Garden ficus, low almonds, topinarium have also proven themselves well. You need to start by choosing a suitable container with humus. An ordinary one will do flower pot... When choosing a soil, it is worthwhile to study its becoming. It is recommended that it provides minimal drainage and retention. the required amount moisture.
According to these criteria, sand, clay and humus are taken in equal parts. To plant a tree, you will need a pruner, which forms the crown line, a spatula, sticks, a sieve, a watering can. Spraying is carried out with a spray gun. If in locality there is a specialty store, then the seedling is bought there.
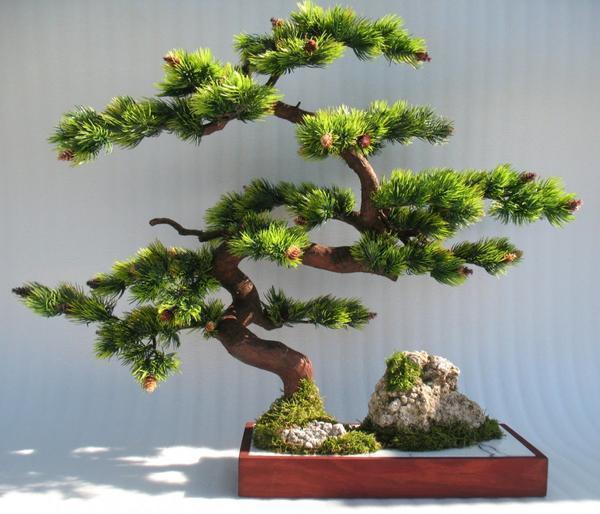
DIY pine bonsai
It is recommended to place a pine composition in a container irregular shape, the bottom of which is decorated with driftwood. If the lightness of forms is at the forefront, then in this case, a pot or pallet of light shades and grass as a decorative element are used. After that, you need to carefully separate the smallest scales from the pine trunk. In order for the needles to look aesthetically pleasing, they need to be grouped into small bunches.

Further production of a green pine composition proceeds step by step according to the following scheme:
- It is recommended to buy a slightly curved seedling.
- Check the taproot before planting.
- For planting, it is advisable to use the same land in which the seedling grew
- Supplement it with a moisture-permeable substrate.
- A thematic video will help you choose a style.
- Pruning and crown formation begins in the spring.
- The formation of curved shapes is best done with strong threads that do not damage the structure of the tree.
- The weakening of the density of the frame is carried out as the trunk thickens.
- All branches are cut at a pre-selected angle.
- Prune the roots lightly every 3-4 months.
The shape of the crown is corrected with sharp scissors, allowing you to quickly get rid of the excess. The placement of the craft is carried out with an orientation towards the sun. As it develops, the coniferous tree requires a large number of natural lighting.
How to make money tree bonsai
There are many ways thanks to which a bonsai can be made from a fat woman, also called a "money tree". The key to success lies in growth control and crown formation. money tree... You can stop further growth by pinching, as the plant reaches the required size.

If you plan to go all the way on your own, you can buy seeds at the store. In this case, strictly 1 seed is planted in 1 pot. Then you need to water it step by step, but not too much.
The seed takes root well, so additional care is not needed, however, some recommendations are required to be followed:
- The depth of the pot is 1/3 greater than the maximum length of the root system.
- You can grow it in an aquarium, but then the shape will be curved.
- The splendor of the composition is formed by creating at least 2 sprouts from 1 bud.
- Excess kidneys are removed with tweezers.
- Pruning is carried out according to a pre-planned plan.
- You can decorate the composition decorative elements made from foamiran.
- If the main holiday of the year is approaching, then the New Year's mood will form a white foamiran.
How to make a bonsai with your own hands (video)
Miniature bonsai compositions decorate offices and living quarters. At proper care and timely pruning of bonsai is formed in 2-3 years. After that, the gardener must carefully monitor the composition, maintaining the splendor of the crown and the shape of the branches. For these purposes, wire or threads are used. Pruning is carried out no more than 1 time every 4-5 months. The exact time depends on the type of tree.
Original variants of beautiful bonsai (photo)


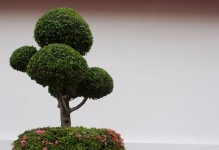


Bonsai is not just about making small copies of trees. Bonsai is an art. And this art of the 22nd century. The first mention of bonsai dates back to the reign of the Chinese Tang dynasty. But art developed in Japan in the Tokugawa era - the heyday of landscape design in gardens, which were considered the residences of monarchs.
With every century, the growth of the plants used in bonsai has decreased. This led to its present appearance. Nowadays, bonsai is easy to buy in almost every flower shop. But forming a tree with your own hands will bring many happy minutes in your life.
In order to plant bonsai, you can use plant seeds or seedlings. Let's take a pine as an example and see how to form a bonsai tree with our own hands.
Pine seedlings are dug out of the forest in autumn. When digging up seedlings, choose pine trees of different shapes. This will allow you to give them different styles.
At first, seedlings cannot be separated from nature. Therefore, pine trees are planted in pots and put in the garden. The diameter of the pot should be no more than 15 cm, it is better to take a couple of centimeters less.
The pots with the future bonsai should be placed in the most wind-protected place in the garden and covered with mulch. Formation will begin after the pines have moved away from winter.
In the spring, at the end of March, the seedlings are pruned to 10 cm. With this pruning, lateral shoots are activated and the trunk thickens. The trunk is cut with sharp scissors at an angle of 45 degrees. If the needles remaining on the trunk are thick enough, then they need to be thinned out.
After trimming, with the help of a wire frame, the trunk is given an interesting shape. It is best to use 3mm aluminum wire. As soon as the barrel starts to cut into the wire, it must be removed and rewound, with the condition of a new barrel thickness. Naturally, the shape should remain the same.
It is necessary to shape the trunk with the help of a wire very carefully so as not to damage the needles. If you are forming several seedlings, then give them different shape... Better not to be repeated. Bonsai formation styles can be found in the literature or the Internet.
The pots should be placed on a slight rise in sunny place garden.
During this period of bonsai formation, special attention should be paid to watering the plants. The substrate must not be allowed to dry out. You also need to apply fertilizers for conifers... Re-cropping is highly undesirable. A bonsai tree this fall should resemble from a distance those pines that can be observed in nature.
Before freezing, you need to cover the plants with mulch again.
In the third year, around April, bonsai are transplanted into large pots up to 25 cm in diameter. The depth of the pot should be at least 12-14 cm.
The substrate is prepared from two parts of a large river sand, two parts of perlite and a part of humus. There should be good drainage at the bottom of the pot.
Particular attention is paid to the roots of the plant. They are straightened during transplantation. In many literary works on the formation of bonsai, it is written that the roots must be trimmed. But at this stage, I would caution gardeners from this procedure. Let the roots remain as they are. True, this does not apply to broken roots. They need to be cut. After the roots are in the pot, sprinkle them with dry "Kornevin".
For the entire third year, you need to repeat the same procedures that you did a year ago - watering and fertilizing. Before freezing, you need to cut the top of the pine at the level of the uppermost branch. Again, you need to mulch the pots and wait for the winter to end.
The fourth year is the most interesting bonsai in life. The tree resembles its natural counterpart. During this period, you need to look for original design crowns.
Since I advised planting several seedlings, you need to figure out which seedling what shape will be given. To do this, you can get acquainted with the styles in bonsai from literature.
All subsequent years, you need to continue to shape the crown and trunk with the help of a haircut and pinching. You can apply wire not to the whole trunk, but to separate branches to shape only them.
The art of bonsai is very challenging and interesting at the same time. Don't expect your first seedlings to turn into beautiful bonsai. Most likely, this will not work. But don't be discouraged and discouraged. Keep building your tree and your work will be rewarded in the long run.
Bonsai is a small tree with a bizarre trunk and crown. Its history stretches back to ancient times, to China, but it was in Japan that bonsai evolved from just unusual plants into real art. Today, both the trees themselves and the method of their cultivation are designated by the word "bonsai". How to grow such a miracle at home? How long does it take for an ordinary houseplant or tree seedling to turn into a self-sufficient decorative element? How to grow bonsai from pine or dwarf hardwoods? We will talk about everything that may interest you in this Japanese art in the article below.
Why do many choose bonsai among hundreds of plant varieties?
Indoor flowers can decorate any interior, add brightness and freshness to it. In addition, living plants purify the air and saturate it with oxygen. Anyone who loves flowers, but does not have enough space to accommodate large bushy specimens, usually choose bonsai. How to grow it yourself, true lovers are most often interested indoor crops because it takes a lot of time and effort. Although this breed is dwarf, it is still a tree, which means that it is formed over several years, and not months, like ordinary flowers in the garden on the windowsill. Very few people ask the question of how to grow bonsai from seeds, because this occupation is even more painstaking and requires a lot of patience. At the same time, caring for a dwarf tree, creating a crown of a bizarre shape, decor of the ground - all this gives an extraordinary scope for your imagination, therefore, in originality and fascination, it is much superior to the cultivation of ordinary indoor plants... So are you ready? Then we begin to get acquainted with the art of bonsai in all details!
How to choose a plant to create a bonsai?
As a bonsai if you don't know absolutely nothing about it? Of course, you should start with the choice of planting material. Most often, this process takes place in a nursery or greenhouse. Maple and pine are among the deciduous and coniferous trees growing in our region. Making bonsai from them will not work out quickly, but in the end you will get a real "dwarf" in the best Japanese traditions. You can try to grow a miniature tree from other breeds, including:
- lilacs of various varieties;
- spirea;
- irga;
- Cherry;
- Apple tree;
- juniper;
- larch;
- viburnum;
- cotoneaster;
- hawthorn;
- Birch;
- barberry.
In fact, it is possible to create bonsai from almost any plant. The main thing is that it feels comfortable in the local climate and tolerates frequent pruning.
It is much easier to grow bonsai from indoor flower crops... Experts recommend giving preference to well-branching varieties with small leaves. Surely you have already presented in the role of Benjamin, a coffee tree, lemon or figs. Hibiscus, evergreen boxwood or laurel will look no worse.
And to conclude this part of the conversation about bonsai, one more tip: choose the plant that you like. It will take a long time to work on it, and the result is unlikely to be brilliant if the tree annoys you with its appearance, smell or flowering.
How to choose a pot and soil for a bonsai?

So, you have selected and purchased the seedling from which you want to create a bonsai. How to grow him strong and healthy? It all starts with choosing a pot and planting.
The ideal pot for a Japanese dwarf tree is a ceramic container, not too deep, large diameter, similar to a bowl. There should be enough space in it so that the roots of the bonsai are securely covered.
At the same time, it is undesirable to use soil for ordinary indoor flowers, because it retains a lot of moisture, and the root system of the seedling can rot. In nature, bonsai grow in harsh conditions, on rocky slopes, clinging to almost naked rock formation... Of course, this does not mean that at home the tree should be grown on stones, but the quality of the soil should be as close to natural as possible. In the case of bonsai, the main function of the pot and soil is to balance the aboveground part of the seedling.
How to plant a bonsai?

There must be drain holes in the container. It is also recommended to lay a net on the bottom to prevent soil leaching. Before planting, the roots of the bonsai are pruned so that the plant fits into the pot. Place some soil over the mesh, then position the tree and tie the largest underground parts with wire, securing it to the container through the drainage holes. Finish filling the pot with soil and watering the bonsai.
Please note that trees of species that grow in temperate climates are planted only in spring. If you plan on converting a tropical native to a bonsai, you can do so any time of the year.
How to properly care for bonsai?
How to grow bonsai at home? To do this, it is necessary to maintain a certain light and temperature regime, create a sufficient level of humidity and organize regular watering. It should be noted that bonsai is a culture that cannot be kept indoors all the time. It should, if possible, be sent for a walk from time to time: to the balcony, veranda, or even to the garden.

The trees need a lot of light, especially in cloudy weather and in winter, when the day is short. The use of fluorescent lamps will help to correct the situation.
The moisture around the bonsai is kept at the proper level by placing a small vessel of water next to the pot. You can arrange for daily direct spraying of the bonsai with a spray bottle. Do this in the morning so that the foliage has time to dry before evening.
The temperature regime is selected individually, based on the specific requirements of the wood species. So, people from the subtropics (pomegranate, olive, myrtle, etc.) feel comfortable at a temperature of 7-15 ° C. Tropical bonsai need more warmth- from 16 to 25 ° C.
The trees are watered often, but in small portions. The soil in the pot should be constantly damp, but not too wet. The water is preliminarily defended. Perfect option is melt water. Make sure that the entire soil layer in the pot is moistened when watering. In summer, bonsai should be "watered" more often, as they grow more intensively at this time.
How to prepare seed material for a miniature tree?
If you are interested in how to grow a bonsai from seeds, immediately prepare for the fact that it will take a lot of time, sometimes even more than 5 years. Planting material can be bought at the nursery, ordered online, or even collected on your own in a nearby park.
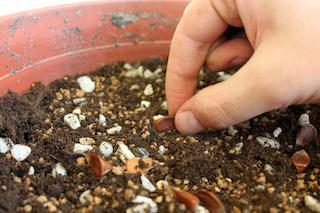
Tropical trees are grown from the seeds of boxwood, myrtle, wisteria, ficus, broad-leaved - beech, hornbeam, maple, elm, birch, conifers - cedar, pine, fir, cypress.
The planting material for breeds such as hawthorn, juniper, quince requires resting for 6-12 months. The seeds are placed in a container with wet sand and left in a cool place. Future pines, spruces, oaks and firs, on the contrary, are best sown immediately after harvest.
So how to grow bonsai from oak or other species with seeds? Immediately before planting, they are germinated in water, moss or vermiculite. Break them down hard shell to increase germination. It is also recommended to treat the seeds with a fungicide and sterilize the soil to minimize the possibility of germ disease.

Where and how to plant sprouted bonsai seeds?
Bye planting material swells, prepare the pots. Peat cups or the most common plastic ones filled with a peat-sand mixture (1: 1) will do. The soil is compacted, seeds are laid out on it, and coarse sand is poured on top. Cover the containers with plastic or glass to create a greenhouse effect. Do not forget to monitor the humidity in the resulting mini-greenhouses.
When the first shoots hatch from the sand, they organize regular ventilation, and after the leaves appear, the seedlings can be completely opened. When the plant reaches a height of 10 cm plastic cup replace with a full pot. From this time on, you can gradually begin to form the future bonsai.
How to grow bonsai from cuttings?
For those who want to learn how to properly grow bonsai and at the same time save time, we will tell you about the method of forming dwarf trees from cuttings. Comparing it with the seed method, we note that the process will accelerate by about a year. Cuttings are cut from healthy woody shoots and rooted in fertile soil or wet sand. If you have chosen a coniferous species, it is better to do it in April or early September. June is recommended for preparing cuttings for deciduous bonsai.
Important: it will not work to grow a tree from a cut sprig of cedar or pine. On the contrary, if you are interested in how to grow maple bonsai by grafting, know: the shoots of this breed, like elms, barberries, hornbeams, as well as shrubs that are used in hedges, take root very well. Conifers take a long time to take root, sometimes within a year. The first time after rooting, the cuttings must be carefully looked after: hardened, watered regularly. Top dressing is not necessary, since a sufficient amount of nutrients is in the fresh soil.
How to form a bonsai crown?

There are several styles of bonsai. How to grow such a tree on your own so that it looks like a real "Japanese"? To begin with, the bonsai crown should have a conical shape. The trees look very original, the branches of which form pronounced horizontal tiers with the most thickened foliage in each of them. Note that this is not only beautiful, but also very beneficial for the health of bonsai.
The first pruning is carried out immediately after planting a young plant. Do not spare the branches: you need to leave only those that fit into the silhouette of the future bonsai that you have invented. By tying shoots to the roots, wrapping with wire or pulling weights, you can set the desired direction for the growth of the tree. At the same time, you will redistribute energy between stronger and weaker branches.
The most thorough pruning is carried out after wintering. During the season, the bonsai crown is corrected with more gentle haircuts. The technique depends not only on your personal wishes for the shape of the tree, but also on the species of the plant.

Artificial aging of bonsai
How is a bonsai at home so that after 1-2 years it looks like it is more than a dozen years old? There is a special aging technique. Sometimes, using a knife or nippers, sections of the bark are removed from the bonsai trunk. With patience and some theoretical knowledge, you can even split a tree or make a hollow in it. If you plan to leave the twig alive, you cannot leave it completely without bark. Save at least a thin strip that will carry food from the trunk to the top of the shoot. Dead branches can be aged more aggressively using a special wood chisel. The bare trunk is sometimes even tinted or, conversely, bleached.
Juniper, pine and spruce lend themselves best to this treatment, since their wood contains special substances that prevent the development of fungus and decay.
A few terms for true fans of bonsai: plants with a stripped bark are called "shalimiki", and with a split trunk - "sabamiki".
Air layering
Air layering is necessary to correct the shape of the bonsai, for example, if its trunk is too long.

To obtain layering, on the trunk of a deciduous plant on the right level make a circular incision and remove a strip of bark. How to grow pine bonsai using this technique? WITH conifers work a little differently: the shoot is tied with wire so that a wound appears on it, and then moistened The resulting damage in both cases is wrapped with wet sphagnum and protected with a casing mosquito net filled with fertile soil. It is better to carry out this procedure in the spring.
Open the casing in the fall (for coniferous bonsai - after a year). Young roots should appear at the cut site. After that, you just have to wait until the roots get stronger. During this time, they should still remain under the casing.
Once you see that the roots are ready to deliver nutrients bonsai from soil, remove the cover, cut the plant just below the cuttings and plant in a new container.
Of course, this story about Japanese dwarf trees and the art of growing them is far from complete. There is a lot more to learn if you decide to create your own original bonsai. However, no matter what kind of wood and style you choose, remember: the main thing in this business is patience, attention, care and ... your imagination!
 For the Japanese, bonsai cultivation is a whole philosophy that combines the spiritual and physical aspects of the process. To an ordinary person to achieve success, you must treat this business with love and patience. You need to have some knowledge of how to make pine bonsai. It will take a lot of time and work to grow a bonsai on your own. As a result amazing plant will give joy and beauty for many years.
Traditional bonsai must meet the following characteristics:
- Trunk. It should be powerful and strong, with a pronounced base and roots protruding to the surface.
- Branches. There are few branches, their lines should be harmonious and clearly visible. The trunk and branches of the bonsai give the tree that unique whimsical look.
- The form. Japanese pine bonsai must meet one of 15 classifications. To help a novice or experienced gardener, drawings, diagrams, photographs or your own fantasies and wishes.
- Pine in miniature should look like a tree that grows in natural conditions.
The main task when creating a bonsai is to achieve slow growth of the plant. This is achieved in several ways: by frequent pruning of tree roots and shoots, artificial growth control, use special types soils, in special ways care and watering of trees.
How to grow bonsai pine outdoors
 V landscape design bonsai pine takes pride of place. Its obvious advantages are its original form, unpretentiousness to growing conditions, resistance to low temperatures, high level adaptation.
Observing certain conditions, you can grow this wonderful tree right in the ground:

A true bonsai is a visually old tree. The aging effect is achieved by artificially bending and landing branches using weights and wire. For the impression of a long-growing pine, the bark is specially cut in several places with the edge of a knife.
Scots pine bonsai formation
 Scots pine can be an excellent basis for self-cultivation bonsai. Conifers differ from deciduous trees in two stages of growth per year, which should be taken into account when creating pine as a bonsai. The first growth wave occurs in late spring and is expressed in the elongation of the branches. The second wave occurs at the end of August and is characterized by thickening of the branches.
For several years, you can grow a bonsai from a common pine with your own hands in a pot:

Scots pine bonsai should have a strong and developed superficial root structure (nebari). The growth of roots is achieved by several seasons of growth, as a result, the tree must firmly and confidently hold on to the ground.
If you plant young trees from pots in open ground, then you can get a garden bonsai from Scots pine. This is done in the fifth to sixth year of the plant's life. The advantages of growing in the garden are the rapid growth of the power of the trunk and the sufficient height of the tree. Before transplanting, the crown and trunk of the bonsai must be fully formed, that is, its proportions by this time are already fully consistent with the desired.
 The formation of bonsai from pine is a balance between the creation of nature and man. In order not to disturb the harmony, several bonsai from different types trees, surrounding them with objects and plants similar in style and mood. Transforming an ordinary tree into a beautiful dwarf counterpart is fun and interesting activity... Bonsai pine will become a real decoration of the garden with its own individual outlines and lines.
Video about planting bonsai pine trees