Most recently, on the shelves of our enlightened needlewomen appeared toys, crafts from Foamiran. Raw materials for them are another know-how, presented to us by the chemicals of the physicists of the world. According to the composition, it resembles foamed rubber, and according to the technical characteristics, which are explained by the presence of linyl acetate, plastic suede.
Judging by the name, you can immediately guess where the wind blows, and you will be right. It was in Iran that the production of this wonderful material was organized for the first time. The company "Foamiran", which was the only one in the world that produces a new landing raw material, gave him his name.
It is not difficult to guess which country picked up the relay. Chinese Foamiran has the same qualities, but, as usual, a little worse. This is more than compensated by its number and low price.


Which is a new diverse raw material. These are commonly familiar sheets of soft porous material with a thickness of 0.8-1 mm (Iranian) or 1.5-2 mm (Chinese). His wonderful properties:
- material non-toxic;
- good painted;
- has a memory form. After any dynamic or kinetic load, the Foamiran restores the former configuration;
- easily cutting in conventional scissors and is pushed by a curly stapler;
- Fom (so it began to call the wizard) not hygroscopic. Crafts from it can be washed with water;
- most important quality: Foamiran changes the form when heated and "remembers" it.
Fat material is well suited to mastere your own various toys. Fine bouquets are obtained from thin sheets.
Foamiran's first handicraft
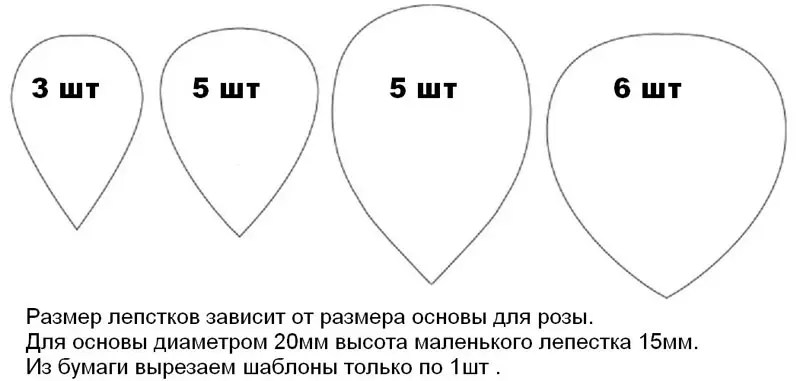
For novice masters, it will be forces manufacturer of ordinary roses. Before starting the master class, prepare everything you need.
It will take:
- foamiran two colors (purple and green);
- scissors;
- iron;
- hot glue.
Constructing flowers and toys from the Foamyran, their details cannot be connected with us the usual glue of PVA. Take into service the glue UHU "Creative" or spray-glue UHU "PoveSPRAY".
Master class for beginners
- Cut with your own hands from the purple foamioran rose petals of three sizes, and from the green - a socket.
- Put on a warm iron or a heating battery several petals and leave them for 3-5 minutes.
- Warm petals do it with your own hands and deploy, stretching the middle. Form the firing - the middle of the toy.
- Glue the hotels with hot glue in a circle first small, then medium and at the end of the large size.
- Heat green socket and form leaves.
- Get the rosette to the flower with your own hands.
Master class without iron
- Deformed rosette petals really without heating with special devices. They can be simply heated with their warmth, rolling between palms, twist the edges in different directions, and then stretch with their own sidelines. The effect will be almost the same, but not so strong.
- Waving a sufficient number of petals, spread them in ascending order.
- Form the "Eskimo" in the form of a pear from foil, plasticine or other material and stir all the petals around it. Remove the "Pear", leaving a wand.
- Highlight instead of a color with your own hands a piece of watts and wrap it with green leaves from Foamyran.
- Here is such a beautiful rose it turned out.

Tools and materials
In order to turn out from beginners to turn into experts and hold the master class, it is necessary, at least, stock special tools and devices. Rosets and daisies can only be done for themselves, but if you want to give close toys made by your own hands, you will have to purchase:

- stacks and boulders for rounding shapes and drawing of residences;
- weiners and Molda, they are called them molds, to impart concrete forms, textures and reliefs;
- brushes, sponges of dyes;
- pastel, acrylic, gouache and other dyes;
- curly holes and curly scissors greatly facilitate work on cutting the same fragments;
- wire for the framework of toys and plants stems;
- stamens - Wire with a ball;
- type-tape, which is wrapped with wire so that it becomes similar to the plant's stem;
- toothpick;
- scissors and sharp knives;
- floors and pliers for working with wire;
- glue pistol;
- iron or any other heated to a temperature of 40-50 o with a surface;
- accessories for jewelry.
But most of all you will need the desire to make flowers and toys do it yourself.
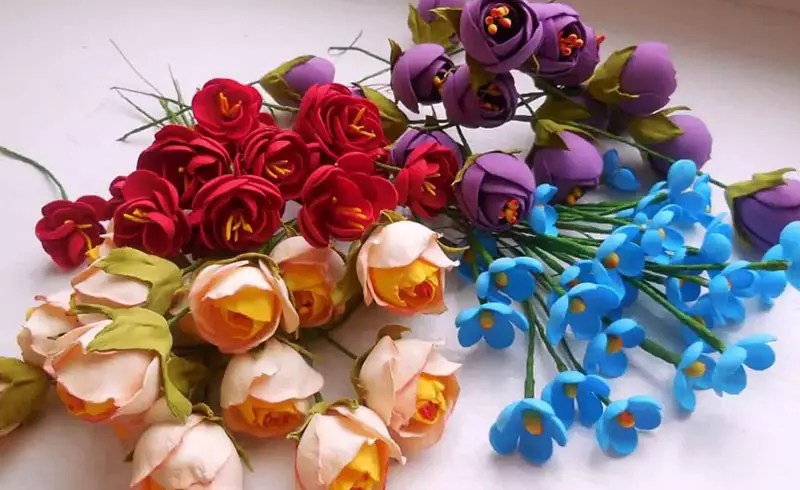
Recently, there was a popular and fashionable passion for needlework, crafts from various materials, including from Foamiran. Master classes are held for the manufacture of various colors, dolls and decorations from this material.
Such products are used to decorate the hairpins, rims, clothing and shoes, and also use flowers from phoamyran to decorate interiors in the form of a variety of panels and bouquets supplied to the vases.
What is Foamiran?
Master classes for the manufacture of colors from Foamiran for beginners can easily find on the Internet.Foamiran is a soft decorative foamy sheet synthetic material, which is one of the types of suede tissue, also known as tweeers, foam, plastic suede, foamed rubber, Fom EVA.
Thanks to the large palette from 20 to 24 tones and supple properties, structure, often it is used in needlework in the manufacture of various toy figures, jewelry, artificial colors, bouquets, clothes ornaments.
It consists of a foamyran from porous rubber, which foamed by special technology, and because of this, it is very well subjected to various treatments and manipulations with it. The main property of Foamiran is compliance with even a small elevated temperature on it. It becomes elastic and can give it any necessary forms and outlines.
Plastic suede is another of the names of Foamiran.
The Chinese and Iranian Foamiran, it is especially popular among the needlewomen, is inexpensive, good quality and with unique properties.
Foamiran properties:
- under the influence of heat, hands takes the necessary shape;
- when using the iron becomes bulk;
- retains the shape that he was given after complete cooling;
- you can easily cut or cut minor parts with scissors;
- you can paint in any color, both acrylic paints and pastel shallow;
- cut down with a composter or hole panel;
- the parts are connected by glue and medium fixation.
When choosing Foamiran, you need to know that there are several types of its varieties.
The most popular and frequently used types:
- iranian Foam, which is manufactured by special foaming technology, produced in sheets of 60/60 cm, the thickness of the edges is uneven up to 1 mm;
- turkish tweeers, uniform thickness and produced in both rolls and sheets;
- korean Foamiran, material of good quality, retains a good shape, thick from 0.6 to 1 mm.
To perform flower arrangements or individual colors, thin silk foam or wicked with brilliages is best suited. Great to perform the petals of the Marshmallow Foam due to its airiness, softness, compliance, which does not require heating and well staining in the desired colors.
Foam in artificial floristic is widely used. This material is perfect for performing a variety of colors and draw up compositions of them.
Tools and Materials for Work
To learn how to work with Foamian, conduct master classes for the manufacture of colors for beginners with step-by-step instructions.
To do this, you will need: 
- foamiran, several sheets of various colors;
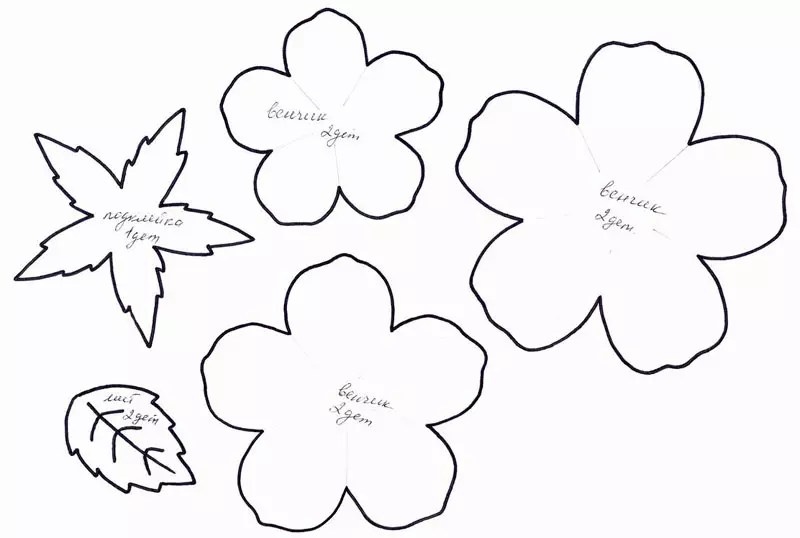
- patterns and schemes;
- curly scissors;
- for the manufacture of small parts holes;
- adhesive gun for gluing parts;
- to give the shape of petals and create volumetric and curvilinear surfaces - Iron;
- small decorative elements;
- molda and Weiners to give billets of the desired shape and naturalness;
- tassels and sponges for paint;
- floristic wire for stems;
- tape tape.
For the manufacture of colors, it is best to take a marshmallow or Iranian Foamiran.
Master class stages for beginners
For the manufacture of snowmobile colors from Foamiran:
- white sheet foam;
- olive flare;
- green Tape Tape;
- wire for stem;
- scissors;
- thermopystole glue;
- acrylic paints and pastel crayons;
- iron.
The phased instruction for creating a snowdrop consists of 3 stages: cutting, gluing and design.
Cutting out
Instruction:
- Draw on a white sheet of foam with a toothpick outline of flower petals, 3 large and 2 small.
- Cut on the contour the resulting snowdrop petals.
- From the inside of the petals with toning paint green, pre-drawn hearts and shallow painted.
- To the heated sole of the iron you need to lean the petal. First, it will stick, but as heated will begin to lag behind. Fingers to give the right petal shape while it has not cooled. The procedure is repeated with all the billets.
- We make a highlighter with a purchased finished stycle, which is attached to glue to the wire-stalk.
Blind
Instruction:
- To the wire with a shychka glued to it with the help of a glue pistol, the small petals are attached first.
- Top on the already assembled, the latch and small petals are glued together.
- It turned out a half-column snowdrop
Registration
Instruction:
- To create the effect of the open snowdrop, it is necessary to beat the larger petals back and apply a little hot glue to their base. When the glue is dry, the petal will remain in the bent position.
- Making a stem from Teip ribbons. We take off the ribbon of the desired length and cut into 2 ribbons. Watch the wire from the bottom towards the buython on the spiral.
- Create leaves from the olive color of the Foam sheet. Cut 1 small, 2 large oblong leaves. On large leaves, we look at the middle of a green shallow. Then, with the help of the fingers, give them the desired form.
- So that the snowdrock looks naturally, the leaflets are bend, and we glue the fold.
- On the bottom of the stem, we first glue one sheet, and then the following leaves.
- We produce the last inspection of the snowdrop and correct your fingers visible flaws.
Master class (instruction) to create colors
To create each flower of another type of Foamira, there are step-by-step instructions and wizards classes for the manufacture of colors. The principle of manufacturing different colors is the same, only the difference is the complexity of the performance and number of parts when assembling.
Lily
To create a lily from elastic phoamyran, you will need:

Step-by-step instructions for the manufacture of lily:
- From the cardboard we make a pattern and cut the petal with a length of 60 mm.
- Cut on the obtained lecturer 6 pieces of petals made of white sheet foam.
- Tinging the pink-lilac shade of the petals with the help of acrylic paints.
- To give the volume of the petals heating them with the help of an iron, and draw the streaks to the toothpick.
- To make the wave-imagination of the end of the petals are also heat treatment with an iron.
- From the bottom of the petals of the brown felt-tip pen weaving points for giving the lily petals of the naturalness.
- On the cooked wire pieces of 5 mm glit length sticks and small rhobics from Foam, painted black.
- From the green leaf of the jelly, cut the leaves.
- To give a figure, heating the leaves on the iron.
- To the base with stamens and pestle glit a row of 3 petals.
- In order of chess glued the second row of the petals.
- Leaflets glue from below in any order.
Chamomile
For the manufacture of chamomile flowers from Foamyran, you need:
- white Foam sheet;
- cardboard sheet;
- glue pistol;
- pastel crayons;
- compass;
- iron.
Chamomile manufacturing process: 
- On the sheet of the FOAMA with a circulation to make 3 circles with a diameter of 90 mm, cut them.
- Cut the strip of 270 mm long with a width of 20 mm from the jelly and paint yellow. This is a blank for a chamomile core.
- We fold the yellow strip in the middle, we cross the edges and cut into thin strips from the bend to get a fringe.
- Twisting the base, previously glued, in the form of a spiral.
- From the cardboard, we cut the circle with a diameter of 90 mm and with the help of the conveyor blacks of the cutting of petals.
- A cardboard pattern is needed for cutting daisy petals.
- Do not cut 0.2 cm to the center, gently cut circles on the petals.
- With the iron, chamomile petals twilight, giving a natural look.
- We put on the blank on the core and glue.
- We make in the same way the next 2 layers of petals, gluing them.
Poppy
Create a poppy flower from Foamian is not so difficult as it seems at first glance, for this it is necessary:
- sheet of red foam;
- green leaf green;
- wire;
- a bead with a diameter of 20 mm;
- cardboard sheet;
- black threads;
- glue;
- toothpick;
- scissors for cutting parts;
- iron.
Macau creation instructions: 
- On the sheet of cardboard, draw poppy petals and cut blank.
- Cut the circle with a diameter of 60 mm from a green-colored phoamioran.
- Through the bead, stretch the wire and twist, form the stem.
- Heat the workpiece on the iron so that it becomes elastic, and turn the beads to them, bonding the edges near the wire.
- Fix the green foam threads on the bead so that the intersection turned out.
- We make stamens from black threads and with the help of glue crepary at the base.
- From red tweeer with the help of toothpicks and billets, we make petals and cut them out.
- First, we put the leaflets in the form of a harmonica, then twist with your fingers.
- We straighten the petals, it is done to give them naturalness.
- To the basis of glue petals with two rows.
- From the floor of the green color, cut out 2 leaves, cut them along the edges, repeat twisting.
- From the bottom under the petals with the help of glue, we attach sheets and cut the excess wire.
rose flower
One of the colors that are made from Foamiran is a rose.
The master class on the manufacture of roses provides for the presence of such materials:

Method for creating roses:
- Cut from cardboard 2 billets of petals, one more, another smaller size.
- On a pink sheet, we have ate pattern, and cuts the toothpick, then cut out with scissors.
- We lean alternately petals to hot iron so that the edges become curved.
- From a piece of foil, roll the ball and turn it with a cone-shaped small petal and glue.
- Next small petals are glued to form a bud.
- We attach large petals with rows of a bouton blank and fasten with glue.
- From the foam green cutting 6 pieces of sheets.
- Heat using an iron sheet so that their edges become curved and secure them with a glue to the flower.
Sunflower
To create a flower from Foamyran, you need:
- tweeer white sheet;
- cardboard sheet;
- glue pistol;
- curly scissors, awl;
- tape ribbon green;
- toothpick;
- paints;
- iron.
 The process of creating a flower step by step:
- On the cardboard we draw rectangular figures of different sizes, 4 species and cut the patterns of petals.
- Watch up a green tape with a big toothpick, it will be stem.
- We supply all 4 types of petals 12 times on a white sheet of tweeer seer, then cut out.
- Mobile in the yellow color all petals so that the color of the petal is more saturated.
- We draw and cut out 4 sheets of sunflower and paint green on both sides.
- From the sheet foam, cut the lane of a meter length and 20 mm wide.
- Pray the band in black and cut scissors so that it turns out the fringe.
- Twist the fringe into the roll on the prepared stem and fasten the glue, the core of the sunflower turned out.
- Heat the petals with an iron, giving them curved.
- Breeping the petals in bed and then large.
- On the bottom of the flower we glue the leaves.
Hydrangea
Artificial inflorescences of this flower are often used as decorative decorations for holidays.
You can create hydrangea from the phoamyran, for this you need:

Master class (process) of the creation of hydrangea:
- Peach Foam leaf is separated by 20 mM squares. Cut with scissors.
- On each square we make cuts from the middle of each side to the center, not reaching 1.5 mm. It turns out the flower of 4 petals, with the help of scissors, spin the edge of the petals.
- Tinging the green pastel on both sides each heart of flowerfish.
- Each petal of the flower heats the iron and apply to Molda so that natural accommodation turn out.
- After that we tinker the flowers with pink pastels.
- In each flower, we make a hole in the center, and insert the purchased tuchin and fasten the glue.
- When the flowers are ready, we collect hydrangea inflorescence, consisting of 5 pieces.
- On a wire, a crap ribbon with the help of glue is a fastener small flowers, giving inflorescence natural shape.
- From the green foam cut out the leaflet. With the help of an iron and a mold that give them naturalness.
- Sut a few pieces of wire with a length of 5 mm and glue on it sheet.
- Then the finished sheets are also glued to the inflorescence of hydrangea.
Orchid
Natural orchid is a very capricious flower and often does not take root at home. But you can make this beautiful flower from Foamiran yourself.
To do this, you will need:

Step-by-step instructions for the manufacture of orchids:
- We make a pattern of cardboard consisting of 3 parts: cores and 2-petal and 3-petal parts.
- From the purple foam sheet with a toothpick, we make the core of the flower and cut out.
- Cut from white phoamiran petals for billets.
- With the help of fingers, we give the petals shape, stretch them a little.
- We cut a wire on a piece of 17 cm long and we ride beads and twist.
- In the core shell make a hole and ride a wire.
- Move the core on a wire with a bead to a burning candle. When the core starts to turn inside, we remove from the heat source.
- Pucked by sewed in the center of the petals, fastened to the design of the core and beads, gluing them to the wire.
- With the ballpoint handle, we draw bodies on the petals.
- On a long wire at the top we make a bowl of foil and krepim with glue.
- From the Sheet of Green Foam, cut out small petals and close them the ball to get a bud.
- The entire length of the floristic wire is wrapped with a green tape ribbon, the stem is obtained.
- On the stem is dripping ready-made flowers, and a whole orchid is obtained.
Pion
Peonies are very beautiful flowers, but they quickly flow. You can make a similar artificial flower so that he will please at any time of the year.
To create a peony, you will need:
- foamiran sheets of white, pink and dark pink color;
- cardboard;
- wire;
- a bead of a tree, a diameter of 15 mm;
- glue;
- scissors;
- iron.
Master class on making peony: 
- From different colors of the Foam, cut the strip of 5 cm wide.
- We make from cardboard templates of petals of arbitrary sizes.
- By template, we supply the toothpick on the foam stripes toothpick and cut the petals. There should be about 70 petals.
- Petals must be: small - dark pink; Medium - pink and large white petals.
- Heat every petal with an iron and give him a waviness, stretching the warm petal with his fingers.
- We give petals the form of boats, a little of them, bending inside.
- We take a bead and make the wire of peony - stem and core.
- We start collecting the flower, sticking to the bead at first dark pink, and then pink petals. Large white petals are pasted.
- When gluing the petals you need to keep some chaoticism, it gives Peony a natural look.
- When the bud becomes bulk and inconveniently glue the petals, it is turned over and started to tweaken below.
- We dry the flower with a hairdryer and cut off the extension wire.
Decoration by Foamyran
Foamiran is applied in many types of needlework, in master classes in the manufacture of flowers and dolls, toys and decorations.
Most often it is used in such cases:
- when decorating photo frames and albums with photos;
- to create wedding bouquets, boutonnieres;
- production of ladies decorations - necklaces and earrings;
- create panels and paintings from colors for the decoration of the apartment;
- making various hairpins on hair and rims;
- decorate clothes and shoes;
- used for children's crafts;
- manufacture of new year toys;
- drawing up floral compositions for decorating premises for solemn cases;
- performing decorative postcards and invitations;
- manufacture of fridge magnets;
- creating small figures for decorating an apartment interior;
- used when scrapbooking.
Having a little fantasy and knowing how to handle the Foamiran, you can create unique copyrights that will please our uniqueness and beauty of loved ones and acquaintances, because in every hand-made fake there is a particle of the author's soul.
Video Master Classes for the manufacture of colors for beginners from Foamira
How to create roses from Foamiran, find out in a video clip:
A simple way to create flowers from Foamiran:
Recently, the needlewomen are very popular with flowers from their own hands. Abbreviated name - Fom, this gentle material arrived to us from Iran. In the talented hands, the craftsmen, any part of the Foamiran turns into an elegant petal or a leaf, whose bends are practically different from the present. Ideas for inspiration Most: it is, magnets on the refrigerator, toys, you can also apply it in scrapbooking or for. Today, Homius's edition experts will hold several master classes and shake their secrets to make elegant colors.
Flower Ranuncoulyus is often included in large compositions, its varieties for growing in the open ground and as, as well as the options for manufacturing with their own hands, a lot. The learning process will begin with the simplest flower shape. To work, we will need:
- marshmallow Foamiran;
- foil and wire;
- adhesive pistol.
marshmallow Foamiran
adhesive Pistol
The process of manufacturing the flower is performed as follows:
| Illustration | Description of action |
 | Posted by Foamyran and thinning it. To do this, put it between the layers of texture paper and stroke the iron. |
 | Cut the fom into squares, apply the marking of future petals and give a volumetric form. |
 | Cut on the contour all petals. |
 | To create a middle to take a bead or foil, give it a round shape, after which it is covered with a piece of thomas and fasten on the wire. |
 | Printed ready stamens. |
 | Alternately glue the smallest petals among themselves. |
 | Printed all other rows ascending. |
 | Cut a cup of green foamiran. |
 | At the end of all work on the wire to tighten the floral sleeve. |

Rose from Foamyran - Master Class
On the Internet you can find a lot of schemes for making roses with your own hands: This is a regular rose, small, interior, pionic, multicolored, with the transition of shades, in the form of bud and in the bakery group.
Templates and patterns for roses from Foamiran
Before making a rose from Foamyran, you need to decide on the flower shape and pick up the appropriate scheme.
Interior roses schemes:


Schemes of small roses:


Large rose from Foamyran
For the manufacture of a large rose from Foamiran, you need to prepare with your own hands:
- pink and green foamiran;
- adhesive pistol.
pink Foamyran
green Foamiran.
Step-by-step flower manufacturing process Next:
- To transfer the scheme of a small roset to the cardboard, the diameter of the pattern should be 6, 7 and 9 cm. Cut petals.
- Heat as for Silka, each petal is applied to the sole, after which the hands or on a blank give them a light bulge.
- Fixing petals starts from the smallest, then from the opposite side to close the bud, then glue them to the right and left.
- Then you need to make a substrate in the form of a five-hundredth, to paint it with bright green paint, make small cuts and fix.

Little flowers rosets from phoamiran do it yourself
For the manufacture of small roses from the Marshmallow Foamiran, the next master class will help us. For billets you need to transfer to the diagram, then cut 2 pieces of the petals of each size, 3 green leafs and 1 chashelistic. All samples in between wipes with warm iron and give a wave-shaped form.
Little petals should be recycled at the base. Then folded the workpiece into one leaf, slightly scrolling, pull the edges. Put 3 petals on the bud, the foil must be completely closed, after which the remaining elements can be fixed in one distance. Complete work with a cup and leaves.

Lily from Foamyran - Master Class
The process is performed as follows:
- Pleasure the base of buds with a white foamifra, to protonten its pink pastel.
- Cut leaves of different sizes from the calculation of 2-3 pieces for each flower.
- Apply an orange stick imitation of the residences on each leaf, pull them down in length and glue a thin wire.
- For 1 lily flower, you will need 3 small and 3 large items. Pre-toned at the base of pale pink pastel and put the specks with the toothpicks.

Hydrangea Foamiran - Master Class
For the manufacture of hydrangea, cut the phoamiran to the strips with a thickness of 18 mm, then to a rectangle with a length of 46 mm. Next, the pieces bend in half and cut the petals in the form of a droplet, the shape of a bow should be turned out in the expanded form. Thus, to prepare at least 35 blanks.
Each petal to warm up on the sole of the iron, then toned from one edge of the purple pastel color, and the middle of the blue tone. Everything is good to grow. Similarly, process both sides of each element. Next form flowers: On one flower, connect 4 stamens and secure 2 petals. On one stem can be 3-4 flower, and in hydrangea there is up to 35 inflorescences. They are harvested on the wire, which is decorated with a ribbon of green.

Growth Flowers from Foamyran - Master Class
You can make large flowers from the Foamyran, they will become real, and the next master class will help us in this. You need to choose a diagram, cover the petal pattern and cut them. To give a form, warm up the blanks on the iron, then to form bulbs with hands, as well as a little bit of the edges. You can perform a pastel to perform smooth sample transitions and toothpick draw a streak.
It is necessary to collect flower on a cone-shaped middle of a foil, starting with the smallest. The more items, the more magnificent and naturally the finished product should turn out. Finish the composition follows a cup of green.

Article on the topic:
In the publication you will find master classes for the manufacture of roses, tulips, lilies, bouquets with candies, which materials are needed and tools, as well as recommendations of specialists.
How to make wildflowers from Foamiran
Wildflowers love many, they decorate the compositions, they can be fixed on rims or hairpins, also used as decor. For their manufacture, it is important to clearly adhere to the recommended schemes, then the appearance of the flower will be more natural.
How to make a daisy flower - instruction for beginners
For the manufacture of field chamomile, you will need a refoamiran yellow and white. From yellow, we make a middle, for this you need to cut a strip of 1 × 15 cm, the genuine side to cut the fringe and fasten everything on the wire. From white phoamyran, according to the scheme, cut the workpiece, process on the iron, so that the edges raise a little. A stick along the edges to draw two strips and secure on the wire. From the volume of the green color to cut a cup of cholestic, after heating to give it the shape and glue from the base. Wire decorated with a green ribbon, you can also fix leaves.


Flower poppy from Foamyran - master class with pattern
To make a poppy flower, we will need:
- bead with a diameter of 15 mm;
- wire;
- fom green and red;
- black threads;
- adhesive gun, scissors.
First of all, it should be formed a leg of a wire. After that wrap the bead with a green material. Further on the center of the beads need to tighten it in such a way that there are 8 segments. Then to form a 2,5-3 cm stamens with a thread, as shown in the diagram.
Cut 5 poppy petals over a pattern of 60 × 50 mm. To give a form, it must be folded into the harmonica and scroll into different directions, a little pulling the middle. The assembly starts with uniform fixation of the stamens at the base of the beads, then glue 3 petals, then complement the volume of two more. From the volume of the green color you need to cut leaves with a length of about 80 mm, fix them on the wire and reorganize the leg with a green ribbon.

As with the help of diagrams and templates, make a peony flower from Foamira
To make a beautiful peony flower, you need a little longer, as the work is quite painstaking. In addition, for clarity, it is not bad to have a lively sample before your eyes. Select from the scheme 4-5 types of petals and cut, the total number should be at least 40 pieces.
To form all petals with the iron, after that, the leaf is twisted into the harmonica and grind over the helix. The sidewalls of some samples can be spinning back. The assembly is started immediately on the wire. The first row is made from the elements of the same size, for the formation of each next row take the petals of different designs. The core of the peony is filled to give bulk. At the final stage, the cup is glued and decorated with wire ribbon and leaves.


Flower Tulip from Foamiran - Step-by-step instruction
For the manufacture of tulip from Foamyran we will need:
- foamiran red and green color;
- wire;
- foil;
- adhesive gun and glue;
- pastel and acrylic paints;
- teip-tape and sponge.
acrylic paints
| Illustration | Description of action |
 | Cut 6 petals. |
 | The base of petals should be tinting green pastels. |
 | Heating petal, give it a natural form. |
 | Cut on lecture sheets. |
 | From the foil on the wire you need to form a bud. |
 | Thomas ribbon to reorganize the wire, then glue a teip tape. |
 | Give the shape of the leaves. |
 | Fix the petals. |
 | At some distance from each other you need to glue leaves. |
This master class can be viewed in the video below:
How to make a pattern of orchid flower from Foamira
For the manufacture of orchids, you will need:
- foamiran of white or pink color, dark-for the middle and green -for the leaves;
- bead, foil;
- pastel more dark shades.
Print templates for colors from phoamyran, transfer them to the material and carefully cut. The middle and base of petals toned with pastels and growing. Lightly warm the blanks and give them a form, slightly stretching along the length.
Secure a bead on the wire. In the workpiece of the middle to make a hole and ride it on the wire, then attach double petals, after - triple, securely fix the base with glue. You can make a whole scattering of colors, additionally to give the naturalness to make air roots and place the entire design in a flower pot, securing it on the foam, the photo in the interior will be a source for inspiration.


How to make small flowers from Foamiran from remnants of material
After work, we still have a lot of trimming of Foamiran, it is a pity to throw them out, you can make small flower flowers. They will be a good addition to artificial compositions. For the manufacture you need to cut petals, after that, a little heated the edge on the sole of the iron, bend them, giving the shape of the cup. Then cut the wire and glue the tops from cotton sticks. It is possible to wear a petal circle on the wire, tightly glue its base and form a bud, if you wish, you can toned pastels. Next, from the stamens and two petal circles make a flower.
How to care for decorations from Foamira
A new hobby will fully fill the house, unusual items can be used as decor, or design. But they require careful care. In order for the products to serve much longer, you need to follow a few simple rules:
- any contamination is easy to remove with a sponge, warm water and detergent;
- after washing the product, it is necessary to wipe dry and dry.
It is important! It is impossible to use abrasive powders, chlorine-containing compositions, acetone and solvents during harvesting, so objects will quickly lose color and shape.

Conclusion
From Foamyran today you can make both simple solitary flowers and whole compositions. After the first product, no needlewomen refuses the fascinating process. Despite the general schemes, in the hands of each master all the decorations will look beautiful, but with individual uniqueness. Which compositions attracted your attention, and what would you like to try to make it yourself? Share with us in the comments.
You may also be interested in:1. Decorations in the form of flowers from Foamiran for women's accessories
The previous series of articles on the site was dedicated to the amazing technique of Kanzashi with the help of which we learned to dodo it yourself graceful flowers From satin ribbons. Hair accessories decorated with crafts from pieces of ribbons, very effectively stand out against a stylish hairstyle. But there is a material from which you canmake gorgeous roses , peonies, gladiolus, lilies and other flowers, practically as real!
This is a Foamiran. In this article you will find step-by-step lessons with photos with which even beginner craftsmen will be able to make different flowers from Foam. And the visual video master classes will help you learn how to accurately attach the right form of petals from Foamyran.
Homemade flower from this material will be , rim, hairpin, hair crest.
The rims decorated with bright flowerflakes from Foam, rhinestones, multi-colored ribbons, bows of ribbons, especially stylishly.
For women who prefer to walk with long loafwood hair , It can be recommended to decorate the hairstyle with ribbons in the ethnic style, which can be decorated with small flower and footballs from Foam. Forhigh styling You can choose tape harnesses or gum decorated with large roses or peonies from this decorative foam material. See master classes with which you can make surprisingly beautiful roses from plastic suede.
But the composition of several decorative colors on hairpin is particularly stylishly stylish. Foam's petals themselves can also be decorated with beads, rhinestones, beads and other decorative elements. who are always at hand at the craftswoman.
Handmade products will always be appreciated. After all, you canmake a female accessory For every taste and it will be original suitable for the style of clothing.
2. How simple and quickly make a very beautiful flower of phoamyran for hairpins
Instructions for beginners:
Tools and materials for work: Foam leaf (white, bodily or beige color), 1 rhinestone, 8-12 beery, cirkul, metal ruler, wooden toothpick, manicure scissors, iron, thermochelery gun.
Stages of work:
On the Foam sheet it is necessary to draw 2 mug with a diameter of 7 cm and 3 mug with a diameter of 5.5 cm with a circulation. Gently cut out these billets;
Now take the toothpick and divide each circle to 4 the same parts by the line. Then each segment is divided into two equal parts. Then - again. Total will be 16 identical segments on each billet;
To the center of the workpiece (where all the lines intersect) stick the circus needle and make a circle with a diameter of 2 cm. Scissors cut the workpiece over all lines up to the central mug. It turned out 16 petals of the future flower from Foamira. We form petals on each workpiece;
Now carefully spinning every petal with manicure scissors;
Then you need to heat the iron (not very strong) and attach each workpiece to the sole. After heat treatment, all petals weigly with your fingers so that the billet takes the view of the mushroom hats;
Build a flower. Now we take a thermochelastic pistol and glue into each other smaller flowers (3 pieces), and then - in the larger flowers (2pcs).
Multilayer flower from Foamiran is ready!
It remains to decorating it a little, incurred in the middle of the ride, and on the outside - for each petal, on bearer. Assembled and decorated flower You can stick to the hairpin (or sew to a hair gum, but three such flower such flower is better to make a rubber.

Stock Foto Decoration with homemade flowers from Thomas.
3. Simple master classes for beginners. Cut the petals from Foam and give them the right form
Master class 1:
How to make a beautiful white rose from Foam and tinkering a dirty colors of a cup of burgundy. Lesson with photo stages.
Master class 2:
Two simple lessons for beginner masters, with the help of which you can easily make rose and lily from Foam, giving the right shape to the petals and folding them into elegant decorative flowers for decorations on the hair.
Master class 3:
We do with your own hands.
Master class 4:
From Foamyran you can make hibiscus. This amazing handicraft will be similar to the real flower! We look lesson with photos.
Master class 5:
Making a beautiful rose