If you got bad land on the site, on which nothing wants to grow, start enriching it. It is easiest to bring black soil, but it is not always possible to get it, especially in urban areas. It is also unprofitable to bring in abundant chemistry: in the end, you yourself will consume it. One thing remains: to make the nutrient soil ourselves. Or rather, learn how to make healthy compost. It is only unknowing people who are afraid of compost pits, because they think that they emit a stench that spoils the air throughout the site. In fact, compost does not smell if it is properly laid and the bacteria are kept active. How - let's figure it out in more detail.
So, first of all, they select a convenient place for a compost pit on the site. As a rule, she is assigned an area at the back of the garden, behind farm buildings, where the appearance of a heap of waste will not spoil the overall landscape. The only caveat: look where the water flows during heavy rains. It should not run towards the well (if there is one), otherwise rotting waste products may get there, which will affect the quality and taste of the water.
There are two options for arrangement: you can dig a deep hole and put raw materials for compost in it, or knock down a wide box with a removable wall from wooden planks for ease of use.
Pit technology
A deep pit is more convenient because all the plant materials will hide in the ground and will not cut the eyes, but the compost takes longer to prepare in it, and it is more difficult to mix it. If, nevertheless, only this option suits you, equip the pit correctly, because oxygen and ventilation are needed for the normal decomposition of organic matter. And the dense earthen walls and the bottom will not allow any air to pass through. Therefore, the pit is dug as follows:
- The soil is taken out no more than a meter deep, three meters long and one and a half meters wide.
- 20 cm on each side recede from the walls of the pit and a wooden box is knocked down, digging in 4 columns in the corners and hammering planks to them.
- There is a distance of about 5 cm between the boards to ventilate all layers of compost.
- Divide the pit into two equal parts using a wooden board to fill only one half.
- The bottom is covered with thick branches of trees, bark, spruce branches and straw (whatever you find). This will drain the excess moisture and help the compost to ventilate from below. The height of the drainage layer is 10-15 cm.
Plant waste is stored in one part of the compost pit, but during the season they are thrown several times from one half to the other in order to saturate the heap with oxygen.
The hole can be made half in the ground, and not completely buried, then it will be easier for you to stir the contents and air access will improve
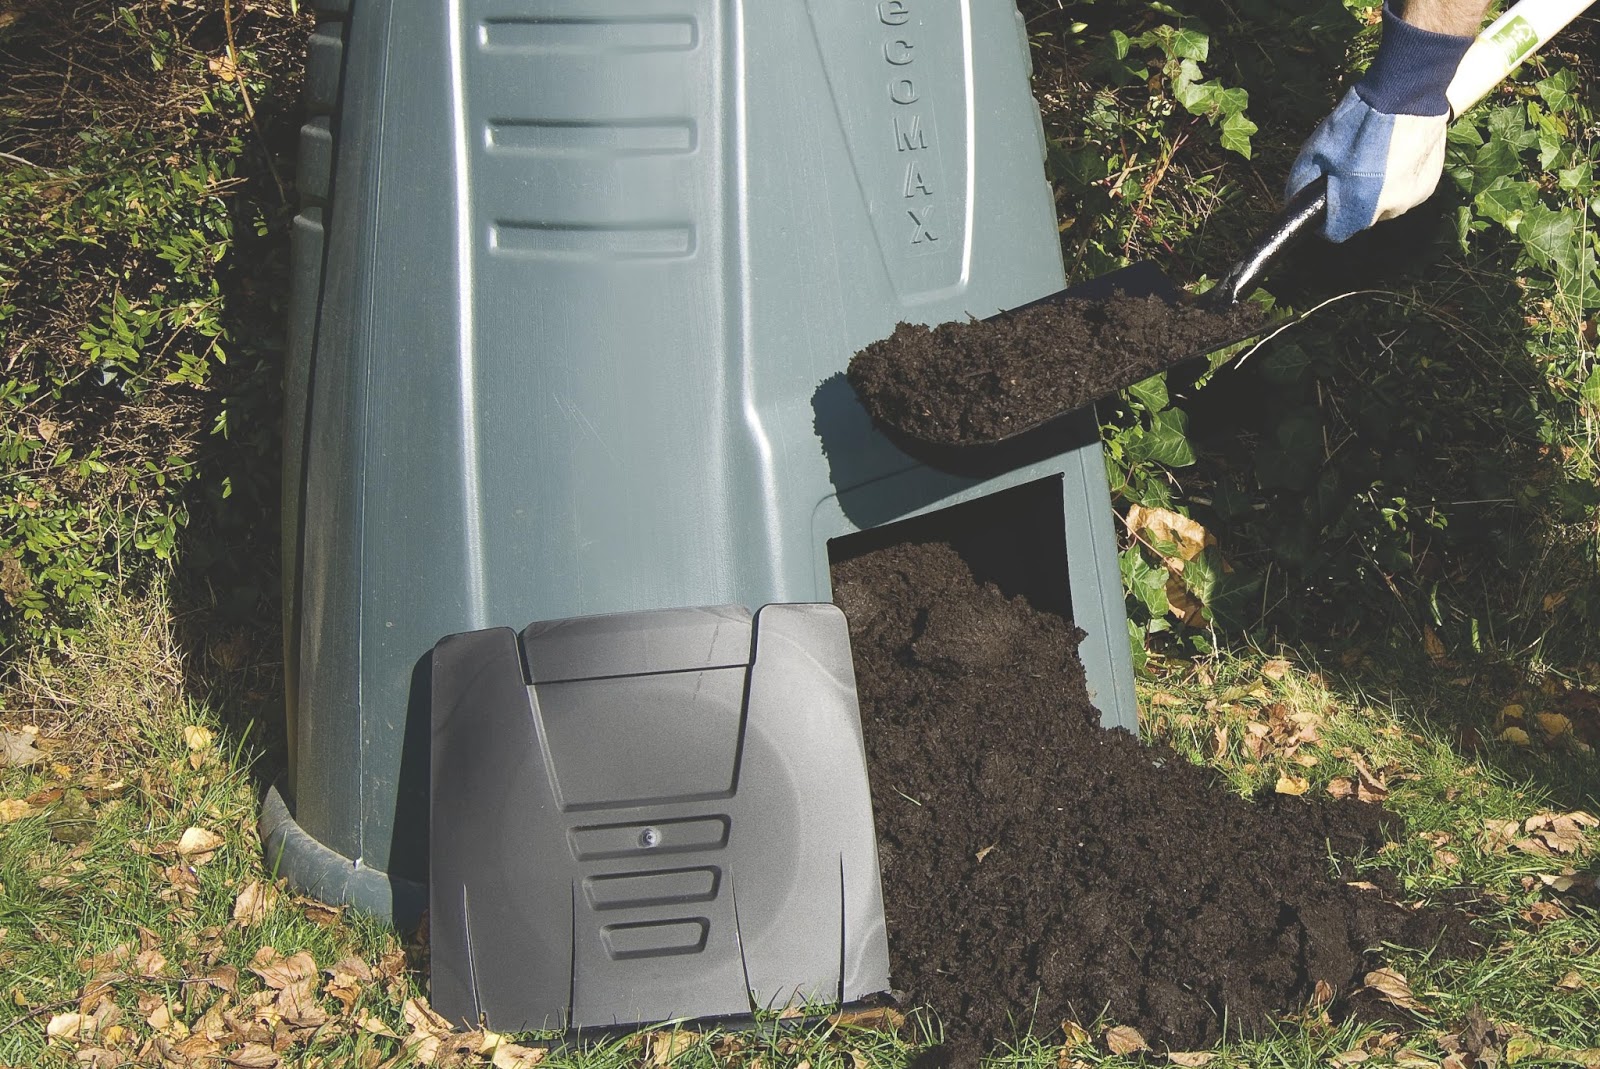
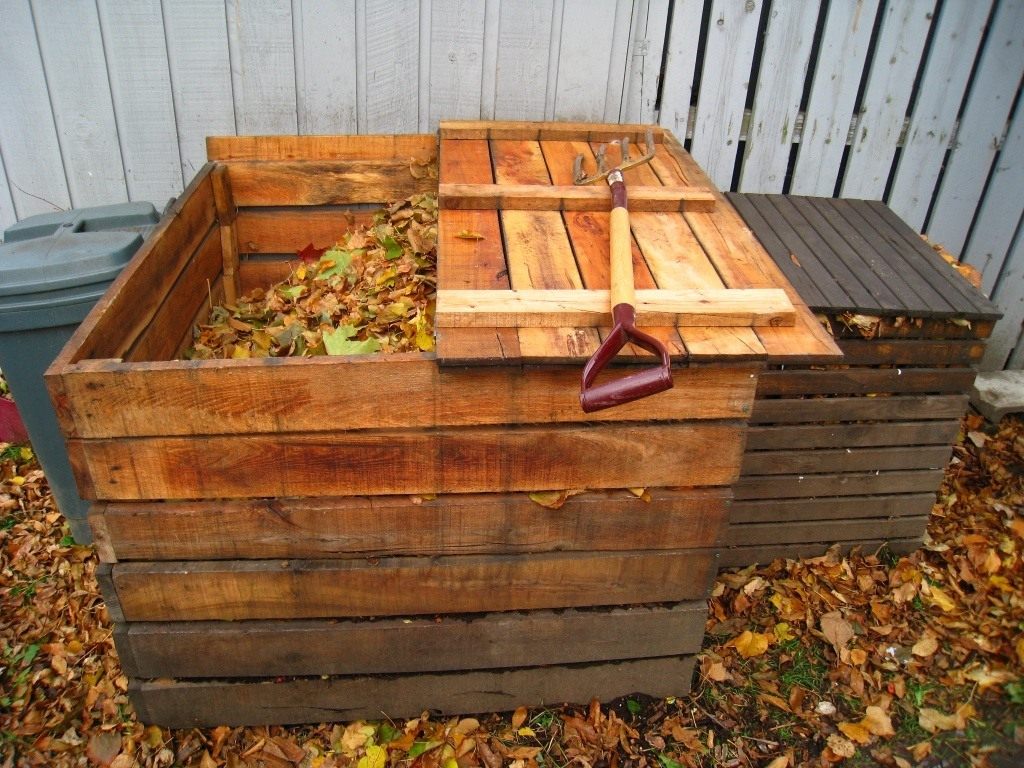
The second option for laying compost is in a box made of unpainted wood (or factory made of plastic). In appearance, it is absolutely identical to ordinary boxes, only several times larger. When creating a frame, do not forget to leave gaps between the boards and make one side removable, so that it is more convenient to lay and mix the raw materials. Alternatively, you can hang the door.

The plastic composter has perforated doors on each side at the bottom, through which the contents are ventilated, but you will have to humidify the waste yourself
Since such structures are usually made for many years, the floor can be concreted, and drainage can be laid on top (such as in the pit). Some owners put wooden or plastic shields on the bottom. True, over time, the tree will fall into disrepair, but after all, nothing is eternal.
Now it remains to fill the prepared place with the correct raw materials, which will rot into high-quality compost.

Two compost boxes located next to each other are convenient in that you can transfer waste for ventilation from one to the other, without clogging up the nearby area
Features of the correct laying of waste
In order for your pile to successfully rot and turn into nutrient soil by the new season, only plant waste should be thrown into the compost: leaves, cut grass, remnants of roots and fruits, turf, weeds, finely chopped branches of trees and shrubs.

Placing waste from your own garden in the compost pit, you thereby solve the problem of removing vegetable waste and get fresh, high-quality soil
To make the composition of the compost even more nutritious, put in it everything that you did not eat yourself: leftover soups, coffee grounds, tea leaves, yesterday's salad, etc. you will be surprised how quickly it will fill up. Old cardboard boxes, newspapers (black and white), worn-out items made from natural materials (cotton, wool) are suitable for compost.
Unwanted ingredients
And now let's dwell on the harmful, from the point of view of experienced gardeners, waste. It is strictly forbidden to put in the compost the remnants of animal products: dead birds and animals, old lard, fats, intestines, spoiled milk, sour cream, etc. All this, when decomposed, begins to exude an unpleasant odor and will attract to a heap of harmful insects, neighbor dogs, cats and crows ... In addition, putrefaction processes in animal remains are slower than in plant ones, and your compost will not have time to mature by the next season.
But the summer residents have not yet decided on the marine inhabitants. Some do not add them so as not to attract animals to a heap, while others are happy to throw into the compost everything that remains when cleaning fish (heads, scales, entrails), citing the fact that they contain phosphorus, valuable for plants. Only it is necessary to bury such waste deeper in a heap so that the cats do not smell the smell.
Indeed, fish feeding is useful. Therefore, we advise everyone who is sorry to throw away a valuable product: do not put them in compost, but bury them right under the trees, in the near-stem circles. Just dig a hole deeper. Thus, you will feed the garden and will not attract stray animals.

If you hit a compost bin with an opening roof, then feel free to put fish waste inside, because animals will not crawl into such a container
Do not put plastic, glass, metal objects, rubber, wash water, etc. into the pit. They are harmful to the soil. All paper products with a laminated backing or with colored drawings will not be useful either. There are too many dyes and chemicals in it.
An unwanted ingredient in compost is tomato and potato tops. In the fall, it is all affected by late blight, and the spores of this disease will be transmitted with compost to healthy plants.
Weeds are not put into compost and weeds with the beginning or the end of the flowering period. For example, if a dandelion has managed to form a flower, the seeds will still ripen, even if it is picked and placed in a pile. Therefore, try to mow the weeds before the flower buds appear.
If there is nowhere to put the tops of nightshades and large weeds that have managed to sow, spread them on a solid base (concrete, linoleum) near the compost pit and let dry. Then throw all the vegetation into an iron barrel and set it on fire. Everything will burn, along with diseases and seeds. Useful ash will remain. Add it to your compost heap.
How to compost waste?
For waste to decompose quickly, you need moisture, oxygen and accelerators of putrefactive processes. You provide moisture yourself, watering the pile abundantly during those periods when it is hot outside. Oxygen will penetrate into the compost more actively if you properly decompose the layers of raw materials. So, dry waste (potato peelings, straw, hay, fallen leaves, husks, etc.) should be alternated with green (tops, fresh grass, rotting vegetables and fruits), soft with hard to avoid excessive compaction. It is very important that the compost is prepared with equal proportions of brown and green components. Fresh waste is the main source of nitrogen for all plants. Brown (i.e. dry) ones act as a layer that prevents compost from sticking together. They are considered a kind of fiber that makes the soil airier and lighter.

Try to put green and brown waste in equal proportions, as excess greens will cause compaction, and excess dry raw materials will suck nitrogen out of the compost.
If you need compost for next spring, add decomposition accelerators to it. These can be concentrates bought in a garden store, which must be diluted with warm water and activate the work of beneficial bacteria contained in the preparation.
Fresh manure (horse or cow) is an excellent accelerator. They find a couple of cakes on the field, bred them in a bucket of water and let them brew for two days. Then the prepared solution is poured into compost and the contents of the heap are mixed. If this goodness is not near your summer cottage, finely chop the leaves of dandelion, nettle, legumes, fill it with a bucket of warm water and put it in the sun. After day 4, the mixture will begin to ferment. Then pour it into the compost.
To avoid nitrogen weathering, cover the top of the compost heap with non-woven material or black film. When closed, decay is faster, and a sign of this will be an active generation of heat. The temperature inside the compost should be at least 60 degrees.

It is highly undesirable to cover a wooden box with plastic from bottom to top, because by doing so you will block the path of oxygen, and the quality of the finished compost will be much worse
During the season, the pile is shoveled 3-4 times to ensure uniform decay of all layers. By spring, plant waste will turn into rich, loose soil with a scent of earth, which can be applied under trees, mulched strawberries, or mixed with garden soil to improve its composition.
Every gardener knows how important it is to fertilize the soil in the garden and in the garden on time and with high quality in order to get a good harvest as a result. You can buy ready-made compost, spending quite large sums on it, almost equal to the cost of the crop itself, or you can make it yourself without much effort.
A do-it-yourself compost pit, the options for which will be considered in this publication, will help not only to make high-quality fertilizers, saving on their purchase, but also to functionally use waste from plant products. There are several approaches to its creation, but first, a few words about the purpose and importance of this agrotechnical structure.
Purpose and general principles of creating a compost pit
What are compost pits made for?
On every plot of land, at least some cultivated plants are necessarily planted, and without feeding they will eventually lose their vitality, wither and die, as the soil around them is depleted.

Therefore, whether it is a tree, shrub or annual vegetable crops, the soil for them must be fertilized periodically. Today in specialized stores there are a large number of fertilizers made on different bases, but not all are equally useful for plants and unsafe for humans. Some producers make compost, however, and they are not always conscientious. To accelerate the maturation of humus, some of these "agrochemists" use not biological, but chemical means that quickly decompose various organic substances, and it is simply impossible for an ignorant person who does not have special knowledge to check how the processing took place. Therefore, having run into such a product, you can not only not achieve an increase in the yield of a vegetable garden or garden, but, on the contrary, spoil the soil to such an extent that it will take many years to restore it.
That is why the best option is to make organic fertilizers on your own, especially since almost all the necessary components can always be found literally underfoot or in the kitchen after cooking.
Any territory is periodically put in order, and in the process of harvesting heaps of grass and fallen leaves are collected, mixed with fallen fruits, as well as branches after cutting trees and bushes - all this is perfect for making compost.
If you do not touch the loaded compost pit, the maturation of the compost will take quite a long time. And provided that special biological solutions containing live bacteria are added to it, fertilizer can be obtained in 3-4 months. However, in order for the “ripening” process inside the compost pits and containers to take place evenly, the mass must be periodically mixed and added to it preparations that accelerate the processes of natural decomposition of organic matter.
Requirements for arranging a compost pit
In order for the compost pit to function properly, its design must provide all the necessary conditions for the development and active life of bacteria that will process plant waste.

The conditions necessary for the normal functioning of bacteria include the following factors:
- The presence of free access of oxygen to the container (pit), so that the plant waste contained in it does not rot, emitting unpleasant odors, but is split under the influence of earthworms and beneficial bacteria.
- Special temperature regime
- Constant high humidity.
High-quality fertilizer can be obtained only if all these conditions are met, and for this it is necessary to correctly build or assemble a compost container from ready-made materials.
The requirements that must be met when building this useful structure can be listed in the following points:
- The container must have openings in its walls for free air access, which means that the best option would be to install it above the soil level.
- For the convenience of removing the finished compost from the container, the front or side wall is best made in the form of a door, or assembled from removable boards.
- If the compost pit is set up in a pit dug in the ground, then it should not be buried more than 500 mm. The mass laid in such a pit must be mixed quite often by adding a solution with live bacteria to it.
- A mobile compost container looks very attractive - if it has at least some aesthetic appearance, it can be installed anywhere on the site. The only thing that needs to be foreseen is that he should not constantly be in the sun. Therefore, it is best to find a place for the container in partial shade under the trees. In addition, if desired, it can be decorated with a removable

- The size of the compost container or pit depends on how much fertilizer is supposed to be produced for the needs of the site. But it is best that its dimensions do not exceed 1000 × 2000 mm. If the site is large and a lot of humus will be needed, then it is recommended to make several small containers with an approximate size of 800 × 1000 mm.
- Do not make the container box too high - it must have a height that will allow the process of loosening the mass to be easily loosened, and this must be done quite often. Therefore, it is most reasonable to foresee the height depending on the growth of the gardener.
- No matter what material the compost bin is made of, its bottom should not be covered - it always remains earthen. Thus, moisture will be maintained in the box, which will come from the soil. In addition, free movement will be ensured for earthworms, which also take an active part in the production of humus.
What kind of waste can I put in the compost bin?
The compost will be of high quality and useful for plants only if it is made from environmentally friendly plant products. Therefore, you need to know what can be stacked in a container and what absolutely cannot.

- Tree branches (but they only fit on the bottom of the composter - this will be a kind of drainage layer).
- Fallen leaves, needles, roots, bark and shredded tree branches.
- Mowed or weeded grass.
- Peelings of vegetables, fruits and berries, as well as spoiled fruits.
- Chicken droppings, matured two-year rotted manure.
- Ash and charcoal from wood burning.
- Sawdust, straw, hay, shavings and other small wood waste.
- Leftovers from tea and coffee.
- Paper bags, corrugated cardboard, used napkins and paper (naturally, in the absence of printing ink or stationery glue on the waste paper).
- Sometimes the lower branch drainage layer spills out with lime for the soonest splitting of the wood.
All plant waste, for example, layers of freshly cut grass, must be sprinkled with a layer of garden soil, since decomposition will take place more slowly without it.
It is also very important to know what should never be put into compost, otherwise you may not help, but harm the plants.
Garden container prices
garden container
So, inorganic substances that do not decompose or, decomposing, emit toxic substances that are dangerous not only for plants, but also for humans, cannot be poured into the container. In addition, there are other substances and products that should not be put into compost pits. These include:
- Plastic bags, plastic, rubber, metal and synthetic products.
- Plants treated with chemicals.
- Tops from potatoes and tomatoes - it can be infected with late blight.
- Bones from fruit trees and animal bones.
- Domestic animal feces - they can contain helminths and their eggs.
- Pet hair, as it will take a long time to decompose.
- It is important to make sure that glass does not get into the compost, as it can seriously injure your hand when processing the beds.
- It is not recommended to lay thick branches in the upper layers - they will decompose for too long.
What are compost pits and how to make them yourself?
Compost pits or containers are made of different materials - it can be wood, metal, smooth or wave slate, metal mesh and plastic wrap or geotextiles, black plastic bags, and more. The design of containers can also be different, but it should function according to the same principle. Next, we will consider the designs of various compost pits, from complex to the simplest options, so the reader will have the opportunity to choose the most suitable one for a particular case.
The first option is a ready-made plastic container
To begin with, it is worth considering a ready-made version of the composter, which can be purchased in specialized stores. These are plastic containers made taking into account all the necessary conditions for the production of humus.

Containers of various sizes and shapes have quite affordable prices, which start from 1,300 rubles, and if there is no possibility or desire to make a compost pit on your own, then the best way out would be to purchase this agricultural facility ready-made.
The containers are rather compact products with a neat and stylish look that will not spoil the landscape design of the site. Moreover, most often the plastic of such composters is colored green, which helps the container visually "get lost" against the background of the vegetation of the site.
The containers are sold unassembled, so they can be easily delivered to the installation site, even by public transport. The kit comes with assembly instructions, and it will not be difficult to mount such a container on your own, since no tools are required for this.

For the convenience of removing ready-made humus from the composter, a side door is provided in the design, which simplifies its operation.
Composters are made of frost-resistant UV-stabilized plastic, which perfectly withstands the effects of ultraviolet radiation, precipitation, wind and temperature extremes. The advantage of this design in comparison with the "classic" compost pit, arranged in the ground, is that it will not become a source of unpleasant odor, since the aeration system provided in the container does not allow the waste to rot.
The second option is a homemade wooden compost bin
This version of the compost pit will not be so easy to make with your own hands for those land owners who do not have carpentry tools or do not know how to work with them. However, knowing the size of the blanks, they can be ordered at the carpentry shop, and assembling the box yourself should not be a problem anymore, since this process does not require special tools. If the "carpentry tool arsenal" is available, and there is at least a little experience with it, then the manufacturing process will be simple and quick.
So, for a wooden compost container, you need 24 boards 1500 mm long, 25 mm thick and 150 mm wide.
From the tools you will need a circular saw or jigsaw, a regular or electric plane, clamps, a tape measure and a simple pencil.
| Illustration | |
|---|---|
 | The first step is to manufacture the parts for the container. It is advisable to use high-quality durable wood for this purpose, which will be resistant to external natural influences, such as moisture, wind, temperature extremes and ultraviolet rays. This is due to the fact that the container will be located permanently on the street. And besides, the wood will be exposed not only from the outside, but also from the biological - from the inside, as the processes of decomposition of plant waste will actively take place there. |
 | Planks are sawn and trimmed from all sides so that they look neat enough. This is especially important if the container is located on a site that is clearly visible - probably, no one would like the box to spoil the landscape design. |
 | After the boards are prepared, they are folded together and tightened tightly with clamps on both sides. Further, 100 mm is measured from each of the edges, then it is set aside and marked with a pencil another 25 mm - this will be the width of the groove to be cut. The depth of the groove must also be 25 mm. |
 | Then, cuts are made on the marked boards. To do this, the depth of cut is set on a hand-held circular saw, and in the area marked on the boards, many cuts are made at a distance of 1 ÷ 2 mm from one another. When the wood is broken into small pieces, it can be easily removed from the boards with the same saw. |
 | When the grooves on one side are ready, the boards are turned on the opposite side. Marking is also made on it - from the edge, 100 is first deposited, and then 25 mm. Then the process of cutting the grooves is repeated. The grooves on one side and the other along the width of the boards should be exactly opposite each other - as shown in this illustration. |
 | The next step is to take two boards with grooves, fold and fasten together with clamps. A line is drawn dividing the boards exactly in half - in this case, it is 75 mm from the edge, and the boards are sawn according to this marking. These parts will be used to install the lower and upper, that is, the last row of the structure. |
 | Further, all surfaces of the finished boards, including the cut grooves, must be treated with one of the antiseptic solutions. This tool will prevent putrefactive processes and extend the life of the wood. The antiseptic is applied with a wide brush. It is important to make sure that there are no untreated areas left, otherwise decomposition of wood may begin from them under the influence of processes occurring inside the container and external natural factors. |
 | After the wood is completely dry, you can proceed to the assembly of the structure. The container should be installed on bricks, as there should be space for air from below. The bricks are placed on site where the compost bin will be permanently installed. The installation site must be relatively flat so that there are no distortions of the container walls during assembly. |
 | The assembly begins with the fact that two boards are installed on the edge of reliably laid bricks, having a groove on only one side. They are positioned so that the groove points up. |
 | Further, perpendicular to them, boards are installed with two oppositely placed grooves, that is, on each side. The bottom groove of the top board should fit into the groove of the bottom board, which is standing on the bricks. This is well illustrated in the illustration. |
 | The next step is to mount boards parallel to the lower structural elements. The entire box is assembled according to the same system, to the very top. The work takes place quite quickly - if necessary, the board installed from above is knocked out by hand or, neatly, with a hammer. |
 | The last two boards are installed, which have grooves on only one side - they, of course, are mounted with cutouts down. The result is a "well" with the required distance between the boards through which oxygen will enter the compost. |
 | It is not enough to make and install such a box - it is also very important to fill it correctly. The lower layer of filler is branches (in this design, it will be located between the bricks installed under the container). And the thickness of such a layer should be up to half the width of the lower wide board, which has grooves on both sides. The branches need to be laid tightly enough, as they will act as drainage. On top of the branches, lime 70 ÷ 80 mm is poured, and then waste, then a layer of soil (its thickness should be about 100 mm.). Then again comes waste, ash and soil. Then, waste, manure, soil and again waste. In this case, ash, manure and lime can be interchanged periodically. It should be noted that this is only one of the options for filling, as each gardener invents his own "recipes" and uses different components to make compost. |
This design is good for everyone, except that it will not be very convenient to get the finished compost out of it. Most often, the option of a compost bin with an installed door or with removable boards is chosen.

In this design, I would like to consider exactly the front side of the container, which is equipped with removable boards installed at an angle to additional corner vertical posts.

To fix them at an angle, complex slots are cut out at an angle on one side of the boards that form the side walls of the container. To make them the same, the boards are folded together in pairs, fastened with clamps, and then the marked part of the groove is selected with a jigsaw.

The result of the work done will be the container shown in the illustration below. It clearly shows the boards installed at an angle and two added vertical posts holding the side walls from the "front" side.

One more circumstance must be taken into account. This is that not treated with an antiseptic and unpainted wood under the influence of moisture can swell, and under the influence of the sun it can begin to dry out, giving cracks. In this case, it will be very difficult to get the boards out of the grooves. Therefore, I make the grooves in such a way that initially the boards come out very freely, and before assembling the structure, it is recommended to process and paint its elements. In addition, it is best to install a wooden structure under a roof or under the crown of trees.
The container can be one- or two-section, open or closed. It is better, of course, to build a two-section version, or put two composters side by side, since they can be used in turn - use ready-made humus from one container while it ripens in another. Having emptied the first composter, they switch to using compost from another, and the first is again filled with waste.
If the territory of the site allows you to place the container away from residential buildings, then it can be made open. If the composter is installed near the house or recreation areas, then it is recommended to equip it with a cover.
The third option is making a compost basket
This method of making a container for the production of compost is so simple that any gardener can do it on his own, since the process does not require any special efforts and be able to work with complex tools.

For the manufacture of this version of the container, the following materials are required:
- Welded metal mesh with cells of 40 × 40 or 50 × 50 mm - 3000 mm long, 700 to 1000 mm wide - this will be the height of the basket. The width of the material is selected at the request of the master. You can choose a regular steel mesh, but it is better if it has a polymer anti-corrosion coating.
- Dense polyethylene film or black geotextile, 3500 mm long and 750 ÷ 1050 mm wide (depending on the planned height of the future basket).
- Stationery clips - 8 ÷ 10 pieces.
- Flexible and durable knitting wire for holding the mesh together.
From the tools, you will need to prepare ordinary scissors and scissors for metal, pliers and a tape measure.
| Illustration | Brief description of the operations performed |
|---|---|
 | The metal mesh is unfolded and leveled. A strip with a length of 3000 mm is measured from it. |
 | Then the cut strip is rolled into a cylinder, so that the edges overlap, about 200 mm. This connection point along the entire height of the cylinder must be carefully tied with wire or plastic clamps - ties. |
 | Further, a polyethylene film or geotextile is spread, the canvas of the required size is measured and cut off. (The work will go faster if there is such an assistant))). |
 | In the next step, the cut film or geotextile is rolled up and installed inside the basket. Then, the material is spread over the walls. |
 | The top edge of the film is wrapped outward over the edge of the net and is hooked to the basket walls using clerical clips. They will securely fix the canvas and will not allow it to detach, even when mixing the compost. |
 | That's it - the compost bin is ready. It turns out to be not at all heavy, so it can be easily transferred to any area of the site. |
 | Further, the resulting container is filled with various debris of plant origin, which is stacked in layers. The first, lowest layer, is the branches, which are covered with soil, then any grass, fallen leaves, waste after cleaning vegetables from the kitchen, etc. Then there is a layer of soil again, and then plant waste. After filling the basket, its contents must be spilled with water, so that it goes to the bottom of the container. After that, a special environmentally friendly product containing bacteria is diluted and infused, which contribute to the rapid decomposition of plant products, which will significantly accelerate the maturation of the compost. Getting compost out of the basket is quite simple - you just need to lift one edge of the container, scoop out the finished compost with a shovel, put it in a garden cart and take it to the fertilized area of the plot. |
Here it is necessary to clarify the point that if a polyethylene film is used for the inner covering of the basket, then it is necessary to cut holes in it for oxygen to enter the processed mass. If it is decided to use geotextiles for the compost basket, it will not be necessary to cut it, since it is a “breathable” material, that is, it allows air to pass through well, and also retains moisture, preventing its rapid evaporation.
The fourth option is a concrete compost pit
The construction of a concrete structure is a rather laborious work. In addition, if the pit is set below the upper level of the ground, it turns out to be not quite convenient for removing the finished product. In addition, building will cost much more than arranging a wooden version or making a basket. However, if there is a desire to work with concrete and build a capital structure, then you need to know how the work on its construction and maintenance is carried out.
Geotextile prices
geotextile

You can build a pit with one or two compartments. If the second option is chosen, then one compartment is intended for ripe humus, and the second is for constant replenishment.
Since oxygen can enter such a hole only through the top, the cover for it must be made of mesh.
The bottom of the pit is not concreted and not waterproofed, since it must remain earthen so that earthworms have access to plant waste, and also to ensure the mass is moistened by soil moisture.
In such a space that does not have aeration, the waste placed in it can begin to rot, so it will be necessary to carry out loosening quite often, providing access to air.
Work on the arrangement of a concrete structure consists of the following stages:
- The first step according to the marking carried out in the selected place is dug a foundation pit. In length and width, it can be of any size, starting from 1000 mm and more. Here it must be borne in mind that the inner space of the pit will decrease due to the construction of the side walls. The depth of the pit can vary from 500 to 800 mm, but the deeper the pit is, the more difficult it will be to get ready-made humus from there and the more difficult it is to regularly loosen the mass.
- The next step along the walls, to the entire height of the pit, is a formwork made of boards or thick plywood. It is mounted at a distance of 100 ÷ 150 mm from the ground surfaces - this space will be the thickness of the walls.

Before sheathing the formwork frame with boards or plywood, a reinforcing mesh is mounted between it and the earth walls. After that, the formwork sheathing is fixed to the frame.
- Further, it is mixed from sand, gravel and cement in a ratio of 2: 4: 1. This process is best carried out in a concrete mixer or in a large container, for example, a bathtub or a spacious garden wheelbarrow is suitable, since it is advisable to pour the solution into the formwork at one time.
- At the next stage, the solution is poured into the formwork, and "bayoned", that is, it is repeatedly pierced with a pipe or a piece of reinforcement reaching the bottom - this process is carried out so that air pockets do not form in the concrete. After the formwork is filled, the poured concrete is left to dry and build strength. It is advisable to carry out stripping not earlier than after 10-12 days.
- After the mortar has solidified, the walls of the pit must be raised above the ground with the help of brickwork, or by rebuilding the formwork on top of the finished walls that strengthen the foundation pit, reinforce it and fill it with concrete. The height of the side framing the pit edges should be equal to 150 ÷ 200 mm.
- The walls of the pit can also be reinforced with brickwork, but under it, along the perimeter of the bottom of the pit, it will be necessary to pour concrete into the strip base.
If it is decided to decorate the walls with brickwork, then it should not be made solid. It is best if there are holes in it that will allow ground moisture and earthworms to penetrate into the pit.

In such a pit (without air access to its lower part), the process of waste processing until humus is fully ripe will take about two years. And to speed it up, you will need to pour a special solution containing live bacteria designed for similar conditions into the plant mass.
The fifth option is a slate composter
Building a slate compost pit is a fairly simple and affordable way, especially if the farm has preserved the old, seemingly unnecessary roofing material.

It does not matter if the sheets are slightly damaged, since the entry of air into the plant mass will only be a blessing, especially since slate containers are most often made open. The slate will perform only the function of the walls, preventing the contents from scattering outside the area organized for the composter. To create such a box, you need to do the following work:
- As in previous cases, you first need to decide on the size and design of the container, that is, how many sections it will have. The optimal size of the sides of each of the sections of the two-section version is 800 × 1000 or 1000 × 1000 mm. The height of all walls, except for the front one, should be 700 ÷ 1000 mm, depending on the expected amount of waste. The front wall can have a height of 300 ÷ 500 mm, which will be convenient for loading waste and sampling finished humus.
- Having chosen a site for installing the box and having made its marking, the topsoil is removed from it by 200 ÷ 250 mm for free penetration into the mass of soil moisture and earthworms.
- To fix the slate sheets in a vertical position, wooden or metal posts are installed along the perimeter of the site. They may need from four to six, depending on the design of the composter.
- Then, slate is fixed to the uprights. It is desirable that a gap of 20-25 mm remains between the lower edge of the sheets and the surface of the soil, which will allow oxygen to freely enter the lower layers of the plant mass.
For faster processing, it is recommended to moisten the stacked waste by adding composting agents with live bacteria to the water.
The sixth option is a compost pit in the ground
This is probably the most common way of arranging a compost pit, which is often chosen by not very experienced gardeners. As you can see from the information presented above, this is far from the most successful version of the composter, since plant waste in it will begin to rot rather than decompose.
Metal mesh prices
metal grid

Such a pit is best used simply for dumping organic waste that is not intended for the production of humus. If the pit is being built precisely for this purpose, then it is best to place it away from residential buildings, since rotting debris attracts a large number of flies, which will tend to visit not only the garbage pit, but also the premises of the house.
If this option nevertheless turns out to be attractive as a compost pit, then it will be necessary to loosen the plant waste piled into it very often in order to provide the aeration necessary for proper processing.
It is not difficult to equip such a pit - for this, a pit 400 ÷ 600 mm deep is dug away from the house. The size of its sides may be different, but the best option is 600 × 600 or 700 × 700 mm. The large size of an unreinforced pit can lead to erosion processes in the soil around it, that is, it will begin to crumble and expand. If a pit of a larger size is needed, then its walls must be strengthened at least with slate, setting it to the full depth.
It is recommended to sprinkle kitchen waste dumped into the pit, such as cleaning from vegetables and fruits, with grass and a small amount of soil - this will partially help hide the unpleasant odor that attracts flies.
It will not be superfluous to add special substances to such a composter, however, it is necessary to choose environmentally friendly preparations, since chemistry with rain and soil moisture can spread to the garden beds or fall under the roots of trees.
Seventh option - composting waste directly on the ground
Another method for preparing fertilizers, which is often used in rural areas, is the storage of plant residues in the form of a stack. This is the simplest compost production method available to any owner. However, it has some inconveniences, since it is rather inconvenient to loosen the mass folded into a stack, as well as to get ready compost from under the upper fresh layers.

If, nevertheless, it is decided to opt for this option, then before laying waste, it is recommended to lay a layer of branches on the ground, which will allow oxygen to freely penetrate into the lower layers of the stack. In this variant, the compost will reach full maturation after one and a half to two years.
If it is not possible to build a composter and even carry out the laborious work of erecting and loosening a stack of plant waste, then there is another simple way to make compost. It can be called "feminine", since all this is done without any special physical effort.

In this case, waste is also piled directly on top of the soil. The best place for this is partial shade, which can always be found under the trees in the garden. You can organize such a composter right on a temporarily unused garden bed, covering the laid plant waste with any dark material. This compost heap does not have to be high and can be easily loosened with a pitchfork. If there is a lot of waste, then several heaps are organized, in different parts of the garden. With this approach, ready-made humus does not have to be transported from one corner of the garden to another, since it will be produced in the area that needs to be fertilized.
Find out how to do with step-by-step instructions in a new article on our portal.

However, in this case, one cannot do without bioactivators. The compost works are carried out in the following order:
- A heap of plant waste with a height of no more than 500 mm is placed on the soil. Each layer is sprinkled with garden soil.
- Then, all waste is watered, as all layers must be wet.
- Further, according to the attached instructions, the bioactivator is diluted, infused, and the whole heap is watered with this solution.
- The wet biomass is covered with dark material, but in such a way that the bottom of the heap is slightly open for free access of oxygen. If there is no dark film or, then an old oilcloth, which does not allow sunlight to pass through, will do. The corners of the covering material are pressed against the ground by heavy objects such as stones or bricks.
- The finished structure is left for overheating. Well, you need to loosen it about once every two weeks.
- According to experienced summer residents using this method of making humus, its full ripening occurs after 5-6 months.
Biological products for composting
Now a few words should be said about the preparations used for composting.
Today, in specialized stores, you can find a large number of different products that help to reduce the decomposition of biological waste.

When using bioactivators for making compost, it matures much faster than when decomposing plant waste in natural conditions. And this is especially important when the site needs to be fertilized annually, since it is constantly used for growing crops.
Bioactive agents containing, contribute not only to the rapid production of humus, but also to the destruction of harmful microorganisms, the elimination of unpleasant odors, as well as the enrichment of the soil with mineral substances. The manufacture of solutions from concentrates is carried out according to the instructions provided by the manufacturer on the packaging. However, experienced gardeners advise adding a little sugar or old jam to them after diluting bioactivators. This will help to give a kind of "acceleration" of the initial activation of living bacteria, which are in a "dormant" state before breeding. After dilution, the solution should be slightly infused. It is interesting - if mixing it in a bucket, then you can even visually observe how the activation process will go.
The table below lists several drugs that can be found in shops that sell gardening and fertilizing products.
| Bioactivator names | Package weight or volume (grams or milliliters) | Average price in rubles (summer 2017) |
|---|---|---|
| "Compostar" | 50 | 200 |
| "Compost" (compost for 15 days) | 100 | 360 |
| "Baikal EM-1" | 40 | 380 |
| "Compostello" | 70 | 200 |
| "Happy Summer Resident" | 45 | 120 |
| "Bioforce Compost" | 250 | 580 |
| "Sanex EcoCompost" | 100 | 300 |
| "Dr. Robik 209" | 60 | 180 |
| "ETISSO Kompost vital" | 1000 | 670 |
| "Sanex Ecocompost" | 1000 | 280 |
| "Compost 25" | 1000 | 300 |
If the aforementioned funds were not found in the nearest store, then the seller will certainly offer other options for bioactivators. Before purchasing the selected drug, you should carefully study its characteristics, manufacturer's recommendations for use and instructions for preparing a working solution.
In conclusion, I would like to say that according to the information presented above about the existing options for arranging a composter for processing plant waste, it is quite possible to decide on the choice of a suitable option. It depends on financial capabilities and practical experience with various materials and tools. And the presence of a compost pit on a garden plot, in any of its incarnations, is always a big plus.
And for completeness - watch a very informative video, which contains recommendations for self-production of compost from plant waste.
Video: Tips for the gardener on how to make quality compost
At their summer cottage, where vegetables, fruits and berries are constantly grown, additional feeding is always needed. It is not advisable to use ordinary mineral fertilizers for your family, except in small quantities. They change the physical and chemical parameters of the soil and contribute to the acidification of the site.
Organic fertilizers are more expensive, but they restore soil well and stimulate crop growth. One of them - compost - can be made from components that can be found in abundance in any summer cottage, and making a compost pit with your own hands will require little financial costs and a little time. But at any time on the site there will be something to feed the plants.
The benefits of compost and how fertilizer works
Compost is plant residues processed by soil microorganisms and earthworms. Passing through the digestive tract, useful nutrients - nitrogen, potassium, phosphorus and other trace elements receive an organic shell.
In it, they are better preserved and better absorbed by plants. People have learned to produce such fertilizers artificially. They are called chelated, but they are expensive. A large plot requires a lot of complex mixtures, which significantly increases the cost of the crop.
If you make a compost pit correctly and learn how to place the compost for maturation, you can significantly reduce the cost of land renewal and increase the yield for free.

Composting raw materials
Anything can be composted:
- leaves;
- green freshly cut grass;
- manure;
- branches, sawdust, bark, paper;
- algae and other pond plants;
- peat;
- fecal matter from the sewer.
It is better to take several components. It is desirable that the composition includes nitrogen and carbohydrate ingredients, as well as land from the site. Nitrogenous substances include: fresh grass, manure or dung, fresh vegetables, fruits. Carbonaceous components include paper, dry grass, sawdust, straw, cardboard.
Adds nutritional value to ash. To make the compost more saturated, you can add mineral complex or single-component fertilizers at the end. In any case, compost will help increase the amount of humus in the soil and revitalize the soil with the help of bacteria.
Composting methods - with and without oxygen
There are two methods of composting - aerobic and anaerobic. In the first case, microorganisms work, which need oxygen for life. Such bacteria live in the soil and decompose plant residues - grass, roots, manure.
To obtain aerobic fertilization, you need to know how to properly make a compost pit with your own hands in order to provide air access. In addition, the mixture must be loosened and inverted periodically to allow oxygen to flow to all components. The disadvantage of the aerobic method is that some of the nutrients are eroded or oxidized and are not beneficial, as well as in the waste of time.
Video: How to make a compost pit with your own hands
Another method is anaerobic. This is the fermentation of components without air access. How to make a compost pit in the country so that oxygen does not penetrate inside:
- the material should be tightly knocked down, and from the inside you can make a lining with a film;
- the components are packed tightly and compacted to remove excess air.
From above, such a shoulder is closed with a hermetically sealed film, which is pressed to the ground with heavy stones or earth. Further, the process takes place without human intervention. The advantage of this method is that almost all nutrients are preserved. Minus - it is difficult to achieve complete tightness of compost pits. Sometimes it is better to buy a container for storing raw materials.
Varieties of composters
A simple DIY compost pit can be made in one day. No special materials or tools - everything that is at hand will do - boards, slate, plastic panels, plexiglass, mesh.
It is necessary to decide which method of composting will be in priority: aerobic or anaerobic. If the first, then there are more options for making a compost heap with your own hands. If it is anaerobic, then every effort will have to be made to make the structure airtight. It may be necessary to apply concreting, but such a collar will serve for a long time.
Classic earthen pit
Compost pit in the ground is done as a depression no more than 50 cm, so that it is convenient to care for the ripening mixture. The sizes are arbitrary. You can make any length and width.

More often, this design is used for anaerobic fermentation, but for this you need to concreted the walls and bottom. The fact is that during the decomposition of plant residues, the liquid flows down. If the bottom is left open, the nutrients will be lost and absorbed into the soil. But if a layer of earth, straw or peat is laid on a closed bottom, then they will be preserved and will benefit the plants.
The simplest way to make a compost pit is from a concrete ring. For this:
- Digging a shallow hole - 60 cm.
- The bottom is poured with a solution and allowed to dry.
- A concrete ring is installed using a crane or tractor height 90 cm.
- Plaster the connection between the bottom and the ring.
Convenience is that the edges will rise above ground level and prevent sediment from entering the compost. Concrete can be painted in any color or decorated as you wish to create a beautiful compost pit - you can plant tall plants around a concrete ring with your own hands, and they will hide the storage. If desired, an overlap with a hole for a hatch is installed on the ring.

Slate shoulder
If old slate is lying around, you can fix it on boards and make walls for the compost pit. It will not be quite a pit, since it is located on the surface of the earth. Rather a pile or a heap, but framed and protected. The do-it-yourself slate compost pit is suitable for the aerobic (oxygen) method of composting.
Stages of work:
- Choose a place and carry out preliminary markings - length, width. The height of the shoulder should be not higher than 1.5 m. At higher altitudes, it will be difficult for air to enter and maturation will slow down. Raw materials can even rot or sour.
- Dig holes in the corners with a drill and put pillars.
- Between the posts, nail the boards on which the slate will be held.
- Using a drill, carefully make holes in the slate and attach it to the boards.
On the one hand, the height is made less so that it is convenient to get the finished compost. The roof must be made, because the rain will disturb the maturation of the mixture.
The bottom is made at will - open or closed. Peat, soil, chopped branches or sawdust, straw can be used as drainage.
DIY board composter
A do-it-yourself compost pit from boards is the most common method. First, markings are made and corner posts are installed. Then one of the options:
- the arrangement of the boards is dense, without air holes - more suitable for cold storage of manure or anaerobic composting;
- with air holes - they can be up to 5 cm wide.
It is better to make the composter mobile - on wheels so that it can be hidden in a warm place during the winter. With a decrease in temperature, bacteria slow down their activity and the maturation of the mixture is disturbed. In the warmth, the process continues and by the spring the fertilizer will be ready.
When used for composting worms, the most effective type is California red worms. They multiply quickly and eat a lot, but do not tolerate low temperatures. They die in the middle latitudes. Vermicompost is prepared in a warm room with good ventilation. In the summer, the box is put out on the street, and in the winter it is put away in the warmth.
Compost pile made of mesh
An economical version of the composter is made of ordinary metal mesh. It is fixed on poles or metal pipes dug into the ground. The plus is that the shoulder is completely open from all sides for air. In order to accelerate the maturation of the compost, it is advisable to add a solution of EM preparations while forming the layers.

Sealed plastic container
Sealed containers are used for anaerobic fermentation of ingredients or for silage of grass. Such composters look presentable and aesthetically pleasing, do not spoil the appearance of the site. Minus - you cannot increase the volume, and you will also have to loosen the layers when preparing aerobic compost.

Sump well as a composter
There is a technology in which fecal matter is processed by anaerobic bacteria and becomes organic fertilizer. But for this, the condition must be met: do not pour water with detergents and chlorine into the well, since these substances cause the death of microorganisms.
The compost pit, or composter, is an important part of the rural vegetable garden. Organic waste - cut grass, food residues, sawdust, serve as an irreplaceable raw material for the production of home fertilizer - compost. So it's time to put a composter on our site.
Structures, hastily assembled from boards or plywood sheets, last 2-3 years and become unusable. Brick composters are laborious to manufacture and impractical, and
you can't fold a high wall - it will squeeze it out. I set myself the task of closing the issue for a long time, if not forever.
Over the years of gardening practice, the dimensions of the future composter have developed in my plans. This is at least 3-5 m 3 for 6 acres. It is known that an ideal composter should have three sections: one container - a reception area, which is filled with waste for two or three seasons. The other is a worker, where organic matter decomposes. The third container is with the finished product; compost is selected from it to fertilize the soil.
A place for a composter is a far corner of the site, hidden by a wood log. A compost pit, or a composter, is mentioned in SNiP only in the point that regulates the distance to the well - 8 m, including the neighboring one. Otherwise, the composter is subject to the norm of the distance to the neighboring area - at least 1 m.
Approximate consumption and cost of material for the manufacture of a composter
|
Name material |
Consumption material |
Price per unit, rub. |
Price, rub. |
|
|
Slate flat |
16 sheets |
8 000 |
||
|
Metal corner 50 x 50 x 4 mm |
32 lin. m |
6 400 |
||
|
Strip 50 x 4 mm |
3 rm. m |
|||
|
Armature 8 mm |
18.5 lin. m |
|||
|
Paint, accessories |
||||
|
TOTAL: |
15 907 |
|||
DIY composter - work progress
1. So, I prepared the site for the future construction and realized that three sections of the required size would not fit. I also didn’t want the design to look like a sarcophagus, and if it’s not elegant, then let it be at least proportional.
Taking into account the dimensions of the raw materials, I developed a project for a two-section composter 1.35 * 3.5 m. The metal frame serves as the basis for the construction. And instead of three sections there will be two, but each of them is almost one and a half times larger. Waste can be stored in such a volume within 5-6 years. Taking into account the readiness of the compost, the receiving section will also be working at the same time. When filled, it becomes used, and the second goes into filling mode.
And yet there is a conditional third section. It's a narrow niche in the middle where I store my inventory and liquid fertilizer barrels.
2. A smooth 12-mm slate 270 x 37 cm went to the walls and partitions between the sections. Experienced gardeners use them to protect their beds. The value of slate lies in its durability, ideal for a composter. Using a grinder with a disc, I sawed the slate in half without waste. These halves determined the size of the composter sections. As a frame, I used a 50 x 50 mm steel black corner with a thickness of D mm.
3. First, we assemble the frame dry. We drive in the supports with a sledgehammer, and the distances between them are determined by installing slate sheets. Having baited U of the sheet in height, we get the upper edge. Saw off the excess parts of the corner supports and scald the upper perimeter. To prevent the temporarily installed plates from folding inward, I secured them in the middle with reinforcement bars stuck into the ground.
4. To obtain the ideal geometry of the frame, the slate plates are temporarily installed and aligned, as if they had been installed completely. To do this, we display them on the horizon and control the right angles by equal diagonals. We clean the finished frame and paint it with metal.
5. The rigidity of the structure is provided by corner braces made of steel 50-mm strip, welded at the upper corners of the frame.
6. The bottom of the frame is tightened with 8-mm reinforcement so that the supports do not disperse on the heaving clay soil. Reinstall the removed sheets. Slate is a fragile material, and fastening to the frame has some peculiarities.
7-8. We use bolted connections. We drill holes slightly larger than the bolt diameter. This is a gap to compensate for thermal expansion of slate sheets or changes in the geometry of the frame. Tighten the bolts slightly on both sides.
9. It is not bad if rubber washers are installed under the metal washers. You can cut them yourself, or use faucet gaskets, or buy them at a hardware store. When drilling slate, we put a solid base under it.
10. We use a drill for concrete and perforation mode. In my arsenal, I found a Soviet-era drill with a victorious tip and a very sharp sharpening angle. Probably especially for slate, because it enters like butter.
11. Sew the sheets on the frame from top to bottom to tightly join them with the neck. And if we miss from below, it's not scary, you can dig out or add soil.
12. The construction of the frame of the composter provides for a minimum number of elements, due to which long sheets of slate bend in the middle of the partition. It was possible to fix the sheets with bolts with wide washers, connecting the adjacent edges of the sheets. These connections can be tightened even tighter. I refused to paint the slate. Firstly, it looks good as it is, and secondly, any outdoor coating is short-lived.
13. So our composter is ready. The second year confirms my calculations. Its walls turned out to be rigid, perfectly holding a large volume of working material. The height of the structure does not interfere with loading waste and collecting compost. During the year, the reception section was almost full. Then the grass mass gradually settles - and further loading of food waste in winter does not change the level of fullness. The second section is still empty. Wait and see.
DIY composter - Photo
DIY compost bin: reviews, opinions and advice
In boots on compost
Grass appeared on the earth much earlier than man. Over millions of years, it has changed and so adapted to the climate and all kinds of elements that it survived under the conditions of natural selection, and lives well to this day. And we are offered seeds grown in test tubes by cloning and in greenhouse conditions, to plant next to these powerful savages. The question is: what will happen to them? It seems to me that the bulk will not survive, but they are, oh, how expensive! Therefore, I believe that first you need to prepare the ground, which I am doing.
I put together a box and grow compost with an accelerated method.
In a box measuring 1 × 2.5 × 1 m, consisting of two compartments, I put branches at the very bottom (after cutting branches from trees), then I tamp the grass with a layer of 20-30 cm, I bring in two bags of manure (I have a horse manure), two bags of sawdust, then one bag of chicken manure, manure again, fill the remaining space with grass on top. I water all this abundantly, but not quickly. and within 2 hours to get thoroughly wet. I add EM preparations according to the instructions and cover with a foil in two or three layers.
Less than a month passed, the mass settled and sank below the sides. Putting on his boots, he tamped it down again and added one bag at a time, all of the above from the list, and chicken droppings - one bag for two compartments. And again he fell asleep with grass with a hill. I make holes with a sharpened stick or a crowbar through 30-40 cm holes, not reaching 1/3 to the bottom, water it again with the same solution and close it.
To connect plumbing fixtures to the water supply network, a flexible water pipe is used. It is in demand when connecting faucets, showers, toilets and other points of water intake, and greatly simplifies the installation process. Flexible hose is also used when installing gas equipment. It differs from similar devices for water in manufacturing technology and special safety requirements.
Characteristics and types
Flexible hose for connecting plumbing is a hose of different lengths made of non-toxic synthetic rubber. Due to the elasticity and softness of the material, it easily takes the desired position and allows installation in hard-to-reach places. To protect the flexible hose, the upper reinforcing layer in the form of a braid is designed, which is made of the following materials:
- Aluminum. Such models can withstand no more than +80 ° C and remain functional for 3 years. At high humidity, the aluminum braid is prone to rust.
- Of stainless steel. Thanks to this reinforcing layer, the service life of the flexible water hose is at least 10 years, and the maximum temperature of the transported medium is +95 ° C.
- Nylon. This braid is used for the manufacture of reinforced models that can withstand temperatures up to +110 ° C and are designed for intensive use for 15 years.
As fasteners, nut-nut and nut-union pairs are used, which are made of brass or stainless steel. Devices with different permissible temperatures differ in the color of the braid. The blue ones are used to connect to the cold water pipeline, and the red ones are used with hot water.
When choosing an eyeliner for water, you need to pay attention to its elasticity, reliability of fasteners and purpose. It is also mandatory to have a certificate that excludes the emission of toxic components by rubber during operation.
Features of gas connections
When connecting gas stoves, water heaters and other types of equipment, flexible hoses are also used. Unlike water models, they are yellow and do not pass environmental testing. End steel or aluminum reinforcement is used for fixation. There are the following types of devices for connecting gas appliances:
- PVC hoses reinforced with polyester thread;
- made of synthetic rubber with stainless steel braid;
- bellows made in the form of a corrugated stainless steel tube.

Holding "Santekhkomplekt" offers engineering equipment, fittings, plumbing and accessories for its connection to communications. The assortment is represented by products and materials from well-known foreign and domestic manufacturers. Discounts apply for bulk purchases, and the quality of products is confirmed by certificates of the established form. For informational support and assistance, a personal manager is assigned to each client. The ability to arrange delivery within Moscow and to other regions of the Russian Federation allows you to quickly receive the purchased goods without unnecessary hassle.
Drainage is an irrigation and drainage measure to remove excess groundwater.
If water does not leave the territory of the site for a long time, the soil gleies, if the shrubs and trees quickly disappear (soak), it is necessary to urgently take measures and drain the site.

Reasons for waterlogging
There are several reasons for waterlogging:
- clayey heavy soil structure with low permeability;
- the aquiclude in the form of gray-green and red-brown clays is located close to the surface;
- high groundwater table;
- man-made factors (construction of roads, pipelines, various objects) that impede natural drainage;
- violation of the water balance by the construction of irrigation systems;
- the landscape plot is located in a lowland, a ravine, a hollow. In this case, precipitation and water inflow from higher places play an important role.
What is the risk of excess moisture in the soil
You can see the results of this phenomenon yourself - trees and shrubs perish. Why is this happening?
- the oxygen content in the soil decreases and the carbon dioxide content increases, which leads to a violation of the air exchange processes, the water regime and the diet in the soil;
- oxygen starvation of the root-forming layer occurs, which leads to the death of plant roots;
- the intake of macro and microelements by plants (nitrogen, phosphorus, potassium, etc.) is disrupted, because excess water washes away the mobile forms of elements from the soil, and they become inaccessible for assimilation;
- there is an intensive breakdown of proteins and, accordingly, the processes of putrefaction are activated.
Plants can tell you what level the groundwater is at
Take a closer look at the flora of your site. The species inhabiting it will tell you at what depth the groundwater layers are located:
- top water - in this place it is best to dig a reservoir;
- at a depth of up to 0.5 m - marigold, horsetails, varieties of sedges - bubbly, holly, fox, Langsdorf reed grass grow;
- at a depth of 0.5 m to 1 m - meadowsweet, canary grass,;
- from 1 m to 1.5 m - favorable conditions for meadow fescue, bluegrass, mouse peas, ranks;
- from 1.5 m - wheatgrass, clover, wormwood, plantain.
What is important to know when planning the drainage of the site
Each group of plants has its own moisture needs:
- at a depth of groundwater from 0.5 to 1 m, vegetables and annual flowers can grow in high beds;
- the depth of the water layer up to 1.5 m is well tolerated by vegetables, cereals, annuals and perennials (flowers), ornamental and fruit and berry bushes, trees on a dwarf rootstock;
- if the groundwater is at a depth of more than 2 m, fruit trees can be grown;
- the optimum depth of groundwater for agriculture is from 3.5 m.
Do you need drainage of the site
Write down your observations at least for a while. You yourself can understand how much drainage is needed.
Maybe it makes sense to simply redirect melt and sedimentary water along a bypass channel, rather than letting them flow through your site?
Perhaps it is necessary to design and equip a storm drain and improve the composition of the soil and this will be enough?
Or is it worth making a drainage system only for fruit and ornamental trees?
The exact answer will be given to you by a specialist, whom we strongly recommend to call. But after reading this article, you will gain some awareness of the matter.
At the end of the technological and production tasks related to the arrangement of the sewerage system in an apartment building, industrial building, as well as in a private household, it is required to test the involved system by the forced spill method. This task was applied to identify possible defects or improper installation of the entire sewer part involved, and the test report for internal sewerage systems and gutters will be material evidence of the acceptance of the facility.

The visual check should be accompanied by the introduction into the certificate of testing of internal sewage systems and gutters according to SNIP, which is currently represented by the current regulations of the application of the D series, which corresponds to SP 73.13330.2012 "Internal sanitary-technical systems of the building", recently a new one has been applied updated working edition for SNiP 3.05.01-85.