Probably every motorist dreams. In this case, the side lights will become similar to those that are endowed with the headlights of a modern BMW model. You can make absolutely the same spectacular lights with your own hands, since our person has ingenuity and desire. Armed with wire cutters, metal saws, pliers and other common tools, everything can be quickly organized.
In order to make "angel eyes" with your own hands, you need to find a plexiglass bar and cut four blanks out of it. LEDs are mounted in them and cuts are cut out for every 5 mm. Self-made "eyes" are installed instead of standard side lights.
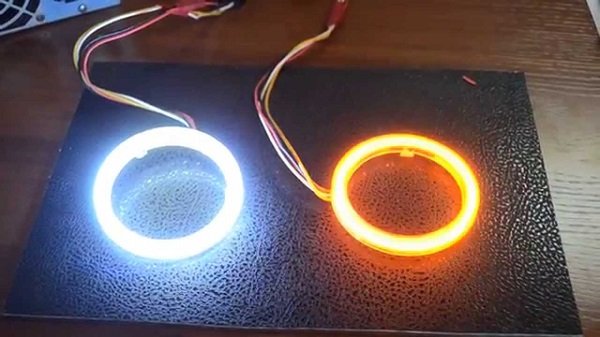
Parking lights from BMW
What are Angel Eyes? It turns out that this is just another strong point from which has not left indifferent any motorist in the world. But it is not worth selling your favorite "six" and saving up for BMW only because of the peculiar and original lights. What do you think?
You can do it differently. Take the side lights of this manufacturer for a sample and try to build something similar on your own.

It should be noted right away that, no matter how beautifully and effectively these components are made, they are not welcomed by the traffic police and can cause “unhealthy” interest in the latter. But still, if you decide to go for it and become the owner of a car with such "angel eyes", you should preferably have a car with round front optics. For example, a VAZ 2106 or a VAZ 21213 has such optics. In addition, it can be some model of a foreign car, for example, the same BMW, only the old version.
Preparing
Before, you need to arm yourself with tools and the necessary material. As mentioned above, it is necessary to have pliers, pliers, a metal cutter, a file, a drill and drill of the required size, a soldering iron or a hair dryer in stock. Also important is a special transparent plexiglass or plastic rod that would withstand high temperatures. Where can I find it? Auto tuning experts advise looking for such a bar in shops specializing in the sale of curtains and blinds. In addition, do not forget to take care of the presence of a large flat capacity for a plastic rod, a round can, electrical tape, one-volt LEDs (there should be 8 of them), 220 Ohm resistors and wires with connectors.
All of the above materials and tools will be easy to find and prepare. It is important to remember that the wells in the headlights are of different diameters, which means that our "angel eyes" must be of different circumferences.
For the rod, you will have to choose the right length, although a piece of thin hose is also suitable as a yardstick (we circle the circumference of the car headlight with it). We cut off the rod of the required length and heat it up in the prepared container with a soldering iron or hairdryer until it becomes soft. If the bar is made of plexiglass, then we place it in a container with hot water so that it becomes soft.
Now you need to take the pliers and take out the workpiece. We wrap a can of coffee or something else with a blank and wait until it cools down (photo below).

If you haven't found a jar, you can use a plate instead. In this case, it will look like this:

In order to make small "angel eyes", you need to wrap the rod around the lid of the can. The smaller the workpiece, the more difficult it is to work with. Be careful not to burn your fingers.
Now we are working on a blank, from which, after cooling down on the can, a ring was obtained. A kind of niche should be drilled at the ends of each workpiece, where the LED will be installed. You need to drill very carefully, preferably at a low speed of rotation of the drill, since the walls of the twig are very thin.
On the video - do-it-yourself "angel eyes":
Further, on its outer side, you will need to cut out a couple of dozen lines with a hacksaw or drill, but no deeper than a third of the circle. This is done so that the light of our "angel eyes" is radiant.
We need to fix the diodes now. You can do this as you like, but you should take into account the high coefficient of thermal expansion of the plexiglass rod. This means that the "eyes" need to leave some free space in the niche. We take and solder the resistors to the LED legs. Two diodes must be prepared on each.
Here's what we end up with:

Go ahead and solder the LEDs to the marker lamp, remembering that you need to solder to the plus. In no case should the polarity be reversed. And all connections must be insulated with a specially designed tape. Then check how everything works.
Now it's time to dismantle the headlights. Unfortunately, there is no way without it. Then we take it out and be sure to plug the holes. We install the prepared diodes on top so that they are less conspicuous.
In conclusion, I would like to note that this is a responsible business. Supplementing the car with home-made parts is, of course, good, but you need to do it very carefully so as not to confuse something, and this is especially true for elements and parts related to electricity.
To better understand how to make "angel eyes" on the headlights of your car with your own hands, we advise you to watch this video:
We hope that the article will help you, and you will succeed!
Angel Eyes is a popular tuning for headlights, decorating them, making them unique. It is used on different cars, be it the domestic auto industry or German models. At the same time, on each car, angel eyes look unique, distinguishing it from others.
However, the cost of such tuning is quite high if ordered from a car repair shop. And all would be fine, but the cost price is a penny. You can do it yourself. Therefore, we will make angel eyes with our own hands according to the instructions.
What is needed to create?
Some materials are needed to create Angel Eyes. Among them:
- four transparent plastic sticks (preferably plexiglass);
- LEDs of 3.5 volts, 2 for each stick;
- four 220 ohm resistors.
The sticks should not be hollow, because they will need to be heated and bent in the future. A hollow tube will not be able to withstand this load and will lose its shape.
Tools and auxiliary items are also needed. Among them:
- insulating tape;
- pliers;
- soldering iron;
- sealant;
- drill.
And also something that can be used to heat the tubes to achieve their plasticity. You also need to find a rounded object that roughly coincides in diameter with the headlights, on which eyes will be placed in the future.
Making LED rings
First you need to make rings of sticks, which will be the main one for the angel eyes. You need to pick up a rounded object like a can, its diameter should match the diameter of the headlights. After that, you need to heat the stick and give it the shape of a ring, wrapping it around the object. You can heat it in any way, but in a domestic environment, an oven or a blow dryer will do.
Important! It is worth twisting the stick very carefully, because it bends under the slightest load. If deep fingerprints or extra bends remain on it, then this will be noticeable on ready-made angel eyes.
As a result, 4 rings came out. Minor irregularities can be corrected by slightly heating the wrong area, straightening it with your hands. Perfectly even rings are needed so that they normally transmit light.
After that, you need to cut the rings so as to open them.
Next, you need to take the LEDs and check their size with the drill. Having picked up the appropriate drill (a little more is possible), you need to drill holes along the edges of the rings so that they look along them. Then insert the LEDs there to compare the dimensions.

After that, you need to connect the two LEDs to each other and attach a resistor to them. We insert the LEDs into the holes and measure the required amount of wire. Then we fasten the LEDs in series with each other, and at the input we hook a resistor for resistance. We check the resulting circuit for operability by connecting a conventional battery as a power source.
After that, you need to fix the LEDs in the ring itself. We drip hot glue into the drilled hole and insert the LED there.
Important! Do not feel sorry for hot glue, you need a tight contact between the LED and the ring. This will provide better light transmission.
As a result, the rings are ready as a base for the angel eyes. But if empty blanks were used, then they lack one important nuance - "eyelashes" that create a unique effect from these headlights.
How to create the notches

Eyelashes are created by means of notches - marks around the entire perimeter of the ring. It is necessary to process the front side of the angel eyes so that they distort the light. To do this, you can take an ordinary knife, and then cut the notches alternately at a distance of 1 cm from each other. This is enough to achieve a visual effect, closer it will simply merge.
We make the depth of the notches about 0.5 mm. Again, shallower depth will simply not affect the propagation of light, so you need to work out everything qualitatively. At this stage, all work is done for measurements, because this will affect the final appearance of the eyelashes. A minor defect can significantly affect the finished product.
Advice! It is worth measuring the location of the notches in advance with a pencil or pen. This will make it more convenient to create them, and the error will be significantly reduced.
Headlight preparation
Before installing the Angel Eyes, you need to prepare the headlights. It is necessary to carefully disassemble them, and then clean the glass and reflective surface from any debris and dirt. In this case, do not use cleaning agents, because they can destroy the surface of the reflector. It is strongly discouraged to use even alcohol, because the surface here is extremely delicate.
During cleaning, do not touch the reflector with your hands. This will leave traces that will be difficult to clean up later. The surface of the reflector is very delicate in relation to dirt, this should be taken into account when disassembling and further working with it.
Advice! When disassembling the headlights, mark the glass with numbers. This will identify the sides and types of glass.
Headlamp glasses are thoroughly washed from dust and dirt. It is necessary to increase their adhesion, because in the future a ring of angel eyes will be attached to them.
Installing rings in the headlights
It's time to directly install the rings in the headlights of the car. It is necessary to take the finished rings along with the wires, pass the wires to the power supply. We glue the angel eyes themselves on the glass, using hot melt glue for this. It can take quite a long time to solidify, but do not rush to put the glass back in place. Let the rings fit securely.
Important! Installation notches must point outward. Otherwise, there will be no such effect of angelic eyes.
On the electrical side, the wires are being threaded along with the old headlight wires. You can connect angel eyes in different ways, but often they are connected as a replacement for dimensions. For this, the following actions are carried out:
- The plug is disconnected. They are disconnected from turns and dimensions. After that, we connect both "dads" to the "mom" from the turns. As a result, there remains a free "mother" of dimensions.
- We connect the lenses. Alternately, pairs of angelic eyes are connected to an empty "mother". The minus from the wire can be attached under the signal mounts. As a result, the size button is assigned to the Angel Eyes.
This option practically does not affect the functionality of the car. Now the dimensions are turned on along with the turns, and the eyes work in place of the dimensions.
Angel eyes on the VAZ 2106

These lenses are perfect for old cars, including VAZ. The technology for their creation is no different. It is only necessary to choose the correct diameter of the rings. It will also be difficult to supply power to the LEDs, but this depends on the specific vehicle model.
The installation practically does not differ from the one described earlier. It takes place in several stages:
- preparation of lenses;
- removing glass;
- cleaning;
- hot-melt glue mount;
- power connection;
- installation of glass.
The functionality is no different from the lenses on more modern cars, there is only one difference. Often, modern cars have additional power contacts for such devices.
When installed on a VAZ 2106, you can face one problem - fixed glasses. They are securely fixed in place, nothing can remove them. There is only one way out - to break the glass and buy a new one. Although this is an extra cost, the cost of a new glass for such a car is quite low.
Angel Eyes look great on headlights from a VAZ 2106. However, it is recommended to make a larger number of notches, since the factory glass distorts visibility, which is why the effect of notches is almost invisible.
Alternative to LED tubes

As an alternative to plastic rings, you can use LED strip. It is on its basis that the original angel eyes are created, so it is most like these lenses. To create them you need:
- Purchase a thin LED strip with a small pitch between LEDs.
- Make a ring on the basis of flexible plastic with a diameter of the headlight.
- Cut the tape to the required length and stick it on the ring.
- Then connect the batteries.
The result is an LED ring that has a completely different effect. Its installation is carried out in the same way, no corrections are needed here. Such angel eyes are very popular and are industrially produced, but their correct creation and connection is rather difficult without experience. In addition, they do not have such a scattering effect, so to some they may seem worse than angelic eyes from plastic pipes.
Advice! It is worth picking up a ribbon with a step of 1 cm. So the effect will be similar to the original angel eyes.
Checking the result

After connecting, homemade angel eyes practically do not differ from the original ones. They look great on any car, visually distinguishing it from other cars. The appearance of such lenses is really attractive, and with a high-quality assembly, you will not see the flaws that were made when creating this product.
Angel Eyes work great on a size-based basis, dramatically changing the look of a car at night.
The creation of such a product does not take much time, and the costs for it are penny. The most difficult thing is to give the correct shape to the ring and connect the power, and everyone can do the rest of the tasks. Therefore, creating your own angel eyes allows you to make your car better and significantly save at a car dealership, where they ask for several thousand rubles for this.
And for a more detailed explanation of the technology for creating angel eyes and their work, you can watch this video. Here's how to create this device from a simple piece of plastic:
Are you concerned about the question of how to customize the headlights on your car yourself? One of the most popular ways to personalize automotive optics is to DIY angel eyes. On the roads, you can often find cars with headlights surrounded by glowing rings. These are the so-called "angel eyes", the famous invention of the designers of the BMW company. The original angel eyes are made from neon tubes in the form of a ring in the amount of four pieces, which are placed inside the headlight.
The mechanism also provides for the presence of an ignition unit. Angel eyes installed in the optics of a car give a bright, beautiful glow. The eyes can be used as DRL daytime running lights or as dimensions. In addition, they can be installed on any car and any headlights. They can be of different diameters and sizes and have many different glow colors. Thanks to them, your car will become more stylish and even more visible on the road.
Naturally, you can buy ready-made headlights with angel eyes and not bother with making and installing yourself. But on the other hand, creating a beautiful headlight tuning yourself is also not difficult - it is a simple and quick way to decorate your car. Alternatively, such eyes can be made for almost any car, for example, cars of the family VAZ or Priora... Believe me, making angel eyes with your own hands is not so difficult!
How to make LED angel eyes with your own hands
The dimensions of the headlights are easy to make from transparent plastic sticks. The rings will be attached using conventional sealant. LEDs can be used as elements that will glow. LED Angel Eyes are easy to make at home. One ring requires two LEDs. In addition, resistors - 2 KΩ will be used. We give the plastic stick the shape of a ring.
This can be done easily with a round object.
For example, a bank, its size is selected depending on the size of the ring that will need to be obtained in the end. To give the stick the shape of a ring, it must be heated; this can be done in the oven or using an ordinary building hair dryer. After the plastic stick is warmed up, it must be screwed onto the jar. This should be done very neat... As a result, we get four rings. If the rings come out uneven, and the ends do not want to be located opposite each other, then you need to reheat the ring and make it completely even.
Then we need LEDs. We measure their length and diameter, and drill holes in both ends of the tube-ring to fit their size. The legs of the diodes should be shortened so that their length is no more than 5 mm from the semiconductor body. Next, you should solder the "legs" from the diodes to each other. The minus must be soldered to the minus, plus to the plus. The leg with a plus sign is in a wider thickening. The next step is to solder the wires to the legs. It is recommended to take colored ones so that later it is easy to determine their polarity.
Further at a distance of 10-15 cm cut off the wire, then you need to solder the ballast resistance to the wire. We solder the wire to the second "leg" of the resistor. Fix the diodes with clear nail polish. One drop of nail polish is enough to drip onto each end. Then we leave the varnish, wait until it dries. The varnish is needed in order to completely fix the diodes, it will fill all the pores, ensuring absolute contact between the plastic stick and the diode. With absolute contact, the light will spread much more evenly.
One of the most popular car lamps when replacing burned out is. Read our article about the possibility of replacing such lamps with LEDs with a long service life.
You may be interested in the classification information. Find out all about the different types of light sources that surround us.
Cilia effect
Many, making angel eyes with your own hands want to give them a beautiful cilia effect. To do this, you need to make notches along the entire length of the ring. The notches are made at a distance of 1 centimeter from each other. The depth of the notch should be about 0.5 cm.
Installing Angel Eyes

It remains only to place the angel eyes in the headlight. We disassemble it, remove the glass. Installing angel eyes is a big problem, because you need to disassemble the headlight without damage. The final assembly must be carried out especially carefully. With the help of cotton swabs, remove the debris that has accumulated there from the surface of the reflector.
In the process of making angel eyes with your own hands, do not touch the surface of the reflector, you cannot use chemical compounds to process it, otherwise the surface of the reflective layer may be damaged... Sealant should be applied to the glass, and then the ring should be installed. We install the ring so that the LEDs are located at the top. We lay the wires in the headlight hollow.
The notches on the ring should point outward and not toward the lamp. Apply silicone between the glass and the headlight. Smear all the pores thoroughly. The sealant dries for half an hour. After it dries, you need to turn on the headlights and evaluate the result. Let's connect the power to the Angel Eyes. Put the headlights in place, attach the wires to the headlight wiring harness, carefully hide them under the hood. Disconnect the plug of the wires from the dimensions and turn signals. We will connect the so-called “Dads” of dimensions and turn signals to each other and connect the turn signals to the “Mom”. The "mom" of dimensions will be free, and we will connect the "plus" from the peephole to her. We will put our "minus" under the mountings from the turn signals.
The moment has come when, when the dimensions are turned on, we will see the angel eyes, which we made with our own hands. Now you know how to make angel eyes yourself.
Bi-xenon Angel Eyes Lenses
Experts and car enthusiasts have known for a long time that the benefits of xenon light are best manifested with lenses on the vehicle. In addition, the car enthusiast and his car are guaranteed comfortable and safe driving with bi-xenon lenses.
These lenses will help to avoid dazzling oncoming cars and ensure the formation of the correct beam of light.
Bi-xenon lenses with angel eyes look the most impressive, stylish and modern. These lenses are suitable for all types of car lamp bases. Installation in a regular base is provided and there is no need to cut the reflector. Often, for installation, it is enough just to remove the outer glass of the headlight and place a lens there.
Angel eyes today

Angel Eyes are an element of car tuning that never ceases to delight motorists. If body kits, interior tuning, spoilers in various configurations can become annoying and "boring" over time, then alternative optics is a pleasant exception. In the early 2000s, the first cars with this tuning element were just beginning to appear on the roads, and very soon there were more and more fans in the angelic eyes. The reasons are clear. After all, this is not just a beautiful accessory, they are also an excellent means of ensuring traffic safety.
Conventional optics, especially high beams, although visible from afar on the roads, dazzle oncoming cars, often creating serious discomfort. This alternative optics is 100% perfect for all tasks, but it does not cause any discomfort to other drivers. There is another advantage of angel eyes - this is low electricity consumption... All this and, of course, the aesthetic characteristics give rise to a huge demand among consumers for this type of tuning.
DIY angel eyes photo
Below are photos on the topic of the article "How to make angel eyes with your own hands." To open the gallery of photos, just click on the thumbnail of the image.
I met a huge number of motorists who were unhappy with the installed angelic eyes, like BMWs. The second common name is "LED rings." Some shone faintly, others quickly faded out, others had a blue tint of light.
At the end of the article there will be a lot of photos of the installation on popular cars 2110, 2114, Priora, Kalina, Mazda, BMW.

- 1. The difference between good and bad
- 2. How to do it yourself
- 3. Installation
- 4. Installation examples
Distinguishing good from bad

Angel eyes of BMW, BMW serve as a standard, of course. At first, motorists will see enough of high-quality cars from expensive cars, then they want to put themselves inexpensive and prettier ones. But in the end, they get a large set of disadvantages, because they think that different models are no different. Buy the cheapest junk, on the weakest and lowest quality diodes, get the appropriate result. This is also facilitated by stores that increase prices up to 5 times.
Little LED wisdom. If you want to buy a chocolate bar, and there is only enough money for a piece of gamna, then it is better to save up for a chocolate bar.
There is no need to buy cheap ones, they will quickly fail. To replace it with others, you will have to disassemble and assemble the headlight every time. If you don't do it yourself, then this work also costs decent money. A new pack of headlight sealant will be required each time. After calculating all the costs, you will see that it is better to put good ones for a long time.

Ready-made sets of LED angel eyes for a particular car brand, for example, Mazda 3, are sold on Aliexpress. The price for such products is quite high, 3-5 times higher, they write like a copy of the branded ones. But as practice shows, the quality is low, the assembly is poor, and they break down quickly. It is often necessary to advise readers on how to proceed in such a case. There are usually two options, replacing multiple LEDs or replacing the entire LED ring.

To make it clearer, look at the difference in the characteristics of Chinese and branded LEDs 5050, 5630, 5730, 3528. The Chinese put a crystal in a standard case 3-4 times weaker, and 10 times worse in quality. It is difficult to distinguish good from low-quality ones, they are outwardly the same, it is necessary to calculate the power of one LED. Many online stores cannot resist the temptation to sell a cheap product worth 100 rubles for 1000 rubles.

How to do it yourself

Readers of my site are interested in how to make angel eyes with their own hands, after the current reading of articles on the Internet. According to statistics, 99% are faced with this for the first time and mostly want to save money. They do not know the standards for luminous intensity and other parameters; therefore, a not very good result is obtained.

As a light source, you can use an end (corner) LED strip or an ordinary flat one.
On the Internet, the most popular option for making LED angel eyes with your own hands from transparent plexiglass or plastic. Shallow recesses are applied to it, and 0.2 or 0.5 Watt LEDs are inserted from the ends. As you can imagine, the power is too low, the light will scatter forward and inward, and decrease inside the transparent material. Such an LED ring will be fully visible only at night, the brightness is at the level of the usual size. Even powerful LED diodes of 1W, 3W, 5W will not help.

In order not to break the textolite, first cut out the circle and then remove the middle. Make the conductive tracks and it remains to solder the LED. This method is quite costly in terms of time and materials. For comparison, the cheapest diode ring for 20 LEDs costs from 80 rubles on Aliexpress, shipping is already included with the price.
For it to shine at the level of a prestigious car, a power of 5-10 watts and a luminous flux of 300 lumens are required, and the light must only go forward.

Another way is to use a flexible light tube, which is most often inserted into headlights as side lights. The tube can be cut and made a ring, it will keep its shape due to contact with the reflector. The two-color tube will be able to perform the function of dimensions and turn signals.
Installation

Do-it-yourself installation of angel eyes is quite difficult, skill is required, sometimes good nerves. For installation, disassembly of each headlight is required. Most of the headlights are assembled on a sealant, which softens when heated with a building hair dryer. Much less common on a sealant that is rubber. It does not melt or soften in any way; you have to carefully pick it out and cut it for several hours. One headlamp can take from 1 to 5 hours. The first time it took me about 10 hours to parse. Due to inexperience, you can spoil the presentation in the area of \ u200b \ u200bthe junction of the glass and the case.
Then the diameter of the seat is measured and the angel eyes are installed. Degrease the gluing points and fix the parts. The kit often comes with double-sided tape for installation, but I don't trust him. The halogen low beam bulb in the headlight gets very hot and affects this tape.

In the reverse order, assemble the headlamp using a special rubber sealant. Assemble so that you can disassemble without consequences next time. If you collect it badly, moisture will get inside, the headlight will sweat, the wires will rot.

There are several connection options in the headlamp:
- inclusion together with dimensions;
- instead of side lights;
- together with DRL;
- inclusion of two-color along with a turn signal;
If the connection to the dimensions does not suit you, to control the on and off, you can use the controller for the daytime running lights of the DRL. Search for "DRL controller". To connect RGB, single-color schemes are suitable, you just have to look for a place to place the RGB control unit.
If you are not confident in your abilities and do not have enough experience, it is better to contact a specialist auto electrician.


Installation examples
The leaders in installation are domestic cars VAZ 2114, VAZ 2110, Priora. Among foreign cars BMW, Mazda 3, BMW E39, Ford Focus. They are also actively installed on motor vehicles, scooters, motorcycles, ATVs.
..


VAZ 2114

Among domestic cars, the second place in popularity is occupied by angel eyes on the VAZ 2114, the first place is shared by Priors and VAZ 2106, which have a round reflector shape.


VAZ 2110


Kalina VAZ


Mazda 3, 6 Mazda 3, 6

Among imported cars, angel eyes for Mazda 3, Mazda 3. They look especially gorgeous on the Mazda 6, which has 4 circles in each headlight. It will be interesting to look at RGB LED rings, which will complement the dimensions and turn signal.


Priora VAZ 2170

The most popular option in Russia is the Prioru Angel Eyes. The shape of the headlights is well suited for such tuning, the reflectors are round in shape.


Ford Focus, Kuga


An article about the "Angel Eyes" car headlights tuning element, as well as about their installation. At the end of the article - a video about a simple way of making this device with your own hands.

Contents of the review:
Currently, tuning headlights with your own hands is perhaps the easiest option for improving the exterior of the car. Increasingly popular in the driving environment began to use "angel eyes". They are luminous rings that are embedded in the optics of the car. The pioneers in this area were BMW, and many motorists who liked the innovation followed them.
What are "angel eyes" for?

"Angel Eyes" have become an integral part of modern tuning. When switched on, they can act as parking lights that can highlight the car. On an impenetrable night, this can significantly increase the level of security. "Angel Eyes" consume an insignificant amount of electricity - they are not able to provoke a quick discharge of the car battery.
"Angel eyes" and their color

Colors of "angel eyes", and in what cases they can be installed on the car:
- yellow, red, green, orange, purple - allowed to be used as tuning on show cars;
- white, blue - can be used in everyday use, as a backlight and dimensions.
Plexiglas products

Practically everyone can make "angel eyes" from plexiglass. To do this, you need to prepare:
- 8 LEDs at 3.5V;
- 8 resistors with a nominal value of 2200 Ohm;
- Sheet plexiglass or round rods from it.
The resulting blanks must be rounded. For this, it is advisable to use a grinder. But you can do this work by hand, using a piece of sandpaper. In the end, you should end up with three round rods, not just machined, but also polished.
Next, the workpieces need to be bent, giving them the shape of a headlight. For this purpose, it is best to use a building hair dryer. In advance, you should find a round object, the diameter of which coincides with the size of the headlights. The pre-heated blocks must be bent over a stencil and allowed to cool down so that they take the desired shape. All surplus must be removed.
At the ends of the blanks with a drill, holes must be made into which diodes will be inserted. They are connected to the wires that supply power to the side lights. The positive terminal of the diode is connected to the positive wire, and the negative terminal to the negative one. Ballast resistors are soldered at a distance of about 15 cm. You can use nail polish to attach the diodes to the holes.
All connections must be properly insulated. If there is a desire to make the "angel eyes" radiant, then cuts are applied along the entire length of the rods, the depth of which should not exceed 1/3 of their diameter.
Using LED strip

Rings with two LEDs have significant disadvantages. Firstly, it is their openness. Secondly, they have insufficient brightness, which does not allow them to be used as navigation lights. These disadvantages can be easily avoided if LEDs are used for the manufacture of "angel eyes". For this you will need:
- A small sheet of plexiglass. Its thickness should not be less than 5 mm, but the use of material thicker than 7 mm is also impractical.
- Cloth for a hacksaw for metal.
- Ballerina - this is what is commonly called a device that allows you to cut out round holes of large diameter.
- A tape that has a large number of LEDs per 1 meter of length.
- Diffusion film.
- Transparent glue.
- aluminum heat-resistant tape.
- Soldering iron with solder.
- Wires with terminals.
- Heat-shrink tubing.
The size of the cut out workpiece must be checked again by attaching it to the headlight. If there is a need for this, then the workpiece needs to be corrected. Only then can the inner contour be cut.
To achieve a better glow, the outer part of the ring is pasted over with a diffusing film. If there is none, then the surface can simply be made matte by processing it with fine sandpaper.
The tape is now installed. True, before that, wires are soldered to it. The place of soldering must be filled with silicone sealant. Also, before installation, it makes sense to check the operation of the structure by connecting it to a 12 V power supply.
Which is better to use, LED or CCFL
We do not have an unequivocal answer to this question. Therefore, we provide lists of the advantages and disadvantages of each of them.

The luminous element in Angel eyes CCFL is a luminous neon tube, which is covered with a protective plastic casing. Their pluses:
- The light is distributed evenly over the entire ring.
- Does not respond to vibrations and shocks.
- The emitted light is softer than that of diode counterparts.
- Relative cheapness.
- The power consumption is very low.
- Starting is carried out through inverters (ignition units), which fail before the end of the life of the backlight ring itself (20,000 hours).
- To achieve the maximum brightness of the glow, it takes about 2-3 minutes after connecting.
- The brightness is significantly lower than that of LED.
- The service life is half as much as for diode ones.
The main advantages of this version of the "angel eyes" include the following:
- The brightness of the glow is so high that they are perfectly visible during the day and they can be used as navigation lights.
- The service life exceeds 50,000 hours.
- Not susceptible to vibration and shock.
- Low energy consumption.
- The light is distributed evenly.
- It works stably both at -40 ° С and + 100 ° С.
Installing "Angel Eyes" yourself

How to install these products yourself, I would like to know many car owners who like to modernize the appearance of the car. But high-quality tuning in the absence of proper optics cannot be considered as such.
Let's look at the process using the example of installing neon tubes. First you need to start preparing the seat in the headlight. To do this, you have to remove the headlight.
After that, you will need to dismantle the glass. This should be done extremely carefully. After removing the glass, the grooves in which it was attached are very thoroughly cleaned of sealant residues. Gasoline helps very well in this case.
Long-term operation of the headlight leads to the accumulation of microscopic debris and dirt in its interior space. They should be removed with an exceptionally soft cloth or cotton swabs. Doing this with unprotected hands is strictly prohibited.
When installing, take into account the aesthetic component. To "angel eyes" perfectly match the color of the car, you need to know some of the nuances. So, for example, for light cars it is better to choose neon ones. If this is not possible, then LED ones will do, but they should emit a bluish color. But the rich white color of the LEDs is perfect for dark and black cars.
After disassembling and cleaning the headlights, you can mount the "angel eyes" in it. This is done quite simply. A colorless sealant is applied to the inside of the ring. After that, the product is superimposed on the surface of the headlamp reflector and is well pressed against it. Connect the device to the car network only after the sealant is completely dry.
The assembled device must be checked for operability, for which power is connected to it. Only then can the headlight be assembled. For this, a layer of colorless sealant is applied to the groove, on which the glass is planted. Again, you should wait until the sealant has completely risen, and only after that the headlight can be put in place and connected.
A simple way to make "angel eyes" with your own hands - in the video: