Radiators are essential elements of any heating system, which perform their function due to the release of heat circulating in the device heated coolant. Modern radiators are unified devices with two lower and two upper technological openings (nozzles) for connecting pipes and an air vent.
The choice of the optimal scheme for connecting the heating battery, the place for installation and adherence to the installation rules allow you to achieve maximum efficiency in the operation of the heater for a long time.
In this article:
Basic connection methods
Regardless of the type of material (cast iron, steel, aluminum, bimetal) and the type of heating system used (with natural or forced circulation, one-pipe or two-pipe), there are several basic schemes for their connection. Each of these schemes has its own characteristics and can be applied depending on specific conditions.
Heating radiator connection types:
- diagonal;
- lateral;
- bottom.
Let's consider in more detail their features, advantages and disadvantages.
Diagonal (transverse)
With a diagonal scheme, the supply pipe is connected to one of the upper radiator nozzles, and the outlet pipe is connected to one of the lower ones located on the opposite side of the device. As a result, the incoming heated coolant is evenly distributed over the entire volume of the inner surface of the radiator, providing maximum heat transfer.
In this case, heat loss does not exceed 2%.

Photo of a diagonal connection diagram
It is believed that this arrangement ensures the most efficient battery performance... The rated power of the device, indicated by the manufacturer in the product passport, is tied precisely to the diagonal type of connection.
Such a scheme is most in demand with a large number of radiator sections (more than 10-12), which ensures uniform heating of the entire area of the device.
The disadvantages include:
- additional pipe flow;
- the complexity and inconvenience of installation;
- unaesthetic appearance.
In multi-storey buildings, this scheme is practically not used.
Lateral (one-sided)
The supply pipe is connected to the upper nozzle of the device, and the discharge pipe is connected to the lower nozzle on the same side, i.e. both pipes are connected to one of the extreme sections of the radiator.
This provides a fairly efficient and uniform heating of all sections with low heat losses (up to 2-5%).
The lateral connection scheme is the most common, including in multi-storey buildings with a central heating system, due to the minimum consumption of materials and ease of installation with a sufficiently high heat transfer from the devices.
The greatest effect is achieved when connecting batteries with 10-15 sections, as well as in apartment buildings with parallel connection of heaters.
With an increase in the number of sections, the thermal efficiency decreases sharply due to uneven heating of the other side of the radiator.

Side battery connection
The delivery pipe will join one of the lower nozzles, and the discharge pipe will join the second lower nozzle on the opposite side.
With this connection option, the upper and lower parts of the device may heat up unevenly, and heat loss can be up to 15%. However, this is more often the case for systems in apartment buildings with a large number of heating devices and long pipe lengths. For autonomous systems of private houses, such heat loss is practically not noticeable.

Saddle diagram
The most common saddle scheme used for private one-story houses when pipes are laid under the floor or hidden inside it.
This allows a significant improvement in the external design of the radiator, making the pipes almost invisible.
A separate type of the lower circuit is the vertical connection, which is used for certain types of heating devices of a special design (and radiators with lower connections).

Vertical diagram for radiators with bottom connections
For such radiators, the inlet and outlet pipes are located next to each other in the lower part of the device. For the connection, a special locking and connecting unit is used.
- Benefits: Material savings and improved design due to the invisibility of the piping to be connected.
- Disadvantages: uneven heating and a decrease in the efficiency of heat transfer.
How to properly connect the battery with your own hands

All connection methods
Regardless of the type of connection, it is advisable to install shut-off valves on the inlet and outlet pipes.
This will allow you to easily disconnect and dismantle the radiator in the event of a breakdown without stopping the operation of the entire system to drain the coolant.
Instead of a shut-off valve on the supply pipe you can install a thermostat with manual or automatic control, which will allow you to adjust the power of the heating device by changing the amount of heated coolant supplied to it.
This will provide automatic maintenance of the desired temperature in the room.
Read how the wireless thermostat works in this.
According to many experts involved in the installation of heating systems, it is better to install the thermostat not on the inlet, but on the outlet pipe.
As practice shows, this makes it possible to improve the heat transfer of the heating device and to increase the efficiency of regulating its operation by limiting the outflow of the cooled coolant from the radiator.
Video with connection examples
To remove air from the internal space of the radiator, an air vent (Mayevsky valve) is installed on one of its upper branch pipes. An air vent will increase the heat dissipation efficiency of the appliance.
Which connection is better - summary.
For autonomous heating systems of private houses, it will be preferable to use a side or bottom connection scheme, since this will reduce the cost of materials, simplify installation and provide a better aesthetic appearance with sufficiently efficient operation of heating devices.
Required tools and materials

The radiator connection kit includes:
- brackets for fixing the device;
- transition nuts;
- stubs;
- air vent (Mayevsky crane);
- quick-disconnect couplings of the "American" type and shut-off valves (in separate configurations).
If these items are missing, you need to buy a universal connection kit or purchase these parts separately.
A more specific list of materials and tools depends on the type of heating pipes. We considered which pipes are better for heating.
Most often used:
- metal;
- metal-plastic;
- polypropylene.
Connection to metal pipes can be done with:
- welding - the most reliable connection is obtained, which has a fairly aesthetic appearance. However, this will require a gas welding machine and skills in handling it;
- on threaded connections - you will need steel grips, couplings, tees or angles of the required diameter, plumbing flax, a grinder or a hacksaw for metal, pipe and ring wrenches.

To connect the battery to metal-plastic pipes you will need special adapters, chrome or brass elbows and tees.
From the tool you will need:
- pipe cutter;
- calibration;
- press tongs;
- ring or sliding wrenches;
- pipe bender.
When connected to polypropylene pipes you need transition couplings and / or fittings, a special device for welding pipes, a cutter or pipe cutter, ring wrenches.
Where better to install a radiator
The best place is the window opening, which is the main source of heat loss in the room. With this arrangement, the heater creates a heat curtain that prevents the penetration of cold outside air into the room.
You also need to find additional heating points in corner rooms with outside walls.
For good circulation of heated air and maximum heat dissipation of the battery stick to these rules:
- the distance from the lower edge of the window opening to the battery is not less than 8-10 cm;
- the distance from the floor level to the battery is at least 10-12 cm;
- the distance between the battery case and the wall is not less than 2-5 cm;
- the width of the battery surface must be at least 50% of the total width of the window opening.

If you are just going to purchase a radiator, we recommend that you immediately select its width and height in such a way as to ensure the required minimum distances when installing it in your chosen place.
It should also be borne in mind that the use of decorative grilles can reduce heat transfer by 10-20%. Therefore, their use is justified if the radiator heats up too much. In this case, the grille will not only improve the appearance of the heater, but also reduce its excessive heat transfer.
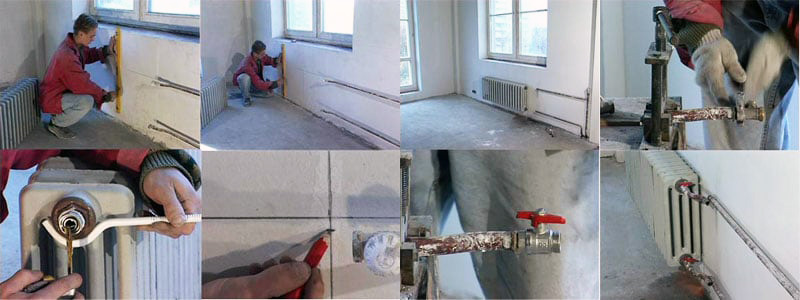
Installation procedure
Installation is carried out in the following sequence:
- When installing a new radiator, the plastic wrapping film is not removed from it until all work is completed, so as not to accidentally stain or scratch its surface.
- The heating line is blocked and the old radiator is dismantled (in case of its replacement).
- Holes for the battery mounting brackets are marked and drilled on the wall, observing the minimum required distances from the window sill, floor and wall. Then the brackets themselves are fixed to the wall.
- Adapter nuts, plugs, air vent, shut-off valves and / or thermostats are installed on the device, depending on the selected connection scheme. At the same time, to ensure tightness, all threaded connections are wrapped with plumbing linen before assembly and additionally coated with silicone sealant.
- The device is placed on the mounting brackets and aligned strictly horizontally using a level.
- The pipelines of the heating system are connected to it using quick-disconnect couplings or adapters with their thorough sealing.
- The system is pressurized and a test supply of the coolant is carried out. All connections are checked for leaks of working fluid.
Compliance with all the rules for placement and installation will ensure reliable and efficient operation of both the radiator itself and the entire heating system.
The maximum return from the heating system in a private house will be in the event that the owner chooses radiators that are optimally suitable in terms of power and other characteristics, connect them according to a correctly drawn up scheme, and ensure the appropriate operation and maintenance of the entire system. The schemes developed by specialists in a private house are aimed precisely at selecting the optimal installation option for any architectural solutions of housing. The general scheme for piping and connecting heating devices, a boiler and shut-off valves for a one- or two-story building may look like this:
Features of installation of heating radiators
Each private house is an individual and unique structure, therefore, a specific scheme for connecting heating batteries in a private house is drawn up based on the realities of housing and its architecture. Violation of the installation can lead to the fact that the radiators will warm up unevenly, air locks will appear, the movement of the coolant will be difficult, and the efficiency of the boiler and energy consumption will be minimized.
The scheme can be drawn up independently, having at least some experience in home and construction work, but it is easier and more efficient to contact the appropriate company, allowing the organization to take responsibility for the quality work of heating in your home. When developing and implementing a pipe layout and installation of all communications, you need to pay attention to the following points:
- Check the correspondence of the theoretical installation of pipes and radiators to the real characteristics of the purchased devices and materials, using the calculations of calculations of similar schemes;
- Ensure correct and consistent connection of system components - pipes, shut-off, control and regulating valves, a heating boiler and pumps;
- Select materials, assemblies and parts that are best suited for the selected scheme.

The next stage is the choice of the location and the connection diagram of the radiators in accordance with the existing SNiP:
- There should be a distance of ≥ 10-12 cm between the floor and the bottom edge of the battery;
- There must be a distance of ≥ 8-10 cm between the window sill and the upper edge of the radiator;
- There must be a distance of ≥ 2 cm between the rear wall of the radiator and the wall of the house;
- It is undesirable to place radiators in niches or cover them with decorative screens.
Important: If you neglect these simple rules, then the heat transfer coefficient of the radiator will significantly decrease, causing disturbances in the operation of the entire heating system.

The optimal place for installing radiators in any room is under the window, and if there is no window, next to the door. That is, the heat source must stop the outgoing flows of cold air. If there are several windows in the room, then, if possible, it is recommended to place radiators under each window, connecting them in series. If the room is corner, then several radiators should also be installed along the cold wall. Such a scheme for connecting heating in a private house will not be much more expensive, but it will provide heat to any room, even one that is not suitable for heating.
Modern heating schemes imply that each radiator has an option for manual or automatic heating control - valves or valves, automatic thermostats. These mechanisms allow you to adjust the heat transfer of an individual radiator in manual or automatic mode. 
Types of piping
It is recommended to connect batteries or radiators in one of two options - a single-circuit (one-pipe) and two-circuit (two-pipe) radiator connection scheme. Heating along one circuit is common in high-rise buildings, since hot water is first supplied to them upstairs, and after bypassing all radiators, it is supplied to the boiler through a return pipe (return pipe). Such a solution does not oblige the use of a circulation pump, since water, when supplied from above, itself creates pressure to advance the coolant. If the boiler is located below the upper floor, then a circulation pump must be connected. 
Advantages of a single-circuit piping scheme:
- Cheap parts and components of the circuit, low labor costs, a small amount of materials used;
- Simple installation and maintenance of the system;
- Possibility of combining with other heating systems - "warm floor" and non-standard heating devices - registers or homemade batteries;
- Installation in rooms with any architecture and geometry;
- Aesthetic minimalism in design.
Disadvantages:
- Complex hydraulic and thermal calculations;
- The pressure and heat transfer on a separate radiator can be adjusted, but at the same time, changes in heat transfer will affect other heating devices;
- The need to create high pressure in the pipes - natural or forced.
Important: When a single-circuit system is operating, sometimes difficulties arise with the free circulation of hot water or antifreeze, which are completely solved by including a pump in the circuit for forced circulation of the coolant.

Connecting batteries through two pipes in a house is based on the principle of parallel connection of all batteries in the house. Thus, the supply pipe is not structurally connected with the return pipe of cooled water to the system, but together the pipes are combined only at the end point.
Advantages of a two-circuit circuit:
- It is possible to install automatic thermostats for each radiator;
- Convenient maintenance and good maintainability of the system - any work can be carried out on a local site without turning off all the heating in the house;
Disadvantages:
- Installation of a two-pipe circuit is more expensive, the assembly and adjustment time for all elements and assemblies is higher than that of a single-circuit heating circuit.

Radiator connection solutions
In addition to existing and proven solutions for pipe distribution options for heating, several working schemes have been developed and implemented on how to correctly include radiators in the scheme. These are the following solutions:
Lateral or one-sided connection of radiators in the system: the hot water supply pipe and the return pipe of the heating medium are connected on one side of the radiator. Such a connection solves the problem of equal heating of each section of the radiator, the cost of purchasing units and parts is minimal, the volume of the coolant in the system also tends to a minimum. Such a scheme is often used in high-rise buildings, where there is always a large number of batteries or radiators. If the radiator in the side circuit is multi-section, then the far sections will warm up much weaker, therefore the optimal number of sections for any radiator or battery option is 12. If this solution does not work, it is better to turn on the device according to a different circuit - with a bottom or diagonal connection. 
A diagonal or cross connection is suitable for heating appliances with more than 12 sections. A diagonal diagram is called because the supply pipe is supplied from above, and the return pipe is supplied from below, with both pipes located at opposite ends of the battery. Here, the supply pipe, as in the previous connection diagram, is connected from above, and the return pipe from below, but they are supplied from opposite sides of the heating battery. When organizing such a connection, the device warms up evenly throughout all sections, which increases the heat transfer throughout the system. 
The bottom connection or "Leningradka" is suitable for heating systems with hidden pipes - in walls or under floors. Both pipes - both the supply and return - are connected to the radiator from below, to the sections opposite to the radiator. There is only one drawback of such a scheme - high heat losses, which can reach 12-14%. Heat leakage can be minimized by including air valves in the circuit, which will remove air from the pipes, increasing the heat output of the radiator. So that the radiator with such a connection can be repaired and serviced, the supply and return are equipped with special valves, and for regulation - with an automatic thermostat, which cuts into the coolant supply pipe. 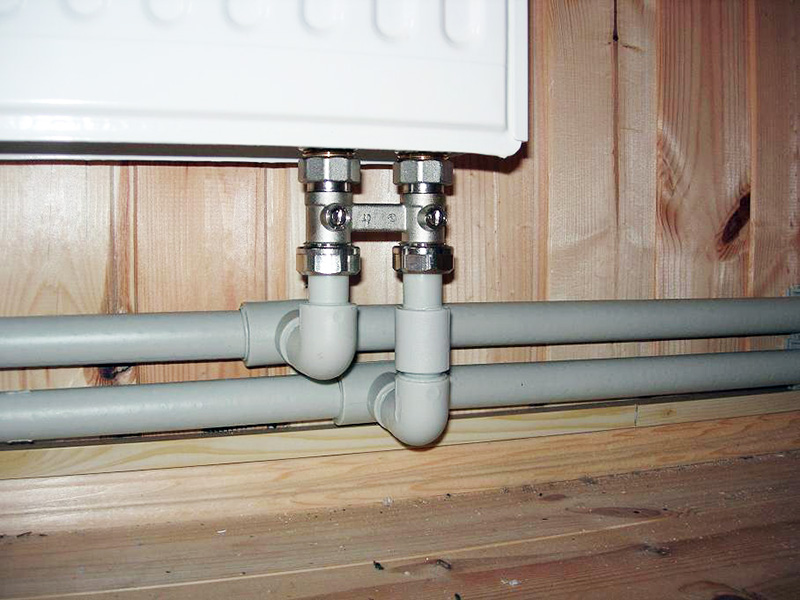
Installation of radiators
The heating system in your home can be developed and connected on your own, without spending money on the services of professionals. Moreover, the connection diagrams are simple and do not require the use of special tools and expensive materials. It is only important to follow the technology and sequence of operations. If all connections are sealed and assembled according to the scheme, then there will be no problems with the start-up and subsequent operation of heating, and the cost of materials and work will be minimal. 
Installation procedure for a new radiator:
- Before dismantling the old radiator and installing a new device, turn off the heating with the main valve on the boiler;
- The attachment points of the new radiator are marked. Usually, the radiator is hung on the brackets included in the kit, which are attached to the wall with dowels;
- The radiator is assembled - the adapters supplied with the radiator are screwed into the mounting holes on the FUM tape or tow.
Important: there should be four adapters for connecting a radiator: two with a left thread, and two with a right thread.
- The threaded holes in the radiators, which will not be used for connection, are closed: one with a Mayevsky tap, the rest with locking caps. FUM or tow is wound: on the right - clockwise, on the left - counterclockwise;
- Ball valves are connected to the pipe connection points;
- The radiator is fixed in place with brackets, and connects to the pipes - do not forget to use a reel for sealing;
- The system is being pressurized, commissioning is being carried out.
Before connecting a battery or heating radiator to a system organized according to any of the presented scheme, you should select the type of piping and the scheme for connecting pipes and radiators. Work on piping, assembling the circuit and connecting radiators can be done by hand, correlating your own requirements for building codes and installation technology. 
- Work in the opposite direction - the supply pipe is confused in places with the return. The error is visible during commissioning - radiators do not warm up well, air jams form immediately;
- Radiators are covered with decorative grilles and screens that impede access to the thermostat. The movement of warm air is limited, the regulator can turn off the boiler with poorly heated radiators, which in general leads to a 20% loss of heat transfer. Therefore, the screens should be as lattice as possible, and not deaf. Without valves, the batteries will heat up unevenly;
- Placing the thermostat head in an upright position will cause interruptions in its operation. Correcting the situation is simple - just change the position of the head.

The feeling of home comfort depends primarily on the microclimate in the premises, on how warm and cozy it is. A well-thought-out heating system ensures the correct uniform supply of heat to all rooms of the house. And taking into account modern realities, it should not only show high efficiency when heating a home, but also remain economical at the same time.
To fulfill these conditions, it is necessary not only to decide on the type of heating radiators, but also to choose a piping scheme around the house, as well as the type of battery connection to the system. When designing yourself, you need to rely only on the advice and recommendations of industry experts. And the authoritative opinion of a neighbor who offers to do everything in the same way as at his house is not very suitable.
Home heating design includes the following steps:
- Selecting the type of pipe routing.
- The choice of the location of the radiators.
- The choice of the type of their connection.
Varieties of heating systems
The diagram for connecting radiators to the heating system depends on the type of piping wiring performed according to one-pipe or two-pipe schemes... Regardless of the type of wiring, the system consists of horizontal lines and vertical risers.
There is a third option for connecting radiators - radial or collector. The peculiarity of this type is that all the batteries are not closed by a single circuit; a separate pipe element is led to each individual heating device. The disadvantage of this type of connection is that a lot of pipes are required, and the installation is carried out directly under the concrete screed. However, there is also a significant advantage - the aesthetics of the installed heating and underfloor heating in the room.
One pipe system
With this type of wiring all heating elements are connected in series with one pipeline... The circulation of the heated and cooled coolant occurs in a ring, alternately supplied to each radiator. 
Sequential wiring of this type requires the correct selection of the pipe diameter, otherwise the entire system will be ineffective.
A single-pipe scheme can be effective in an apartment building, where the coolant is first pumped under pressure to the upper floors, after which it naturally flows down the radiators to the boiler room. The circulation can take place without the use of pumps. The diagram also shows good efficiency in small houses with a total length of the heating system of no more than 30 meters and the number of batteries up to 5 units.
Advantages:
- low cost;
- a small amount of materials used;
- suitable for absolutely any type of radiator;
- use for underfloor heating systems is possible.
Disadvantages:
- complexity in design and installation;
- the inability to adjust the heat supply to individual heating devices;
- high proportion of heat losses;
- low efficiency at low coolant pressure;
- the likelihood of problems with fluid circulation and stagnation.
- radiators are installed in ascending order of the number of their sections;
- an increase in their number in the room;
- the first in the ring should be the premises where the greatest heat loss occurs.
Two-pipe
With two-pipe wiring two pipelines are used: for hot and cold heat carrier... According to the first, the heated water enters the radiators, and according to the second, it is taken from them back to the gas boiler. The batteries are connected in parallel. So each heating element heats up evenly, this ensures the same temperature and uniform heating in all rooms. 
Two-pipe wiring is considered the most optimal, since it provides minimal heat loss. At the same time, its installation is more expensive, since the volume of pipes being laid increases.
Advantages:
- low heat loss;
- the ability to adjust the temperature on each individual radiator;
- the possibility of using automated regulators;
- uniform heating of all rooms;
- ease of maintenance and correction of errors, if any, during the design.
Disadvantages:
- increased cost due to a large amount of material;
- duration of installation.
It should be noted that although the amount of pipe used increases, its diameter is smaller in comparison with the one-pipe scheme. Accordingly, the cost of installing a two-pipe system will be higher, but the difference may not be as significant.
Radiator locations
When we have decided on the type of pipe routing, we proceed to the next stage - we select the location of the heating elements.
Regardless of whether your radiator is bimetallic, aluminum or cast iron, it should be located directly under the window... This creates a thermal barrier that prevents cold air currents. In addition, the heat from the battery heats the glass, which prevents condensation from forming on them.
Installation standards for heating elements:
- height from the floor to the bottom edge of the battery - 8-12 cm;
- height from its upper edge to the lower part of the window sill - from 10 cm;
- the distance from the wall to the ribs of the battery - from 2 cm;
- radiator width - at least 70% of the width of the window opening.

Violation of these standards can lead to a decrease in the efficiency of the heating system: 
In rooms with a large number of windows, heating elements should be installed under each window opening. In corner rooms, their number is also increased.
Radiator connection options
As mentioned earlier, the heating system coolant circulates naturally or forcibly by installing a water pump next to the boiler.
Most often, preference is given to systems with natural circulation of water, since it is she who acts as a coolant in the overwhelming majority of cases. This view is especially relevant for regions with frequent power outages. After all, staying in the winter with cold batteries is not fun at all.
Therefore, before choosing the option for connecting the heating element, you need to understand how the water will circulate. There are several schemes for supplying coolant to radiators, which ensure high efficiency of the general heating system.
Lower or saddle
This option has another name - "Leningrad". It is used when laying the pipeline under the floor or in the walls. The ends of the pipes of the system are led to the bottom of the radiator, where the inlet and outlet pipes for connection are provided.
Radiators designed for the lower connection type have special ball valves and air valves. The former allow you to easily dismantle the battery if necessary, while the latter allow you to avoid heat loss during the formation of air jams. It is worth noting that losses can be up to 12%.
A saddle connection can be used, for example, in an apartment for interior design, when it is necessary to hide all the unaesthetic elements of the heating system. Not recommended for natural circulation of the coolant.
Lateral
Lateral, or one-way, connection differs in the type of placement of the supply line:

Diagonal
The best option for the best heat dissipation. The coolant is supplied from one side of the radiator, passes through all the fins, gives off heat as much as possible and is discharged into the branch pipe from the opposite side. The diagonal circuit allows the use of batteries with a large number of sections, which warm up evenly and provide better heating of the premises.
It is used for both one-pipe and two-pipe junction. The type of circulation does not matter.
Each of the schemes differs in the amount of heat transfer during operation: 
As a conclusion, it should be said that two-pipe wiring is the most optimal option for a heating system in a private house, even taking into account the need for additional costs for materials. It is effective and will allow fine temperature control in different rooms. In addition, twin-tube systems allow hydraulic balance to be achieved, which prevents the possibility of water hammer.
One of the reasons for the insufficiently good operation of the heating system in the house is an illiterate installation of heating batteries, an incorrect calculation of the number of sections in a battery, or an incorrect location of radiators in the room and throughout the building. Therefore, the technical characteristics of the battery indicated in the passport will not be met. Correct installation of heating radiators involves the use of several schemes, and you need to know them before choosing the most optimal one.
How the radiator works
Structurally, any radiator is an assembly of heating sections combined into one unit (items No. 1 and No. 2 in the figure below) by a manifold. There can be as many such sections in one radiator, but usually the maximum number is 10-12 pieces. Sections can be added or removed as they are threaded together. Some models of radiators are made non-separable, which complicates their maintenance-free operation.
- 1 - top collector;
- 2 - a collector from the bottom;
- 3 - vertical sectional channels in the radiator;
- 4 - a radiator housing that acts as a heat exchanger.
Vertical channels are connected to each other (position No. 4), and hot water flows through them. Both collectors have an input and output (in the diagram, for the collector on top, these are B1 and B2, for the collector below, these are B3 and B4). 
The heated water supply from the heat generator is connected to the inlet, the return pipe ("return") is connected to the outlet. Unnecessary holes are closed with threaded plugs. When buying a new radiator, all the necessary parts for assembly, including plugs, are included in the basic configuration. It is the correct installation of heating radiators and the connection diagram of the collectors that determine the efficiency of the heating system. A Mayevsky crane is usually installed on one free exit, which is also included in the kit. An effective installation of heating batteries includes two main schemes - 1-pipe and 2-pipe methods for connecting heating radiators. The choice of the scheme depends on how the supply and "return" will be connected to the system. Within the framework of the chosen scheme, the connection of pipes with a coolant can be upper, lower, diagonal or lateral.
Note: The figure shows a simplified diagram of the heat sink design. The specific model will differ in design features.
One-pipe heating system
Such schemes for connecting heating radiators in a private house are considered the simplest and are used even in multi-apartment high-rise buildings, despite their low efficiency. The popularity of the one-pipe scheme is due to its cheapness and simple installation. Therefore, connecting the batteries according to this principle is one route that runs from the supply to the "return" connected to the boiler. For one floor, a one-pipe heating connection diagram in a private house is as follows: 
It is clear from the figure that the return pipe of the previous battery is the supply pipe of the next radiator. There is only one drawback of such a scheme - in each next radiator the temperature will be lower than in the previous one. In addition to the horizontal connection of the hot water pipe, there is also a vertical scheme, and this is also a good connection. Such a scheme is usually implemented in an apartment building, it is mounted in two versions - "a" and "b": 
- According to the "a" scheme, the pipe with the coolant is supplied from above, and the water is directed downward.
- According to the scheme "b", the bottom connection of heating radiators is realized.
Option "b" is used to save materials, since this scheme has the main disadvantage - the temperature on each next radiator drops even more than in option "a".
Two-pipe scheme
Before connecting a heating radiator, you need to study the 2-pipe version, which is considered more efficient, simpler and capable of adjusting the temperature in each heating device. But connecting a heating radiator to a two-pipe system will require more consumption of building materials and higher labor costs. 
The plus of the implementation of such a scheme is obvious - in each radiator, the temperature is maintained as efficiently as possible, at a constant and stable level, and the location and distance of the heating devices from the heat generator does not matter. The two-pipe connection of the heating battery is also carried out in multi-apartment high-rise buildings. The supply and "return" are muffled from above, and the connection of two vertical collectors running in parallel is obtained.
In practice, other two-pipe heating schemes are also used - collector, it is also "radial" or "star". But such complex wiring is used mainly for the installation of hidden wiring, for example, under the floor. From the figure it is clear that it is necessary first to assemble the collector itself, and from it to dissolve the heating pipes throughout the premises of the house. 
Before connecting the heating battery correctly, you need to understand which scheme will be most effective for a particular room and its geometry. Often, batteries are connected in two ways - 1-pipe and 2-pipe - even in the same room.
Diagonal radiator connection with top flow
Option "A" (see figure below) is considered the most effective. If the batteries are connected according to this option, then in the calculations of the heating system for the circuit, a correction factor of 1 is introduced, and for other connection options - corrections in one direction or another. The heated water passes through the pipe line without hindrance, the pipes are filled to 100%, there is no air in them. As a result, the heat exchanger heats up evenly over the entire area, which leads to maximum heat transfer to the room. 
- A - diagonal connection of heating radiators with top flow;
- B - one-sided scheme with top feed.
Option "B" is traditionally implemented in a 1-pipe scheme. This scheme was most widespread when connecting risers with a coolant supply from above in high-rise buildings or when connecting pipes with a supply from below on descending heating lines.
On the positive side: the circuit works as efficiently as possible if there are few sections in the battery.
Negative point: with a large number of heat exchange sections, the pressure in the system may not be enough to push water along the uppermost ring. Therefore, water can flow along the near vertical sections of the battery, which will provoke stagnation in certain sections of the heating main.
The approximate number of radiator sections per room - table:
| Brand | Heat output, | Room area, m 2 (ceiling height 2.7 m) | ||||||||||||||||
| 8,0 | 10,0 | 12,0 | 14,0 | 16,0 | 18,0 | 20,0 | 22,0 | 24,0 | 26,0 | 28,0 | 30,0 | 32,0 | 34,0 | 36,0 | 38,0 | 40,0 | ||
| Required number of sections | ||||||||||||||||||
| Aluminum radiator A350 | 0,14 | b | 7 | 8 | 9 | 12 | 13 | 14 | 15 | 16 | 17 | 18 | 19 | 20 | 21 | 22 | 23 | 24 |
| Radiator made of aluminum A500 | 0,186 | 5 | 6 | 7 | 8 | 10 | 11 | 12 | 13 | 14 | 15 | 16 | 17 | 18 | 19 | 20 | 21 | 22 |
| S500 aluminum radiator | 0,201 | 4 | 5 | b | 7 | 9 | 10 | 11 | 12 | 13 | 14 | 15 | 16 | 17 | 18 | 19 | 20 | 21 |
| Bimetal radiator L350 | 0,14 | 7 | 8 | 9 | 10 | 12 | 13 | 14 | 15 | 16 | 17 | 18 | 19 | 20 | 21 | 22 | 23 | 24 |
| Bimetal radiator L500 | 0,19 | b | 7 | 8 | 9 | AND | 12 | 13 | 14 | 15 | 16 | 17 | 18 | 19 | 20 | 21 | 22 | 23 |
Even the standard sizes of the radiator will give heat losses of up to 5%. And with an increased number of sections, heat losses on each radiator can reach 10%. Therefore, when connecting heating radiators of the piping circuit, it is better to install batteries according to the first method - "A".
Radiator connection options
Bottom water supply with one-sided pipe connection

The circuit has a low efficiency, but with the lower connection of the coolant supply pipe, it is used very often, even in high-rise buildings. The option justifies itself by the simplicity of installation, economical consumption of building materials and low labor costs.
Cons of connecting with this option:
- The appearance of a zone of stagnant water, which will lead to cooling of the farthest radiator.
- Heat transfer losses can rise up to 20-25%.
Double-sided bottom feed

The option is used both in private houses and in multi-apartment high-rises. This scheme allows you to mask the pipe line in the wall or under the floor. The efficiency is low, but it is precisely because of the possibility of covert pipe laying that the option is popular.
Disadvantages:
- Heat transfer losses can rise up to 10-15%.
- The upper sections of the battery sections will warm up less due to the counterflows of the cooled coolant, since hot water will tend to move along the lower collector.
Bottom connection diagonally

The most ineffective installation of heating batteries, but there may be cases of forced installation of just such a scheme.
Disadvantages:
- As mentioned above, the pressure in the line may not be enough to warm up the upper rings of the heating system as much as possible.
- In addition, resistance and temperature differences play a role. Therefore, if a radiator with a larger than the calculated number of sections is installed, a stagnation zone may appear under the coolant return pipe.
- Heat losses when installing heating according to a similar scheme are ≤ 20%.
Top connection on both sides

Before connecting the radiator correctly, you must understand that this option is ineffective. Disadvantages:
- The coolant is supplied through the upper collector, which means that it will not flow down, and the lower part of the battery will always be cold.
- This option is also used in exceptional cases when there are no other solutions. Connecting high radiators according to this scheme can be considered more or less effective.
Optimizing Battery Connections - Options
With the existing piping, you don't want to change it, but often this option is more profitable than replacing the radiator or changing the entire battery connection diagram in the system. It is possible to optimize the connection of pipes directly connected to the battery if the piping of the heating radiator is changed geometrically (see figure below): 
Companies that manufacture heating batteries and radiators almost always produce models designed for connection according to different tie-in options, but the diagonal option is considered the most optimal connection solution, at least in Moscow, which is indicated as the most efficient device in the passport. Also, the operating instructions (and possibly on the device itself) indicate the correct direction of flow and other useful parameters. If it is not possible to purchase the above radiator, heat transfer optimization is carried out using a valve. 
Such a valve is mounted between the sections, overlapping the intersection nipple. A heating pipe is inserted inside the valve, supplying or removing heat carrier - this depends on the selected battery connection option.
Another option for optimizing heat transfer is a flow extension. This is a special pipe Ø 16 mm, which is inserted into the upper manifold of the radiator. If the Ø 16 mm thread does not fit the radiator or the battery, then you can buy an extension cord with a different thread diameter or connect it to the battery through an adapter sleeve. 
An extension cord is most effective when connected diagonally to the top of the battery in a single-sided version. In this version of the connection, the coolant enters the upper remote edge of the battery through the cavity of the extension cord and from there moves diagonally to the lower opposite end of the radiator. Thus, a variant of the coolant is implemented diagonally from top to bottom, in which all sections of the heater are evenly heated.
Video about the operation of a 1-pipe heating system
Video about the operation of a 2-pipe heating system
Location of the radiator in the room
Even the most expensive radiator will not give the desired effect if it is incorrectly connected or incorrectly installed on the wall. Standard mounting options for heating radiators are under window openings, next to entrance doorways, in places where there are permanent drafts. But there are also standard requirements regarding the mounting of heating batteries on walls and other surfaces:
- Under the windowsill. There is always a place under it for a battery, since other interior items are simply not needed there. All drafts from the window are minimized by the heat flow from the radiator. With this arrangement of the device, its total length should not exceed ¾ the width of the entire window. If this rule is followed, the heat output will be maximized. The radiator should be mounted in the center of the window, the tolerance to the left or right should not be more than 2 cm.
- There must be a height distance of at least 10 cm between the window sill and the radiator (or at least ¾ of the thickness of the radiator), but not more than 15 cm, otherwise the plane of the window sill will retain the entire heat flow or not reflect it when mounted high.
- The distance between the battery and the wall on which it is mounted should not be less than 2 cm. A smaller distance provokes the accumulation of debris and dust, which, in turn, reduces the heat transfer of the device.
These requirements are not enshrined in GOST, therefore they are recommendatory. Unless there are other recommendations from the manufacturer, it is best to take these tips into account when attaching any radiator. But most often the manufacturer in the radiator passport indicates the optimal scheme for its installation on the wall, which should be used.
Conclusion
After considering the main options for connecting heating devices to the heating system, their main disadvantages, as well as the advantages of each connection option, clearly emerge. In addition, the considered options for optimizing heat transfer can be applied to any scheme, and recommendations for mounting radiators are always needed when installing a heating system in an apartment or in a private house.
The efficiency of the heating system primarily depends on the correct choice of the heating battery connection scheme. Ideal if, with low fuel consumption, radiators are able to generate the maximum amount of heat. In the material further, we will talk about what are the schemes for connecting heating radiators in an apartment building, what is the peculiarity of each of them, and also what factors should be taken into account when choosing a specific option.
Factors affecting radiator efficiency
The main requirements for a heating system are, of course, its efficiency and economy. Therefore, its design must be approached thoughtfully so as not to miss all sorts of subtleties and features of a particular living space. If you do not have sufficient skills to create a competent project, it is better to entrust this work to specialists who have already proven themselves and have positive feedback from clients. You should not rely on the advice of friends who recommend certain methods of connecting radiators, since in each case the initial conditions will be different. Simply put, what suits one person may not necessarily suit another.
Nevertheless, if you still want to deal with piping to heating radiators on your own, pay attention to the following factors:
- the size of the radiators and their heat output;
- placement of heating devices inside the house;
- connection diagram.

The modern consumer can choose from a wide variety of models of heating devices - these are mounted radiators made of various materials, and baseboard or floor convectors. The difference between them lies not only in size and appearance, but also in the methods of supply, as well as the degree of heat transfer. All these factors will affect the choice of options for connecting heating radiators.
Depending on the size of the heated room, the presence or absence of an insulating layer on the outer walls of the building, power, as well as the type of connection recommended by the manufacturer of radiators, the number and dimensions of such devices will differ.
As a rule, radiators are placed under windows or in the walls between them, if the windows are at a great distance from each other, as well as in the corners or along the blank wall of the room, in the bathroom, hallway, pantry, and often on the stairwells of apartment buildings.
To direct heat energy from the radiator into the room, it is advisable to attach a special reflective screen between the device and the wall. Such a screen can be made of any heat-reflecting foil material - for example, penofol, isospan, or any other.

Before connecting the heating battery to the heating system, pay attention to some features of its installation:
- within the same dwelling, the level of placement of all batteries must be the same;
- the ribs on the convectors must be directed vertically;
- the middle of the radiator must coincide with the center point of the window or can be shifted 2 cm to the right or left;
- the total length of the battery should be 75% of the width of the window opening;
- the distance from the window sill to the radiator must be at least 5 cm, and there must be at least 6 cm of the gap between the device and the floor. It is best to leave 10-12 cm.
Please note that not only the heat transfer of the battery, but also the level of heat loss will depend on the correct choice of methods for connecting heating radiators in an apartment building.
It is not uncommon for apartment owners to assemble and connect the heating system, following the recommendations of their acquaintances. In this case, the result turns out to be much worse than expected. This means that during the installation process, mistakes were made, the power of the devices is not enough to heat a particular room, or the scheme for connecting heating pipes to batteries is inappropriate for this house.
Differences Between Basic Battery Connections
All possible types of connecting heating radiators differ in the type of pipe routing. It can consist of one or two pipes. In turn, each of the options assumes division into systems with vertical risers or horizontal highways. Horizontal wiring of the heating system in an apartment building is often used, and it has proven itself well.
Based on which version of the piping to the radiators was chosen, the diagram of their connection will directly depend. In heating systems with one-pipe and two-pipe circuits, the lower, lateral and diagonal method of connecting radiators is used. Whichever option you choose, the main thing is that enough heat gets into the room for high-quality heating.

The described types of pipe routing are referred to as a tee connection system. However, there is another variety - this is a collector circuit, or beam wiring. When using it, the heating circuit is laid to each radiator separately. In this regard, collector types of battery connections have a higher cost, since a lot of pipes are required to implement such a connection. In addition, they will pass through the entire room. However, usually in such cases, the heating circuit is laid in the floor and does not spoil the interior of the room.
Despite the fact that the described collector connection scheme assumes the presence of a large number of pipes, it is increasingly used during the design of heating systems. In particular, this type of radiator connection is used to create a water "warm floor". It is used as an additional source of heat, or as the main one - it all depends on the project.
One-pipe scheme
A single-pipe heating system is called, in which all radiators, without exception, are connected to one pipeline. In this case, the heated coolant at the inlet and cooled down on the return flow moves along the same pipe, gradually passing through all the heating devices. In this case, it is very important that the internal section of the pipe is sufficient to fulfill its main function. Otherwise, all heating will be ineffective.
A heating system with a one-pipe circuit has certain pros and cons. It would be wrong to believe that such a system can significantly reduce the cost of laying pipes and installing heating devices. The fact is that the system will function effectively only if it is correctly connected, taking into account a large number of subtleties. Otherwise, she will not be able to heat the apartment properly.

Saving money when arranging a one-pipe heating system does take place, but only in the case of using a vertical supply riser. In particular, in five-story buildings, this type of wiring is often practiced in order to save materials. In this case, the heated coolant is fed up through the main riser, where it is distributed along all the other risers. Hot water in the circuit gradually passes through the radiators on each floor, starting from the top.
As the coolant reaches the lower floors, its temperature gradually decreases. To compensate for the temperature difference, radiators with a larger area are installed on the lower floors. Another feature of a one-pipe heating system is that it is recommended to install bypasses on all radiators. They allow the batteries to be easily removed in the event of a repair, without shutting down the entire system.
If heating with a single-pipe circuit is made according to a scheme with horizontal wiring, the movement of the coolant can be associated or dead-end. Such a system has proven itself in pipelines up to 30 m long. In this case, the number of connected radiators can be 4-5 pieces.
Two-pipe heating systems
Inside the two-pipe circuit, the coolant flows through two separate pipelines. One of them is used for the supply flow with hot heating medium, and the other is used for the return flow with cooled water, which moves towards the heating tank. Thus, when installing heating radiators with a bottom connection or any other type of tie-in, all the batteries warm up evenly, since they receive water of approximately the same temperature.
It is worth noting that a two-pipe circuit when connecting batteries with a lower connection, as well as when using other schemes, is the most acceptable. The fact is that this type of connection provides a minimum amount of heat loss. The water circulation scheme can be either associated or dead-end.

Please note that in the presence of a two-pipe wiring, it is possible to adjust the thermal performance of the used radiators.
Some private home owners believe that projects with two-pipe radiator connections are much more expensive as more pipes are required to complete them. However, if you look in more detail, it turns out that their cost is not much higher than when arranging one-pipe systems.
The fact is that a one-pipe system assumes the presence of pipes with a large cross-section and a large-sized radiator. At the same time, the price of thinner pipes, which are required for a two-pipe system, is much lower. In addition, in the end, unnecessary costs will pay off due to better circulation of the coolant and minimal heat loss.
With a two-pipe system, several options are used for how to connect aluminum radiators. The connection can be diagonal, side or bottom. In this case, the use of vertical and horizontal joints is allowed. In terms of efficiency, a diagonal connection is considered the best option. At the same time, heat is evenly distributed over all heating devices with minimal losses.
The lateral, or one-sided, connection method is used with equal success in one-pipe and two-pipe wiring. Its main difference is that the supply and return circuits cut into one side of the radiator.
Lateral connection is often used in apartment buildings with vertical delivery pipes. Please note that before connecting a radiator with side connection, a bypass and a tap must be installed on it. This will allow the battery to be freely removed for flushing, painting or replacement without shutting down the entire system.
It is noteworthy that the efficiency of one-sided insertion is maximum only for batteries of 5-6 sections. If the length of the radiator is much longer, with such a connection there will be significant heat loss.
Features of the version with lower piping
As a rule, the connection of a radiator with a lower connection is carried out in cases where unpresentable heating pipes must be hidden in the floor or in the wall so as not to disturb the interior of the room.
On sale you can find a large number of heating devices in which manufacturers provide a lower supply to heating radiators. They are available in a variety of sizes and configurations. At the same time, in order not to damage the battery, it is worth looking at the product passport, where the method for connecting a particular model of equipment is spelled out. Ball valves are usually provided in the battery connection point, which allow it to be removed if necessary. Thus, even without experience in such work, using the instructions, you can connect bimetallic heating radiators with a bottom connection.

The circulation of water inside many modern radiators with bottom connections is the same as with diagonal connections. This effect is achieved due to an obstacle located inside the radiator, which ensures the passage of water throughout the heater. After that, the cooled coolant enters the return circuit.
Please note that in heating systems with natural circulation, the bottom connection of the radiators is undesirable. Nevertheless, significant heat losses from such a supply scheme can be compensated by an increase in the thermal power of the batteries.
Diagonal connection
As we have already noted, the diagonal method of connecting radiators is distinguished by the least heat loss. With this scheme, the hot coolant enters from one side of the radiator, passes through all sections, and then exits through the pipe from the opposite side. This type of connection is suitable for both one- and two-pipe heating systems.

Diagonal connection of radiators can be performed in 2 versions:
- The hot flow of the coolant enters the upper hole of the radiator, and then, having passed through all the sections, leaves the side lower hole on the opposite side.
- The coolant enters the radiator through the bottom hole from one side and flows out from the opposite side from the top.
Connecting in a diagonal way is advisable in cases where the batteries consist of a large number of sections - from 12 or more.
Natural and forced circulation of the coolant
It is worth noting that the method of piping pipes to radiators will also depend on how the coolant circulates inside the heating circuit. There are two types of circulation - natural and forced.
The natural circulation of the liquid inside the heating circuit is achieved through the application of physical laws, while there is no need to install additional equipment. It is possible only when using water as a heat carrier. If any antifreeze is used, it will not be able to circulate freely through the pipes.
Heating with natural circulation includes a boiler for heating water, an expansion tank, 2 pipes for supply and return, as well as radiators. In this case, the operating boiler gradually heats up the water, which expands and moves along the riser, passing through all the radiators in the system. Then the already cooled water flows back into the boiler by gravity.

To ensure the free movement of water, horizontal pipes are mounted with a slight slope to the direction of movement of the coolant. A natural circulation heating system is self-regulating, as the amount of water changes depending on its temperature. When the water is heated, the circulating pressure increases, which ensures uniform heating of the room.
In systems with natural circulation of liquid, it is possible to install a radiator with a bottom connection, subject to a two-pipe connection, as well as use a scheme with an upper distribution in a one- and two-pipe circuit. As a rule, this type of circulation is carried out only in small houses.

Note that the batteries must have air drains through which air pockets can be removed. Alternatively, the risers can be equipped with automatic air vents. It is advisable to place the heating boiler below the level of the heated room, for example, in the basement.
If the area of the house exceeds 100 m 2, then the method of circulation of the coolant must be forced. In this case, it will be necessary to install a special circulation pump, which will ensure the movement of antifreeze or water along the circuit. The pump power depends on the size of the house.
The circulation pump can be installed both on the supply and return pipes. It is very important to install automatic drains at the top of the pipeline or provide Mayevsky taps on each radiator in order to manually remove air locks.
The use of a circulation pump is justified both in one- and two-pipe systems with a vertical and horizontal type of radiator connection.
Why is it important to correctly connect heating radiators
Whichever method of connection and type of radiator you choose, it is very important to carry out competent calculations and correctly install the equipment. At the same time, it is important to take into account the characteristics of a particular room in order to choose the best option. Then the system will be as efficient as possible and will avoid significant heat losses in the future.
If you want to assemble a heating system in a large expensive mansion, it is better to entrust the design to specialists.
For houses of a small area, you can cope with the choice of the wiring diagram and the installation of batteries yourself. You just need to consider the quality of a particular connection scheme and study the features of the installation work.
Please note that piping and radiators must be made of the same material. For example, plastic pipes should not be connected to cast iron batteries, as this is fraught with trouble.
Thus, provided that the features of a particular house are taken into account, the connection of heating radiators can be done independently. A well-chosen scheme for piping pipes to radiators will allow you to minimize heat loss so that heating devices can work with maximum efficiency.