The construction of a summer shower for a summer residence is not complete without questions related to the choice of material and determination of the size of the structure. In addition, you want the building to be heated. This will allow you to swim on cold days, when the water in the tank does not have time to warm up from the sun. An important issue is the organization of drainage and discharge of dirty water. Today we will look at how to build an outdoor shower with our own hands, and we will try to touch on all the questions of interest.
A country shower is so simple that it does not require a detailed diagram. Usually they withstand the standard dimensions of the booth 1000x1000x2200 mm. It is impossible to build a booth below, since part of the height will be taken by a wooden pallet, plus a watering can overhead. But it is advisable to individually select the width and depth of the structure according to the physique of the owners. For example, an obese person in a small booth will be cramped, so the size will have to be increased.

Drawing of a simple summer shower for a summer residence
If you decide to cultivate the building, build a dressing room with a dressing room, install benches and a table in it, drawings will already be needed here. Draw what you want to build, specify all dimensions. Consider the following points when drawing up a detailed diagram:

Wooden shower cubicle
Wooden booth construction is the most common option due to its ease of construction. Wood is an environmentally friendly material, easy to process. Its only drawback is susceptibility to moisture and bugs, so it requires additional processing. To build a wooden shower for a summer residence, you will need boards and beams, preferably from coniferous trees. You can, of course, use oak or larch. These types of wood are more durable, but more difficult to process. Having decided on the material, you get to work:
- Since we are building a wooden shower, the frame will be made of wood. The main load on the racks will be created by the water tank. If its volume is about 200 liters, then the main posts must be installed from a bar with a section of 100x100 mm. To fix the door, install additional posts made of timber with a section of 50x50 mm. The distance between them is equal to the width of the doors themselves with the door frame.
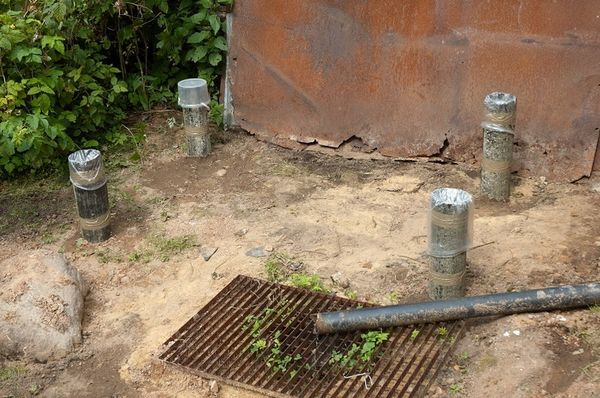
- Dig holes 80 mm deep under all the vertical posts. Fill the bottom of the holes with a 100 mm layer of rubble and sand.
- To make the tree less rotten in the ground, lubricate the edges of the timber with bitumen or machine oil. Wrap the top with two layers of roofing material. Insert the posts into the pits, level them with a plumb line and concrete.

- Another method of extending the life of the uprights is by concreting metal bushings. They can be made from pieces of metal pipe with a diameter of 100 mm. When the concrete hardens, cut the edges of the square beam with an ax to the size of the inner diameter of the pipes and install them in the concrete sleeves. Concrete bushings from a pipe of a smaller diameter under the door posts in the same way.
- When installing vertical posts, make the front ones from the side of the doors 100 mm higher than the rear ones. The difference in height will help build a pitched roof.

- Connect the exposed racks along the perimeter from below and from above with horizontal jumpers, securing them with bolts. If you plan to make the floor in the form of a wooden lattice, reinforce the lower lintels with metal mounting angles. The jumpers will support the logs and must support the weight of a person.
- Now you need to make a frame for the tank from wooden lintels fixed on top of the frame. A tank filled with water from any material has an impressive weight, so the frame for it must be made strong.

Flat water tank installed on the roof of the shower
- Cover the sides of the booth frame with a sanded board. Make the door from a board 20-25 mm thick. Cut it to the required length, lay it in a row and sew with the cross bars. From a 40-50 mm thick board, knock down the door frame and fix the door to it with hinges. The entire structure can now be bolted to the door pillars.
- Treat the finished booth with an antiseptic and cover with linseed oil or varnish. Cover the door from the inside with a film so that water does not get on it.

Options for wooden summer showers
Polycarbonate booth
A polycarbonate cabin is easier to build than a wooden one, but welding experience is required. The fact is that for polycarbonate it is necessary to weld a frame from a metal profile. For racks, a profile with a section of 40x60 mm will go, and for strapping you can use a smaller section. The use of a wood frame for polycarbonate is not desirable, since both materials have the property of "playing" from changes in weather conditions. From this, polycarbonate sheets can deform.

The process of making a metal frame for polycarbonate is similar to that of a wooden structure. Concrete the main racks, and then weld the upper and lower lintels. In the middle of the frame, three jumpers must be made so that the polycarbonate sheets do not bend. The fourth is unnecessary. She will interfere with the doors. Weld the frame under the tank on top. Make a frame under the door from a profile with a section of 20x20 mm and fix it with hinges to the rack. Paint the entire structure with waterproof paint.

For cladding, use opaque cellular polycarbonate sheets, 6-10 mm thick. Cut a large sheet into pieces according to the size of the booth with a circular saw. Fix the resulting polycarbonate plates to the frame with self-tapping screws with a thermal washer. Cover the door with a sheet of polycarbonate too. Bolt the handle and latch to the frame.

Polycarbonate shower option with dressing room

Shower tank
Corrugated booth
A good option for giving would be the construction of a booth made of corrugated board. Lightweight, strong and durable material will last for many years. For a metal profile, both a metal and a wooden frame are suitable, but always with additional crossbeams. Sheets of corrugated board are soft, and additional emphasis will not interfere with them. We build any of the frames for the metal profile in the same way as the above options. In any case, weld the door frame from a metal profile.

Fastening the corrugated board with galvanized self-tapping screws with a sealing washer through one wave. First, fix the sheets of corrugated board on the side walls, then sheathe the door. If you need to cut the material, use scissors or a special disc with teeth on the grinder, so as not to burn the polymer coating of the corrugated board during cutting.
Brick cubicle
The construction of a brick booth in the country requires the construction of a foundation. To do this, it is enough to dig a trench 200 mm wide and 400 mm deep around the perimeter of the future structure. Fill the trench with a fight of bricks and fill it with liquid concrete so that it seeps between it. A week after the concrete has set, start laying bricks on the cement mortar. Don't forget to put a box for the door. The door itself can be made of wood or a frame can be welded from a profile and sewn up with a sheet of corrugated board. On the last masonry, wedge wooden blocks across the structure, preferably along the thickness of the brick. You will lay the roof on them and fix the tank.

Installing the roof and tank
The material for the roof will be hard. Slate or corrugated board is well suited. After securing the roofing material, drill a hole in the center of the roof. Place the tank on top so that the water supply tube goes into the hole. Screw the tap and watering can onto the tube.
The optimal capacity of the tank for a garden shower is 200 liters. In the store, you can buy a plastic or galvanized tank or make it yourself by welding it from stainless steel. Any container with a neck for filling water will serve as a tank. To make a shower for a summer cottage with heated water, mount a heating element with a capacity of 2 kW in a metal tank. Paint the container with black paint on top. The dark color will attract the sun's rays and the water will heat up faster.

Diagram of a tank for a heated summer shower
If you install wood-burning titanium in a booth in the country, then in addition to hot water, you will get a heated room. Then you will need to install a second tank of cold water next to it.
Arrangement of floor and drainage
The floor and drainage of the shower for the summer cottage can be done in two ways:

Summer shower in a country house
If there is free space, a country shower can be built in the house. To do this, it is better to purchase a shower stall in the store. Make a recess in the concrete floor and install the acrylic pallet according to the product instructions. Connect the siphon on the pallet with a corrugated hose to the drain. Seal the joints of the pallet to the floor with sealant. Further, according to the instructions, assemble the frame from the profile, install the doors, supply cold and hot water from the boiler.
As you can see, you can build an outdoor shower with your own hands in the country house from almost any material. The main thing is to prepare blueprints, materials, tools and to show aspiration.
In contact with
Whether you worked in a suburban area or were resting - this is not so important, in any case, you will certainly want to take water procedures at the end of a long summer day. In order to have this opportunity, you need to build a shower in the country with your own hands.
General steps
Regardless of what type of country shower you prefer to build, some steps will need to be performed in any case:
Seat selection

The choice of the optimal building site is accompanied by the following rules:
- No shadow... The sun's rays are a natural and free source, and if it is not equipped with a forced temperature rise system, then it is the only one. Therefore, try to provide them with sufficient access to the structure by choosing an open area for the shower.

- The presence of a drainage or cesspool... Used water must drain somewhere, and it is better to take care of this in advance than waiting for it to find its way to flower beds, to a cellar or other undesirable place for moisture accumulation.
- Compliance with overall design... You should not place a shower room in front of the facade of the house if it has already been erected, or in other equally significant places where it will disrupt the overall interior. This is especially true for temporary buildings that are not particularly aesthetically pleasing.
Design

Ready-made drawings-dimensions of a shower in the country with your own hands can be easily found on the Internet. You can also create your own unique project yourself.

The main thing is that the made drawings of the shower in the country with their own hands are supplied with all the necessary dimensions and a list of materials used.
Option number 1: film construction

If your suburban area is rarely visited, then it makes no sense to erect a capital structure, and an elementary film structure, which has a number of advantages, will be quite suitable for receiving water procedures:
pros
- The minimum selling price. You don't need a lot of expensive materials.
- Ease of construction. You can easily and quickly cope on your own.
- The possibility of dismantling.
There are two positive aspects here:
- If necessary, such a shower can be moved to a new, more suitable place.
- For the winter, the structure is disassembled and hides in a warm, dry room, where it will not be threatened by aggressive weather conditions or the danger of being stolen.
Minuses
The negative aspects here are no less obvious than the positive ones:
- Nondescript appearance. Racks covered with foil do not represent any particular aesthetic value.

- Low level of comfort. The simplicity of the design does not allow the implementation of many useful functions inherent in capital showers.
- Fragility. If you don’t hide the film shower for the winter, then in the spring you will most likely have to build a new one.
Mounting
So, if you, after weighing all the pros and cons, decided on this economical option, then you will need step-by-step instructions for a shower for giving with your own hands:
- At the selected location, remove the top layer of turf and level the area. From it we dig a small sewage trench to the drainage system.
- We take four metal corners 2.5 m long and eight 90 cm long. Alternatively, you can use wooden beams, but their dismantling will be more difficult.
- We drill holes along the edges and bolt them into a quadrangular frame.

- We cover it with a film, leaving one side partially unsecured, so that you can, by pushing it away, get inside.
- We put an ordinary wooden grate on the floor as a pallet.
- We install a suitable water tank equipped with a watering can on the roof.
Tip: It is convenient to use a portable shower bag for maintenance of a temporary building. It is easy to operate, does not require a reinforced base, is easy to clean and most often has its own heating system.

Option number 2: frame construction

This type of shower is a kind of intermediate option between a film structure and a solid brick structure. Such a building is perfectly protected from wind and atmospheric precipitation, is able to spend the winter in the open air without losing its stability, and is equipped with such nice little things as shelves for shower accessories and hooks for clothes. But without careful maintenance it will not last long.
In this case, the work progress is expanded by some activities.
Pouring the foundation
Since the frame construction of a shower for a summer residence assumes its constant presence in one place, it must be equipped with a suitable base in order to avoid further subsidence into the ground:
- We remove a ten-centimeter layer of earth with an area corresponding to the future structure. It is noteworthy that in this case it is not at all necessary to be limited to the dimensions of 90 by 90 cm, you can afford to build a more spacious structure, in which there is even space for a changing room.
- We ram the bottom, and cover the sides with pieces of plywood as formwork.
- We mix the concrete mortar using the following ingredients and their proportions:

- In the place where the drain will be located, we put a small log wrapped in roofing felt. This will create a hole that we will lay through later.
- Fill the prepared place with the kneaded mixture.
- We deduce the slope of the surface towards the drain.
- We are waiting for the complete setting.
Frame

The assembly of the frame is not much different from the above considered option. The only exceptions are large dimensions and the presence of central horizontal beams at a height of about a meter, which are necessary to enhance the mechanical resistance of the entire structure.
Tip: Vertical posts can be concreted during the foundation laying process. This will increase the reliability of the structure.
Sheathing
The following materials can be used to fill the walls:
- Wood treated with antiseptics.
- Particle board.
- Plexiglass.
- Polypropylene panels.
- Iron sheets.
- Slate.

All elements are securely bolted to the shower “skeleton”.
A single-pitched roof, covered with metal tiles, roofing felt or slate, will be enough.
Option number 3: capital structure

The capital project of a shower in the country is an independent architectural structure, which must be registered with the appropriate administrative institution. This already prompts thoughts about the need for such a design.
In addition, in this case, brick is usually used for the construction of walls, which must be able to lay, a reinforced foundation that requires additional costs, and a massive roof that can withstand any precipitation for many years. And when you build a residential building with a built-in bathroom, then the need for such a solid building will disappear that it will nullify all the efforts put into it.
Conclusion
A shower in the country is necessary, but it's up to you what type of construction to build for this purpose. You can do with a temporary building or create something more durable, it all depends on your future plans for the site.

The video in this article will guide you through additional content. The visited dacha must have all the necessary living conditions, including a shower.
Summer in the country is a fairy tale: the air is clean, berries from your garden, salads from only plucked vegetables. Only the lack of water can spoil this happy time. Everyone wants to take a shower in the country after finishing work in the garden. If some prefer a bath, others need a shower and nothing more. Therefore, the decision to build a summer cottage shower with your own hands is logical and expedient. After a small house without windows, the construction of a shower is the first on the list. For her, they use the materials found on the site and purchased, the advice of neighbors on the site and their own imagination.
One of the options for creating a shower enclosure in the country is to build an additional structure to the finished barn, it can be painted with cheerful colors. You can also divide an existing building, and use a partition to make a place for a shower.
If there is no such barn that will be comfortable and durable, you can give preference to a frame made of wooden beams. A reliable support will be a beam of 10 cm in cross section. To protect it from moisture and insects, we paint the tree or treat it with a wood preservative. We choose the installation site, it should be the sunniest and preferably on a hill, otherwise you will have to make an embankment so that there is a drain.
DIY shower plan
- Choose a sunny place
- Pour the foundation
- Make a drain
- Install pallet
- Build wireframe
- Install the tank
Building the foundation
We mark out a rectangle 1x1.4 meters, drive in the pegs, pull the rope between them, measure the distance of the sides and diagonals with a tape measure.
If we plan a stationary and durable shower in the country, then we need to do it. With the help of a garden drill, we make holes one meter deep in place of the pegs. A metal pipe 1.2 meters long and 90 mm in diameter is placed there. We use three parts of sand, one part of cement and five parts of rubble for pouring. We measure the distance between the pipes, rising by 20 cm.
Formwork will provide protection of the structure from moisture; they must be filled with the same mixture as the foundation. Due to this, the country shower will rise above the site. On the still not frozen posts, you need to insert 3 sticks of reinforcement with a small section up to 1 cm and 20 cm in length. We are waiting for the foundation to solidify.
We make a drain
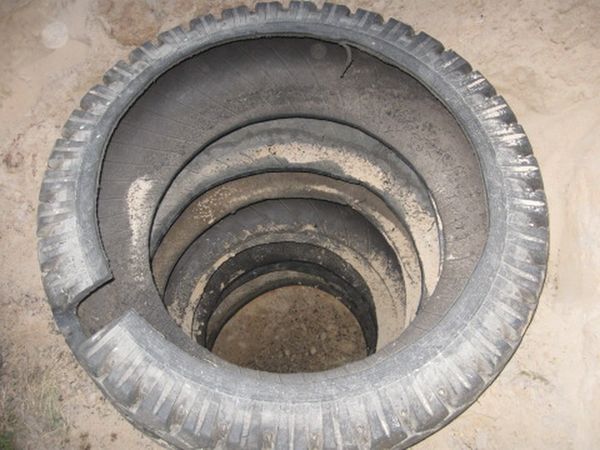
To arrange the drain, we dig a two-meter hole. We strengthen the walls so that the edges do not crumble, an economical way is to lay 6 - 8 unnecessary tires. We make the hole for the drain pipe connected to the pallet in the penultimate one. You can do without a pallet, but the water will corrode the soil, you can buy a ready-made pallet.
We build a frame
We collect wooden frame beams on a dried-out foundation. The dressing is done from below and from above. The upper and lower frames are assembled separately on the ground. The structure is bolted together and installed on the foundation. For installation, you need to drill holes for the fittings on which the bars are mounted. Additional stability is provided by diagonal braces. You can sheathe it with planed wood, be sure to varnish or paint. It is advisable to seal the door to avoid drafts.
Tank installation

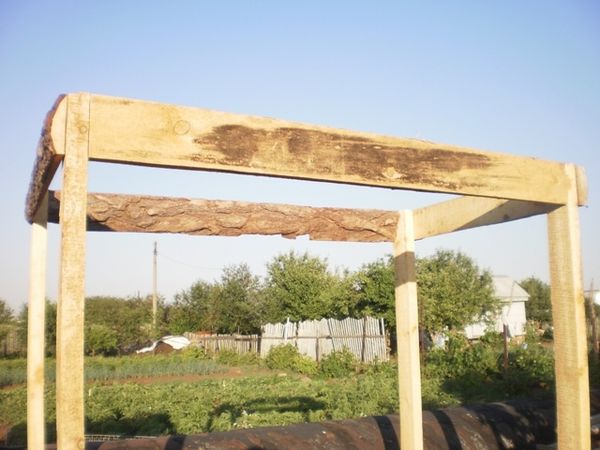
There are two options, just put the tank on the roof of the building or create a frame of beams above the tank and cover it with polyethylene, which will give the effect of a greenhouse. If the first option speeds up the work, the second will save the time it takes to heat the water and will keep warm.
Given the instability of weather conditions, it is worth choosing the second option, so that the presence of a shower in the country does not depend on the sunny days. To create a structure above the tank, knock down two blanks, from the beams into the letter V. We select the length of the beams according to the diameter of the barrel. We connect the workpieces using a wooden lath. We put the structure along the edges of the roof, fix it using self-tapping screws. Then we just cover it with polyethylene.
Tank material alternatives are between lightweight plastic and fast-heating metal. The metal tank can be painted with a dark paint, and it will heat up more quickly, light plastic is convenient to install. Let's give preference to dark plastic, barrel 200 l. in volume. It must be laid on the roof, secured with straps, and fixed on both sides with nails.
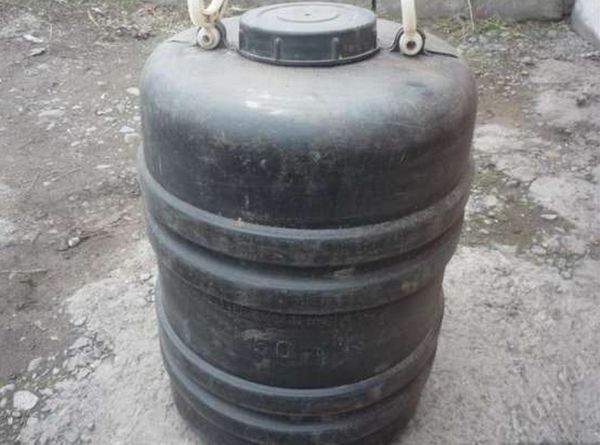
You need to cut two holes in the barrel, the first will be for a watering can, it should be sealed with silicone, through the second the tank will be filled with water. Using a hose, we connect the upper opening of the tank and the tap with water. You can use a pump to pump water from the well.
Your country shower is ready to use!

Summer country shower in the greenhouse
You can plant moisture-loving plants around the shower. Attach hooks for clothes outside the building. Creating a summer shower in the country is an easy and pleasant experience, the result of which will delight you for many summer days.

Those who have a good greenhouse for vegetables at their summer cottage sometimes have a barrel of water for a shower in it.
Even in case of windy and cloudy weather, you can close all the vents and doors in the greenhouse in order to comfortably take a shower in the country.
It is very convenient that the water in the barrel, which is in the sun all day, warms up much faster.
You can easily make and equip an outdoor shower in the country with your own hands. Photos and dimensions, as well as recommendations for choosing a place for construction, can be found in this article. After all, there is nothing better in the summer heat than to refresh yourself with cool water, especially after active work on a personal plot. With the onset of hot days, having a shower in the country becomes an urgent and necessary requirement. This factor is especially important if your house is under renovation and the water supply lines have not yet been connected.
In any case, the inner space of the shower should be spacious so that the bathing person can comfortably fit himself and with him all the things necessary for this procedure. The most common parameters of country shower buildings are 2.5 meters in height and 190/140-160/100 cm in width. It is necessary to plan the construction of a summer shower in the spring, at the very beginning, so that it is already ready for the arrival of summer.
There are no particularly strict criteria regarding the arrangement of such a shower. If you have imagination and the ability to hold construction tools in your hands, you can translate your ideas into reality and build such a thing necessary for giving. Depending on the complexity of the idea, you can equip a simple outdoor shower in one day. A more detailed project will take more time, but it will also serve you for more than one year.
Shower for giving, which place to choose for it
So that the water in the tank is not cold, it is more logical to place the shower building in a place illuminated by the sun's rays. If you prefer to shower in the afternoon or late afternoon, then you should choose the part of the site where the concentration of solar activity is observed in the afternoon. It is important that this place is protected from wind blowing.
The second important factor is the availability of a waste water outlet. An outdoor shower for a summer residence should be installed on a hill so that the water quickly drains off and does not stagnate, attracting insects. The operation of any shower involves the use of large amounts of water, and if many people (a large family) are going to wash in it, then this nuance must be calculated and properly equipped.

If the capacity of your shower tank is about 1-2 m³, then a drain pit will be required. When arranging a place for water drainage, its correct placement is important - in no case should it be located under the building itself. A septic tank or septic tank with drainage should be located at some distance from the booth, in turn, the slope should go in their direction.

The presence of a waterproof layer for drainage is highly desirable: hydroglass, PVC film, roofing felt or concrete screed are suitable for this purpose. The drainage pit should be at least 3 meters away from the booth, its depth should be 2.5-3 meters, the bottom should be covered with gravel or a thick layer of sand. The top of the pit must be covered and fenced.
How to make a shower in the country - an example of a simple design
There can be a great variety of options for this useful summer cottage building - it already depends on your creative approach. For example, we will consider the features of the "standard" version of a summer cottage shower.
It should be comfortable in the shower, so the minimum dimensions of the internal space should be at least 100 × 100 cm. Movements should not be constrained - a person should freely raise his hands and bend over during ablution. There should also be a small space for clothes and towels (changing room), 50-60 cm will be enough for it. Thus, in the total footage, the dimensions of the shower will be 160 × 100 cm and 2-3 m in height.
- Install sturdy and reliable racks - this is your safety, since a summer shower tank filled with water is huge. A 100 × 100 wooden beam is ideal for this purpose.
- It is better to dig the racks into the ground, having previously treated them with tar or a fat-containing agent. Pouring them with concrete, by the way, will be best.
- For the container, a horizontal platform should be installed at the top.
- The booth is made of any materials, the main thing is that it should hide the bather from prying eyes and protect from drafts.
- Summer shower containers can be metal or plastic. It is worth considering that the metal tank will heat up faster, but it will rust too. In order for the water to heat up quickly, it is recommended to paint the tank with black paint.
- If you make a frame over the tank and cover it with plastic wrap, then the process of heating the water will be much faster.
- The valve for the tank can be anything, but a ball valve is most suitable.
The whole process begins with marking the perimeter of the future shower, racks are installed in the corners and connected from above with a bandage from a similar bar. After that comes the turn of the lower dressing, keep in mind that it should be located 10-15 cm from the ground level.

Use long bolts to fasten all fragments of the frame - this will have a positive effect on the overall strength of the structure.


However, you can do it easier and install a metal or acrylic pallet, while the water will be discharged using a hose.
Use seals to keep the shower door close. The shower compartment and the dressing room can be separated by a special curtain, while it will be better if the threshold between these two compartments is somewhat overestimated (in order to avoid water leakage into a dry room).
Summer shower, as already mentioned, outside can be decorated with absolutely any material. Lining, plastic, polycarbonate, moisture-resistant plywood, fiberboard, slate, metal sheets, siding - the main thing is that the building is in harmony with the rest of the buildings on the site.

It will not hurt to pre-open wooden materials with protective compounds.

If the frame is welded from metal, then it must also be coated with anti-corrosion agents or painted with paint.

In order for the water in the tank to heat up several times faster, rafters can be laid on top of the upper trim, and a sheet of roofing iron can be placed on top of them. The metal will reflect the rays of the sun, making the water heating process more active.
Summer shower tank, which one to choose

Separately, it is worth paying attention to water tanks or shower tanks - their choice is determined by the individual requirements and preferences of the developer. They are small and large-capacity, flat and round, iron and plastic. The size of the tank depends on how many people will wash in this shower, often a volume of 100-200 liters is enough for an average family. As mentioned above, it is better to choose a dark-colored or even black tank - this way the water will heat up more quickly.

Such a container must have a lid so that various debris and insects do not get inside. At the very bottom of the tank, a tap outlet is mounted, to which a spray can is screwed.

There is an important point here - the tap must be located at the very bottom of the tank, so that all the water drains from the tank and does not stagnate.
When equipping a summer shower with your own hands, you can purchase a ready-made tank in a specialized department of the construction market. There are also containers on sale for just such showers, with all the necessary parts included.
If you have a metal or plastic barrel of a suitable size, then after certain manipulations it can turn out to be a perfectly acceptable shower tank. For these purposes, a hatch for water filling is cut out on top of the barrel laid on one side, and it itself is treated with acrylic enamel (or a bath repair agent) from the inside - this applies to metal containers.
Or you don't need to lay the barrel on its side. You can do everything if "your hands grow from where you need it."

Also in this role, tanks from worn-out washing machines play well. Despite the fact that their volume is enough for 2 washes, they very quickly adapt to the shower tank, thanks to the presence of inlet and outlet pipes, as well as the necessary technical openings. Corrosion is not terrible for such tanks.
When equipping an outdoor shower in the country with your own hands, it is better to prepare photos and dimensions, as well as approximate drawings in advance. So you will see all the working stages clearly and will be able to calculate the final result extremely accurately. Having such a work plan in front of your eyes, you will know how much material you need for the external and internal decoration of the booth and the drain pit.

Paying attention to the functional part, do not forget about the aesthetics of the appearance of your summer shower - everything should be not only comfortable, but also pleasing to the eye.

Outdoor water procedures are very useful, so many adherents of relaxation and hardening decide to make an outdoor shower for a shower in the country with their own hands, or at least install a ready-made booth on the site. This article will help you understand the design features, choose the right size and place for installation, draw up a preliminary diagram and complete all stages of construction without errors.
Types of autonomous toilets. Choosing a place for building a toilet in a summer cottage
If it is planned to build a capital shower for a summer residence with your own hands made of bricks, it is advisable to use a tape type of foundation. A trench is formed along the perimeter of the future building. The optimum depth is 0.5 m. Then the formwork is installed. At the bottom of the trench, it is necessary to form a sand-crushed stone cushion 0.1 m thick. After that, the reinforcement is laid and the concrete is poured. This must be done so that the finished foundation rises about 0.1 m above ground level.

When the base is completely solidified and dry, it will be possible to start building the sewer system.
How to organize a drain system in the shower in the country with your own hands
There are several ways to organize a drainage system in a shower stall. The choice of construction technology depends on several factors:
- the type of soil on the site;
- type of foundation;
- the number of people living in the house.
If a monolithic slab is used as a foundation for a summer shower in the country, then before pouring it is necessary to lay a system of plastic pipes with an elbow. The plate is formed in such a way that there is a slope on all sides towards the drain hole. The sewer pipe is led outside the shower room and connected to the general drainage system. You can bring a drainage system to a drainage well.

Useful advice! For the construction of a similar sewage system for a booth installed on a foundation of a different type, it is not necessary to fill the floors with concrete. It is enough to buy an outdoor shower for a summer cottage with a pallet made of acrylic. This element will serve as a floor.
With a connection to the sewer system, it is the best option for a large family, since the pit will not be able to accommodate the volume of wastewater that will be formed during operation. If the structure is designed for 1-2 people, it will be enough to drain directly under the booth. But this type of system is suitable for areas with a loose soil type, when the shower is installed on a columnar or pile foundation. This option can also be used on a strip base.
First, you need to remove a layer of soil 0.5 m deep. The formed depression is filled with gravel or stone at half its height. The rest is covered with crushed stone with a fine fraction. After the structure of the booth is assembled, a pallet made in the form of a wooden lattice is placed on the rubble layer. The system is designed in such a way that the wastewater passes through the drainage layers and is gradually absorbed into the soil.

Sometimes the owners of summer cottages lead the sewer into the garden, which cannot be called a good solution. If you still resort to a similar method, it is desirable that the place where the water is drained is well warmed up by the sun. Otherwise, the liquid will accumulate, and a swamp teeming with mosquitoes will form around the shower.
Making a cabin for a summer shower: photo and construction technology
Any materials at hand can be used to build a stall for a homemade shower.
Suitable for these purposes:
- wood;
- polycarbonate;
- professional flooring;
- brick.
Each type of material has its own advantages, features and properties.

How to build a shower in the country with your own hands: economy cabin option
There is a little trick that can help you save money while building a shower house. To reduce costs, it is sufficient to use one of the blank walls of the building as a side for the booth.
Before building a budget-type outdoor shower, you need to fix a small water container equipped with a watering can on the wall. Here you can also install accessories related to comfort, for example, hooks for clothes, shelves, etc. A partition is located at the top of the future structure. It is fixed to the wall of the building. A tarpaulin or film (necessarily opaque) can be used as an entrance door. The curtain is suspended with rings.
The floor is arranged so that the drains are diverted as far as possible from the foundation of the house. To do this, the site is concreted or you can get by with the installation of a pallet made of acrylic.
Useful advice! If you use the inner corner of an L-shaped structure, you can generally avoid the construction of booth sides. Their function will be performed by the walls of the building.

DIY construction of a wooden cabin for a country shower
The most common version of a country shower is a cabin made in the form of a wooden house. This type of building is considered one of the most affordable. Wood is easy to process. At the same time, it perfectly retains heat, which is an undoubted advantage if the shower is used in cold weather.
For the construction of a summer shower in a private house with your own hands, it is advisable to use a wooden bar. For the manufacture of corner posts of the booth, you will need a material with a cross-sectional size of 10x10 cm. A tank designed for 200 liters of water is installed in the upper part of the shower, so the beam must be thick enough to withstand such a weight load.
To hang the door, you will need to install two additional posts in the front of the booth. These elements are placed between the corner posts. For their manufacture, you can take a bar with a cross-sectional size of 5x5 cm.
To form a small slope angle for a pitched cab roof, it is recommended to install the front corner posts 0.2 m higher than the rear. This will not be required if a square-shaped tank is used as a container. In this case, the racks are mounted on the same level.

All supports are attached to the wooden frame of the lower harness. For fixing it is necessary to use hardware and metal corners. In the upper part of the structure, strapping is done in a similar way. Spacers can be used to further secure the uprights. On the upper trim of the frame part of the booth, a base is formed for mounting the container. In this case, it is necessary to read not only the size, but also the shape of the tank.
For sheathing the frame part of the building, you can use a 2 cm thick board. This material is also suitable for making a door. It is necessary to lay the boards in one row and knock them together using two jumpers. To prevent the door from skewing, the structure can be reinforced obliquely using a long strip. The door frame for a summer cottage shower is made of boards, the thickness of which is 4 cm. It is recommended to use self-tapping screws as fasteners.
When the booth is completely ready, it can be opened with a colored varnish. From the inside, the entrance is covered with a film, otherwise the doors will swell from moisture.
Useful advice! Often, a large barrel for a shower is used for construction. By installing a watering can above the structure, you can get a budget version of a wooden booth.

Polycarbonate garden shower technology
Since wood is subject to deformation changes under the influence of moisture, many site owners are thinking about how to make a shower in the country with their own hands from more practical and resistant materials, for example, polycarbonate. The frame part of the stall is made in the same way as in the case of a wooden shower, however, a metal profile must be used as a material. The optimal section size is 4x6 cm.
The frame part of the booth is formed with the help of racks and jumpers between them. In this case, metal elements are used, so a welding machine is required to fasten them together. Moreover, the assembly order can be performed in several ways. In the first case, the frame part is welded separately, after which it is installed on the base and fixed by means of anchor bolts. The second method involves concreting the racks while pouring the foundation. Then the harness is formed, spacers are attached.
It is advisable to use sheet material 1 cm thick as a covering for a shower made of polycarbonate. On a metal frame, it is fixed with hardware, which must have sealing gaskets.

Installing a tank and features of building a shower in a heated cottage with your own hands
At the last stage of the shower construction, a tank is installed. The container can be made by yourself using any container made of stainless steel or plastic. To do this, it is necessary to form a hole in the bottom, the diameter of which is 1.5 cm. To it, a piece of pipe with threads on both sides is attached with the help of nuts. The length of this element should be 30 cm.
In the roof of the booth, in the center, you need to make a hole where the pipe will be inserted. After installing the tank, a tap and a plastic watering can are screwed onto the free end. Then the container is firmly fixed on the frame of the frame part of the booth, filled with water and covered with a lid.
To create a heated summer shower for a summer cottage, it is enough to install a heating element in the tank. Of course, the natural energy of the sun can be used to heat the water. In this case, there will be no electricity costs. However, the sun's rays are unable to heat a large volume of liquid. In addition, not every region has the necessary climatic conditions.

On the network you can find many circuits necessary to connect a summer shower for a heated summer cottage to electricity. The advantage of these devices is that the water heats up in the tank quickly enough, regardless of the time of day and the weather outside. In this case, a person can adjust the temperature mode himself. If you attach a piece of Styrofoam to the hose, the warmest water will flow into the watering can. For the same reason, fluid intake is carried out from the upper zone of the tank.
Useful advice! To speed up the process of heating the liquid, you can add a coil to the circuit.
Is it possible to buy an outdoor shower for a summer residence inexpensively: prices for ready-made structures
To simplify the construction technology, you can buy a ready-made outdoor shower and install it on a prepared base. The cost of booths is varied and depends on various factors.
The following points influence the price of products:
- material of manufacture;
- modification (locker room availability);
- the shape of the water tank (barrel-shaped, square tank);
- complete set (presence of a heating element, tank, temperature sensor, etc.);
- tank capacity;

- the material from which the water tank is made.
Average prices for finished structures
| Name | price, rub. |
|
Metal frame and PVC fabric |
|
|
Garden shower |
|
|
Garden shower with water heater |
|
|
Garden shower with water heater and changing room |
|
|
Polycarbonate construction |
|
|
Cabin with a 130 l tank |
|
|
Cabin with a 200 l tank |
|
|
Cabin with a 130 l tank with heating |
|
A wide variety of materials suitable for construction, as well as manufacturing technologies, allows any summer resident to acquire a comfortable and convenient shower in the country. Moreover, you can make a booth yourself from improvised means, or buy it ready-made in a specialized store.