Clay plaster, the composition of which is simple and literally lies under our feet, is increasingly found on construction sites as a facing material for interior and exterior decoration. It is known that it was the main material for the masters many centuries ago, why do we return to this experience again today?
Plastering walls with clay - what is this process?
The return to the ancient traditions of construction is no coincidence. Modern mixtures for decorating houses practically do not exist without chemicals, which, over time, harm the body. The cheaper the composition, the more harmful. Expensive plasters are not available to everyone, and they do not become less chemical. Clay interested the consumer primarily in its ecological purity, because the ancient craftsmen did not have a chemical industry.
And even not such old village buildings, where this material was used, are still functioning properly, which means that the clay does not crumble in a couple of years, but behaves like a full-fledged durable natural finish, not only not harmful, but even useful for humans. Plastering walls with clay is cheap, and for those who are especially thrifty there is an opportunity not to spend a penny on components, but to dig them out on their own from the nearest quarry, river or even on their site. After all the mixture requires only clay and fine sand... But this is an activity for extreme lovers, because the depth of good clay is about 1.5 m, and it will not take so little.
Even if you buy ready-made mixes, they are quite cheap. Only when choosing, you should pay attention to the place of extraction, because clay is a good adsorbent of harmful and sometimes radioactive contamination. There are no problems with the color of the plaster, because natural clay can be of several shades, roughly representing the entire palette from reddish-red to blue, and it depends on the location and depth of extraction. Colorants, although natural, are rarely added, and natural fillers such as straw can be used for texturing.
Clay plaster - composition and properties
In addition to being cheap and environmentally friendly, this one has a number of other advantages. Therefore, before instructing how to plaster with clay, consider what we win and what we lose. The layer that you get on your walls will not decay very soon, which will be indicated by numerous cracks, because clay is very elastic, and gives this quality to the plaster mixture. Her appearance will always be presentable and original, as a natural material, she is not afraid of humidity, temperature jumps, wind and even moderate earthquakes. Its density creates the effect of preserving the room, not letting in harmful substances, for example, exhaust from the street, it is believed that even electromagnetic radiation is to some extent blocked by such walls.
After a dozen years, the first crack may appear, but the restoration is done almost instantly, and it is unlikely that it will be necessary to cover the entire wall, it is enough to fake the problem area. A layer of clay plaster breathes well, allows moisture and steam to pass through, the microclimate in the room will be almost ideal from all possible options. And there is no need to wait for unwanted guests in the house, various kinds of insects simply cannot gnaw through the strong bonds of natural clay. The advantages can be attributed to the hypoallergenicity of this material, as well as the purity of not only the layer on the walls, but also the construction process itself. No harmful waste is generated, because everything is taken from nature, and it is not shameful for her to return the surplus.
It would be unfair not to indicate some of the difficulties that will have to be faced. If you are doing it for the first time, then you have to feel all the capriciousness of clay plaster, because it is not so easy to prepare it, because there is no recipe, readiness is assessed by a practical method. We will try to help you master it, but if you have an experienced master, it is better to take him to help. By the way, it is also not easy to find such a person, because clay is not yet so popular, and previously it was not taken into account at all, few people know how to really work with it competently. The plastering process itself is quite lengthy, you will have to wait a long time for each layer to dry, and if you are doing external finishing with this material, then restoration will be required almost every year. Although the plaster will not crumble, it will crack often.
How to plaster with clay - work sequence
Let's start describing the work itself, because there are many nuances here, so we will no longer be distracted by theory.
How to plaster with clay - step by step scheme
Step 1: Preparing the base
Clay plaster is heavy, so the adhesion must be very high. To do this, it is desirable to have tangible roughness on the wall, and it is better to build a shingle (wooden lattice). If the walls are brick, then clean the surface of any remnants of the previous finish and slightly open the seams. Then the clay will lay down confidently and for a long time. A wooden house should definitely have shingles; making notches on logs is a thankless task. Do not use metal, since the clay is unlikely to be able to squeeze into it with high quality, it is too dense.
Step 2: preparing the mixture
A clean mixture of clay and sand is used for the finishing plaster, as it is very "cold". The clay must first be soaked in water for 2-3 hours, then a little more water is added and mixed thoroughly to obtain a homogeneous mass. Then sand is poured into the container, the composition is mixed again. But the proportions need to be selected empirically, they will depend on the original fat content of the clay. This is checked in several ways, but the fastest and does not require a perfect eye is the ball method.
To begin with, achieve such a state that the mixture does not stick to your hands, this is done by gradually adding water. Then we take a little of the mixture and sculpt a 2 cm ball.You should put it on a hard surface and flatten it, just not to a thin pancake, but to an impressively plump one. Now pay attention to the edges, if cracks have formed on them, then the solution is non-plastic, more clay is required, if there are no cracks, then you guessed right with the proportions and you can start working. On average, sand for mortar requires 50-80%.
The main plaster solution is prepared with additives, it can be sawdust, straw, needles. Such a solution holds more firmly, i.e. fillers give a reinforcing effect and keep warm better. The "warmest" is a purely clay solution with the same additives, but it is not plastic and will definitely require finishing, since the cracks will not take long to appear.
Step 3: applying plaster
The first layer is covered with sloppy lumps, and in order to better stick them to the surface, you need to make some efforts, i.e. press down on clods, and not spank with a spatula, as is done with other plasters. If this layer is the only one, then it must be perfectly leveled with a float, if not, then it is enough just to roughly bring the surface to one level. It is necessary to let the layer dry, it will take a little more than a month in the summer, and in the winter all three.
Then the next layer is applied, usually "cold", see the description above. Its thickness is small. You can also use a grouting solution, where cement is also added to the clay with sand. In this case, the ratio of clay-cement-sand is 1: 1: 3. The surface should now be flat. And this layer should dry out, give it a few weeks. Do not try to speed up the process; forced drying will ruin the finish right away. Further, the wall can be decorated, painted or left in its natural color. If some kind of finishing is still conceived, then a number of additional preparatory work should be carried out, for example, a primer.
Clay is a natural source for the construction and decoration of a rural hut, a barn, and other outbuildings in your own yard. Excellent material, environmentally friendly, warm and practical.
However, clay can be of different deposited layers, respectively, of different quality and composition. Today, no one will tell you the exact recipe for how to make the composition of clay,
to anoint the hut. For a greased hut, everyone has their own method.
Usually smeared with clay with straw, dung, and other additives. But you can ask the neighbors who have already smeared, where they took the clay, what proportions they added, they will explain everything to you in a popular way. As I wrote in the previous article, about the composition of the mortar for laying the stove. Only by selection method.
Walls covered with clay are less durable than concrete, and you will smear such walls every year. But you still get clean, environmentally friendly walls that breathe. They dry more slowly, but more naturally, and set slowly, however, when working with clay, it is easier to smear.
To begin with, we prepare the surface, we sew up the walls and ceiling with shingles. Wooden walls, cross to cross, punch through thin strips 3 mm thick, 10-12 mm wide, with a take-off run of no more than 30 mm.
If the wall is brick, you need to cut the seams between the brickwork so the clay, mortar, will be best kept on the wall.
How to anoint a hut so that the clay does not fall off?
Now we will prepare the clay with which we will smear the walls of the hut. As in the case of the stove, we will need to make some test samples.
The quality of the clay smear solution depends on the main component of the clay itself. Clay is very oily, sometimes even red, and sometimes light brown, even with an admixture of sand. We need clay as fat as possible, respectively, as dark as possible. Having diluted such clay with water, it is smeared like butter on bread. But a very greasy clay is bad because the walls, smeared with such clay, crack. This means that we will need to empirically make up a solution. When the clay is diluted with water, stirring well, add horse manure, finely chopped straw. From such components, the walls will be warmer, and the straw will additionally reinforce them, when dry and prevent cracking. The sand is colder, but if the sand with clay, from a good quarry, then you can add. If you are in the cold season, put your hand against the wall with straw and against the wall with sand, with that straw the wall will be warmer. So, having made up several types of solution and, having chosen the right one, we knead the clay.
First, knead 5 buckets, you will have to knead with your feet, in summer you can barefoot, in spring in boots. The advantage is that the mixed clay thickens a little but does not set as there is no cement. And accordingly, having kneaded the clay on Monday, it can be used on Wednesday, only by adding a little water there and mixing it.
So now we proceed to the most crucial moment. We begin to smear the walls with clay. This is a very laborious job, it requires a lot of physical strength. You only need your hands to work. We simply take the finished well-mixed clay with our hands and apply it to the wall, lightly pressing and pressing into the shingles. Such work is best done in warm autumn, or spring, in dry windy weather.
The first rough layer should be no more than 30 mm, especially it does not need to be smoothed out. On the contrary, you can run your fingers along the wall several times, making grooves no more than 3 mm deep in different directions. And we leave the walls to dry for at least a month. The first layer should dry completely, which will give you a good dry and warm wall in the future. If you do not dry the wall well, your walls may become moldy, or simply give out dampness into the room. After the walls are well dry, we begin to "iron" our walls.
Now we take clay without the admixture of manure and sand. Add some very finely chopped straw to the clay, and with this liquid mixture, we begin to iron the walls. We also take clay, and smear it with our hands, smoothing it out. The man who used to iron the walls of the hut was called the ironer. Since he could iron the hut, no one else could.
We don't need a flat surface like glass. But a well-prepared plastic and elastic solution, very simply and without much effort, lies on the wall, and is leveled with bare hands. For a smoother surface, place a bucket of warm water next to it, and periodically dip your hand into the bucket, so smoothing the walls with a wet hand will make your surface even smoother. So, having smoothed the walls throughout the room, we leave it to dry for about a month more. We also smear the ceiling with clay, and earlier we also smeared the floor. You can also smear the floor of the attic with the same composition of clay and straw, smoothly smoothing the surface over the entire area, starting from corner to corner.
Further, it is best to cover the walls with several layers of lime, which will disinfect the room, and the dark room will suddenly become brighter. You can cover the walls with chalk or white clay, but your clothes will get dirty from such walls. Although I whitewashed my barn with chalk, because chalk is whiter than lime.
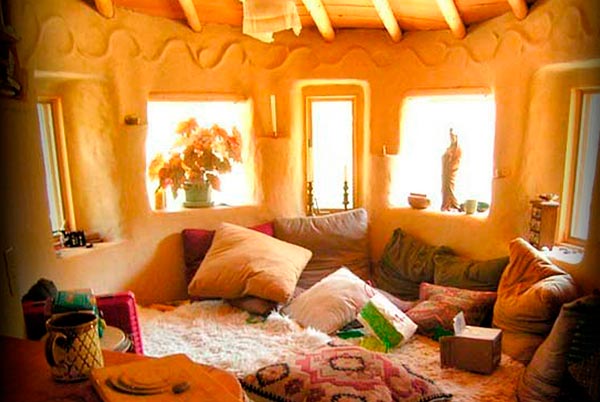
"Mazanka" or the house, which is covered with clay, is a very comfortable and environmentally friendly housing. In the summer, it is quite cool in it, and in the cold, it is warm, while the organized microclimate has a beneficial effect on human health. Coating a house with clay is a somewhat laborious work, for this reason it has recently lost its relevance a little, giving way to simpler types of work. If you are not afraid of difficulties, and you are in full readiness to revive the old method, try to build a "hut" on your own.
Well, if you are interested in planning and creating interiors of public buildings, visit studio-practica.ru. Only there they will help you create a suitable and comfortable interior quickly and without problems.
Build the frame and foundation of the hut house. You can just drive stakes into the ground and carefully weave them with the help of twigs, it will be a fairly simple structure for storing things and relaxing in the summer. For the construction of more solid housing, a concrete foundation should be erected - to install vertical beams on it, fill bars to them, upholster the structure with a board or croaker.
The surface of all walls should be upholstered with willow or shingles to ensure excellent adhesion of the wall to the clay. The rods should be stuffed at an angle of 45o, while splitting thick branches with an ax into 2 halves. If possible, immediately build the roof of the structure.
Then start preparing the clay. To do this, take a container; it is recommended to dig a large round hole in the ground. Place sand and clay in the pit in layers, pour water in the center.
Stir the clay - it is recommended to do this using your feet. If the container is small, use a drill with an ordinary bent pin or a special attachment. Gradually add straw to the clay - the thicker the stem, the better.
Knead the clay, working towards the edge starting from the center. Add straw or water if necessary. Do not throw in a large amount of straw right away, otherwise it will be difficult to mix. From the edges, the clay should be thrown into the center of the hole. As a result of the above actions, you will get a fairly thick, homogeneous mass.
The wooden surface of the wall must be slightly moistened with water using a broom. Bring the clay closer to the building, you can load it into the cart. It is recommended to work with clay with a pitchfork, not a shovel.
Take a clay slate with your hands and send it with a forceful throw to the wall. At the same time, the clay should adhere well, turning into a pancake. When covering shingles or rods, smear it a little.
If the clay does not stay on the wall overnight, it should be peeled off and the surface of the wall should be allowed to dry. Sometimes hands need to be moistened with some water.
Photo: avillageinafrica.wordpress.com

European maple (Acer campestre) Family: Sapindo Flowers Commercial names: field maple (Great Britain); ahorn (Germany); Norwegian maple, European maple, Bosnian maple (Great Britain) Distribution: throughout Europe, including Great Britain, Asia Minor and Russia European maple - description of wood Wood color is creamy white with natural shine. The older the tree, the darker the wood. Over the years, it becomes light brown in color. Grain like ...

Mansonia (Mansonia altissima) Family: Triplochitonaceae Other names: aprono (Ghana); ofun (Nigeria); beta (Ivory Coast, Cameroon) Distribution: West Africa Description of wood Mansonia The color of wood is gray-brown or light purple, often purple with lighter or darker spots. Wide range of colors. The grain is straight. The texture is fine and smooth. Weight about 590 kg / m3. Mechanical properties Mansonia is a wood that ...

Litsea (Litsea calicaris) Family: Laurel Another name: tangeao Distribution: New Zealand Description of Litsea wood Core color creamy-light brown with a dull sheen. The wood is straight grained, with a fine and even texture. Weight from 608-768 kg / m3. Mechanical properties Litsey has medium bending and crushing strength, low stiffness and high shock resistance. The wood dries well. Working properties ...

In modern construction, clay plaster has given way to professional finishing materials. But as before, it remains in demand among people living on their land. In this article, we will tell you in what proportions a mortar is prepared from clay, and how walls and ceilings are plastered with this affordable and environmentally friendly material.
Where is clay plaster used?
 For many years, clay plaster was used, perhaps, only for the laying of partitions inside the premises, as well as for the decoration and laying of stoves and fireplaces. But, if you look at the old buildings, plastered with clay compositions, you can be sure that it still serves properly.
Partitions made of red brick are also very strong, in the masonry of which cement-clay mixtures are often used. Moreover, unlike fragile drywall, heavy racks can be hung on them without fear of their fall.
Clay-sand mortar is most often plastering wooden, clay (adobe) walls, not only outside, but also inside the house. Plastering with clay, in principle, can be any surface. The main thing is to properly prepare them, as well as select the fat content of the clay and observe the proportions with additives (sand, sawdust, straw) in the solution.
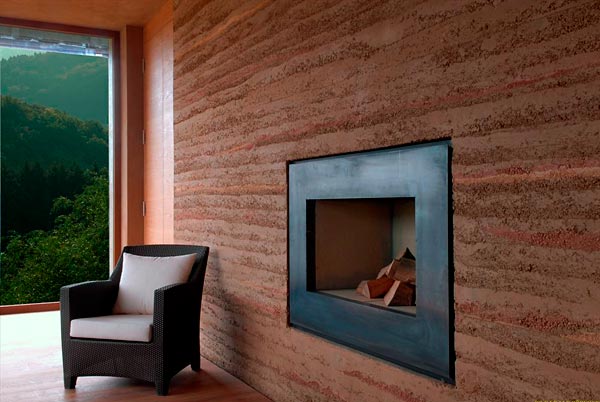
This environmentally friendly material is able to absorb excess moisture and release it as needed. Clay plaster with the inclusion of flax or straw fibers looks original, so designers and craftsmen are increasingly using it as decorative finishing.
Advantages and disadvantages
Plastering walls with clay has many advantages:
- Environmental friendliness; clay does not contain harmful impurities.
- Fire resistance: she is absolutely not afraid of fire.
- This material easily adheres not only to concrete or brick, but even to wood. In the latter case, shingles are used to secure it.
- Even a non-professional can work with plastic clay mortar.
- It is able to "breathe", that is, to absorb moisture from the air and release it when the relative humidity changes, which is very important for creating a comfortable microclimate.
- Adsorption. It has been noticed that allergy sufferers feel more comfortable in rooms finished with clay plaster. After all, clay is able to absorb odors and bind harmful substances.
- It costs absolutely nothing: you can dig it up with your own hands in your nearest quarry or in your garden.
- Good sound insulation and heat conservation.
 Despite the obvious advantages, clay plaster also has disadvantages:
- Drying time of the surface - a layer only 1 cm thick will dry for 5 days. Thicker 5-10 cm layers dry for 2-3 weeks.
- Moisture capacity. Due to their ability to absorb water, clay surfaces need additional protection.
- Low strength. Of course, it cannot be compared with cement mortar. Clay is easily scratched and chipped.
Specifications
Thermal conductivity clay-sawdust coating ranks second after gypsum-perlite mortar - its thermal conductivity is 29 W / m × ° С. In its pure form, the thermal conductivity of clay is 69 W / m × ° C, that is, almost 1.5 times lower than that of a cement-sand mixture.
Another important indicator for plaster is vapor permeability... After all, moisture must be removed from the premises in order to avoid the appearance of condensation. Vapor permeability coefficient for clay = 0.11-0.15 mg / (m * hour * Pa). This is more than log walls. Therefore, clay is great for plastering wooden houses.
Density(mass-to-volume ratio) for clay is 1700 kg / cu. m. Brick has a similar density.
Clay plaster consumption with a layer thickness of 1 cm it is equal to 15 kg per 1 sq. m.
What kind of clay is suitable for plastering?
 The ratio of clay and sand in the composition directly depends on the fat content of the clay. Very oily clay requires much more sand. The proportions can vary 1: 5 (clay-sand); 1: 4, 1: 3 (with clay of medium fat content) and even 1: 2. If the clay is very thin, then no sand can be added at all. Please note that you need to measure the components not by weight, but by volume. For this, it is more convenient to use a bucket or a large jar.
To select the proportions of the clay solution, you need to determine the fat content of the clay... This is done in the following way.
Prepare 4 types of the indicated solutions with different sand content and try to roll a small ball of 3-4 cm from each of them.Now, throw each of them from a height of about 1 m.
The “correct” ball, when dropped on a hard surface, should not change its shape or be damaged much. If it flattened, the solution is too greasy. It will crack when dry. If crumbled, then the clay is skinny, and you need to increase its ratio in the mixture, otherwise the plaster will be fragile.

Also, to check the readiness of the solution, you can put a clay ball on a hard surface and flatten it, reducing its height by half. Ideally, small cracks should appear along the edges of the specimen. If they have not appeared at all, then more sand is needed. If the cracks are deep, then, on the contrary, clay is added.
You can try to roll out a long tourniquet 20-30 cm long with a cross section of a couple of centimeters from the prepared solutions. By experimenting and choosing the ratio of sand and clay, it is necessary to ensure that such a flagellum does not crack after bending.
Advice! If you want the clay plaster to last as long as possible, protect it from moisture with a thin layer of cement (iron) or paint.
How to make a plaster solution
 You can prepare a solution for plaster without any complicated tools. We take an old large container - for example, a trough or a bath. Even if a large volume is required, it is not worth soaking more than 10-15 buckets - it will be difficult to stir the clay with sand.
Clean, without admixture of earth and plant roots, clay must be soaked at least a day and periodically mixed. In this case, it will be easier to work with it - it will be easy to knead it with your hands. Drain excess water. We remove all large lumps, poorly moistened with water, and plant residues. Since we have already determined the quality of the clay and know the required proportions, we prepare the solution by adding sand in the required amount.
We add the liquid gradually so as not to overdo it. We continue to knead until we make a solution of the desired consistency.
If you have a mixer or at least an electric drill, the cooking process can be significantly accelerated. For large quantities, a concrete mixer is required. By the way, in order for the clay to break perfectly in it, throw a couple of stones or pieces of brick into the water. They will help break up the clay and stir the solution.
Additives in the composition of the clay mixture
 For plastering fireplaces and stoves, asbestos, lime or gypsum are often added to the composition of the solution to increase the strength of the future plaster. Very few of them are required - 1/10 part. For example, if the ratio of clay to sand is 1: 2, then asbestos is added to the mixture of 0.1 part and 1 part of lime.
Advice! Be aware that no cement is used for laying the kiln, which breaks down under the influence of very high temperatures. Only clay (preferably chamotte) and sand in a ratio of 1: 3. For a small hearth, you can use a 1: 2 ratio.
Fireclay (white fired) clay is often used for stove plaster... After exposure to high temperatures, it acquires the properties of a stone and becomes refractory. It is crushed and used in solutions in proportions of 1: 3: 1 (clay, sand, cement M400-500).
For oily clay, the amount of sand can be increased. Learn that the amount of cement is calculated based on the sand. That is, the more sand, the more cement.
In the event that it was not possible to obtain high-quality clay, without impurities of chernozem (and in some areas it has to be obtained from great depths), it is better not to take risks and purchase ready-made mixtures for plaster, and especially for laying bricks of stoves and fireplaces. After all, stoves, stacked on an unsuccessful solution, can begin to smoke when it cracks.
Clay mortar with the addition of sawdust is ideal for building insulation. The lumber in the composition not only improves the heat saving of the building, but also acts as a reinforcement of the plaster layer. However, this mixture is not very elastic, and it is not easy to smooth it. Therefore, the hut is often left without alignment. But after drying, the plaster with sawdust is not afraid of cracks and does not crumble.
Advice! If the solution is too runny, leave it alone for a while, and then simply drain off the excess water.
Preparing walls before plastering
The clay solution, due to the absence of chemical bonds with the surface to be plastered, does not adhere well to a smooth base. Therefore, when facing bricks before plastering, jointing must be done.
Shingles are used to reinforce wooden surfaces finished with clay plaster... The use of plaster mesh in this case is not very convenient. Since clay is not as flexible as gypsum, it will not bond well to the mesh.
Shingles are called narrow planks 3-5 mm thick, which are stuffed onto the wall with nails. Wooden planks are located at an angle of 45 °. Moreover, the nails should not enter the wall completely, but only half. The rest of them are bent and recessed into the wall. In this case, the shingles will hold up better.
Clay plaster

The principle of working with a clay mixture, in fact, is no different from working with ordinary plaster:
- For alignment, beacon profiles are also placed.
- To obtain a solid surface without cracking, the thickness of each layer should not be more than 10-15 mm.
- With strong slopes and the need to apply a solution of greater thickness, clay-straw or sawdust mixtures are used, which are allowed to be applied to walls reinforced with shingles with a large layer.
- If necessary, a new layer is added on top of the first only after the surface has dried.
- After finishing with shingles, the walls are dedusted and moistened with water.
- The surface is abundantly moistened so that it does not take liquid from the solution and does not weaken the plaster.
- The solution is thrown on with force to provide better adhesion.
- To reduce the formation of cracks, it is advisable to add fibrous additives to the solution.
The video below shows how to plaster a clay or wood wall.
Decorative clay finish

Recently, colored clay plaster has become one of the most popular materials for interior decoration. It is used in many decorating techniques and is suitable to highlight the owners' commitment to natural, traditional materials.
Often the natural texture of a clay wall is complemented by embossed patterns or patterns. To do this, putty on the clay with a fine-grained composition without impurities. Then, on a layer of putty with a thickness of 3-5 mm, they are rolled with rollers, stamps, or they form a pattern with their own hands.
The finishing coat can be coated with a vapor permeable casein primer or paint in various colors.
Here are a few photos of clay in the interior.


The composition of the mixture for this type of plaster largely depends on the area in which people live. In Ukraine, wall decoration with clay was carried out with the addition of straw and horse manure to the solution, but now they are increasingly being replaced by wood shavings or sawdust. Some people prefer a clay-sand mixture without any third-party fillers. Consider here the most traditional option, but with the addition of a small amount of wallpaper glue for strength.
Plastering walls with clay with your own hands?

How to putty clay walls?
Consider the small features of how to plaster walls with clay. Much here depends on the composition of the filler. A damp clay wall conducts heat very strongly, three times better than a silicate brick. But as soon as she gets dry, she can already compete with him. But this is pure clay, and if you add straw, shavings, dung or other impurities to it, then such a solution will become much warmer. The thickness of the plastered layer should not be less than 1 cm. But it is worth noting that with straw filler it is unlikely to work out thinner for you. Another feature of working with such a peculiar solution is that the smaller the fraction of additives, the better your wall will look. Therefore, for the finishing layer, if such an opportunity arises, you should take wood dust or very fine sawdust, as well as clean washed sand.
The range of building mixtures is constantly expanding, but you shouldn't forget the old recipes either. In pursuit of cheapness and beauty, we forget about environmental friendliness, which very soon affects our health. That is why houses decorated with natural wood or clay have become popular in the West.