Beauty and comfort in the house is not only perfect cleanliness and exquisite interior, consisting of expensive furniture and designer renovation. The harmonious design of the room consists of many details and decorative elements, which can often both attract attention and repel the lack of taste.
Indoor flowers are an invariable decoration of any home, giving the room a special aura of home and freshness. But sometimes, flower lovers do not have the opportunity to place the number of plants in the room that they would like. Or, due to a change in the style of the interior, indoor plants in simple pots do not harmonize with the rest of the details.
But do not be upset! After all, you can diversify the interior and place more flowers with the help of a planter - a decorative item that will emphasize all the advantages of the decor and indoor plants. You can buy a flower pot, or you can create it yourself, which will give the interior individuality and originality.

Common types of planters
Before you start making flower pots with your own hands, it would not hurt to learn about its varieties. Indeed, today there is a huge selection of flower pots, which are conditionally divided depending on the purpose:
- desktop planters - it is customary to place them on cabinets, tables, racks, taking into account the stylistic decision;
- floor planters - located in spacious rooms and used for tall indoor plants;
- wall planters - suitable for small rooms where it is important to save space;
- hanging planters - in addition to originality, this type of planter allows you to place indoor plants quite compactly;
- planters for the garden - perfectly enliven the space of the site and give the site a complete look.


What materials are used to make pots? A decorative flower item can be made from just about anything, especially if it's handmade. During the creative process, all improvised means are used - from natural materials to old things or various small decorations.
- Wood. This is the most common material for creating decorative containers, when choosing which it is important to consider its resistance to moisture, as well as the processing of the material itself.
- Glass. A planter made of this material is a versatile and practical item, thanks to which you can track the moisture level of a plant.
- Plastic. Inexpensive and easy-to-care containers have long been in demand by many housewives due to their availability and a variety of colors.
- Ceramics. A more expensive option for pots, but also more diverse. Moreover, ceramics are easily amenable to some changes, for example, drawing a picture or glazing.
- Metal. Very unusual containers for flowers made of stainless steel or forged elements will give the interior a special expressiveness and emphasize the sophistication of indoor flowers.


Cache-pot in home decor with your own hands
Flower and hardware stores have a huge selection of flower pots. Here you can choose by size, color, and also depending on the location of the container.
But it so happened that each person is individual, therefore, in his own house, he expects to see only exclusive items that will emphasize the taste of the owner of the house. With some needlework skills, any housewife can create a real masterpiece that will refresh the interior.
So, let's begin.
Planters with lace
To diversify plain plastic pots, you can use pieces of bright fabric or lace. In addition, for work you will need:
- scissors;
- glue;
- pot;
- glue brush;
- material for gluing (lace, braid, ribbon).
Operating procedure:
- To begin with, the outer side of the pot should be wiped with alcohol in order to degrease the surface.
- Apply the necessary contours, in place of which the decor will be located.
- Lubricate this area with glue, without going beyond the contours of the pattern.
- Press well and leave to dry completely.

For a more durable fixing of decorative elements, you can use a glue gun, which will give the decor strength. If desired, you can decorate the pots with braid, bright buttons, beads and other interesting little things.

Planters from branches
An equally interesting option for creating a flower pot is a planter made of wooden circles, the manufacturing principle of which is similar to the previous one. Only for this you need to use tree branches in the work, the diameter of which does not exceed 2 cm.
To prepare the material, you need garden scissors, with which we cut wooden mugs with a thickness of no more than 1 cm
Having previously degreased the surface, we attach the material to the pot one at a time, carefully applying a small amount of transparent Moment glue.
Having pressed it well, we leave it in a place inaccessible to children until it dries.
In order for the planter to serve for a long period, it is recommended to varnish the product for wood.
No less interesting options can be obtained by gluing river pebbles, shells, dry moss, cork, tree bark.

Wooden planter with twine
An old wooden pot will sparkle with new colors if it is decorated with twine. To do this, apply glue to the surface and slowly press the rope, wrapping it around the pot. It is very important to fasten the rope at the end so that the product does not lose its original shape.
Having previously drilled holes for the rope, you can build a hanging planter with your own hands. To do this, carefully thread the twine into the holes and secure it well.

Branches or bamboo planters
Natural materials are the best way to decorate the interior, as they are distinguished by their natural beauty and environmental friendliness. One of the options for creating a planter is a planter made from cane or bamboo branches.
For this you need to prepare:
- chopped straight branches or bamboo;
- twine;
- scissors;
- glue "Moment" transparent;
- dense coarse fabric (burlap, linen);
- plastic pot.
Operating procedure:
- Before you start tying the sticks together, they should be aligned so that the product looks aesthetically pleasing.
- Then we tie the branches together with twine along the edges (2-3 cm to the edge), tightly tightening so that the canvas does not crumble.
- Apply a layer of glue to the outer walls of the pot and evenly glue burlap or linen.
- We tie a cloth of sticks around the pot, and tightly tie the upper and lower parts.
- The cache-pot can be additionally decorated with flowers made of twine or burlap, which will give the product a special effect.

DIY hanging flower pots
Hanging planters are often used by those who need to free up more space in a house or apartment. This decor allows you to move around the house without obstacles, so this type of planter can be called the most popular.

In this way, you can perfectly decorate the garden with your own hands. But before that, it is worth remembering that the materials for hanging planters must be resistant to high temperatures and the adverse effects of precipitation. For such purposes, a planter from a plastic bottle will be suitable.

Cache-pot from a plastic bottle
There are many methods for making decorative containers from plastic bottles. One of them can be decorated using the decoupage technique.
Necessary materials:
- a plastic bottle with a volume of 1-1.5 liters and a flat bottom;
- scissors;
- basis for decoupage;
- napkins for decor;
- brushes;
- varnish.

Operating procedure:
- Prepare the bottle for work by thoroughly washing and wiping.
- Apply a thin layer of foundation, evenly distributing it with a brush.
- After the base dries, it usually takes 20-30 minutes, apply surfactant glue, also smoothing well.
- After separating the top layer of the napkin, apply it to the container and smooth it with a brush or fingertips.
- In order for the surface to dry well, it is better to leave the product overnight at room temperature.
- Then the pots are varnished and dried.
- We pierce holes on both sides of the pot with a hole punch and thread the rope with which the plant should be tied to the mount.

Features of vertical gardening
Fans of unusual plant decor will surely like “living walls”, or vertical gardening. Today it is a favorite technique of designers around the world, emphasizing the exclusivity of expensive interiors. Professional "living walls" are not cheap, especially if everything is done with the latest technology, including automatic watering.
Vertical gardening has a number of advantages:
- air saturation with oxygen;
- space saving;
- improves the appearance of the walls and complements the style of the interior;
- the abundance of plants on the wall are a source of additional air humidification;
- division of space into zones.

Despite the apparent difficulties in creating such walls, having become well informed with the necessary information, you can create an unusual structure on your own. It is worth recalling that this type of landscaping can be built both in the house and in the garden.

Planters for this type of landscaping can be wall-mounted and conventional, depending on the design and location of the plants. To create wall-mounted pots, containers from plastic bottles are suitable, which are easily attached to a vertical structure or wall with a rope. To make the container more aesthetically pleasing, you can decorate it with a braid to match the interior. This decor is a macrame or crocheted canvas.

An equally interesting option is pockets made of dense fabric in which climbing plants can be planted. This option is good for decorating the garden, in which you can build metal grills or special racks.
On special frames made of stepped wood, you can place flowers in flowerpots, the surface of which is decorated with natural materials.
A great option is a planter decorated with moss. All you need is dry moss and clear glue. The process of creating such a pot will not take much time, but the result will exceed all your expectations - an original and exclusive decor item will become an unusual decoration of a garden or home.

A cache-pot decorated with river pebbles is an interesting option for vertical decoration. The process of creating such an item will take a little longer than in the case of moss, but it's worth the effort. This decor is distinguished by a non-standard approach and originality.

Equally successful in creating a beautiful flowering wall in the garden are suitable plants. For this case, curly and ampelous flowers are ideal, which, with proper care, in addition to landscaping, will create a whole riot of floral colors.
Decorating a home is a time-consuming and interesting activity that requires creativity and the desire to make the interior unique. To do this, they use all sorts of tricks and tricks, just to stand out with originality and non-standard solutions.
Making a planter with your own hands is one of the ways not only to refresh and diversify the interior, but also to prove yourself as a creator and artist who creates incredible masterpieces. After all, needlework has always been a part of art, which in turn contributed to the manifestation of human creative abilities.
So, create with pleasure!
(18
ratings, average: 4,08
out of 5)
 An unusual planter can bring originality to the interior of the house and emphasize the beauty of the flower planted in it. Making beautiful decorative planters for the garden with your own hands is not difficult at all. Any object, be it an old shoe or a leaky car tire, can be given a new life by turning it into a vessel for a flower. The choice of materials is not limited by anything but the master's own imagination, and the result will make your home garden unusual and bright.
materials
- Plastic is an inexpensive and affordable material from which both flower pots and planters are made. For greater safety and overheating in the sun, it is recommended to choose light colors for plastic flowerpots. Plastic products are good because they are easy to decorate with any decorative elements.
- Clay is a traditional material from which pots and planters have been made for many thousands of years, and the plasticity of the material allows you to create a wide variety of options and shapes. The inconvenience of clay is that it is difficult to make additional holes for drainage, and also not always such a capacity allows the plant to develop naturally.
- The stone is most convenient for street design options. This material is environmentally friendly and durable.
- A planter made of wood is a very unusual and attractive choice. In such containers, the roots do not dry out and perfectly retain heat. However, natural material has a very limited lifespan, over time, pests start up in it, the tree rots and decomposes.
- Metal planters are suitable for strict interiors. This is a very dense material that has high thermal conductivity, so it is recommended to use metal in combination with other materials with insulating properties.
- Nylon thread is used to weave macrame-style hanging planters. Such planters are cheap, exclusive, perfectly harmonize with any interior style and do not take up much space.
- For plants that need constant monitoring of the liquid level, glass containers are well suited.
 It must be remembered that there are no special holes in the bottom of the pots, from where water should pour out, as in flower pots. In order to prevent the roots of the plant from rotting, water needs to be drained regularly.
Whatever material is chosen for the product, first of all, they must be resistant to high humidity and sudden changes in temperature.
The tutorials below show some ideas on how to make a planter with your own hands.
Cement planters
A decorative planter made of cement will be not only original, but also very durable. Make a pot with your own hands possible in different ways.
Option 1
Materials:
- Cement;
- An old curtain, tablecloth or any fabric of a suitable size;
- A vessel for creating a mold;
- Water;
- Bucket;
- Perforator or nozzle on a drill in the form of a "mixer";
- Paint in desired color.
Making a cement pot is very easy.. First of all, you need to make a cement mixture. To determine the amount of mix needed, place the fabric in an empty bucket and mark the wall with how much space it takes up. Along the edges of the mark, you need to pour water for the future solution, and then gradually add cement to the water, mixing it with a “mixer”. The result should be a mixture that resembles liquid sour cream in consistency.
The entire fabric should be placed in the finished mixture and left for several minutes until it is completely impregnated. After you pull the fabric out, you need to make sure that there are no dry spots on it.
Hang the fabric soaked in the cement mortar on the container chosen for the form, straighten the material and leave to dry until the mortar has completely solidified. Then the product can be removed from the mold and given the desired color. Special paints for concrete will be more durable.
Option 2
Materials:
- bricks;
- Cement;
- Sand;
- Two plastic containers of different sizes;
- Nozzle for drill "mixer" or perforator for mixing;
- Mixing container (bucket, basin or pan).
 For less sticking of the cement mixture, you need grease plastic containers with vegetable oil. The smaller one on the outside, the larger one on the inside.
Then you need to make a cement mortar. Gradually adding cement and sand to the water, stir the future mixture until the consistency looks like watery sour cream. Pour the finished mixture into a large plastic container, and place a smaller one inside. The thickness of the walls of the future planter or pot depends on the difference between the volumes of containers.
Inside the smaller container, place a load: bricks, gravel, or any other weighting object, and then leave the product to dry. Depending on the volume, the cement mortar will dry out from two or more days.
After complete solidification, you need to cut the plastic and remove it from the product.
It will look very good do-it-yourself cement planter for the garden, as such products look good in large sizes. However, small pots, despite their bulkiness, look very original in the home interior.
If desired, you can paint the finished work with acrylic paints, paints for concrete or otherwise decorate with other decorative elements.
Gallery: unusual flower pots (25 photos)


Gypsum planters
Materials:
- Water;
- Gypsum;
- Two plastic containers of different sizes.
Gypsum planter production technology similar to the creation of cement pots. A gypsum mixture, mixed in a ratio of 2: 1, is poured into a large container lubricated with oil. A smaller one is placed inside the solution, the desired level is set with the load, and then the product must be left until completely dry.
Birdcage planter
An old birdcage is a very beautiful and original option for planters. The plants decorated in it look very unusual. The advantages of using a cage are that it can be placed on the windowsill and hung in any convenient place.
Materials:
- Bird's cage;
- Acrylic paints;
- Gloves;
- Brush.
Make such a pot extremely simple. The washed and dried cage must be covered with paint. In order not to get very dirty with paints, you must first paint the cage from the inside, and then from the outside. The shade of paint should be in harmony with the colors of the interior.
After the paint has completely dried, several flower pots can be placed inside. Climbing plants that can wrap around the rods are best suited for birdcage planters.
Hanging multi-tiered planter made of wood
The best option for a decorative planter for an apartment is hanging wooden planter. Due to the fact that the product has several tiers, flower pots will not take up much space. Making a wooden hanging planter with your own hands does not require much time and money, and the result will fit perfectly into any interior.
Materials:

Saw as many squares from a wooden plate as you plan to place in tiers in a future product . To determine the size, need:
- Turn the pot upside down and place it on a wooden plate.
- Circle the odds of the pot. Using a ruler, retreating five centimeters from the edges of the circle, draw a square.
- Cut out the squares along the contour.
Then you need cut holes in the finished squares for pots. For this

With a drill, the diameter of which does not exceed one centimeter, you need to drill holes for the rope at the corners of the squares.
Using sandpaper, sand the wood, smoothing out all internal and external bumps and protrusions. Then paint the plates with wood varnish or paint. If desired, the pots can also be painted so that they are all in the same color scheme.
To assemble wooden squares, you need to cut 4 ropes of 180 centimeters.
- The ropes need to be fixed on a strong knot in the corner holes of one of the squares. This will be the bottom of the pot.
- Having measured about 25-30 centimeters from the beginning of the stand, you need to tie one more knot on each of the ropes, and then string the second tier on them. It is important to ensure that all nodes are even, and the second square is strictly horizontally above the first.
- Repeat these steps for the rest of the plates.
The wooden flower pot is ready and you can plant the plants. The advantage of this design is that when watering, water will drain from the upper plant to the lower one, so the stand is required only for the lower pot. To prevent the pot from falling if someone accidentally hooks it, you can glue it to the stand with superglue.
If you put absorbent filters on the bottom of the pots, then one of them the earth will not fall out, which, however, will not interfere with watering the plants.
Garden planter from twigs
A beautiful planter, decorated with sticks or branches, will give a natural and harmonious look to the garden in the country. Such a planter will hide a faceless plastic pot, creating an atmosphere of natural nature in the garden.
Materials:

Technique for making garden pots
- Sticks need to be cut into pieces of the same size. The length of the blanks depends on the height of the plastic pot, and their number depends on its diameter.
- The branches must be tied together both above and below. To do this, on each branch you need to knit two knots, continuing until you get a single canvas.
- Burlap is wrapped around and inside the pot. You can fix it with superglue or sew it firmly.
- The wood blank should be wrapped around the pot with the plant, and the edges of the ropes should be tied together, secured with glue and cut off the excess.
Flowerpot for giving
You can show your imagination in the design of garden planters. You can make flower pots with your own hands literally anything which has already outlived its usefulness. Garden flowers in a bucket and a multi-tiered planter from an old chest of drawers with drawers will also look good. DIY hanging flower pots for the garden can be made from an old hat, broken dishes, unnecessary shoes or a garden watering can.
The garden will be wonderfully transformed if you decorate it with handmade items. The garden designer gets the greatest satisfaction if he manages to combine beauty and usefulness. From this point of view, the most advantageous decor is street flowerpots and flowerpots, which will not only decorate the local area, but also shelter your favorite flowers.
Vases from tires
Gloomy tires rarely fit into garden design. But really decorate them beyond recognition. For example, imitate brickwork.
A decorative planter-well is built from tires, timber and metal tiles
Unique flowerpots from tires are made quickly.
Step-by-step instruction:
- On the side surface of the tire with chalk, draw a notch line.
- Cut the tire with a knife along the marked line.
- Turn the tire over, press down on the inside with your foot, grab the edge and pull up and towards you.
When cutting with a knife, the blade should be wiped with grease or machine oil for better glide
Coat the rubber with a primer and apply a pattern.
For an outdoor flowerpot, oil or acrylic paints are used.
For complete masking, put a mesh on the tire, then a thick cement mortar with sand and glue the tiles.
Covered with tiles or pebbles, a flowerpot made of tires looks very stylish.
Photo gallery: design of flowerpots from tires
Draw a landscape on the tire and plant hostas A bright flowerpot in the form of a parrot will decorate an unsightly place Flowerpots in the form of cups look very elegant Place a flowerpot from a tire in the form of a kettle in the dining area A flowerpot from a tire in green tones organically fits into any landscape A flowerpot from a tire in the form of a cup is suitable for ampelous plants
We make a flowerpot from a tire - video
Flowerpots made of plastic and glass containers
Ordinary garbage will serve the cause of beauty, for example, various containers. Plastic is instantly transformed if you glue it with twine.
Any waterproof glue is suitable for sticking twine on an outdoor flowerpot
A great option is burlap decor.
Rough burlap sets off the fragility of flowers
Branch trimmings will also reliably hide the plastic.
Branches to the flowerpot are glued with glue or tied with twine
Apply a pattern to the pots with hot glue and cover with acrylic paint.
To create a three-dimensional pattern, you need a thermal gun
Or place the bottles in gift bags.
Gift bag planters are a quick way to spruce up plastic bottles
After cutting off part of the canister, create a planter for the wall.
The surface of the canister is smeared with glue and sprinkled with sand to create the effect of a “sandy” face.
Fix glass bottles on the fence and plant juveniles and stonecrops in them.
To cut a glass bottle, wrap it with copper wire at the cut point, heat the ends with a lighter, and dip in cold water.
If you cut a plastic bottle in half and glue the neck to the bottom, you get an original flowerpot.
If you paint the flowerpot with silver or gold paint, you will get the feeling that the flowerpots are metal
Flowerpot from a plastic bottle - video
Cache-pot in the form of funny characters from plastic containers
Get the kids involved in making unusual pots.
Garden flowerpots are created from any plastic containers
Pot-pig do-it-yourself - video
Bottle flowerpot
Looks great mini flower garden made of glass. The base (bucket or tire) is coated with a thick cement mortar with sand. Then rows of bottles are laid, pressing the necks into the base solution.
Consider the location of the flowerpot in advance, because it is difficult to move it
Gypsum planters
Eco-friendly materials are in vogue. Gypsum is famous for its best plastic properties. Any container or wire frame is wound with strips of fabric soaked in a gypsum solution until the desired wall thickness is achieved. When the product dries, it is sanded, primed, painted or pasted on the wall decor.
In the manufacture of planters, gypsum can be replaced with putty or alabaster
Pebbles, shells, tiles are used as decor.
If you mix gypsum with the color of the desired color, we get colored seams
Planter swan
The figures of birds will give a romantic touch to the garden. For a planter in the form of a swan you will need:
- gypsum - 5 kg;
- plastic bottle 5 l;
- leg-split;
- wire;
- mesh for wings and tail;
- bandage;
- primer;
- paints (white, black and red);
- putty knife;
- brush;
- emery.
It is convenient to knead gypsum with a special spatula
Step-by-step instruction:
- Cut off the side of the bottle and pour sand into the resulting container.
- Insert one end of the wire into the neck, give it a bend and wrap it with twine along the entire length.
- Apply a gypsum solution with a spatula with a layer of 2 cm on the surface of the "skeleton" of the future bird.
- On the sides of the body, press the reinforcing mesh (wings) at an angle.
- Apply several layers of bandage and plaster over the mesh to hide it.
- Form the head and beak by wrapping the wire with a bandage and applying layers of plaster. Smooth out irregularities with a brush.
- Attach the tail from the mesh and process it like wings.
Dry the figurine for three days, then sand it with sandpaper. Cover the bird with a primer, wait for it to dry and paint.
Making a swan planter is not as difficult as it seems
Making a planter swan - video
Cache-pot from a barrel
A large container will also come in handy. For example, iron barrels are stylized as human figures.
Ampelous plants are planted in flowerpots from barrels, which fall beautifully
Or sheathed with wooden slats.
Planks are fastened with a nail gun
Wooden barrels are cut in half across.
From one barrel you can make two flowerpots
The cut barrel is placed on a stand so that it lasts longer
Homemade pots from a barrel - video
Cache-pot from unnecessary things
It is not necessary to throw away everything that is worn out.
A second life can be given even to frank trash
Sometimes junk pots become the highlight of the garden.
Exquisite planter is obtained from a birdcage
An old umbrella will be transformed if you plant flowers in it.
To keep the umbrella decorative for longer, just put pots of plants in it
Photo gallery: planters from old things
Cut an old basketball in half Leaky watering cans are not good for watering, but will be a garden decoration Paint old colanders and plant hanging flowers in them Old flip flops and cups are a beautiful ensemble Attach sewer cuts to the wall and plant petunias in them Wrap an unnecessary hose around a flowerpot  Weld a cache-pot umbrella from scraps of reinforcement and an iron sheet
Wooden planters
Products made from natural materials look most organic in the garden. Among them, the tree is the leader.
A simple flowerpot is made from an ordinary stump using a drill and a chisel.
Step-by-step instruction:
- On the cut of the stump, drill holes around the perimeter.
- Remove excess wood with a chisel.
- Treat the inside of the stump with stain and dry.
- Lay polyethylene inside the flowerpot and plant the plants.
Inside the planter, you can simply place a suitable size pot
Coat wood jewelry with antiseptic to keep it from rotting.
To prevent the logs from rolling, drive stops into the ground
Cache-pot from a bar and boards
All that is left after the construction of the house is used to decorate the site. Stylish containers for plants are built from timber and boards.
Planters made of wood are better to do on legs, so it will last longer
Planters painted in light gray are suitable for a Provence-style garden.
Drill drainage holes in wooden pots
If there are scraps of wood lying around in the barn, collect planters from them in the form of a well, a wheelbarrow, a bicycle.
Planter-well decorates the garden very much
Photo gallery: tree planters
If you put the stumps on top of each other, you get a picturesque composition. 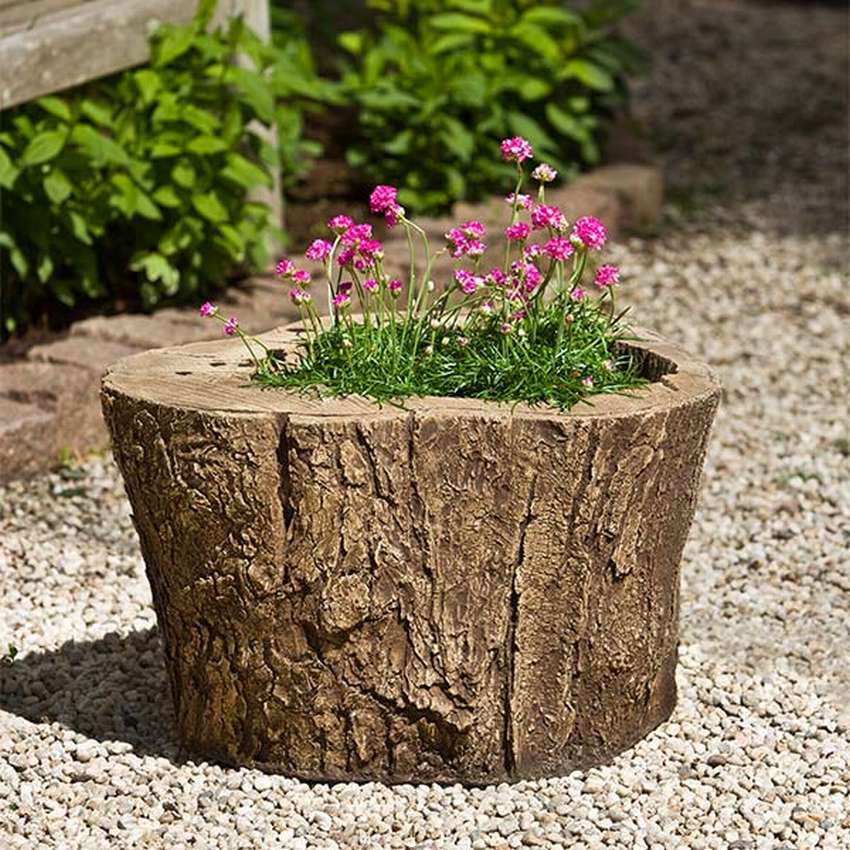 Plant drought-resistant plants in flowerpots Bulbous plants look advantageous in a flowerpot from a stump: tulips, daffodils, crocuses
  Please note that untreated wood will quickly lose its appearance.
  To make the texture of the wood visible, tint it with oil Hang small planters made of wood in the gazebo Wooden planter will decorate the area near the house
The main requirement for gabion wire is durability
Any plastic container is easily decorated with crushed stone. Screws are screwed into the cache-pot, between which wire is wound, cement mortar is placed on top and crushed stone is pressed in.
A mesh of nylon thread or wire is needed so that subsequently the cement does not fall off the container
Dried products are varnished.
Holes are made in the upper part of the iron cans through which the twine is passed.
The flowerpot will not fall out of the attachment, woven using the macrame technique.
If design allows, attach three chains to the top of the planter
Sometimes the pots are nailed to a wooden rail, which is attached to the wall with dowel-nails.
Holes are drilled in the shelves of the whatnot through which the rope is passed
We hang planters - video
After chopping firewood in the country, a lot of beautiful bark remains, which I use to decorate flowerpots. The bark is cut into strips 2-3 cm wide and attached to the pot with a heat gun. Working surfaces are dedusted and degreased before gluing. If gaps remain between pieces of bark, I mask them with moss or lichen.
Hot melt softens in the sun, so flowerpots decorated with bark are best kept in the shade.
When creating planters from improvised materials, take care of their durability. Treat wooden flowerpots with anti-rotting agents and drill drainage holes. Before decorating the containers with stones or tiles, wrap them with a reinforcing mesh so that the solution with the decor does not fall off over time.
A planter or an unusual pot can emphasize the unique charm of the plant in it, add zest to a mini-garden on the windowsill, or become an interior decoration both inside the house and in the garden. However, the question often arises of the material that should be preferred when choosing a container for flowers. The article will discuss how to choose, or make flower pots with your own hands.
Material selection
Depending on your needs and budget, you can choose from a wide range of pots. Before deciding to buy, it is worth comparing different options, and weighing the pros and cons.
A few points to consider:
- finance. There are a lot of options on the market - from inexpensive planters to exclusive handmade ones;
- purpose. Will the flower pot be part of a temporary project? In this case, it makes no sense to spend a lot of money on it. If it is an element of interior decor, then it is worth investing in the long term;
- independent production. Often, to save time, a ready-made planter is purchased, however, nothing compares to your own unique work;
- advantages and disadvantages. Before purchasing, it will be useful to consider the advantages and disadvantages of different types of pots.
Types of materials for pots
Plastic flower pots

A cheap versatile material from which both small pots and large flower pots are made.
- The color of the pot is preferably light, this will not heat up quickly in the sun, the plants in it will be less susceptible to the spread of microorganisms.
- If necessary, in such a planter, you can always make additional drainage holes for the root system.
- Of the minuses of the material, it is worth noting its fragility, especially if it is used on the street, over time the material becomes thinner and becomes brittle.
Clay planter

Traditionally popular material for pots.
- In terms of design, clay pots offer many attractive options.
- However, for plants, a clay pot is not always the best place to live, since it is almost impossible to provide adequate drainage in it.
Cache-pot from a natural stone

Most often used in the manufacture of outdoor flower pots, as an element of landscape design.
- They are very beautiful, monumental and, of course, durable.
- In addition, the stone can be called, perhaps, the most environmentally friendly material.
- Its main disadvantage is its heavy weight.
Wooden planter for flowers

Wooden pots are very attractive and original.
- They provide excellent thermal insulation for the soil. Where necessary, they help insulate plant roots from excessive solar heat.
- However, due to the fact that wood is a natural material, pests can start in it, and wooden bottoms rot over time. To avoid this, it is recommended to combine the tree with other types of planters, for example, put several plastic pots in a wooden pallet.
metal planter

Metal containers will add a touch of rigor to the design.
- They are strong and durable, but have a very high thermal conductivity, so they, like wooden pots, are recommended to be used in tandem with an insulating planter, for example, made of clay.
Nylon threads

With their help, weave flower pots in the style of macrame. These are inexpensive, but at the same time exclusive planters that will perfectly fit into the interior of not only a country house in a rustic style, but also suitable for a modern city apartment.
Six ideas on how to make a flower pot with your own hands
In spring and autumn, gardeners traditionally put things in order in their gardens, both ordinary and mini-gardens on the windowsill: they transplant plants, get rid of unnecessary ones. Why buy a new expensive planter if you can make it yourself from improvised materials? Surprisingly, from such simple things as baskets, shoes, dishes, furniture, amazing, unique planters are obtained, which will undoubtedly become an adornment of any garden.
Old cabinet drawers or chest of drawers will look very interesting as a planter. To prolong their life, it is better not to fill the earth directly into the box, but to put smaller pots with plants in it.

Helpful Hints:
- at the time of watering, it is better to remove the pots from the box, so its life will be noticeably extended;
- to mask pots in a box, they are covered with coconut fiber or moss.
Sackcloth. This material, rough at first glance, in capable hands becomes an excellent design tool. The fabric can be dyed and simply wrapped around the pot. So, even pots of different shape and quality will turn into a single ensemble.

Helpful Hints:
- in order to securely fix the fabric on the pot and simplify the process of creating a planter, it is recommended to use a glue gun;
- and vice versa, you can create a removable cover for the pot, in this case it is sewn with threads.
Tiered basket design. This technique will help not only optimize the space for plants, but also facilitate watering. In addition, this is an excellent option for pots for ampelous flowers.

Helpful Hints:
- in order to prolong the life of the baskets, a layer of coconut fiber (peat) is first laid on the bottom, and then the earth is already poured;
- before planting, it is necessary to calculate the height of the baskets and the height of future plants in them.
Bright plastic buckets for sand. Only for children to play in the sandbox? Not at all! It is enough to make drainage holes in the bottom, and bright plastic buckets will cheer you up in your summer cottage.

Helpful Hints:
- with the help of such planters, you can create a kindergarten by planting your baby's favorite plants in them so that he learns to take care of them on his own.
Looks unusually stylish old shoes as a cache-pot. It can be rubber boots or leather boots. The undoubted advantage of this type of pots is the possibility of their regular replacement. And as a hanging planter for flowers, old bags are also suitable.

wooden box. You can leave the tree intact, adding brutality to its appearance or painting it to match the overall landscape.

Helpful Hints:
- with the help of boxes, you can create themed corners, for example: medicinal or culinary herbs, spring and summer flowers, etc.
DIY flower pots with a self-watering system
A flower pot with a self-watering system consists of the following elements:
- actual pot. Any old plastic one will do, the main thing is to make sure that it has the necessary drainage holes;
- moisture-absorbing area, any plastic bottle is suitable for these purposes;
- the tube for filling the tank with water is wide enough to make it convenient and easy to fill the water. You can use a plastic tube or hose;
- barrier (mosquito net, plastic bag, etc.);
- stones (for example, large river pebbles);
- land (in which the plant will be planted);

Step one: preparation
- In a self-watering pot system, the heart is the area that is responsible for transferring moisture to the roots of the plant. Therefore, the manufacture of the pot begins with this element.
- For its manufacture, any plastic bottle is taken, from which it is necessary to cut off the bottom and make many small holes in it (through which the soil will be saturated with moisture).
- The height of this plastic part depends on the height of the pot, and should be at least a quarter of it.
Step 2: Preparing the Tube and Drain Hole
- The tube must be installed in the planter and cut to height. It can be 2-4 cm above the ground.
- Then the level at which a hole will be made to drain the water is measured. It should be flush with the top of the plastic part that was made to saturate the soil with moisture.
- The drainage hole is responsible for preventing excess water from reaching the roots of the plant in order to prevent them from rotting.

Step 3: Filling with soil and installing a moisture-absorbing area
- At this stage, a mesh or film is required, the size is determined by the diameter of the pot, the fabric should be 2-2.5 times larger.
- At the cut, the middle is marked, which is inserted into a plastic drainage cup.
- Then the grid must be straightened, and earth should be poured into the cup. It is important to ensure that it lies exactly along the edges, and the earth is carefully tamped.
- After that, the glass can be placed in the center of the pots.
Step 4: install the watering pipe and backfill the stones
- A glass of soil was placed in the center of the pot, a tube (or hose for water supply) was installed on one side, and then stones were poured to the height of the plastic cup.
Important: the protective barrier (mesh) must be held at this moment, then it will be carefully laid on top of the layer of stones. Its function to separate is to separate the stones from the soil. The glass itself does not need to be covered with material.
Step 5: Backfilling the soil and planting the plant
- Backfilling of the earth begins from the middle of the pot, from the place where the plastic cup is placed, which performs the function of moisture saturation, moving from the center to the edges.
- When pouring soil, the mesh can be gradually pressed down. When most of it is covered with earth, the plant itself is planted to the required depth. Then the earth is filled up to the top of the pot.
Step 6: Water and Finish

- Now that the plant is planted, the earth is filled up, it's time to water.
- The first time after transplantation, the top layer of soil is watered, and then water is added through the tube to the bottom layer.
- The plant will now be able to take the necessary moisture with the help of roots through a moistened area of \u200b\u200bthe soil in a plastic cup.
- To feed and plant, you can add fertilizer to the water, which is poured through the tube.
A flower pot made in this way can be used as a wall-mounted one, if it is braided using the macrame technique, or as a floor-standing one for large-sized plants.
Often, home plants are placed on the windowsill - closer to natural light. If the window sill is very narrow and there is not enough space to accommodate house plants in flower pots, you can grow flowers together on hanging fixtures. In this case, the way out can be hanging basket
or pots
. A cache-pot is a hanging container in which a single pot with a flower or green plant is placed. A more interesting option is a hanging basket in which several plants are planted at the same time, forming a flower arrangement.
There are a number of difficulties that can complicate the process of this method of growing plants. But thanks to our advice, you can choose the right place, arrange the composition correctly and properly care for flowers in hanging containers:
- Tip 1: It must be remembered that warm and dry air rises, so plants in a suspended structure will require more frequent watering.
- Tip 2: If you overfill the water, it may drip right onto the floor. This threatens to swell the wooden floor, therefore, the best place for hanging baskets is the kitchen or balcony, where the floors are usually laid with tiles.
- Tip 3: For baskets located indoors, polyethylene is sometimes placed inside the container so that water does not drip, but this creates a threat to flood the plants. The best solution is to place several plant pots in a waterproof container. The container itself can be hung on a wire, rope or twine from the ceiling. The principle of such placement is similar to the flower girl, which is described in the article about the home mini-garden.
- Tip 4: The gaps between the pots and the walls of the container are filled with wet peat. Peat is lighter than, for example, a mixture of peat and earth, and when hanging from the ceiling, unnecessary loads should be avoided.


- Tip 5: If you have chosen the option of planting plants in a common container, then the rules here remain unchanged: the plants must have the same watering regime, temperature regime and be equally sensitive to lighting. As for the soil, it is poured into a container on top of the drainage layer, which is also a general rule for this method of growing plants.
- Tip 6: It is better to hang the basket in such a way that it can be reached by hand, that is, at the level of your height. If for some reason this option is not possible, then use not a simple hook, but a carabiner, this design will allow you to raise and lower the container.
- Tip 7: One last tip: check if your green "pets" are getting enough light and air at the chosen height. Flowering and variegated plants should be placed closer to the light - near the window.
Examples of flower arrangements in a flower pot:


