Banquet in the hallway - an irreplaceable thing. You can sit on it after a hard day or accommodate guests if there were not enough chairs at the celebration. This article will tell you how to make a bench with your own hands.
What is a banquette
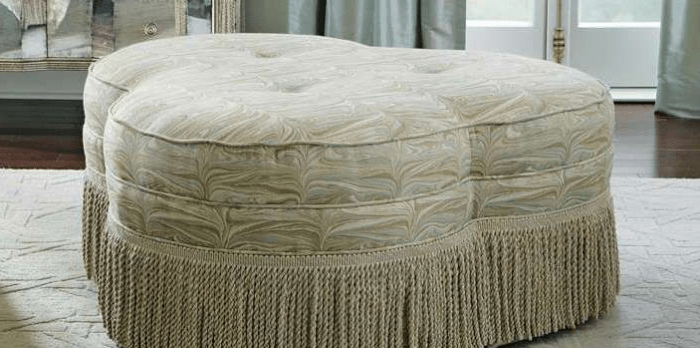
Such an indispensable element of the interior as a banquette was invented back in the 18th century. It is a stool or a small bench with upholstery and sometimes a back. Some banquettes can store shoes, making them even more functional. Traditionally they are made rectangular, round or square.
Such a piece of furniture will be a great addition to the interior of any room:
- entrance hall (you can sit down when tying shoes on a bench; shoes and various care products are often stored in it);
- bathroom;
- kitchen (a bench is often used as an addition to a soft corner);
- bedroom;
- living room (here this piece of furniture can serve as an additional place for guests).

Bench types
A properly selected banquette helps to give the room coziness and comfort, to make an individual, unique atmosphere. Consider several basic types of banquettes, which differ from each other in shape, size and material.
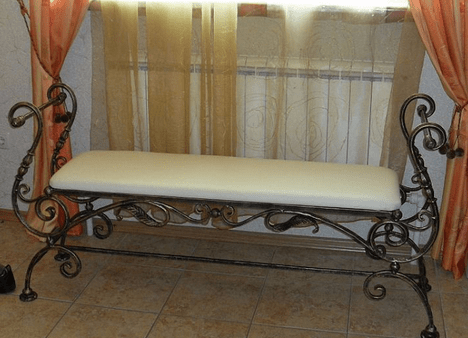
Forged
This type will look great in the interior of the Baroque, Provence or Empire style. This type of banquettes is distinguished by forged, twisted legs. Most often, such benches are made without lockers and drawers, as they are very difficult to build in. But sometimes they still make a small shelf.
Advice ! Banquettes with wrought iron legs are more suitable for the hallway than for the living room or bedroom.
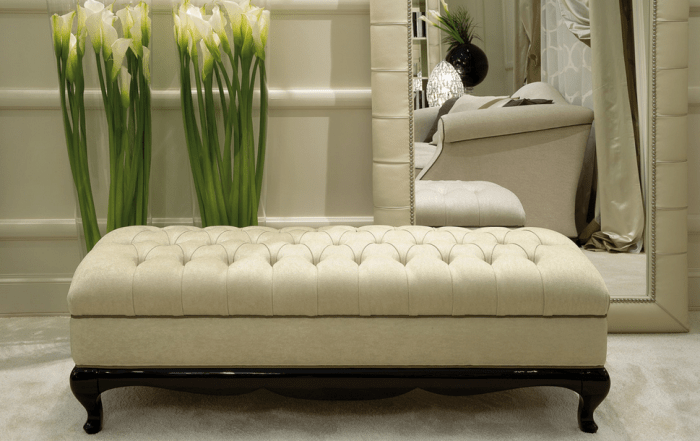
from wood
Wooden banquette will suit almost any interior. It will also look good in the hallway, as well as in the kitchen or in the living room. It is easier to build cabinets into a wooden sofa, which will immediately make the item more functional. You can also add a back to a wooden bench, but this is the next look.

with back
Benches with backs are the most convenient to use. They give the hallway home comfort and warmth. In addition, dues for work or a walk thanks to such sofas become much more comfortable. Large benches can be used for zoning. By the way, if you have an oriental-style interior, you can decorate the bench with bright pillows. This also applies to forged banquettes.

collapsible
This type of banquette is a steel frame, on which a fabric or a leatherette seat is stretched. If desired, such a bench can be quickly assembled and disassembled. All its elements are fastened with bolts. Such pieces of furniture are easy to maintain and functional. True, collapsible benches rarely have a decorative function. The abundance of elements would greatly complicate the assembly process.
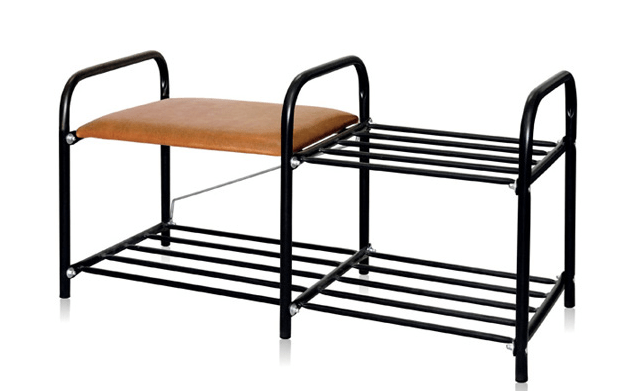
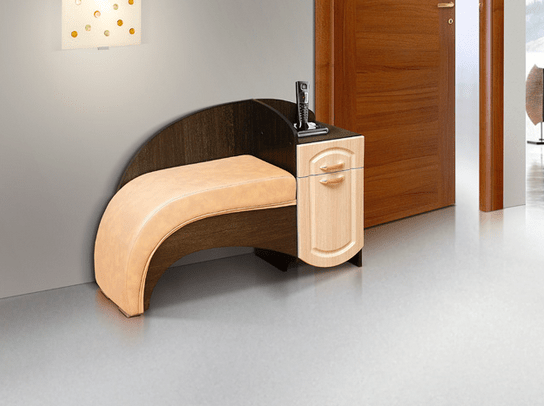
with drawers
A bench with drawers helps to save space if the hallway is small. Drawers (which can be retractable or have regular doors) can store shoes, care products for them, and everything that the owners of the house want. Most often, shelves are placed under the seat. But if desired, the bench can be equipped with a side cabinet, on which you can put a phone or a decorative element, such as a vase of flowers or a figurine.

Upholstery materials
A wide range of materials are used for the upholstery of the banquette. Consider the most common:
- Fabric (it can be chinille, cotton, linen, silk or flock). The fabric is easy to clean, its range allows you to choose materials and shades that suit your interior. The price depends on the type of fabric. Usually the price of natural materials is higher than synthetics.
- Skin. This is a more expensive and noble material. If you choose a bench with leather upholstery, then the interior must match. This material looks best with expensive woods. As for care, the skin is more capricious than the fabric. But caring for her will not be a big difficulty and will not make a hole in the family budget, so you should not be afraid.
- Faux leather. This material is more budget. Leatherette is easy to clean, but has a shorter lifespan than genuine leather. If the banquette is well made, then in the room it will look as elegant as the skin.
We make a banquette on our own
Making a banquette in the hallway with your own hands consists of several steps. Each of the stages is quite simple, but they all require care and accuracy.
Necessary materials and tools
Banquettes with forged frames and forging will require certain skills and professionalism. In this article, we will consider the possibility of making a wooden bench with our own hands.
Necessary materials:
- A timber beam measuring 30 by 40 or 30 by 50 mm;
- Legs can be taken from an old stool or coffee table;
- Glue, self-tapping screws, pins and furniture corners;
- Plywood or MDF sheets.
The upholstery consists of a cover and a filler. Foam rubber usually acts as a filler. It keeps its shape well. If you want to make the seat softer, then you can take a synthetic winterizer.
For manufacturing, you will also need the following tools:
- drill, jigsaw and screwdriver;
- a hammer;
- screwdrivers;
- needles and threads;
- construction stapler;
- level;
- sandpaper;
- paint, varnish and stain (optional).
Preparatory stage
Before proceeding with the manufacture of a bench, a drawing should be made. It is necessary to accurately determine the size of the room and the future product.
First you need to decide on the model. It will be difficult to implement a bench with a back in the absence of experience, so it is better to choose a simple, wooden model without a back. Further, based on the selected model, you need to calculate the dimensions of the remaining parts.

Advice ! If you plan a lot of details, then you should make a pattern, and only then proceed to cutting plywood.
Details need to be cut with a jigsaw and process their edges with sandpaper.

Product assembly
It is not worth doing all the necessary details in one day, especially if this is your first time making furniture. It may turn out that you make a lot of mistakes, and something will have to be redone.
First of all, it is worth making a seat and starting from its size. Other parts are much easier to fit under the seat.

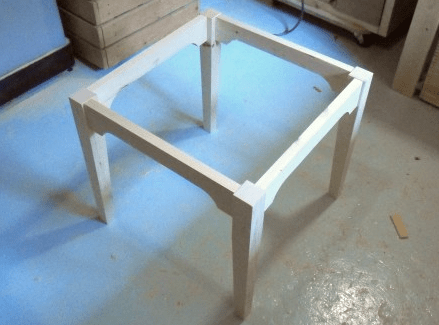
Then you need to make the legs. As mentioned above, you can take ready-made ones, but if you want to make new ones, especially for a banquette, then you need to take the beams, process them with a manual cutter, and attach them to the seat with screws. The workpiece must be covered with stain or paint.
Attention ! The manual mill will make legs more stylish and accurate. This tool is simpler and cheaper than a milling machine. It will allow you to make the legs round or with non-standard protrusions.
If the future product will be based on the sidewalls, then in this case all the parts are prepared immediately, cut out, polished, and then simply put together. You need to assemble on pins, for them, special holes are made at the ends of the blanks.
After the work done, you can start upholstery. The day you start, you need to cut a piece of foam rubber of the right size. And then fix the foam rubber with glue and a construction stapler to the base. It is desirable to lay burlap or any coarse material under the foam rubber.
Then, from the selected fabric, you need to cut out a piece of the required size with an allowance. After cutting, the fabric must be carefully tucked up and secured with a construction stapler.

How to sew a cover yourself
If the upholstery on the old bench is worn out, there is no need to rush to throw it away. It can always be updated. To do this, you do not need to change the upholstery, you can simply sew a cover that will please the eye and complement the interior. Usually the cover is made for models without backs. You can sew a beautiful cover in several stages:
- On the fabric you need to designate a rectangle or square according to the size of the seat.
- The fabric must be folded with a scarf and measured 10 cm from each side.
- At the resulting "box" you need to cut the corners and process the edges.
- Then you need to take a piece of fabric, which in width will be equal to the height of the banquette itself, and sew it with a pipe. The length will depend on the number of frills planned. The frill is swept to the seat and draped. You need to do this from the inside out.
- After that, you need to sew a seam with an elastic band or sheathe it with tape.
- The edge of the cover can also be sheathed with tape, or you can simply stitch it. A decorative cord can be attached over the seam.
Conclusion
Banquets can be completely different. When choosing materials and creating a drawing, you should not only pay attention to materials, dimensions and the design itself, but also to how a piece of furniture will fit into the interior. Before you start making a bench with your own hands, you should soberly assess your strengths. If you are new to making furniture, then perhaps you should not take on complex designs with a back, drawers and shelves, and you should not buy very expensive materials. There is a chance that the first pancake will turn out to be lumpy, and you will regret the money spent.
A bench can also be made from old and even broken furniture. For example, in the following video you will learn how to make a bench from an old, broken stool.
Quite often, our favorite items that we use for a relatively long time lose their original appearance or simply get bored. Sometimes it happens that there is a desire to make repairs and update the interior of the room, but at the same time not to part with your favorite piece of furniture, which, in its style or color, does not fit into the new design. And if we are talking about such items as soft poufs, it is enough to change their lining, and they will be able to please you for many years to come, making life more comfortable and cozy. Covering the pouffe with new fabric and soft lining, you will get a completely new piece of furniture that will fully match its style and your taste. If you still do not know how to sheathe a pouffe yourself, then this article is for you.
Our story will also be useful for those home craftsmen who are going to sew an ottoman from burlap, leather, old jeans with their own hands or make it from plywood and cover it with upholstery fabric. After reading the article, you will be convinced that these processes do not require special knowledge and experience in furniture upholstery. Possessing elementary cutting skills and knowing how to sew fabric parts together, you can easily cope with the task.
To perform finishing work, you will need the following tools and materials:
- decorative fabric for upholstery;
- cut of synthetic winterizer or foam rubber;
- furniture stapler;
- glue gun;
- sewing machine.
Upholstery fabric selection
To begin with, you need to choose what stylistic solution your new easy chair will have. Depending on the style, I cover the ottomans with various fabrics of dense texture - tapestry, suede, velor, velvet, eco leather, eco fur and other materials.

Furniture velor
So, for example, a pouffe covered with satin or brocade fabric is perfect for a classic design.

Satin for padded poufs
If you are planning to decorate a room in ethnic style, then a matting pouffe will look very good in it.

Modern interior styles are perfectly complemented by original pieces of furniture made in the patchwork style.

Patchwork furniture
To make such a cover, you will need several patches of dense fabric in contrasting colors, from which identical wedges should be cut and sewn together. It will turn out a very bright and stylish seat for an ottoman. The sides of the chair cover can be cut out of a plain fabric that matches the color tone of one of the patches.
Stages of work
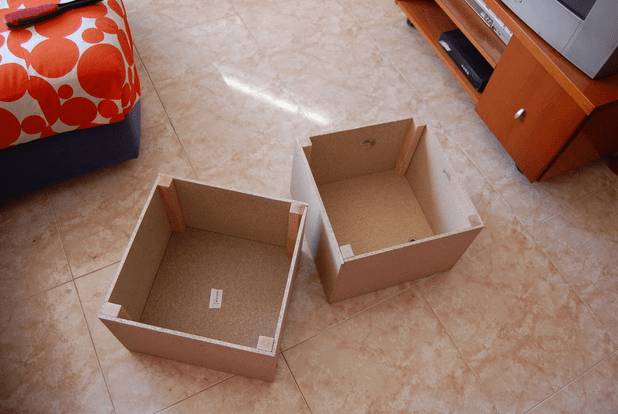
Take your old ottoman or make a pouffe frame from chipboard or plywood sheets. In accordance with its size, make patterns from the prepared fabric.

We make patterns
According to the size of the seat, we cut out a blank from foam rubber.

Fitting the lid
Next, you need to measure and sum up the width of all the sides of the pouffe. According to the measurements obtained, taking into account the height of the product, we cut out a piece of synthetic winterizer and sheathe the side parts with it. We fix the synthetic winterizer with a furniture stapler.

We fit the sides
For the convenience of performing these works, you can first apply special glue to the walls of the pouffe frame. In the same way, fix the foam blank on the seat of the chair. Attach the patterns cut out of the upholstery fabric with a stapler to a soft base, tucking the edges.

We apply a decorative pattern
At the joints of the parts, glue a suitable decorative cord or apply a decorative pattern on the sides.

The pouf is ready
Another way to update the ottoman with your own hands is to sew a cover from the selected material. This option will be more practical, since if necessary, it can be removed, washed and pulled over the pouffe again.

Case update
To do this, fabric patterns must be tacked together and stitched on a sewing machine.

We make patterns

We sew all the details
After we sew all the details together, it is necessary to cut off the excess fabric and smooth out the seams with an iron.

Trim excess seam allowances for a snug fit
The bottom edge must be hemmed on a typewriter or manually and also ironed. We turn the cover inside out and put it on the pouffe, straightening the folds.

We put on a cover
On this, work on the updated pouffe is not completely finished - if desired, it can be decorated. For example, a large button can be sewn into the middle of the patchwork seat, having previously covered it with decorative material in the color of the sides.
An ottoman trimmed with ruffles or lace is perfect for a bedroom or a nursery for a girl.

Pouffe decor option for the bedroom
The fringe sewn on the bottom will look good on a product designed for a baroque or classic interior.

Baroque fringed pouffe
Upholstery replacement for pear chair

Pouf pear
If your favorite bag chair has lost its former beauty due to the wear of the fabric on the outer shell, then you will have to restore the ottoman. Of course, you can throw it away and buy a new one, but believe me, repairing it will be more enjoyable and less expensive than buying a new bag.
If the inner burlap is in good condition, and the filler has not shrunk and still holds the shape of the chair, then you will be able to quickly update the product.
The simplest option is to remove the old cover from the bag and, in accordance with the shapes and sizes of its wedges, cut out new blanks from the fabric. To do this, we select a dense and strong material for the new outer shell of the bag, make a pattern and sew all the details together from the wrong side. Then we cut off all the excess fabric, steam the seams with an iron and turn the product inside out. We sew in a zipper and update our old pear ottoman by putting a new and beautiful outer cover on it.
By the same principle, you can sew a stylish and fashionable ottoman from old jeans. It will look pretty good in a children's room or a youth apartment. To do this, you will need several pairs of unnecessary jeans and a great desire to sew an ottoman out of them.
We cut the legs lengthwise, cutting off the seams We sort the patches by color We sew the whole fabric The finished jeans chair
If you already have filled burlap, you just have to make a pattern on paper, examples of which can be easily found on the net, and transfer it to pieces of jeans that were previously ripped at the seams.
When choosing a pattern, keep in mind that the width of the wedges for the bag chair should be no more than the width of the legs.
Now you know how to sheathe an ottoman at home with your own hands and you can easily give new life to your old, but very beloved, soft and cozy pieces of furniture.
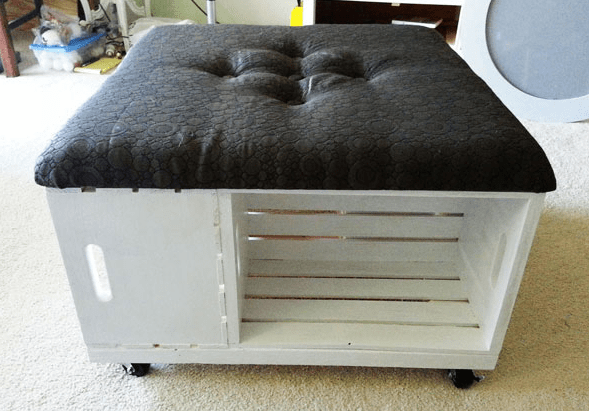
The banquette can be called a popular type of furniture for the hallway. Over time, its design has not undergone drastic changes. This is not only a comfortable pouf that can accommodate guests, but also a stylish piece of furniture, it will look great in the hallway, kitchen, bedroom and living room.
There is a huge selection of these soft poufs in stores: with cabinets, shelves, drawers. Each manufacturer draws up a banquette at its own discretion. But what to do if you still haven’t found a suitable option for your interior? In this case, the question may arise: how to make a bench with your own hands?
The principal device of the bench is quite simple - a stool with a soft seat.

The fabric is tucked inward along the edges and secured with staples.
A bench can be made by anyone who has minimal carpentry skills and is good with a needle.

Often the basis of the product really is a stool.

Such a product looks very decorative, and it is quite simple to make it.
Consider the advantages of a homemade pouffe.
- Firstly, you can independently choose the shape, color, size to your liking. It all depends on your imagination. Then you can create a banquette that is unlike other factory counterparts, which will add originality to your interior.
- Secondly, a do-it-yourself pouffe will cost you much less than a ready-made one from a store.
- Thirdly, you can make a bench from old furniture that you were already going to throw away (stool, coffee table), but in this way give it a new life.
- Fourthly, the creation of something useful and beautiful always brings moral satisfaction to the creator. Having done such a thing yourself, you can present your work to guests and receive many compliments as a reward for your work.

A larger bench, if the size of the hallway allows, is no less easy to make.

From the selected fabric, a fragment of the desired size is cut out with an allowance.
Before starting work, you need to think over the design of the product and see what types there are. The banquette can be chosen according to the shape, material and size.

This will require minimal carpentry skills and the ability to hold a needle and thread.

Consider the main types.
- Forged.
More suitable for the interior in the Baroque or Empire style. The product will have forged, twisted bases. More often these specimens do not have built-in shelves, drawers and lockers. A pouffe made in this style will look best in the hallway.
- From a tree.
These types of products are often very functional: with built-in drawers and cabinets. Will look great in the hallway, kitchen or living room.
- With a back.
This small sofa will immediately create an atmosphere of comfort, especially if you decorate it with soft pillows made in the same style. This is the most comfortable and convenient option.
- Collapsible.
This type is more functional: it can be quickly disassembled. All elements are bolted. Therefore, for quick disassembly of the product, the design will be ordinary and not carrying decorative functions.
- With boxes.
A very useful copy for the hallway, which will save space.

The "raw materials" for the product are wood materials.

For a soft seat, a piece of foam rubber of the required size is cut out.
To make a bench, you must also familiarize yourself with the types of upholstery that can be used when working.
- Textile.
The bench can be covered with silk, cotton, linen fabric. Textile puffs are unpretentious in care. A variety of shades is the advantage of such upholstery.
- Leather.
This material is not suitable for every interior, but it will look very expensive and elegant. Among the shortcomings can be identified high price, difficult care.
- Artificial leather.
This option is cheaper than the previous one. It will look as noble as a pouffe made of genuine leather. At the same time, leatherette is not capricious in care. Although its service life is much less than that of a natural "brother".

Forged models or furniture with an iron frame will require much more serious skills and experience.
It is easiest to make a bench from old furniture or from wood, as forged models and those with an iron frame will require more serious skills and experience from the master.

The filling material, as a rule, is foam rubber - it is quite elastic and keeps its shape for a long time.

An attractive appearance of the legs will provide the use of a manual cutter.
Necessary materials
To work, you need to have the following materials.
- For a pouffe with legs, you will need a wooden beam - 30 * 40, 30 * 50 mm. or, if available, you can use old screw-in legs from a stool, table, or bench.
- Plywood.
- Mounting materials: staples for a stapler, self-tapping screws.
- Lacquer, stain or paint.
- High foam.
- Cloth or leather for covering.
- Fabric for finishing the invisible side of the seat.
- Buttons.
- Cloth for the cover (if required).

If a very soft seat is being constructed, especially with a carriage screed, then in addition to foam rubber, a synthetic winterizer is also used.

If a model with legs is implemented, then 4 wooden planks are attached to the bottom so that they protrude 1-2 cm beyond the edges.
Required Tools
To work, you must have the following tools:
- drill, screwdriver;
- screwdrivers;
- a hammer;
- construction stapler;
- sandpaper of different hardness;
- manual cutter (if the base of the pouffe is made of timber);
- level;
- thick threads and a large needle;
- scissors;
- roulette;
- sewing machine (if you need to sew a cover).

In addition, paint or stain and varnish may be needed.

The seat is cut out first - its dimensions serve as a starting point, and all other parts are adjusted to fit the seat if necessary.
If you do not have enough experience in making furniture, then it is better to split the whole process into several days so that due attention is paid to every detail.
Step 1: Finishing the legs
If you have ready-made screw-in legs, then they need to be restored. We clean the surface with sandpaper. Then we apply new paint or varnish and stain. It is better to apply in two layers.
If you do not have ready-made legs, then they must be made from timber. They will be attached to the seat with screws and corners. If possible, it is better to process the timber with a hand mill. Such a tool can make non-standard protrusions, and the product will turn out to be more interesting. We also cover the beam with stain or paint.
Step 2: Plywood and foam
It is necessary to cut the foam rubber of the desired size around the plywood. At the same time, it should protrude 2-3 cm on each side. We select sizes individually.
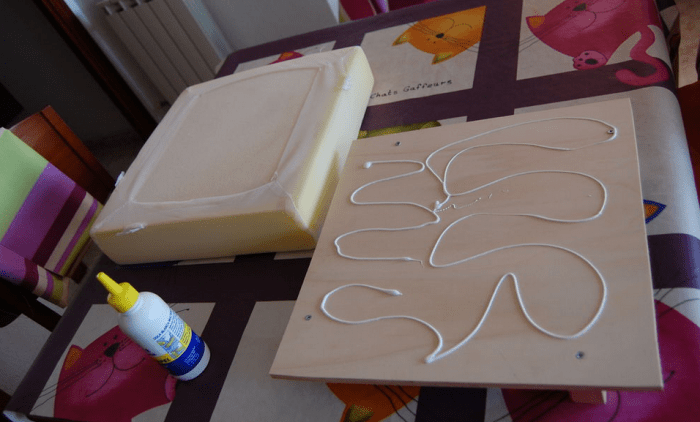
Step 3: Lay out the plywood
We glue the foam rubber to the plywood, placing the glue closer to the edges. With the help of a tape measure and chalk, we draw a markup, along which we will sew on buttons in the future. We make several holes in plywood at the same distance. At the same time, we try not to touch the foam rubber.
Step 4: We assemble the product, sheathe it with fabric or leather
Cut out a square or rectangle from leather or fabric according to the shape of the product. It is necessary to carefully calculate the dimensions of the upholstery and fit them under the seat, leaving a margin of 2-3 cm on each side.
You can start installing buttons. With the help of a needle, the thread is first threaded into the button, and then brought out into the plywood hole under the seat. For better fixation, you can fasten the thread with staples.
It is necessary to close the rough finish on the back of the seat with a textile cloth. Sew the cut piece along the edge of the bottom.
If the legs were from another product, then we choose the place of their placement, fasten their bases with self-tapping screws and screw them in. We fasten the legs from the timber with the help of self-tapping screws and corners to the seat.

The process consists of several stages. All of them are quite simple to implement and require only accuracy and due care.

decoration
Buttons are better to choose the color of the upholstery. The amount depends on personal preference. You can diversify the bench with a decorative cover, which you can also sew yourself. All you need is a skill with a sewing machine.
If you do not have cutting skills, then it is better to use a finished product pattern found on the Internet or watch a master class on making it yourself.

The capacity of the banquette is calculated: one person occupies a plot with an area of 45 * 55 cm.

Details are cut with a jigsaw, the edges are sanded.
For an interior in the Empire or Baroque style, you can make a carriage coupler. This model looks very interesting and presentable.

The parameters of the hallway and the maximum possible dimensions of the product are determined.

If there are a lot of details - partitions, shelves, back, it makes sense to make a pattern, and then proceed to cutting the plywood board.
So you learned that making a banquette on your own, with minimal carpentry skills, is quite realistic. The main thing is not to rush and pay due attention to each stage. Then the product will turn out neat and beautiful. This type of furniture will not only be useful in terms of comfort and space saving, but will also become a stylish and original addition to the interior.

They choose a model: with a back - it is quite difficult to implement with a minimum of experience, with shelves, drawers, on legs or based on sidewalls, and so on.

Based on the dimensions of the seat, the parameters of the remaining elements are determined and a sketch is drawn.
VIDEO: Making a banquette at home
Installing a banquette is one of the best ways to decorate the hallway. This multifunctional piece of furniture will replace several items at once, being compactly placed in a small room or decorating a spacious hall. On the modern market there is an unimaginable variety of options for pouffes, benches with shoe dryers, drawers, shelves and niches for storing small items, constructed from a variety of materials. However, it is not always possible to choose an option that fits perfectly in style and under the selected dimensions. In this case, the best solution would be to make a bench in the hallway with your own hands, which will not only be in harmony with other items, but will also combine all your tastes and preferences.
A popular piece of furniture is easy to make at home, even for a person who does not have rich experience in carpentry. The accessory is based on a bench, which is subsequently complemented by a soft seat, decorated with curls, accessories and other details.
The main advantages of such an independent product will be:

And besides, the creator will be proud of his invention, every day receiving a portion of positive emotions.
What materials will be needed
You can make a pouffe or bench forged, wooden, plastic. The wood is malleable and easy to process, so this option is best suited for a beginner amateur. Use MDF, chipboard or plywood, if the legs are planned to be wooden - then you will still need a bar. The base for the seat, as a rule, is made of foam rubber, upholstered with synthetic fabrics, leather, eco-leather, velor or other available textiles.
So, the raw materials that you need to have available to start work:

Please note that it is better to choose a fabric that is not easily soiled, dense and resistant to mechanical damage, so that with intensive use you do not have to constantly change it, wash it or patch holes.
Required Tools
In order to implement the idea, you need to have:
- Hammer, building level, screwdrivers;
- Screwdriver and drill, as well as a jigsaw;
- To process a wooden surface, you need sandpaper;
- Stapler for mounting fabric elements;
- Sewing kit, decorative accessories.
Just in case, prepare a stain or paintwork materials.

How to make a bench for the hallway with your own hands
When implementing an idea, the main thing is careful preparation, adherence to the sequence of execution and advice. You need to be extremely careful when using electrical appliances and sharp parts.
Instruction
There are no clear instructions on how to make a bench with your own hands. This is a creative process, and everyone approaches it from a different angle. But the general steps and rules for creation still exist - this is planning, preparing all the necessary tools, implementing the assembly and decorating. All steps are described in more detail below.
Training
At the preparatory stage, a drawing or sketch of the future product is created, where all the optimal dimensions are indicated. When planning the length and width, please note that the seat per person is calculated as 45x55 cm. And also:

Think about the availability of space for drawers or opening the doors of the bedside table, if any are assumed in the project.
Product assembly
The manufacturing process includes the following steps:

Do-it-yourself furniture upholstery
The technology described above allows you to design an ottoman with a perfectly flat surface. And if it is long and wide it will look strictly and neatly, then the small one will look insipid and cheap. Think carriage tie - this is one of the easiest and most profitable options to decorate a "dull" surface.
To create such a sheathing, you will need all the same materials and tools as when constructing a bench, with the difference that it is better to take a thin fabric so that it is convenient to form folds from it, and you will also need buttons covered with the same fabric.

Such a product looks very original, and making it with your own hands is not difficult.

decoration
The main thing in creating decor is that the end result should be in harmony with the overall picture in the hallway, not be sticky, easily soiled and be made of practical material.
A model with a soft seat can always be updated, additionally decorated or remade, thereby making the banquette almost new, with a “fresh” interesting appearance.
For example, frame a model without a wall and armrests with a chic ruffled cover. They will make a piece of furniture delicate and unusual. At the seams and joints, attach a burlap bow or a stylish decorative ribbon.
Tie the cover with your own hands - then your furniture accessory will become completely copyrighted.

Tie the cover yourself.
If the hallway is made in country or Provence style - age the legs and wooden ends, make the effect of peeling paint or scuffs with silver or bronze stains

There is a huge variety of options for how to decorate a banquette, everything is limited only by your imagination. However, if it is not there, use the Internet resources. There you can always find interesting solutions.
Unusual ideas
Creative and talented people have long been using old, worn-out furniture that has become irrelevant, out of fashion or completely unusable to create furniture accessories. Therefore, having a developed imagination, it is not necessary to design an interior item from scratch. It is enough to use the ready-made solution, having restored and added some notes to it, emphasizing the modern style and design. So, as a banquette, you can use an old, unnecessary wooden box, modifying it a little. Remove all unnecessary components (hinges, rivets, locks, etc.), sand, prime, apply varnish or a layer of paint, cover the cover with leather or decorative fabric, placing foam rubber to size. You can also decorate it with decorative elements: inserts, drawings, bows. Old chairs connected by bars, old bedside table elements, wire products, etc. look original as a banquette. The main thing is that all your fantasies fit into the overall interior.
Making a bench with your own hands is not difficult. Use the materials available, or use an old bench or coffee table. Follow the detailed instructions and carefully consider the decor that will complement the already created style in your hallway. Take measurements carefully so that the banquette fits perfectly into the room. Be creative with decorating, and then you will get a real masterpiece that will meet and see off guests, become a practical and indispensable part of the hall.
Video: Do-it-yourself banquette in the hallway
Photo gallery: Do-it-yourself banquettes in the hallway


Beautiful and functional furniture is expensive - an axiom that is relevant in the 21st century. If there is no money to buy, why not do something useful and creative with your own hands? Below is a step-by-step instruction on how to make a bench for the hallway with your own hands. We are talking about several successive steps that require the utmost attention to detail.
Preparatory stage
The most simple in terms of manufacturing are considered wooden pieces of furniture. The following materials should be prepared in advance:
- wooden beam - 30x50 mm;
- corners for furniture;
- plywood sheets;
- self-tapping screws, glue, fixing pins;
- several decorative legs from an old table.

It is better to fill the seat with foam rubber, as it perfectly retains its original shape. A softer analogue is a synthetic winterizer. To assemble and fit individual parts, you will need several tools that almost every owner has:
- jigsaw;
- level;
- screwdriver and drill;
- a set of threads and a set of needles;
- a hammer;
- sandpaper;
- construction stapler;
- stain, paint and other decorative solutions.
Deciding on a project
The task of paramount importance is to determine the optimal project. Under it, a drawing is prepared not only of the product, but also of its individual elements.
It is very important that the furniture in its size corresponds to the parameters of the room.
Each person has an area of 45x55 cm (average value). If you have certain skills, you can stop at the option with a back, in all other cases it is advisable to make models with drawers, shelves.

The drawings indicate the dimensions of all elements. If it is assumed that the bench will consist of a large number of small parts, it is better to make a pattern, and then cut plywood sheets on it. The edges of the workpieces are rubbed with sandpaper “zero” or “micron”.
Construction assembly
In the absence of practical experience with wood in general and furniture in particular, you should not prepare all the elements of the product in one go. There are always certain defects, certain deviations.
First of all, a full-size seat is cut out of plywood, since the rest of the details will depend on its size. Obviously, it is much easier to fit smaller elements under the largest surface.
The second stage is the manufacture of legs for a bench. We are talking about a time-consuming process, so it makes sense to use ready-made solutions from old furniture (as an option, you can buy them at a furniture store, commission shop). An analogue is to take 4 large bars, process them with a manual cutter, and then fix them with self-tapping screws to 4 planks. Wooden legs are treated with 2-3 layers of stain or painted to match the color of the interior.

The third stage is the preparation of the supporting sidewalls. They are pre-cut and sanded. Then they are opened with paint or stain. After that, the structure is assembled together with pins (blind holes must be prepared at the ends).
The fourth stage is furniture upholstery. For a do-it-yourself banquette in the hallway, foam rubber is cut to the size of the seat. Soft material is most effectively fixed with a construction stapler. For small loads, construction adhesive is quite suitable. Under the base of the foam rubber, it is worth preparing a layer of coarser material; burlap is quite suitable.
The fifth stage is the fabric pattern. Taking into account the style of the interior and the intensity of the load, the optimal fabric is selected. It is very important to cut it in such a way that the piece lies with an allowance on the structure. The cut fabric is tucked up and fixed with a construction stapler.

Making a banquette with your own hands is a simple matter. When deciding on a drawing and selecting material, one should focus not only on the design and dimensions, but also on how successfully the furniture will complement the interior of the hallway. Remember that we are talking about a functional item, not an exhibition item. From the first time and without experience behind you, only a few can create beautiful and comfortable furniture, so soberly assess your skills and abilities.