A series of molding flash drives continues, from the float of an automobile carburetor. You can see two previous works by clicking on the link at the end of the article. To make a USB flash drive with our own hands, we need a little imagination, desire, some material. In this case, brass and copper were used (or rather, other products made from these non-ferrous metals), a tool, and, of course, your hands. So, having all of the above in stock, we begin to make a flash drive body in the form of a helicopter.
We prepare small parts of the helicopter and tie them with copper wire to the hull (fuselage). According to the principle, we are preparing a sleeve where the counterpart with a flash drive will be inserted. Then, using a gas burner and tin, solder them to each other.

Now we are making the tail section of our helicopter. We make a file in the form of a triangle in the tube and bend the edges to each other. We cut out the tail and solder it with tin in the same way.

We are preparing a cap with a cutout for a flash drive.

We clean out excess tin with a needle file and sandpaper.

We cut out screws for our helicopter from stainless steel.

With the help of ammonia, we "starve" the helicopter.

And then we polish it to a shine with felt and Goi paste.


Welcome to all beginners, as well as experienced life hackers of this site!
We have an electronic magazine where we write various interesting articles about useful gadgets and unusual concepts. We also look into the future or make the present more interesting, more beautiful and more useful. Read the next article of the electronic magazine.
Almost everyone has a USB flash drive these days. But with all the variety, the range of cases for such devices is quite limited. And, why not make a case for a flash drive yourself? It is not as difficult as it seems, you just need to spend quite a bit of time. But you will become the owner of a unique little thing.
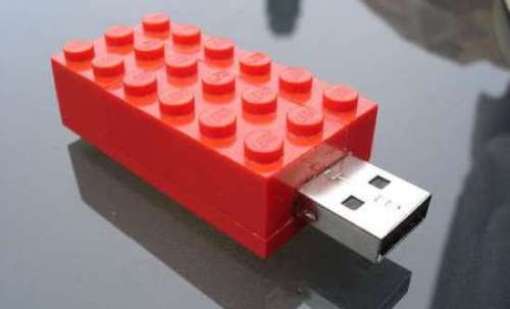
So let's get started! Following the step-by-step instructions, we will make a case for our USB flash drive from bricks from the children's Lego constructor.
 This is how she will look
Tools and materials
Penknife
Pliers
Several Lego blocks
Super glue
Sandpaper
Metal polish
Flash drive
Step 1. Body base
 Internal elements are broken
USB memory cards come in different sizes. We will package quite a large fee. Therefore, we need a brick from Lego with a size of 6 × 3 cylindrical landing elements (we agree to call them "points").
With a penknife, you need to cut all the internal partitions of the brick, and then break them out with pliers.
We use two more low-profile bricks with sizes 4x2 and 2x2 "points" to create a cover. Also, for the lid, you will need a low-profile element of 1 × 6 “points” (for the lid, you can use other combinations of designer parts, or you can simply take exactly the same brick as for the base of the case (6 × 3), and carefully cut off its upper part with a jigsaw parallel to the horizontal plane).
Using superglue, we glue the elements of the cover to get a part of 6 × 3 “dots” in size.
Step 2 Installing the Board
 Board in the case
At the end of the case, we cut out a groove for the USB connector, and after a slight adjustment, we install the device into the case with a penknife.
Step 3. Fixing the board
 We fill the body with silicone
We put brick trimmings on the bottom of the case and make sure that the board is parallel to the horizontal plane and does not push through. We fill all the remaining space in the case with transparent silicone, sealing it to reduce the possibility of any movement of the flash card inside the case.
It is important to use transparent silicone, since the indicator LED will have to shine through it.
Step 4 Gluing and Polishing
 We clean the edges
 Polishes of different abrasiveness
To ensure that there are no gaps between the lid and the case, we take sandpaper, put it on a flat surface, and align the lower plane of the lid on it.
After we glued the lid to the case with superglue, use the same sandpaper to remove burrs and smudges of glue from the side faces of the case.
Then we finish polishing the body with a polish.
Step 5. Finish
 Hull ready
 Compare your exclusive and mass consumer goods
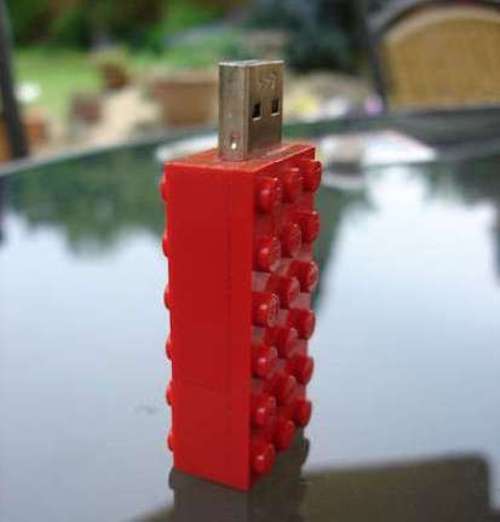 Look stylish!
But the creative possibilities for creating exclusive flash drives do not end there. On the contrary, there can be an infinite number of types of cases for them.
See what other craftsmen have done.

Do you have the original flash drive? What ways of personalizing this mini-carrier do you know?
In the meantime, there are still some unread curiosities in the mini-magazine: a visionary video about the medicine of the future; gadgets - a stationary cell phone and a bottle for a tourist to disinfect water. and don't miss anything!
There are cases when, during operation, the body of the flash drive does not withstand and collapses (small children do an excellent job of disassembling).
On kickstarter, a similar project was approved and raised the necessary amount of money for its implementation.
We will not collect money and place applications, we will try to implement a similar project on our own.
Suddenly something is not clear, then watch the video:
To make an eternal case, we need:
- titanium BT1-0
- die M18*1.5
-tap M18*1.5
- cutter HSS d 14.5
-machine
1. We make and prepare the workpiece. The total length of the workpiece is 64mm.


2. Cut off the workpiece with a length of 38mm. From this part we will make the lower part of the flash drive case.


3. Making a hole with a diameter of 14.5mm

4. We prepare a platform for cutting external threads using a die M18 * 1.5


5. The bottom of the flash drive almost finished looks like this (it remains only to polish).

6. We prepare the upper part of the flash drive (cap).
7. We make a selection inside the cap.

8. We chamfer the outside and prepare a place for the ring.

9. We cut the thread in the cap using a tap M18 * 1.5.

10. We make a hole for the ring.

11. The body is ready.

12. In my case, we take an 8GB flash drive.

13. We extract from the standard case.

14. Place in heat shrink.

15. Then we place the prepared flash drive in a titanium case. Pour hot glue (so it will be easier to remove the flash drive if it fails). Some are filled with epoxy, this is 100% forever (unless you just burn it out).
16. We check for strength with a car.
Hello my friends. Today we will not consider any schemes of certain designs, the topic for today is the so-called homemade flash drive. Some, of course, may not believe that this is possible at home, and they do it right, since it is quite difficult and it is almost impossible to do it at home without special equipment. But smart people have long come up with a memory card for mobile phones. In stores, you can easily find an adapter with which you can connect a memory card to a computer via a usb port. This adapter only costs $2.
The device works very simply - you just need to put the memory card in a certain place on the adapter, and the adapter itself is made in the form of a USB plug that only needs to be connected to the PC's USB port. For our homemade flash drive, you need to have just such an adapter with a memory card from a mobile phone and one more plug or an appropriate plastic case for USB.


Then we place the adapter in the plug casing and close the cover and see what we got.

Now it looks like a cut off USB plug, but no one will even suspect that there is a memory drive there! Now it's time for the schematics. There are 4 wires, we remove a small part of the insulation from the wires in advance and tin them. Next, we take a couple of brand new parts (it is better to take damaged ones, but so that they look like new ones) and share them with each other. There is no specific circuit here, solder whatever you want, the design should just look like a circuit, of course it will not work! You can use capacitors, resistors, polar and non-polar capacitors and a couple of transistors, as you know, some flash drives have a built-in LED indicator on the back, you can get a simulator of such an indicator so that our homemade flash drive looks believable and does not raise doubts.

To do this, the unpacking of the USB socket and plug is attached to the article, power is supplied through the side channels, which must be connected to our wires, then assemble the simplest flasher circuit for one LED, in which case we have two more free wires to which we can attach a pre-made<блеф>memory storage diagram. So, let's summarize - we got a rather interesting design, when connected to the computer's usb port, the LED will start blinking and it will give outsiders the feeling that a flash drive is connected, but they will be more surprised when the computer notifies that a memory drive is connected to it! Yes, everyone will begin to believe that you are a genius and ask for a diagram of such a simple miracle flash drive. Try to make the details connection scheme as confusing as possible, so that even the master does not suspect what the deception is. Well, that's all, you can see such interesting gizmos in further articles, goodbye friends - Arthur Kasyan (AKA).
A flash drive is a universal gift that will come in handy in every home. You can record your favorite songs on it or make a selection of good photos. This is a great surprise for a birthday or other holiday. Everyone can fill it to their taste, but you will learn how to turn an ordinary flash drive into an author's gift with your own hands from our master class!
Materials and tools
Today we will make a case for a flash drive with our own hands from wood using the following materials:
- a small wooden block (in our case it is a birch burl),
- a flash drive with a collapsible case,
- 2 metal bolsters for a flash drive (you can buy them, for example, here),
- several different grinding skins,
- drill cutter,
- epoxy adhesive.
Instruction

The whole manufacturing process is quite simple and does not take much time. It took about 2 hours for one product, not counting the time for the glue to harden.
This is a beautiful author's gift that can be given to a close or unfamiliar person, teenager or adult. The wooden case is comfortable and pleasant to hold in hands, such a card is durable and at the same time unique.
Here is another interesting idea on how to make a flash drive from an ordinary lighter!