Do-it-yourself garage homemade products are almost rationalizing developments with important effects that help motorists when servicing a car. This article will tell car owners what they can do in the garage with their own hands.
It briefly describes the device structures, useful tips for their use.
How can you equip a garage
In any garage, it is necessary to provide convenient storage of all frequently used tools and a dense arrangement of various little things "in reserve". It is good to have here not only a place to place a car, but a workshop with a convenient system of laying out all items, as shown in the photo.

The first homemade products in the garage - comfortable racks (see), shelves, all kinds of drawers where spare parts for the car will be placed, the most necessary tool.
Tip: For these purposes, the entire height of the room should be used. On the floor and under the ceiling in plastic boxes, you can fold things you need from time to time.
Convenient homemade products for the garage are:
- A wall-to-wall stand for storing small items.

- Open shelves.
- Boxes for storing unnecessary things.
- Lockable drawer stand.
- Metal nets for storing all kinds of cans, packages.
- Special stand for storing power tools.
- Sliding panels can provide additional space for tools.
How to equip your garage, what kind of homemade products you can make with your own hands in the garage, the video will tell you.
How to make a drill stand
DIY garage crafts can be made not only for, but also to facilitate repair work. It is very convenient to have such homemade products with your own hands in the garage, for example, racks for various power tools.
An example of such a homemade product for a home and garage is a drill stand.

Often, when doing homework, you have to drill holes that must be even so that their axes are strictly perpendicular to the plane of the part, which is quite difficult to do with an ordinary drill without distortions in either direction. A do-it-yourself drill stand helps to solve this problem.
To make the device you will need:
- Base from a milling machine.
- Calibrated tube or bar.
- Plywood.
The basis for the device is a platform from a worn hand router.
Its advantages are:
- Smooth plane.
- There are guides that change to longer tube elements.
- A box is made of thick plywood, the size of a drill.
- With the help of wing nuts, the drill is firmly fixed in the box.
- Two holes are drilled in the box.
- Through them, this element is pushed onto the guides of the base. In this case, the movement of the drill will only be vertical.
Absolutely everyone can make accessories for the garage with their own hands. With the help of such products, the owner of the premises will free up a lot of space, and tools and equipment will always be at hand.
The workbench is a must-have item in every garage
A homemade workbench should be in every garage. It does not take up much space and makes it possible to comfortably make repairs and make useful crafts. Usually the workbench is made of sturdy wooden planks that are attached to a thick timber or profiled pipe. Quite often the workplace is made of steel blanks. They are quite easy to cut and fasten into one solid structure using metal corners and universal screws.
To make a workbench, as well as others and garage machines, it is necessary to draw an accurate construction plan. In this case, take into account the space that will be allocated for the product. It is best to place the structure next to shelves or racks. In the drawing, note the presence of drawers and shelves. In them you will store small fasteners and tools. A compact vice can also be attached to the worktop. Having drawn a plan, start making a workbench. First, we assemble the countertop.
If you have a small room, then there is no point in making an overall homemade product for it. You can connect the boards together with good glue and metal ties. Typically, a standard workbench tabletop consists of 5-10 identical planks. Next, we make special grooves on the tabletop with dimensions of 2.5x2.5 cm. They are needed for stops. As soon as the glue on the product dries, the surface must be planed. The result should be a perfectly even coating. The legs for the structure can be made from several pieces of 80x10x10 cm in size.

In the front legs we make grooves into which the brackets will be inserted. In the future, the latter will be connected to the longitudinal beam of the table top. Then we assemble the base of the underframe. It consists of two frames, which are made of 5x10 cm boards. The base is attached to the support, after which the frames are cut into the legs of the workbench by 2.5 cm. At the end, we fix the components with bolts. Then you need to attach the back and side support walls to the workbench. For their manufacture, sheets of chipboard or centimeter plywood are taken.
The last step will be to connect the table top and the top frame. For this it is worth using powerful bolts. After that, we apply drying oil to the coating of the workbench. As soon as it dries, we treat the surface with varnish. As a result of the work, you got a stable structure on which you can not only repair parts or make various crafts, but also store the tool.
We make a rack - about a complex structure in simple words
Every driver probably has a lot of large garage accessories that have nowhere to store. Where can you find such a place for them so that later you can quickly find the right tool? The correct answer is on the shelf. This design will allow you to organize free space and save a lot of time. Similar garage fittings can be made of wood or metal. The second option is more reliable, but it is rather difficult to implement it on your own.

The first is much easier to perform, however, in order for the structure to serve for a long time, it is worth choosing strong types of wood for work. Beech or oak is perfect for this. Drawers and shelves made of them can withstand significant loads. In principle, the norm for a rack is the ability to support a weight of 150–180 kg. In practice, only a few adhere to these recommendations. However, be sure to remember that the maximum weight of all tools on the rack should not exceed 300 kg. Otherwise, this design will become dangerous for the garage owner himself.
It is very difficult to make a rack with a complex design. It requires significant effort, time and equipment. A simplified product is not much inferior to it, the manufacturing algorithm of which we will consider in more detail. So, the order of work is as follows:
- 1. First you need to take a 9 cm wide board and cut it into pieces of different sizes. In the future, these parts will play the role of supports for the structure.
- 2. For the shelves, you will need to take a thicker board. It must be cut into several identical parts.
- 3. Next, take a board for the base of the rack and mark the points on it where we will make spacers. They should be located at a distance of 3 cm from the edges of the base.
- 4. Attach the top brace using superglue. We nail the top shelf to it with nails. The same manipulations must be repeated with other spacers and shelves. The last to be fastened is the lower spreading part.
- 5. Then it is necessary to turn over the assembled product, pull off the base of the rack with spacers, using screws for this.

After the work done, your rack is almost ready. In the end, all you have to do is to sand the surface of the rack with sandpaper and treat it with oil varnish. It is best to apply the latter in 2 layers. Fasten the structure to the wall with strong anchor bolts by screwing in the fasteners under the upper and lower shelf of the structure.
Cyclonic vacuum cleaner and press - useful homemade products for the lover of tinkering
The list of home-made machines and devices must include a press. This clamping device will become an indispensable assistant for every lover of home creativity. For the manufacture of the press, you will need a hydraulic jack, a metal bed-platform and 4 shaped pipes. Two of them should have a cross-section of 4x4 cm, and the rest - 6x6 cm. To make a press, we take two pipes with a smaller cross-section and attach them to the base of the product. At the very top, between these pipes, we weld another pipe with a large section.
Install the remaining pipe so that it can easily move along the previously installed guides. The device made in this way works on a very simple principle. To connect two products, they need to be placed on the base of the press and covered with a thick plywood sheet. The pipe with the jack installed must be lowered, and then the two short pipes must be turned. With this simple movement, you will securely connect the two previously supplied products.
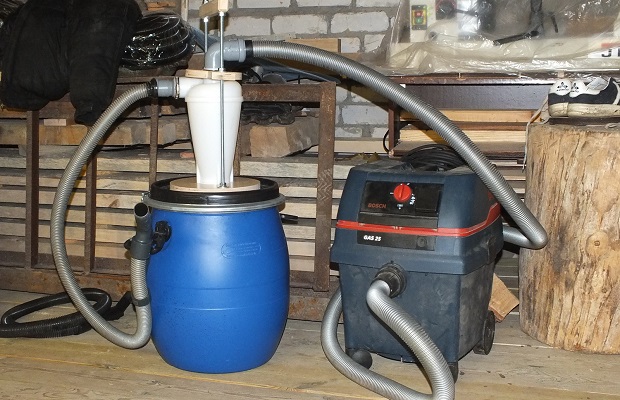
The second device is a cyclonic vacuum cleaner, it will help you always keep your garage perfectly clean. To make it, prepare a plastic or metal container. An important nuance - the vessel lid must be hermetically closed. Next, make 2 small holes in the lid. The first should be in the center and the second close to the edge. The bore diameters and cross-sections of the hoses you use must be the same. We connect the pipes to the holes. The first will serve to collect garbage, and with the help of the second you will connect a regular vacuum cleaner
Install a plastic elbow into the inlet. With the help of it, the air will be sucked in by a device, like a cyclone. Thanks to the presence of this knee, the vacuum cleaner will be able to draw in not only dust, but also small stones, sawdust, lumps of dirt and other small debris. All this will remain in the container to which you connected the hoses. If you wish, you do not have to equip the vacuum cleaner with a knee. But in this case, you will not be able to remove garbage, but only dust. In such a device, it is most advisable to use a plastic container and narrow hoses. If you need a more powerful device, then you should make a vacuum cleaner from large hoses, an elbow and a steel container.
Rope making device - ropes from plastic bottles
During the heating process, plastic bottles shrink quickly. Thanks to this, we get the opportunity to make quite strong ropes out of them. With their help, the garage owner will be able to combine several different products that are used on the farm. To create the device, you need to find two bolts with nuts and washers, a piece of thin board, an electric drill and a stationery knife. After that, take two washers and place them in the middle of the board. The centers of the pucks should be marked on the board with a marker. Drill holes at the points obtained.

Next, we drill the holes on the back of the board. This must be done in order to exclude cranking during the operation of the device. At the next stage, we screw in the bolts. We are testing the device. We put several washers on the protruding ends of the bolts. The final thickness of the rope will depend on the number of bolts. Next, place a utility knife or a small piece of it on top of the washers. We fix the device with additional washers screwed in until it stops. Next, the device must be fixed on the desktop using clamps.
Then we take a two-liter bottle made of plastic, cut off its bottom and cut out a strip in the remaining part. We put the latter on the device so that it is located under the knife. Next, take the strip with one hand and pull it, while holding the plastic container with the other hand. As a result, from one unnecessary 2-liter bottle, you will get about 20 linear meters of rope.
How to make a viewing hole - detailed instructions for beginners
Whatever one may say, but sooner or later the car has to be repaired. And so that the owner of the car does not have to crawl under the car and "squirm", bending twice, it is necessary to dig a hole in the garage floor for inspection and repair. First of all, if you want to do this, you need to mark the area of the room where the car is parked. For this, the area of the garage is marked with chalk. There are several important factors to consider when drawing up your markup. The length of the pit should correspond to the length of the car, and add another 1 meter to this value. The width should be such that it is comfortable for you to work. However, be careful - this value should not be more than the distance between the wheels of the car.

The pit depth is calculated taking into account the height of the garage owner. Another 20 cm is added to this indicator.
"Having taken measurements", proceed to digging a hole. Having done this, think about the arrangement inside. First of all, this concerns the walls of the pit. For this purpose, bricks, building blocks or concrete can be laid out on the sides. The thickness of the walls directly depends on the material. So, if you use ceramic bricks, then this indicator should be equal to 20 cm.If you purchased cement, then the thickness of the walls should be 12 cm.If you want to make the walls from blocks, then their thickness should not exceed 22 cm.
Do not forget that the walls of the pit will need hydrophobic impregnation. It will protect materials from moisture. It is necessary to apply the impregnation from the inside of the brick or blocks. For a more comfortable entrance and exit, we make steps in the front part of the pit. It is best to use cement for this. You need to start from the lowest step, gradually rising higher. Each of the stair elements must be the same. To achieve this, first measure the lift height and calculate the number of steps.
Indoor shelves - for storing loose fasteners and more
Sometimes the area of the garage does not allow making and installing a large spacious rack in it. In this case, shelves of different sizes can be made. They will be attached directly to the walls at any height convenient for you. This will make it possible to save space on the floor of the room. First of all, you need to determine the place of fixing the shelves. On the selected section of the wall, we make an approximate marking, dividing the area into identical squares. Dowels will be screwed into the corners of these squares to hold the shelves.
To screw in the fasteners, drill the holes for them with a hammer drill. If possible, it is worth purchasing special dowels with hooks at the ends - they will provide a better fixation of the products. Next, we take a thin board and attach suspensions with lugs to it. When calculating the distance, be guided by the markings you made on the surface of the wall. To secure metal hangers, use reliable self-tapping screws. After that, it remains to make the shelves. We take several boards and cut them into equal parts - they will serve as bottoms for products. Then we cut out the walls of the shelves from the thicker boards. We nail or glue them to the bottoms. If desired, the products can be painted or varnished.
The final stage will be the installation of ready-made shelves in the designated places. When installing each of them, make sure that the products are level and move freely along the guides. If you like, you can glue turned wooden handles to the front walls of the drawers. It will be more convenient to use the shelves with them. A very interesting idea would be to make shelves from plastic canisters.
If you have a sufficient number of these containers, and in the future you do not plan to use them for their intended purpose, then one of them can be done according to this principle. First, we cut holes in the outer walls of the canisters. At the same time, make sure that only the right or only the left wall of each of the containers is cut off. Otherwise, the shelves will look disorganized. After cutting out the outer walls, remove the burrs from the plastic. To do this, use a file. After that, it remains to install the shelves in place in the wall or use them as drawers in the rack.
Tidy in the garage means convenient open storage of all frequently used tools and compact storage of various little things "in reserve".
Often the garage and home workshop are co-located, so all tools and supplies must have a convenient storage system.
As soon as the storage system becomes not very convenient for regular maintenance, the garage turns into a spontaneous warehouse again.
For storage of tools in the garage, it is better to use open shelves. It is very convenient if these shelves are removable.
In the garage of the workshop, it is necessary to place not only the usual set of tools of a car enthusiast and a home craftsman, but, sometimes, gardening tools and camping equipment.
Make the most of the entire height of the room. In plastic boxes under the very ceiling and on the floor, you can fold those things that you use from time to time.
The garage tool storage system uses the entire wall area as a stand. Separate sections-shelves for storing tools and consumables are suspended on horizontal rails.
Wooden guides are used here, but it is better to use metal pipes for these purposes. If, over time, the guide that we see in the photo crumbles, the box with the heavy tool may fall right on your foot.
You can make such an organizer for storing consumables yourself from sheets of plywood, which are connected by loops in the form of a book.
A lockable stand-box for DIY tools will allow him to easily maintain the desired order in the garage.
Metal nets are convenient for storing paint cans, fertilizer bags, etc.
Metal rails and metal shelves not only ensure safe storage of the tool, but are easy enough to clean.
It is inconvenient to keep a power tool in a branded suitcase, it is much more convenient to make such an open stand for storage.
The owner has a lot of necessary little things in the garage, and for each of them there is a different way of storing.
Most storage methods are simple, but still more efficient.
Very convenient design for storing consumables! The box with self-tapping screws, which you use, is fixed on a separate panel, and at the end of the work, you push it into the common organizer.
Each owner has its own scope of activity and a different number of tools. But a convenient work organization always makes you want to do something else. Take the time to clean up your garage.
Sliding panels provide additional storage space for tools. Make sure they will work reliably without getting stuck in the grooves, otherwise this storage method will not be practical.
Simple and convenient. Store your instrument wisely! If you do not have a garage, and you keep all your tools in a small box on the balcony, then even there you can organize a small work cabinet.
Let's continue for the lucky owners of the garage. Before us is a convenient way to store clamps.
Some storage ideas can be found in shops that sell tools.
But our garage isn't just about tools. We also have pipes, slats, necessary pieces of plywood and plastic.
It is not difficult to assemble such a ceiling structure from pipes in your own garage.
It is better to store large sheets of plywood and drywall in this way - in an upright position.
For scraps of plywood, plastic, etc. you can make such a wall rack.
Even a dozen planks can create clutter in your garage. Let's make a simple storage structure.
Another convenient way to store long pipes and all kinds of sheets in the garage.
A small workbench can also serve as a storage place for boards and pieces of plywood.
You don't have to clean up your garage in one day. All this can be done gradually, step by step.
With proper arrangement of the space, the garage can serve not only for parking a car, but also be a workshop for its maintenance. In addition, a properly planned space will easily accommodate the required tool for this, provide storage of technical fluids and wheels in the off-season. The functionality of the room will allow you to expand the garage accessories with your own hands, which can be made from improvised material or purchased in specialized stores with subsequent refinement to fit your needs.
How to properly organize the interior of the garage
Considering the fact that the number of things in the garage will increase over time, it is worthwhile to rationally use the walls, floor, basement (if any) equipping them with the maximum number of shelves, hooks, shelves. For skilled people, they define a workplace, equip it in accordance with the needs.
Storage of bulky items
All items that occupy the garage space are conventionally divided according to several characteristics: large and small, required constantly or used once or twice a year. Depending on this, before starting the arrangement of the space, they work out a list of large things of not frequent use, which include:
- winter, summer wheels;
- bicycles;
- skiing.
 Garage bike shelf option
 The list may be longer, perhaps the garage owner loves locksmithing, then in his arsenal there will certainly be long pipes (plastic and metal) of different sections, bars and boards. For compact, ordered storage of large-sized items, garage home-made or purchased devices are used, for example:
- Purchase wall mounts for bicycles that allow them to be stored in an upright position, which provides significant space savings;
- For rubber sets, special shelves are equipped, on which each wheel lies separately. They are placed in any convenient place, for example, under the ceiling, along the wall or, capturing the corner space, or suspended from the ceiling or wall on an appropriate support, having previously cleared of dirt, packed in special cases. This way of storing tires is only suitable for disc kits. Considering the cases when tires without disks are stored, a rack is welded from metal, on which the tires stand vertically in one row. Place the device under the ceiling or on the floor, securely fixing it;
- With the help of homemade mounts, they provide a compact arrangement of skis, ski poles and other sports equipment.
Attention! Provision should be made in advance for space in the upper third of the wall for storing the removable rack.
In addition, artisans make various suspended ceiling structures parallel to the floor to accommodate long objects such as pipe cuttings or beams.
Accessories for small things

For many craftsmen, the number of different-sized screws, nuts, bolts, washers is measured by a bunch of boxes and buckets, in which it is extremely difficult to find the right part. To resolve the issue, such adaptations for the garage have been invented, which allow you to streamline small things and ensure that the desired part is quickly found, for example:
- special portable boxes with compartments. A convenient option that allows you not only to store, but also to transfer the required parts if necessary. It should be noted that the cost of the boxes is relatively high, therefore the ideas proposed below will help reduce costs;
- craftsmen sort small nuts and other parts into jars with screw lids, while the lids themselves are securely attached to the hanging shelves. It remains only to screw the jar into the lid and the details will always be in sight, at hand.
If financial resources are available, they purchase compact storage systems for hardware, nuts and other parts, different in size, differing in mounting options.
Tool storage
The working tool is divided into large-sized and small-sized, respectively, home-made devices for the garage will be different. In most cases, the owners prefer to store a cutting machine, a perforator, and other large tools using their "native" boxes. Therefore, for their convenient location along the wall, a rack is made from scrap materials, taking into account the total load on the shelves (for self-made structures, the weight should not exceed 150 kg).
Attention! The stores offer a wide variety of models of shelving, made of both wood and metal, withstand loads of up to 500 kg or more. At a relatively low cost, it is convenient to purchase a ready-made rack in the garage for the desired size, fixing it against the wall.
For small tools such as wrenches, screwdrivers, pliers and others, organize the space according to their number:
- sets are stored in purchased boxes, placed on a rack;
- for single items, either they equip cabinets in which each tool is fixed in a corresponding niche, or they prepare a perforated surface (like in a store), fixed on the wall and determine a specific place for each of the tools.
Some craftsmen place their tools using structures made of plastic pipes, in which holes of the appropriate diameter are made.
Homemade machines for garage work
For comfortable repair work, a place for a workbench is provided (to save space, it can be folded). To begin with, they work out the drawing of the table, thinking over the presence of retractable shelves, then they make it from boards or metal sheets, equip it with a vice and a sharpening machine.
In some cases, craftsmen cannot do without home-made machines and other devices made on their own and improving the quality of the thing made.
Press from improvised tools
 Homemade garage press
 One of the most popular DIY garage gadgets is the press. To create it, you will need a hydraulic jack, a metal surface that will serve as the base of the moving part of the press, springs and profile pipes or a channel to create a frame. Further:
- create a frame by welding channels and reinforcing the structure with transverse stiffeners, downwardly for stability, transverse corners are also welded;
- the movable platform is attached to the upper frame with springs, a jack is installed.
The efforts of the press are regulated by a jack.
 Homemade screwdriver holder
 Depending on the needs of the garage owner, other useful home-made machines are made, for example, a drilling machine, made on the basis of a drill, fixed with clamps and moving along a rail using a gear or a cut-off, or a lathe.
In addition to the devices listed above, you should take care of the location of work clothes, provide for a fire extinguisher or sand (based on fire safety rules), think over ventilation and lighting systems.
Thus, with a little ingenuity and thriftiness, you can make accessories for the garage with your own hands, thereby providing compact storage of things and freeing up enough space for minor car repairs and work related to the maintenance of one or another home appliance.
vseogarage.ru
DIY garage accessories
For a real car enthusiast, a garage is a second home. And even the first one. Therefore, everyone tries to take seriously its arrangement and equipment. The functionality of each square centimeter of area is also very important. This will allow you to work in a spacious room, and tools and parts will be stacked and positioned intelligently and in perfect order. As for the arrangement in terms of everyday life, we will not talk today, but today we will try to save on equipment.
What should be in the garage

Basically, there is no device that cannot be bought. True, not everyone has the opportunity to spend big sums on the purchase of Bosch equipment, by the way, it is useful to look through catalogs with Bosch equipment or Intertool, or Interskol. The young but high-spirited company Jonesway and Ombra, repainted from green to brown, have a lot of experience and opportunities in this regard.

In the catalogs, there is a sea of excellent working equipment, accessories and universal pullers, mandrels for all occasions and, of course, tools that are difficult to look at without a mean male tear. But the cost in catalogs is unreasonably high, as for a private trader. Service stations, of course, in more favorable conditions, they earn money with equipment and God himself ordered them to have a better tool. Otherwise, such a master is worthless.

Wishlist of a garage master

Still, it is worth making an approximate list of what should be in the workshop, and from it you can already choose accessories for the garage that you can build yourself. Here's what everyone would like to see:

This should be an approximate set of additional equipment, not counting welding, a compressor, two or three grinders and two or three drills and screwdrivers of different capacities.

Homemade gadgets

An elementary bed for a grinder can become a universal home-made machine. Applications - Mass, made from anything, up to a solid timber frame. it will be useful in cases where it is necessary to process a small part carefully and with both hands, without clamping the part in a vice. Of course, this design has limitations, but like a small grinding or cutting machine, it will work well.

We do not indicate the sizes, the designs and sizes of the grinders are different. The photos show the essence of the device, and it is not difficult to assemble it. It is worth working on attaching the grinder to the bed - so that it is quickly and securely fixed and quickly removed. Such a device is especially valuable for grinders with speed control.

As a base, we use a chipboard sheet of a suitable size, which is mounted on hinges, as in this design, or on latches, you can use a screw fastening.

DIY lathe

The drawing of a small lathe, which is presented, can be useful to those who occasionally have to deal with turning work, and there is no point in buying a desktop one. This project, of course, will not satisfy those who need high precision and high spindle speed, but for minimal turning work it will do. Instead of the spindle from the M10 bolt shown in the drawing, use a ready-made spindle or drill chuck.

Designed for processing wood and plastic parts, the diameter of the part is up to 50 mm, and the length is up to 200, but can be revised if necessary. If we take it as a basis, then replacing the wooden base with any rolled metal, we get a semblance of a table-top lathe for metal turning.
Tool storage devices

Various little things are often folded in plastic buckets and boxes in the form of a kind of assorted. Therefore, finding the right small tool, drill or nut is quite problematic. For storing little things, jars of mustard, mayonnaise and other products with a metal or plastic lid that is firmly attached to the jar are perfect.

To organize convenient access, you will have to go through everything, separate the cutlets from the flies, 10 bolts from 6 nuts and sort everything into jars. The covers are screwed to shelves or any horizontal surface, and now it is not difficult to find the necessary fasteners.

For horizontal storage of loose fasteners, you can use magnetic containers. Convenient thing. Fasteners will not crumble, always in sight, and you can arrange containers as space requires. The main thing is to fix the thin magnetic tape in the right place, and glue large metal washers to the bottom of the containers themselves.

More creative ideas that come to minds of inventive craftsmen regarding organizing and storing tools and fixtures, we showed in the photo. Use your imagination and reinvent the wheel. And your garage will be the perfect place to comfortably repair your beloved car.
Read also Electric heat guns for the garage, Do-it-yourself lifting garage doors - drawings
ladamaster.com
How to make homemade garage accessories: 2 workshops
 Homemade gadgets can be made from scrap materials Machine repair is a complex and responsible occupation that requires practical knowledge and the availability of special equipment. This equipment includes a whole list of tools that are not cheap. That is why even those motorists who know how to fix their four-wheeled friend send it to a car service for repair. If you decide to get your own garage accessories, but do not want to spend a lot of money on such purchases, you can do some of the necessary things yourself.
So that your garage can become a place to repair cars. It needs to be equipped with many different tools. Some of them will have to be purchased in specialized stores, but others can be made with your own hands.
With all the necessary fixtures and fittings for the garage, you can open your little car service. A garage business like this will bring you good income.
Garage attachments are easy to do with your own hands. In fact, there are many master classes for making such homemade products. Let's see what tools are most often done on their own.
Which homemade tool is suitable for a garage car service:
- First of all, it is a lift for cars. Not a single auto repair shop can do without this equipment. The price of such a ready-made device is high, but if you wish, you can make it yourself. We will talk about the technique of creating such accessories today.
- A hydraulic press is also required for a garage workshop. Such a device helps to compress unnecessary parts. You will be pleased to know that you can do it yourself with minimal investment.
- Useful accessories such as a spotter comb are also important. Such equipment is easy to manufacture, but ready-made is very expensive.
 For a car service with your own hands, you can make metal shelves that can be moved
These are far from all the devices that can be made for the garage with your own hands. However, it is the described useful homemade products that we will make today in our master classes.
Garage accessories: room furnishings
Before we start describing the methods of making accessories for the garage, we suggest putting things in order in the auto repair shop itself. After all, each tool should have its own place, so it will be easier for you to work.
Homemade tools are very practical, but they do not always look aesthetically pleasing, so it is better to remove them from prying eyes. But, for example, such a device as a drilling machine and jacks can be put in a conspicuous place.
You cannot make a drilling machine with your own hands. In this case, the main thing is to choose the right tool correctly.
Now more about the organization of the workspace. If you decide to make a car workshop in the garage and make money from it, then you will have to prepare the space accordingly.
How to organize storage space in your garage:
- First of all, we advise you to make several wooden crates for you. In some of them, you can make a shelf with holes for screwdrivers.
- It is also necessary to make movable racks for heavy tools. This will allow you to change the location of these shelves, placing them in a place that is convenient for you.
- So that in the process of work, you do not have to constantly run after the tool, you can use a special belt, which will fit the essentials. Such devices can be bought or made on your own.
This kind of homemade tool storage will help you organize your garage space. Thanks to this, everything you need will always be at hand. This will save you a lot of time.
DIY garage appliances: making a lift
A lift is needed for every workshop. This device helps to keep the machine in the raised position for the time you want. This opens up access to all hard-to-reach areas.
Of course, you can also buy the lift from specialized stores. However, the price of such products will surprise you unpleasantly.
A lift for a car workshop can be made by hand. You don't even need to have the skills of a welder to do this. Therefore, you can easily cope with such a job.
In order to assemble the lift, you will need:
- Worm gear, the carrying capacity of which will start from 300 kg;
- Steel corners with dimensions 7.5X7.5X0.8 cm - 2-3 pcs;
- A certain number of bolts;
- You will also need a steel plate, at least 1 cm thick;
- Two iron chains, at least 2 cm thick;
- Steel cable with a half-centimeter section;
- Metal hook;
- Two sprocket keys.
It is not difficult to make a lift from such materials without spending a lot of effort. The main thing is to perform all actions accurately and efficiently.
 To make a good garage lift, you need to use quality metal.
How to make a car lift:
- Steel corners must be attached to opposite walls. In this case, they should be located at the same level.
- A plate is attached to the corners. This is done with eight bolts. Thanks to this method of connection, the plate can be moved relative to the engine.
- A worm gear can be installed on the plate.
- One of the keys, the one with the larger diameter, must be fastened to the gearbox drive shaft.
- You need to make one hole on the stove. A chain is passed through it and closes into a ring.
- On the output shaft of the gearbox, a smaller key must be installed.
- A couple of holes need to be drilled into the elevator plate.
- A second chain must be passed through the drilled holes. One of its ends is snapped onto a smaller dowel, and a hook is hung on the other.
This completes the manufacture of the lift. You just need to test it in action. Spending quite a bit of time on such work, you can save an impressive amount.
How to use a garage fixture such as a lift
It is quite simple to use such a lift. However, in order not to damage anything, several rules must be followed.
How to use a homemade lift:
- Unscrew the bolts that connect the engine of the machine to its frame;
- Carefully place the steel cable loops under the engine. Throw the ends of the rope onto the hook.
- Play the chain carefully. Gradually tighten the cables, which will set the engine in motion. Perform all actions slowly and smoothly.
- When the engine is raised to the required height, the lift can be stopped. The reducer will hold the structure.
- In the place where the car is stuck, it is necessary to put a table that can support the weight of the engine.
 Before using the lift, you need to read the instructions
Using a lift will greatly facilitate your work in the workshop. Therefore, it is worth taking the time and making it yourself.
Garage machines: making a hydraulic press
A hydraulic press is often used in auto repair shops. It is necessary for installation and repair work. Such a device works on the principle of a jack.
Such a device can be very expensive. Some models can cost tens or even hundreds of thousands. It is because of the cost of a factory product that a hydraulic press is often made by hand.
There are several positive aspects to making a DIY hydraulic press. Let's take a closer look at them.
Why making a DIY hydraulic press is a good idea:
- A homemade hydraulic press can be made specifically for the work you need. This applies to both its size and its performance.
- You can assemble such a jack from scrap materials. Therefore, the price of such an assembly will be low.
- You can be confident in the quality of the assembled product. It can be repaired if necessary.
The hydraulic press is made of a jack, channels, two metal angles, bolts and springs.
 From time to time, the hydraulic press should be inspected for worn and damaged parts
The assembly of the structure is carried out according to the scheme. All elements are fixed by welding and bolts. It is very important to position the jack in the correct position.
Homemade garage gadgets: making a comb
We would like to tell you about the manufacture of a comb. This spotter can be used to align dents in doors. You can buy it in specialized stores, or do it yourself.
How to make a do-it-yourself spotter comb:
- Take a metal strip and punch three holes in it. The first should be at a distance of 1.5 cm from the edge, the second at a distance of 2.5 cm, and the third - 3.
- Now, between the two holes (which are closer to the edge), you need to cut the jumper with a file. After completing this work, you should have one oval hole instead of two round holes.
- From the third hole we make a cut out to the edge. You should have a notch for the washer.
- Now we cut out a kind of semicircle over the hole made. As a result, you should have a crochet hook with an oval hole and a rounded notch. Make four more such details.
- Take a tube with a diameter of 1.5 cm. At a distance of 2 cm, drill a hole with a diameter of 8 mm. Cut the tube two cm later.
- On the other tube, make a semicircular notch, our workpiece should ideally fit into it.
- We weld the tube with a notch to the workpiece so that the hole is on top. A nut must be welded to this hole.
- We take another tube, on one side we weld the washer and on the other we put on our hooks and the workpiece. The comb is ready.
Such a comb is no worse than a purchased one. It does its job well and is inexpensive.
DIY garage tools (video)
Do-it-yourself garage accessories are not difficult. To do this, you only need to apply diligence and ingenuity. Go for it!
Examples of DIY garage accessories (photo)
Attention, only TODAY!
oteplicah.ru
Homemade machines and accessories for the garage. Read the article!

Making homemade machines and accessories for the garage with your own hands, you significantly save your and your family budget. Homemade products in the form of shelving, various furniture, workbenches and even some tools - you can do all this yourself.
DIY garage machines are needed to solve the following tasks:
- The process of processing metal products is simplified,
- There are new opportunities for grinding and processing wood,
- The machine in the garage allows you to save money on the purchase of a power saw and other woodworking accessories.
As a rule, any of the shelving or power tools is quite expensive in the construction market. That is why the owners of garage boxes come to the idea of creating some fixtures on their own. The most popular homemade homemade tools options are:
- Manual or semi-automatic carpentry workbench for metal;
- Wooden or metal workbench;
- Drilling machine for the garage;
- Homemade press design;
- Various variations of shelves, racks and organizers for tools;
- Hoist or winch for lifting heavy parts and items.
How to make drills in a garage with your own hands?
 Drilling machine for garage
 Thanks to this self-made device, you can perfectly cope with the manufacture of any number and diameter of holes for metal and wood objects right in the garage workshop. The simplest and at the same time reliable option for manufacturing a machine is to use a drill with a bed. To manufacture the device you will need:
- Metal frame in the form of a base;
- Small mechanism for giving rotation to the drill;
- Low vertical drill stand.
In the form of a rack, it is best to use scraps from chipboard or unedged boards. Due to the low weight of the drill, there is no need to use a metal profile. At the same time, it is better to use a cast-iron base for the bed - it will avoid the appearance of any vibrations during the operation of the equipment. In the video you can see how to correctly make homemade garage machines with your own hands.
How to make a carpentry vice in a garage?
To create a vice with your own hands, you need to connect the following elements in the correct sequence:
- Several supports, each of which will be a sponge for clamping the product,
- One metal clamping jaw,
- A set of steel guides, which are used for the smooth movement of the sponge,
- Lead screw design,
- An element called a crank that drives the screw.
The first support from the pipe will act as a kind of body. It will be necessary to solder other supports to it from below and install a steel flange. Especially for the movement of the running nut, we drill a hole and, on the contrary, we weld a sponge. For the operation of the equipment, it remains only to install a stud in the holes, fix it with nuts and insert a movable tube next to it. As a result, making a vice for a garage with your own hands is not particularly difficult.
DIY garage forge
If you decide to make a blacksmith in the garage, then you do not need to buy expensive components for this - everything can be made from scrap materials. The main furnace will be an old gas stove. We install it in the chosen place, having previously overlaid the base and the frame of the structure with refractory bricks (chamotte) and smeared all the cracks with clay.
The next step is to make a grate. For a mini forge in the garage with your own hands, you can weld it from an old piece of steel. It is advisable to choose a metal of at least 10-15 mm. Further, furs are made for pressurization, a block of which can be quickly put together from thin-walled plywood and several pieces of board.
The last step is to prepare the fuel. You can buy charcoal from the store or make your own in a trench using a large duralumin pan. To do this, load the chopped firewood, close it tightly with a lid and coat the cracks with the edges with a clay mixture. Make a firebox in the trench and heat the coal “until ready”. As a result, you get a full-fledged DIY forge in the garage.
Now, from the materials and tools at hand, you can easily make things useful for the garage on your own. If you have any questions - write them in the comments!
Video of the channel "TEXaS TV". Topic: fit and more for the garage. At one time, when the master was just starting to repair cars, there was no money for a good tool. Complex and expensive designs had to be done by myself. The author of the channel decided to prepare an overview of homemade devices.
Watch the youtube video “Hands from the Shoulders”. Excellent fit for garage and summer cottages.
If you have an old vacuum cleaner lying around, you can put it back into operation again, remake it, for example, a blower. With its help, you can quickly clean some equipment from dust or put things in order on the street. You will need rubber bands, a motor and a part of the body. We remake the button, leg, handles and get a compact and convenient device. To focus the flow, in this case, the bell of the fire extinguisher. Surely there are many more alternatives.
This summer it is planned to build a similar dryer at the dacha. It can be used not only for fish, but also for meat, apples, mushrooms. Cool option. There is a thermostat that maintains the required temperature in the chamber. Air intake from 150 ventilation pipes. It has a built-in heater consisting of two incandescent lamps. Above is a mosquito net filter. Server rack fan. Outlets are brought out to the street.
Interesting execution of a milling copier. Moving on shafts with a diameter of 20 mm is carried out using linear bearings.
If you build something from foam blocks, then you probably felt all the charm of their rise to the floors. This is still a pleasure. Weight over 30 kilograms. The simple design of the gripper together with a winch or electric hoist will make the work easier.
An improved version of the vise for welding. Additional instructions have been added to the adaptation, which made it possible to connect parts at once in 3 planes.
In early May, summer residents begin a hot season, including potatoes. If you have a walk-behind tractor, then it makes sense to think about automating the harvesting process. Moreover, the whole summer to prepare. This digger is of a roaring type, but there is no roar in it as such. This greatly facilitates the manufacturing process of the adapters. Instead, the rods on the ploughshare are lengthened. The soil with potatoes is picked up by a plowshare and served on the table from the twigs. The latter vibrates, the soil wakes up through the cracks, the roots from the other side fall to the ground. It remains only to pick up and put in a container.
In a private home, a garden shredder is a useful thing. No need to think about what to do with the cut branches. Secondly, for such fertilization, your garden will repay with an excellent harvest. The knives are mounted on discs 16 mm thick. Spring cutting elements. Hammers for chopping branches to the desired size fraction.