Many owners of suburban areas and cottages are faced with the fact that by the end of the season they have accumulated a lot of unnecessary canisters and plastic bottles.
Such things should not be thrown away: from them you can create a wide variety of crafts for the garden, cottage or garage, which can perform both a practical and decorative function.
Most of these items can be built with minimal effort in 10-20 minutes, and they can make the area more interesting and original.
 Depending on the characteristics, such containers classified according to the following parameters:
- Volume - from 1-2 to 50-80 liters.
- The form. Canisters can be flat and rounded, oval, rectangular or square in section, have a handle with a lid.
- Colour. Plastic products are most often white or translucent, there are also cans of green, blue, red and other shades.
For creating decorative items and practical devices suitable containers for food, water, fuels and lubricants, fertilizers, other liquid products.
Before you start making crafts, it is advisable to inspect the canister for damage, thoroughly clean and degrease it.
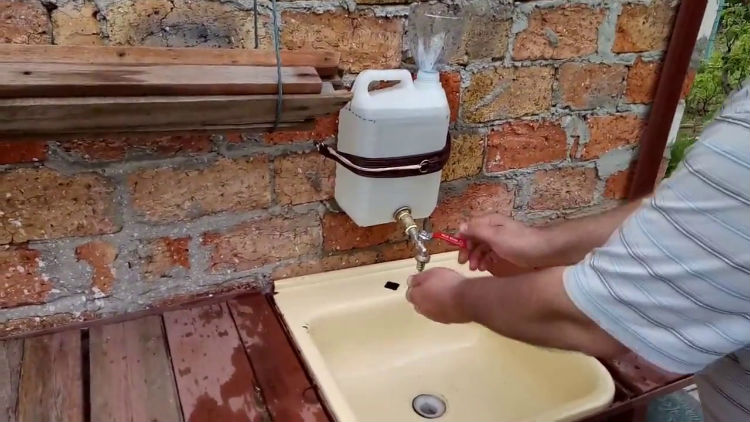
How to make a washbasin?
A 5 liter plastic container is ideal for creating country or camping device for washing.
The filler hole of the canister will be used to fill with water, and in the bottom you need to make a hole and insert a tap or valve.
To do this, you need to use a pair of seals in the form of rubber gaskets and a fixing nut so that the water does not leak out, and the tap is firmly fixed.
Washbasin or washbasin can be hung on a crossbar, hook, attach to a vertical surface with a belt or even tape. A funnel can be inserted into the filler hole for convenience: this way, when filling the canister, water will not spill onto the ground.
If you put a simple faucet, you can adjust the pressure by turning the handle.
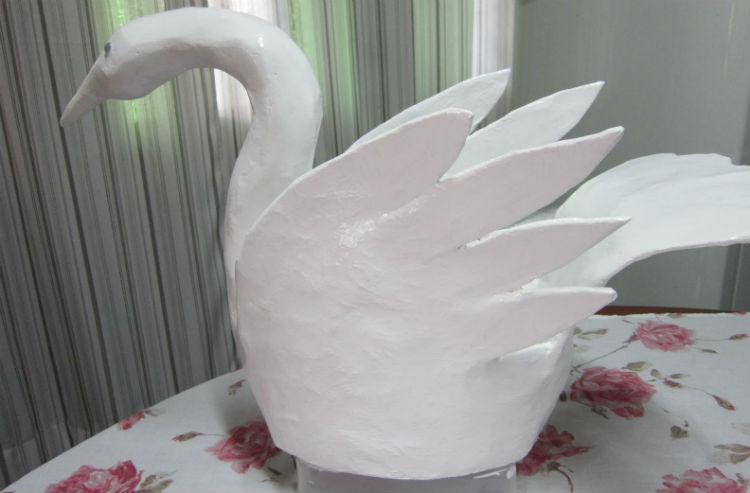
Master class on creating a swan
Sculptures of birds to decorate a suburban area are often made of plastic. We present to your attention a small master class on making a swan from an old canister.
For this purpose 5 liter containers required. It is necessary to cut the product so that the body, tail and long neck are immediately cut.
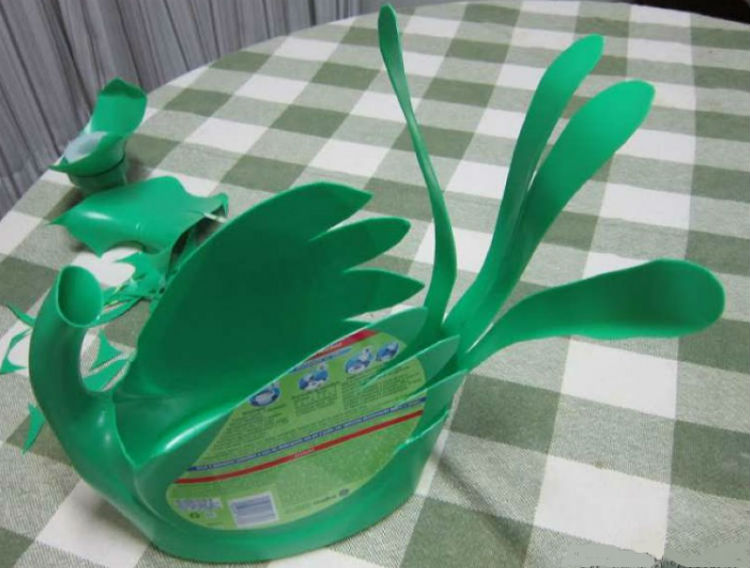
Then you need to prepare the wings from thick cardboard.
Neck worth cover with newspaper and tape, then do the same for the entire workpiece.
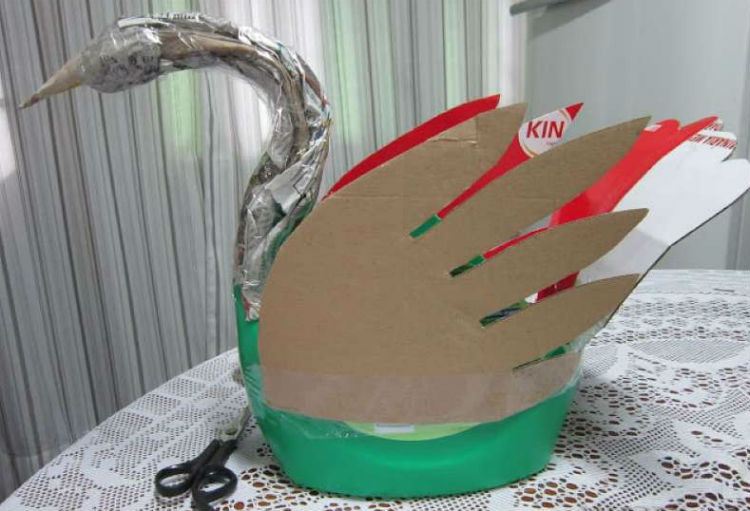
After you need apply a layer of plain napkins and coat the future sculpture with plaster mortar.

As they dry, the surfaces are sanded, painted and decorate with additional elements(for example, the eyes of a bird can be made from colored stones or glass).
Garden flowerbed
Many owners equip flower beds in the garden or front garden, and plastic canisters can be used for two purposes:
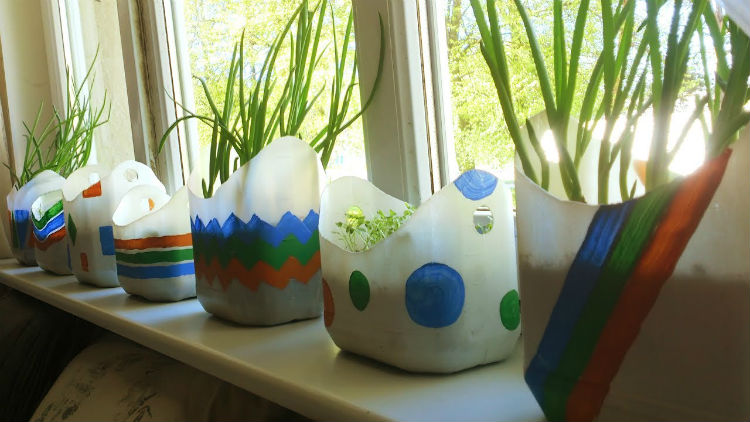
- Container for planting flowers. You will need to cut the product, turning it into two halves, and dig it into the ground, then pour the prepared soil with fertilizers inside and sow flowers. The canisters themselves can be optionally decorated with colored paper, paint, and in other ways. In addition, the mini-flower beds themselves can be lifted off the ground, as shown in the photo below: this is especially true if the soil is initially not suitable for specific varieties or it is too wet.
- fencing for the finished flower bed. The option is great for large flower plantings: canisters are dug around the perimeter, blocking the plants. This design is rather decorative, for her it is better to use colored containers of the same shade or alternate 2-3, then the fence will look aesthetically pleasing.
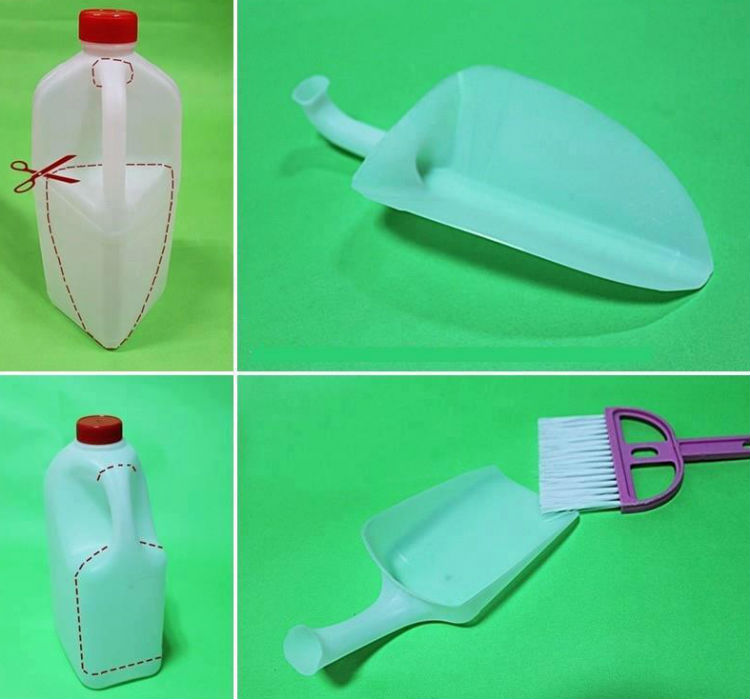
plastic scoop
If the canister is small (1.5-2 liters), a scoop can be made from it for cleaning or garden work.
You will need to mark the future product on the surface and cut it out; the handle matches the container handle. The bow can be made both triangular and square.
In the first case, it is convenient to use a scoop for digging up plants with a small root system from soft soil, and in the second case, for collecting garbage.
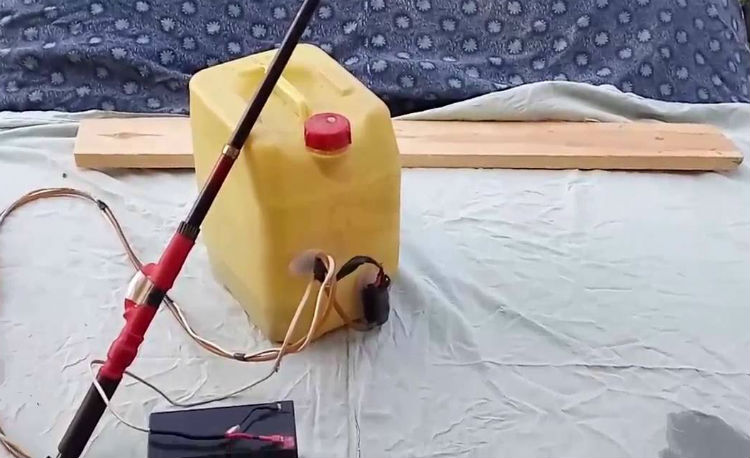
Sprayer
A large capacity (10-30 liters) can be adapted for spraying plants with chemicals that protect plantings from pests.
canister equipped with a manual or electric pump for ease of spraying. For carrying, you can adapt the handle or straps to carry it on your back.
The hose, spray nozzles, and rod can be purchased at any hardware or plumbing store.
A rubber nipple can be used to install the valve.
Such a sprayer is suitable for processing small gardens and front gardens, for larger areas an extension may be required.
Most often a device made of a plastic canister used for spraying chemicals against pest beetles, cabbage, as well as mold and fungus. You can also use products prepared according to folk recipes, from soap solution to urea.
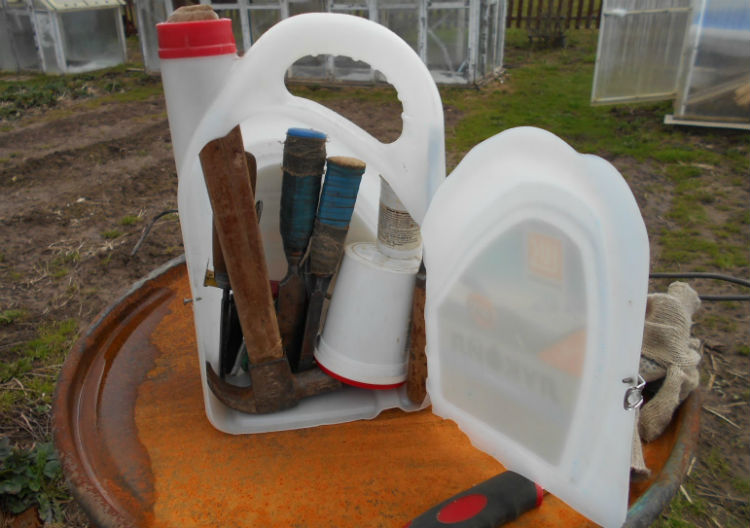
Tool box in the garage
To create such a device, you can use cans of different sizes, the choice depends on how many things you plan to put inside.
The most commonly used containers are 10-20 liters from under water, food, chemical, combustible products. The shape should be rectangular, in the middle at the top is the handle.
Manufacturing instructions:
- make a vertical cut on the side of the neck and handle, leaving the wall intact from the narrow part of the canister;
- bend the resulting "door", opening the container. Inside you can place sections of plastic cups or boxes, any other fasteners. In such a box, you can store small items (nails, screws, paper clips, electrical tape, etc.) or tools directly (hammer, pliers, pliers, etc.).
In order to make the tool box stronger and more airtight, the sides can be reinforced with metal plates, for this, the walls will need to be drilled and fixed with bolts and nuts.
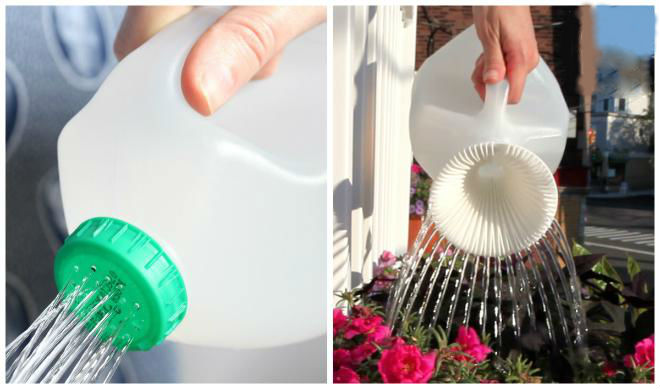
Watering can
For such a product, it is optimal to take a canister from under the detergent or other products that have slightly flattened shape and comfortable handle.
It is necessary to thoroughly wash the internal parts from liquid residues, then drill thin holes in the lid. The optimal size is 1-1.5 mm. Just above the handle, you need to make a larger hole for air supply: if this is not done, it will be more difficult to water the beds due to the pressure drop.
If necessary, you can equip the watering can with a plastic tube, which is purchased in household goods or plumbing stores: it will increase the spray range.
The water is poured through the cork, for this convenient to use a funnel or hose so that the liquid does not spill.
You can also cut a wider lid, then the use of a funnel when filling with a regular bucket is not necessary. However, in this case, care should be taken to ensure that when watering the plants, water from the watering can does not flow to the ground through the lid.
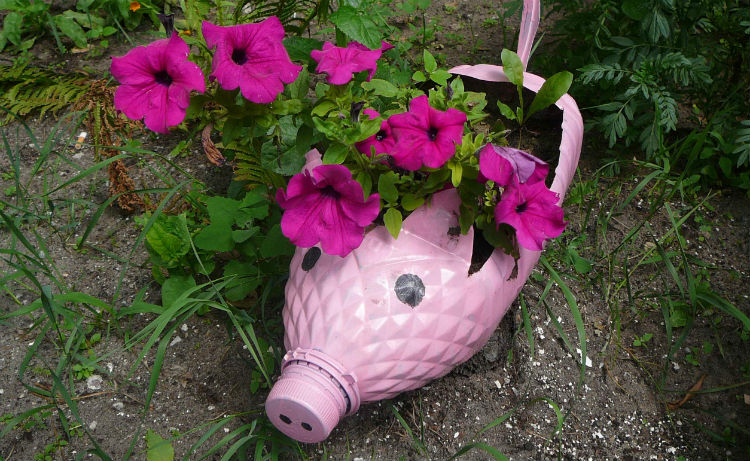
We create a planter
Hanging or stationary flower pots can also be made from plastic containers.
canister can cut in half horizontally, then process the edge of the medium so that it is not sharp: grinding will be required. After that, holes are made 0.5-1 cm from the edge, into which a cord or rope of small thickness is inserted, fastened with an allowance of 20-40 cm (the size depends on which plant the pots will be used for).
Then a single suspension is formed, it can be made in the form of a loop. The planter can be hung on hooks, wire, nails.
If the products are to be placed on a stand, making holes for fasteners is optional.
In any case, small cuts are needed in the bottom: they allow you to create a competent soil microclimate and remove excess moisture.
The surface of finished planters can be braided into knitted covers, decorated with appliqué or painted - a sample of such crafts is shown in the photo below.
fishing box
For this purpose, 20 liter oil cans can be used; side pockets, if necessary, are made from less capacious containers.
The canister is cut off, leaving the height at which the fisherman will sit comfortably for a long time, reinforce the cut with an aluminum strip with rivet fastening.
Inside you need to place a partition made of thick plastic: it not only divides the object into compartments, but also serves as an auxiliary stiffener and prevents the lid from deforming.
The lid is cut out of a thick plywood sheet and attached to the hinges. The top part is usually Lined with soft material for comfort.
A strap is attached to the sides of the canister so that the fishing box can be carried on the shoulder. The inner tool compartment can be divided into smaller segments (for rigging, rods, donks, circles, etc.).

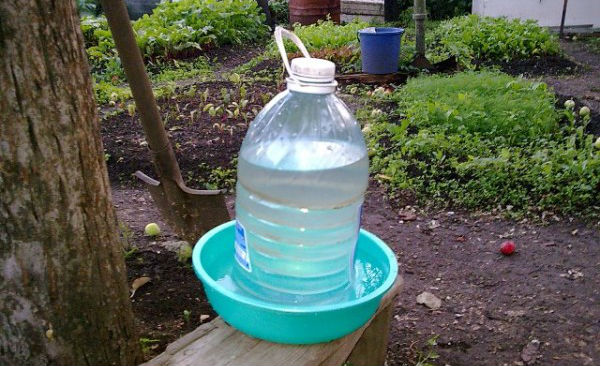
Drinker for chickens
A device for providing poultry with fresh water can also be made from a 20-30 liter canister.
Would need prepare a wide pallet impervious to moisture. Make cuts in the bottom, then put the canister in the pan, leaving a gap between it and the bottom of 1-2 cm (for this, you can make coasters along the edge under the container).
The structure should be fixed so that the water container does not turn over from an accidental push.
After filling the liquid will flow evenly into the pallet where the chickens can drink from.
Such a drinker for chickens is good not only for its simplicity, but also for the absence of the need to manually adjust the water flow.
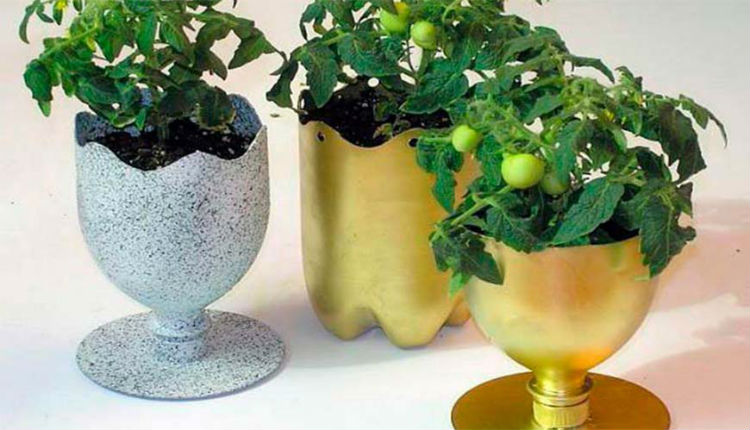
Flowerpots
It is very simple to make such products: just cut off the upper part and make holes in the bottom to remove excess moisture. Canisters are placed on stands, soil is poured inside and seeds or seedlings of flowers are planted.
Such flowerpots can be decorated or processed with moisture-resistant paint, decorated with appliqué.
Most often they are placed on terraces and in gazebos, turning the place of rest into a piece of paradise filled with greenery.
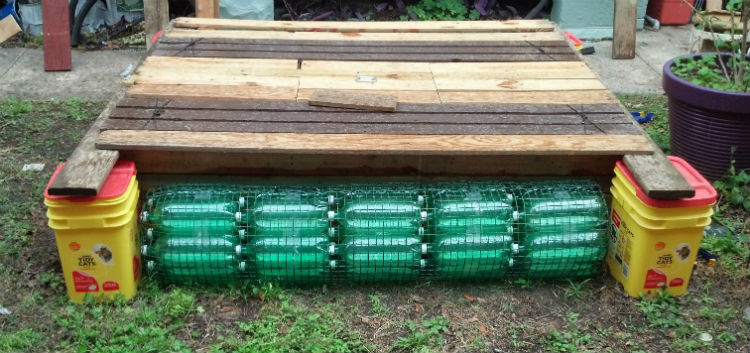
A raft of empty containers
This design is suitable for crossing the river, fishing, mobile bridges on the pond.
The frame of the raft is made from a 3 mm board, knocking it down with nails or screws.
A raft is made from empty canisters with a volume of 40-50 liters, they are attached to the frame with packing tape or a special darkened film.
The second option is interesting in that it protects plastic surfaces from fading under the rays of the sun. The frame must first be coated with antifungal agents and varnish to protect it from decay upon contact with water.
Finished construction can be equipped with the following equipment:
- mooring ladder;
- feeders for luring fish;
- seats, loungers;
- shelter from the sun;
- anchor.
Shower for giving
The procedure for creating such a structure includes the following steps:
- Creating a handle. To do this, you can use a simple rope, passing it through the handle of the container and tying it around a tree or other structure where the shower will be attached.
- Installing the nozzle. A lot of small holes should be made in the lid, blow through them, then insert it into the container faucet. The joint should be sealed so that moisture does not leak.
- Building a stopcock regulating water pressure. Such a product can be found in the plumbing department. Rubber seals are required for installation.
- Cover arrangement where the water will flow. It is better to make it closed so that dirt, foliage and insects do not get into the canister.
- The sides are covered with black tape. so that the water inside warms up faster: black walls absorb ultraviolet better.

Useful video
Another idea for using a plastic canister is the toilet paper holder plus shelf in this video:
Conclusion
If you still have unnecessary plastic canisters and you cannot find a use for them, you should not throw them in the trash.
Recycling plastic with reuse in industry is the best option, allowing rational use of resources without harm to the environment.
In addition, the containers themselves can be used both for decorative and practical purposes - the choice depends only on the owner's imagination.
From the article, you learned what can be made from 10-50 liter canisters for a garden or garage, got acquainted with how to make a washbasin, a swan, a watering can, a raft, garage boxes and other useful tools.
In contact with
Many fishermen, to store their fishing gear, purchase special fishing boxes. However, this box is available for various reasons, alas, not for everyone. To the rescue of fishermen who are keen on winter fishing, ingenuity and the ability to create and do something with their own hands come.Do-it-yourself fishing box from a plastic canister
Now you can find a lot of articles on how to make a freezer box from a Soviet refrigerator, or a wooden, plywood or even completely foam winter fishing box. But not everyone has a freezer either, and sometimes it is impossible to find it.
Styrofoam is needed very strong and solid, but it will get wet in winter fishing conditions, and it is heavy. You should not be upset, because you can make a box from a plastic canister, which is quite easy to find in your garage. We take two canisters of the size you need. Naturally, the volume of canisters determines the volume and dimensions of your future fishing box.
The sequence of making a box for winter fishing with your own hands

We take a knife and cut off the top of a large canister to get such a container. First you need to measure the height of the future box. The comfort of your sitting while fishing will depend on this and whether your back will get very tired or not. It is better to determine the height of the fishing seat by the old box or chair, on which it was comfortable for you to sit and fish.

At a small canister, cut off as in the photo. To get such a container in the form of a patch pocket.

Now you need to fasten the small canister to the side of the large canister to get an extra pocket. Fastening methods can be different, both with rivets and with bolts. You can also use a furniture stapler, as I did. With the help of a furniture stapler, we attach a small canister to a large one.

Bend the staples inside the large canister.

We cut out the lid for the box from plywood, 6 mm thick. After the cover was sawn and adjusted to size, I decided to attach foam rubber to it and cover it with leatherette. We attach hinges to the lid, you can attach them to self-tapping screws or other fasteners. The lid will not be attached to the plastic of the canister, but to the edge reinforcement.

The top of the canister is quite flexible and needs to be reinforced. This can be done using a 4 * 2 mm aluminum corner. or reinforced with fiberglass and epoxy.

Now that the edge of the canister is reinforced, we need to attach the lid to our box.

We just have to do it with our own hands, just a belt mount. We drill two holes and fix the wire in the form of loops there. We attach the belt. for easy portability.
Homemade fishing box from a plastic canister is ready

I would advise making the internal partitions of the box from plywood, because. plywood will further strengthen your box and give additional rigidity in the transverse and vertical direction. If you have little space (and there is always little), you can make several pockets on the drawer. You can also make lids on the pockets. The undoubted advantage and main advantage of this box is its lightness.
Belskikh Nikolai Viktorovichwith. Virgin Altai Territory - Specially for Samodelki FISH
On sale you can find a variety of things made by skilled people from improvised means. For example, a very interesting idea is a canister converted into a bar cabinet. Looks impressive and worth the same. At the same time, such a thing can be done by yourself, so that it satisfies exactly your requests and needs. In bars, the door, as a rule, opens down, which may not always be convenient.
Below is an instruction on how to make your own canister cabinet with height-adjustable shelves. The layout of the shelves depends on the purpose for which the cabinet is intended, for example, the combination below is suitable for photographic equipment, but you can adjust it to your needs.
Necessary materials and equipment
To work, you will need the following:Materials:
- Old washed or new canister.
- Boards.
- Loops.
- Pen.
- Rubber compressor.
- Screws, bolts and nuts.
- Dremel with cutting disc.
- Angle grinder with cutting disc (Bulgarian).
- Band saw (or jigsaw).
- File.
- Marker, pen.
- Angle ruler (optional, a ruler will work too).
- Sandpaper.
- Plane.
- Bench drill press or drill and drill bit.
Decide on door size


Before you start cutting a door in a canister, you should decide what size it should be. Using a marker attached to the square, you can mark the doors of different sizes and choose the most suitable one. In the example shown, this is 30 mm from the edge of the canister.
In order not to accidentally erase the line drawn with a marker, you can stick it with a translucent adhesive tape, and draw a thinner line on top with a pen, along which it will be more convenient to cut.
Cut out the door


The door can be cut with a dremel or grinder.
The second option may be faster, while the grinder leaves a wider slot, because. she has a wider disc. Since it is planned to stick a rubber seal on the door and the edges of the opening, this would be a more suitable option. When working with a grinder, you will most likely need help to fix the canister.
At the final stage, it is more convenient to use a dremel to cut rounded corners. When cutting metal, you must be very careful with sharp edges in the cut. Use gloves and file the edges with a file.
Rubber seal on the door and sizing


Glue the rubber seal around the edge of the door and check if the door fits snugly. If necessary, cut and adjust the corners with a dremel and a file.
Determine the dimensions and location of the shelves inside the canister


Now you need to make the internal shelves for the locker. Depending on what you plan to store in it, consider its design. The picture shows a layout suitable for photographic equipment, while the entire structure can be further disassembled and redone, since the assembly uses a locking connection.
The internal dimensions of the canister may vary slightly depending on the manufacturer, so you'd better use your own measurements. You can use a design software like Autodesk Inventor to simulate the end result and imagine what it will look like.
Making shelves


First of all, sand the boards. In this case, the boards turned out to be 12 mm thick. Then, using the templates, mark out the details for the shelves on the boards. To cut them, it is best to use a band saw. Because this canister has a notch in the middle along the narrow side, it was necessary to cut a hole in the shelf using a drilling machine. Drill also a hole for connection to the support posts in each corner, 6mm from the edges 3mm wide and 8mm deep. When securing a shelf with a clip, put a piece of wood between the clip and the shelf itself so as not to damage it.
To precisely fit all the parts to each other and to the dimensions of the canister, careful grinding of the edges and joints will be required. Remember that sanding is best along the grain of the wood.
Finally, you need to cut out the vertical posts. To connect to the shelves using dowels, make holes 12 mm deep, 3 mm in diameter at the ends of the posts (then the fastening should be 20 mm in length).
Preparation and installation of the door


Choose the right hinge design. After measuring the width of the loops and determining where you want to attach them, make a mark using a nail or something sharp. One of the options: loops at a distance of 15 mm from the edge of the canister, at a height of 100 and 270 mm.
In order not to make a mistake with the location of the hole, start drilling using a thin drill bit, preferably 1 or 2 mm in diameter, and then install a thicker one that matches the purchased bolts.
Install the hinges and trim the seal if necessary. It is now easy to determine the location of the holes on the door by attaching the door and placing it in the desired position. Drill holes in the door as described above and attach the hinges to it.
Last but not least, attach the doorknob to the desired location. In this case, it is installed 45 mm from the edge and 180 mm from the lower edge of the door.
Shelf assembly


Finally, you need to assemble the shelves for the locker. Whether it will be easy or difficult depends on how intricate the design you come up with.
Fill your locker and enjoy


Think about where you will store the amazing locker. The most important thing, of course, is to find a place where it will be in full view, and you can proudly show everyone the creation of your hands.
Convenient and roomy tool box, this is the dream of almost any master. Neatly folded tools, which are always at hand and in perfect order, are almost a guarantee of pleasant and efficient work. Moreover, a convenient box can be made from almost anything that you have in your arsenal.
How to make a portable tool box from a plastic canister:
Of course, now there are many different kinds of plastic products, and special tool boxes are proof of this, comfortable, lightweight, ergonomic, transformable, there are even waterproof ones. But not everyone can afford such pleasure, and therefore have to improvise. A tool box, or under, whatever it is, can be made from a five-liter baklag or canister or a large can. And you will also need loops, you can buy them, or you can simply sew on a piece of leather, strong fabric instead of them, or do as I do - use an ordinary clothesline.
The first thing to do is mark the workpiece, that is, draw a line with a marker or pencil, along which you then need to saw off the top of the canister.
 We draw a line of sawing and sawing
 Next, in the resulting top cover, make one hole in front and two in the back (I took a drill, heated it on fire, and melted holes - it’s more convenient and correct to do this, because if you drill them, then the plastic can break). You need to screw a bolt into the front hole - it will act as a kind of fastener.
 holes
holes  Bolt clasp
 In the same exact way, it is necessary to make holes in the bottom of the canister, mirroring the top cover, respectively.
 Hole for zipper
  Holes in the bottom of the plastic canister
 And further actions are banal and simple. You just take and put a clothesline through the holes, and tie knots well. Insert a loop into the front opening of the lower part and tie a knot - this knot will act as a fastener.
 Making a loop
 And in a similar way, we need to make an impromptu “door” loop that will connect both parts of the box between failures, the lid to the very bottom of the box.
 Threading the rope
  We fix the rope with knots
 This whole design works very simply, the knots and the loop under the weight of the tools do not allow the box to open when you take it by the handle of the canister.
 Closed box (an eyelet is thrown over a bolt)
  Remove the loop from the bolt and open the drawer
 Thus, I got a light, practical and roomy tool box, which, moreover, is not a pity to adapt for anything, and besides (if necessary) you can collect water, sand, construction debris in it. And in general, thanks to such a transformation, an ordinary canister has become a multifunctional container.
Hello readers of this site. Today I will tell you how I made a convenient box for transporting a welding machine from a plastic canister.
Most of the time I live in a city apartment. In the basement under the nine-story building, I have a workshop, where I do my hobby - homemade products. There I can do everything except welding - firstly, there is a 10-ampere automatic machine installed in the electrical panel, which can knock out when the electrode sticks (And the electrician has the key to the shield). Secondly - fire safety! And thirdly (and most importantly) ventilation there does not allow welding.
And therefore, in order to perform welding work, I go to the dacha, or to a private house. And since I'm always running out of time, most often, after work, I jump into the basement, grab everything I need, and go ....
I use this welding inverter "Gerard-MMA200".

He has served me faithfully for many years. I kept it in my "native" box. But the trouble with all factory packaging, as you know, is that once you take out its contents, it is almost impossible to put everything back in!)))). Fortunately, a "souvenir" welder's shield was supplied with the device! Without it, the device easily fit .... But only he!
And so, I arrived at the cottage. I lay out the tool in anticipation of interesting work ....
...... And then it turns out that I forgot the mask!!!...
Another time I took both the mask and welding .... but forgot the electrodes ...
The next time - I took everything except cutting wheels ...))))).
These are the events that gave rise to the idea in me to make a kind of box, where the whole set would fit - a welding machine, a mask, wires, electrodes, clamps, a hammer .... In short, to grab one box, throw it into the car - and not forget anything!) ))))
And I began to think of what I could make such a thing! My choice fell on just such a 30-liter canister, of which I have quite a lot:

Having estimated, I came to the conclusion that such a volume is exactly what I need. (To be honest, it was not this canister that went under the knife. I just forgot to take a picture of the one I cut.))))
As a result, I got a box, which you can see in this video (it was filmed "crookedly, but, I'm sorry):
And now I will tell you in detail how I did it.
I needed:
1. Plastic canister 30 l.
2. Blind rivets with a diameter of 4.8 mm of different lengths.
3. Loops 2 pcs.
4. Chest latches 2 pcs.
5. Strips of tin.
6. PVC pipe cuttings.
7. A piece of linoleum.
6. Washers M5 enlarged.
So, let's begin...
At first I wanted to do a horizontal layout. But, on reflection, I came to the conclusion that, firstly, I will significantly lose in the rigidity of the structure, and secondly, I’m still going to wear it by the handle (i.e., vertically), and therefore, it will be better if the instrument is laid will be made in the same position.
So I took the canister and cut off the top of it:

I had such scraps of tin.


These are just strips with a folded edge. Remained from something, I don't remember. If necessary, they could be easily cut and bent.
I took a narrower strip and riveted the edge of the cut off upper part with it, using a regular riveter and pop rivets. At the same time, I slightly pushed the double-curved edge of the tin over the cut:

At the same time, I inserted the rivets from the outside, and from the inside, since there was no metal surface, I put M5 washers on them:


Next, I wanted to do the same with the bottom of the canister, but ran into an unexpected problem. The stress of the wall material was released during cutting, and changed the geometry of the lower, less rigid part. And when I put exactly the front, the back did not fit far:


Therefore, I first made a "forging" blank, using the top cover as a template, and bending the desired perimeter of the lower part along it:


Then I put it inside, forming the perimeter geometry:

And then I put a narrower strip on the outside (such as I used on the lid) and riveted them together with rivets:

Next, you need to connect the lid to the canister. Digging through my storerooms, I found these loops:

Then I shortened them with a grinder:

The drill increased the diameter of the holes to 5 mm.

And screwed-riveted in place:

As locks, I decided to use the so-called chest latches.

I always have them in stock, because they cost a penny, and in many places they can come in handy. Here is one example of using them to repair an old punch case:


So in my homemade they came in handy:


Well ... Let's start creating the "insides" ....
I took a piece of PVC pipe with a diameter of 32 mm:

I cut off four pieces, cut the edges obliquely and drilled holes for the rivets:


Then I riveted them to the side wall inside the canister. I laid the rivets from the inside, again put washers on them from the outside:


Now it is convenient to store a supply of electrodes of different diameters in them (at the time of shooting it turned out that "two and a half" were over! Only "two" and "three" were available ... Now I have already bought it)))))) :

The hammer was also placed there:

By the way, the hammer is also homemade. Especially for welding, he built it from a piece of round timber and a piece of a water pipe. And heavy enough, and the handle will not light up ....

Next, I proceeded to build a pocket for grinders. I cut out a piece of linoleum in this shape:

The edges are "forged" with tin:


Then I riveted the bottom edge first: