Content
To provide a private house with heat, it is necessary to carefully consider the design of the heating system. It is important not only to choose the right boiler power and choose high-quality batteries, but also to correctly connect heating radiators. At the same time, the choice of the heating system and the direction of movement of the coolant through the internal channels of the battery affect the amount of heat coming in the form of infrared radiation and convection heating of air masses. Consider which of the schemes for connecting heating devices are considered the most effective in an apartment and a private mansion.
Radiator battery connection
Factors to Consider
At the design stage of the heating system, a thermal calculation of the house as a whole and each heated room separately is performed. This allows you to install a boiler of the required power and select a heater for each room, the heat transfer of which is enough for high-quality heating even on frosty days. It does not matter what material the radiator is made of - it can be steel, cast iron, aluminum or bimetallic.
However, the type of battery affects the usability of the heating system - cast-iron radiators cool down and heat up for a long time, not allowing you to flexibly adjust the microclimate in the room. It is also worth paying attention to the presence of steel panel-type radiators with a bottom connection - they are connected to the pipeline in the only possible way.
In order for the heating system to provide the house with heat, operating in the optimal mode, without unnecessary fuel consumption, it is necessary to take into account:
- type of heating system;
- the location of the batteries (their heat transfer is affected by the installation location - protruding structures and decorative screens reduce the performance by 3–20%);
- length and specifics of the heating main.
Features of the circulation of the coolant
The heat carrier in the heating system is water or antifreeze (the latter option is used in private houses with autonomous heating). It can move through the pipeline in two ways:
- under the influence of gravitational forces and thermal expansion of the liquid, the heated water rises through the accelerating pipe, and then moves down the pipes installed with a slope, displacing the cooled water into the boiler;
- under the influence of a special pump that forms the flow of liquid.
 natural circulation
 When considering how to connect a heating radiator, one should take into account the type of circulation of the coolant, otherwise there is a risk that the batteries will not warm up well in the gravitational system.
Single pipe wiring
With single-pipe wiring, heating devices are connected to the system in series, as a result, the hot coolant passes through all the batteries in turn, after which it enters the return line, through which it is transported to the boiler.
This option is usually used in apartment buildings as the most economical during installation. Moreover, there are two main connection methods:
- a riser passes through each heated room of the apartment, to which a heater is connected;
- supply and return risers are connected to each apartment, and heating devices of all rooms are connected in series to them.
 Single pipe system
 In private houses, the radiator outlet is also connected to the inlet of the next heating device, and the outlet of the latter is connected to the return pipe. The disadvantage of serial wiring is:
- Insufficient heating of the last batteries, the most remote from the boiler. To ensure sufficient heating of the room, it will be necessary to install heating devices with a higher heat output due to the increased number of sections or the size of the panels.
- The inability to regulate the heat output of the radiators to create the optimal microclimate for each of the premises separately.
Two-pipe wiring
The two-pipe wiring option involves connecting the battery input to the supply pipe, and the output to the return pipe. Parallel connection:
- Provides uniform heating of heating devices, regardless of their distance from the boiler.
- It makes it possible to change the heat output of each radiator individually using a thermostat, including in automatic mode.
The disadvantages of a two-pipe system include high material consumption - the length of the pipeline actually doubles. But the financial costs of installation are paid off by a simple balancing of the system, the convenience of its operation and fuel savings when using temperature controllers.
 Two-pipe system
 A two-pipe connection is mainly used in private houses, but can also be found in apartment buildings.
Battery Connection Principles
It will be necessary to decide how to properly connect the heating battery in the apartment if the supply and return risers are connected to it, and the tenants themselves will have to choose the principle of connecting radiators. In Soviet-built multi-storey buildings and in many modern buildings, a single-pipe system with a riser in each room is used - in this situation there is no choice, the battery must be installed according to the standard project.
The scheme for connecting heating radiators in a private house is selected in accordance with the preferences of the owners or the decision of the developer, the type of wiring of the heating system. To understand the advantages and disadvantages of each of the battery connection schemes, it is necessary to understand how the radiator works.
The design of the radiators is similar, despite the differences in the material of execution and appearance. Two parallel collectors (upper and lower), located horizontally, are connected by channels that act as vertical bridges. A heated liquid moves through the channels, giving off thermal energy to the metal case.
 How batteries are connected in an apartment building
 Heaters designed for side mounting are equipped with threaded fittings at the ends of the manifolds. Two pipes are used to connect the battery to the pipeline, plugs are installed on the remaining two. Instead of one of the top plugs, a manual air vent is usually mounted.
A number of manufacturers offer steel panel radiators that are conveniently connected to a pipeline hidden under the floor or baseboard. Such heating devices are equipped with two externally threaded pipes located in the lower part of the housing.
The scheme for connecting heating radiators with a two-pipe and one-pipe system is selected taking into account the heating efficiency of the battery case when the coolant moves through its internal channels.
Lateral connection (one-sided)
One-way side connection with top feed. This option is used in apartment buildings, where one radiator on each floor is connected to the risers. The outlet pipe (lower) is also connected to the supply riser (one-pipe system) or to the return riser (two-pipe system).
 Side connection
 The advantage is compactness. This type of connection has proven itself for heating appliances of short length - up to 10 sections. In the case of installing an elongated battery, it is necessary to use a special pipe (flow extension), which is inserted inside the upper manifold and supplies the heated coolant to the far sections, otherwise they will not warm up and the heating device will not be able to work at full capacity.
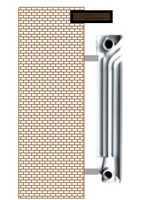
One-way side connection with bottom feed. It is used in single-pipe systems with the supply of coolant through the riser from the bottom up. The heated liquid tends to pass through the channels closest to the nozzles, so the far part of the battery does not warm up enough - the radiator power loss can exceed 20%. In order for the battery to work in the optimal mode, a flow extension is mounted inside the lower manifold, which contributes to the supply of heated liquid to the distant channels.
Diagonal connection (cross)
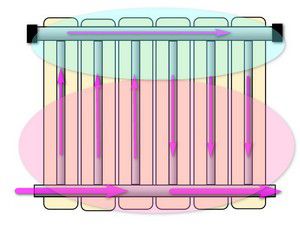
Diagonal top feed connection. This option is the most effective, it is this connection scheme that is taken as the basis for calculating the thermal power of batteries with side connection. The supply pipe is connected to the upper branch pipe, and the outlet pipe is connected to the lower one on the opposite side. The coolant enters the upper collector and all jumper channels, evenly heating the body of the heater over the entire area.
 Diagonal connection
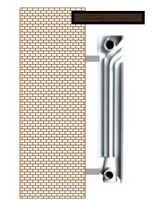
 Diagonal bottom feed connection. If you connect the supply pipe to the radiator using the lower pipe, so that the coolant passes through the heating device diagonally from the bottom up, its power will decrease by approximately 20% relative to the optimal connection option. The coolant rises through the channels closest to the inlet and through the collector enters the pipe connected to the upper branch pipe. As a result, the lower corner of the battery does not warm up. This option is not recommended due to the extremely low efficiency.
Bottom connection, saddle
In private homes, hidden installation of the pipeline is popular - communications are located in the floor or behind the plinth. Accordingly, the heating batteries are connected from below.
Bottom connection. This term is used in relation to steel panel radiators, which are equipped with closely spaced pipes for connection to the pipeline.
 Bottom saddle connection
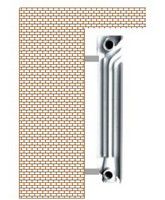
 Saddle connection. This type of radiator connection implies the use of the lower connections of the standard model with side connection. The advantages include aesthetics - the pipes do not remain in sight. The disadvantage is the loss of thermal power by 10–15% due to the fact that the main part of the coolant moves directly along the lower collector, and only part of the heated liquid rises up through the channels, heating the radiator housing.
The intensity of movement of the heated liquid in the absence of a pump is not enough to warm up the radiator, therefore, the installation of heating devices with a lower or saddle connection is only allowed in systems with forced circulation.
Conclusion
The most correct option for connecting a heating device in a private house is diagonal with top feed. If you choose the right speed for the movement of the coolant in a system with a circulation pump, you can minimize heat loss with the lower connection method. Other types of battery connection in autonomous heating systems are not used as often, since their efficiency is noticeably lower. In apartment buildings, lateral connection is practiced.
Of course, it is too early to talk about the installation of radiators in the design section. However, the connection of heating batteries must be considered already at this stage. In a sense, choose a way to connect radiators to the pipeline.
What are you talking about, you ask?
The most efficient connection of radiators
As you know, sectional radiators have four outputs (or inputs?):
At first glance, it does not seem to matter in which of these places to connect the supply and return pipes. But this is only at first glance. Because with different connection options, the batteries will work with different efficiency.
In order not to torment you, I will immediately show the connection method, which is considered the most effective. Here's one:

The radiator with this method of connection warms up most completely, evenly, and its heat transfer is better than with other methods.
Consider for comparison and other methods.
One-way connection of radiators
Such a connection looks like this:

And with such a connection, there is a limitation on the number of sections: for an aluminum radiator, there are no more than 20 sections.
Bottom connection of radiators
Here, the supply and return are connected to the lower outlets of the radiator:

According to this scheme, the batteries are connected when the pipes pass along the bottom of the wall or along the floor (for example, with collector wiring). As you can see from the figure, the efficiency with this connection still decreases, up to 88%.
Connection of radiators with bottom supply
A mirror image of the first method, i.e., the supply is at the bottom, and the return exits diagonally at the top:

The efficiency of the radiator with this connection is only 80%.
And another option for connecting a battery with a feed at the bottom:

The efficiency of the radiator is even less: 78%.
One-sided bottom connection of radiators
There are radiators with inlet and outlet nearby. Schematically, the connection of such radiators looks like this:

Such a connection has the advantage that the pipes are not noticeable, but the efficiency with such a connection is also 78%. To gain the necessary power with such radiators, you need to install more sections.
How does the method of installing a radiator affect the efficiency of its operation?
In addition to the connection method, the efficiency of the radiator is affected by how it is installed. What am I talking about? Yes about the next one.
Usually radiators are placed under the windows, and this is correct and good ... if not for the window sills. In the absence of a window sill, nothing would prevent the radiator from giving off heat to the air, which would freely rise vertically upwards. And all 100% of the heat from the radiator would go to heat the room.
Due to the window sill, the trajectory of air movement changes, heat transfer decreases by 3 ... 4%. If the radiator is also hidden in some niche, then its efficiency still drops, by as much as 7%:

Decorative screens further reduce the heat transfer of radiators. If the screen has a space below for air access, then heat transfer is reduced by 5 ... 7%:

And for radiators completely covered with a decorative screen, the heat transfer drops and generally by 20 ... 25%.
Conclusion: if you really want to hide the heating battery from your eyes, choose at least such screens that have air access from below.
So, now you know practically (theoretically :)) everything about connecting radiators. And directly about mounting them in one of the following articles.
connection of heating batteries
Any heating system is a rather complex “organism”, in which each of the “organs” performs a strictly assigned role. And one of the most important elements are heat exchange devices - it is they who are entrusted with the ultimate task of transferring thermal energy or to the premises of the house. In this capacity, familiar radiators, convectors of open or hidden installation, gaining popularity of water floor heating systems can act - pipe circuits laid in accordance with certain rules.
You may be interested in information about what is
This article will focus on heating radiators. We will not be distracted by their diversity, device and technical characteristics: on our portal on these topics there is enough comprehensive information. Now we are interested in another block of questions: connecting heating radiators, wiring diagrams, installing batteries. Proper installation of heat exchange devices, rational use of the technical capabilities inherent in them is the key to the efficiency of the entire heating system. Even from the most expensive modern radiator there will be a low return if you do not listen to the recommendations for its installation.
What should be considered when choosing radiator piping schemes?
If you take a simplified look at most heating radiators, then their hydraulic design is a fairly simple, understandable scheme. These are two horizontal collectors, which are interconnected by vertical jumper channels through which the coolant moves. This entire system is either made of metal that provides the necessary high heat transfer (a striking example is), or “dressed” in a special casing, the design of which assumes the maximum contact area with air (for example, bimetallic radiators).

1 - Upper collector;
2 - Lower collector;
3 - Vertical channels in the radiator sections;
4 - Heat exchanger case (casing) of the radiator.
Both collectors, upper and lower, have outlets on both sides (respectively, in the diagram, the upper pair B1-B2, and the lower B3-B4). It is clear that when a radiator is connected to the pipes of the heating circuit, only two out of four outlets are connected, and the remaining two are muffled. And now, the efficiency of the installed battery largely depends on the connection scheme, that is, on the relative position of the coolant supply pipe and the outlet to the "return".
And first of all, when planning the installation of radiators, the owner must figure out exactly what kind of heating system is functioning or will be created in his house or apartment. That is, he must clearly understand where the coolant comes from and in which direction its flow is directed.
Single pipe heating system
In multi-storey buildings, a single-pipe system is most often used. In this scheme, each radiator is, as it were, inserted into the “gap” of a single pipe, through which both the coolant is supplied and its removal to the “return” side.

The coolant passes successively all the radiators installed in the riser, gradually wasting heat. It is clear that in the initial section of the riser, its temperature will always be higher - this must also be taken into account when planning the installation of radiators.
There is another important point here. Such a one-pipe system of an apartment building can be organized according to the principle of top and bottom feed lira.
- On the left (item 1) the upper supply is shown - the coolant is transferred through a straight pipe to the upper point of the riser, and then sequentially passes through all the radiators on the floors. This means that the flow direction is from top to bottom.
- In order to simplify the system and save consumables, another scheme is often organized - with a bottom feed (pos. 2). In this case, radiators are installed in the same series on the pipe ascending to the upper floor, as well as on the pipe descending. This means that the direction of the coolant flow in these "branches" of one loop is reversed. Obviously, the temperature difference in the first and last radiator of such a circuit will be even more noticeable.
It is important to deal with this issue - on which pipe of such a single-pipe system your radiator is installed - the optimal tie-in scheme depends on the flow direction.
A prerequisite for piping a radiator in a single-pipe riser is a bypass
The name “bypass”, which is not entirely clear to some, refers to a jumper that connects the pipes connecting the radiator to the riser in a single-pipe system. What is needed for, what rules are followed when installing it - read in a special publication of our portal.
The single-pipe system is also widely used in private one-story houses, if only for reasons of saving materials for its installation. In this case, it is easier for the owner to figure out the direction of the coolant flow, that is, from which side he will be supplied to the radiator, and from which side he will exit.

Advantages and disadvantages of a single-pipe heating system
Attracting with the simplicity of its device, such a system is still somewhat alarming due to the difficulty of ensuring uniform heating on different radiators of house wiring. What is important to know about how to mount it with your own hands - read in a separate publication of our portal.
Two-pipe system
Already on the basis of the name, it becomes clear that each of the radiators in such a scheme "relies" on two pipes - separately for supply and return.
If you look at the two-pipe wiring diagram in a multi-storey building, you can immediately see the differences.

It is clear that the dependence of the heating temperature on the location of the radiator in the heating system is minimized. The direction of the flow is determined only by the relative position of the branch pipes cut into the risers. The only thing you need to know is which particular riser acts as a supply, and which is the “return” - but this, as a rule, is easily determined even by the temperature of the pipe.
Some apartment residents may be misled by the presence of two risers, in which the system will not cease to be one-pipe. Look at the illustration below:

On the left, although there seem to be two risers, a single-pipe system is shown. Just one pipe is the upper supply of coolant. But on the right - a typical case of two different risers - supply and return.
The dependence of the efficiency of the radiator on the scheme of its insertion into the system
Why was it all said. what is placed in the previous sections of the article? But the fact is that the heat transfer of the heating radiator very seriously depends on the relative position of the supply and return pipes.
| Scheme of inserting a radiator into a circuit | Direction of coolant flows |
|---|---|
| Diagonal radiator connection on both sides, top inlet | |
 |  |
| Such a scheme is considered the most effective. In principle, it is she who is taken as the basis for calculating the heat transfer of a specific radiator model, that is, the battery power for such a connection is taken as a unit. The coolant, without encountering any resistance, completely passes through the upper collector, through all vertical channels, ensuring maximum heat transfer. The entire radiator warms up evenly over its entire area. | |
 |  |
| Such a scheme is one of the most common in multi-storey building heating systems, as the most compact in vertical risers. It is used on risers with an upper supply of coolant, as well as on return, descending - with a lower supply. It is quite effective for small radiators. However, if the number of sections is large, then the heating may be uneven. The kinetic energy of the flow becomes insufficient to propagate the coolant to the very end of the upper supply manifold - the liquid tends to pass along the path of least resistance, that is, through the vertical channels closest to the entrance. Thus, in the part of the battery farthest from the entrance, stagnant zones are not excluded, which will be much colder than the opposite ones. When calculating the system, it is usually assumed that even with the optimal length of the battery, its overall heat transfer efficiency is reduced by 3–5%. Well, with long radiators, such a scheme becomes inefficient or will require some optimization (this will be discussed below) / | |
| One-way radiator connection with top inlet | |
 |  |
| A scheme similar to the previous one, and largely repeating and even reinforcing its inherent shortcomings. It is used in the same risers of single-pipe systems, but only in schemes with a bottom supply - on an ascending pipe, so the coolant is supplied from below. Losses in the total heat transfer with such a connection can be even higher - up to 20 ÷ 22%. This is due to the fact that the difference in density will also contribute to closing the movement of the coolant through the near vertical channels - the hot liquid tends upwards, and therefore it is harder to pass to the remote edge of the lower radiator supply manifold. Sometimes this is the only connection option. The losses are compensated to some extent by the fact that in the ascending pipe the general level of the coolant temperature is always higher. The circuit can be optimized by installing special devices. | |
| Double-sided connection with bottom connection of both connections | |
 |  |
| The scheme of the lower, or as it is often called the “saddle” connection, is extremely popular in autonomous systems of private houses because of the wide possibilities to hide the pipes of the heating circuit under the decorative floor surface or make them as invisible as possible. However, in terms of heat transfer, such a scheme is far from optimal, and possible efficiency losses are estimated at 10–15%. The most accessible path for the coolant in this case is the lower collector, and distribution along the vertical channels is largely due to the difference in density. As a result, the upper part of the heating battery can warm up much less than the lower one. There are certain methods and means to minimize this disadvantage. | |
| Diagonal radiator connection on both sides, bottom inlet | |
 |  |
| Despite the apparent similarity with the first, most optimal scheme, the difference between them is very large. Efficiency losses with such a connection reach up to 20%. This is explained quite simply. The coolant has no incentives to freely penetrate to the far section of the lower radiator supply manifold - due to the difference in density, it selects the vertical channels closest to the battery inlet. As a result, with a sufficiently evenly heated top, in the lower corner opposite to the entrance, stagnation often forms, that is, the surface temperature of the battery in this area will be lower. Such a scheme is used extremely rarely in practice - it is even difficult to imagine a situation where it is absolutely necessary to resort to it, rejecting other, more optimal solutions. | |
The table deliberately does not mention the lower one-sided connection of the batteries. With him - the question is ambiguous, as in many radiators that suggest the possibility of such a tie-in, special adapters are provided, which essentially turn the bottom connection into one of the options discussed in the table. In addition, even for ordinary radiators, you can purchase additional equipment, in which the lower one-sided eyeliner will be structurally modified to another, more optimal option.
I must say that there are also more “exotic” tie-in schemes, for example, for high-height vertical radiators - some models from this series require a two-way connection with both connections from above. But the very design of such batteries is thought out in such a way that the heat transfer from them is maximum.
The dependence of the heat transfer efficiency of the radiator on the place of its installation in the room
In addition to the scheme for connecting radiators to the pipes of the heating circuit, the place of their installation also seriously affects the efficiency of these heat exchange devices.
First of all, certain rules for placing the radiator on the wall with respect to the adjacent structures and elements of the interior of the room must be observed.
The most typical location of the radiator is under the window opening. In addition to the general heat transfer, the ascending convection flow creates a kind of “thermal curtain” that prevents colder air from freely penetrating from the windows.

- The radiator in this place will show maximum efficiency if its total length is about 75% of the width of the window opening. In this case, it is necessary to try to install the battery exactly in the center of the window, with a minimum deviation not exceeding 20 mm in one direction or another.
- The distance from the lower plane of the window sill (or other obstacle located on top - a shelf, a horizontal wall of a niche, etc.) should be about 100 mm. In any case, it should never be less than 75% of the depth of the radiator itself. Otherwise, an insurmountable barrier to convection currents is created, and the battery efficiency drops sharply.
- The height of the lower edge of the radiator above the floor surface should also be about 100÷120 mm. With a clearance of less than 100 mm, firstly, considerable difficulties are artificially created in carrying out regular cleaning under the battery (and this is a traditional place for the accumulation of dust carried by convection air currents). And secondly, convection itself will be difficult. At the same time, it is also completely useless to “pull up” the radiator too high, with a clearance from the floor surface of 150 mm or more, since this leads to uneven distribution of heat in the room: a pronounced cold layer may remain in the area bordering the floor surface air.
- Finally, the radiator must be at least 20 mm away from the wall with brackets. A decrease in this gap is a violation of normal air convection, and in addition, clearly visible dust marks may soon appear on the wall.
These are indicative indicators that should be followed. However, for some radiators, there are also recommendations developed by the manufacturer on the linear parameters of the installation - they are indicated in the product manuals.

It is probably unnecessary to explain that a radiator located openly on the wall will show heat transfer much higher than one that is completely or partially covered by certain interior items. Even a window sill that is too wide can already reduce the heating efficiency by several percent. And if you consider that many owners cannot do without thick curtains on the windows, or, for the sake of interior design, they try to cover up unsightly, or their eyes, radiators with the help of facade decorative screens or even completely closed casings, then the calculated battery power may not enough to fully heat the room.

Heat transfer losses, depending on the installation of a heating radiator on the walls, are shown in the table below.
| Illustration | The influence of the shown placement on the heat transfer of the radiator |
|---|---|
 | The radiator is located on the wall completely open, or installed under the window sill, which covers no more than 75% of the depth of the battery. In this case, both main heat transfer paths - both convection and thermal radiation - are completely preserved. Efficiency can be taken as a unit. |
 | A window sill or shelf completely covers the radiator from above. For infrared radiation, this does not matter, but the convection flow is already facing a serious obstacle. Losses can be estimated at 3 ÷ 5% of the total thermal power of the battery. |
 | In this case, not a window sill or shelf on top, but the upper wall of a wall niche. At first glance, everything is the same, but the losses are already somewhat greater - up to 7 ÷ 8%, since part of the energy will be wasted on heating the very heat-intensive material of the wall. |
 | The radiator from the front is covered with a decorative screen, but the clearance for air convection is sufficient. The loss is precisely in thermal infrared radiation, which especially affects the efficiency of cast iron and bimetallic batteries. Heat transfer losses with such an installation reach 10÷12%. |
 | The heating radiator is covered with a decorative casing completely, from all sides. It is clear that in such a casing there are gratings or slot-like holes for air circulation, but both convection and direct thermal radiation are sharply reduced. Losses can reach up to 20 - 25% of the calculated battery power. |
So, it is obvious that the owners are free to change some of the nuances of installing heating radiators in the direction of increasing the efficiency of heat transfer. However, sometimes the space is so limited that you have to put up with the existing conditions regarding both the location of the pipes of the heating circuit and the free area on the surface of the walls. Another option - the desire to hide the batteries from the eyes prevails over common sense, and the installation of screens or decorative casings is a matter already decided. This means that in any case, it will be necessary to make adjustments for the total power of the radiators in order to guarantee the required level of heating in the room. Correctly make the appropriate adjustments will help the calculator below.
Pipes are just installed simultaneously with gas boilers.
It depends on how the scheme for connecting heating batteries in a private house will then be arranged.
It is better to get acquainted with the current ones before making a choice in favor of certain devices. This will help to spend as little time and effort as possible on arranging a working system:
- Minimum 2 cm distance between the wall and the back walls on the panels.
- 8-10 centimeters should be equal to the gap, starting from the top of the radiator, and ending with the window sill.
- 10-12 centimeters - the minimum distance from the bottom of the battery to the floor.
In devices, heat transfer becomes less if these standards are not observed. Reduces the likelihood that the operation will be uninterrupted. And the very scheme for connecting heating batteries in a private house from a gas boiler ceases to be effective.
Radiators must have an adjustment function. It is automatic, either. Therefore, the kits are supplied with heat regulators. Thanks to which indoors it is easier to maintain the optimum level of temperature.
What is piping
When connecting, use two-pipe or one-pipe schemes.
Single pipe option
In addition, heating is not complete without such additional elements.
- Temperature controller. It helps to save fuel, maintain the temperature in the rooms at the same level.
- Air vents. Needed to release oxygen. It periodically accumulates in the pipes, because of which it becomes a destructive element.
- Stop valve. Maintenance with repair is easier for those systems that have a large number of cranes installed.
Expansion tanks are indispensable assistants in the construction of systems of any type. It is released in closed and open.
Paired with circulation pumps, only closed varieties are installed. They try to place open tanks as high as possible. For example, in the house attic.
What about chimneys
And in this case, there are mandatory conditions. The outlet pipe at the boiler must exactly match the diameter. There are other subtleties:
- If the pipe approaches an unheated room, insulation is required in these places.
- It is unacceptable to have connections in places where pipes pass through roofs or walls.
- Three bends - the maximum number for the chimney from the boiler to the head.
Installation of heating batteries: main stages
The installation rules remain the same for each type of battery. It doesn't matter which one played the role of the main one, how the connections are made. The order of operations will always look like this.
- First, they shut off the entire heating system, drain the water.
- The battery is dismantled along with other elements of the old circuit.
- The use of dowels for marking and fixing brackets on the wall surface. A cement solution is needed for rubbing places with fasteners in order to level the surface.
- After that, the plugs begin to be installed. There are entrance holes for each pipe, on both sides. Plugs for the organization of the passage, on which the correct thread is applied, are wound in places where the connections are located. Linen strips with additional sealing adds tightness to the whole structure. At the top there is a valve mechanism that releases excess air.
- Radiators are hung on supports prepared in advance. Water special devices will help to check how correctly the levels are set.
- Installation of a shut-off valve inside the plugs.
- Batteries are connected to the pipeline.
- The entire heating network is tested.
Do not get carried away with decorative protective screens. They look, but at the right time they can block access to thermostats. Because of this, the heating is turned off in case of insufficient heating.
For more information about the heating system at home, you can watch the video:
The device or reconstruction of the heating system involves the installation or replacement of heating devices. The good news is that if you wish, you can do it yourself without involving specialists. How the installation of heating radiators should take place, where and how to locate them, what is needed for the work - all this is in the article.
What is needed for installation
Installation of heating radiators of any type requires devices and consumables. The set of necessary materials is almost the same, but for cast-iron batteries, for example, the plugs are large, and the Mayevsky tap is not installed, but, somewhere at the highest point of the system, an automatic air vent is installed. But the installation of aluminum and bimetallic heating radiators is absolutely the same.
Steel panel ones also have some differences, but only in terms of hanging - brackets are included with them, and on the back panel there are special shackles cast from metal, with which the heater clings to the hooks of the brackets.

Mayevsky crane or automatic air vent
This is a small device for venting air that can accumulate in the radiator. It is placed on a free upper outlet (collector). Must be on every heater when installing aluminum and bimetallic radiators. The size of this device is much smaller than the diameter of the manifold, so another adapter is required, but Mayevsky taps usually come with adapters, you just need to know the diameter of the manifold (connecting dimensions).

In addition to the Mayevsky tap, there are also automatic air vents. They can also be placed on radiators, but they are slightly larger and for some reason are only available in a brass or nickel-plated case. Not in white enamel. In general, the picture is unattractive and, although they deflate automatically, they are rarely installed.

Stub
There are four outlets for the radiator with lateral connection. Two of them are occupied by the supply and return pipelines, on the third they put a Mayevsky crane. The fourth entrance is closed with a plug. It, like most modern batteries, is most often painted with white enamel and does not spoil the appearance at all.

Shut-off valves
You will need two more ball valves or shut-off valves with the ability to adjust. They are placed on each battery at the input and output. If these are ordinary ball valves, they are needed so that, if necessary, you can turn off the radiator and remove it (emergency repair, replacement during the heating season). In this case, even if something happened to the radiator, you will cut it off, and the rest of the system will work. The advantage of this solution is the low price of ball valves, the minus is the impossibility of adjusting heat transfer.

Almost the same tasks, but with the ability to change the intensity of the coolant flow, are performed by shut-off control valves. They are more expensive, but they also allow you to adjust the heat transfer (make it smaller), and they look better outwardly, they are available in straight and angular versions, so the strapping itself is more accurate.
If desired, you can put a thermostat on the coolant supply after the ball valve. This is a relatively small device that allows you to change the heat output of the heater. If the radiator does not heat well, they cannot be installed - it will be even worse, since they can only reduce the flow. There are different temperature controllers for batteries - automatic electronic, but more often they use the simplest - mechanical.
Related materials and tools
You will also need hooks or brackets for hanging on the walls. Their number depends on the size of the batteries:
- if the sections are not more than 8 or the length of the radiator is not more than 1.2 m, two attachment points from above and one from below are sufficient;
- for every next 50 cm or 5-6 sections, add one fastener at the top and bottom.
Takde need a fum tape or linen winding, plumbing paste to seal the joints. You will also need a drill with drills, a level (a level is better, but a regular bubble one is also suitable), a certain number of dowels. You will also need equipment for connecting pipes and fittings, but it depends on the type of pipes. That's all.
Where and how to place
Traditionally, heating radiators are installed under the window. This is necessary so that the rising warm air cuts off the cold from the window. In order to prevent the glass from sweating, the width of the heater must be at least 70-75% of the width of the window. It needs to be installed:

How to install
Now about how to hang the radiator. It is highly desirable that the wall behind the radiator be flat - it is easier to work this way. The middle of the opening is marked on the wall, a horizontal line is drawn 10-12 cm below the window sill line. This is the line along which the upper edge of the heater is leveled. The brackets must be installed so that the upper edge coincides with the drawn line, that is, it is horizontal. This arrangement is suitable for heating systems with forced circulation (with a pump) or for apartments. For systems with natural circulation, a slight slope is made - 1-1.5% - along the course of the coolant. You can’t do more - there will be stagnation.

wall mount
This must be taken into account when mounting hooks or brackets for heating radiators. Hooks are installed like dowels - a hole of a suitable diameter is drilled in the wall, a plastic dowel is installed in it, and the hook is screwed into it. The distance from the wall to the heater is easily adjusted by screwing and unscrewing the hook body.

Hooks for cast iron batteries are thicker. This is fasteners for aluminum and bimetallic
When installing hooks for heating radiators, please note that the main load falls on the top fasteners. The lower one serves only for fixing in a given position relative to the wall and it is installed 1-1.5 cm lower than the lower collector. Otherwise, you simply will not be able to hang the radiator.

When installing the brackets, they are applied to the wall in the place where they will be mounted. To do this, first attach the battery to the installation site, look where the bracket will “fit”, mark the place on the wall. After putting the battery, you can attach the bracket to the wall and mark the location of the fasteners on it. In these places, holes are drilled, dowels are inserted, the bracket is screwed onto the screws. Having installed all the fasteners, the heater is hung on them.
Floor fixing
Not all walls can hold even light aluminum batteries. If the walls are made of or sheathed with drywall, floor installation is required. Some types of cast-iron and steel radiators come with legs right away, but they do not suit everyone in terms of appearance or characteristics.

Floor installation of radiators from aluminum and bimetallic is possible. There are special brackets for them. They are attached to the floor, then a heater is installed, the lower collector is fixed with an arc on the installed legs. Similar legs are available with adjustable height, there are fixed ones. The method of fastening to the floor is standard - on nails or dowels, depending on the material.
Heating radiator piping options
Installation of heating radiators involves their connection to pipelines. There are three main connection methods:
- saddle;
- unilateral;
- diagonal.

If you install radiators with a bottom connection, you have no choice. Each manufacturer strictly ties the supply and return, and its recommendations must be strictly followed, because otherwise you simply won’t get heat. With a side connection, there are more options ().
Binding with one-way connection
One-way connection is most often used in apartments. It can be two-pipe or one-pipe (the most common option). Metal pipes are still used in apartments, so we will consider the option of tying the radiator with steel pipes on the spurs. In addition to pipes of a suitable diameter, two ball valves, two tees and two spurs are needed - parts with external threads at both ends.

All this is connected as shown in the photo. With a single-pipe system, a bypass is required - it allows you to turn off the radiator without stopping or lowering the system. You can’t put a tap on the bypass - you will block the movement of the coolant along the riser with it, which is unlikely to please the neighbors and, most likely, you will fall under a fine.
All threaded connections are sealed with fum-tape or linen winding, on top of which packing paste is applied. When screwing the tap into the radiator manifold, a lot of winding is not required. Too much of it can lead to the appearance of microcracks and subsequent destruction. This is true for almost all types of heating appliances, except for cast iron. When installing all the rest, please, without fanaticism.

If you have the skills / ability to use welding, you can weld the bypass. This is what the piping of radiators in apartments usually looks like.
With a two-pipe system, a bypass is not needed. The supply is connected to the upper entrance, the return is connected to the lower one, taps, of course, are needed.

With lower wiring (pipes are laid along the floor), this type of connection is made very rarely - it turns out inconvenient and ugly, it is much better to use a diagonal connection in this case.
Binding with diagonal connection
Installing heating radiators with a diagonal connection is the best option in terms of heat transfer. She is the highest in this case. With a lower wiring, this type of connection is implemented easily (example in the photo) - supply from one side at the top, return from the other at the bottom.

A single pipe system with vertical risers (in apartments) does not look so good, but people put up with it because of the higher efficiency.

Please note that with a one-pipe system, a bypass is again required.

Strapping with saddle connection
With lower wiring or hidden pipes, installing heating radiators in this way is the most convenient and most inconspicuous.

With saddle connection and bottom single-pipe wiring, there are two options - with and without bypass. Without a bypass, the taps are still installed, if necessary, you can remove the radiator, and install a temporary jumper between the taps - a drive (a piece of pipe of the desired length with threads at the ends).

With vertical wiring (risers in high-rise buildings), this type of connection can be seen infrequently - too large heat losses (12-15%).