Ministry of Education of the Krasnoyarsk Territory
Regional state autonomous professional
"Krasnoyarsk Technical School of Transport and Service"
project topic:
"Hair hygrometer model"
Completed by: students
groups MP1-17 Pogodaev M.A. Gorensky S.A. Checked by: physics teacher: Levdikova E.D.
Krasnoyarsk 2018
Content.
Introduction……………………………………………………….3 pp.
Section 1. Theoretical part…………………….…………………4 pages.
Instruments that measure air humidity………………4 p.
Alternative methods for measuring air humidity……………………………………………………..6 p.
History of the origin and development of the hygrometer…………7 pages.
Section 2. Practical part…………………………….……9pp.
Design and principle of operation of a hair hygrometer…………………………………………………………….8 p.
Diagram of a hair hygrometer……………………………..9 p.
Description of the assembly of the hair hygrometer model………10 p.
Comparison of the results of the readings of an electronic hygrometer, a psychrometer and a hair hygrometer.………...……… 10 p.
Section 3. Final part…………………………………13 pages.
3.1. Conclusion…………………………………………….….13p.
Appendices…………………………………………………………….……14 pages.
References……………………………………………………………15 pages.
INTRODUCTION.
Moisture mainly comes into the body of animals and humans through food or drink. However, a sufficient amount of it is necessary not only internal organs, but also to the mucous membranes of the eyes, respiratory tract, skin. Therefore, it is important not only to consume fluid internally, but also to obtain it from the environment. humid air. To determine the humidity level and maintain it at a normal level, special measuring instruments are used.Among the most common special devices are psychrometers and hygrometers. Such devices serve a single purpose, but their operation is based on fundamentally different principles. We were interested in the hair hygrometer device. Having studied it more detailed device, we realized that you can do it yourself.
Relevance Our project is that to study the topic of air humidity, a model of a hygrometer device is required.
Objective of the project: assemble a working model of a hair hygrometer.
Project objectives:
Study the devices and operating principles of instruments that measure air humidity.
Assemble a model of a hair hygrometer.
Compare measurements of a hair hygrometer with a psychrometer and an electronic high-precision hygrometer over the course of a month, in the same class.
SECTION 1. THEORETICAL PART.
DEVICES THAT MEASURE AIR HUMIDITY.
The psychrometric method for calculating humidity indicators has become quite widespread in everyday life. If a hygrometric device for measuring air humidity usually shows deviations of about 5% in both directions, then in the case of psychrometers there are no such errors. The simplest psychrometers have two sensors - dry and wet. While the evaporation of water cools the wet sensor, the dry element of the psychrometer records changes in the ambient temperature. Measurement result based on this principle becomes the formation of the necessary indicators in a special microprocessor device. Thus, it is easy to understand that a psychrometer is a device for determining air humidity, where the main role is played by recording the temperature difference between dry and wet sensors.
Fig. 1.Psychrometer.
A hygrometer is a device for measuring air humidity, the operating principle of which makes it possible to identify how changes in humidity indicators affect separate bodies and matters. As a shining example You can note the hair hygrometer, where defatted human hair acts as a measuring medium. By changing its own length, based on changes in humidity, the hair allows you to obtain data on the required indicator in the range from 30 to 100%.

Fig.2. Hygrometer.
1.2. ALTERNATE METHODS FOR MEASURING AIR HUMIDITY.
MEASUREMENT OF AIR HUMIDITY WITHOUT USING EQUIPMENT.
There is a fairly simple way by which you can obtain fairly objective data on the level of humidity in a room. Moreover, all you need to do is have an ordinary glass glass of water. To measure humidity, you need to fill the glass cold water. Then place the container in the refrigerator for several hours until the water cools to a temperature of about 5. Having placed the glass in the room in which you want to find out the humidity level, you should observe the surface of the glass, paying attention to the following: if the walls of the glass first fog up, and then dry quickly within a few minutes, in which case the air in the room is dry; the persistence of the effect of fogging the walls after 5-10 minutes after the start of observations indicates average air humidity; the appearance of flowing streams on the walls of the glass indicates high humidity.
HUMIDITY MEASUREMENTS USING A THERMOMETER. A fairly effective device for measuring air humidity is a regular thermometer. Using a thermometer for this purpose is a kind of copying of the principle of operation of psychrometers. To begin with, using a standard mercury thermometer, the air temperature in the room is recorded, and then its head is tightly wrapped with damp gauze or a piece of wet cotton wool. After 10 minutes, new temperature readings are noted. To find out the percentage of humidity, the wet-bulb temperature is subtracted from the dry-bulb temperature data.
1.3. HISTORY OF THE ORIGIN AND DEVELOPMENT OF THE HYGROMETER.
Cardinal Nicolas da Cusa (1401-1464) was the first to develop an instrument for measuring humidity. He encountered this problem in the wool trade, since the value of wool depended on its weight. Wool buyers quickly realized that the same quantity could be sold at a higher price during rainy days. Therefore, sellers were waiting for rain, and buyers were waiting for dry days. To determine fair value, Cardinal Nicholas de Cuza invented the first instrument for determining moisture content. He used scales, placing more wool in one bowl and stones equal in weight to the wool in the other. With each sale, he placed so many additional stones on the scale that the balance was maintained. The amount of liquid in the wool was then determined by the number of additional stones. After this, buyers and sellers could begin to negotiate the price of wool.
The German mathematician Johann Heinrich Lambert (1728-1777) proposed calling any instrument that measures humidity a hydrometer (later it was renamed a hygrometer). In 1774 Lambert invented a mechanism that used genuine leather as a measuring element. Also, Johann Lambert was the first to derive the relationship between temperature and humidity (relative humidity).
Decaucourt (1740-1799) invented the hair hygrometer in 1783. In these measuring instruments Human hair is used, but it was believed that blond hair is more suitable for this. The natural composition of human hair leads to a measurement error of only 2.5%, so industrial hair hygrometers have an error of 2.5%.
Relative humidity measures the amount of vapor in the air, which is expressed as a percentage of the maximum vapor that can be contained in the air at the current temperature. Here the temperature has more humidity, for example, if the hygrometer shows 50% humidity at a temperature of 30 ° C, and then the temperature decreases, then the relative humidity will increase
Thus, the colder the air, the less moisture it can hold.
SECTION 2. PRACTICAL PART.
2.1 . DEVICE AND PRINCIPLES OF OPERATION OF HAIR HYGROMETER.
A hygrometer reveals relative humidity environment, which is one of the most important components of the indoor microclimate. The moisture content in the air affects people's well-being. This indicator must be within the average range. Low humidity air can lead to difficulty breathing and drying out of the mucous membranes, and increased levels of air can lead to worsening physical condition. People with respiratory diseases need to monitor this value especially strictly. The operating principle of a hair hygrometer is based on the property of defatted human hair to change its length with changes in air humidity. When air humidity decreases or increases, the length of the hair changes. Under the influence of this change, the pulley turns and the end of the needle moves along the scale, indicating the relative humidity of the air. Rules for using the device. During the demonstration, the hygrometer is mounted vertically in the leg of a universal tripod or hung on the wall. The device should be at eye level of the person working with it. The location where the hygrometer is installed should be free of vibrations and sources of heat or cold. Anyone working with a hygrometer must be at a distance from it where the scale marks are normally visible and be careful not to breathe on it during readings. Check the position of the arrow. If the arrow is shifted relative to “0”, then use the adjusting screw to set it to “0”.
The relative air humidity is measured as a percentage on a scale. The scale division value corresponds to 1%.
When taking readings, the worker's eyes should be on
level of the vertical tangent to the arrow so that the scale mark at the reference point is visible as a straight line.
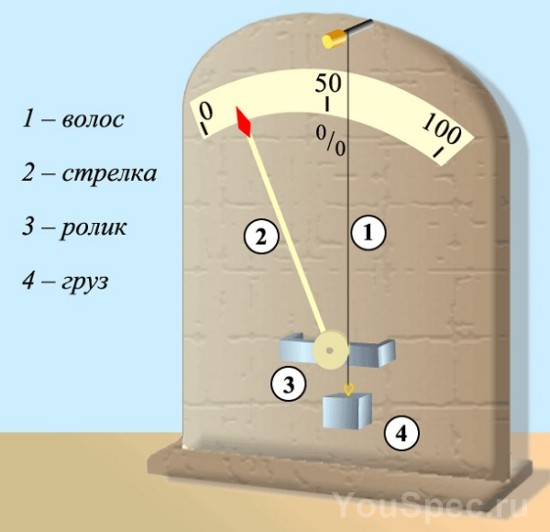
2.2. DIAGRAM OF HAIR HYGROMETER.

Fig. 3. Model of a hair hygrometer.
2.3. DESCRIPTIONS OF ASSEMBLY OF HAIR HYGROMETER MODEL.
To assemble the installation we needed the following parts:
Threaded studs – 2 pcs.
Connecting plates- 3 pcs.
Mounting corners – 2 pcs.
Nuts – 11 pcs.
Bolts – 4 pcs.
Measuring scale with arrow.
Fat-free hair – 7 pcs.
We assembled the model according to the diagram in Figure 3.
The arrow is at position 90, this is the initial position of the device.
The maximum deviation angle is 90, which means one scale division will correspond to 1.1% humidity.
X=1.1%, it’s not difficult to calculate how many divisions the needle has moved during the day.
RESULTS OF INDICATIONS OF ELECTRONIC HYGROMETER, PSYCHROMETER AND HAIR HYGROMETER.
To compare the results of the hair hygrometer model, we made comparisons with other devices that measure air humidity: a psychrometer and an electronic high-precision hygrometer.
A psychrometer is the difference between two thermometers: one measures the air temperature in the room, the other is placed in damp gauze, using a psychrometric table we determined the air humidity in the classroom.
We measured humidity with these devices for a month, entered the results into a table and built a graph.
Textbook Physics grade 10 G.Ya. Myakishev, B.B. Bukhovtsev, N.N. Sotsky (2010)
Today, much attention is paid to the level of air humidity in residential premises. Many people mistakenly believe that this indicator is actually not as important as air humidifier manufacturers say.
But if you take a closer look, the level of environmental humidity actually has a huge impact on our well-being.
Normally, the humidity level in the house ranges from 30 to 60%, but in winter time the air is drying up and summer time As a rule, this figure is higher than normal.
Dry air is the main reason that our mucous membranes and skin suffer due to lack of moisture and decreased immunity, causing rapid fatigue and drowsiness.
And in general, people’s well-being with reduced humidity is far from ideal. However, this is not even the worst thing! Excessively dry air can cause the development of chronic rhinitis, allergies and even asthma.
Children and people suffering from various chronic diseases are especially sensitive to changes in air humidity.
It’s not even worth mentioning that the premises themselves suffer from an excess or lack of moisture in the air. For example, if there is excessive moisture content, mold fungi settle on the walls of the house and problems arise. bad smell dampness.
If the air is too dry, they lose their properties very quickly. appearance all furniture made of wood and parquet. Cracks may appear on them, indicating that they are drying out.
Device for measuring air humidity levels
And therefore, every home should have a device that measures this important indicator. One of the simplest and available types A hair hygrometer is rightfully considered a device that allows you to control the level of humidity. It is easy to use, but at the same time allows you to obtain the most accurate data.

Design features of the device
It has a fairly simple design. It consists of a metal frame with fat-free synthetic or natural hair stretched over it.
A small weight is attached to the free lower end of the hair; in addition, it is thrown over a pulley and connected to an arrow that moves freely along a scale on which the relative air humidity is indicated as a percentage.
When air humidity changes, the needle moves along the scale and shows us its current level.
Operating principle
The operating principle of the device is based on the ability of hair to change its length in a humid environment. When this parameter decreases, the hair becomes shorter, and when it increases, on the contrary, it becomes longer.

When the length of the hair changes, the pulley rotates and moves an arrow along the scale, indicating the level of relative humidity of the environment. Each hygroscopic scale division corresponds to 1% relative humidity.
Features of use
The hair can be either hung on the wall or installed, for example, on bookshelf. When choosing a place to install the device, you must pay attention to the fact that it should not be located in close proximity to sources of cold or heat.
It is equally important that there is no vibration in the installation location of the device, that is, you should not install the device on top of any operating electrical appliances.
Also, due to the fact that the principle of operation of the device is based on changing the length of the hair, it is not recommended to move it from place to place or subject it to sharp blows and shocks, as this may cause the device to fail.

However, in order to have a hygrometer at home, you don’t have to buy one at all, since you can simply make this device yourself.
DIY hygrometer
In fact, making this device is much simpler than it might seem at first glance.
It is necessary to take human or fat-free horse hair at least 40 cm in length. A small weight needs to be placed on one end of the hair.
A washed rod from ballpoint pen or the sharp end of a nail. It is very important that the weight of the load is sufficient to completely straighten the hair. It is recommended to use nitro glue to attach the weight to the end of the hair.

After this you need to take small sizes nail and place any plastic tube no longer than 5 mm on it. It is necessary that the tube rotates as freely as possible on the rod and does not slip off it.
The hygrometer must be mounted on a vertical base or a piece of plywood with a horizontal stand that serves as the base of the structure.
Now you need to drive a nail with a plastic tube on it in the center of the board, equipped with a horizontal stand, so that the edge of the hair thrown over it can be secured with its free end to the horizontal base.
It is very important that the part of the hair thrown over the nail is equal to at least a third of the total length. The hair must be thrown over the nail, after which its free end must be fixed with glue.
When the humidity level changes, the length of the hair will change accordingly, during which the tip of the plumb line will rise and fall. After this, all that remains is to make a scale out of paper, which is then glued to the back of the plumb line.
As you can see, making a hygrometer with your own hands is not a difficult task. The main thing is to choose the right source materials for its implementation.
Craft and mount on a high pole vane and tell the children how to determine the direction of the wind. Take a smooth stick and drive a long nail into one of its ends. Cut out a flag from thick cardboard and laminate it so that it does not get wet when it rains.
Wrap the edge of the flag around the nail so that it can rotate freely when the wind blows. Make arrows from thin wires pointing south, north, west and east and attach them to a stick. The weather vane is ready. Install it on your weather site, orienting the arrows to the cardinal points.
With older children (6–9 years old), making weathervanes fits perfectly into geography lessons, when you talk about how winds are formed, how the first navigators used knowledge about them, what winds mean at “horse latitudes,” what trade winds are.
Sailors, knowing about the trade winds - steady winds blowing in tropical zones - called them “trade winds”, because with their help merchant sailing ships (engines had not yet been invented) crossed Atlantic Ocean. Sailboats carried goods from Europe to America.
Subtropical winds between 30 and 38 parallels of southern and northern latitudes were so light that sailing ships became calm. We had to wait for months for the right wind. Often the wait lasted for 3–5 months. The sailors were running out fresh water and food, and they had to eat horses that were transported to large quantities from Europe. Therefore, these latitudes were nicknamed “horse latitudes”.
Using a weather vane, children mark the direction, strength and change of wind in their weather observation calendars. In this way, we not only introduce them to the basic meteorological instruments, but also to the methods and techniques of observation and processing of results.
DIY thermometer
Install a large one at the weather site thermometer and teach children to read air temperatures. This work is also a preparation for understanding the concept negative numbers in mathematics, which is offered to children ages 9–12 in a Montessori school.
Children aged 3–6 years will enjoy making their own thermometers from cardboard and colored thread. For this:
- In the middle of a white strip of cardboard 4–6 cm wide, a thermometer scale is applied (above and below zero).
- Connect red and blue (white) threads together.
- Holes are made at the upper and lower ends of the scale and the ends of the threads are passed through them, tying them on the reverse side.
Checking with a real thermometer, the guys move the thread on their homemade thermometers, setting and recording temperature values in weather calendars.
DIY hygrometer
The next device of the children's weather station is hygrometer- a device for measuring air humidity. To make a hygrometer you will need:
- a rectangular piece of wooden plank or foam;
- two push pins;
- scotch;
- human hair about 10 cm long;
- a piece of thin wire.
Attach two buttons to the board at a distance of approximately 8–10 cm. Attach a wire to the bottom one so that it can move, that is, not tightly. Attach the end of the hair to the top button, then pull it around the wire and secure it to the top button. The device is ready.
Teach children how human hair reacts to air humidity by becoming shorter or longer. At high humidity it will lengthen, thus moving the arrow down; at low humidity, on the contrary, the hair will become shorter and raise the wire arrow upward. This property of hair is used to make a hygrometer.
DIY precipitation gauge
Will complement your weather site precipitation gauge- a device for measuring liquid and solid precipitation (hail). Take an ordinary bucket and place it on a small hill (pedestal, stool). The accumulated sediment is poured into a measuring cup with a scale. Children record the results in their calendars.
A weather station built with your own hands is not only part of a Montessori educational environment, but also a fun and educational opportunity to observe the weather and keep a journal of observations.
When discussing the weather with children, you can expand the topic and tell them about modern professions depending on weather conditions. With older children (8–9 years old), as part of the Montessori program for economic geography, we're talking about how climatic conditions generally affect the economies of different countries.
Collapse
A hygrometer is a moisture meter for an incubator that can be used to control the air humidity inside the incubator. But in different periods During incubation, humidity indicators should be different: in the first week - 65-75%, in the second - 40-50%, in the third - 75% (data for hatching chickens is indicated).
Devices that are used for household incubators are characterized by low cost - from 500 to 1000 rubles per product.
Principle of operation
Electronic hygrometer
To measure humidity, lower an incubator hygrometer into the container through a special hole. It is fixed in a suspended state for 5-10 minutes.
After the specified time, humidity indicators should appear on the display of the moisture meter. If you open the incubator lid to lower the device, you need to wait about an hour to get accurate data.
For long-term and productive operation of the device, it is protected from falls and shocks, and the wire to which the sensor is connected is not pulled.
In order for the device to function properly, you must comply with temperature regime(from -40 to +70 degrees). You should also reduce the likelihood of dust, dirt and various liquids coming into contact with the device.
The humidity sensor for the incubator works according to a specific algorithm:
- If the humidity level inside the container, which was set by the poultry farmer, has changed, the equipment operates and signals possible problems.
- After this, the farmer must study the humidity indicator, add or remove the amount of water in the incubator.
- After a few hours, you need to check the sensor readings again. You need to constantly monitor it so that there is a stable level of humidity in the chamber.
Types of hygrometers for incubators
Meet different types hygrometers, which have their own characteristics, individual type of operation, advantages and disadvantages.
The following varieties are distinguished:
- Weight hygrometer for incubator. It consists of several combined tubes, inside of which there is a hygroscopic substance that absorbs moisture. Using this system, a small amount of air is drawn in and its humidity is determined.
- Hair moisture meter. It is known that hair changes length when air humidity changes. Due to this, you can measure relative humidity - from 30% to 100%. The hair is pulled onto a metal frame, and if the humidity level changes, the data is transmitted to a needle, which moves along the scale.
- Film air humidity sensor for incubator. Equipped with a special element made of organic film. When humidity increases, it stretches, and when it decreases, it contracts.
- Ceramic. Its work is based on the dependence of the resistance of a ceramic part on air humidity.
How to choose the right hygrometer, what to look for
To choose a good hygrometer for an incubator, you need to study its technical data. First, pay attention to the pressure parameter, which can be relative (RH) or absolute (g/m3).
The choice of equipment also depends on the size of the incubators. If the container is small, for 40-50 eggs, you can use the simplest device. But for incubators with 100 or more eggs, it is recommended to buy more powerful hygrometers.
Typically, hygrometer readings are off by about 5%. If you need a more accurate device, then preference should be given to optical types. To ensure that the equipment lasts more years When buying it, you need to look at the level of its protection.
Measured on the IP scale. The higher its value, the more resistant the device is to dust, dirt and water.
Hygrometer models
| Device name | Price | Advantages | Flaws |
| MAX-MIN | 600 rubles | Equipped with a thermometer and a clock with alarm. An additional sensor can be connected. | There are no disadvantages. |
| Digital moisture meter with remote sensor. | 250 rubles | Humidity measures from 10 to 99%. The kit includes an LR44 battery. Using the device you can work remotely. | The measurement error is too high - 7-8%. Moreover, the device quickly breaks down. |
| Stanley 0-77-030 | 6000 rubles | It has a shock-resistant case, an LCD display, and is small in size. | High price. |
| HP-2GD | 600-700 rubles | User-friendly interface, easy to use. Just press the button and select the desired option. | Low quality case material. |
| Ryobi Phoneworks RPW-3000 | 2200 rubles | It is compatible with the operation of a smartphone; data can be received directly on the phone screen. | There are no disadvantages. |
| DC-206 | 300 rubles | The model has compact dimensions and can be used in small incubators. | The body is easily deformed under mechanical stress. |
| HTC-2 | 600 rubles | Has a built-in thermometer and clock. | No. |
| TA308 | 700 rubles | 3 in one: humidity sensor, clock and thermometer. | High error of indicators: above 5%. |

If you are wondering which is the best of all the options, then this title is occupied by the MAX-MIN device (3 in one). This is not just a humidity sensor. The plastic case contains a thermometer for the incubator, which shows the temperature values as accurately as possible. The device is also equipped with a clock and alarm.
In addition, an additional MAX-MIN TH218A humidity sensor can be connected to it. By placing it directly inside the housing, you don’t have to worry about disturbing the internal microclimate in the incubator.
The sensor readings are as accurate as possible with an error of 1%. If the humidity level changes, an audible alarm will sound, allowing the poultry farmer to quickly become aware of any violations.
The thermometer lets you know if the temperature sensor is working properly. After all, if deviations from the norm are too large and quite frequent, then there is a high probability of problems in its functioning. It needs to either be replaced or configured correctly.
An alarm clock is also an important indispensable tool. Especially if you have to work with manual incubator when you need to turn the eggs yourself. By setting it to fire every 4-5 hours, you will never forget that you need to perform masonry manipulations.
The screen of the equipment is large, divided into three segments (for humidity, temperature and clock). All indicators are visible from afar, highlighted bright color. Therefore, you don’t have to approach the incubator every time, because data on its operation can be viewed from a distance. I am especially pleased with the cost of the device - only 600 rubles.
How to make a hygrometer with your own hands
And although a hygrometer for an incubator is inexpensive, you can make it yourself. A DIY moisture meter for an incubator gives more accurate readings than its store-bought counterparts.

To do homemade device, necessary:
- Take two mercury thermometer for measuring air temperature, water. You also need to take a board on which both thermometers will fit.
- Both thermometers need to be attached to the board parallel to each other. A vessel with distilled water is placed under one of them.
- The mercury ball of one thermometer must be carefully wrapped in a cloth without contacting it. Then the fabric should be tied with thread, not too tightly. This thermometer is called wet, and the second is called dry.
- The edge of the fabric should be lowered into water by 5-7 mm.
- The indicators of both thermometers are compared with each other and using the table they find out the relative air humidity in the incubator.
Sometimes you have to spray the eggs with water to increase the humidity in the chamber. But this technique should only be used in the case of waterfowl eggs. For the rest of the embryos, a humidity of 50-60% is enough. You can calculate the humidity indicator using the table below.
| Dry thermometer data | Difference in thermometer readings in degrees | |||||||||
| 0 | 1 | 2 | 3 | 4 | 5 | 6 | 7 | 8 | 9 | |
| Relative humidity percentage | ||||||||||
| 15 | 100 | 92 | 80 | 71 | 61 | 52 | 44 | 36 | 27 | 20 |
| 16 | 100 | 90 | 81 | 71 | 62 | 54 | 45 | 37 | 30 | 22 |
| 17 | 100 | 92 | 81 | 72 | 64 | 55 | 47 | 39 | 32 | 24 |
| 18 | 100 | 91 | 82 | 73 | 65 | 56 | 49 | 41 | 34 | 27 |
| 19 | 100 | 91 | 82 | 74 | 65 | 58 | 50 | 43 | 35 | 29 |
| 20 | 100 | 91 | 83 | 74 | 66 | 59 | 51 | 44 | 37 | 30 |
| 21 | 100 | 91 | 83 | 75 | 67 | 60 | 52 | 46 | 39 | 32 |
| 22 | 100 | 92 | 83 | 76 | 68 | 61 | 54 | 47 | 40 | 34 |
| 23 | 100 | 92 | 84 | 76 | 69 | 61 | 55 | 48 | 42 | 36 |
| 24 | 100 | 92 | 84 | 77 | 69 | 62 | 56 | 49 | 43 | 37 |
| 25 | 100 | 92 | 84 | 77 | 70 | 63 | 57 | 50 | 44 | 38 |
A psychrometer is used to monitor temperature and humidity levels. Of course, after spending a certain amount of time, you can purchase it in a store. Whereas it is not at all difficult to make a psychrometer for an incubator with your own hands - the table for it is in this article.
What is a psychrometer?
So called special device, the purpose of which is to measure air parameters. Most often, this device is used to measure air humidity - an indicator very important for efficient work incubator. The operation of the device is based on physical property water to evaporation. As a result, there is a difference in temperature readings on a dry thermometer and one that is immersed in a humid environment. Relative humidity is determined from a table - its value is at the intersection of the readings of a pair of thermometers, or as they are also called - thermometers.
We make a psychrometer ourselves
Making this meter yourself is not at all difficult.
Drawing of a homemade device
Tools and materials
To manufacture the device used for the incubator, you will need the following components:
- two alcohol thermometers used to measure ambient temperature;
- some wooden slats different sizes;
- small screws;
- a piece of cambric fabric;
- small container for liquid;
- antifreeze in the amount required to fill the container.
The set of tools used to perform this work is quite small:
- wood hacksaw;
- screwdriver;
- pliers.
Step-by-step instruction
- Let's start by cutting out a platform from a wide strip, the size of which should not exceed 50x120 mm. We use it as a stand for our device. In this case, the thickness of the stand of great importance does not have, however? You shouldn’t make it from 5mm plywood.
- Now you need to take a 15x15 mm strip and cut it to the length of the existing thermometers. It will serve as the central pillar of the device.
- A traverse is attached to this rack at a right angle.
- Using small screws, we attach the thermometers to the traverse.
- We wrap the alcohol-containing end of one of them as tightly as possible with cambric, so that the strip of fabric remains quite long to act as a wick. It will be immersed in a container of antifreeze.
- A tripod, with thermometers attached to it, is attached to the stand. To do this, a hole is made in the middle of it, completely corresponding in size to the dimensions of the central pillar. The connection is made using PVA glue.
Summary of relative humidity data in the incubator
To determine the actual level of humidity in the ambient air of the incubator, it is practiced to use a special calibration table.
Video “Making a psychrometer with your own hands”
The video contains a story about how to make a psychrometer for an incubator with your own hands.