As noted above, the main materials for layout are cardboard and Whatman paper. These materials are comfortable and easy to use manual processing, have sufficient rigidity and plasticity, which makes it possible to implement in one form or another creative ideas author. If a rolled Whatman paper is used for prototyping, then it must be stretched onto a stretcher before work, since when twisted it does not represent flat surface
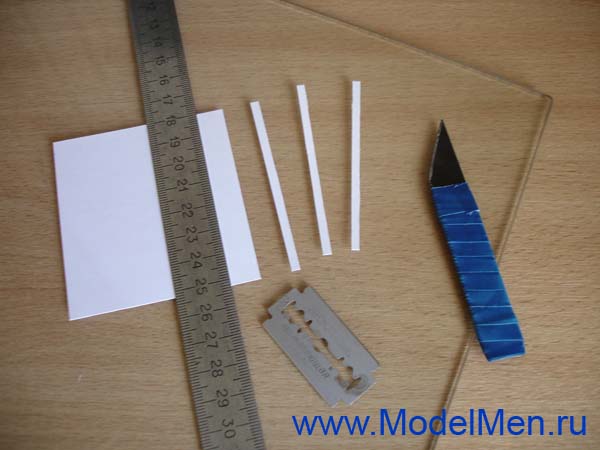
. Whatman paper allows you to perform operations such as bending, twisting, cutting, and corrugating. It cuts and glues well, and the black and white gradations are clearly visible on white paper. The paper for layouts should be perfectly flat, the sheets should be stored horizontally, preferably under a press. To determine the direction of the fibers of the sheet, two narrow strips of arbitrary length should be cut ─ one along the vertical edge, the other along the horizontal. Using a knitting needle or pencil, you need to twist both strips into a spiral.
The surface of one of them will be plastic (in the direction of the fibers), and the other will be covered with small cracks and breaks.
The paper used is mainly drawing paper (Whatman), white, thick. There are basic techniques for giving paper configurations that will be used in the future. 1. To glue any curved surface, you need to pass the paper through a cylindrical object (pencil, knitting needle) (Fig. 32).
3. If it is necessary to create a structure or a rigid spatial frame in the layout, as well as in cases of hollow geometric shapes, you can use U-shaped or L-shaped elements in cross-section, since they have geometrically extreme rigidity.
Rice. 32. Curved surface
4. In order for the edges and edges of the paper or cardboard folds to be clear without creases and curvatures, cuts must be made along the lines of the future fold on the side where the outer edge will be formed, similar to what was described above (Fig. 34).

 Rice. 33. Body of rotation
Rice. 34. Edges, edges of paper folds
In the manufacture of complex volumetric forms, the need arises for the stage of sketch development of the form: gluing.
It checks the nature of the divisions, proportions, and the correctness of the development itself.
For the quality of the mock-up, it is important where the surfaces will join together and along which line the form will be glued.
It is desirable that there be as few gluing points as possible; they should not fall on protruding corners and should not be located on the surface of the edges. To correctly draw a development, you need to unfold the sketch layout into a plane. When constructing paper models of complex volumetric shapes, it is recommended to proceed as follows: 1. Make drawings of the edges. You can use the drawings below, enlarging them to the desired scale. Be very careful, the accuracy of the drawing determines how accurately the parts will fit. 2. Make a stencil according to the drawing. To do this, place the drawing on a sheet of thick cardboard and pierce both sheets at the vertices of the polygon with a needle or thin awl.
4. Using the stencil, make the required number of blanks. To make a blank, place the stencil on a sheet of the material you have chosen for the model and make punctures in the vertices of the polygon. Now, using a sharp object ─ a needle or an awl ─ draw borders and fold lines between the punctures. If you are using thick enough cardboard, you can use a very sharp knife, carefully cutting the cardboard to a third of its thickness.
5. Cut out the parts, leaving sticker fields with which the parts will be connected, ranging in size from 0.3 to 0.5 cm. There are several technologies for connecting parts (they are discussed below);
leave those stickers that are required for the technology you choose. Cut the corners of the workpieces so that the cut goes exactly through the puncture.
6. Carefully bend the pieces along the lines you drew. If the fold is very long (more than 8 cm), then in order not to wrinkle the workpiece, use a ruler and press the workpiece along the fold line.
7. You can skip this step, but if you are making a one-color layout, it will greatly benefit from this treatment. After peeling back the stickers, carefully paint the ribs of the future model with black ink. To avoid staining the workpieces, paint the ribs one at a time, without starting the next one until the previous one has dried. It is very convenient to work in a “conveyor” way, making many identical workpieces at the same time ─ you paint one edge of each workpiece, and by the time you process the last part, the first one will already be completely dry.
8. If the layout has very sharp polygonal corners, additionally trim the corners of the stickers. This should not be done prematurely, otherwise it will be difficult to carefully peel back the stickers. Try to leave as much room for gluing as possible.
more space
. Cut off just enough so that the stickers do not interfere with the edges and each other near the vertices of the polyhedron.
9. When all the parts are ready, you can start gluing the layout. Examples of developments of paper complex forms are shown in activities not only contributes creative development, but also develops perseverance, accuracy, and hand motor skills in the child. Let's move from theory to practice.
Workplace. Take care of the good comfortable table and chair, the lighting should fall from behind the left shoulder, if necessary, use table lamp. To avoid staining the table with glue, cover it with paper, film, or place a sheet of glass with sanded edges to avoid cutting yourself.
Remember that your elbows should not rest on the glass - this is harmful to your joints!
Paper- this is what we work with. Should be given Special attention paper quality, I like working with good paper! Good and bad paper are like two cars, one a Mercedes and the other a Zaporozhets, choose for yourself which one you “drive” :) For initial creativity and simple paper toys, it is best to use ordinary paper, for printing on a printer, A4 format, “Snow Maiden” type ", she has good qualities and is the most snow-white in relation to other brands. The density of such paper should be 80 g/m.
More complex models and toys are glued from thick paper or cardboard. Today, cardboard began to be produced of very poor quality and you can find good sheets very difficult. A set of cardboard can be colored or white, choose which cardboard you will use to glue the models yourself.
If you like thick paper, then I recommend purchasing thick paper for drawing. Please note that the sheets in the set are not secured along the edges with sticky glue; it is best when the sheets are simply folded without gluing. The thickness of drafting paper can vary greatly between sets, so when choosing, compare sheets from different sets and buy the whitest and thickest paper.
If you need super white and thick paper, then there is a wide selection of photo paper at your disposal. You can print color scans on this paper. Sheets of photo paper make the most beautiful and colorful models. For work, choose photo paper with a density of 200 g/m2 or more; sometimes photo paper is almost like thick cardboard. Depending on the future paper model, you can buy single-sided photo paper or for double-sided printing - this is very convenient!
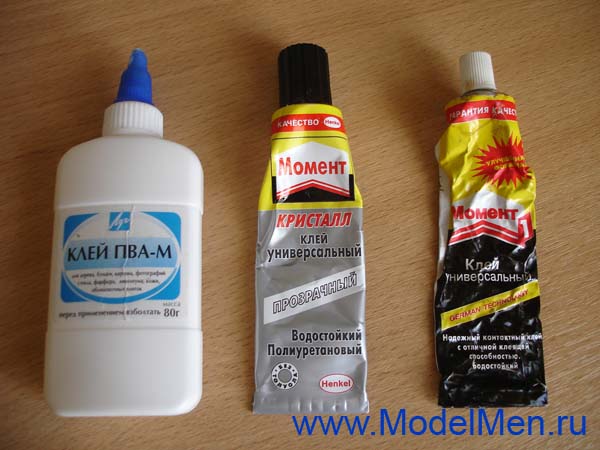
Stationery (silicate) glue is suitable for gluing regular paper, but I still recommend using PVA glue, you will understand the difference when you try to glue with both. It may be possible to glue photographic paper with PVA glue, but it is better to use Moment glue. Remember, they are on sale different glues and cheap doesn’t mean high quality, that’s why I’m bringing you photos of what I use myself.
You can spread the glue with a brush or squeeze it out of the tube directly onto the paper part and spread it with a strip of thick paper (use scraps). If you glue with Moment, then ventilate the room, as the glue is very toxic!
Working with paper. For paper modeling you don't need a lot of knowledge and tools.
Basic tools: pencil, knife, eraser, ruler, compass, scissors.
The pencil must be wooden, medium hard ( letter designation on a pencil: TM, T, F), even with different markings, pencils may not match the quality, choose carefully. A pencil sharpening knife should not be too long!
Remember that it is easier to cut yourself with a dull knife than with a sharp one!
The eraser must be large and soft so that it does not smudge the pencil, but erases it!
A ruler, preferably metal, from 30 to 50 cm. Plastic rulers, even new ones, have practically no straight line. The compass must be rigid, without loose parts, the lead or pencil must not move, otherwise such a compass is worthless!
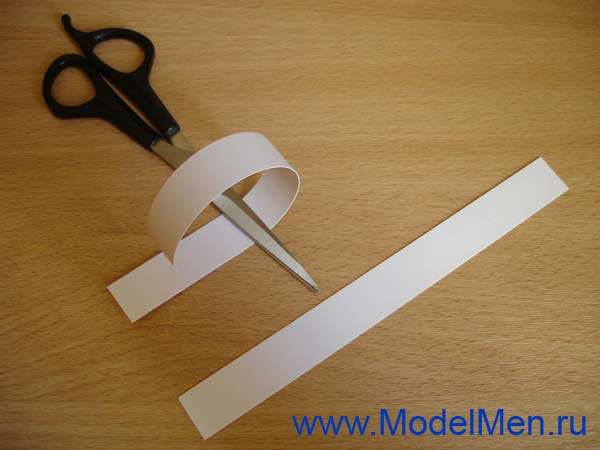
Scissors can be different sizes, the main thing is that they do not fit tightly and lie comfortably in the hand.
The most difficult thing in paper modeling is to draw the development of the model, and without drawing knowledge it will be difficult to do this. If you don’t like to develop models yourself, then you can take ready-made scans.
I will tell you about a common technique for high-quality paper folding so that the fold line is smooth and sharp. For example, I took two rectangles, I bent one with my hands without using any tools, the line turned out to be simply disgusting, it is very difficult to bend paper along a straight drawn line in this way. I will bend the second rectangle along the line made with a needle from a compass under a metal ruler. Many people advise doing such actions after working ballpoint pen, but it’s difficult to find an empty rod and you still won’t make a line with a pen of sufficient quality, which is why I advise using a compass. Attention, you can cut through paper with a needle, it is better if the needle is blunt; when you draw a line, bend the compass in the direction of movement, almost laying it on its side.

Look at the result, the fold on the left is terrible, and the fold on the right is very neat. Try to do this experiment yourself, you will see for yourself in my words.

Working with a pencil. Pay no less attention to this than to everything else, because the final work depends on the quality of sharpening the pencil. Whether your parts come together when gluing or not depends on the pencil!
Sharpen the pencil sharply so that it draws a thin, clear line. The point is not even in the quality and beauty of sharpening the “wood”, but in the sharpness of the stylus. Learn to sharpen pencils with a knife or blade, but forget about the sharpener forever!
Be careful with cutting tools!

Now let's talk about cutting. You need sharp scissors to cut paper! Do not sharpen scissors by cutting sandpaper , the scissors will be sharpened, but at the same time you will scratch their internal side faces, they will cut sloppily and tear the paper. Better ask someone who knows how to sharpen scissors for help!
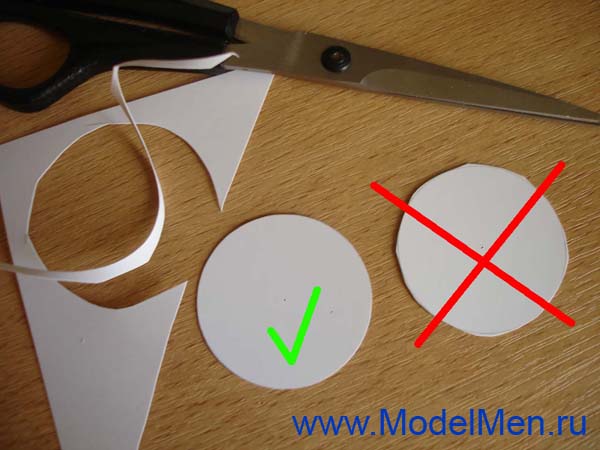
The most difficult element to cut out is the most ordinary circle. Children without skills cut out a polyhedron instead of a circle; you need to show and teach them how to do it correctly! First, you need to cut the part around the line at a distance of 2-5 mm, so that nothing else interferes, then cut along the finishing line.

The cut circle should not have any corners, just a clean, straight line!
Often you have to cut out complex parts with small triangles for gluing (see photo). Before cutting out such a part, you must first go through all the folds with a compass; they are drawn with a dashed line. Next, use scissors to cut off the excess paper along the tops of the triangles.

In any direction, make cuts along one side of the triangle to the fold line.

Then, on the back side of the triangle, make a second cut until the piece of paper falls off on its own; no need to pull it out of the corner with your hands! You will get a neat piece, and the corners will be easy to bend thanks to a pre-drawn line with a compass needle.

To cut strips long or short and save time, use a metal ruler and a sharp knife or blade. You need to cut on a sheet of plastic or glass so as not to spoil the table! Press the ruler firmly, otherwise it may move and ruin the paper.
Often, to glue a cylinder, for example a car wheel, you need to glue the paper around the circumference so that the paper does not resist; it can be bent with scissors or on the edge of the table. To do this, take the folded scissors in your right hand, in your fist, place a strip of paper on top and press thumb right hand, now with your left hand pull the strip of paper so that the strip rubs against the edge of the scissors. You can also do this by stretching a strip along the edge of the table.
This is where I finish my acquaintance with the basics of paper modeling, if I didn’t tell you something in this article, I will tell you in others or you will learn it yourself in the process of work. I wish you creative success and will be happy to look at your paper models!
Three-dimensional modeling is a fascinating activity that will not leave either children or adults indifferent. It is modeling that makes it possible to see a three-dimensional image of a future building or equipment. There are many ways to use simulation. Let's focus on one of them. How to create a house model from paper? Why is this layout needed? And what do you need to make it?
Creating a model with your own hands is not only about bringing your architectural and construction perspectives to life. This is a great way to do original gift for a child, to capture a piece of the history of the construction of their own home, to improve their creative skills. It is undeniable that a three-dimensional model of a house made of cardboard or paper is useful not only for students, architects, builders, but also as an excellent advertising engine. After all, having seen your future home in such a miniature form, having examined it from all sides and from different angles, you will certainly want to purchase it.

Before you start work, you need to stock up on everything you need:
- several sheets of paper and cardboard;
- quick-drying glue;
- stationery knife;
- pencil;
- scotch;
- drawing set;
- thick board for cutting parts.
Cardboard or paper for modeling should be thick and textured. The accuracy of creating a layout directly depends on the accuracy of the drawing, so you should be especially careful when drawing out the details of the future layout. First you need to decide on the original building from which the model will be made. And indicate the scale with which the house model will be built. Typically a scale of 1:100 is used.
The next stage of modeling is the construction of a development – an image of the layout unfolded on the plane of paper or cardboard. The construction of the sweep begins from the reference point. This can be any corner of the building along which all segments will be measured.

Step by step and slowly, the layout of the house layout is built, taking into account the exact size of the walls, gables and the allowance for flaps for gluing. Separately make markings for the roof of the building and the stand. The stand is made 1-2 centimeters wider than the base of the walls of the house model. This modeling principle is quite simple and does not require any special knowledge. After the layout of the house has been built, it is necessary to draw or glue window openings and doors from colored paper. And after that, start final assembly paper house models.

If the house model is more complex, then it is made by phased creation building facades, roofs and foundations. Using a stiffener, the model is assembled into a complete composition.

Internal partitions, windows and doors are attached using glue or tape. Bending parts of doors and windows forms a stiffening rib and allows you to independently maintain the shape. To give the model additional stability, internal partitions Can be made from rigid cardboard or foam.

To detail a three-dimensional model of a house, furniture and interior items are made from paper. This is quite simple, since paper is a very plastic material. Furniture pieces are cut out on paper, glued together and placed inside the building model. If the area of the house model is not large, it is advisable to display interior items against the background of the model walls.

For the purpose of spatial orientation, the model performs modeling of the adjacent area, green areas and infrastructure. To do this, use multi-colored paper, dry branches of trees and shrubs, paint and children's toys. Execution of such a model allows you to determine the placement of the house relative to the cardinal directions, the installation of communications, drawing up an estimate for the construction of the house, and improvement personal plot and other construction features.

The color scheme plays a special role in modeling a house. With the help of color, you can effectively emphasize the advantages and hide the shortcomings of the designed house, as well as focus on the main details of the room. Paint finished monochrome paper model not worth it at home. This may lead to deformation of the layout structure. It is better to glue the necessary colored elements from colored film or paper.
A paper house model, unlike plastic and wooden models, is less detailed and durable. It is not resistant to moisture and temperature regime, which accordingly requires careful use.
The main advantage of this layout is the speed and ease of assembly, as well as cost-effectiveness. Such hand-made paper models are indispensable for all kinds of presentations and exhibitions, and also as a basis for creating more complex modeling using plastic and detailing internal filling space of the room.
One example of creating a paper layout:
Dear readers, comment on the article, ask questions, subscribe to new publications - we are interested in your opinion :)
Despite the fact that the majority computer programs, which are performed in 3D modeling, allow you to imagine quite realistically appearance your future home, designing paper houses is still relevant. After all, not everyone knows these programs. Should you order one from an experienced engineer or designer? computer model expensive. In this case, mastering simple techniques for modeling houses made of paper and cardboard is much faster.
And if you have children from 2 to 10 years old, then this work for them can turn into a most exciting activity. Moreover, the training and developmental effect of this type of activity is difficult to overestimate. This includes accuracy, motor skills, skills in working with tools and, of course, the development of spatial thinking.
Simple layouts of paper houses and patterns for gluing
Making a house model with your own hands is not difficult. The simplest layouts of paper houses are easiest to make from the so-called. developments, when all their elements are connected to each other by fold lines and represent a solid element in the form of a diagram.

Also, the development, in addition to the walls, floor and roof, has additional bends for gluing. You can find links to such scans on the Internet. It is enough to print them on a printer or, by measuring the aspect ratio, draw them on sheets of paper or cardboard and obtain a scan diagram for modeling.


You can transfer the resulting scan to colored paper.

You can transfer key points onto it using a needle or awl various elements: windows, doors, additional mounting points architectural elements And so on. You need to cut them out immediately using a stationery knife, placing a piece of thick cardboard or plywood under the sheet with the scan.

Separately, overlay elements are made: window frames, shutters, doors, etc., which you glue onto the finished layout last.

The easiest way to make an even bend along the lines is to apply a ruler with a sharp edge to it. By repeating this procedure at all bend points, you will get a development ready for gluing.

You can also make a development by making each structural element separately and connecting them together at the bend points from the inside with tape. This method is especially interesting when you are making a house model from thick, hard cardboard.
You can glue the layout using quick-setting adhesives such as PVA, stationery silicate, glue stick, etc. It can also be produced using double sided tape, sold in construction stores.

We offer a video to help:
Making a layout for a house model with your own hands
Process self-made development is no less exciting than working with ready-made samples. To do this, you will need almost any program for working with graphic images installed on your computer. CorelDraw or something similar that processes vector images is best. In it, with an increase or decrease in the image size, both the thickness of the lines and the loaded textures change in the same ratio. This allows you to obtain more realistic images. And the library of textures built into its shell is impressive. At the same time, by filling the sweep element with texture, you can get the finished appearance of the main layout elements.

The entire process, including filling parts of the scan with the selected texture, applying visual effects and architectural elements, as well as inserting images from the symbol library, takes from 10 minutes to half an hour if the house is not very complex. Print the scan on a color printer and start prototyping.

For testing, you can also use this one we made by copying the image to your computer and enlarging it to the required size.
Making complex designs from paper
The process of manufacturing complex multi-component house models is not much different from that described above. It’s just that similar sweeps are performed for individual elements of composite layouts. A group photo of the assembly of a similar layout shows it individual elements and assembly order.

Having mastered the simple technique of paper layout simple houses, you can create entire paper towns with elements landscape design, plants, car models and small architectural forms.

Paper building models round shape The easiest way to do this is to apply the formula for determining the circumference of a circle (2πr) to their calculation, adding to it a strip for gluing.
You can also add realism to your layout by simply lighting the house from the inside.

To do this, you can mark the connection points for the LEDs and the battery on the scanner, and then install them during the process of gluing the layout.

Such a house can also serve as a night lamp, but in this case it is better to use a switching power supply connected to the mains.

The charger is suitable for mobile phone. You can also use inexpensive Christmas tree garland:
Simple house layouts without development
These are, first of all, houses assembled with your own hands from paper cylinders. The same layouts are great for various small architectural forms on prefabricated models with landscapes.

But also, using a similar technique, you can create a realistic model that imitates a log house so dear to the heart of any Russian.
To do this, you need to take longer pieces of paper to make the tubes, so that after folding, its turns resemble the annual rings of a tree cut.

And the junctions of the crowns can be modeled by pressing the ends of the tubes with a solid round object of suitable diameter.

It is easy to assemble a paper frame from such elements. And display the intermediate crowns along the facades, and for a sample you can take a photograph of any real log house.
It is better to make roof coverings for model houses separately, in the form of paper slate sheets, tile flakes or honeycombs of bitumen shingles.
Dear readers, if you have any questions, please ask them using the form below. We will be glad to communicate with you;)
The little one and I did it!
Since our family has an ingrained tradition of remembering everything at the last moment, this case was no exception. My son Vadik told me about the assignment exactly one day before it was due. There was nowhere to go - I had to get to work!
Tools and materials
The model of the city does not require any extra-natural materials, and a normal student should have everything available:
- Ruler
- Colored paper + colored cardboard
- Colour pencils
- Scissors
- Brushes + paints (we used gouache)
- Glue
- A4 paper
How to make a city layout
We thought about it a little and decided that since time was running out, we would make a road + a couple of buildings + some kind of transport. We decided - we do it.

We took a piece of thick cardboard, cut out a 40 by 30 cm rectangle from it. Then we pasted it on one side with A4 office paper.

Having carefully trimmed the edges, we got a base for the layout, which is ready for painting.

They drew an impromptu road


The next step was to build a high-rise building. I don’t give explicit dimensions, since everything was done by eye...

Before gluing the building together I decorated it

This is what happened after gluing

We cut the back of the building to size, then glued it on and also painted it.
Children's city layout
Sorry friends.
Due to the fact that time was really pressing, the shooting had to be postponed. The building alone took almost 2 hours.
The next step was a bus. They did it according to the same principle as the building - they glued it together and painted it. Balconies were added to the building and the inscription “shop” was attached to the bottom.
They built a stop with a sign and made several trees.
The final step was gluing all the products onto the base. To make it stick better in some places I had to use tape :)
And here is the result!

And further…

The city model with your own hands is ready!
Thank you for watching!