Almost every man in the house or in the garage there is a set of tools. Consequently, keep them in perfect order. How best to do this, tells a new review. Surely everyone can find in it who were interested in his examples of the organization of storage.
1. Plastic cans

Cropped cans perfectly suitable for storage of nails, screws, bolts and buckets. And in order not to dig for a long time in search of the necessary, containers are better to march.
2. Wooden shelf

A narrow wooden shelf with holes is a wonderful storage space for screwdrivers.
3. Stand

So that the pliers are not scattered throughout the garage, make a special wooden stand for them.
4. Reiling

The thin metal rod is perfect for storing painting brushes in a suspended state.
5. Separate cells

From the remnants of PVC pipes, you can make convenient cells for the gentle storage of a small power tool.
6. Wooden stellage

A homemade wooden shelving for storing wrenches will forever forget about the mess and tedious search for the desired tool.
7. Open locker

An outdoor wooden locker is best suited for storing aerosol paints, which most often happen chaotically scattered in the garage.
8. Mobile stand

A small stand on wheels perfectly suitable for storing a hand tool. Such a rack is very compact and will always have the desired tool at hand.
9. Wooden stand

A stylish wooden stand with a shelf that is suitable for storing a variety of different tools. Such a product will help not only streamline the hand tool, but will become a real decoration of the male monastery.
10. Homemade Stand

An unnecessary pallet can be turned into a comfortable storage support for gardening inventory, which often takes a lot of space in the garage.
11. Hanger

A simple wooden slab with metal hooks will forever solve the storage problem of the power tool.
12. Handbags for clothes

Non-good manipulations with an ordinary clothes hanger will make it to turn it into a convenient organizer for storage tape and scotch.
13. Storage system

Forks, shovels, rakes and other garden equipment is not too steady and also takes a lot of space in the garage. Reliable wooden hooks on the walls will help competently place a garden inventory along the garage or shed walls.
14. Folding table

A homemade folding table of wood and a wall-mounted hand-tool storage - a stunning idea for a small garage owners.
15. Glass cans

Ordinary glass jars with metal covers are perfect for storing various trifles. For greater convenience and reliability, the cans can be screwed to the shelves.
16. Vertical storage

The usual average garage looks very climbed. The competent organization of storage systems will solve this problem. Instead of the next cabinet, equip the walls with various shelves and hooks, which will allow you to carefully place a lot of things starting from the tool ending with a huge boat and bikes.
17. Magnits

Magnetic tape or separate small magnets are an excellent idea for storing bits for screwdrivers, drills and other small metal parts.
In continuation of the topic, let's tell about anywhere.
Each master seeks to maximize their sphere, saturate the workspace with machine equipment and fixtures. Homemade machine tools and devices for a home workshop are greatly benefited.
Among homemade economic crafts and equipment can be allocated:
- joinery;
- crafting table;
- stool;
- shelves;
- racks.
Crafting table
Dimensions of the workbench
The height of the countertop surface should be such that the worker standing can operate with tools and equipment. The height of the workshop master determines itself - according to its growth. The height of the desktop varies from 75 cm to 80 cm.
The size of the countertops is determined by the area of \u200b\u200bthe utility room. The table should not prevent the free passage around it.
Vistak material
Wood
Often use wooden table. The workbench makes from a bar and boards. The feet of the table for reliability fasten with diagonal cross.
The countertop is made in the form of a shield from a knocked-up bruse cuts. The shield is based on the feet of the table and fasten with nails or screws. Details of the connections are made from steel corner.
Options for assembling a wooden workbench are different, but in one one they are one - the design of the table should be stable and withstand static and dynamic loads.
If the surface of the workbench will be subjected to random impacts of cutting and sharp tools, then the countertop is frown or put a metal sheet from above.
Metal
The most reliable design of the desktop is the workbench cooked from metal products. The manufacture of the welded product implies the presence of a welding machine and experience with it.
The support frame and the feet of the table are welded from steel corner and stripes. For utility parts use segments of reinforcement.
The countertop is made of metal sheet, 8 - 12 mm thick. Thick sheet will significantly increase the weight of the workbench, which is associated with difficulties in its move.
Stool

Stool make it yourself quite simple:
- From the bar of 40 x 40 mm make 4 supports, 50 cm long.
- The legs in the middle of the length are bonded by cross.
- In the supports of the chisel make grooves.
- At the ends of the transverse strokes, the protrusions on the size of the grooves are cut out.
- The protrusions are lubricated with joinery glue and insert into the grooves.
- At the time of drying, the glue supports is tightened with a belt.
- The seat is filled with a disk saw from a wide board with a thickness of 30 mm.
- The seat of 300 x 300 mm is nailed with nails or fasten with screws to the legs of the toaster.
Shelves
Shelves make from the board, chipboard or MDF. They are open or with side walls. For fasteners, use mounted furniture loops.
In the wall, drill holes in which dowels are driven. Screws screw in a dowel not to the end so that the shelves loops can be put on them.
The loops are screwed to the back of the shelf. Shelves hang on the wall, dressing the loops on the head of the screws.

Stellagi.
Racks are a whole complex of shelves of different sizes. They are good to do from chipboard. The lattice structure is based on the pedestal or just put on the floor. For the stability of the rack, the corners are screwed to the side sides of the furniture. Free shelves of the corners with holes are nourished with a dowel to the wall.
Vertical tool holders
Each craftsman seeks to organize his workplace so that the tools are at the distance of an elongated hand. This contributes vertical holders.

Holder of wrench keys
- On the wall above the workbenk fasten the wooden bar. Rake is screwed into the dowels installed in advance.
- Small nails are driven into the bar with gaps equal to the width of the span keys.
- The keys hang on the rail.
- Hats nails hold keys in the horizontal and vertical plane.
Holder of dumping
- In the segment of a bar of 40 x 40 mm, the holes are drilled by the corresponding diversion with the diameters, at a distance of 30 - 40 mm from each other.
- The segment of the bar is naked to the wall of the dowels so that the holes are vertically.
- Unscrewing inserted into the obtained sockets. Now you can quickly get the desired tool without leaving the workplace.
Belt for chisels
- The bar is fixed with dowels to the wall.
- The belt or belt is navigated with carnations to the bar so that peculiar end-to-end pockets.
- The pockets are lowered by the chisels through which only steel blades pass. Handles are held with a belt.
In the device you can keep hammers, ticks, passatias and other tools.
Homemade soldering iron stand
Working with a soldering iron, the situation occurs when you need to postpone the tool. Put a soldering iron with a declared stale on a tabletop or any item - always risky. The homemade stand will solve this problem.
Example of making support for soldering iron
- The holder is made of wire in the form of a spiral. To do this, the wire hanger is inflicted.
- Wires are wound on a cylindrical object, a diameter of 1.5 - 2 cm. It will suit the chisel knob or another tool.
- On the one hand, the spring leaves the free end of the wire.
- The end bend the rounds into the loop.
- For the base of the stand take a board of 200 x 100 x 20 mm.
- Based on the end-to-end hole Ø 4 mm.
- From the back side of the board, the hole is drilled by a large drill - under the screw head.
- The screw is from bottom to top.
- On the screw dress the springs loop and tighten the nut.
- In the board, the crown cut circles under the size of the cup for candles or similar products.
- The chisel makes the sample of wood in 3 recesses.
- Inserted cups, which are filled with solder, tin and napkin to clean the sting.
- The soldering iron is inserted into the spring.
- The board make a small hole for fastening the flexible steel cord from the lamp.
- At the end of the cord, the clamp is fixed, which fix various parts for soldering.
The design may have a different look - it all depends on the imagination and the author's ingenuity.
The simplest mousetrap in the world

This name can be assigned to many homemade mousetres, invented by craftsmen. They are united by one - this is a humane treatment with animals who fell into the trap. The device does not kill the animal, but isolates it. Several examples, how to make a simple mousetrap:
Plastic funnel
Cutting plastic 3 liter balloon in half. The sliced \u200b\u200bneck is turned over and insert it into the lower part of the bottle. At the bottom, the bait (seeds, grain and so on) is embroidered.
The trap put a close item by which the mouse could climb. Rodent, having fallen into a funnel, can no longer get out of the bottle.
Console
The design is a tipping platform. She is made of a piece of cardboard or plastic. The bar is placed on the plane so that its half has pissed in the air.
The bait is placed on the edge of the console so that the plank is on the verge of equilibrium. The animal, having reached the bait, overturns the bar and falls along with it into the substituted bucket.
Suspension
On the edge of the table is put a blank plastic bottle with bait at the bottom. The cord is fixed to the neck, pushing the plastic with a crochet from the stationery clips. The other end of the cord is tied to any support.
The mouse attracted by the smell of food penetrates the tank. A bottle overturns under the severity of the rodent and hangs on the cord.
Mini vice from a metal loop

When performing minor operations, it is often necessary to hold small parts. For this use mini vice made from an indefinite door loop.
The coinciding holes are drilled in both hinge sash.
They have a suitable diameter bolt. On the other hand, the bolt thread is screwed. Details are created in the opening between the sash and clamp, spinning the nut. The device can be used as a clamp.
Beer portable
Box for drinks in glass containers - a convenient tool to carry several bottles at once in the country or picnic. To make this drawer with your own hands, you will need the following tools and materials:
Instruments
- electrolovik;
- saw on a tree;
- schlifmashinka;
- drill-screwdriver;
- drill;
- a hammer;
- chisel;
- feather drill.
Materials
- edged board - 1050 x 170 x 15 mm;
- planks from the fruit box - 5 pcs.;
- stalk Ø 36 mm and 350 mm long;
- morida;
- screws;
- nails.
Step-by-step instructions for assembling box
- The edged board is collected by three identical parts (bottom and two sidewalls), 350 mm long.
- Two boards are cut off by an electrolybic so that from their middle of the sidewalls, the oval vertex is frightened and end.
- In the vertices, the sidewall is drilled by a feather drill hole Ø 36 mm.
- All wooden parts are cleaned with grinding with a sandpaper. Skyrenok sketch manually emery.
- Thin drill drill 4 holes on the edges of the bottom. On the bottom of the openings of the holes are annkedy.
- The sidewalls are installed on the sides of the bottom. Screws screw the bottom at the bottom. Heads of screws "hide" in the holes of the holes.
- Two planks from each side of the box are nauseated to the sidewalls of cloves. They will become a vertical fence for bottles.
- In three boards, they make feeds so as to arouse them, it turned out a doomer with square loops under the glass container.
- The makeup laid on the bottom between the sidewalls.
- Carnations are naked in those places where the ends of the roasters rest in the sidewalls and enclosing strips.
- In the holes of the vertices, sidewalls do a stalk Ø 36 mm.
- Driving nails at an angle, bonded sidewalls with a stalk.
- The entire surface of the box is treated with a mourn.
Box is ready for use. In portable capacitance, 6 bottles of beer or other beverage are freely placed. Dooming and box fencing will not give bottles during carrying breakdown or fall out.
Modernization hammer
Frequent phenomenon is a loss of a wooden handle from a hammer nest. One of the ways to create a reliable attachment of the handle - in the upper end of the handle do the cut. The holder is inserted into the hammer nest. Propyl is filled with "moment" glue. In the groove drive a wooden wedge.
In order to do not look for nails while working, and even more so - do not keep their teeth, a round magnet is glued into the handle in the handle. Nails on the magnet will always be at hand of the employee.
Dangerly random dropping hammer from hand at height. So that this does not happen, the hole is drilled in the handle, through which the cord has been told. The worker believes in the loop.

Homemade tools and machines
Pipe bender
Fixture for flexing metal pipes is a metal rod welded to the bed. I make a rod from cutting reinforcement. The pipe is dressed on the pin, and on the other hand, a long segment of reinforcement is inserted into the pipe. Pressing the lever, the pipe bend under the desired angle. The device is suitable for small segments of round pipes.

Fixture for flexing profiled pipes
The owners of greenhouse farms know how important it is to be a device for flexing the lengths from the profile pipe. The curved profile is used as an arched construction for the formation of polyethylene coatings of greenhouses.
Pipe bender allows you to save considerable money on the construction of the greenhouse. The design consists of 3 rollers - two are guides, and the third roller performs the master function.
The profile tube is set in the opening between two wheels and a rink. The roller has an emphasis and a rotary device in the form of a lever or drive of an electric motor.
Production of pipe-bender do it yourself
- Two axis from the segments of smooth reinforcements are welded to the metal bed, which dresses old car hubs.
- From the hubs remove protruding chamfers so that the side surfaces of the rollers were smooth.
- In the opening between the hubs put the channel shelves up.
- In the channel invests the same profile less than the width of the shelves down.
- To the inner profile, the axis is welding from above, to which the third hub is dressed.
- To the bed welded a vertical shelf of steel sheet.
- The vertical bar cut the hole and the bearing will be pressed into it.
- On the middle channel, the nut is fixed with a nut.
- One end of the screw rod is screwed into the nut.
- The screw shank is drawn through the bearing in the vertical bar.
- On the back side of the plank to the shank weld the rotary handle.
- A swivel lever is welded to the axis of the leading hub.
The machine is ready to work. A profile tube is created between the rollers and clamp it with a screw. The swivel lever is driven by rollers that stretch the pipe, flexing it. The bend radius is installed by a rotary knob of the screw.
Pipe bender from car hubs is one of the variants of devices. There are many designs of bending devices. In some models, the presenter roller is coaxially connected with the motor shaft.
Shock rebreak
There are situations where you cannot unscrew the rusted bolt or screw. Impact dumping with this business perfectly copes. The tool is made with their own hands from the parts of the automotive starter:
- A shaft and sleeve remove from the starter housing.
- The shaft is cut off, leaving the rod with the slots.
- On the sleeve we dress the cut pipe, suitable size.
- By the end of the pipe, the trim of the bolt of equal diameter is welded.
- The end of the shaft is calculated in the form of a quadrupleman, which dresses the heads of the desired size. For screws in the head insert the bit.
When hitting the hammer on the bolt head, the shaft slides the slopes inside the sleeve, performing a rotational movement. The stronger the blow, the higher the shaft turns the shaft.

Homemade circular saw
The cutting machine from the Bulgarian, made by their own hands, is not inferior to some samples of factory manufacture. Bulgarian is a rather powerful manual circular saw.
The brand-based machine performs precise cuts of sawn timber and metal products. For its manufacture, it will take the power tools, welding machine and metal-plastic.
Step-by-step instruction assembling machine
- Two metal slats are welded to the pipe cut, in which the mounting holes are drilled.
- Accordingly, the Bulgarian casing also makes two holes.
- The planks are screwed to bolts to the casing.
- Make a steel sheet from a metal sheet with a welded back corner.
- The welding is fixed to the bed vertical segment of the corner in which the hole is drilled.
- To the lower end of the lever, the segment of the corner is welded and drilled along with a pipe through.
- The bolt is drawn through the holes and the nut tighten the hinge joint of the vertical rack with the lever. Additionally set locknut.
- In the vertical position, the lever of the grinder takes a stable position.
- In the place of contacting the saw blade with the bed, they cut the disk to completely cut the workpiece.
- The handle of the power tool is rearranged at the end of the lever.
- As additional devices, a cross and corner stop are installed on the bed.

If necessary, the power tools are removed from the machine and use a circular saw in manual mode.
Homemade Basic Pila
Great sawing a convenient tool for sawing the trunks of trees and sawn timber. The design of the saw is simple, make a hand tool with your own hands easy. To do this, you need to prepare tools and materials:
Instruments
- drill;
- saw-knife;
- chisel;
- a hammer;
Materials
- cord;
- wooden rail 20 x 40 mm;
- slingles - 2 pcs.;
- stalk Ø 10 mm;
- saw blade;
- morida;
- wooden varnish.
Step-by-step instructions for the manufacture of an archery saw
- Rake is cut into three parts (two vertical side planks and an average horizontal bar).
- In the side handles of the chisel make grooves.
- At the ends of the center, the styers cut out the protrusions under the grooves.
- The furnace is connected to the side handles.
- In places of compounds drill through holes. They are clogged with wooden spop.
- Shplops form hinged connections. This is necessary for the mobility of the lower ends of the side rails when tensioning the web.
- In the lower ends of the sidewalls make feeders - parallel to the student.
- In the holes of the saw blade insert short bolts and tighten them with nuts.
- The canvas start to the cuts so that the bolts are outside the design.
- In the upper ends of the handles cut circular grooves.
- At the ends of the double cord make loops that dress on the grooves.
- A stalk is inserted between the values \u200b\u200bof the cord, the long end of which rests in the furnace.
- The feed of the saws is spinning with a cutter, seeking the desired degree of tension of the saw blade.
- Wood is covered with a mourn and two layers of varnish.
- After drying, the varnish saw ready to work.
Conclusion
Homemade devices, tools and machine tools bring not only a significant benefit to the native, garage and household, but also significantly save the family budget. In the manufacture and use of homemakes, you can not forget about safety rules.
The order in the house depends not only on whether every thing is in its place. Each dwelling needs periodic maintenance. If each mechanism in the house works like a clock, then we can say that the owner fully fulfills his duties. To maintain order not to do without workshop and tools. Some of them can be made independently. The article will be told about the process of assembling tools that will allow the workshop to equip.
What can be collected with your own hands
With due skill, you can collect almost any machine that will be needed for processing wood or metal. They will differ from the factory method of assembly, as well as dimensions. Most often for home use does not require large aggregates. There are no problems in order to independently build a milling machine, with which you can beautifully draw up various rails. Another needed machine that can be collected at home is drilling. Without it, it is not necessary if there is a need to drill the exact holes in small blanks. In some cases, the machine assembly implies the manufacture of a holder for a manual tool, in other it can be collected from zero using engines from other devices.

Before proceeding with the assembly of any products for a home workshop, it is necessary to clearly determine which tasks are delivered before the workshop and what kind of work will be performed. On the one hand, this will allow you to decide which machines will be required, and on the other, it will provide an opportunity to learn whether the available area is enough or a workshop must be placed in another room. Well, if it is a separate room, since noise from working machines can irritate tenants. The easiest way to build a workshop in a private house where you can use a basement or garage. A good master is all organized and in its places, so it is important to take care of practical racks.
Storage elements

Almost any surface in your home workshop can be used to store the tool. At the location of organizers, such types can be distinguished:
- wall shelves;
- racks;
- shields;
- outdoor organizers;
- ceiling shelves.
All of them can be placed in one workshop, which will give the opportunity to significantly expand the total area of \u200b\u200bthe room.
Wall shelves

This design for the domestic workshop is the most common and frequently used. Wall-mounted shelves will not work. First of all, it is necessary to determine the wall where their placement will be the most practical. For example, it can be a wall, near which it will be impossible to position the rack. Do not place the wall shelves in the workshop where it is planned to build a shield for hanging a hand tool. In some cases, the wall shelf can be placed under the ceiling. Since the shelves in the domestic workshop are designed to store heavy items, not soft toys, the strength of the design should be higher than those that are used at home. For assembly will be required:
- 40 × 20 mm corner;
- board or chipboard;
- bulgarian;
- welding machine;
- roulette;
- tool for marking.

The first thing is a sketch-drawing with an indication of the exact dimensions of the design for the workshop, which are determined on the basis of the free space on the wall. The sketch also indicates the number of tiers that one regiment will have. The next step is to prepare the segments of the carcass assembly. The shelf for a domestic workshop will be careful, in which the ends of the racks will be cut under 45 degrees. You can achieve this using a coal or a special holder for a grinder. The first thing is to assemble the side faces of the shelves for the workshop that can be represented by rectangles or squares. It all depends on the selected shelf shape.

Elements should be absolutely identical to the design of the shelf for a home workshop turned out without curvature. After that, the sidewalls are connected to four horizontal crossbars. In this case, placing the corner is necessary in such a way that the part with a length of 20 mm was at the bottom. It will serve as a support for the board. During welding frame for the shelf, there is no need to rush to the workshop. Start standing with tapes so that the design does not lead, and after milking one-piece seam. An angular clamps will serve as an excellent assistant when assembling a frame, which will save the corner of the straight.

When the frame is ready, it is necessary to determine how it will be attached to the wall in the domestic workshop. This can be done, winding drums in angle or welding special ears. The first option is more reliable. Next, the design of the designs in the workshop and painting of the metal base is performed to eliminate corrosion destruction. The last step is cut off wooden stands that are stacked inside. The shelf is fixed in its place in the workshop and ready to use.
Stellagi.

Racks for workshop can be collected in several ways. It all depends on the material used, and this may be:
- metal;
- wood.

Each of these materials is practical in its own way. With the right approach, wood is capable of withstanding considerable pressure and weight, but the dimensions of such a rack in the workshop will be greater than that of a similar from the metal. The assembly of the whole design in the home workshop begins with the drawing. In this case, it is necessary to correctly determine the depth of the rack. Convenient is considered such a depth at which there is an opportunity to reach the edge of the shelf in the workshop, just pulling the hand. Usually this size does not exceed 50 cm. If the rack in the workshop will have a height of the ceiling, then the presence of a small ladder will be appropriate, which will ensure safely reach the necessary tools from the upper shelves.
Note! You can find ready-made racks for the workshop that have a modular design.
This means that the number of shelves can be varied depending on the needs. Often, their purchase costs cheaper, considering not only the cost of materials for self-assembly, but also the time that will be spent for this.

The number and height of the shelves of the rack in the home workshop is determined by the fact that they will be stored. Each regiment can have its own purpose. For example, you can place instruments or billets with a lot of weight. If it is a power tool, then it makes sense to make a height above the highest element that will be stored on the shelf. The principle of assembly is similar to that used for wall shelves in the workshop. In this case, the racks are better to use the corner with large dimensions so that the strength is greater. At the same time, it is important to correctly calculate the width of the rack for the domestic workshop, so that when used for the shelf, the corner with smaller sizes, they did not bend.
Shields
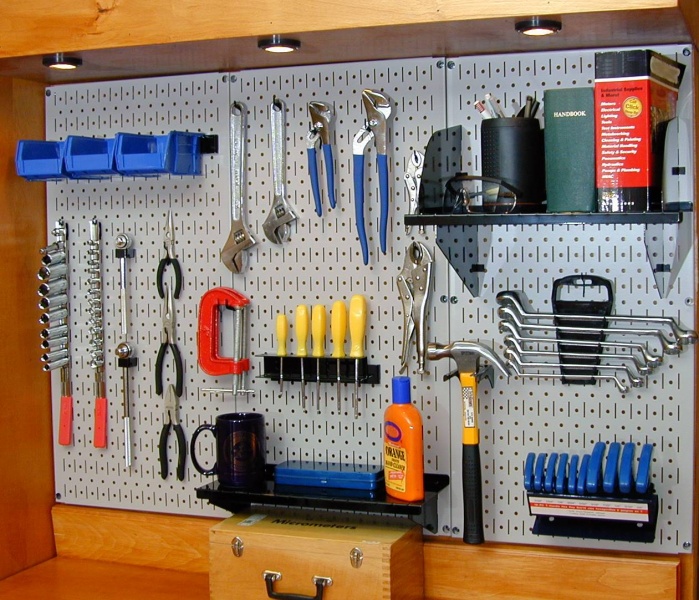
Shields are one of the most convenient elements that can be used in a home workshop. The advantage over other storage methods is that each element has its place and is in sight. The disadvantage of such a system is only inefficient use of space. Compared to the shelves, it is required more, and the tool is placed less. That is why shields are best suited for storing the tool that is used most often. The advantage of shields for the workshop can be considered their specific versatility. On the shield you can position not only hooks for hanging, but also various small storage boxes.

There are ready shields for the workshop on sale, according to which you can collect your own option. To do this, you can use:
- sheet metal;
- phaneur.

The principle of assembly in each of these cases is similar, only a way of working with the material differs. If plywood was chosen as the basis, then you can enter in several ways. First of all, the marking of the sheets will be made in the home workshop. After that, they laid out on the surface and lays out a tool that will hang on the shield. Under each tool, the fastening is screwed in the form of a self-press or it will be burned along the contour so that it was later easier to navigate. Next, the sheet is fixed to the wall through the screws. To attach, it is better to use the hexagon head bolts and clamp sheets through the washers.

There is another version of the shield for a home workshop, which uses hooks instead of self-tapping. This design can be considered more universal, since its configuration can be changed depending on the needs. The best solution will prepare metal hooks in advance that are used for shields in workshops. Depending on how the distance is the locking mustache in hooks, the sheet markup is performed. In the noted points are drilled by holes. The shield is fixed on the wall in a home workshop at a short distance from the wall so that you can freely remove and put hooks in your place.

Metal shield is assembled according to the sample of the second version of the wooden. In this case, the work is also reduced to drilling holes at the specified points. It is better to use a metal with a wall thickness of 0.8 mm. Under the weight of the tool, the metal can bent. You can solve the problem in several ways. One of them is the installation of additional spacers in the form of corners on the back of the shelving. You can also collect several separate shields of smaller size and install them next.
Ceiling shelves

Certain zones in domestic workshops are practically not used, or the ceiling height exceeds 2.5 meters, which will allow freely posting elements for storage on the ceiling. The easiest way and more convenient to fix containers in which you can fold the smallest. Make it is quite simple. To implement the entire project, the workshop will require wooden drawers of arbitrary size. The easiest way will be acquired by plastic containers that are perfect for these purposes. In addition to plastic containers, metal intermediate beams will need. If there are no such available, then the P-shaped profile can be used for the workshop. In the extreme case, you can remove one wall at the square tube to achieve the desired result.

Plastic containers for a domestic workshop have special sides along the edges for which fixation can be carried out. Therefore, it is enough just to attach the prepared profile to the ceiling in the workshop at such a distance so that the containers are placed between them. This design is not suitable for storing heavy items, but a lot of material or tools, which is rarely used can be placed there, freeing the place on the shelves and racks.
Note!Outdoor organizers for the workshop can be represented by conventional boxes in which there will be inserts separated by a certain number of cells. In such inserts it is convenient to store fasteners. But with a sufficient number of shelves and racks in the workshop, outdoor organizers will not be needed.
Crafting table

This design is an integral for any domestic workshop. It is on the workbench that all the magic on the repair and construction of any products takes place. Workshop workshop is better to do universal, because it will take processing not only wood, but also metal, but if the area of \u200b\u200bthe workshop allows you to make two separate workbenches, which will be more convenient, since wood requires the most accurate circulation, and to Metal is often required to attach power. The process of manufacturing a wooden workshop for a home workshop will be described in detail in several videos, which are shown below. It should be immediately noted that for the assembly of such a design for the domestic workshop, a certain operating skill will be required. Ready workshop workshop will support work with various fastening systems.
More simple, but not me, the functional design for the domestic workshop can be collected from the metal. At the same time, it is easier to build additional holders for shelves and boxes. Above the drawing that can be taken as a basis. The dimensions are adjusted depending on which space is available in the workshop. The height of the workshop for a domestic workshop is selected individually, but most often grabbed 80 cm, which allows you to work with objects at the belt level. Better if the workbench is securely fixed to the floor. Also worth setting it in terms of level. If wood processing is planned on a metal workshop in the workshop, then special carpentry vice are additionally mounted where it will be convenient. You can use a portable version of the vice, which is fixed by clamping clamps.

Tip! An excellent option will be the manufacture of a wooden countertop in a home workshop, but it can be damaged by metal.
To protect the wooden surface of the workbench, you can lay a metal sheet from above through a gasket from OSB plates. Metal thickness that will be used as a pad must not be less than 1 mm.
Machines for workshop
The general principle of assembling machine tools for the workshop will be described below, which can be used as a basis, and make the assembly from available materials.
Turning on wood and metal

It is necessary to immediately say that only small metal blanks can be processed on such a lathe in the home workshop. An important part of the machine for the workshop, which will ensure the stability of processing is the bed. It can be made independently or use the factory. For self-making, you can use a profiled tube or a robust corner. Two elements are placed at a suitable distance and securely fixed with the transverse elements. Examples of machine tools for domestic workshop are visible in the photo above and below.

As an engine, which will rotate the part, you can use the unit from the old washing machine, pump or any machine. As a backstone, you can use a powerful cartridge for a drill. In this case, it will be possible to insert a cone or drill, if necessary when processing. The front grandmother can be purchased factory or making sample in the photo.

In this case, the metal axis will be required, better if it is made of tempered steel. It is necessary two holders with bearings under the axis. On the one hand, the pulley is recorded, and on the other cartridge, in which the workpiece will be clamped. The engine on such a machine for the workshop is installed next to the front grandmother, and the force is passed through the belt. The speed can be varied by the frequency module or the cake of the belt for the pulley. A supporting element is also needed according to the schematic figure below.

Video about an independent assembly of a turning machine on a tree is below.
Milling Machine
The milling machine for the domestic workshop is also pretty simple. One option is to use the finished manual millingrer, which is indispensable for the owner, who likes to do something from wood in his workshop.

For a manual machine you can make a special workbench in a home workshop. The photo shows an example of such a table. In essence, it is a small table in which there is a cutter for the cutter and fastening for the most freserzer. If desired, it is possible to do this in the workshop and on the finished workbench. It is important to choose the most convenient place to fix the mill. During the attachment, it is necessary to correctly calculate the maximum departure of the cutter. When working in this way, it will be necessary to completely raise the factory support on the manual fresher. Turning on and off can be implemented via the extension with the switch. The disadvantage of this method is the need for manual adjustment of revolutions directly on the Flemereer itself. The video about the homemade milling machine is lower.
Tip! If there is an engine of the required power and frequency converter, you can build a stationary milling machine in the workshop.
To do this, the engine is fixed to the bottom of the table. On the motor shaft mounted cartridge for cutter. Connection is carried out through frequency, which will vary the revolutions.
Drilling machine

Drill can be used as a drilling machine in the workshop. But for this it must be properly fixed. You can do this by means of a holder that can be stationary for workshop or portable. There are many different options for assembling such a drill holder for the workshop. One of them is given in the video below. The assembly will require materials that are within walking distance in each construction store.
A circular saw

The stationary circular saw for the workshop can be made in a similar way, like the holder for a manual milling. It is enough to make a slot to the slab on the tabletop and mount it when it takes. The only disadvantage of such a solution is to reduce the depth of the cut. It is possible to fix it with an installation on a metal table top, which is less in thickness. Video about the assembly of such a design is below.
Summary
Electric drill is compact, easy, easy to operate and transport the machine. She is indispensable in a domestic workshop, in the garage and at the construction site. In addition to drilling operations, it can be accommodated for performing turning, milling, grinding and other works. Many craftsmen based on drills create homemade machines and appliances for a home workshop. They are used in the garage for simple turns on wood and metal.
Workshop equipment
Not always with a hand drill, you can drill an exact hole. If such a need arose, a stationary drilling machine is used. It is definitely accurate and safe, which is necessary when processing solid elements with a drill of a large diameter.
In the garage or workshop rarely meet such a machine mainly because of the price, it is expensive, in addition, bulky, takes a lot of space, is rarely used. Drill on a tripod - lightning, convenient in transportation design, while fulfilling all the requirements for a desktop drilling machine.
Stationary drilling device
 The homemade machine based on drill will provide high accuracy of drilling in any conditions - is installed on the worktop of the workbench or on the floor. It consists of several elements. The main, of course, are the foundation and column. The first part is responsible for the stability of the machine installed on a flat surface. The second, in turn, allows smoothly and very accurately move the drill and down when drilling.
The steel column is not deformed even under the influence of the greatest pressure to ensure the perpendicularity of drilling. In addition to high accuracy, it is worth mentioning the safety of work. If we reliably secure the workpiece in the vice on the desktop, then the risk of injury will not occur during drilling.
The tabletop based on the drill provides accurate drilling of the holes in the details of complex forms, for example, round, oval, and also at an angle of 90 degrees. Without it, you can not do a homemade master, where the tool is not used intensively. For the manufacture of a desktop vertical drilling machine based on a drill, you can use ready-made racks or tripods. They are quite suitable for use.
As the manufacturer guarantees, the vertical drilling rack is useful everywhere where there is a need to perform drilling operations during the repair of metal structures, wooden parts. The product is made of high-quality materials, ensures stability and reliability of the attachment, thanks to which the quality of work is good. The product of this type perfectly reduces the time to work.
In private garages you can meet homemade machineswhere the tripods from photographer and codecopes, jacks and automotive steering racks of a suitable design are adapted as a rack for a drill. There are machines made entirely of wood. The drill is a universal mechanism, with which it is possible to design homemade wood machines.
Woodworking Machine
Using a drill as an electrical drive, you can collect homemade machines and garage fixtures. For example, a lathe on a tree in a few days from the board and handustrian screws. No one makes drawings for making machines, Everything is created by the invented project.

In addition to homemade drilling and turning equipment, a homemade workshop, you can make a milling machine on wood. To drive, you can select an electric door or a manual milling mill.
Stanna for Bulgarian
 Bulgarian, like an electric drill, rapidly entered our lives and took the place of the universal tool. With it, you can cut pipes, sheet metal and rods, stone and tiles, grind and polish. She found widespread use in the car service when repairing car bodyworks. For convenience, you can make a cutting machine.
To be cheaper and easier, make it from a tree. As in each machine there is a base, the material can be a wood-chip plate with a size of 400 x 400 x 20 millimeters. On the bottom to the plane screws to attach the legs in the form of two rails of 40 x 40 millimeters. From above to the stove to attach a block of a height of 100 millimeters, 50 millimeters thick. A door loop with a long plate is attached to the bruck with a long plate. Bulgarian is attached to the plate with a clamp. Everything, homemade device for a domestic workshop that performs the role of a cutting machine is ready. For safe work on the base, machine vise is installed.
Sharpened for garage
 Emery, electrician, grinding machine - so called the toolwithout which the workshop does not work, private garage, car service. The most necessary device sharpened during the repair of cars, the manufacture of plumbing products, sharpening of the tool, grinding the metal surface of the crafts. It is not necessary to buy this useful mechanism, it is quite possible to do the homemade on the basis of the electric drill. First you need to select a place on the table and with the help of two wooden brackets with a thickness of 40 millimeters and two screws to fasten the drill.
To stop the arms or tool, you need to make a girlfriend. To do this, you can apply a thick-layer phaneur with a thickness of 20 millimeters. Bashed a girlfriend to the table, exhibited under the emery circle. In order for chips freely falling on the floor and it was possible to use elaborate circles of different diameters in the girlfriend, a rectangular hole of a slightly more abrasive tool thickness is cut. To adjust the girlfriend to different height, it is necessary to install a set of plates from plywood, and fasten with screws. The top plane of the girlfriend close the steel plate. All, useful power tools for the house is ready for operation.
Milling machines
Among woodworking professionals are the opinion that the milling machine is the most necessary tool for the joinery workshop. It may even replace some power tools, such as a circular saw, drill and even fuganok. There are two main types of millions:
- submersible;
- edge.
Submersible works as follows: the mill is immersed in the material and moves along the specified circuit. The edge does not allow immersing the mill, its milling depth is exhibited in advance and fixed. By power, the milling mills are divided into three categories:
- small from 500 to 1200 watts;
- middle from 1100 to 1900 watts;
- powerful from 1900 to 2400 watts.
 Light power mills are lightweight, compact, maneuverable, comfortable in operation and allow you to fulfill all the tasks of your home workshop - this is the best choice for the house. True, low power imposes its limitations. The device works with cutters with a diameter of up to 32 millimeters, there are limitations in length. If you have to manufacture boxes, frames, this car is quite enough.
Using an electric drill or a milling mill, you can make a useful device for power tools with your own hands - milling table. Such a device is useful if we have to make profile products made of wood. For these purposes, you can adapt an ordinary table, amplifying the tabletop sheet metal with a thickness of two millimeters.
 A milling mill is mounted at the table to the countertop. A stubborn board is installed on the table, which moves under the mounted size and fixed by the presser bolts. The mechanism of supplying cutters - an elevator is made from a conventional automobile jack, which is installed on metal brackets under the table. Finished homemade pleases the eye.
Changing cutters can perform various milling work. In general, the device is a professional milling machine on a wood workshop. It is convenient to choose the grooves in it, milling a quarter to process the configuration of the plinths.
Electrock, Bulgarian, manual milling tools, on the basis of which you can create devices and multifunctional machines, significantly facilitating the work of a homemade master.
Currently, you can buy finished machines, tools and equipment for equipping your own workshop, but all this will cost quite expensive. Homemade machines will help the master in his practical work, while they will not burden his budget. Why buy what you can do with your own hands, and even in relation to specific conditions.
How to use for a home workshop?
Equipping your own workshop every owner chooses himself. It depends on the features of the hobby, i.e. Type of work and area of \u200b\u200bpremises. The minimum home workshop area, in which it makes sense to place the equipment is 3-4 m².
It can be located in a small room or on the balcony of the apartment, a separate building on its own area or in the garage. The ideal option is a secluded room in which you can make noise without interfering with other people.
In its destination, the home workshop can be universal, i.e. To carry out any work that have unexpectedly arising in everyday life, or have a specific direction associated with the passion of the master. Most often, workshops are equipped for working with wood, i.e. For carpentry work. Quite often appears the need for metal processing (plumbing) and car repair.
In general, the arrangement of the domestic workshop includes such elements:
Designs for placing tools and materials (racks, shelves, cabinets);
- equipment for work (workbenches, desktops);
- Machines for processing materials;
- devices for mechanization of work, relief, tool preparation, etc.
It is necessary to place the equipment so that it is a free approach to him, the safety and fire provisions was observed, minimal comfort was provided.
Carpentry workbench
The joiner's workbench is a durable table with a working surface, on which carpentry (2 pieces) are fixed, fixators to secure the workpiece when planing with a planing, places are provided for the installation of a mill and other manual machines.
The height should ensure the convenience of working, taking into account the actual growth of the wizard. The length should be at least 1 m (usually 1.7-2 m), and the width is 70-80 cm.
Instructions for the manufacture of joinery workbench:
The working surface is manufactured in the form of a shield with tightly fitted boards with a thickness of at least 55 mm. Best suitable beech, oak, ram. Previously, they should be impregnated with oil. Hardening is achieved by a timing of 4-5 cm in size, which is attached throughout the perimeter of the shield.
Vertical table supports can be made of pine or linden. Typically, a ram with a size of 12x12 or 15x15 cm in length of about 120-135 cm is used. The reference elements are connected by horizontal jumpers from a wide board, fixed at a height of 20-30 cm from the floor.
Storage of tools and fixtures are made on the shelves, which are located under the lid. It is better to produce them in the form of a handset with the door. Shields-shelves can be placed on the wall above the workbench.
On the working surface, a pair of homemade or factory carpentry tubes is attached
For homemade vice, a long screw rod with a diameter of at least 20 mm with a long threaded portion is at least 14-16 cm, metal studs and wooden bars.
The manufacture is carried out in the following order:
A wooden bar (can be made of pine) in size of about 20x30 cm and a thickness of at least 5 cm, in which the screw hole is drilled in the center, and at the bottom 2 holes for the guide spills. This first sponge of the vice is inpatiently fixed on the working surface.
The second sponge is cut from a similar board and has 20x18 cm sizes. It will be a mobile element.
Through the sponges skipped a screw pin. To eliminate the displacement of the elements, the studs are fixed with a diameter of about 8-10 mm. A knob is installed on the screw rod.
How to make a plumbing workbench from metal with your own hands?
For fitter work, a metal workbench will be required. Its standard size: length 1.8-2.1 m, width - 0.7-0.8 m, height - 0.9-1.2 m. Manufacturing includes such steps:
Build a workbench frame with the attachment of longitudinal stiffness.
- Assembly and fixing 2 Tombus in the form of a frame, covered with a metal sheet.
- Installation of the working surface - a wooden shield, covered on top of a metal sheet.
- Installation of a rack for a tool that is fixed on the back of the workbench and additionally strengthens it.
Rack beams - profile pipe with a wall of at least 2 mm in size 4x6 cm. Needed - 4 pcs.;
- 5x4 cm beams for horizontal ligaments racks providing longitudinal rigidity. Quantity - 3 pcs.;
- profiled tube (9 pcs) for the manufacture of carcass of the Tumb size of about 4x3 cm with a thickness of the walls of at least 1 mm.;
- 5x5 cm corner for vertical racks with a height of 1.5-2 m. For horizontal linking, you can apply a 4x4 cm corner;
- board for tabletops with a thickness of at least 5 cm;
- Metal sheet for a working surface with a thickness of at least 6-8 mm.
Features of the creation of a lathe on a tree
A homemade lathe for working with wooden blanks includes the following items:
Stanna. It should have sufficient strength. It is better to make it from a metal profile (tube, corner), but you can also from a wooden bar. It is important to securely secure the frame on the floor of the workshop and dragging the design at the bottom.
- Front grandmother or clamping spindle. As this element, the machine can be used the head from the drill of high power.
- Rear grandmother. In order to provide longitudinal billet feed, it is better to use a standard factory spindle with 3-4 cams.
- Caliper or focus for cutters. It must ensure reliable fixing and the possibility of moving towards the workpiece, which is provided by a screw rod.
- Tool table. On the face you should form a working surface on which you can decompose the cutters and another tool.
- Drive unit. To create a torque, an electric motor is used at a speed of rotation of 1500 rev / min with a power of 250-400 W. You can apply the engine from the washing machine. A belt transmission is used as a transmission, for which the pulleys are installed on the shafts.
CNC milling machines for wood and metal
When milling wooden parts, software can significantly expand the capabilities of the machine and the quality of processing. For its formation, elements such as LPT port and CNC unit are installed. For the manufacture of the copier, you can use the carriages of the old matrix printer.
Build a milling mill for wood is carried out in the following order:
The table top is made of chipboard or plywood with a thickness of at least 15 mm.
- cutout for cutter and its installation.
- The drive, transmission and the machine spindle are fixed.
- stops and limiters are installed
The metal mill assembly requires a stronger base for the machine:
Installation of columns and races in the form of the letter "P". Elements are made from steel chapeller. In the P-shaped design, the jumper forms the base of the tool itself.
- The guide elements are performed from the steel corner and on the bolts are installed on the column.
- Guide consoles are made from a rectangular pipe. The screw pin is inserted into them. The console movement is provided with the help of a car jack to a height of up to 12-15 cm.
- The worktop is manufactured from chipboard or plywood.
- The tabletop is assigned visks, guides from a metal corner, pin locks.
- The rotating part is installed so that the shaft is located vertically.