It is unlikely that you can meet a person who would not feel the desire to settle in a comfortable chair and feel the smooth swaying movements of the suspended structure. Comfortable swing and at all times enjoyed great popularity. Today, the range of hanging seats has been significantly expanded: hanging sofas and armchairs decorate many suburban areas, easily fitting into the landscape design.
The suspension seats are based on conventional rocking chairs. Wicker rattan or wicker structures have become the most promising for furniture experiments, because they weigh quite a bit, but at the same time have excellent strength.

As a result of such furniture experiments, designers have created pendant chairs that resemble half a ball.
Semicircular designs are attractive in that they allow you to evenly distribute the entire load. In addition, they are conveniently suspended by placing the device at the highest point.
The frame of the hanging chairs can have several options.

Wicker chairs made of wicker, rattan, clear acrylic or plastic have a rigid body. For convenience, they are complemented by decorative pillows and soft mattresses.

The hammock chair is a softer version of the suspended structure. On soft swinging pillows you can always pamper yourself in moments of relaxation

Closed on three sides with wicker walls, a cocoon armchair is ideal to retire and abstract from the outside fuss
Instead of traditional rattan or vines, synthetic materials are increasingly used in the design of hanging chairs, thanks to which the structures become lighter, more flexible and quieter.
As you can see, there are many options. We will specifically analyze 2 examples.
Building such a chair is not difficult. You just need to master the basic technique of weaving macrame.

Such a hanging chair will allow you to create a special atmosphere on the site, conducive to peace and tranquility.
To make a chair, we need:
- Two metal hoops of different diameters (for the seat D = 70 cm, for the back D = 110 cm);
- 900 meters of braiding cord;
- 12 meters of sling;
- 2 thick cords for connecting rings;
- 2 wooden rods;
- Scissors, tape measure;
- Work gloves.
To equip the chair, it is better to use hoops made of metal-plastic pipes with a cross section of 35 mm. Reinforced-plastic pipes of this thickness have a metal braid inside and are able to provide sufficient strength to the suspended structure.
To make a hoop from a pipe, first determine the length of the segment using the formula S = 3.14xD, where S is the length of the pipe, D is the required diameter of the hoop. For example: to make a hoop D = 110 cm, you need to measure 110x3.14 = 345 cm of the pipe.

For connecting the ends of pipes, wooden or plastic inner inserts of the corresponding diameter are perfect, which can be fixed with ordinary screws.
For weaving, a polyamide cord with a polypropylene core 4 mm thick, which can be purchased at a hardware store, is ideal. It is good because it has a soft surface, but unlike cotton fibers, when knitted, it is capable of creating denser knots that will not "creep" during operation. So that there is no discrepancy in the color and texture of the material, it is advisable to purchase the entire volume of the cord at once.
Stage # 1 - creating a winding for the hoops
Our task is to completely cover the metal surface of the hoops. To decorate 1 meter of the hoop with dense turns, about 40 meters of cord are needed. We make the turns slowly with a good tension, applying the cord evenly and neatly.
To make the winding tighter, tighten every 20 turns, tightening them with force in the direction of the winding until they stop. As a result, we should get an even and dense braid surface. And yes, to protect your hands from calluses, this work is best done with gloves.
Stage # 2 - netting
When creating a mesh, you can use any vending pattern of the macrame technique. The easiest way is to take a "checkerboard" with flat knots as a basis.

Weave the net with a double polyamide cord, attaching it to the braided hoop with double knots
Pay attention to the tension on the cord while weaving. The elasticity of the finished mesh will depend on this. The free ends of the knots should not be cut off yet. A fringe can be formed from them.
Stage # 3 - assembly of the structure
We assemble the braided hoops into a single structure. To do this, we fasten them from one edge, wrapping them together with one cord.

From the opposite edge of the unwinding, we place two wooden rods vertically, which will serve as a support for the back of the structure
The length of the support rods can be any and is determined only by the selected back height. To prevent the hoops from slipping, we make shallow cuts at the four ends of the wooden rods.
Stage # 4 - chair back design
The weaving pattern of the back can also be any. Weaving starts from the top of the back. Gradually sinking to the seat.
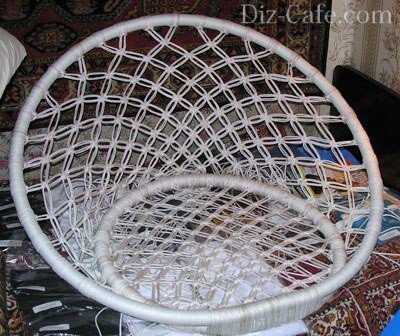
We tighten the free ends of the cords on the lower ring, collecting their hanging edges into loose brushes
When the pattern is braided, we fix the ends of the threads in the lower part of the back and decorate them with a fringe. The structure will be strengthened by two thick cords that connect the backrest to the seat. The graceful hanging chair is ready. All that remains is to attach the slings and hang the chair at the chosen place.
Hanging chair with cover
If you do not want to do weaving, or for some other reason the first option did not suit you, then this may be suitable.

A cozy, gently rocking nest is the perfect place to relax, forget about your problems, or just take a nap
To make such a hanging chair, we need:
- Hoop D = 90 cm;
- A piece of durable fabric 3-1.5 m;
- Non-woven, dublerin or trouser tape;
- Metal buckles - 4 pcs .;
- Lanyard - 8 m;
- Metal ring (for hanging the chair);
- A sewing machine and the most necessary tailor's supplies.
You can make a hoop from a metal-plastic pipe, which is sold in the form of a rolled coil, or from bent wood. But when using wood, you should be prepared for the fact that under the influence of a temperature drop, the hoop can quickly dry out and deform.
Stage # 1 - cover cutting
From a three-meter cut, we cut two equal squares, each measuring 1.5x1.5 meters. We fold each of the squares separately four times. To make a circle out of it, draw a circle from a central corner with a radius of 65 cm and cut it out. By the same principle, we make and cut out a circle from another square. On each of the resulting circles, departing from the edges by 4 cm, outline the inner contour with a dashed line.
We outline the holes for the lines: we fold the circle in four and iron it so that the folds are landmarks. The first pair of lines will be located relative to the bend at an angle of 45 0, the second - 30 0. Having marked the corners for the slits for the lines, we again lay out both circles and iron them.

Along the outlined four axes, we make rectangular slots 15x10 cm in size. The slots are made along the contour of the Y-shaped marking made inside the rectangles
To make the same cuts on both circles, connect the fabric cuts and pin them. Along the contour of the finished cuts of the first circle, we make cuts in the second piece of fabric.

Bend the petals of the slots inside out, gluing the edges with non-woven fabric. Only after that we make a full cut, stitching it along the edge, retreating by 3 cm
Stage # 2 - connecting elements
Sew both circles together along the previously marked dashed line, leaving a hole for inserting the hoop. Cut the free allowance with teeth. We turn out the finished cover and iron it.

Cut out strips 6-8 cm wide from the filling material, with which we trim the hoop. We insert the sheathed frame into the cover
Having retreated 5-7 cm from the edge, we sweep both sides together. Turn the edges of the hole left for the hoop insert inside out.
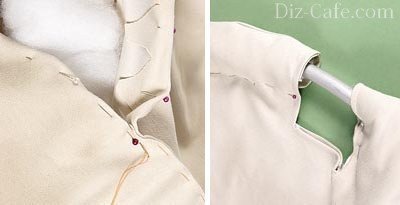
We cut off the unstitched allowances from the front side with pins, and sew the edges, stepping back from the edge by 2-3 cm.Using the same technology, we process the entire edge of the cover
We fill the cover with padding polyester, stretching the strips of filler and fixing their edges with a blind seam. To strengthen the cover on the hoop, we quilt the fabric in several places.
Lanyard mode for four cuts 2 meters long. To prevent thread unraveling, we melt the edges of the lines.

We stretch the melted ends of the lines through the slots, form loops from them and sew them 2-3 times
To be able to adjust the height and angle of the hanging chair, we put buckles on the free ends of the lines. We collect all slings into one suspension, fixing on a metal ring.
Methods for arranging the suspension system
Such a chair can be placed in the garden by hanging it from a thick branch of a spreading tree. If you plan to make a hanging chair a functional decoration of a veranda or gazebo, you will need to build a hanging structure.
The harness must support not only the weight of the chair itself, but also the weight of the person sitting on it.

To fix a simple hanging chair, the weight of which together with the person sitting in it is no more than 100 kilograms, it is enough to install a simple anchor bolt
With this method of fastening, the maximum load on the ceiling ceiling should be taken into account, which is measured in kg / m 2, because the entire suspension system will act on this area. If the permissible load is less than the calculated weight, it is necessary to distribute the load along the ceiling by constructing a power frame that combines several anchor bolts.
Make such a chair, and you will get a great opportunity to relax at any moment, enjoying pleasant swaying movements, while gaining peace and a philosophical attitude to all troubles.
From this article you will learn about the advantages and disadvantages of foundations built using TISE technology. We will tell you how to arrange a foundation with your own hands, we will give step-by-step instructions. You can learn about the nuances of a monolithic pile grillage and the piles themselves.
Individual ecological construction pursues many goals, one of which is respect for natural resources. Gentle technology allows you to get the desired result - a solid durable house, without wasting extra energy and raw materials. We will tell you about the foundation, which can be erected by an average master, even alone.
Basis of technology
The main advantage, or as they say today - "trick", of such a foundation is that it does not come into contact with the ground. More precisely, the contact area is minimal and is reduced to the surface of the piles. The tape grillage rests on them and is in a suspended state. This provides the following benefits:
- Reinforced waterproofing of the foundation is not required. For all waterproofing work, 5-6 rolls of ordinary inexpensive roofing material are enough.
- Seasonal heaving of the soil * does not affect the grillage tape. This factor often becomes the cause of the fracture of strip foundations.
- The minimum amount of earthwork.
- Ventilated space under the ceiling - reliable protection against dampness and discussion.
- The energy of the soil is used. With the correct organization of the basement and the ventilation under the house in the underground bosom, a constant temperature will be maintained.
* Heaviness of the soil - the property of the soil to change the volume with temperature drops. Depends on soil moisture and temperature.

Disadvantages can be called conditional:
- More planks are needed to form the beams.
- It is necessary to withstand at least 21 days before stripping.
"Hanging" grillage does not differ structurally from rooted to the ground. The difference between them is only in the level of laying.
TISE piles
The peculiarity of TISE piles is that they have a developed support part in the form of an expansion along the radius of the pile. It is difficult to call it a novelty - such a structure has been used in industrial construction since the middle of the 18th century. The main problem - an increase in the space in the bottom of the pile hole, was solved in different ways - from special nozzles on the drill rod to the explosive method.
TISE engineers took the work of industrial mechanisms as a basis and created a special drill with a folding knife. No other way to make an expansion at a depth of 1.8 meters under these conditions has yet been invented. The drill itself has a rather primitive design and consists of the following elements:
- Vertical bar with handles.
- Dirt collector equipped with cutters at the bottom for digging into the ground.
- Folding knife with pull to the handle.

Drilling a borehole under a pile is elementary - having reached the required level with conventional drilling, the operator throws back the knife with a pull and selects the cavity, continuing to rotate the drill. The soil is collected in a dirt collector container and the operator retrieves it to the surface. The pile depth is set from a single rule: the supporting part of the pile must be completely below the level of soil freezing.
At the moment, you can find on sale two original TISE-F200, F250 and F300 drills, as well as countless copies and analogues of them. The numbers in the title are the diameter of the pit in millimeters. Drills cost:
- TISE-F200 - 75 USD e.
- TISE-F250 - 80 cu e.
- TISE-F300 - 85 USD e.
Piles and drill TISE on video
Erection of the foundation
The TISE foundation consists of two structural elements - a pile row and a grillage-beam, respectively, and the work will be divided into two stages. First you need to arrange all the piles, and then make the grillage.
Pile concreting
After drilling all the pits, you should start preparing the frames for the piles. These can be simple frames made of A3 Ø 12 reinforcement - 3-4 working rods per pile. Take the length with a margin of 400-600 mm. Tie the working rods with clamps.
Progress:
- We make a foundation - add at least 50 mm of concrete to each pit. If you need precision in your work, at this stage you need to level the horizon at depth. To do this, pull the cord in the horizon so that it does not interfere with work, and adjust the level with a layer of concrete, focusing on the cord.
- We install the frames and concreting the support headstock of the pile.
- We install a "shirt" made of roofing material.
Video - how to make a sleeve for a pile
- We concreting the piles through the conductor, as shown in the video. The height of the post on concrete is from 100 to 200 mm above ground level.
Concreting of TISE piles on video
Further steps will differ depending on the material of the grillage. If it is wooden, like the rest of the house, then the piles can be cut with a grinder along the desired horizon after hardening. If the grillage is monolithic, it is necessary to focus on the tensioned cord during concreting so that the concrete level of the pile is appropriate.
Grillage concreting
After the solution has hardened (3 days), the foundation can be continued.
Progress:
- Fill the space between the piles with soil or sand / slag flush with the concrete level (horizon) to a width equal to the width of the tape + 200 mm. Tamp down with boards or hand tamping.
- Lay the contact plane with roofing felt or polyethylene.
- Bend the pile reinforcement outlets at the level of the future working rods of the beam frame.
- Tie the frame according to the reinforcement requirements. In this case, the outlets of the pile frame must be tied into the frame of the beams.
- We install the formwork according to the formwork requirements.
- Concreting the beams, focusing on the horizon, which is better to transfer to the inner side of the board. To do this, use high-quality concrete from pure raw materials with proportions of 1/3 / 3-4. When laying, use a vibrator - the hanging beams must be reliable.

After placing the concrete, it is necessary to withstand at least 7 days to continue the work. After removing the formwork, after 21 days, you need to remove the bedding from under the beams. The terrain will flatten out and there will be gaps between the bottom of the beam and the ground. The beam can be covered with one layer of liquid waterproofing (except for the contact surface during the further construction of TISE walls).
The final view of the TISE foundation on video
Further operation of the foundation will require the organization of underground ventilation. This can be done by bridging the gap with a perforated sheet of galvanized laminated metal. The described technology is extremely economical. Attempts to make it even cheaper by using low-quality raw materials will inevitably lead to big troubles that will start from the foundation. Decent concrete and sufficient reinforcement will extend the life of the foundation to 180 years.
A hanging gutter garden is a great way to take advantage of the vertical space around your home to grow flowers, edibles and create a stylish space division or garden screen without spending too much money.
Materials (edit)
1 - 8 "white PVC rain gutter cut into 3 sections 32"
6 - white PVC gutter plugs
Cut 2 - 1/8 "steel cables to the required length
6 - Clamps (see the image below)
6 - 1/8 "steel rods
2 - Galvanized hooks
Instruments
Cordless drill
Hand saw or wire cutters
Right angle ruler
Roulette
Permanent marker

1. Determine the center of your gutters and mark (otherwise your gutter will not hang straight).

2. Mark and drill holes for steel cable rods. Find a drill with a diameter equal to that of the cable to minimize wiggle room.
3. Drill holes a few sizes larger, make sure you get good drainage (plant roots don't like to sit in water for long periods).


4. Find a place that has at least 4 hours of sun. I placed my gutters on a gazebo that I built a couple of years ago.

5. Drill pilot holes (the hole is slightly smaller in diameter than the auger diameter) to facilitate screwing the hooks. Make sure the holes are evenly spaced so that the cable hangs straight down.
6. Pull the grooves through the holes and secure them with the cross clips at the desired height. You will notice that I placed a mesh (usually used for drywall joints) left over from another project over the drainage holes to keep the soil from seeping through. However, I think the holes are small enough that this step is optional. I did it out of habit.
7. Secure the groove with cross braces and half round steel rods.


You are now ready to fill with organic soil and plant the small root plants of your choice.
If you liked this material, then we offer you a selection of the best materials on our site in the opinion of our readers. A selection - TOP about existing eco-settlements, Ancestral estates, their history of creation and everything about eco-houses, you can find where it is most convenient for youBefore building the roof of a house, it is necessary to study the possible options for rafter systems and choose the optimal scheme depending on the individual characteristics of the building. Among the most common rafter frame schemes, there are layered systems suitable for buildings with an internal load-bearing wall, and hanging systems in which the rafters can only rest on the outer walls of the roof. This article will consider the nodes and construction of hanging rafters.
Hanging rafters
Hanging rafters are called that way for a reason - in fact, they are constantly suspended and have no other support under them, except for the outer walls of the building. Despite the seeming unreliability, hanging rafter systems are quite effective and capable of fully performing their functions in spans up to 17 m long.
Of course, the hinged rafters themselves would cost little, but they are used in conjunction with a one-piece system, which includes a lot of additional elements that allow you to form large nodes like trusses or arches.

An example of a simple truss is a structure consisting of two rafter beams that are connected at the top point, thereby providing a triangular shape of such a truss. In the horizontal plane, a rafter tie is installed, represented by an ordinary wooden beam. Of course, it can be made of metal, but then it must be called heavy.
The role of the lashing beam should not be underestimated - the rafters under load constantly try to disrupt the triangular shape of the truss, and the tightening of the rafters prevents this effect. In addition, the expanding force that appears is not transmitted to the walls of the building, but falls on the tightening itself, due to which the building experiences only vertical forces.

The tightener can be set at any vertical level, but for this you need to know exactly what functions are assigned to it. For example, if the tie is located at the bottom of the rafters, it can also be used as a floor beam for the floor below. If there is a living space under the roof, then the tightening should be set higher so that it interferes with the arrangement of the attic.
When arranging large spans, the nodes of the hanging rafters will have to be additionally reinforced. In the event that the span between the walls exceeds 6 m, then the rafters are reinforced with braces and hangers, and the tightening should be done from two beams connected to each other.
The device of hanging rafters can be performed according to several schemes, and they should be considered in more detail.
Triangular hinge arch
The considered type of construction is rightfully considered one of the simplest. Structurally, such a scheme involves the creation of a simple truss in the shape of a triangle, which includes two rafter beams directed towards the ridge. At the bottom, the rafters rest on a horizontal beam, in addition, at the lower level, the puffs are fastened to the rafters. For this structure to function properly, the ridge height must be greater than 1/6 of the truss span.
In such a scheme, considered traditional, the main load falls on the rafters, bending them so that they diverge in different directions. This force is compensated by tightening, which, working in tension, relieves the load on the rafter system. The tightening in this case does not belong to the number of load-bearing elements, therefore, instead of a wooden part, it is quite possible to use a metal one.

To reduce the bending load experienced by the rafter legs, the ridge elements in this case are installed with a slight deviation from the central axis. Such a scheme becomes the cause of the appearance of an additional effort with an oppositely directed vector. In addition to reducing the load on the rafter frame, this also allows the use of thinner beams - and this is a direct path to justified savings.
Most often, triangular articulated arches are used to create attics, and the puffs located at the bottom of the structure perfectly serve as floor beams. All the schemes of hanging rafters described below are variations of the described three-articulated arch, in which additional elements only increase the rigidity of the rafters.
Hinged arch with headstock
This structure is more complicated than the previous one, but it can be used to cover spans longer than 6 m. The main problem with long structures is a long tightening - it carries significant loads, so it bends under its own weight. To compensate for these loads, a headstock is used - a wooden block with which the tightening is suspended. If necessary, metal rods that have sufficient tensile strength can also be used as a headstock.
Using such a suspension, it is possible to install hanging rafters with a long tightening, because its bend will be compensated. The main point when installing such a structure is that the headstock should not be compressed, that is, it cannot be used as a vertical rack. Of course, structurally, the stand and suspension are very similar, but these elements do completely different jobs.

The main difference between the headstock is that it is suspended from the eaves unit, and the tightening is attached to it by means of clamps. To create a tightening of the required length, component elements are used, which are adjusted by means of notches and fixed with bolts. Before assembly, it is worthwhile to calculate the tightening of the rafters so that the design is optimal.
This design is rarely used today due to obsolescence. However, the ideas and principles laid down in it still find application in other, more modern rafter systems.
Raised pull design
This scheme is mainly used when creating residential premises under the roof. The height of the puff position in this case determines the height of the ceiling of the future attic. The tightening in such a structure rises to the ridge part of the roof, and the higher it is installed, the greater the load it has to experience.
The rafter frame uses a Mauerlat as a support, and not a tightening. So that the roof can independently change its size depending on external factors, the rafters are fixed in a movable manner to special devices that provide the necessary freedom of movement of the structure.

When balanced loads are applied to the roof, the structure will be stable, but if the forces on one side prevail, then the roof will be slightly overwhelmed. To prevent such a situation, the rafters must be removed outside the walls on both sides of the building.
In an arch with a raised puff, the latter does not function as a support. It is influenced only by tensile loads, if an attic is arranged under the roof, or tensile-bending, when creating an attic. In the latter case, the tightening can be used to mount ceilings or insulating materials.
A suspension is installed to protect the tightening from sagging. There are also some nuances here: with light loads and a short length, the tightening can simply be nailed to the crossbar and ridge, but for a long tightening with heavy loads, several suspensions and additional fixation with clamps will be required.
Hinged arch with crossbar
This scheme is structurally similar to the previous one, but there is one difference - instead of movable supporting elements for a hinged arch with a crossbar, a rigid rafter mount is used, which is quite reliable. The rafters are cut into the Mauerlat or attached to fixed support beams. Due to the change in the design, the supports also change the stresses arising in the system - the main load becomes the expanding one, which falls on the Mauerlat and the walls.

The tie is fixed at the top of the arch, but instead of being stretched, it is now compressed. Along with the change in the nature of the loads, the name of the tightening also changes - now it is called the crossbar. Such an arch with a raised crossbar can work only under the condition of a small bursting load, and when it increases, the crossbar must be additionally reinforced with a tightening. The result is hanging rafters similar to a traditional three-hinge arch, and the Mauerlat is no longer needed in this case.
Arch with suspension and struts
This scheme is a logical continuation of the theme of arches with grandmas. An arch with a suspension and struts is used to bridge spans up to 14 m long - in such structures, the load is so great that the rafters sag due to their own weight. To compensate for these loads, struts are used.
As a rule, struts in the rafter system rest against the inner walls of the building, but hanging rafters are used only if they are not available. The headstock, which is the only available support, helps to solve this problem.

The structure assembled in this way works according to the following principle:
- The rafters have an external load;
- The struts take on some of this load;
- The suspension stretches and pulls the ridge bar;
- The rafters are grabbed by the upper part and pulled down, due to which the struts are pressed.
For long rafter legs inherent in this design, a long puff is used. It is best to use a beam of two rigidly connected beams. The brace is attached to the headstock by means of a clamp.
Types of connections of individual elements and nodes
In order for the structure of the hanging rafters to be of sufficient quality and reliability, it is necessary to take care of the high-quality connection of its elements, choose fasteners for the rafter system, which can serve for many years, for which the following methods can be used:
- Butt joint... This method is used to connect the upper parts of the rafters, that is, the ridge knot. The rafter beams are cut at an angle, aligned and secured with wood or metal strips.
- Lap joint... To implement this method, the upper edges of the rafter legs are clasped and fastened with a bolt with a nut or hairpin.
- Cutting connection... Before joining, the rafters are cut to half their thickness. The prepared parts are brought together and fixed through the drilled through hole with a bolt connection. The same method is actively used for the installation of eaves nodes - a tooth is cut out in the lower part of the rafters, which is fed to the supports and fastened with bolts or plates.
- Sliding connection... This method of connecting the lower parts of the rafters is used in systems with a movable support. For connection, special metal elements are used.
Calculation of a hanging rafter system
A roof with hanging rafters must be calculated at the design stage to avoid further problems. It would be best to order a calculation from specialists or use a ready-made project, but if you wish, you can do all the work yourself, using an online calculator or more traditional calculation methods.

In any case, for calculations you need to know:
- The area and dimensions of the roof space;
- The presence of an attic;
- The expected load on the roofing system;
- The angle of inclination of the slopes;
- Type of rafter system;
- Material for making the walls of the building;
- Roofing material.
The calculation of hanging rafters is needed in order to determine the thickness of the rafters, the step of their installation and the shape of the required trusses.
Installation of hanging rafters
When all the preliminary stages are completed, you can proceed directly to the installation of the rafter system, which is performed according to the following algorithm:
- First, you need to mark the center of the roof and the height of the ridge, after which two boards with marks are placed on the gables;
- Next, you need to make a template for mounting rafter legs, for which you need to take a piece of board and lean it with one end against the Mauerlat, and with the other against the ridge height mark, and make cuts on this board;
- Using a template, roof beams are made in the required quantity;
- Prepared and processed rafters are laid out in pairs;
- First, the first truss is mounted, which, after assembly, must be installed on the pediment of the building, using self-tapping screws or corners with nails for fastening;
- A second truss is installed on the other side of the building;
- A string is pulled between the two installed arches, from which you will need to push off when installing the remaining trusses;
- All other trusses are installed sequentially, observing the calculated step and level.

Having completed the installation of the hanging rafter system, you can proceed to the next stages of roof installation.
Conclusion
Wooden hanging rafters are quite convenient and suitable for a variety of tasks. Installation of the hanging system is quite simple - you just need to correctly plan the future structure and carefully carry out each stage of its assembly.
A hanging gutter garden is a great way to take advantage of the vertical space around your home to grow flowers, edibles and create a stylish space division or garden screen without spending too much money.
Materials (edit)
1 - 8 "white PVC rain gutter cut into 3 sections 32"
6 - white PVC gutter plugs
Cut 2 - 1/8 "steel cables to the required length
6 - Clamps (see the image below)
6 - 1/8 "steel rods
2 - Galvanized hooks
Instruments
Cordless drill
Hand saw or wire cutters
right angle ruler
Roulette
Permanent marker

1. Determine the center of your gutters and mark (otherwise your gutter will not hang straight). 
2. Mark and drill holes for steel cable rods. Find a drill with a diameter equal to that of the cable to minimize wiggle room.
3. Drill holes a few sizes larger, make sure you get good drainage (plant roots don't like to sit in water for long periods). 

4. Find a place that has at least 4 hours of sun. I placed my gutters on a gazebo that I built a couple of years ago. 
5. Drill pilot holes (the hole is slightly smaller in diameter than the auger diameter) to facilitate screwing the hooks. Make sure the holes are evenly spaced so that the cable hangs straight down.
6. Pull the grooves through the holes and secure them with the cross clips at the desired height. You will notice that I placed a mesh (usually used for drywall joints) left over from another project over the drainage holes to keep the soil from seeping through. However, I think the holes are small enough that this step is optional. I did it out of habit.
7. Secure the groove with cross braces and half round steel rods. 

You are now ready to fill with organic soil and plant the small root plants of your choice.