A glazed balcony or loggia does not just provide additional thermal insulation and protect from extraneous noise from the street. Such a solution makes the owner of square meters the owner of an additional (albeit small) room, which can be arranged according to his own taste and according to his needs. Many construction companies offer their services in this regard, as do the sellers of PVC and aluminum structures. However, often the financial situation forces us to look for more profitable options in terms of savings, which involve doing most of the work or all of it on our own. The article will focus on how to glaze the balcony yourself.
Important: glazing of balconies requires official approval from the relevant authorities. If you do everything "according to the law", then you will first have to attend to additional "permissive" documents.
How best to glaze a balcony
There are a lot of ways, we will list all the main ones and give a small idea about them, which will allow us to determine the direction of work in the future.
Glazing balcony photo

- "Cold" glazing, regardless of the way the frames are opened, suggests that the balcony can be used as an additional “habitable” room only in the warm season. This is the most inexpensive option, since the structures made of aluminum profiles, which are most often used for these purposes, are quite affordable. Among the positive qualities of this type of glazing is light weight, so if there are doubts about the reliability of the support, then aluminum will be the right choice. The material is very resistant to external influences, it is not afraid of humidity and low temperatures, although it can still deform from sudden jumps. Sometimes for the "cold" method, wooden frames with one glass are used.
- There is an option with "Warm" aluminum profile... It uses double glazing and double glazing. And in addition, special plastic placed inside the profile keeps the heat inside and does not let cold air from the street. But such a design is almost not in demand due to its high cost.
- Usage frames made of wood considered a budget option, but laborious in terms of caring for them: the paint will have to be renewed once a year if the appearance matters. To reduce the cost, some use used wood. With proper care, it will last long enough. If income allows, it is possible, as they say, to install wooden "Euro-windows" once and for life. Their production technology makes them durable and they look very impressive.

- Panoramic view glazing assumes that special glass, additionally processed to increase the strength characteristics, serves as the basis for assembling the balcony railing from floor to ceiling. From the point of view of creating a spectacular space, this method takes a leading position. Due to the thickness of the material, the apartment becomes protected from heat loss and the sound insulation performance increases. The partition can be made of tinted glass and looks especially amazing when assembled without frames.
- Frameless way balcony glazing requires certain skills and literacy during installation. But the complexity is justified by the result, when "at the exit" a light, as if weightless construction of one glass is obtained. The lack of frames is compensated by special metal guide profiles. It is in them that glass sections are attached and move along them. A special tempered glass is used for such tasks.
- PVC profile frames are a popular and practical glazing method. The possibility of installing a double-glazed window with three air chambers significantly insulates the room, especially in combination with a wider profile. Installation is simple and quick, and the service life is long enough, and all this splendor does not require complex maintenance. For those who do not want to install plastic windows due to the fact that the sashes when opening "eat up" a lot of space, you can opt for the option with sliding sashes.

- If you want to glaze the balcony "with the take-out" of the structure, then you should be very confident in the strength of the parapet, because the load on it in this case will increase in two directions at once.
Important: it is better to carry out work on the exterior decoration of the balcony with siding or other materials before glazing. This sequence will facilitate the cladding work.
How to glaze a balcony with plastic windows
- This process is not very difficult, especially since the manufacturer itself takes measurements, so there should be no mistakes in this area. So, the finished PVC structures have been delivered, the decision has been made to abandon the installation, what next?
- The existing old doors are being dismantled and, along the way, the balcony must be freed from all objects and things that may interfere. The balcony space cannot be called large anyway, so ideally it is worth taking everything out of it. What else is the "deep cleaning" stage useful for? All the nuances that require revision and elimination during work on insulation, waterproofing, and so on become immediately visible.
- A wooden beam is fixed along the perimeter of the balcony using mounting dowels. When measuring, the presence of beams is taken into account. That is, the height of the finished structure will be equal to the height from the side of the barrier to the top plate minus the parameters of the crossbar. It is worth checking with the representative of the supplier company, what thickness of the beam he puts into the calculations.

- First, the PVC frame itself is installed without sashes. First of all, the main and largest front part is mounted. And then the side one. In order to save money, many people abandon glass in the side in favor of sandwich panels. This, of course, is already a matter of taste.
- From the side of the street, an ebb is attached under the frame. If a balcony with a roof is glazed, then it is imperative to fix the visor. It is wound under the structure and fixed with self-tapping screws, the cracks are filled with sealant. The visor will protect against moisture ingress and its leakage into the profile and into the room. Therefore, more attention should be paid to the issues of snug fit.
- When the frame is leveled and secured, you can proceed with the installation of the sashes in place. After installation, check them for tightness. An important indicator and smoothness of movement when opening and closing. If everything is done correctly, then the frames will open easily and close without effort, tightly fitting into the opening.
It is important to think carefully about the options for opening the sash. This structure will have to be washed, and it is better to plan it so that from the tear-off section you can easily reach the neighboring “deaf” one. It is unlikely that anyone wants to risk their lives, bringing cleanliness.
- Outside, it is convenient to hide the joints with additional decorative elements. They can be purchased individually or "included" when ordered from a PVC frame supplier. All gaps from the inside are sealed with polyurethane foam. When it dries up, it is trimmed, the protective film is removed from the frame and sashes. Further work continues on the final decor of the room.

Glazing balcony video
Glazing the balcony with an aluminum profile
Another plus in favor of a lightweight aluminum structure is the sliding opening system. It saves space, however, because of it, problems arise with the freezing of bundles in winter. If the choice is still made in her favor, then we learn how to properly glaze a balcony.
- Let's dismantle the previous glazing.
- If the parapet is made in the form of metal handrails, then on top of them it is required to install an "apron" made of galvanized steel. If the barrier is concrete, this is not required. The profile will stand directly on it.
- The visor is mounted.
- A window sill is being installed.
- To fix the frame, anchor plates are installed in the opening. With the help of anchor bolts, a frame structure is installed on them.
- The ebb is attached to the frame.
- Sashes are installed in the openings.
- All seams are sealed with polyurethane foam and covered with strips (optional)
- As a final step, the fittings are adjusted. The flaps should slide apart smoothly without emitting a rumble. This indicates correct installation.
Glazing the balcony with wood
It is good if the home craftsman has carpentry skills. Then the option with glazing with wooden frames becomes cheaper. After all, he can use wooden beams, glazing beads and ordinary glass 4 mm thick to assemble the sashes, supplying them with the simplest fittings from the nearest store. However, even in the absence of such talent, you can order an inexpensive finished product in the workshop. Then you can proceed with the installation.
It is important to take into account that a large structure can “sail”. Therefore, despite the visual appeal of large and wide openings, this unpleasant effect is worth remembering.
- The preparation has already been written above, so we skip this stage.
- There are no special tricks in the installation of such a structure, moreover, the process itself differs little, say, from the installation of a PVC profile. Using metal fixing plates and self-tapping screws, we install a wooden frame without frames.
- Ebb, canopy and window sill are installed in the same way as previously described glazing methods.
- The seams are foamed and subsequently hidden under the trim.
- The doors are fixed in place, the fittings are debugged.

For a long time, this was the only way to glaze a balcony in Khrushchev. Of course, such glazing will never become the object of envy of neighbors. But done neatly and securely fixed, it can protect against dust, falling leaves and change the microclimate on the balcony by a couple of degrees.
How to glaze a balcony with your own hands in a frameless way
- A very spectacular type of glazing, but also a method that requires some effort and courage. The first thing many homeowners fear for when they are offered this option is safety. If we are talking about the installation of glass "full-length", then perhaps it is worthwhile to provide for some kind of removable structure, reaching a meter in height, and attached to the walls or floor at a time when children play on the balcony, for example. It is quite simple to weld it from small diameter metal pipes.
- The second not entirely desirable effect of a great view of the surroundings is an equally great view of the privacy of the apartment. Especially in the evening with the lights on. Those who do not want to provide neighbors and casual passers-by with the opportunity to watch the reality show "live", you can choose the following options for "salvation".
- Consider a curtain or blinds system. The second option will turn out to be costly, given the non-standard dimensions of the opening, and you will have to suffer with the fabric solution.
- You can choose the type of glass with one-sided transparency even at the planning stage. They look good, they are very good on sunny days, but in autumn and in cloudy winter weather, such glazing brings melancholy due to the low light transmission capacity. Alternatively, the presence of such glasses can be combined with conventional ones.
- If we are talking about frameless glazing of the balcony only in the part where most people are used to seeing the window opening, then the difficulties described above do not arise.

Important: glazing into the floor involves the dismantling of the parapet. Before doing the work, you need to make sure that the demolition is legal and will not cause negative consequences for the whole house.
- For all its attractiveness, the panoramic method requires additional costs for insulation, well, it is not worth choosing it if a “wonderful view” of the factory complex or dull neighboring high-rise buildings opens from the balcony.
- An aluminum panoramic profile will cost less, but its qualities to keep warm, let's say, tend to zero and you should think carefully before installing it.
There are many options, but each of them can be implemented on your own. Therefore, the glazing of the balcony can be counted among the type of work on which you can save money.
How to glaze a balcony with your own hands
A glazed balcony or loggia does not just provide additional thermal insulation and protect from outside noise from the street. A similar solution makes the owner of square meters the owner of an additional (albeit small) room, which can be arranged according to his own taste and needs. A huge number of construction companies offer their services in this regard, as do traders of structures made of PVC and duralumin profiles. But, often the financial situation forces us to find more profitable options in terms of savings, which imply a huge part of the work, or do all of it completely without the help of others. Trying to glaze the balcony with our own hands. The article will discuss how to glaze the balcony yourself.
Fundamentally: the glazing of balconies requires official approval from the relevant authorities. If you do everything "according to the law", then at first you will have to attend to additional "permissive" documents.
How best to glaze a balcony
There are quite a few methods, we will list all the main ones and give them a small idea, which will allow us to determine the direction of work in the future.
Glazing balcony photo

- "Cold" glazing, regardless of the methods of opening the frames, implies that the balcony can be used as an additional “habitable” room only in the warm season. This is the most inexpensive option, because the structures made of duralumin profiles, which are most often used for these purposes, are fully available. Among the positive properties of this type of glazing is low weight, so if there are doubts about the reliability of the support, then aluminum will be the right choice. The material is very resistant to external influences, it is not afraid of humidity and low temperatures, although it can still deform from large jumps. From time to time, for the "cold" method, frames with one glass are used from wood.
- There is an option with "Warm" aluminum profile... It is not difficult to make a wardrobe for a balcony or loggia with your own hands. You need to know some of the nuances and features, to have at least an approximate drawing or diagram. It uses double glazing and double glazing. And in addition, special plastic placed inside the profile keeps the heat inside and does not let cold air from the street. But such a design is almost not in demand due to its high cost.
- Usage frames made of wood considered a budget option, but laborious in terms of caring for them: the paint will have to be renewed once a year if the appearance matters. To reduce the cost, some use used wood. With proper care, it will last long enough. If income allows, it is possible, as they say, to install wooden "Euro-windows" once and for life. Their production technology makes them durable and they look very impressive.

- Panoramic view glazing assumes that special glass, additionally processed to increase the strength characteristics, serves as the basis for assembling the balcony railing from floor to ceiling. From the point of view of creating a spectacular space, this method takes a leading position. Due to the thickness of the material, the apartment becomes protected from heat loss and the sound insulation performance increases. The partition can be made of tinted glass and looks especially amazing when assembled without frames.
- Frameless way balcony glazing requires certain skills and literacy during installation. But the complexity is justified by the result, when "at the exit" a light, as if weightless construction of one glass is obtained. The lack of frames is compensated by special metal guide profiles. Do-it-yourself window installation video instruction. It is in them that glass sections are attached and move along them. A special tempered glass is used for such tasks.
- PVC profile frames are a popular and practical glazing method. The possibility of installing a double-glazed window with three air chambers significantly insulates the room, especially in combination with a wider profile. Installation is simple and quick, and the service life is long enough, and all this splendor does not require complex maintenance. For those who do not want to install plastic windows due to the fact that the sashes when opening "eat up" a lot of space, you can opt for the option with sliding sashes.

- If you want to glaze the balcony "with the take-out" of the structure, then you should be very confident in the strength of the parapet, because the load on it in this case will increase in two directions at once.
Important: it is better to carry out work on the exterior decoration of the balcony with siding or other materials before glazing. Glazing balcony video. How to glaze a balcony with your own frameless hands. This sequence will facilitate the cladding work.
How to glaze a balcony with plastic windows
- This process is not very difficult, especially since the manufacturer itself takes measurements, so there should be no mistakes in this area. How to decorate the balcony from the inside with your own hands (photo). So, the finished PVC structures have been delivered, the decision has been made to abandon the installation, what next?
- The existing old doors are being dismantled and, along the way, the balcony must be freed from all objects and things that may interfere. The balcony space cannot be called large anyway, so ideally it is worth taking everything out of it. What else is the "deep cleaning" stage useful for? All the nuances that require revision and elimination during work on insulation, waterproofing, and so on become immediately visible.
- A wooden beam is fixed along the perimeter of the balcony using mounting dowels. When measuring, the presence of beams is taken into account. That is, the height of the finished structure will be equal to the height from the side of the barrier to the top plate minus the parameters of the crossbar. It is worth checking with the representative of the supplier company, what thickness of the beam he puts into the calculations.
Do-it-yourself balcony glazing (Part 1, installation of a window sill and siding)
Glaze do it yourself balcony not as difficult as it might seem. Moreover, sheathing the balcony with clapboard with your own hands, as on the balcony video tutorial :. In this series of videos, I will try.
HOW TO GLASS BALCONY IS CHEAP !!! Do-it-yourself balcony glazing.
HOW GLASS balcony for 30,000? !!! Channel DeloSadovye Delo Sadovye Hello, my viewer! My name is Belik.

- First, the PVC frame itself is installed without sashes. First of all, the main and largest front part is mounted. And then the side one. How to glaze a balcony with your own hands: step by step. In order to save money, many people abandon glass in the side in favor of sandwich panels. This, of course, is already a matter of taste.
- From the side of the street, an ebb is attached under the frame. How to glaze a balcony with your own hands. If a balcony with a roof is glazed, then it is imperative to fix the visor. It is wound under the structure and fixed with self-tapping screws, the cracks are filled with sealant. The visor will protect against moisture ingress and its leakage into the profile and into the room. Therefore, more attention should be paid to the issues of snug fit.
- When the frame is leveled and secured, you can proceed with the installation of the sashes in place. After installation, check them for tightness. An important indicator and smoothness of movement when opening and closing. If everything is done correctly, then the frames will open easily and close without effort, tightly fitting into the opening.
It is important to think carefully about the options for opening the sash. This structure will have to be washed, and it is better to plan it so that from the tear-off section you can easily reach the neighboring “deaf” one. It is unlikely that anyone wants to risk their lives, bringing cleanliness.
- Outside, it is convenient to hide the joints with additional decorative elements. They can be purchased individually or "included" when ordered from a PVC frame supplier. How to sheathe a balcony with clapboard with your own hands, video on sheathing and walls on the balcony. All gaps from the inside are sealed with polyurethane foam. When it dries up, it is trimmed, the protective film is removed from the frame and sashes. Further work continues on the final decor of the room.

Glazing balcony video
Glazing the balcony with an aluminum profile
Another plus in favor of a lightweight aluminum structure is the sliding opening system. It saves space, however, because of it, problems arise with the freezing of bundles in winter. If the choice is still made in her favor, then we learn how to properly glaze a balcony.
- Let's dismantle the previous glazing.
- If the parapet is made in the form of metal handrails, then on top of them it is required to install an "apron" made of galvanized steel. If the barrier is concrete, this is not required. The profile will stand directly on it.
- The visor is mounted.
- A window sill is being installed.
- To fix the frame, anchor plates are installed in the opening. With the help of anchor bolts, a frame structure is installed on them.
- The ebb is attached to the frame.
- Sashes are installed in the openings.
- All seams are sealed with polyurethane foam and covered with strips (optional)
- As a final step, the fittings are adjusted. The flaps should slide apart smoothly without emitting a rumble. 6 do-it-yourself balcony glazing video; glaze the balcony with your own hands. This indicates correct installation.

Glazing the balcony with wood
It is good if the home craftsman has carpentry skills. Then the option with glazing with wooden frames becomes cheaper. After all, he can use wooden beams, glazing beads and ordinary glass 4 mm thick to assemble the sashes, supplying them with the simplest fittings from the nearest store. How to glaze a balcony yourself: video and photo. However, even in the absence of such talent, you can order an inexpensive finished product in the workshop. Then you can proceed with the installation.
It is important to take into account that a large structure can “sail”. Therefore, despite the visual appeal of large and wide openings, this unpleasant effect is worth remembering.
- The preparation has already been written above, so we skip this stage.
- There are no special tricks in the installation of such a structure, moreover, the process itself differs little, say, from the installation of a PVC profile. Using metal fixing plates and self-tapping screws, we install a wooden frame without frames.
- Ebb, canopy and window sill are installed in the same way as previously described glazing methods.
- The seams are foamed and subsequently hidden under the trim.
- The doors are fixed in place, the fittings are debugged.

For a long time, this was the only way to glaze a balcony in Khrushchev. Of course, such glazing will never become the object of envy of neighbors. But done neatly and securely fixed, it can protect against dust, falling leaves and change the microclimate on the balcony by a couple of degrees.
How to glaze a balcony with your own hands in a frameless way
- A very spectacular type of glazing, but also a method that requires some effort and courage. The first thing many homeowners fear for when they are offered this option is safety. If we are talking about the installation of glass "full-length", then perhaps it is worthwhile to provide for some kind of removable structure, reaching a meter in height, and attached to the walls or floor at a time when children play on the balcony, for example. It is quite simple to weld it from small diameter metal pipes.
- The second not entirely desirable effect of a great view of the surroundings is an equally great view of the privacy of the apartment. Especially in the evening with the lights on. Those who do not want to provide neighbors and casual passers-by with the opportunity to watch the reality show "live", you can choose the following options for "salvation".
- Consider a curtain or blinds system. The second option will turn out to be costly, given the non-standard dimensions of the opening, and you will have to suffer with the fabric solution.
- You can choose the type of glass with one-sided transparency even at the planning stage. They look good, they are very good on sunny days, but in autumn and in cloudy winter weather, such glazing brings melancholy due to the low light transmission capacity. Alternatively, the presence of such glasses can be combined with conventional ones.
- If we are talking about frameless glazing of the balcony only in the part where most people are used to seeing the window opening, then the difficulties described above do not arise.

Important: glazing into the floor involves the dismantling of the parapet. Before doing the work, you need to make sure that the demolition is legal and will not cause negative consequences for the whole house.
- For all its attractiveness, the panoramic method requires additional costs for insulation, well, it is not worth choosing it if a “wonderful view” of the factory complex or dull neighboring high-rise buildings opens from the balcony.
- An aluminum panoramic profile will cost less, but its qualities to keep warm, let's say, tend to zero and you should think carefully before installing it.
There are many options, but each of them can be implemented on your own. How to insulate a balcony with your own hands - step by step. Therefore, the glazing of the balcony can be counted among the type of work on which you can save money.
Reading time ≈ 3 minutes
The non-glazed balcony does not fully fulfill its functions. It seems that you can perform some actions on it, but there is always a fear that bad weather, or neighbors from the upper floors will make some adjustments to your plans. It is also impossible to use it as a storage place for things. In order to protect a piece of your space, the right decision is balcony glazing.
There are a huge number of options for glazing balconies, you can be convinced of this by looking Photo in the article, but the most interesting thing is to independently carry out such repairs.
Preliminary measurements and calculations
Before making the plastic glazing of the balcony, you need to clearly understand what overall dimensions of the windows are required. To do this, we remove the old glazing, if it was, of course, we dismantle the frame and fasteners. We remove everything clean so that the overlap from above and the base of the parapet are visible.

The next step is to directly measure all the required dimensions: from the ceiling to the parapet, and between two walls. It is also important to make sure the parapet is horizontal with a level. After all, if there is a skew of more than 15 mm, the frame may simply not fit into the connector.
Preparatory work
At glazing the balcony with your own hands preliminary work is reduced to the preparation of the parapet for the future installation of the window frame. Examine the parapet carefully, if you have any doubts about the strength and stability of its base, it is better to make a new one. To do this, we remove the old one, and in its place we lay out a new one in one brick, everything is strictly according to the level.

After that, we make a frame for installing the frame around the entire perimeter of the parapet. For this purpose, a metal corner with a cross section of 0.5 cm is perfect, which is screwed with dowels to the parapet.

If you are satisfied with the old parapet, then it is necessary, if there is a gap, to close it up with a galvanized sheet. To do this, we measure the size of the gap, after which we start the pre-cut piece of galvanized steel from the outside under the railing and fix it with self-tapping screws. This work is best done with a partner.

Do-it-yourself balcony glazing process

- We take out the glass unit from the frame to lighten the weight by 25-30 kg. To do this, pull the glazing bead, which is directed along the window, pull out the glass and place it next to it on the cleaned floor. The opening sash can be left with a glass unit.
- We remove the sash from the frame: in the upper hinge, push the stem towards the bottom, then tilt the sash and raise it 3-5 cm, finally removing the sash from the lower hinge.
- Attach a plastic support profile for the bottom of the frame.
- We install fasteners for the frame. Step back 150 mm from all extreme positions of the frame and, using silver self-tapping screws and a drill at least 3 cm long, fix the fasteners.
- We mount the frame in the opening. To do this, we fix the mounting plates with self-tapping screws.
- We assemble the frames into one piece using self-tapping screws. Check verticality and horizontalness.
- We attach the frame to the parapet with anchors.
- Foam up the cracks and mount the visor.
- We insert double-glazed windows, and hang the sashes.
- After checking the tightness of the fit of the closed doors, and the full operability of all elements, we mount the ebb and the window sill.
Greetings! I recalled a funny incident. I was visiting an old friend - they remembered childhood and their pranks.
And then with obscene cries he ran to the balcony and began to drive out a flock of pigeons from there, which had already made half of the nest for themselves.
He said that they make such attempts every day.
Out of old friendship, I decided to help my friend and told me how to glaze the balcony with my own hands so that this space would be protected from the encroachments of birds.
Many apartment owners strive to expand their useful living space at the expense of all the resources they have.
One of these methods of expanding the territory is glazing and insulation of balconies and loggias.
Thus, it becomes possible not only to get another room suitable for living, but also to significantly improve the thermal insulation of those rooms that face balconies or loggias.
Nowadays, a loggia ceases to be just a place for storing unnecessary things and drying washed linen - this is a place where you can arrange a study, a winter garden or a recreation room. In order to ensure the appropriate temperature regime and avoid unnecessary heat loss, glazing and insulation of the balcony will be required.
A team of specialists can be invited to perform all the necessary work.
It's not for nothing that they say: "If you want to do something well, do it yourself."
Consider how to properly glaze a balcony and insulate it with your own hands. This does not require any special building skills - neatness, hard work and ingenuity are enough.
What you need to know about glazing
To begin with, you should know that glazing of loggias alone is not enough if we want to provide acceptable thermal comfort there. Therefore, it is necessary to work on insulation - otherwise the heat will go through non-insulated ceilings.
To insulate the loggia with their own hands, they use materials such as expanded polystyrene, mineral wool and foamed polyethylene - penofol. These are materials of a new generation - they are widely used in modern construction to insulate various sections of buildings. Their choice depends on the tasks, conditions of use and, of course, the financial budget.
Expanded polystyrene (or expanded polystyrene) is a material consisting of air and expanded polystyrene. This white substance of granules tightly adhered to each other is confused by many with foam. But due to the different manufacturing technology, polystyrene and expanded polystyrene have different properties.
Expanded polystyrene has stronger intermolecular bonds and its performance is much higher than that of foam. Let's consider them in more detail:
- High heat-insulating and sound-insulating properties;
- Non-absorbency of moisture;
- Moisture resistance - it does not lose its properties under the influence of moisture;
- Resistance to decay, mold, fungus formation;
- Resistance to temperature extremes;
- Non-toxic - it does not emit substances harmful to the human body;
- Environmental friendliness;
- Low specific weight, which facilitates its installation and reduces the load on the structure;
- Good machinability by mechanical means with the most common tools;
- Affordable price.
This material is widely used for do-it-yourself thermal insulation of loggias - it is convenient, has a small mass and is easy to work with.
Mineral wool is more expensive than penoplex, it has a much larger mass and it is undesirable to use it for thermal insulation of loggias. In addition, the high permeability of mineral wool forces the mandatory use of waterproofing and vapor barrier.
Penofol is a heater that consists of a foil layer and foamed polyethylene. This material is heat-resistant, moisture-resistant and is often used to insulate loggias with your own hands. It can be used both as an independent heat insulator and in combination with expanded polystyrene or mineral wool.
Glazing and insulation of a balcony - general concepts
When planning how to glaze a balcony and insulate it yourself, it should be borne in mind that the whole process in general looks like this:
- preparation of balconies and loggias for glazing;
- glazing;
- sealing of cracks;
- thermal insulation;
- finishing.
To begin with, consider the simplest option - insulation of a balcony with front glazing. It so happens that the glazing was performed earlier on non-insulated aluminum structures and it is necessary to perform thermal insulation in order to avoid heat loss.
There are three options for solving the problem:
- Installation of PVC double-glazed windows parallel to existing windows. This makes sense if it is important to preserve the original appearance of the facade of the house from the street;
- Installation of a thermal bridge for insulating an aluminum profile. We increase thermal insulation by placing insulation inserts between the inside and outside of the frame. This thickens it and reduces heat loss;
- Dismantling of old glazing and installation of PVC double-glazed windows.
Note!
Now we will consider step by step how to glaze a balcony in the event that we have a structure in the form of thin concrete slabs on the sides and a lattice parapet in front.
We lay walls made of foam blocks or ceramic bricks. This masonry does not require building skills and almost everyone will be able to lay it on their own;
After we have prepared the walls, we install PVC double-glazed windows. All cracks are hermetically blown out using polyurethane foam. After that, we can proceed with the insulation and finishing of the walls, floor and ceiling;
We carry out the preparation of the floor. Standard loggias have a barely noticeable slope towards the street for rainwater drainage - it must be leveled using a thin concrete screed with the addition of expanded clay. After the screed has dried, we put the waterproofing in the form of dense polyethylene, gluing it at the joints with tape.
We put on polyethylene parallel to each other and fix wooden blocks measuring 40 mm x 40 mm at a distance of 0.5 m and place expanded polystyrene plates between them. We blow out the cracks between them with polyurethane foam. On top of the perpendicular to the laid bars, put the bars again and fasten them. On them we mount a floor made of boards or thick plywood, which we cover with a laminate on top;
Do-it-yourself wall insulation, if possible, should be done outside. Then the dew point will be outside the room and we will be rid of the droplets of moisture on the walls.
We glue the expanded polystyrene plates with bitumen mastic on the outside of the wall, fix them with plastic dowels and apply a reinforcing mesh so that the finishing plaster is held. But in multi-storey buildings, it is often not possible to lay out the wall on the outside with a thermal layer on its own. In this case, we perform thermal insulation of the walls of balconies and loggias from the inside.
We attach penofol to the cleaned wall as waterproofing. We glue all joints with adhesive aluminum tape. On top of penofol, we plant expanded polystyrene plates on an adhesive solution and additionally fix them with plastic dowels with large caps. If the climatic conditions are harsh, we put polystyrene foam in two layers.
We spread it on top with glue, apply a reinforcing mesh and roll it into the glue with a construction roller. After the glue has dried, we finish with decorative plaster and topcoat. If we plan to decorate the walls with clapboard, then we attach the crate to the wall, on which we mount the finishing covering from the clapboard or drywall;
We carry out insulation of the ceiling in a similar way. We fix the waterproofing to the ceiling, fix the foam board with glue and plastic dowels. We put a reinforcing mesh on top, roll it into a layer of glue and either plaster or fix a suspended ceiling on top.
After thermal insulation, the space should be equipped with a heat source. It should be borne in mind that safety standards do not allow the use of central heating systems here.
Panoramic glass glazing
Recently, equipment with panoramic glass has become more and more popular. It differs from the usual one in that it has no frames.
The advantages of this method are as follows:
- More aesthetic appearance;
- Better lighting;
- The space visually expands;
- The visibility is improved.
However, it should be noted that the equipment with panoramic glass does not provide for the presence of vents and opening windows. Therefore, it is necessary to equip the space with an additional ventilation system.
It should also be borne in mind that options with PVC panoramic glazing are not suitable for use in winter - heat loss is too great. For use in winter, aluminum structures are more suitable.
This type of glazing is considered quite complex and not everyone will take it. But it is quite do-it-yourself. The main thing is to make a solid structure for glass installation, which would withstand wind gusts and significant loads under the weight of the glass.
Useful advice!
We use tempered glass with a thickness of at least 8 mm. We distribute the load between the upper and lower edges of the profile. We take into account that it is not the glasses themselves that are subjected to the load, but the structure that holds them.
We make polymer thermal insulation between the sashes. In order not to violate the aesthetic appearance and the integrity of perception, it must be transparent.
Conclusion
Glazing and insulation of loggias has become very popular today among apartment owners. This is not surprising - in this way, you can significantly expand the usable area of \ u200b \ u200bthe housing by equipping an additional room.
Using thermal insulating materials of a new generation and modern technologies, it is quite possible to do all the work with your own hands, thus saving a significant part of the financial budget.
Equipping the insulated and glazed space with a heating system, we get another room and significantly reduce heat loss in the rooms that are adjacent to the balcony or loggia.
source: http://mynovostroika.ru/osteklenie_i_uteplenie_balkona_i_lodzhii
Glazing the balcony and loggia yourself
The functions of the balcony can be very multifaceted. For some, it serves as a warehouse for rarely used items, while others turn it into a multifunctional room. In order to use the balcony area with benefit and turn it into a comfortable room, first it must be glazed and insulated. There are many options to renovate the balcony with benefit, you just need to decide what we are turning it into.
It is possible to glaze the balcony with your own hands, but one should not neglect a detailed study of all the intricacies of this process. The most important thing is the reliable installation and glazing of window frames, the right material and successful insulation.
Having started planning a balcony, you should decide what function it should perform. The price and folding of the building depends on this decision. To turn a balcony into a full-fledged room, you will have to spend money not only by ordering double-glazed windows and special frames, but also to take care of insulation around the entire perimeter.
The main types of balcony glazing
So, glazing is: cold, warm and frameless. The first type includes wooden structures or euro-frames with one glass. Between the windows, powerful insulation will be required, and the glass is reinforced with a high-quality sealant.
Such covered will protect the room from wind and dirt and will allow you to use the balcony as a refrigerator in the cold season.
The warm version is more demanding on the arrangement, since it is necessary to insulate the room inside and out. Frames must be ordered with thermal inserts, and the more double-glazed windows, the better the heat is retained in the room.
A dangerous point in keeping warm is the formation of condensation on the glass, which contributes to the appearance of mold. Be sure to take care of controlled ventilation, it provides protection against condensation.
Wood, aluminum or plastic - choice of materials
To understand how to glaze a loggia or balcony, you need to know about what types of profiles exist. Recently, few people prefer to use wooden frames for construction.
The indisputable advantage here is the naturalness of quite affordable and budget material. However, wooden frames are cold permeable and not practical to clean. In addition, the tree is not characterized by the best resistance to temperature changes and interaction with moisture.
It should be noted that the process is quite lengthy, but the work is still scrupulous.
When making a choice how to glaze a balcony, most decide today on metal-plastic frames, which is much more convenient not only to use, but also to care for.
The cost of such a building is much more expensive, but they also have many times more advantages:
- - modern design;
- - effective heat and sound insulation;
- - fast and easy mounting process;
- - complete tightness prevents the penetration of dirt;
- - the ability to install locks makes them safe for small children.
Advantages of aluminum frames:
- despite the low weight of the metal, it is quite durable;
- heat-resistant material that does not burn and does not react with air and water;
- long service life;
- does not require painting;
- easy to deliver and easy to install;
- contributes to sound insulation.
How to make a balcony comfortable
Since to implement the planned you will have to spend money, the decision will become quite understandable - to make a balcony with your own hands, or to take on at least part of the work. For example, the first step in a lengthy process is calculation and measurement.
It should be noted that this task is not easy, and it requires maximum precision and care. If you doubt your capabilities, it is better to entrust this work to specialists. For yourself, you can make approximate calculations that will guide you in the cost of materials.
The easiest way is to measure the balcony, which has easy access to the wall and parapet. Experience shows that even new designs allow for slabs to diverge up to 10cm. Therefore, measurements should be taken in at least three different locations, relying on the average result.
Glazing height measurement is the distance from the edge of the railing to the top point every linear meter, the length is the width of the railing. It is necessary to determine the smallest distance, subtracting 6cm from it for a plastic structure, and 4cm for an aluminum one. We leave this gap for filling with polyurethane foam.
If the balcony is already glazed, in order to carry out accurate measurements, it must be completely disassembled. You should not risk inaccurate measurements, a large load on the balcony can lead to the collapse of the entire structure.
For reliable operation, the installation must be solid and robust. In order not to get confused in the calculations, it is recommended to draw an approximate sketch and write down all measurements in accordance with the figure.
At the second stage, preparatory work for the glazing is ahead. First, check the strength of the balcony parapet. Even the smallest gaps should be repaired using conventional zinc plating. If the old parapet seems unreliable, it is necessary to replace it by laying a new one out of bricks.
It is very important to make an accurate horizontal level so that the mass of the structure is evenly distributed over the entire area. Now you need to build and fix the metal frame for the frames. Attach it around the perimeter using self-tapping screws and dowels.
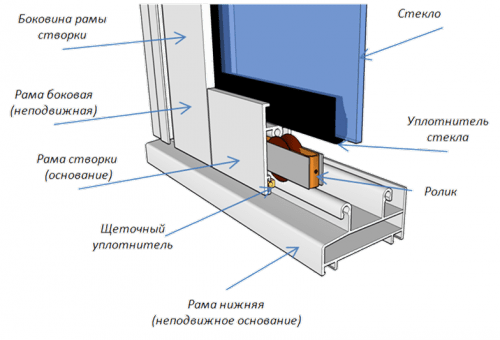
The last and most difficult stage is directly glazing the balcony with your own hands. To simplify the task, remove the glass units from the reinforced-plastic structures, leaving the frames empty. Pull gently on the stick, detaching the glass unit. On movable windows, the sashes should be removed from the frame: tilt the sash, then lift it a few cm and remove it from its hinges.
Now you need to fix the supporting base profile to the frame. It is necessary to turn the frame over, insert the profile into the grooves and fix it with a mallet. So, it's time to install the frame mount: leave 15cm from the edge and use a hammer to hammer the plates into the grooves. The part that protrudes should be turned perpendicular to the structure.
For the next step, it is advisable to find an assistant to lift and secure the frames in the opening. Prepare the drill, drill (length - 30mm, diameter - 6mm) and self-tapping screws. After leveling the level, install the frame to the concrete wall and fix it with clamps, screwing in self-tapping screws.
Connect the frames to each other, checking the horizontal and vertical levels. Then, attach the frames to the balcony building structures using anchors. After that, the gaps should be filled with polyurethane foam and the visor should be attached.
Note!
In order to finally glaze the balcony, carefully install the glass units back into the frames. It remains to hang the swing-out flaps on the hinges and mount the swing-out mechanism on the frames and flaps.
After completion, check the tightness of the glass unit with the frame and the mechanism of the hardware. The last step is to install the window sill and supply drainage.
source: https://perfect-okna.com.ua/ru/statti/iak-zaskliti-balkon/
How to glaze a balcony and insulate it yourself
So that the balcony area does not remain ownerless, you can carry out some work to transform it and turn it into a small, but very functional room. Since this room is not heated, first of all, it must be glazed and insulated.
Do-it-yourself glazing of the balcony can become possible if you study the instructions for carrying out this process in detail. But when the window frames have already been installed and glazed, nothing will interfere with the work on further insulation and decoration of the room - neither rain nor wind.
Glazing types
If a decision is made to upgrade, you need to start by choosing the type of glazing. It can be traditional - using ordinary wooden frames or euro-frames - aluminum, metal-plastic and wooden with the installation of double-glazed windows. In addition, glazing can be frameless, insulated and cold.
Warm and cold glazing
Glazing of balconies can be cold and warm, and both are performed both when installing ordinary wooden frames, and more advanced ones.
Cold glazing includes the installation of wooden frames with ordinary glass or Euro-frames - also with one hermetically installed glass. It is used if the balcony is not planned to be used year-round as a living space.
A balcony made in this way should not be subject to special temperature preservation requirements. Frames can only make the room neat and protected from wind, dust, and somewhat reduce the penetration of sounds from the street.
Cold glazing does not require additional insulation measures. The only thing that can be done is to arrange a wooden flooring on the floor for comfort.
Insulated glazing is necessary if a balcony or loggia will be combined with one of the rooms. The whole room must be insulated with one or another thermal insulation material.
With such a change in the layout, frames with double-glazed windows with triple glazing are installed.
Warm insulation requires a more serious approach.
If you have chosen one of the Euro-glazing options, then you need to purchase frames with thermo-inserts that fit between the profile and the glass unit.
Double-glazed windows should have one, or better - two vacuum chambers - this choice will depend on the weather conditions in the region.
Further, when creating a warm room, it must be remembered that the so-called "dew point" must not be allowed to form inside the room. Failure to do this will lead to dampness and mold due to the formation of condensation - first on the balcony, and then in the room.
The formation of a "dew point" must not be allowed between the glasses installed on frames outside the perimeter of the balcony. In this case, it is much more difficult to achieve the correct balance of the effect of temperatures on the windows, since they can be cooled not only through the glass, but also from the lower and upper end sides.
Therefore, you need to carefully consider their insulation.
If wooden frames are chosen, then it will be necessary to "conjure" by installing good insulation between them, as well as a seal between the frame and the glass.
In order to prevent mold spots from appearing on the balcony, it is necessary to carry out a number of measures to help avoid dampness:
- - sealing of cracks and gaps in the floor and on the walls of the room before it is insulated;
- - waterproofing of the floor and balcony parapet;
- - organization of effective ventilation.
Useful advice!
The ventilation device is one of the main conditions for preventing the formation of condensation.
But, in order not to cool the insulated room, ventilation should be regulated:
On euro windows, it is installed in the upper horizontal part of the profile;
When installing wooden frames, which are tightly closed for the winter, a through ventilation valve with an adjustable damper must be built into one of the upper sections of the window or wall.
Traditional wooden frames with glazing
In recent years, this option for protecting the balcony from rain, wind and snow is becoming a thing of the past, but nevertheless, some apartment owners prefer it due to the low cost of the material and the ability to carry out the process on their own.
Such glazing will not save from frost and will not make the balcony warmer in winter, nor will it create effective sound insulation from external noise, but it will become an obstacle in the way of dust, wind and precipitation. In winter, the balcony protected in this way can only be used as a refrigerator.
Nevertheless, if you install double wooden frames, insulate them well, as well as walls, floor and ceiling, and install heating devices, then in not very cold weather you can use the balcony as a living room.
Glazing of wooden balcony frames does not go quickly, since in each of them you need to install a separate glass on a special putty, securing it with carnations hammered through the glazing bead. It should be noted that this process is very tedious and requires the utmost care.
The disadvantages of such glazing include the complexity of putting the glasses in order, especially if double frames are installed, twisted together. In addition, wooden frames require special treatment with antiseptic compounds and periodic painting.
Metal-plastic windows
Euro-glazing is called the installation of metal-plastic frames with double-glazed windows. This way of transforming a balcony will cost much more, but it also has much more advantages over wooden frames.
Double-glazed windows installed in metal-plastic profiles can have single, double or triple glazing.
The advantages of this type of glazing are:
- Aesthetics and accuracy of design.
- The tightness of Euro-frames allows you to create effective heat and sound insulation, prevent precipitation, wind, dirt and dust from entering the premises. With additional insulation of all walls, floor and ceiling, the balcony becomes a full-fledged room in which you can arrange an office, workshop, greenhouse or quiet recreation area.
If you know the process of installing Euro-frames, then they can be mounted quite quickly on your own.
Ease of maintenance will allow you to put them in order more often and faster.
Frames do not require additional annual insulation events and painting.
When installing special locks on the opening sashes of the windows, you will not be afraid that the child will be able to open the frame on his own.
Aluminum frames
Frames made of aluminum are now quite popular for installation on a balcony. They are used for both cold and warm glazing. In the first case, options with single or double glazing are used. But when organizing a warm room, frames with thermo inserts are used.
Aluminum frames can be installed on parapets, or panoramic glazing structures can be composed of them. It should be noted that in the latter case, the thermal insulation of the balcony decreases, since the metal has a very high thermal conductivity.
Advantages of aluminum frames:
- This metal is very lightweight and at the same time has a high mechanical strength.
- Aluminum has good heat resistance indicators, it does not burn, and is not affected by corrosion.
- The service life of such structures is on average 50 ÷ 70 years.
- The lightness of aluminum makes it possible to use structures made of it in such conditions where heavier frames, for example, made of metal-plastic or metal-wood, cannot be used due to their greater weight. This speaks in favor of such frames for installation on balconies - no additional reinforcements are required, which will save a certain amount.
- Aluminum frames do not require painting and are easy to maintain.
- The balcony glazed with aluminum frames gets good sound insulation.
Frameless glazing
Frameless balcony glazing is rarely used, since it is still a new technology, but already gaining popularity. Glazing can be made from ceiling to floor or installed on a parapet.
Frameless glazing not only visually expands the space of a small balcony room, but also perfectly protects it from dust and external noise. It is perfect for a room where it is planned to grow various plants - due to the absence of frames, they will receive sunlight in a large volume.
Frameless glazing is characterized by the following qualities:
- For this transparent fence of the balcony, tempered glass is used, which is 8 ÷ 10 times superior in shock resistance and strength, therefore it can withstand very high loads.
- It is impossible to get hurt with such glass panels, since all their edges are rounded and sanded in a special way.
- Such glazing is easy to use - the structure is designed in such a way that it is easy to open and close, since each of the panels slides on a metal rail with rollers.
- Glass railing practically does not take up space, while frames always “eat up” 50 ÷ 100 mm of area around the entire perimeter of an already small room. This is especially true for floor-to-ceiling glazing.
- High sound insulation - noise absorption efficiency reaches 50–70%.
Glazing with roof device
The real problem is the balcony without a roof. Rain and snow, dust and leaves from trees - it all gathers in this small area. Such a balcony cannot be used functionally, you cannot relax on it, leave the laundry to dry, and in rainy weather you cannot even go out on it.
Therefore, the owner of the apartment has to solve the problem on his own by installing the roof and glazing the balcony.
Roofs above the balcony in a complex with glazing can be of two types:
Dependent roof is installed only when installing aluminum frames. It is attached to the block built of them and the wall of the house.
The advantages of this design include its reliability, ease and speed of installation at a fairly reasonable price.
The disadvantages of a dependent roof include the fact that it can be installed only over narrow balconies and loggias. When installed over wide outbuildings, the structure becomes unreliable and is unlikely to be able to withstand the snow load in winter.
The independent roof differs in that its installation is not associated with the glazing of the balcony. An individual metal or wooden frame is made, that is, you can make a roof without even planning further glazing.
The advantages of this roof can be called the fact that it can be installed over a balcony of any width, the main thing is to correctly calculate the strength of the structure. In addition, if it is not possible to immediately install both the glazing and the roof, then you can first install the roof, and later - the balcony frames.
Building a roof over a balcony at a height is a rather dangerous undertaking, therefore it is recommended to entrust this work to professional craftsmen. Moreover, you first need to carry out accurate calculations of the brackets and the entire frame so that the structure does not one day be blown off by the wind.
Safety measures when working on the balcony
When planning your balcony glazing, always keep in mind the dangers of working at height. Not only do you need to protect your life or health - you must not allow threats to other people, for example, in the form of tools or building materials that have fallen from a height.
Note!
When performing work on the insulation and glazing of the balcony on your own, extreme caution is needed, especially in cases where any processes are performed from the outside.
You should not take risks and fully rely on your strength and dexterity - you must definitely protect yourself with a safety belt. The belt is purchased for industrial or sports, while the attachment must withstand a load of 350 ÷ 400 kg, which must be indicated in the certificate. If such information is not available, then this product is not worth purchasing.
In addition, it is imperative to consult with a sales assistant who will clearly show you how to use this safety device.
You should not carry out the work alone - you must definitely invite a partner who can, if necessary, insure - this should be taken into account for work outside the balcony, and when installing frames and double-glazed windows.
To keep your hands safe when working with glass and metal, be sure to use gloves made of durable material.
Glazing stages
Unlike a loggia, where one of the sides is glazed, frames on the balcony have to be installed on three sides. The work is complicated by the fact that it is necessary to correctly expose each of the structural elements and make their reliable connection at the corners.
Moreover, during installation, it must be borne in mind that only the end frames will be rigidly fixed to the wall.
The front part of the structure has the maximum size and weight, therefore it also differs in windage. It must be installed very carefully and immediately rigidly fixed not only to the balcony parapet, but also to the plate of the upper balcony (or to the visor).
Frame blocks can be purchased ready-made or ordered at the factory that manufactures them, specifying the exact dimensions of the balcony. Installation of ready-made blocks can be done independently if you carefully study the instructions.
Installation of frames
Before insulating a balcony, it is necessary to glaze it. The explanation is simple - you cannot create a risk of wetting insulation materials - they will simply lose their qualities.
The installation of frames is carried out according to the same principle, but the preparation of the base for them may differ. So, for example, frames can be installed on the base of the balcony, on the fence (parapet) or out of the perimeter.
Preparing to install a structure on a parapet
It is good if the parapet of the balcony is made of brick or concrete - in this case it will be easier to fix the frames on a fence that is sufficient in width. It is more difficult to solve this issue if the parapet is made of a metal corner and a rod.
In this option, it is desirable to do the preparatory work, slightly expanding the basis for the convenience of fixing frame structures. This can be the installation of an additional corner with a wider shelf. One side of it is placed outward, creating a kind of enclosure for the lower frame profile. In the same way, you can fix the corners at the top.
The corners are screwed with self-tapping screws with a step of 150 ÷ 200 mm from each other to the upper part of the parapet.
Useful advice!
Metallic elements must be well coated with protective paint. It will not only reduce the influence of the external environment, but also give the structure a more aesthetic appearance.
Wider brackets, installed to expand the base for the frame structure, will also serve to fix the window sill inside the balcony.
Preparation for installing frames on the base of the balcony
In this option, you need to take into account the height to which the insulated floor will be raised. For example, if it is planned to raise it by 100 mm, then a bar of the same size is fixed along the perimeter of the balcony. It will be easier to install glazing frames on such a base.
In the upper part of the balcony, metal corners, wooden blocks can be used to fix the frames, or the frames can be screwed to the ceiling using special brackets.
If the ceiling is also going to be insulated, then it will be necessary to include a bar in the installation scheme, which will set the thickness of the insulating layer.
Preparation of the parapet base for the installation of frames with an extension
When expanding the upper part of the balcony due to the removal of frames beyond its perimeter, you will have to build a more complex structure for their installation.
Installation is usually carried out using a metal corner, from which a kind of shelf is cooked.
If there is no welding machine or welding skills, then you can build such a structure from a metal profile, reinforcing it with a wooden bar, laying it in the profile cavity and fixing it on the parapet and the balcony floor.
Using only a profile, it is impossible to obtain sufficient rigidity of the structure, and if you install it only from a bar, then under the influence of the external environment, the frame will become less durable.
Brackets installed outside the parapet should be made in the form of triangles - this will give the greatest rigidity to the frame.
The upper, protruding part of the structure is also mounted from the corners, connecting them horizontally with the visor, and vertical posts - with the lower part of the frame. It is best to additionally fix the corners on the load-bearing wall of the house to the height of the entire balcony and fasten them to the structure of the protruding part - this option will give the frame maximum reliability.
If aluminum frames are used for glazing, for which it is not necessary to install a common frame, then they can be fixed in the upper part using metal strips. And x is screwed to the end side of the frame and to the upper balcony (to the roof).
Expansion of the balcony
If the plans include an increase in the area of the balcony, then the slab of its floor must be thoroughly strengthened, so that the main load from the entire structure is removed from it. The possibility of this action must be agreed with specialists, as this will require an accurate engineering calculation of whether the load-bearing wall of the house will withstand the additional load.
Expansion is carried out with the help of a metal structure, which will be attached to the wall of the building with a frame outside it for installing frames. A similar method will help to increase the area at the base of the room by 200 ÷ 300 mm in width, and the window sill in the upper part taken out beyond the balcony by 200 ÷ 250 mm.
Fastening frames
Fastening of frames (wooden or otherwise) is carried out according to the same principle - with the help of special perforated metal strips and anchor screws.
The fastening strips of the required length are screwed to the end sides of the top and bottom of the frame. Often they are used for mounting the sides of the frame. On each side, you will need two or three strips for fastening.
If necessary, wooden spacers and supports are installed between the frame and the wall, which will help to achieve the desired position.
Often anchors are used to attach frames to the wall, for which the necessary holes are drilled. In this case, it is very important to choose an element of the required length, since it must enter the wall by at least 50 ÷ 60 mm.
The difficult knots when installing frames on the balcony are the corners. To connect and fix them to each other, you can use several techniques:
Use a special corner profile, which is embedded in the manufacture of frames.
Install a metal corner 80 ÷ 100 mm in size at the corners, and fix the frames to it. Previously, the corner must be painted with a special protective paint.
Attach the frames to a wooden block masked with plastic panels on the outside and inside after installation.
It is easier to solve the issue with wooden frames - they are fastened together with corners or a wooden bar.
After installing the frames, all gaps between the walls and frame profiles are filled with polyurethane foam. If the gaps are very wide, in order to save money, you can first install fragments of expanded polystyrene in some places of the gaps, and then apply polyurethane foam.
Glazing of frames
After drying the foam and cutting off the excess, you can start installing double-glazed windows in euro-frames or cut glass - in ordinary wooden structures.
Installation of double-glazed windows
When installing double-glazed windows in installed frames, it is very important to follow all the recommendations.
Before installing a double-glazed window, it is necessary to put special spacer pads in the lower inner part of the frame. They are also sometimes placed on the sides and on top, between the frame and the glass unit.
It is necessary to lay the gaskets so that the weight of the glass unit is distributed evenly along the entire length of the frame profile. One of the sides of the gasket should protrude slightly beyond the perimeter of the glass unit.
This must be done so that cracks do not form on the glass when the glazing beads are hammered. When driving it, the bead will select the final location of the lining by moving it the required (but not more) certain distance.
Further, on top of the gaskets, a double-glazed window is carefully installed. For the convenience of its installation, professionals use special suction cups. They help to lift a rather heavy element without any problems and install it in the frame opening.
Having installed a double-glazed window, glazing beads are hammered with a wooden hammer. They should fit tightly into the gap provided for them and press the glass unit against the frame.
After the installation of double-glazed windows is completed, proceed to the installation of the window sill and the insulation of the ceiling, floor and walls.
Glazing of a wooden frame
To glaze a wooden frame, you will need small nails, wooden glazing beads, a rubber trowel, putty or sealant, drying oil and a narrow brush.
When installing glass in a wooden frame on a balcony, one may encounter one discrepancy, which is considered the rule in this work. Glazing beads used to fix the glass in the window opening must be nailed from the outside in order to protect the frame from moisture penetration, which is not always possible to reproduce in a balcony located above the first floor.
If the frames are small, then glazing can be done before the frame is installed on the parapet.
Provided that the wooden structure is massive, the glasses installed in advance will make it even more heavier and lifting it will be not only problematic, but also dangerous. Therefore, you will have to install glass in the frame from the inside, and there is nothing to worry about if you carry out this process correctly.
The first thing to do before installing the glass is to treat all the window openings in the frames with linseed oil, applying it with a narrow brush. Then you need to wait until the composition is absorbed into the wood and dries.
If the frames are painted with paint, then the next step is to apply paint on top of the drying oil on the frame openings, which should also dry well.
After that, putty is applied to the folds of the opening using a rubber spatula in a uniform layer, thickness 2, 5 ÷ 3 mm. This will prevent water from entering between the glass and the frame.
Then the glass prepared to the size is installed in the frame opening, on a soft, not hardened putty, and gently pressed against it.
Next, another layer of putty is applied on the inside of the glass, and a glazing bead is installed on it, which is very carefully nailed with carnations. Carnations are installed vertically or horizontally on the glazing bead, since if they are hammered at an angle, it is easy to damage the glass.
You can do without putty by using a silicone tube instead, which is cut from one side along the entire length and put on the edges of the glass.
Another option for installing glass in the frame is to fix it only on putty, which is applied under the glass, and then on it with a sufficiently thick layer, and neatly leveled.
From modern materials, a sealant is used to seal the gaps between the frame and the glass. Many are afraid that it will firmly adhere to the glass, and, if necessary, it will be difficult to remove it from the opening.
To prevent this from happening, the glass is lubricated along the edge with soapy water or liquid soap, and then it is attached to the sealant and fixed with a glazing bead, which is also nailed down with carnations.
Note!
If the skills of working with tools and building materials are completely absent, then it is recommended to entrust this process to professional masters. Moreover, to date, some companies that produce euro-frames, when ordering their products, the installation is made free of charge.
When the renovation reaches its height, there is a desire to equip your balcony. Currently, there is a wide variety of these services on the market, which, in turn, confuses the consumer. By all means, everyone wants to glaze the balcony rather cheaply, but also of high quality. Or maybe it is worth considering the option of arranging your balcony yourself? Therefore, today, together with the portal, we will try to figure out how to glaze a balcony with our own hands. Here we will be helped by step-by-step instructions, which were created in order to answer all the questions.
Important information
Stage one - preparation ... First, you should start preparing the balcony. In order to prevent it from collapsing under the total weight of the structures, and your windows could not fly out in gusts of strong wind, and the outer cladding of the facade did not come off, it is necessary to correctly install the balcony. Technological analysis is the main part of the initial work. It is necessary first to conduct a competent assessment of the construction of the balcony, take into account how dilapidated it is, and how old the building is. The listed features will allow you to understand what percentage of the load will go to the building structure when glazing your balcony. In order to make sure that your balcony does not collapse, you should start strengthening its parapet. This work is carried out by strengthening with metal or foam concrete blocks.
What material should you opt for?
This question can be answered only when you define for yourself all the goals and design features of your home. The best option in this case is metal. How should this work be done? In our article, you can see this in the photo. The diagram is clearly drawn on it. The strength of this structure, as a rule, is ensured by the parapet, which will take on part of the load after glazing the balcony. In the event that it is strong enough and large in width, then it is quite possible to use foam blocks. This material is heat insulating. In this case, it is necessary to reinforce the structure with reinforcement. Or you will not get the desired result. After the preparation of the balcony, the next stage of work can begin.

Stage two - choice of design. This work is not difficult, but one should take into account the fact that almost any man has certain knowledge in the field of construction. But, nevertheless, glazing a balcony without experienced specialists in this field, you should know that you will have to do this rather dirty work yourself. Now we start choosing the design. We start by choosing glazing. It is either cold or warm.
What is the difference between them
Cold glazing is made using inexpensive materials, while warm glazing, on the contrary, can hit your wallet quite significantly.
Cold glazing is not able to keep the heat inside this room, and the temperature in it will be the same temperature as outside. Warm glazing, in turn, retains heat in the room and thanks to it it becomes possible to maintain the temperature that is currently present in the room, regardless of the season. Currently, there are only these types of glazing.
After you have been able to deal with the load, you should start choosing materials. PVC, wood or aluminum.

Finishing options
Wooden windows have a short service life, therefore, when choosing these products, you should not be upset that they will soon succumb to rotting or drying out due to the external influence of nature.
Aluminum structures are cheaper, lightweight, but serve more for cold glazing.
If we focus on the choice of PVC structures, then in this area they are most often used and have a large number of options: thermal insulation, sound insulation, imitation of wood or a kind of architectural style. They are heavy, unlike aluminum products, and serve for warm glazing.  How to decide what should be the illumination of our balcony. Not only the frames are worth paying attention to, but also the glass. If your balcony faces the sunny side, but in your plans to equip it as a playroom for children, then in this case, in order to avoid unnecessary ultraviolet radiation of your child's skin, you need to choose glasses with tint or a special film applied, as a rule, to the outer glass of this product.
How energy-saving glass works Energy-saving glass units absorb almost 100% of radiation. If your balcony will be used as a greenhouse for growing plants, then, as a rule, double-glazed windows are installed with tint, which will not allow sunlight to enter the room. And such glasses as stained glass or colored items are elements of a certain decor or style that is present in the interior of the room.
And, of course, energy-saving double-glazed windows. In the production of these products at the plant, the following technology is used - silver oxide is applied to the inner part of the glass, which is in the glass unit itself, which makes it possible to keep the internal heat in the room.
How to glaze a balcony with your own hands. Step-by-step instruction
Now we begin to deal with the glazing of the balcony. Therefore, we will consider below how to glaze a balcony with our own hands in a Khrushchev building.
You can look around and discover the fact that there is a huge variety of balconies in the neighboring houses. But let's try to figure out what kind of glazing are all the same.
Glazing with a slight extension. The internal area of the room is increased due to the profile system used for glazing. The area of the room will increase by approximately 25-30 cm. On the installed frame, it is quite possible to install a window sill.  Frameless glazing. As a result, we get a window with a panoramic view, without the presence of horizontal partitions and frames. In this case, we will be the owners of a very well-lit room. But there are also disadvantages - it is quite problematic to clean and wash these structures. This structure, in its essence, will have excellent rigidity around the entire perimeter of the balcony, therefore, do not pay attention to such a factor as a strong wind and worry.
Art finishing. This method takes place where the installation of stained glass windows takes place. In this case, you need to use the services of a designer.
If you have decided on the type of glazing for your balcony, you need to install the visor. The installation of the visor should be done before your balcony is completely mounted, for the simple reason that in the future you do not have to puzzle over how and where to fix it. The installation of the visor takes place, as a rule, using ordinary dowels to the ceiling. After installing the visor, we begin to work on fixing the anchor plates around the entire perimeter of the balcony, except for its lower part.
Installation of wooden frames
Now we proceed to the installation. Naturally, the balcony area must be free before further work. It should be freed from furniture, chairs, and various items.
Next, we install our frame. For this we use wooden beams, the surface of which is pre-treated with a special sealant. Then we begin to engage in the construction of wooden structures along the perimeter of the balcony. Also in this work we use dowels to secure our frame.
Our next step will be the installation of windows. First, let's unpack the frames. Removes all double-glazed windows, as they can easily break during installation. The installation must be carried out in the required sequence: first we mount the front part of the balcony (frontal) and then proceed with the installation of the side parts.
After the installation work, it is necessary to putty all the seams on the balcony with a sealant, in order to avoid the destruction of the polyurethane foam during further operation. After the sealant dries and the foam hardens, you need to start glazing. Before performing this work, all grooves of the frames should be lubricated with a special silicone sealant. And the glazing beads should fit snugly against the glass, pressing it against the frame.
Installation of the aluminum frame
- We start by eliminating all the elements in the structure, that is, to remove them so that our work is easier.
- Then, we attach the mounting plates to the frame, with a distance of about 650-700 mm from each other.
- After that, we install our frame in the opening, and then we carry out work on its alignment.
- Now we are assembling the plates in the place we need using dowels.
- We insert glass into the frame and mount the sashes in their place.
- The remaining gaps are sealed with polyurethane foam.
Installation of PVC windows
If you do not know how to glaze a balcony with your own hands, then you should definitely read the useful information and watch a special video.
- In order to glaze the balcony with PVC, the glass must be removed from the frame. And to do this easily, you must first remove the glazing beads from it.
- If you plan to install PVC windows, then there is the same installation scheme as in the case of the installation of previous structures. However, there are already small changes here.
- As in the case of installing aluminum and wooden windows, we will use mounting plates that are attached to the frame with self-tapping screws.
- All gaps are also closed with polyurethane foam.
- And the last stage of our work is bringing the facade of our balcony into a normal aesthetic state.
