The beauty of an apartment is the most important thing, since it is the small various details that make it more attractive and comfortable. A do-it-yourself panel of butterflies will not be a bad option for decorating a living space. It is the butterflies that are considered the most fashionable trend of the last season, and regardless of the season, the butterfly panel will look perfect.
Butterflies are called winged flowers and therefore they will be an excellent addition to any interior. A butterfly panel on the wall adds airiness and lightness to the room, and also fills it with charm. And according to popular beliefs, even though alive, even artificial moths can become a symbol of good luck, joy, love and luck. That is why it is far from surprising that on the walls of many houses you can see panels with paper butterflies and more.

Making a panel of butterflies with your own hands is not so difficult, you just have to start and it will immediately become clear that this is a simple and entertaining process.
For such work, you do not need professional skills or attendance at such a meeting as a master class, but enough scissors, glue and a desire to create.
It is important to note that making such a panel will help not only create a beautiful picture with your own hands, but also have a pleasant rest in emotional terms, since psychologists recommend just such a pastime in order to relieve stress.
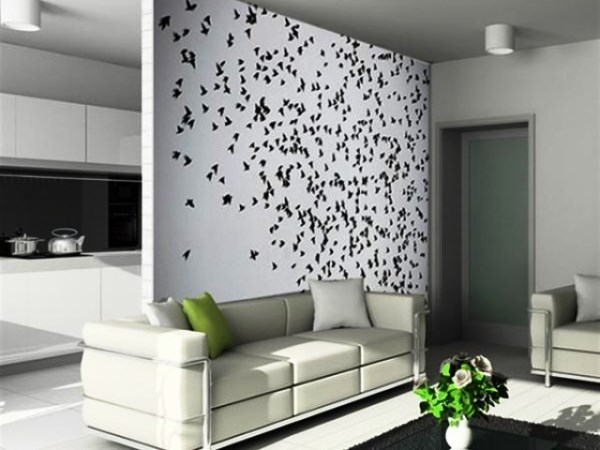
The composition of butterflies is mainly made on plain walls. For example, you can place a family of butterflies on a plain decorated wall.
Flocks of butterflies can be located in different directions and groupings, and such pictures of butterflies are considered especially chic, such as:
- Vortex;
- Heart;
- Spirals;
- Chaotic order.

If the background for placing butterflies is colored, then the butterflies themselves should be bright, but not in the same tone with the wallpaper, otherwise they will merge, and they will not be visible. Before work, you should definitely sketch out a sketch according to which it will be performed, or to be more precise, on the wall itself with the help of crayons it is worth making notes on the location of butterflies, so that after they are made, you do not spend additional time on marking.
What material to choose for a panel with butterflies
A stencil for butterflies on the wall can be made of cardboard or plain paper, and it can be the remains of boxes or, simply unnecessary materials left over from previous work. Also, compacted stationery film and fabric will not be a bad option.
Ideas for making paper butterflies are the most optimal and simple, since it is easy to deal with it, so there will be no problems with such a process as cutting out patterns, regardless of their shape and size.

Also, paper stencils can be very simple to give symmetry. Paper has one more great advantage and this is the availability of this material, since it is sold in many stores and at the same time at a fairly optimal price.
It is important to remember that making stencils from cardboard will allow them to be used much longer than from paper, since it is denser and stronger:
- The cardboard perfectly retains its given shape, but it will take a lot of work to cut a butterfly.
- The result of a long and laborious process will be a strong durable stencil, according to which you can cut a huge number of butterflies for room decor.
Quilling is the way of decorating a room that does not require stencils, because it is prepared immediately on the panel without preliminary blanks.
Thicker film can be stronger and more attractive than cardboard, which is simple and easy to work with. A variety of butterflies are cut out of the film, regardless of their type, and they are attached with ordinary glue, and for this you can even use a glue stick.
In order to create a beautiful original picture or, in other words, a panel of butterflies, it is worth using a combination of glossy film and matte, and if you place them under a certain slope, then a 3D effect is quite possible.
If you purchase already prepared stencils from a film, then small squares of adhesive canvas are attached to them at the factory, and to decorate the wall with them, you just need to remove the protective layer.

The system of moths is sometimes created as one fluttering wing, but it all depends on how the wings are bent, how the light falls on them, and even what shade they are. It would seem that such trifles, but they can become an important point when decorating a room with your own hands. Some budding designers install butterflies so that they catch the draft in the room and thereby come to life, which delights everyone who watches.
How to make a panel with paper butterflies (video)
How to attach butterfly panel ideas to walls
You can install ready-made stencils on the wall in various ways, since it all depends on the personal preferences of the decorator. In particular, the pannokiling butterfly is attached with glue, and for other types of decor, you can use pins, foam. Glue is considered an ideal way to create a wall panel, but it is important not to overdo the dosage so as not to spoil the view with the remnants of the material peeking out from under the base of the butterflies.
The pins can be used in cases where the canvas on which the panel is attached is made of soft material, since the mace will need to be driven into the wall so deep that the wind currents do not tear them out and spread around the room, which may be far from safe.

Not many people know that you can decorate the wall with butterflies through the use of foam.
Fixation occurs by gluing pieces of foam on the moth, after which its reverse side is smeared and applied to the wall. Thus, you can make the panel more voluminous than just fix it on the wallpaper. It is important to know that only lightweight structures can be fixed with foam.
How to make a panel of butterflies in stages
Before you start cutting out butterflies, you should choose a certain pattern, which will be an important component of the applique. To select, you need to carefully examine the wall on which the panel will be located, and also assess the scale of its location. Naturally, if the wall is wide, then you can make the most voluminous drawing, but in small rooms you should not overdo it with such a decor, as it will put pressure on the psyche and is unlikely to help you relax.

After that, it is worth moving on to the development of butterfly decor, to the choice of color and material.
It is worth remembering that this panel should become the brightest and most memorable spot on the wall, but it should not violate the overall harmony and atmosphere.
It all depends on the space, on the adjacent interior items, as well as on how large the composition will be.
Creating a panel of butterflies (video)
The very creation of templates or, in another way, the cutting of moths must be done with the help of a clerical knife. The shapes of the moths must remain symmetrical for the picture to be truly gorgeous. The final step is to mount the moths to the wall using the previously described methods.
Examples of a panel of butterflies (photo)


The end of the renovation is marked by pleasant efforts to decorate the premises. Sometimes the desire to freshen up the environment arises spontaneously. A budget option for the original design of the room will be paper butterflies on the wall. Butterfly patterns, a large number of which are presented in this publication, will help to make an individual decoration with your own hands.
Preparatory work
The tradition of using paper butterflies as decoration on the wall has arisen relatively recently. Multi-colored moths can quickly transform the interior of a room, filling the atmosphere with romanticism and pleasant dreams of relaxation. The preparatory stage will help to achieve the desired result:
- It is better for paper butterflies to take the wall as free of foreign objects as possible. A good view enhances the aesthetic pleasure of a DIY creation.
- Determine the area and shape of the image on the wall. It can occupy a compact area or disperse as much as possible over the surface.
- The easiest way to make butterflies is from colored paper, but there are still a lot of interesting ideas for decorating the wall with original moths. The material of manufacture and its compatibility with the interior of the room are thought out in advance.
- A wall with butterflies of different sizes looks impressive. Prepared stencils for cutting will help to quickly cope with the task.
Comment! When choosing a template, it is worth remembering the difficulty of cutting intricate shapes.


Characteristics of individual materials for butterflies
You can make graceful moths on the wall with your own hands from various materials. Only paper models have several solutions:
- classic colored paper or double-sided colored sheet;
- cardboard;
- corrugated paper;
- newspapers and glossy magazines.
In addition to paper decor, other options for original butterflies are used in the interior of the room:
- from vinyl records;
- a contour painted on the wall with phosphor paints, applied using a stencil;
- from nylon tights, which are covered with a wire frame;
- from cans or plastic bottles.
Advice! In the absence of experience, it is recommended to make several copies of various materials, then attach them to the wall and choose the appropriate option.

Paper
The easiest and cheapest way to make moths with your own hands is from ordinary colored paper. There are several design techniques. If you plan to stick the butterfly completely on the wall, then paper painted on one side will do. When creating a volumetric composition, when only the body of the moth is fixed, it is preferable to take double-sided colored paper for work, so the appearance of the decorative elements will only benefit.

In addition to the classic colored paper, copies of corrugated material look original on the wall. The butterfly turns out to be more airy and light, it is easier to add volume to the figure.
Moths look extraordinary on the wall, in the manufacture of which glossy magazines, postcards, newspapers or wallpapers are involved. In addition to simply cutting out butterflies from paper, they can be additionally colored, combined with other shades of a similar material, or made multi-layered. There are practically no boundaries for the flight of creative imagination.


Cardboard
For cutting butterflies on the wall, cardboard is selected of low density. Otherwise, the process will be a lot of hassle.
Comment! Cardboard is considered the most suitable material for decorating a volumetric decor of moths on the wall. It keeps the shape well.
Naturally, in this case, it will not work to make a corrugated copy of the butterfly. Hard material cannot be folded into small folds.
Cardboard is ideal for cutting openwork moths. For registration, you will need a sharp stationery knife and a margin of patience. A high-quality result of decor on the wall is possible only with perseverance and the ability to accurately work with small details.
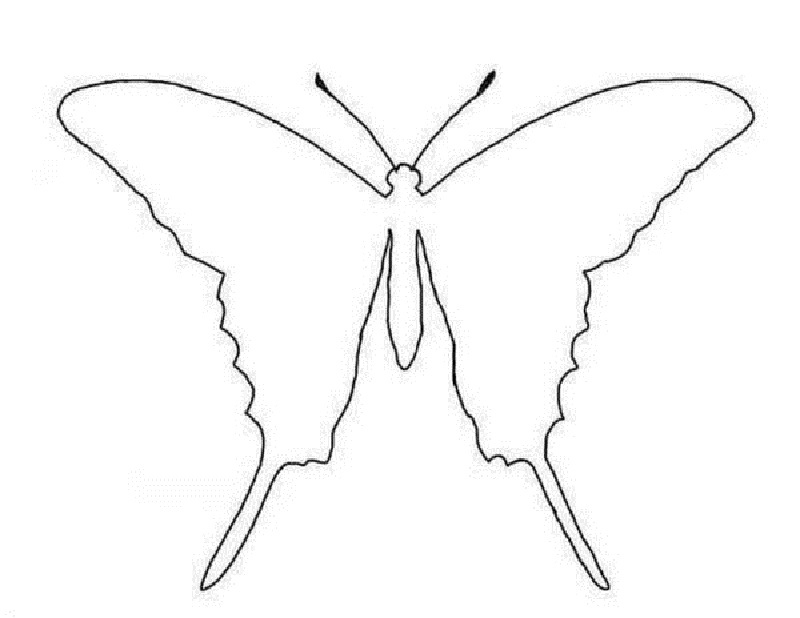
It is also better to prepare a butterfly stencil for subsequent cutting out of numerous copies from cardboard. Original templates for cutting paper butterflies are presented below:

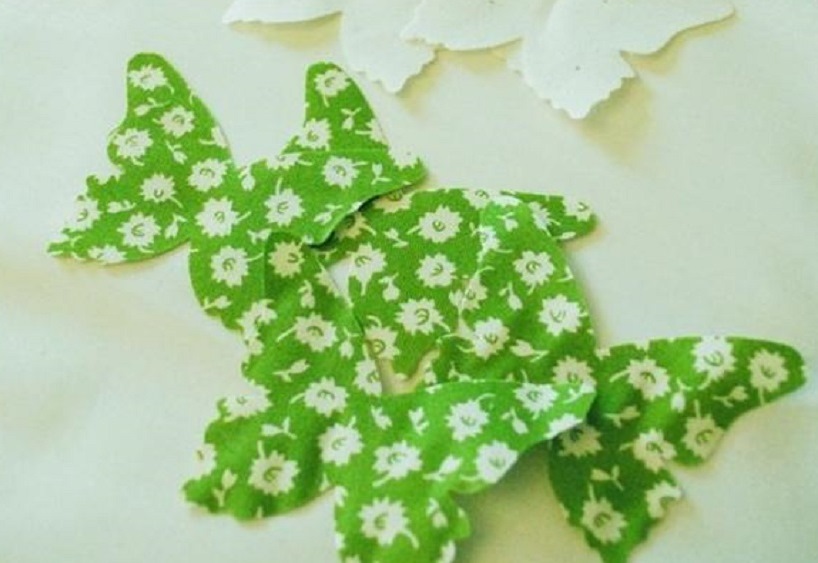
Textile
In order for the decor on the paper wall to acquire a complete look, it is sometimes complemented with similar elements on the lampshade of the lighting fixture. But paper moths are not suitable here, so they turn to fabric counterparts. Butterflies made of matter are not distinguished by complexity:
- using a cardboard stencil, the contour of the figure is applied to the fabric;
- the part is cut out;
- the workpiece is stiffened;
- if necessary, the moth is additionally decorated (wire antennae on the body or beads on the wings);
- the butterfly is attached to a suitable surface.
Advice! Experienced needlewomen can try to imitate veins on the wings with a thread and a needle.
A little exotic
Extravagant ladies will love the idea of creating decor on the wall based on vinyl records. Key steps in the process:
- Initially, the outline of the butterfly is applied to the vinyl with chalk.
- In the initial state, the material is hard enough to cut a figure out of it; the plate needs to be softened. An oven with a baking sheet covered with foil or a microwave will help you to accomplish your plans.
- When the vinyl becomes plastic, it is taken out and the shape is quickly carved out. If the butterfly has not acquired the desired shape before cooling, the heating process is repeated.
- At the final stage, the moth is given the required volume.
It is more difficult to mount a vinyl butterfly on the wall than a copy made of paper. It cannot be removed in the future without damaging the surface.

The material for making a moth can be a sheet of tin or a beer can, which is pre-washed and straightened. The contours of the selected stencil are transferred to the material with a marker or an awl, the workpiece is cut out. Decorate the figurine with nail polish or colored markers.
Attention! The edges of the butterflies are very sharp, so you need to work very carefully so as not to cut yourself.
The tin decor can be hung on threads. It will be appropriate in the interior of a loft; for a classic design, paper moths will still be the best solution.


Making contour butterflies
Let's start with the simplest option, how to make contour butterflies. The main stages of the creative process:
- Butterfly stencils on the wall are best cut out of medium density cardboard. A suitable material would be breakfast cereal or tea packaging.
- The original moth can be selected and printed from the templates below.
- The silhouette you like is applied to cardboard and cut out. The wall looks more colorful, on which butterflies of different shapes are fixed.

Some useful tips for decorating paper butterflies:
- For cutting, use the entire figure in full, if you want to achieve perfect symmetry, the workpiece is folded in half.
- Instances with slight asymmetric deviations look more natural on the wall.
- If there is a need to get moths of different sizes, the template is converted through a graphic editor.

Making openwork copies
Openwork paper butterflies are best obtained on the basis of cardboard. To work, you will need a sharp knife, a blade and a printed template with cutting lines. Getting high-quality decor on the wall is possible subject to painstaking work. The algorithm of actions is only slightly different from cutting out contour butterflies. First, a template is selected and printed. The required number of elements is cut out along it.


The use of a blade and a sharp knife in work can damage the surface of the table, therefore it is recommended to protect the table top with a sheet of plastic, plywood or chipboard. Openwork paper butterflies on the wall are usually given volume. A little trick can make the process easier. The product is slightly moistened and rounded, the resulting bend is fixed. After evaporation of moisture, the workpiece will retain the desired shape.


Options for volumetric paper decor
The volumetric figures of paper moths look spectacular on the wall. There are several options for creating butterflies of complex configurations:
- multi-layered instances are created;
- use corrugated paper;
- figures are formed by folding the sheet in several layers;
- The art of origami enjoys well-deserved popularity.
Multilayer
It is quite simple to settle multi-layer moths on the wall:
- several blanks of the same shape are cut out of paper;
- the color and size of parts may vary;
- the elements are superimposed one on top of the other, the bodies are glued together, and the wings are bent in different directions.
Multilayer butterflies look spectacular not only from contour blanks, but also from openwork details. This will require paper in contrasting colors or similar shades. For the upper part, an openwork blank is taken, the lower one remains contoured. The following photo will help to evaluate the result:

There is an interesting technique when you can make a multi-layer butterfly on the wall from one sheet of paper, by folding it in a special way. The photo further demonstrates the simple manufacturing process:

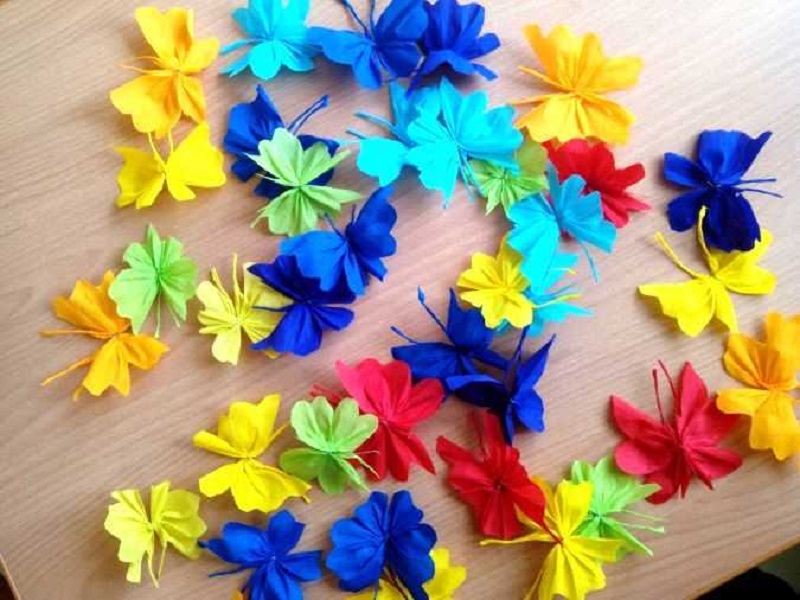
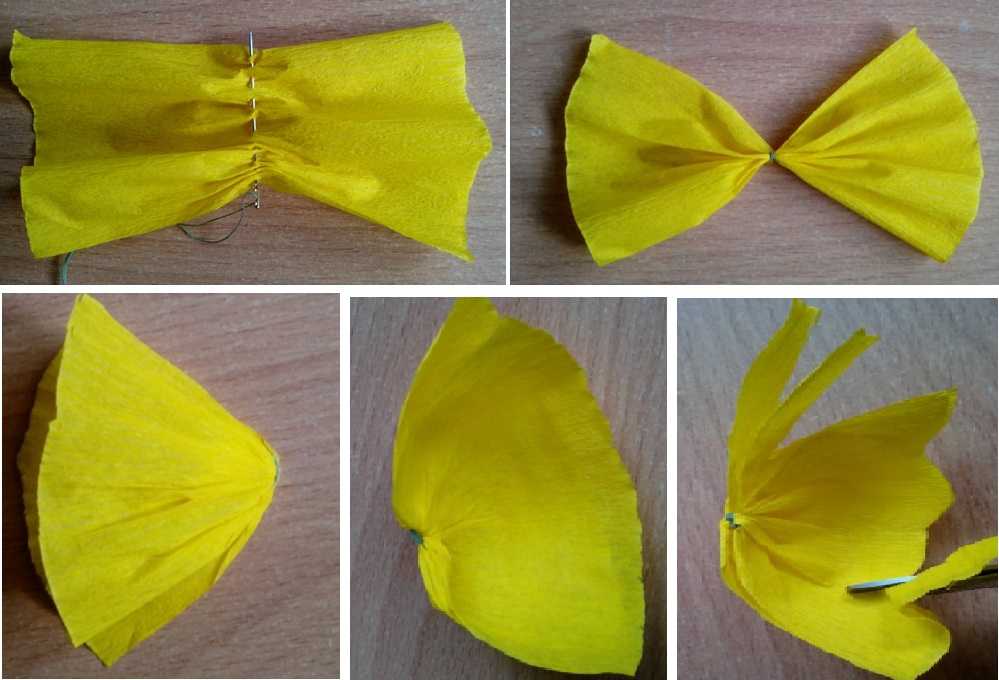
Corrugated paper
It is easy enough to work with butterflies on a corrugated paper wall. The algorithm of actions includes the following steps:
- The required paper colors are selected.
- Rectangles are cut out with an approximate size of 7x10 cm.
- The blanks in the center are sewn with large stitches, after which they are assembled with an accordion and fixed with a thread in several turns.
- The resulting paper bow is folded in half, the future butterfly wings spread out.
- Then the desired configuration is cut out along the edges.
- From narrow strips, flagella for antennae are formed, which are glued to the body.
The entertaining process is clearly demonstrated by the photo:

Ideas for beginners and professionals
It is very easy to prepare butterflies from double-sided colored paper for wall decoration:
- First, a rhombus or square is cut.
- The figure is folded into a small accordion.
- The two workpieces are connected together and fixed in the middle with a thread.
- Antennae are formed from wire.
The photo will help to follow the main stages of making butterflies on the wall:

The origami process, which is so interesting for children, is somewhat complex. One option for making a paper moth is presented below:

Mounting options
You can securely fix paper butterflies on the wall in various ways:
- If the issue of the safety of the wall surface is not relevant, PVA glue or wallpaper solution will help to fix the figures from paper.
Comment! Regardless of the chosen template, whether it is a contour or an openwork butterfly, three-dimensional paper figures look more impressive on the wall. A light breeze can set the wings in motion, making them flutter like real ones.
- Useful in the process and small pieces of foam, which are initially glued to the body of the butterfly, and then to the wall.
- Similarly, double-sided tape is used instead of foam.
- When the task is to preserve the integrity of the wallpaper after removing the paper moths from the wall, they are secured with safety pins.


There are many options for creating decorative images on the wall using paper butterflies. A huge heart or a whirlwind receding into the distance, separately distributed specimens or a flock comfortably located on flowers - there are no boundaries of creative imagination.
Sometimes the monotonous interior becomes boring over time. To refresh it and breathe new life into an old apartment, you can use one interesting trick. These are butterflies for wall decor. They are placed on the surface of walls and ceilings, as well as pieces of furniture or textiles. Artificial insects will quickly change the room, fill it with lightness and airiness. This helps to improve the mood: sadness and longing will forever leave the walls of the house.
Materials for making decorative butterflies
Modern decor for an apartment does not have to be made of expensive materials. Butterflies are made from any available means. The main thing is to give free rein to your imagination, and after a short period of time the room will change beyond recognition.
You can make 3d butterflies on the wall from anything.


Decorative butterflies are made from:
- paper;
- cardboard;
- different fabrics;
- vinyl;
- foam.
Some people even manage to use cans and wood. To achieve an unusual effect, you can combine different materials with each other.


Step-by-step production of butterflies for decor
Each person himself chooses a model of butterflies for decorating a room. There are hundreds of sketches to be found on the internet. Fixing parts to walls, ceilings, furniture or textiles is up to the owner of the house.


Contour butterflies
To get bright moths, you need to take colored paper. If it is not there, then you can use the pages of glossy magazines. This will make the butterflies look different from each other. To make a template, you need cardboard. The creation of contour butterflies is performed in stages:
- Preparing the template. A silhouette for the future butterfly is cut out of thick cardboard. To make it symmetrical, it is better to first fold the cardboard in half, and only after that cut out paper butterfly patterns from it to decorate the interior. If you intend to create a whole picture, you need to prepare several artificial insects of different sizes.
- Cutting blanks. Images made of cardboard are applied to paper, traced around the contour, and then cut out. The result is neat and even butterflies. To make them look natural, the wing is slightly bent away from the body.
- Fasteners. Drawings can be glued to the surface after making the sticky attachment (double-sided tape, glue, etc.).
First, the moths are attached to the surface with pushpins. This will help visualize the end result. At this stage, you can still make adjustments. If everything suits, then the butterflies are finally fixed.


Openwork butterflies
Such products have the main accent - beautiful carved wings. For manufacturing, you need to prepare a sharp stationery knife. The process consists of three stages:
- Making or buying a cardboard template.
- Cutting a paper product on it.
- Creation of fasteners.
All work is done very carefully. Any careless movement will ruin the beautiful butterfly. Ready-made stickers are placed on any surface.


Volumetric multilayer butterflies
To achieve the effect, it is necessary to cut out several insects at once. They should be different in size or color - this will add texture to the composition. The butterflies are stacked on top of each other and glued together. Bent wings will help to add volume and naturalness to the decor. Examples of three-dimensional butterfly decorations are presented in various contemporary styles.


Each person himself chooses the best option for how he will decorate the apartment. Artificial moths will revive the interior, fill it with lightness and serenity. Being in a room with such a decor, you can feel like walking along a blooming summer field.


Paper moths
For the manufacture of decorative butterflies, paper is most often used. Even a novice master will be able to make crafts out of it with his own hands. The material can be white or colored. Butterflies cut from:
- postcards;
- old newspapers;
- colored napkins;
- magazines;
- wallpaper;
- unnecessary printed matter.
If you want to achieve an unusual effect, you can use corrugated paper. Butterflies made of this material will be as if alive. If necessary, you can combine different types of paper.


Cardboard products
So that the butterflies do not look bulky in space, it is better to choose cardboard of low density to create them. The material holds its shape well, it comes in various colors and shades. If he is not at home, thick paper may come to replace.


Cardboard is ideal for openwork crafts. The material has sufficient density, which allows it not to tear or deteriorate. It is very important to show perseverance when creating such butterflies, since the result of the work will depend on this.
Stencils are also made from cardboard, on the basis of which a large number of butterflies can subsequently be made.


Fabric butterflies
Fabric moths are suitable for decorating lampshades, chandeliers, and also with their help you can revive boring walls. Fabric butterflies, like paper ones, are made using a stencil. The difference is that fabric products need to be stiffened. This can be done using starch or a special mixture (PVA, wallpaper glue, alcohol).

With the help of fabric butterflies, you can revive boring walls in the interior.


Styrofoam for creating jewelry
Artificial insects made from this material are voluminous and durable. To prevent the composition from looking boring, the foam can be painted in any color. For this, it is best to choose an acrylic paint that is easy to apply to the surface. Ready-made butterflies can be attached to the wall using the most common glue.


Wood moth decor
Only professional wood carvers can handle this material. To create a sketch, you must have special equipment. But the butterflies made in this way will make the room cozy and comfortable.


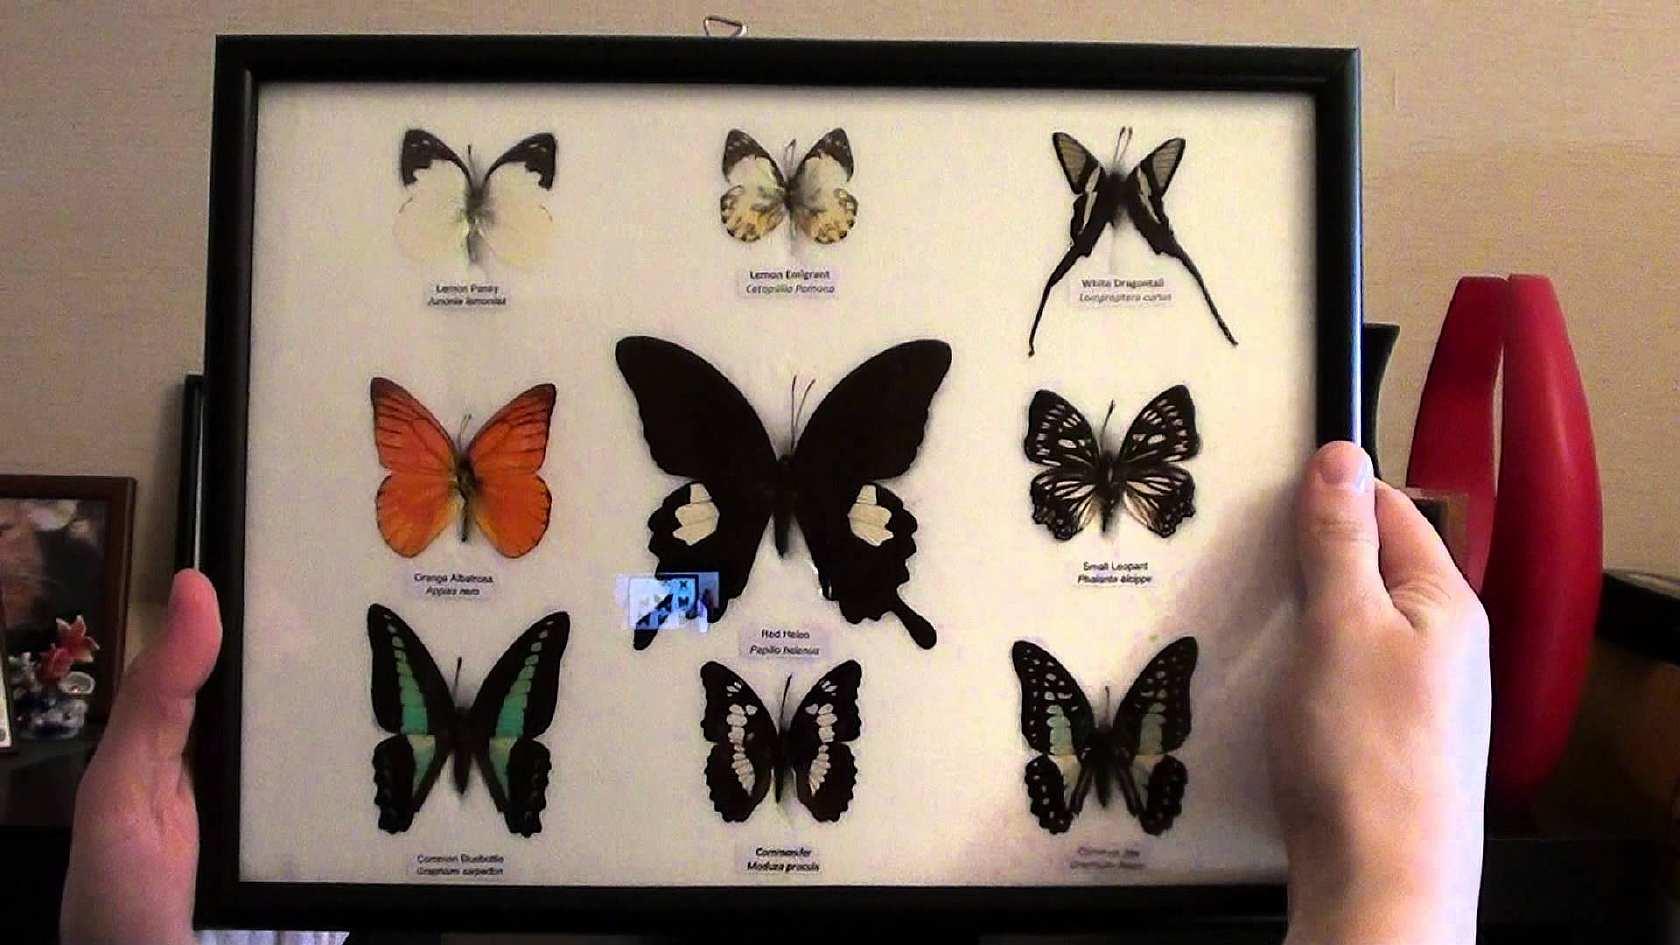
Old Stock Photos and Royalty Free Images
Butterflies of different sizes will become an alternative to boring and monotonous photo frames. On their wings, insects will store moments of experienced emotions and pleasant memories.


What style are decorative butterflies suitable for?
Graceful insects are suitable for almost any interior design, it is only important to think over the overall composition. Butterflies should blend in with their surroundings, and also not blend in with the main background.
Professional designers advise you to choose your own design and tint palette of decorative products for each style. You can immediately purchase ready-made samples or make them yourself.


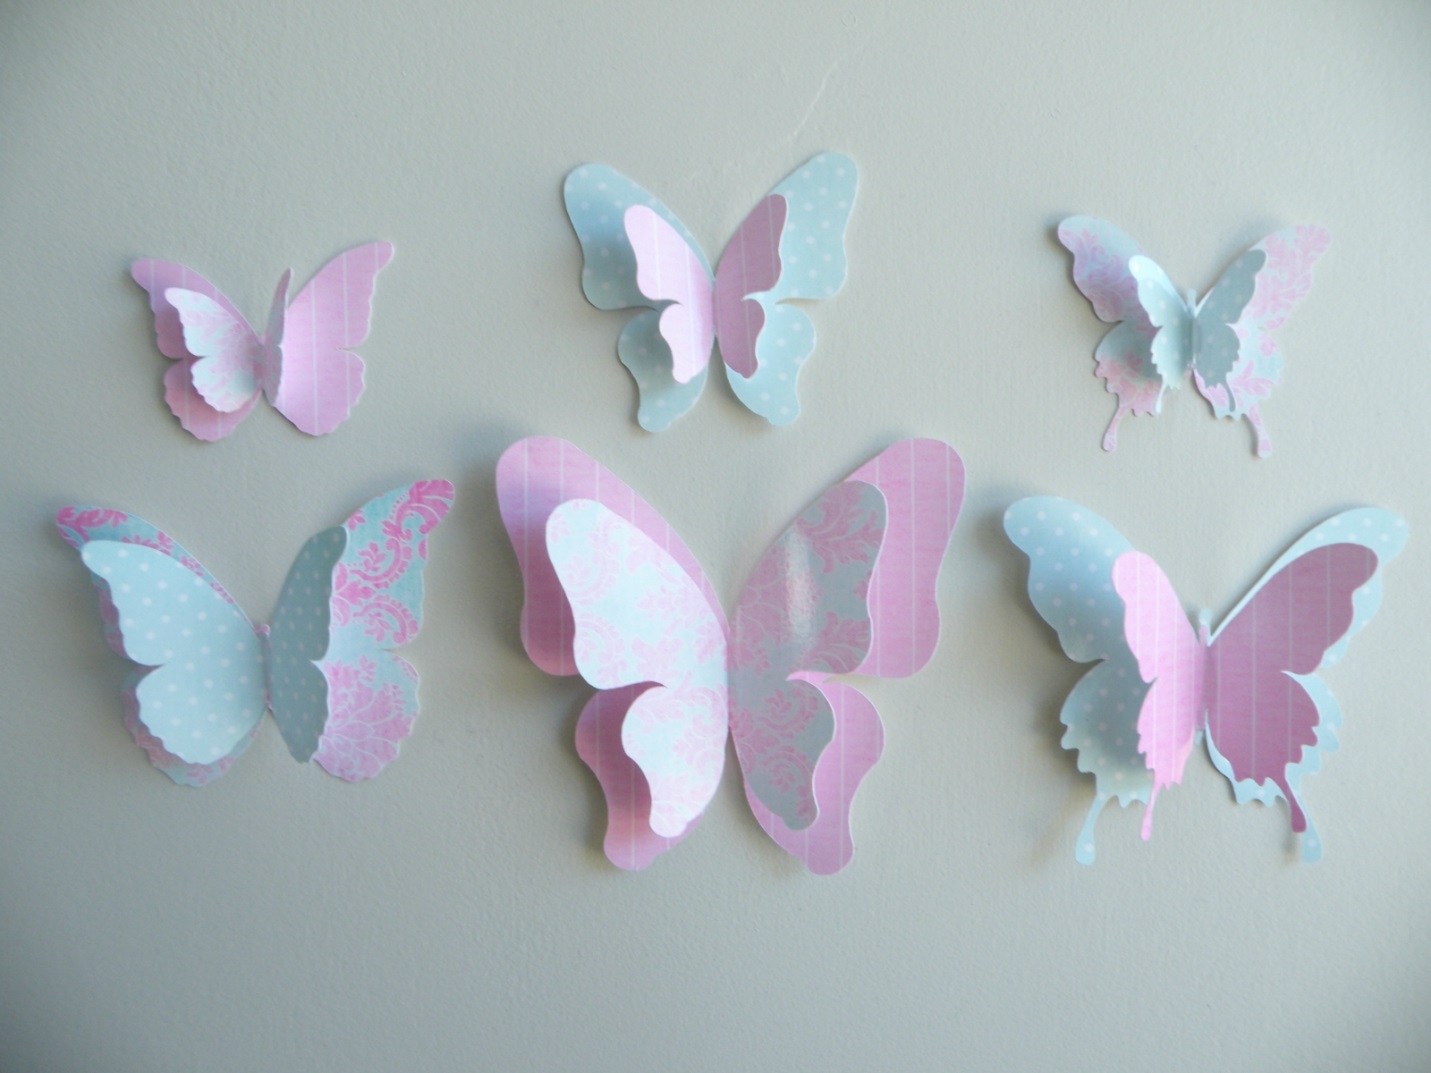
Provence
The design, saturated with French romance and the scent of lavender fields, is appropriate to use in a bedroom or a nursery for a girl. The delicate decoration of the room in a pastel pink, lilac or blue palette will be complemented by moths of light green, hot pink or blue, which will look harmonious on a monochrome surface.
The outlines of the wings should be smooth, and the color harmony should be soft. Contrasting combinations should be avoided here.


Shabby chic
The name of the style translates to shabby chic. It is characterized by old worn furniture, which is sometimes found at flea markets and flea markets. You can age the surfaces yourself by choosing the appropriate fittings. The entire interior is performed in a subdued delicate range.


Butterflies in such an interior bring rustic joy, harmony and good mood. They represent the beginning of a new life and immortality. According to the philosophy of feng shui in the bedroom, you need to place them on a hanging structure above the bed. They should flutter from the window into the middle of the room, increasing the love of the spouses.


Country
In the style of rustic classics, preference is given to natural shades. The interior can be supplemented with a panel, in which a flock of fluttering moths will be fixed against a light background. It is allowed to release several pieces outside the frame, but the bulk must be inside.
Butterflies can also be placed on any surface. You need to do this chaotically so that it looks like the swarm accidentally flew into the room. For this, both small and large moths are used.


Ethnic
Motives of different nationalities are used in this style. This is a kind of mix of cultures, which is often chosen by European colonists, hippies and creative bohemians. The decor should be bright and contrasting, made depending on the chosen direction: Chinese, Japanese, African or Arabic.
Bright red, bright green butterflies on a beige background or black moths on a white wall will look organic. They can be a decoration for a common frame for family photos or a rice paper lampshade for a night lamp.


Modern
In this style, it is allowed to use butterflies as a key accent of the interior. It is advisable to complement the decor with modern LED lighting, which will create the illusion of real flutter. This creates a romantic mood in the evenings. You can make a panel with a whole composition of fluttering moths made of thin wire, or place them under a chandelier.

Butterflies will perfectly complement almost any interior style.

Classic
It is important here not to overdo it with shades. The main interior decoration is carried out in light or brown tones, the furniture may have a small print. In such a design, the shape and shades of the butterflies should be combined with the textile elements, as well as the overall decor. Two methods are allowed:
- brown butterflies are glued to the light wall;
- light moths are located on a dark surface.
Butterflies in a classic interior will decorate the corridor, living room, kitchen, hallway, hall and other rooms.


Compositions of butterflies in the interior
Decor in the form of butterflies usually involves the creation of a specific composition from many bright and beautiful moths. Its final appearance will completely depend on the imagination of the owner of the apartment. Suitable for placing jewelry:
- walls;
- ceiling;
- curtains;
- furniture;
- tile;
- chandeliers and floor lamps.
The main thing when creating a composition is to take into account the environment: butterflies should be fully combined with it.


Panels and paintings
You can place the moths in the frame. Insects are cut from any available material and neatly attached inside it. It is best to install glass on top of artificial butterflies: it will prevent dust from entering, as well as keep the fragile craft from children and pets.

Glass will protect the craft from external influences.

Decor of corners and walls with glowing butterflies
Luminescent paint will help to create a unique composition. First you need to make a stencil of the future decor and fix it in the corner (or on the wall) with glue. Then apply the luminous substance. When it is completely dry, you can gently remove the applique. All that remains is to turn off the light and enjoy the result.


Decorating old furniture
The right decor can give a second life to worn-out furniture. Butterflies made of high-quality fabric or wood can transform an old armchair, a faded floor lamp or an unprepossessing bedside table beyond recognition.


Compositions on the ceiling and chandelier
Butterflies of various shapes and sizes are attached to the ceiling lamp. This is done with a thread or fishing line. To make the composition dynamic, you can hang the workpieces at different heights. They will move with any movement of air.

The butterflies, suspended in the air, look alive.

Decor for vases, photo frames and mirrors
You can use double-sided paper, sheets from glossy magazines or pages of old books to create blanks. They will reflect off the surface of mirrors, and also play in different colors on the surface of photo frames and vases.


More ideas
Many people strive to achieve an original style in their apartment or house. It seems to them that no one can be surprised by the usual composition of paper butterflies. Therefore, they are looking for completely new and fresh ideas for creating interesting decors. These include:
- Making products from vinyl records. It is very difficult to create a plastic butterfly, but with a certain skill and diligence, it becomes a very real task.
- Making butterflies from tin cans. The main thing in this process is to be careful. When the moths are ready, they need to be secured with thin wire to a chandelier or shelf.
Everyone can decorate an apartment with decorative butterflies. It is enough to show a little patience, accuracy and care when creating products. The composition of air moths will bring lightness and notes of romance into the house.


Often, many have the idea to change the appearance of their apartment, or at least refresh it, without making a lot of effort. Usually this means at least a cosmetic repair.
However, in order to give the room an updated look, while not carrying out exhausting, expendable repair work, one should approach this issue creatively.
It would be nice to remember one wonderful way of decor - this is the creation of a decorative panel. And in this case, a simple option for decorating the walls with butterflies can come to the rescue, for which they use templates or stencils.
If you put a little effort and effort, then, undoubtedly, ordinary walls will have a stunning look and the room will take on a completely different, fabulous look.
To do this, you need to study the basic ways of decorating walls. How amazing can a decoration be? This is an applique, or rather, a do-it-yourself panel of butterflies on the wall. To accomplish it, a variety of materials are used. In the future, it is attached to the walls in elegant compositions.

How to make a butterfly stencil with your own hands? For the manufacture of small moths on the walls, there are different options for using materials for cutting butterflies of different sizes, and already based on these parameters, the final type of decoration will depend. Making templates with your own hands of paper butterflies for interior decoration is within the power of everyone.
The more you try, the more impressive you will impress everyone who sees such an applique. Therefore, we choose the appropriate decor, and then we fix the butterflies on the wall. Imagine that on the wall, for example, many openwork butterflies are flying from the center. All of them are of various sizes and colors, spin in a round dance and vibrate with their wings.
Undoubtedly, this will attract attention and delight, although the butterflies will not be dried, but made from scrap materials.

Important! Butterflies should be highlighted against the background of the wall, and for this it is better to make them bright. So they will not blend in with the interior.
For wall decoration, butterflies of various sizes, shapes and colors, cut along the contour of paper - the most suitable material - are suitable. The implementation of such an enchanting spectacle will depend on many factors, the main of which is the quality of the sketch and accuracy.
The pattern of openwork butterflies for cutting out of paper should be cut very carefully.

Butterflies on the wall with their own hands, photo
What to look for when creating butterflies
First, you need to decide on the form. If there are no own ideas on this issue, then you can search for proposals on the Internet. There are sure to find templates and stencils for cutting, examples of finished works. You can also watch the creation of such a panel on the video:
Secondly, you need to choose the color of the future butterflies. After all, the design of any apartment is individual, so it is so important to take the time to select the appropriate color option for the future decor of the butterfly on the wall. Use the most successful color combinations, then the decor will best fit into the room and will be in harmony with all the elements.
The form deserves special attention. To date, ready-made multi-colored butterflies are offered in the form of stickers. They can be ordered at any store. They are of the most varied colors, as well as simple and intricate shapes. But we are considering decorations that are made on our own, so for beginners it is worth familiarizing yourself with the basic recommendations.

Butterfly stencil on the wall - scheme, photo
At the initial stage, you should create a sketch of butterflies for cutting. This can be helped by using a program that draws or edits images. In the future, based on the sketch, butterflies are made stencils for cutting in different sizes from the appropriate material. Templates can be made without even using a computer.
You just need to take a pencil in hand and create sketches on ordinary paper or tracing paper - the outlines of butterflies and then cut them out.
Advice! The best option is not to use strict symmetry. And for this it is worth trying not to mirror the wings. It is best to portray them slightly different in size - literally a little.
Thanks to this, decorative butterflies on the wall will be more voluminous and dynamic. And the applique will look great, regardless of how it is attached to the surface. But do not bend too much, because the wings should differ from each other in moderation.

Stencils of simple butterflies for wall decor, photo
Once the butterfly drawing for cutting is ready, you can proceed to the next steps.
It is necessary to decide on the format of the future decor element, the number of butterflies, as well as the way to fix them. Then you can modify the image and make it in several sizes, and then print. You can also draw everything completely by hand, if you do not have a printer, and cut it out.
After that, we make a butterfly stencil for cutting. It will not be so difficult to do this if you put the printout on a sheet of cardboard - and the outline of the butterfly for cutting is ready.
The printed silhouette of a butterfly is first cut off along the outer edge, only then you can proceed to the inner holes and cut them, where necessary, with thin nail scissors or a special knife. 
Butterfly stencils on a paper wall - a photo of the trimming process
For decorating walls with butterfly decor, you can also use such an option as origami. You will not need to spend energy on drawing the silhouette of a butterfly for cutting out of paper, but you will only have to learn the ability to collect origami.
Important! You should not achieve the grace of a butterfly by increasing the number of folds or frills on the wings: openwork butterflies look more airy.
Further cutting with scissors or a paper cutter will be meticulous and a lot of details will quickly tire you out.
In fact, creating such elements is not very difficult. A lot of ready-made training videos have been posted on the Internet on how to make butterflies on the wall, as well as lessons on origami making. Here is one of them:
Features of fastening elements
When you have already cut out the moths using a stencil, you can start creating a pattern on the planned surface. It is worth initially looking at the various options on the Internet if your imagination has exhausted itself.
Most often, if a person decides to create such an element of room decor, he already has his own assumptions about the location of the pattern itself on the plane. The most popular are images of a vortex, a growing flow, an arrangement of blanks in a chaotic manner, in the form of creating a decorative pattern, and so on.
Important! By attaching butterflies to the wall, you can highlight the boundaries between certain areas in the room.
The main thing is to observe the correct placement of the moths and do everything possible so that they do not fall into the wallpaper pattern.

Original decor - butterflies on the wall, photo
For colored wallpapers (with an ornament and a repetitive, pronounced pattern), it is preferable to make butterflies monochromatic (black or snow-white coloring is ideal); for monochromatic wallpapers, you can expand and cut out silhouettes of butterflies from bright juicy colors.
When the blanks are cut and prepared, you can start attaching it. Before you start doing this, you should recreate your idea on paper in order to understand how well it will look after implementation. Next, you need to outline with a pencil already on the wall the places where the butterflies will be.
All marks should not be bold, so that in the future you can remove the butterflies without leaving marks on the walls.
To attach these elements to the wall, you can use glue, pins, or hang them on a strong thread.

DIY wall decor with butterflies, photo
Materials (edit)
Decorating the interior with butterflies created with your own hands, you can choose various bases for this:
- cardboard;
- the cloth;
- vinyl film;
- paper.
You should choose any of them based on the complexity of the picture that you have in mind. Paper is the most affordable base of all of the above, plus the easiest way to cut blanks from it. White sheets can be colored to create colorful butterflies.
However, the disadvantage of this material is that it is fragile. It can be selected in case you want to attach butterflies for a short time.

Cardboard is a stronger base. You can choose double-sided and create solid blanks. Butterflies from vinyl films look beautiful. Such decoration will delight the eye with bright colors and its glossy surface.
To create a "warmer" look, you should give preference to fabric, but, except for glue, they will not be able to hold on to anything.
If you prefer the vinyl version, you should fix the butterflies in the middle of the body, so that at the slightest flow of air they begin to wiggle their wings. Then the spectacle will be simply amazing.
When choosing a rigid cardboard for making butterflies, if you try very hard, you can give them different shapes. In addition, such applications will delight the eye for a long time and will not lose their unusual 3D volumetric shape.

Everyone who wants to make voluminous paper butterflies with their own hands will be satisfied with the result. Although this way of changing the interior is not easy and takes a lot of time, the emotions that you will receive after completing the work will be really unforgettable.
The process of creating such an application is very exciting and is guaranteed to make your room original without any renovation work.
See a selection of photos of interiors decorated with artificial butterflies - an incredibly beautiful sight: