A modern private house is usually built with an attic or second floor. The construction of such a house costs much less than a one-story house of the same area. To the second floor, basement or attic, they go up and down the stairs, which at the same time performs decorative
We welcome our regular reader and offer him an article on what a ladder from a profile pipe is and how to install it with your own hands.
Profile pipe - a pipe with a rectangular, square or oval cross-section. The pipes have a cavity inside and relatively thin walls - due to this, they have a relatively low weight and high strength, which allows them to be widely used in metal structures.
A metal profile ladder has many advantages over other types of ladders:
- The frame made of steel tubing has a very high strength and does not lose it over time.
- The pipe is a relatively light material (when compared with solid-section rolled metal), and the construction of the staircase will be much lighter than reinforced concrete and not much heavier than wood.
- Very long service life - in dry living conditions, the service life of steel structures can reach and exceed 100 years.
- Steel pipe is a very technological material, and structures of any complexity can be realized.
- A ladder from a professional pipe can be made and installed very quickly.
- Steel profiled pipes -
- Steel does not rot, is not damaged by bugs, does not dry out or crack.
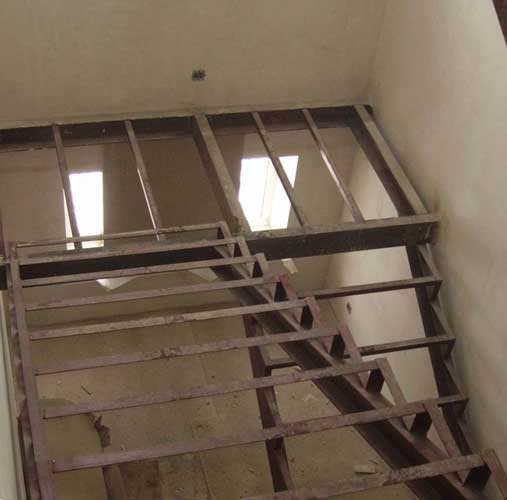
- Stairs made of metal structures can be mounted in an already built house, and they can be upgraded at any time.
- Steel structure is more compact and versatile than reinforced concrete and timber.
Disadvantages of these stairs:
- Steel is susceptible to corrosion - structures will have to be painted from time to time (and in damp places, for example, a basement, they must be cleaned and treated with special anti-corrosion agents).
- Lightweight structures spring a little when descending and ascending.
- The decorativeness of the metal structure is not great, therefore, in residential premises, the steel structure is decorated with steps, railings and fences made of wood, glass and plastic.
- To make the design reliable, welding is used for its manufacture - you will need a welding machine and a master with certain experience.
Types of stairs from a professional pipe
The main types of ladders from a professional pipe: marching, spiral, stepladders and attached. Attachments are simple and easier to buy ready-made, and we will tell you more about the other types.
Marching
The flight staircase consists of one or more flights connecting the intermediate flight platforms and floors. The steps in the spans are based on one or more kosour, the spans are rectangular, the steps are also rectangles. Kosoura are straight and broken.
Single-flight staircases are installed in spacious halls or long wide corridors, more often they use the usual two-flight structure - it can be installed in a staircase. There may be more marches. A single-flight staircase is convenient in that it is possible to equip a pantry, a dressing room or a small bathroom in the space under the stairs.
The convenience of a single-flight staircase depends on the angle of inclination. The steep angle of inclination of the stringers is usually done at marches leading to the attic or to the basement - rarely visited premises.
Screw
Spiral staircases are often installed in living areas such as living rooms. They are very original and decorative, compact, but not very convenient to use. The advantage of the small ladder is its compactness - it can be placed in a circle with a diameter of 1600 mm. Spiral structures are usually installed in small houses in order to save space (in large houses, a spiral staircase can be installed for beauty and a march staircase for other purposes).
The step consoles are attached to the central support along a spiral line, along the outer perimeter on the console supports for the handrails are installed - from the outside, the staircase is closed with a grid that adds rigidity to the structure.
The steps have a triangular shape, when descending and ascending, it is advisable to hold onto the railing with your hands for safety, it is very inconvenient to climb with objects in your hands. The most significant drawback is the inability to lift any large pieces of furniture to the second floor.
The second significant drawback is the complexity of design and especially manufacturing.
In large houses, you can install a swivel staircase with a large angle of rotation and rectangular steps - it looks very impressive, it is convenient to walk on it and carry things, but it takes up a lot of space. Typically, such structures are luxuriously decorated in the old style and serve as an adornment for large mansions.
Ladder
This is the simplest type of staircase - two rectangular pipe structures connected to each other, rungs can be on one side or on both. The frames are connected to each other using a special hinge. On the underside of the racks, triangular pointed tips are fixed.
The optimal profile option for one stringer is a 100 × 100 or 80 × 80 mm pipe with a wall thickness of at least 4 mm. For two stringers - a pipe with dimensions of at least 80 × 80 mm with a wall thickness of at least 3.5 mm. For side supports of steps and lintels between stringers - at least 50 × 50 mm or 60 × 40 mm with a wall thickness of at least 3 mm.
approximate price
Profiles 100 × 100 mm, 80 × 80 mm, 50 × 50 mm, 60 × 40 mm retail at 50 rubles per kilogram - a very affordable price.
Calculations of the main parameters of the stairs
Standard staircase parameters: step width 30 cm, height 15 cm. Stairs with these parameters are installed in high-rise buildings. But for a house, such a staircase would be too cumbersome. To make the ladder more compact, the steep angle is increased. It is undesirable to increase the steep angle more than 45 °.
Calculator of the dependence of the length of the horizontal projection of the stairs from the angle of its steepness
The length of the horizontal projection depends on the height of the floor as follows:
Projection length = ctg α x span height, where α is the steepness angle.
The height of the floor necessarily includes the thickness of the slab with the thickness of the floor covering.
Calculator for calculating the length of the flight of stairs
The length of the flight of stairs is calculated in two ways:
- If there is an angle of steepness, then the length is equal to the height of the floor divided by sin α; or the length of the projection on the horizontal divided by cos α.
- By the Pythagorean theorem: the square root of the sum of the squares of the projection length and the floor height.
Calculator for calculating the size of the steps of the main staircase
The optimum height of the steps is 15 cm, from 12 to 20 cm are allowed. The height of the floor is divided by 0.15 m, a fractional number is obtained, the nearest whole number (greater or less) is selected - this is the number of steps. Divide the floor height by the exact number of steps to obtain the exact step height (to the nearest mm).
The depth of the tread should be at least 30 cm. This value allows you to conveniently use the steps even for men with large feet. If necessary, you can reduce the tread depth by 3 cm, but not more. If the horizontal projection of the march is too small to accommodate the required number of steps, then the steps are made run-in - the upper step hangs over the lower one. Such a ladder should be used with caution when descending.
The width of the tread is usually in the range from 80 to 120 cm, in the most extreme case it can be reduced to 70 cm.
Making a ladder from a professional pipe with your own hands
The metal structure, through which all family members will pass several times a day, will only be reliable if assembled by welding. If you have small skills of a welder, then it is quite possible to weld and install stair flights in a private house with your own hands. look no worse than purchased ones. Below we will consider the installation of a single-march structure with straight steps and straight kosoura - it is the simplest constructively.
Required tools and materials
For welding metal structures you will need:
- Welding machine. For a home craftsman, it is enough to have an inverter welding machine with a welding current of 160-200 A.
- Electrodes.
- Drill, screwdriver.
- Electric jigsaw or grinder, cutting wheels for metal cutting, grinding wheels.
- Manual router - for grinding welded seams.
- Tape measure, metal folding rule, square, protractor, plumb line, building level.
- Plane.
- Hammer.
- Clamps.
- Sandpaper, brushes.
- Anti-corrosion primer.
- Dye.
- Dried boards 40 mm thick for steps.
- Wood varnish.
Drawings and diagrams
The ladder device requires very precise cutting of workpieces and their welding, installation of ready-made structures. Therefore, before starting work, it is necessary to draw an exact drawing or a detailed diagram, precisely indicate all angles and dimensions.
The order of work
Before performing the work, carefully mark the profile and cut the frame blanks. Then the kosoura are installed, the side supports for the steps ("zigzag"), and the transverse crosspieces are welded. Grind or mill the welded seams, clean the entire frame with sandpaper, paint. Then the steps and the fence are mounted.
Manufacturing video
Features of the assembly of structures by welding are shown in the video:
Assembly and installation of the structure
The technology of welding and finishing of the frame is described step by step below.
Frame preparation
Before welding the workpieces, it is necessary to grind or mill the burrs at the cutting points of the workpieces. Support plates are welded to the lower end of the stringers. Blanks for stringers are installed in their place and welded to mortgages or anchors pre-installed in the wall. This work cannot be done on your own - you will need an assistant. Carefully measure the angles of inclination before and after installation. Then the place of installation of the lower step is carefully marked, two blanks are welded - a side support for the step is obtained. Then repeat on the other side, weld the cross-member - and so on to the top of the stairs.
After welding each seam, it is necessary to let the metal cool down, otherwise the structure will "lead". During welding, the metal heats up very much and can deform, therefore, after each stage of welding, it is necessary to check the dimensions and correctness of the angles and the horizontal-verticality of each part.
When doing welding, it is necessary to take breaks so that the metal has time to cool down and does not "lead". The seams are grinded or milled - protruding rollers spoil the overall impression of the structure.
Installation of steps
Saw off the board to size, sand it, cover, if necessary, with water-soluble paint to give the desired tone, dry it, and varnish it 2-3 times. Holes are drilled and the boards are screwed to the side and transverse supports with self-tapping screws.
Mounting the fence
Modern fencing is usually mounted using bolts and nuts or self-tapping screws. On the underside of the fence posts, a flange with holes is made and screwed to the side zigzag supports. It is impossible to weld the fence in the presence of wooden treads. True, you can weld the racks to the structures from the side, but this placement of the fence is not very aesthetically pleasing.
Painting and finishing works
Before installing wooden steps, the metal frame must be sanded, treated with an anti-corrosion primer, and painted twice with paint.
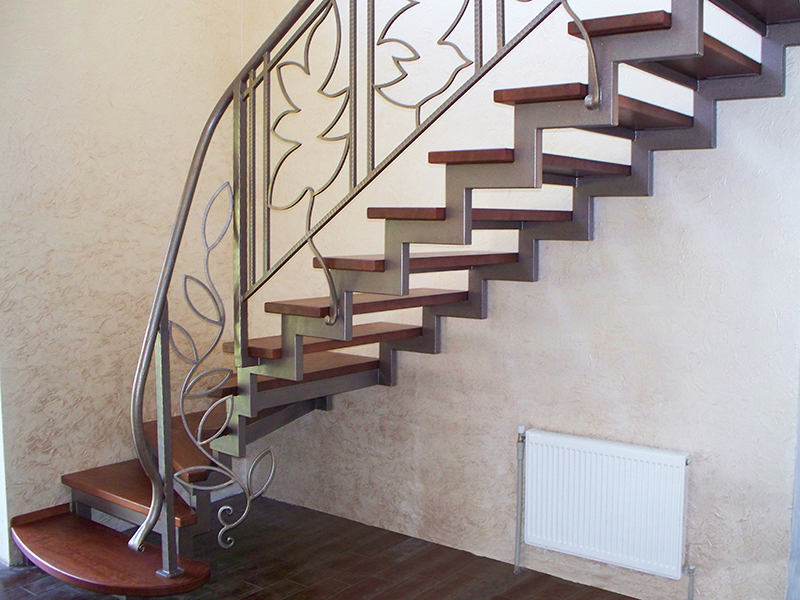
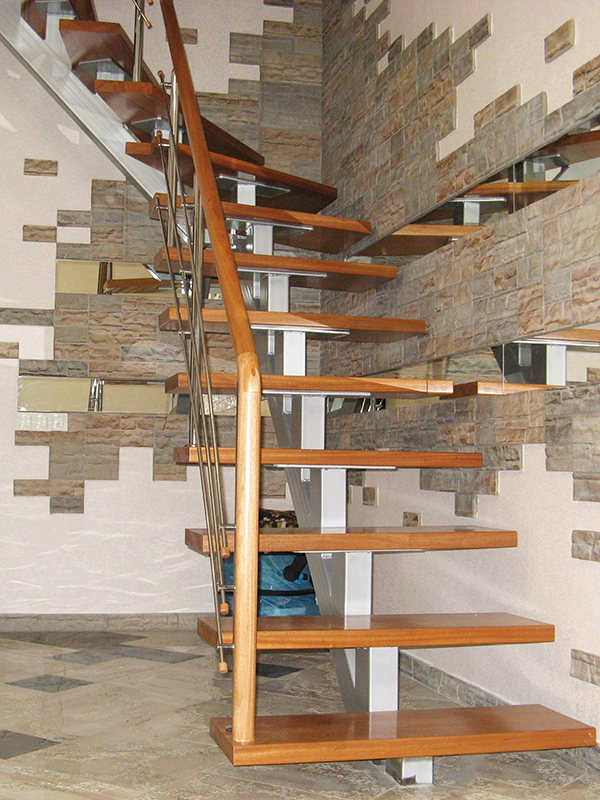
Photo - options for finished structures
There are many options for staircase designs, our photos show the most decorative of them:

Metal stairs are widespread not only in private use, but also in industrial and commercial facilities.
The use of a profile pipe in such cases makes it possible to lighten the structure while maintaining the strength indicators relative to similar products from the channel.
Varieties of frames from a profile pipe
Consider options for how to make a staircase from a profile pipe. The type of construction in all cases is. can be absolutely anything: straight, rotary or helical. It depends on your home design and interior design.
Possible frames from a shaped tube:

Advantages of ladders from a profile pipe
Any design, no matter what material it is made of, has its pros and cons.
Advantages of frames from a profile pipe:
- reliability and long service life;
- the ability to implement a design of any shape, with a certain skill;
- the ability to combine with other materials, which makes it possible to fit such a frame into any interior;
- due to its high resistance to mechanical stress, it is possible to install a staircase at the initial stage of construction, without worrying about its appearance; upon completion of construction, if necessary, you can re-paint;
- such a staircase can be installed both indoors for access to the second floor and outdoors.
The main disadvantage of any metal structure is possible corrosion, the effect of which can be minimized or eliminated with proper preparation and processing of the product.
What type of professional pipe to choose for the stairs
Determination and selection of a profile pipe for a future structure is an important stage, which will determine how reliable the frame will turn out to be.
A square or rectangular tube is used for the staircase.

Below we have given for you the sizes of pipes for various frames, which will be sufficient for standard structural loads.
| Frame type | Minimum cross-section of pipes used and wall thickness, mm |
|---|---|
| Straight stringer: one central or double | 100x50x4 |
| Broken line: single or double | 80x60x3 |
| Ladder | Guides 40x40x3, for steps 20x20x3 |
| guides - 80x40x3, steps - 50x25x2 |
Profile ladder installation
It is possible to make any frame with your own hands, it all depends on your skills.
If you are not confident in your abilities, of course, you should not refuse to implement a complex screw or rotary structure. In this case, we advise you to contact the professionals who will help you with the installation and welding of stairs from a profile pipe.
Required tools:
- grinder with cutting discs for metal;
- drill with drills;
- welding machine;
- screwdriver.
Drawing preparation and calculation features
In order to clearly understand how to weld a ladder from a shaped pipe, it is necessary to prepare a drawing and make all calculations in size.

At the design stage, the following are determined:
- for comfortable movement;
- march;
- type of construction: screw, straight, L-shaped, U-shaped.
Determination of these parameters will help to visualize and understand how the finished structure will look in your interior. Depending on the type of staircase you choose, you can equip it according to your needs.
Frame preparation welding work
Starting the installation of a ladder from a profile pipe with your own hands, you should already have all the drawings according to which you will work.
Consider a simplified version of welding a broken stringer.
The secret is that there is no need to cut the pipe into small pieces, but you can make a step at a time:
- we measure out the place in which there should be a right angle, and we cut out an isosceles triangle in such a way as not to damage one side of the profile pipe;
- bend the pipe and get a step with a right angle;
- boil the resulting joint and move on to the next;
- having received a broken kosour, we weld a metal plate on each tread, on which steps will be installed in the future.

Stairs made on the basis of a metal frame are considered the strongest and most durable. In addition, the use of metal as the basis of the structure makes it possible to create unique compositions with incredible turns, large spans and other non-standard design solutions. Therefore, such a staircase can be integrated into any interior. We will tell you about the advantages of metal structures, types of ladders from a profile pipe and provide instructions for the manufacture and installation of the structure.
Advantages and disadvantages
A staircase made of a shaped pipe has many advantages over structures made of other materials:
- high strength;
- long service life;
- the speed of manufacturing a ladder base from a profile pipe;
- the possibility of implementing any form of structures by using different fastening elements;
- low cost of building materials.
At the same time, metal structures have several disadvantages:
- Due to the significant mass of the frame, lighter and less durable materials, such as wood, plastic and glass, have to be used as other elements of the staircase.
- For the manufacture of a strong and beautiful structure, all basic connections must be made using a welding machine, that is, experience with this equipment is required.
Views
In addition to the usual attached metal products, there are marching, boltsev and spiral staircases. Let's consider each type in more detail:
- An extension ladder is the simplest design, which includes two parallel supports with steps perpendicularly installed between them.
- Marching stairs are distinguished by a more complex design, which implies the installation of steps on beams installed at a certain angle. It is such a product from a profile pipe that is mainly made by the owners of private houses. The supporting elements of the structure can be bowstrings or stringers.
- Spiral staircases. In this case, the steps are in the form of a triangle or a sector of a circle. On the one hand, they are attached to the central support beam, and on the other – connected by handrails. Such a structure is rarely made with his own hands. This is due not only to the inconvenience of using a steep design, but also to the complexity of its manufacture.
- Bolt stairs. Here, the steps are attached by means of powerful bolts (bolts) directly to the wall. On the opposite side, the ends are connected with balusters and railings. To install such a structure, a strong wall is required. If there is none, then you should pay attention to other options for staircase structures.
Thus, the most suitable for self-production are attached and marching structures from a profile pipe. Let's find out how to make these devices with your own hands.
Gallery: Types of stairs from a profile pipe
The structure can be installed only in the presence of a strong wall The spiral staircase is difficult to manufacture, but takes up little space The marching staircase can be installed both inside and outside the house A ladder made of a profile pipe has high strength and is easy to manufacture
Structural calculation
- The number of steps is defined as the ratio of the height of the future staircase to the height of the riser.
- The length of the stringer is calculated in accordance with the Pythagorean theorem (the square of the diagonal is equal to the sum of the squares of the legs, that is, the vertical and horizontal projections of the future structure).
- The load on the support beams can be calculated by the formula: G = 1.1 * ms + 1.4 * ml, where G is the maximum load on the stringer, ms is the mass of the steps; ml is the mass of all people who can be on the stairs at the same time.
- The section of the metal profile is determined by the formula: S = 5.2 * a * G * L / E, where S is the section of the profile; a - step width; L is the length of the stringer; E is the modulus of elasticity of the material (for steel E = 2,000,000 kgf / cm2).
- The width of the stairs should be between 80 and 120 cm.
- The optimum angle of inclination of the structure is 45 °.
- The maximum step height is 20 cm, the minimum is 12 cm. The optimal tread depth is 30 cm.
- The height of the handrail should be 95 cm for adults and 60 cm for children.
Required materials and tools
For self-manufacture of a ladder from a profile pipe, you will need:
- Two steel pipes with a square cross section with sides of 40 mm. Do not use profiles longer than 2.5 m as posts, as this will reduce the strength of the structure.
- Sections of a profile pipe with a length of about 30 cm. If the staircase is small, then the length of the crossbeams can be reduced. The number of elements is selected depending on the length of the future structure with the expectation that the distance between the steps should be 20 – 25 cm.
- Metal corners (two for each crossbar).
- Square plates with an area of 160 sq. Mm.
- Measuring tape and marker.
- Angle grinder with disc for metal.
- Sandpaper.
- Primer for metal surfaces.
- Varnish or paint for metal.
- Profile for creating kosour;
- Profile for the construction of the frame under the steps;
- Blanks for steps (you can make yourself from wooden boards or purchase a finished product);
- Self-tapping screws for metal;
- Grinder with a disc for cutting metal;
- Screwdriver;
- Welding machine;
- Sandpaper;
- Building level and metal corner;
- Concrete solution;
- Heavy-duty anchor bolts;
- Primer and paint for metal surfaces.
The order of work
The length of the rungs must correspond to the calculated width of the ladder
The procedure is as follows:
- We put metal supports on a flat floor. We place them strictly parallel to each other at a distance of 0.3 meters.
- We make marks on the racks in accordance with the chosen step of the location of the steps. In this case, the extreme marks should be at a distance of 15 – 20 cm from the ends of the supports.
- In the marked places, perpendicular to the legs of the stairs, we weld the corners, which will serve as a support for the rungs.
- We take two pre-prepared pipe sections 30 cm long and weld them to the corners, with one grabbing from above, and the other from the bottom of the future staircase. As a result, you will have a rectangular frame.
- In the same way, we fasten the remaining crossbeams along the entire length of the structure.
- To prevent moisture from entering the product, we weld plates to the ends of the stairs.
- We carefully clean all metal joints with a grinder and sandpaper so that there are no sharp corners.
- We apply a layer of primer to the product, and after varnish or paint.
Helpful Hint: When the paint is dry, slide the rubber pads over the feet. This will increase the adhesion of the ladder to the surface.
Mounting
After installing the support beams, the comb-shaped frame is installed
The sequence of the device of a single-flight ladder on a metal frame is as follows:
- In accordance with the calculated data, we cut the pipes for the support beams.
- We install support beams in a pre-selected location. At the bottom and top, we fasten them with anchor bolts. At the foot, it is advisable to concrete the supporting structure. The beams should be located strictly parallel to each other.
- We take the profiles for the frame under the steps and cut them into segments to create a ridge.
- We weld the pipe sections to the support beams, forming a ridge-like frame for the steps. When installing each component, it is necessary to control the angle of inclination using a building level. Observe the parallelism of the structural elements.
- After completing the welding work, we clean all the seams and sharp corners with sandpaper.
- We cover the ladder frame with primer and paint.
- After the paint has completely dried, we attach the blanks for the steps to the stringers. For this we use self-tapping screws for metal and a screwdriver.
At the last stage of work, wooden or plastic steps are attached to the stringers
At this point, the process of installing a single-flight staircase on a frame made of a profile pipe comes to an end.
If you have basic construction skills, then assembling and installing a high-quality ladder from a profile pipe will not be an unsolvable task for you. And by adhering to the above rules and recommendations, you can build a strong and durable structure.
23266 0 1
Profile pipe ladder - 2 of the best options for home and summer cottages
Square or rectangular hollow metal pipes have long become almost the main material for the construction of light frame structures in private construction. The hand-made ladder made of a profile pipe, familiar to everyone, is in almost every summer cottage.
To weld it from the pieces of material left after the construction of the fence or gazebo, you don't need a lot of mind, welded the crossbars between the guides and use it. Today I will talk about the calculation and assembly of more complex marching and screw structures from the same profile pipe.
What you need to know when calculating any staircase
The calculation of a ladder from a profile pipe is not much different from the calculation of similar structures made of wood or concrete. Such calculations cannot be called too complicated, the instruction is standard, but it is not worth neglecting the stage of drawing up a drawing or at least a sketch of a sketch, with a calculation of all sizes and angles.
Calculation of the marching structure
Marching is called rectilinear structures that do not have smooth bends or turns. There are still staircases with an intermediate turning platform, and if all marches that join them are straight-line, then such structures are also referred to as marching.

- You should start by measuring the height of the future flight of stairs. This is the easiest way to do this. The march height is understood as the distance between the floor of the lower and upper floors. In other words, you need to add the thickness of the interfloor to the height of the ceilings;
- In order to make it convenient to walk on your stairs, you need to clearly calculate the dimensions of the tread and riser. The tread is understood as the platform on which we put our foot, and the riser is the vertical distance between the treads. In both cases, there is a comfortable range of operation, so for a tread it lies within 200 - 400 mm, and for a riser 150 - 200 mm;

- But it is equally important to maintain the correct ratio between the selected values. There are also a couple of formulas to calculate this ratio. I like A + B = 470 mm more (“A” is the height of the riser, “B” is the size of the tread). In addition to it, there is another formula 2A + B = 640 mm, to be precise, it is not exactly 640 mm, but from 600 mm to 640 mm;
- The minimum width of a stationary home span starts from about 800 mm;
- When you calculate the tread and riser dimensions that are suitable for yourself, you can already calculate the number of steps (the height of the span divided by the height of the riser) and the horizontal distance from the beginning to the end of the span (the number of steps multiplied by the size of the tread);

With a ceiling height of more than 2.5 m, the horizontal distance (along the floor) from the beginning to the end of the march starts from about 5 m. For small rooms, it makes sense to build a turntable with a turn of 90º or 180º.
- Now it remains for us to find out the most important thing. What will be the size of the future stringer from the profile pipe. Here the Pythagorean theorem will help us. For those who have slightly forgotten, I remind you that the square of the hypotenuse should be equal to the sum of the squares of the legs (a² + b² = c²). We have two legs, this is the height of the march and the horizontal size, it remains only to calculate the hypotenuse, which, in fact, is our kosour from the profile pipe;
- There is one more point that must be taken into account when calculating this is the angle of inclination of the march. So, according to SNiP, for stairs in residential premises, this angle ranges from 23º to 37º. If less, then this is already a ramp, and if more, then you get tired of climbing such steps.

So that you fool yourself less with all the calculations, in the table below I have collected the most running parameters of direct marching structures:
| Step dimensions | Angular march slope (given in degreesº) |
|
| Step width | Riser height | |
| 400 mm | 100 mm | 14 |
| 380 mm | 110 mm | 16 |
| 360 mm | 120 mm | 18 |
| 340 mm | 130 mm | 21 |
| 320 mm | 140 mm | 23 |
| 300 mm | 150 mm | 26 |
| 280 mm | 160 mm | 29 |
| 260 mm | 170 mm | 33 |
| 240 mm | 180 mm | 37 |
| 220 mm | 190 mm | 40 |
| 200 mm | 200 mm | 45 |

When calculating, it is extremely rare to get integers, convenient numbers. So, it is better to round up the data, so it will be easier for you to work in practice.
And the error that remains is compensated for by the height of the first stage. Believe me, if it is a little smaller, no one will even notice.
Calculation of a spiral staircase
The choice in favor of a spiral staircase is most often made due to a lack of space, although in some cases this decision is caused by the original idea of the designer. The price of such work from professionals is an order of magnitude higher, so it makes sense to calculate and assemble the supporting frame of the staircase from the profile pipe with your own hands. Moreover, this is not much more difficult than working with a direct march.
As in any business, there are 2 ways here, for the lazy and for the persistent. If you do not want to mess with calculations, then you can use the spiral staircase calculator, of which there are enough on the network now. And for those who are persistent, I will tell you further how to do it manually.
First, let's figure out the parameters and designations. By the way, the same designations are used in most electronic calculators.

- "H" is the vertical height of the structure. That is, the height of the ceiling, plus the interfloor overlap;
- "Н¹" - turn-to-turn distance. This means the distance from the step you are standing on to the step above you. Naturally, this parameter should not be less than the average human height, about 185 cm;
- "H" - the height of the tread, this is what we called the riser in the marching staircase;
- "H¹" - the size of the tread or the depth of the step, as you like;
- "R" - outside radius along the edge;
- "R¹" - the working radius or the one along which the person will climb the stairs;
- "R" is the radius of the central support.

- Along the line of the working radius, the tread depth should be in a comfortable range for a person, it is the same as in the case of linear marches 200 - 400 mm;
- The tread width next to the central support must be at least 100 mm;
- The minimum width of the span is 1m, but if you are not going to make a railing, then this value increases to at least one and a half meters;
- In spiral staircases, the risers are usually left open, this is much more convenient. Compared with marching structures, a slightly larger variation in the riser height of 120 - 220 mm is allowed here.

As in the case of marching structures, you need to start with a preliminary measurement. This includes the outer radius of the structure, the height of the stairs, and where you plan your entry and exit points, this is called the angle of rotation of the structure. After that, you can start calculating.
For example, I took fictitious values, you will naturally substitute your own. Let the outer radius "R" = 1000 mm, the height of the structure "H" = 3000 mm, the twist angle ω = 360º, that is, the entrance and exit are above each other.
With this data, we can find the working length of the run "L", that is, the size of the ladder along the line of the working radius. It is believed that the working radius is about 2/3 of the maximum. Starting formula L = 2πR¹.

Now we find out the number of steps:
- Let the size of the tread "h¹" be 250 mm, the basic formula is n = L / h¹;
- Therefore, 4190/250 = 16.79. The number of steps cannot be fractional, so we round up to 17, in addition, the upper step coincides with the floor level, as a result we get 16 clean steps.
If we take as a minimum (100 mm) the size of the tread at the central pillar, then we can fully calculate the dimensions of the entire tread, only for this we still need to know the length of the structure by the outer radius "Lout".
Lout = 2πR = (2 * 3.14 * 1000) = 6280 mm. Now we substitute everything into the starting formula.
h¹ = (7536/17) = 369 mm

The height of the riser is calculated here in the same way as in the marching span. The total height "H" is divided by the number of steps "n", so the total is:
h = (H / n) = (3000/17) = 176 mm.
Correction of the ratio of steps is also permissible here and is done according to the same formula as for a linear march, only the designations change slightly.
2h + h¹ = 600… 650 mm. After the correction, we get a riser height of 190 mm.
But that is not all. We still need to calculate the size of the top output pad. As you remember, our twist angle is 360º, the riser height in our case is 190 mm, and the total height is 3000 mm.

In other words, having climbed 4 steps, we will lose the height of 760 mm. If we take into account the thickness of the overlap, then we have about 2m in stock. Therefore, the width of the upper platform should not exceed the width of 4 treads, otherwise tall people will cling to their heads.
Both when designing linear flights, and when calculating a spiral staircase, try to always have an odd number of steps. The fact is that it is subconsciously more convenient for a person to start and end a movement with one leg.
Assembly of structures
If you cope with the calculations and sketching, it will not be difficult for you to mark the pipes for the future staircase. Therefore, we will go directly to the question of how to weld a ladder from a profile pipe.
Theoretically, of course, such a structure can be assembled on studs and bolts, but, not counting the complications in the calculations, it will take at least 3 times more time and effort to assemble this ladder.
Plus, this option is not considered absolutely reliable, since the bolts tend to unwind during operation. Therefore, I advise you not to get involved with such models.
We collect the marching span
Linear marching structures can be of two types: a staircase based on a powerful flat profile pipe and a variety of structures with broken stringers.

It is much easier to design and cook the first option with a solid, straight pipe and it takes much less time, but the price of such a structure is slightly higher. This is due to the fact that as a base you will have to buy a square profile with a minimum section of 100x100 mm, although I advise you to take from 150x150 mm. These ladders are much more reliable and look better.
In addition, the platforms on which the treads will be attached should not be more than half of these treads. Consequently, additional metal sheets with a thickness of 3 - 4 mm will have to be welded on, and such an amount of thick high-quality metal will inevitably lead to an increase in the cost of the project.
As you understand, horizontal treads will need to be fixed somehow on a flat inclined pipe. Therefore, you will have to weld on the platforms. They can be done in two ways.

- After we have calculated the angle of inclination of the pipe and marked the places of attachment of the steps, pre-cut metal sheets are horizontally welded to the base, along the entire width of the profile pipe, and wooden treads will subsequently be screwed onto them. But naturally, one horizontal seam cannot withstand such a load, therefore, props will have to be welded between the sheet and the pipe. These can be metal plates, pieces of reinforcement or shaped pipes of a smaller section. As you can see, nothing complicated, but to be honest, this option does not look very nice;
- I like the second option more, it is simpler and looks more aesthetically pleasing.... The supports for the platforms are cut here from the base profile pipe and sheets under the tread are already welded onto them. To do this, mark a cut on it at a calculated angle, take a grinder and. From the side, such a cut will look like a triangle, and from the front side it has the shape of the letter "P". Further along our cut, we weld this support to the base pipe. The diagram shows both options.

Since the entire structure will actually be based on one pipe, the weight there turns out to be serious and there will be a colossal point pressure at the junction of the profile pipe with the floor.
In order to distribute it evenly over a larger area and to insure against lateral overturning of the stairs, you need to weld metal plates with a thickness of 5 mm or more to the base of the pipe and the fixing point to the floor. The dimensions of such plates should be slightly larger than the step area.
Now let's consider the assembly of a staircase based on a broken version of the kosour. In addition to cost, such designs are good for their low weight. After all, they use pipes of a much smaller section.
It is believed that the optimal size is 40x60 mm. More is possible, less is not desirable.

Here, as in the case of a straight stringer, you can cook in two ways:
- According to the first method, the profile pipe is cut into separate sectors corresponding to the size of the treads and risers, plus a margin for the thickness of the pipe. After that, all these pieces are welded together into a finished kosour. In theory, it sounds simple, but in practice there are too many welding works and it is not a fact that you will be able to weld everything exactly everywhere;
- According to the second option, everything turns out much more elegant and faster.... The point is to cut out sectors in the form of isosceles triangles from a straight pipe with a grinder, while only one wall remains solid. After that, we bend the pipe and weld the joint. How it looks, I depicted in the diagram.

As for the plates for the support points, then for a profile pipe with a section of 40x60 mm, it is enough to weld squares of about 200x200 mm and fix them on 4 anchors. Although if possible, of course, it is better to connect two or more broken kosour on a single monolithic plate.
Assembly of the screw structure
Installation here begins with the installation of a central supporting round and preferably thick-walled pipe. The load on it will be serious and here the savings can go sideways. As I already said, the cross-section of the pipe starts from 100 mm, this is the minimum width of the tread at the base.
Naturally, the pipe itself from below should be based on a thick, reliable platform. If you are installing a staircase at the construction stage, then in order not to spend money on an expensive thick iron sheet, you can weld a cross from the bottom of the same profile pipes. Then walled up all this in a screed.

The supports themselves under the treads can be made of two types. Both in terms of bearing capacity and aesthetic characteristics, they are not much denounced. It all depends on what section of the profile pipe was at hand:
- If your tube is thin 20x20 mm or 30x30 mm, then it is better to cook the frame around the perimeter of the tread, in a closed loop... In order not to measure each arc separately, you should immediately make a pattern from wooden bars stuffed on a chipboard sheet. With such a device, you just have to insert the cut tubes into your mold and "grab" them by welding;

- With the second option, there is less hassle... But it uses profile pipes with a minimum section of 40x60 mm. There is no need to construct any patterns here. Simply cut pipe sections along the working radius of the ladder. In the outer end, in the form of the letter "T", weld a piece of the same tube, slightly less than the width of the tread, and at the end weld this entire structure to the supporting pipe.

Both in the first and in the second case, one fixation point on the support is not enough for the step. Therefore, I recommend welding an additional support under the frame of the step. There is no guarantee that you will be able to weld everything firmly and efficiently, and with a support, the reliability of the step increases significantly.
Finishing work
Most often, the frame of a staircase made of a profile pipe is revetted with natural wood. According to my observations, it is much cheaper, more beautiful and more reliable.
When choosing a board for treading, the most important thing is strength, so its thickness should be at least 40 mm. The thickness of the lining for the risers and the side bowstring, if required, does not really matter, since these parts of the ladder are only aesthetic value.

Do not forget that you are dealing with metal, and it is known to rust. I don't think you are going to spend the fabulous sum on a homemade stainless steel staircase. Therefore, after assembly, you first need to clean up all welded seams with a file or better with a grinder. Then degrease or prime the structure and at the end apply 2 - 3 coats of good paint.
Many people advise powder spraying on the metal. So, such things as powder painting or nickel plating of metal can be done exclusively in the factory on professional equipment. At home, you can only paint or varnish the stairs.

Output
For self-production, the frame of a staircase from a profile pipe is perfect. It is much easier than constructing stairs made of wood, plus the strength of the metal structure is much higher. The photo and video in this article provides additional material on the manufacture of stairs. If your question remains unanswered or if you have something to add, write in the comments, we will talk.

If you want to express gratitude, add clarification or objection, ask the author something - add a comment or say thank you!
When it is necessary to make a reliable and durable product, we are always talking about metal. Despite the fact that the strength of the metal depends on its thickness, when creating and assembling a ladder, it is worth knowing that too large dimensions can damage the structure.
When using very thick metal, the staircase will turn out to be cumbersome and not lifting with large angles. Then you will have to spend a considerable amount of additional funds to bring the stairs into an elegant and durable structure. To make the design beautiful, and not have to spend extra money and effort, you need to know which profile is best for the staircase and how to install it.
Choosing a profile
Making stairs from metal has become a long time ago, and this is not a new idea at all. When choosing such a design, special attention was paid to the metal corner and channel.
The assembly principle that has been applied for years:
- Parallel to one another, two channels were placed;
- With the help of a metal corner, the contours were welded between the channels;
- A step made of wood was attached, or a metal embossed structure.
Do-it-yourself stairs to the second floor from a profile pipe
Judging by many years of practice, we can say that the use of a metal corner is short-lived, since it deforms under the influence of loads. They found an alternative to the metal corner, and this is a metal profile.
Hint: It is best to use a 40 * 60 square metal pipe for stairs, this is the most suitable option. If you use a pipe with a smaller cross-section, then the result will be the same as in the case of a corner, and if you choose very large ones, they will look ugly and rough.

Advantages of a ladder made of metal profiles:
- With such a profile, you can make a stationary ladder, an extension and even a spiral one. The turns at the stairs can be at any angle;
- You can combine any materials with it, wood and glass look beautiful, and even plastic. By combining metal with such materials, you can make the staircase unique and in absolutely any color;
- You can use only one profile, as it is easy to paint with the modern powder method. Gold and silver colors are popular, as well as deep black with shiny metallic in some places;
- Such a staircase is durable and beautiful, it can last for several decades;
- Even if the frame is made of a complex shape, then you can assemble the ladder yourself, the main thing is to make the blanks correctly;
- You can install it both at the stage of construction of the house itself, and during the repair;
- The price of the product is low and affordable for everyone;
- You can assemble it yourself using an ordinary household welding machine.
How to work with a metal profile during the installation of a ladder
No matter how strong and durable the material is, it necessarily has its own characteristics, the knowledge of which will greatly simplify the work and help to avoid troubles.
Preparatory work

No business starts without preliminary calculations and a drawing. With their help, you can accurately determine the amount of material that is needed. To work comfortably and not have to be distracted, it is worth preparing the necessary tool in advance, you will need:
- Electrodes and welding machine;
- Grinder and circles for working with metal;
- Perforator with a set of drills;
- Hammer.
During preparation, it is worth making a markup and cutting the material in accordance with the required dimensions.


 Profile steps for installation in a building
 Assembling the stairs
During assembly, it is worth paying special attention to the load-bearing beams, since the greatest load falls on them. To assemble an ordinary ladder you will need:

Very often, a gap is left between the stairs and the wall so that you can paint the wall or paste the wallpaper. In this case, it is worthwhile to additionally strengthen the structure with crutches, which are driven into the wall, fasten them under the main inner pipe and weld to the entire structure.
 Screw structure made of shaped tube
 Using a metal profile, you can make a staircase of any design with your own hands, the difference will only be in the effort, time and finances spent. These stairs are practical and durable, do not require special maintenance and look beautiful.