Hinged ceilings have long ceased to be luxury, you can see them in many homes.
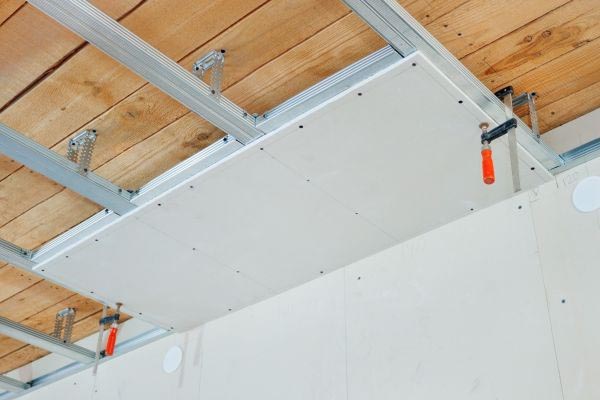
Suspended ceiling design scheme.
Installation of mounted ceilings can be carried out not only by specialists, everything can be done with their own hands.
Such ceilings make it perfectly hide all irregularities and communications. Installation of ceilings is pretty simple, it is possible to arrange a variety of lighting options, you can introduce sound and thermal insulation. Installing the ceiling with your own hands will not cause big difficulties.
To install mounted ceilings, you will need the following tools:
- building level;
- self-tapping screws;
- roulette;
- pliers;
- roulette;
- drill screwdriver;
- bulgarian.
How to develop installation of mounted ceiling

The scheme of the assembly of the mounted ceiling.
- It should be started with the fact that it is necessary to place the boundaries of the mounted ceiling. In order to be as accurate as possible, the alcohol or laser level should be applied. It should be carefully taken to work with such instruments, they imply the use of special glasses. As for the height of the ceiling, it all depends on the preferences and what pipes.
- Electrical wires should be tightly secured by special screeds, then they will not prevent work.
- Before strengthening profiles, you need to check the sensor if there is on the surface of the pipe and wires. If this is not done, everything can be destroyed with sharp screws.
- You should determine the angle from which the start of installation is planned. It is recommended to get up in the doorway and look at the look. That area that is visible most of all should be separated first. In most cases, the installation of such ceilings is done so that pieces of plates are above the doors in the most intimidated place.
- Now around the perimeter of the room should be strengthened with wall profiles, with the wall they are connected by 100-millimeter screws. If the wall is frame, then the screws can be screwed right in the rack. If the surface is made of concrete, then first of all the holes should be made for the dowels, then they are clogged into the base, and then screwed screws.
- Now it came to mount the frame of the framework, the brand profiles are used for this, they will need to fix the new ceiling panel.
Nuances setting a new ceiling

A diagram of a multi-level suspended ceiling.
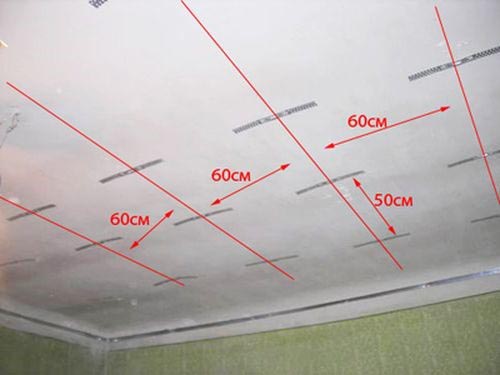
- If plasterboard is planned, the profiles from 60 cm long and 120 cm should be used.Through the angular profiles on two reverse transactions, the distance is to be measured, which is equal to the length of the average profile (this is 120 cm). Marks should be set, and then roulette to refine the distance between them.
- The resulting distance is transferred to the transverse profile, which will remain, then simply spills with a grinder. Now you can install a transverse profile, it needs to be drunk on the corner.
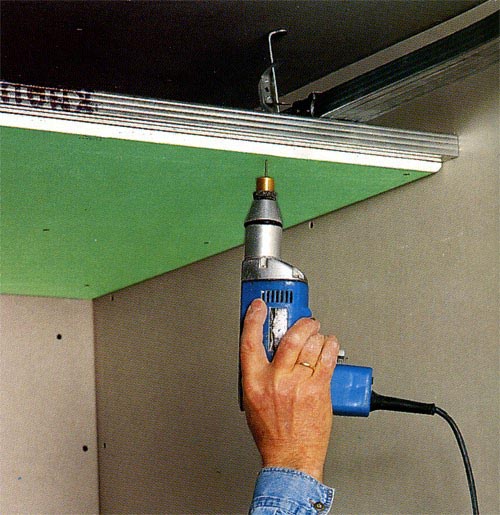
- You can proceed to the assembly of cells for ceiling tiles: the first thing is strengthened by a profile of 120 cm long, it should be placed in parallel to the angular guide. If the question arises, how to fix profiles, then there is nothing complicated. Before installing it, you should bend in a certain side of the petal. If the profile is secured properly, a small click will be heard, which indicates a good job.
- When the ceiling installation is carried out, it is necessary to ensure that it does not fade in the middle. For this, the transverse profile should be attached to the old ceiling or overlap supports. It is necessary to use special metal cables. Sculpt the suspensions to all sections should not. They need to be fixed through two mounting openings. For strong retention, the frame is quite enough. The top plate of the suspension bends 90 degrees with the help of pliers.
Additional Information
Now the loop must be attached to the surface of the ceiling, after which it is fixed on the ceiling by screws. To do this, apply a screwdriver, the lower end of the suspension must be flexing in a hook into the profile hole. As you need, the suspensions need to be simply subject to compressing and tightening, thus adjustable the ceiling height.
To do this, prescribe a curved narrow plate, which is located in the central part of the suspension. After working with suspensions is completed, the creation of cells should be completed, for this, transverse profiles of small length are mounted.
You should check the horizontal frame of the frame, and then go to the next area of \u200b\u200bthe room. If there is a connecting box for the lighting device on the old ceiling, it must be dismantled (it must be borne in mind that electricity should be pre-disabled). The wire is lengthened to then put the socket on the new ceiling.
Ceiling panels are stacked alternately in pre-made frame cells. Before that, it is necessary to wear unpeiled gloves, otherwise you will have to wash drywall. And this is not the easiest and not the most pleasant lesson. When the work came to an end, from the new suspended ceiling you need to wash off dust.
Installation of the mounted ceiling is made. Thus, make all the work with your own hands is not so difficult, as it could seem at first glance. Installation of such ceilings is good in that in the event of an emergency, you can simply change several ceiling plates. To redo the whole design from the very beginning there is no need. When installing the ceiling should be especially attentive and neat, then everything will definitely work out and nothing will have to redo. Due to the simplicity of mounting the mounted ceiling, it is becoming increasingly popular.
The apartment or private house will be a good solution to the ceiling finish using tensioned cloths. It will help to hide the irregularities of the foundation, hide various non-residential communications under the material (electric conduction, extractor, etc.). Stretch ceilings have a weight gain. There are a huge amount of their colors and textures. This finish will harmoniously fit into almost any type of interior.
Installation organizations carry out the installation of cavities quite expensive. Wanting to save the family of a family budget, if there is a sufficient amount of free time, you can perform all actions yourself. How to install stretch ceilings, It will be discussed in detail in the article.
Selection of material
There are two main varieties stretch ceilings. As installed The presented structures directly depends on their features and characteristics. There are fabric ceilings and a PVC film finish. The choice depends on the type of room, as well as the preferences of the home owners.
Tissue ceilings are made of polyester material. It is impregnated with polyurethane to give the necessary durability and wear resistance. Almost any pattern can be applied to the surface of the web. It can be one color, drawing or even a picture. Fissure ceilings due to the features of operational characteristics are installed in the living room, bedroom, a children's room or a hospital.
PVC film is characterized by a glossy surface. She gives the room solemnity and beauty. This canvas does not miss moisture, is not afraid of splashing. The film can be installed in the bathroom, in the kitchen and in other rooms. Cheap varieties of material can produce an unpleasant chemical smell. It makes harm to health. It is extremely recommended to install similar canvas in the bedroom or childish.
Wondering can I install stretch ceilingsshould consider the technology of this process. Installation of film and fabric has a number of differences. Before proceeding with work, you need to learn about this detail.
Methods of installation
Learning how install the stretch ceiling in the bathroom, In the kitchen, in the bedroom or living room, you need to familiarize yourself with the existing techniques for carrying out this process.
PVC film is mounted on the base with the help of strokes or special wedges. Also can be used in this case. It is considered quite complicated, but reliable way. The fact is that there are no cloths with welded harpunas. They will need to attach to the film using special equipment. Such a procedure is carried out by specialized organizations. The processing price is high enough. This is explained by the use of complex high-tech equipment.

Most often, the staps or wedges are applied during self-installation. When mounting around the perimeter, a special rigid baguette is installed. It has a certain kind of profile. Stip involves the use of special additional fasteners. The fabric starts in baguette. It is fixed with a stroke inside the design.
There are also clip clamps. First, the film is started inside the profile. Then it is closed. Baguette reliably holds the material inside. There are many different methods for fixing the stretch ceiling in the profile.
Fabric ceilings mount their own easier. In this case, the framework of the base is also mounted around the base perimeter. It clamps the canvas. The difference lies in the method of pulling the material.
Preparatory stage
Studying technology how to install a stretch ceiling with your own hands It is necessary to consider the detailed instructions of this process. First, you will need to hold a number of preparatory work.
From the room we endure all the furniture. If necessary, the walls are putty, finishing finishing works. It is also necessary to prepare the foundation of the ceiling itself. It should not be left old whitewash, paints. If the material begins to crumble, it will spoil the appearance of the stretched canvase.
Seams between the plates should also be wrapped in a putty. Walls must be smooth. This will greatly facilitate the process of installing profiles. Also, you should install all the communications in advance, bring the wires for chandeliers or point lamps. Under the web you can hide the ventilation box. How to install a point lamp in the stretch ceiling? FROMthere is a specific instruction.
If you plan to install chandeliers in the room, you need to prepare a base for it. You can lengthen an existing hook, enhance it additionally with a metal chain. You can also build a special base. It should not reach the surface of the canvas for several centimeters.
Required tools
To install the stretch ceiling in the room, bathroom or in the kitchen, you should prepare all the necessary equipment. Some have at hand from every homemade master. Part of the equipment is likely to purchase.
First of all, for installation, it is necessary to prepare a screwdriver and a perforator. Also required roulette, construction level. Install the cloth in the profile is needed using special blades. It will be necessary to purchase them. We need straight and angular blades.

You should also choose a certain type of web for the stretch ceiling. At the same time, the conditions of operation of the finish are taken into account. After that, pick up profiles. They can be plastic or aluminum.
You can pick up various additional components. They are presented in the form of multi-colored inserts. Also, if necessary, acquire clips, accessories to install lighting devices (glue, plastic rings).
If a PVC film is stretching, a special thermal gun or a construction hairdryer should be purchased. This equipment will allow you to correctly mount the cloth.
Installation of profile
Choosing which stretch ceiling to install In the room, pickup all the necessary materials and tools, should consider the procedure and stages of the installation itself. First, it will be necessary to perform the correct marking of the walls. For this, the height of the walls is measured in all four corners of the room.

After measurements, appropriate labels are applied to the surface. The difference in height can be about 5 cm in some apartments and even more. By defining the smallest distance from the floor to the ceiling, it is necessary to take away from the result obtained space that will be discharged under ceiling communications. If the chandelier is installed in the room, it is necessary to take into account the height of the platform for its attachment.
After the calculations produced using a laser level on the walls in the room the line is applied. The profile will be installed on it. This mark should be perfectly smooth.
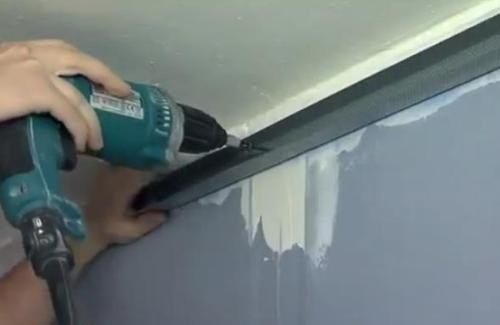
After that, you need to get acquainted with the technology of how to install cornice on the stretch ceiling. According to the intended line, the profile is installed using a dowel or self-tapping screws. The step between the fasteners should be 7 cm. To simplify installation, you can first glue a profile to the wall. So he will not shift.
Installation of film ceiling
Many novice installers are asked how many tension ceilings are installed. It should be noted that the duration of this process depends on many factors. Professionals perform all the work in one day. The novice master will need more time.

Installation starts from the base angle. Ship clips should be installed. They are fixed in the corners of the room. First attach one edge of the canvas. Next, the brush is fixed the opposite angle. Then all edges of the canvas must be fastened with clothespins.
After that, it is necessary to send a stream of hot air to the web (at least 70 ºС). Then the corners of the canvas in the profile are fixed alternately with the blade. Clothespins are removed. All edges of the film are attached in the profile.
The procedure is completed by installing a plastic baguette around the perimeter of the room. This decorative element can be selected in specialized construction stores.
Plastron for plastic canvas
It is important to consider how to install a chandelier on the stretch ceiling. There are several options for this process. Even before installing the cloth to the baguettes, it is necessary to prepare a platform for the lighting device.

If the chandelier hook is already provided in the ceiling, it will be necessary to lengthen it. At the same time take into account the distance from the canvas to the base of the ceiling. Hook will need to strengthen. For this, steel chains are used.
If there is no hook at the base of the ceiling, you should prepare a special platform. At the same time take into account the weight of the lighting device. If it is a small, light chandelier, you can make two heads on which the platform will be attached. The lighting device will be mounted.
It may be necessary to consider the technology of how to install a chandelier on the stretch ceilingwhich weighs quite a lot. In this case, the platform should not be installed on two, but by four supports. The platform should not reach several centimeters for the surface of the canvas.
Chandelier installation
To install a chandelier on a plastic stretch ceiling, you need to perform a number of manipulations. It should be noted that the film under the weight of the lighting device can be deformed and break. So that this does not happen, when installing the PVC web, you will need to perform several uncomplicated actions.

You need to purchase special protective rings from plastic. They will prevent the destruction of the material at the installation site of the chandelier. How to install lamps in the stretch ceiling? FROMthere is a certain technique.
The locking ring must be glued to the film in the place where the mounting or hook platform is installed under the cloth. You need to wait. When the glue dries, in the center of the ring with the help of a stationery knife, a circular hole is cut. The electric wire is dragged through it.
The chandelier connects to the power grid. Next, it is attached to the prepared platform or hangs on the hook. The decorative cap is covered by the installation location. If you wish, you can create a system from dot luminaires. In this case, protective rings also apply.
Safety regulations
To install the stretch ceiling in the kitchen, In the bathroom or other rooms, it will be necessary to apply special equipment. When carrying out such works, it is necessary to follow all safety rules.
The heat gun heats the air with a gas. This is explosive equipment. The balloon must be good. If his service life came out, it is impossible to use gun.
If you need to fill the balloon, you should contact a special organization. It is impossible to produce such actions at the gas station.
Before starting work, it is necessary to check whether the hose is if there is no visible damage to the equipment. If the gas leak is determined, the unit will need to be passed to repair.
The heat gun creates high heating. Direct the hot air flow to the cylinder is strictly prohibited. Clear execution of the rules of operation of gas equipment guarantees the security of the wizard. If you ignore the recommendations of the equipment manufacturer, you can cause significant harm to the property, the health of the master.
Tissue ceiling
After studying the technology of installation of vinyl canvases, the technologies of technologies from the fabric should be given. Such products do not have seams. Their width can reach 5 m. It allows you to mount seamless canvases in almost any room.
Fabric stretch ceilings are easier installed with their own hands. In this case, you will not need to use a heating gun. The room should be the usual temperature. This type of installation also assumes a preliminary installation of profiles. It is necessary to give preference to durable structures.
The installation of profiles is performed according to the same technology as in the case of a PVC film ceiling. First, markup is made, and then with the help of dowels or self-tapping screws, the guides are tightly attached to the wall.
Stretching the cloth from the fabric does not follow from the corners, but from the middle of the wall. First, a kind of cross is formed from the material. The remaining pieces are stretched from the center to the corners of the room. At the same time, special blades are also applied. Excess material is cut into a sharp knife. Installation should be installed so that folds are not formed on the canvase.
Examined how to install stretch ceilingsdifferent types, you can perform the whole process yourself. Following the recommendations of specialists, you can achieve a high quality finish. When working, be sure to be guided by existing safety rules. The installation of the tissue canvase for beginners is carried out easier than PVC films.
Installation of suspended ceilings is a simple and elegant way to hide the irregularities of overlapping and hide communications. In addition to ease in the assembly, such ceilings have a lot of other advantages.
To the main one can be attributed:
- the possibility of organizing various lighting options;
- application of sound and heat insulation;
- the possibility of implementing various design ideas.
Today we will tell you more detail about how the installation of the suspended ceiling is being done.
Tools and materials
To work, you will need:
- ceiling panels;
- metal profiles for creating a frame;
- suspensions;
- screws;
- dowel;
- pliers;
- level;
- roulette;
- screwdriver;
- bulgarian or scissors for metal;
- wooden layoffs.
Installation of the suspended ceiling, detailed video instruction:
Suspended ceiling - installation technology
On the perimeter of the room, the angular profiles are installed, which are fixed on the wall of 100-mm screws. If the wall is frame, then the screws can be screwed directly in the rack. For a concrete surface, first will have to drill holes for dowels, score them and only after that twist the screws.

The installation of the suspended ceiling with its own hands continues to fasten the frame from profiles. The distance between such placas depends on the material used to cover the material and the size of its elements. For example, a profile 120 and 60 cm longs are used for drywall.
According to the angular profiles on two opposite walls, the distance equal to the length of the guides is measured. Make marks. Use the roulette to check the distance between them (read: ""). This is necessary due to the fact that the uneven walls of many buildings are simply not allowed to do only one measurement.
The noted distance is transferred to the transverse profile. In this place, the extra part is scorn with a grinder.
Removing the corner, set the transverse profiles.

How to install a suspended ceiling? In order for the ceiling to be seen in the middle, a transverse profile is attached to the base base with the help of suspension. The suspensions are installed with a certain step, they are fixed through one or two mounting openings. The upper loop of the element is bent at an angle of 90 degrees.
After you secured the framework on the suspension, set the transverse profiles, thereby completing the formation of cells.
Just in case, check the horizontal frame of the frame. If he saves in some place, then just pull the suspension.

Now start the installation of facing cells. Be sure to wear clean gloves in order not to leave dirty traces on the ceiling surface.
After completing the framework of the frame of the frame, the dust from the ceiling surface is shifted.
On this your new suspended ceiling is ready. If during its operation, one or two tiles will be damaged, they can be easily removed enough and change to new ones.
We hope our article will help you figure out how to install a suspended ceiling.
Armstrong ceiling systems are known as prefaby suspended structures consisting of metal frames and plates from mineral fiber. Under them, you can easily hide communications and they will not spoil the appearance of the room decorated in the classic style.
Advantages and disadvantages
Most often, the installation of the ceiling Armstrong in public institutions, when finishing offices, trade enterprises, cafes, and they are well fit into the decor of apartments.
Among the advantages of these ceiling structures are:
- low cost;
- lack of need for preliminary preparation of the basic basis;
- sufficient degree of sound and thermal insulation;
- a wide variety of plates allows you to implement any designer solution;
- simple installation of the suspended ceiling Armstrong, for which the participation of professionals is not required;
- the ability to make imperceptible communications and ventilation systems;
- ensuring easy access to the interpostral space for inspection and repair;
- trouble-free setting of lighting devices;
- it is possible to dismantle and reuse the elements of the system, since it is completely collapsible.

Armstrong deficiencies a bit:
- it lowers the height of the room no less than 20 centimeters, so it is not always possible to use it in apartments;
- the ceiling can not be mounted indoors having a non-standard configuration;
- the design will not protect the objects in the event of leakage from above;
- it poorly tolerates the elevated moisture, from which the organic plates begin to twist and undergo deformation.
The popularity of such ceiling systems, thanks to numerous advantages, does not decrease. To perform your own hands, the installation of the ceiling Armstrong is quite simple and in the office, and in the residential room.
Features of the structural device
Armstrong ceilings consist of a frame made of metal plates collected in the form of cells of 60x60 centimeters. They are placed soft or rigid tiles of a certain size.
Hard elements produce from such materials:
- whole or perforated metal sheets;
- wood;
- plastic;
- mirror;
- glass.

Soft plates are made of organic or mineral materials. Recently, due to the fact that preference is given to environmentally friendly finishing materials, mineral products began to use very rarely, since they contain minvat, the smallest particles of which when penetrating the respiratory organs cause serious harm to human health.
For mounting the suspended ceiling type Armstrong, soft organic tiled elements often use. There are secondary cellulosic raw materials in their composition, so they are completely safe, weigh a little and, if necessary, cut easily.
For the construction of the frame and its finishes will be required:
- Ceiling tile, having parameters 60x60 centimeters.
- Profile carrier T-shaped 370 centimeters long. It is installed in parallel with the short side of the room and in the presence of the need to increase using standard fasteners or cut off the excess part.
- Profile transverse T-shaped 60 centimeters long.
- Profile longitudinal T-shaped with a length of 120 centimeters. It is attached to the bearing profile with a period of 60 centimeters.
- Suspension ceiling with crochet and barbell. To the ceiling overlap, the bar is fixed with dowels or anchors, and the hook - to the supporting profile. The suspension length is adjusted by clamp and thereby provide horizontal location of the frame.
- Profile wall L-shaped long 300 centimeters. It is installed along the perimeter of the room using the level.
- Dowel or anchor. When the Armstrong ceiling fastening is performed, these products serve to fix the suspension to the draft base.
- Ceiling cropped plate designed to fit under the room parameters.

The profile for assembling the frame is metal-plastic or metal coated with powder painting composition. The standard width of its shelves is 15 or 24 millimeters. In the first case, the profile is used to build light structures using organic tiles.
The second option is involved in the construction of metal, glass, mirror ceiling structures with a large number of built-in elements. For fasteners Armstrong to the ceiling, if it has a lot of weight, use reinforced suspensions.
The frame is fixed using standard fasteners, it, as a rule, requires a minimum fit, because it is assembled similarly to the design, quickly and simple.
By the way, the tiles for Armstrong can be made by MDF or wooden panels. Their design gives the interior of the premises a unique style.
Calculation of component elements
Before mounting the ceiling Armstrong, it is necessary to calculate materials that will be required for work, for which the length and width of the room are measured. Taking into account these parameters determine their number.
When the installation of heavy lamps or elements of the ventilation system is to be set, experts are recommended to additionally use the suspensions. All the necessary materials are desirable to order with a small margin, because when performing work, you may need a fit or product will be damaged.
Preparation of the foundation
As with the arrangement of other types of ceiling structures, before installing the Armstrong ceiling, a number of preparatory activities are performed. This suspension system fully does the invisible state of the draft base.
The preparatory stage is to remove the previous ones, which came into disrepair of finishing material. When the paint or the whirlwinds are firmly kept on the surface of the overlap, it is not allowed to removed.
If there is a detachment of the finish sections or a layer of plaster will be disposed, they are able to damage the mounted tiles. For this reason, they must be removed, and cracks to fill with putty. Before mounting the ceilings Armstrong indoors, where the likelihood of leaks is large, the draft base should be hydroizing.

Since there will be a period of 20 to 25 centimeters between the overlap and the surface of the design, the heat and sound insulation materials can be placed in it. Before their placement, first of all for fibrous plates of the heat-insulator, they collect a crate of wooden bars, having it in such a way that it is slightly shifted in relation to the suspended frame.
Step-by-step assembly of the ceiling Armstrong
Getting Started, you need to use the instruction on the installation of the Ceiling Armstrong.
Installation is made in several stages:
- Design layout of construction. From the correctness of the execution of this stage, the successful result of all operations largely depends. For marking uses a laser level. It is starting from the lowest of the four corners of the room. It is delayed from the ceiling overlap the average length of the suspension so that it can be adjusted in the direction - and upwards and down. The level from this point on both walls is carried out lines, there are angles adjacent to them, and then continue the lines on all other walls. In the last corner, direct should come together.
- Fastening wall profiles. When installing L-shaped elements, dowels and self-tapping screws or anchor bolts with an interval of 50 centimeters down the shelf and are aligned according to a previously marked line. The profile bends in the corners before having cracked the shelf.

- Installation of ceiling suspensions. These framework elements are used to attach a carrier profile. To place ceiling suspensions in the desired place, you should define the location of the plates. They are installed parallel to the short wall of the room with a pitch of 120 centimeters. For convenient installation, you can read the corresponding lines on the ceiling or use for the markup of the chalk cord. Further, according to the scheme, the places of attachment of suspensions are noted. In accordance with the instruction on the installation of the suspended ceiling Armstrong, these components should be placed at a distance of no more than 120 centimeters one from the other and 60 centimeters from any wall. They are fixed with anchor bolts or dowels. For this, according to the markup, the holes are drilled and the suspension of the barbell is fixed.
- Installing suspensions for lighting. Places where the installation of lamps and blocks of split-systems is scheduled, it is necessary to additionally enhance the suspensions by placing them with a little displacement relative to the main component framework. The hook of the suspension often interferes with the installation of elements, so the suspension is desirable to be placed with a displacement of 5 - 10 centimeters.
- Installation of carrier profiles. They are placed on the pre-applied markup and fasten with the help of hooks of suspensions for the holes that are available in the profile. It is necessary that the ends of the carriers of the rails rest in the shelf of the L-shaped profile. When it turns out not enough length, it must be increasing, applying a standard lock located at one of the ends of the rail. If necessary, the profile can be trimmed. Read also: "How the assembly of the ceiling Armstrong is being built - the sequence of installation".

- Alignment. Horizontal arrangement of carrier elements should be achieved by adjusting the length of the suspension. To do this, first the clamp-butterfly is compressed, in the desired direction, the hook and rod move. Then the clamp is released and thus fix the length of the suspension. In order to control the ceiling plane, use the level and tight tight cords.
- Build frame construction Using transverse and longitudinal type profiles. Longitudinal profiles with a length of 120 centimeters are installed between carrier elements in 60 centimeters increasing fasteners on the profile. For extreme plates once again not cut, you should adjust the indents from the walls, making them symmetrical. In the gap between longitudinal rails, 60 centimeters long with conventional fasteners are mounted.
- Installation of built-in elements. As indicated in the instructions for mounting the ceiling Armstrong, after completing the frame assembly, it is necessary to start filling the cells with plates and installation of built-in instruments. First prepared to connect communication, laid below the surface of the suspended system - Ventkanals and wiring. For this, they are summarized to the locations of blocks and lamps. LED, raster or luminescent lighting devices in size 590x590 millimeters are inserted into Armstrong. They are raised at a low angle relative to the ceiling plane and unfold diagonally, aligning with a cell. As a result, the lamps turn out to be on the guide profile. Through adjacent empty cells, connect the devices to the feed cable.

- Installation of point lamps and ceiling split - systems. They can also be used in the ceilings Armstrong. For this, the stoves make holes in accordance with the size of the armature of the lighting equipment. After returning the tile, point devices are connected to the place. The air intakes of ventilation systems are embedded. Blocks split system is better installed in the most fortified places, for example, in the corner.
- Laying tiles. Deaf elements are placed in place last. They need to be brought to the cell diagonally and put on the guides, then, lifting the bottom and turning, put in place.
Nuances install ceiling construction in the apartment
With the task, how to install Armstrong in model planning apartments, you can not always cope. If the ceiling height exceeds 275 centimeters, the installation is performed according to standard technology. In this case, the surface of the structure should be located at an altitude of at least 250 centimeters - this value is provided for SNiP.
When the ceiling floors are below, then Armstrong is permissible to install indoors, where people stay periodically, for example, it can be a corridor.
Since such a ceiling has a low price, does not highlight substances harmful to health, easy to install and maintain, the main thing is to choose quality material for it and the corresponding design.
In order to figure out how to install a suspended ceiling, consider what it is, what major types and species exist. The suspended ceiling is elements from a variety of material that are attached to a rigid wooden frame or a frame of light, durable metal, which is further attached to an existing ceiling.
The most frequent option is the use of suspensions, but if the suspensions are not used, the frame is attached directly to the ceiling, then such a suspension ceiling is called stroke.

There are two main types of suspended ceilings: modular and solid.
Modular ceilingsthey have in their set a variety of modules that form a ready-made complete design. The next type of ceilings can be cassette, mat.
Cassette ceilings They are square modules (plates or so-called cassettes), these plates are inserted into rectangular or square niches, isolated from metal peeks. The most popular cassette ceilings are Armstrong and Albes.
Advantages:
- easy to assemble, mounting;
- easily repeats the irregularities and bends of the room or room;
- environmental friendliness;
- safety.
Disadvantages:
- bulky;
- hides up to 30 cm of the height of the room.

Rush ceilings Consist of narrow regions that are connected to each other. This type of ceiling is most often put in bathrooms or in the kitchens.
Advantages:
- heat-resistant;
- moisture-resistant;
- eco-friendly;
- fireproof;
- practical to use.
Disadvantages:
- steals up to 20 cm of the total area of \u200b\u200bthe room;
- not aesthetic, insufficiently comfortable.

Solid ceiling plasterboard are sheets of drywall, which are suspended on metal structures.
The main pleasant qualities of working with this type of suspended structures are:
- hiding all irregularities;
- the possibility of creating a multi-level ceiling;
- convenient hiding all communications;
- the ability to conveniently accommodate all lighting directly into the ceiling;
- the ability to create smooth bends and shape the ceiling.
Preparatory stage
Before proceeding to the direct installation of the selected suspended ceiling, it is necessary to carry out mathematical calculations attentively, so as not to be mistaken in size, form, buy the desired building material and prepare the tools necessary for further work.
What materials are needed?
- selflessness, dowel (plastic inserts that attach to the wall);
- suspensions;
- support profiles - Stringers;
- ending corners (P-profile);
- brackets, thanks to which the installation of suspensions is performed;
- panels (rails), interpanel inserts;
- luminaires, wires (if you plan to add built-in lighting).

What are the main tools need to work?
- pencil or marker for marking;
- scissors for metal;
- laser level (or ordinary bubble);
- drill with a variety of set of nozzles;
- reliable roulette;
- standard size hammer
Components of system elements
The suspension frame as a whole consists of several specific types of ceiling profiles:
- corner-free 19/24 profile;
- transverse profiles with a length of 0.6 and 1.2 m, types T15 and T24;
- bearing with a length of 3.6 m, types T15 and T24 (from this type depends on the width of the profile).
Tiles are the main finish. Depending on the size can be divided into two types: 595 x 595 mm (single) and 1190 x 595 mm (double tiles). The first option is the most popular, because the rectangular form is not always practical.
We will understand what the needker represents. Spin is a twin device consisting of three main elements:
- spin at one end prisoner by an eye;
- the needles ending at the end of the crochet;
- spring, the so-called "butterfly".
In order for the profiles to be supported securely in a hanging condition, as a fastener uses certain knitting needles that are securely spring and with which there is a convenient ability to change the height of the frame installation. For professional horizontal leveling, the ceiling design uses high-quality control of the length of spring-loaded spokes.
Exist various classes of suspended ceilings, it all depends on the prices, the desire of the customer, ideas for the beautiful interior. The main classes that can be distinguished (on the example of the suspended ceiling Armstrong):
- economy option - Plates made of microfolocone have not too high-quality properties, but at the price of the most acceptable. Have low moisture resistance, therefore, in rooms with high humidity or unreliable roof such ceilings are not recommended. Basic models of this option: Baikal products, oasis and tatras;
- "Prima" class is higher specifications associated with technicality, moisture resistance here is already high, such ceilings are durable, as well as high indicators. Different designer relief and different color gamut, the thickness of the tiles - depends on the desire of the buyer, but in general up to fifteen mm;
- acoustic ceilings - the next products will delight high quality material, reliable relief and most importantly - protects against any penetration of undesirable noise. Also, this design will be incredibly reliable in operation, environmental friendliness;
- designer classes are the most expensive, but unusual and brave, such ceilings are designed from high quality material, have many advantages.
Important moment! In the case of planing in a room with a large humidity, it should be selected moisture-proof material for the suspension so that the design serve for a long time and did not grieve premature breakdowns. Very often, after the final sheat, certain works of the finishes are carried out, for example, filling with putty joints between the ceiling sheets, after which work the surface is painted into certain paints for the origin of work. The correct calculations play an important role.
It is necessary to carry out calculations above the following important details of the room:
- ceiling size;
- the right number of profiles;
- how many suspensions need;
- number of sheets of plasterboard or other main material.
During the necessary preliminary calculations, it is necessary to use those data that are on the outside of packages of different building materials, this is explained by the fact that the packages indicate the approximate material consumption per 1 m2. Such information will significantly simplify the calculations, so it will be very important to pay attention to them.

 One of the main tasks is the right calculations.
 First stage - markup
The marking is applied directly to the feels, the walls of the measured room, it will be formed further the framework. The desired level of construction is determined, which will be created in the future, the height of the room in each corner is measured. Of the lowest corner of the room, the distance of the lowest point of the future ceiling is determined. In the case of the layouting planning simultaneously with the finishing of the main work, it is necessary to take into account that the distance between the suspended structure, the base must be more than ten cm, in other cases it is possible to use a smaller distance.
In one of the four angles, the base line is drawn, which will be a guide for the starting profile. It should be noted that to obtain the desired result, the most effective will be the use of a laser level (if there is no such, the usual bubble level will also be useful). The markup is further applied directly to the ceiling, which will determine the subsequent locations of the fixation of the necessary suspensions. One important point, the distance between them in 60 cm will be more optimal and efficient.
When the necessary markups were applied, the main work begins. That is the direct formation of the structure. In the process of planned making markup In order for in the final result, there were no distortions and other unpleasant situations, the usual standard roulette is not suitable, professional measuring devices are needed for the ideal result. This should be considered.
Second Stage - Creation of Main Frame
When performing the installation of the frame, the sequence of actions is very important. To begin with, a metal starting profile is attached to the walls, so the orientation is important for marking made in advance. In order for the profile fastening is reliable, special anchor bolts are attached to the pre-made holes (here you can use a perforator or any other suitable tool).
The same anchor bolts are attached to the ceiling mounted suspensions. The most commonly used lamellar suspensions that can break in such a way that they will be perpendicular to the ceiling. In the case of the use of rod suspensions, they are attached to the rings, and then the optimal and desired length of each rod is adjusted separately.
Using short screws, fasten the main profiles to the suspensions. Self-tapping screws are used intended for working with metal materials.

To work in wide rooms, connect the longitudinal elements of the finished frame with each other. Using a level, all parts of the harvested frame are aligned, checked. The main profiles with their ends come to the starting profile, after that they are fixed with the help of working screws.

Third stage - lighting and wiring
In order for the design to be really saturated, full, unusual, the lighting is better to think through, make in advance using the built-in high-quality lamps. In this stage, it is necessary to make wiring wiring, then fix the lamps themselves. We define the connection point to the main electricity network, we apply markup on the ceiling.

These points will show the place of installation of each lighting device. The trace of this connects the cable, which is fixed reliably to the very base of the structure, provided that the cross section is more optimal.

In places where the lamps will be installed, the cable is passed, it is very important to calculate the correct length of the cable, so that the use of lighting devices was comfortable for humans and easy. The lamps will be connected, checked so that in case of malfunction you can fix the error.
Installation of suspension ceiling
The next stage is the mounting of the trim, which is plastic panels, drywall or other elements, it all depends on the wishes, design, financial capabilities.
Depending on the distance between the suspensions, the sheets are cut, for which a regular knife is used. For a variety you can apply marking to avoid damage to the material. One person holds a sheet, another fixes it, usually a screwdriver - the optimal tool for this. It is necessary to screw the screws in such a way that the plane is smooth, and there was no screwdriver hats.

Final Actions
After the skin, the final finish, joints, irregularities are performed, the screws of the screws are filled with a spike material. Dry material is corrected, removed with sandpaper. Decorative finish materials, such as paint, lacquer coating, decorative plaster, wallpaper, any coating. It all depends only on fantasy and desire.

As you can see, making the mounting of the suspended ceiling itself is not at all difficult. Enough to follow the instructions, have the necessary materials, desire and inspiration!