Frame baths 6x8, 6x4 and similar structures are widespread, not only in regions with a mild climate, but also in places with severe weather conditions.
In short, the technology for the construction of such houses includes the following stages:
- Laying the foundation;
- Frame assembly;
- Sheathing of the assembled frame with OSB plates or boards outside;
- Installation of heat-insulating materials into the wall cavity;
- Indoor finishing work (wall, ceiling and floor paneling);
- Finishing work on the facade of the building.
Design features
After reviewing the list of works, we see that a 6 by 6 frame bath or an object similar in its characteristics can be built with our own hands without the involvement of highly qualified specialists.
But there is one important point, if you are interested in a strong and durable construction, it will be necessary to develop an appropriate project.
Project development

A professionally designed 6x4 frame sauna project guarantees a number of advantages, including:
- Ensuring a long service life thanks to a professional approach to calculating the design loads on the frame;
- The ability to choose the right type of building materials in accordance with the loads on the frame;
- The ability to correctly draw up an estimate and, as a result, prevent overspending of building materials;
- No difficulty in registering a construction object with the cadastral authorities;
- Higher price when selling a house together with a bath in the secondary real estate market.

From the above it follows that the project of a 6x6 or 6 by 4 frame bath is necessary. But if the construction can be done independently, then the development and production of project documentation requires a professional and qualified approach.
You can order projects of baths of various configurations in specialized bureaus. Also, project documentation can be obtained by purchasing a ready-made set of frame baths. As a result, you assemble the structure according to the provided plan, independently or with the help of invited installers.

In accordance with the standard design documentation, a frame for a quick-assembly bath is built with a step of 95-100 cm. A 150x50 mm board or timber is used as the main building material.
Important: If the procurement of materials and construction is carried out independently, you must make sure that the purchased wood is properly dried. If the moisture content of the timber and the board is more than 20%, there is a possibility that the building will "lead" during operation and expensive repairs will be required.
A 6x6 frame bath with an attic, as well as a 6x4 building, is being built with a steam room and a washing section on the ground floor. On the same floor, a dressing room or dressing room is set up. For greater comfort and safety, the heater-heater is fired not from the washing compartment, but from the dressing room.
According to the project, the attic can be accessed from the dressing room by an internal wooden staircase. The calculation of the premises is made in accordance with the planned number of people using the bath at the same time. A number of developers, in addition to the recreation room, provide for a terrace or veranda in the attic.

Baths, in accordance with the drawing documentation, are equipped with internal partitions between the washing compartment, the steam room and the dressing room. Partitions, like load-bearing walls, are made of frame + with insulation laid between the layers of the outer coating. Insulation without fail on both sides is laid with a hydro- and vapor barrier film.
Small-sized frame buildings, regardless of the type of finishing materials used, are characterized by a low load on the ground. Therefore, quick-assembly.
The use of a strip base guarantees such advantages as saving building materials and time.
Important: organizations involved in the design and construction of quick-assembly buildings, if necessary, can make the required changes to the facility plan. Of course, making changes to the project will affect its cost, but in this case it will be possible to build an atypical bath that will best suit your needs.
Assembly technology
Having drawn up a drawing of the bath, and having decided on its location, you can proceed to the procurement of materials and to construction ().
We need:
- typical boards (50x120 mm);
- timber (120x120);
- bars and boards for lathing (20-30 mm);
- bars (75x40);
- lining or siding for wall cladding;
- cement;
- roofing felt or roofing material;
- mineral wool;
- expanded clay;
- fastening materials.
The construction instructions are as follows:
- The site is cleared and marked for construction;
- Along the perimeter, according to the project, a strip foundation is laid under the load-bearing walls and under the partitions;

- The frame is assembled from four frames assembled from bars, transfers and rafters.
- Frames are mounted to the bottom rail;

Important: before proceeding with the next steps, you need to saturate the entire structure with antiseptics and fire retardants.
- wall elements are mounted on the prepared piping, which are attached to the frame with anchor bolts;
- the joints formed between the frame and the plates are insulated with polyurethane foam;

- on top of the frame, beams of the rafter system are mounted, and a crate is made;
- slabs are attached to the crate, on top of which heat-insulating material is laid;
- roofing material is laid on the rafter system;
- then internal partitions are assembled and installed;
- the partition to which the furnace will adjoin is laid out from heat-resistant bricks;
- after the walls are ready, interior decoration is carried out, during which heat-insulating material and vapor barrier are laid into the walls and partitions;
- further, the space under the floor is filled with expanded clay, covered with a vapor barrier film;
- in the next step, the final floor is laid.
After the main structure is assembled, you can start decorating the interior.
Output
The construction of a frame bath from ready-made kits is not difficult if there is a project, the necessary tools and assistants with experience in installation work ().
You can find more useful information by watching the video in this article.
We all love to spend summer weekends in nature. Some just go out of town to the reservoir, others - go to the country. But what kind of rest in the country without a bathhouse, barbecue? For those who have recently purchased a summer cottage and have not yet decided which structure will be there, we offer the best option - a frame bath with an attic. The advantage of such a structure in small summer cottages is as follows:
- By building a bathhouse with an attic floor, you get a 2-in-1 structure, where you can take a steam bath and spend the night.
- If in the future it is planned to build a large house, then such a bath will serve as a guest house.
- During the construction of a solid country cottage, you will not have to solve issues with a temporary hut (change house).
- If you do not plan a plot of small and major construction on it, a bath with an attic is an ideal option to save space for beds and a recreation area, because you do not have to carve out a place for two detached buildings.
Advantages of wireframe technology:
- cost-effectiveness, both during construction and during operation
- easy and quick to do it yourself
- frame bath does not require shrinkage
- can be built at any time of the year
- wide range of finishing materials
The appearance and layout of a frame bath practically do not differ from a bath made of a bar (log). Frameworks projects also include a vestibule, washroom, steam room and bathroom, and the attic usually houses a lounge that you can use as you see fit. However, there are differences between them, which favorably distinguish frame projects against the background of their log counterparts:
- a frame bath is much cheaper than the exact same one, but made of logs or a bar (you can save even more if you do everything yourself)
- unlike a log house, which cracks over time under the influence of external factors, the frame bath cladding made of a block house retains its original appearance
- it takes much less time to build a frame bath
- in the steam room, the frame project provides for upholstery with aspen clapboard, which perfectly tolerates any temperatures and creates a useful microclimate
- non-combustible materials are used for thermal insulation, which allows frame baths to perfectly retain heat

Where to begin
It all starts with a project that you can buy, order from an architect or create yourself, detailing how to build everything yourself - the choice is yours. Usually, projects of any buildings contain the following main points:
- total area
- detailed arrangement of premises
- floor type
- communications
- Construction Materials

We start construction
If the area of the site allows, then the most optimal project will be 6x6 m. - it will perfectly accommodate all the necessary premises, in addition, the above dimensions will make them quite spacious and comfortable. The place for construction, if possible, choose an even one, and if this is not found, then try to level the available territory as much as possible. When the project is ready, you can start building a bath using frame technology. Next, you can familiarize yourself with one of the many do-it-yourself bath projects.
Foundation
For a frame structure, a strip foundation is quite suitable:
- remove the fertile soil layer
- we dig a trench and put a pillow of sand, crushed stone and gravel into it (you can use ASG)
- pour everything with molten bitumen and lay concrete in the pre-installed formwork from boards

Before building the wireframe
- As soon as the foundation hardens, we lay a layer of roofing material on it, which will serve as waterproofing, and we make the lower strapping of the structure. For this we use a bar of 150x100 or 150x150 mm.
- We connect the joints with nails.
- We install logs made of 150x50 mm boards on the strapping.
- We treat the harness and logs with an antiseptic in accordance with the instructions and leave to dry completely.
Frame
We make frame racks and parts of the rafter system from boards 150x50 mm (everything is done in accordance with the project).

Building the walls
- in the corners we install two racks, and between them - several intermediate
- we mount the cladding (in our case, these are OSB plates) - we fasten the plates to the frame with self-tapping screws (using a screwdriver when doing work with our own hands will significantly save time and effort)
- do not forget to periodically monitor the position of the sheets at the building level
- simultaneously with the installation of the slabs, we install the subsequent racks, to which the sheathing will also be attached
So, by mounting the racks and attaching the OSB sheets to them, we carry out the installation of our entire frame structure (do not forget about door and window openings).

We mount the roof
- According to the project, we assemble the truss structure on the ground;
- We lift the finished structure and attach it to the frame posts.
- To make the work conveniently, we attach a temporary overlap to the beams. We apply the markings for fastening the cladding for the gable of the building.

Do not forget that all wood that we use for construction must be well dried and treated with fire protection. This is necessary so that the house is not eaten by bugs, which is especially true in houses located in the immediate vicinity of the forest.
- between the counterbeam and the rafters we lay a layer of special film for arranging ventilation
- we attach the roof sheathing directly to the rafters, then we mount the roof
- when the installation of the roofing material is completed, we attach OSB sheets to the gables of the building
Interior and exterior decoration
- We insert windows and doors into the openings and proceed to the interior decoration.
- For arranging the ceiling, you can use the same OSB plates - we attach them to the beams from below.
- We insulate the ceiling and walls with a layer of insulation, in the walls of the steam room, in addition to insulation, we lay a layer of "screen" foil. Glassine is mounted on top of the insulation.
To arrange the floor, we use the boards left over from the temporary overlap when installing the roof (we remove the boards from the beams and nail them to the logs).
Usually steam rooms in baths are equipped with a stove, and boilers for heating water are installed in a dressing room near a common wall with a steam room (the wall between the steam room and the rest room must be brick - this is required by fire safety standards). You can use regular building bricks.

In principle, exterior decoration can be done at the same time as interior decoration. This approach will significantly save your time and effort. The frames of the internal partitions can be made already during construction and the final finishing materials can be immediately attached to them (this can be either a block house or a lining).
As for the interior decoration, it all depends on the purpose of the room. So, for a rest room, you can use a block house, and for other rooms - a wooden lining. Access to the attic can be arranged in the dressing room by making a hatch in the ceiling and installing a staircase.

The ceiling in the steam room must be additionally insulated and lined with clapboard. If you decide to draw up a project and build a bath with your own hands, you should take into account that additional insulation of the steam room ceiling significantly reduces the height of the ceiling. According to the norms, the ceiling height should not be less than 2.1 m.
Terms of installation and all work
It usually takes a team of three builders ten days to build a frame bath. If you have assistants and you decide to do everything yourself, without resorting to the help of hired workers, then such a rough plan will help you:
- laying and arrangement of the foundation - 3 days;
- installation of piping and lag - 3 days;
- construction of the rafter system - 2 days;
- installation of doors, windows, installation of roofing materials and work on interior and exterior decoration - 2 days.
Note: Do not strive to meet the deadlines given in the plan exactly. The main thing is attention and accuracy - only in this case you will get a good result, and the bath, built with your own hands, will become a source of pride for you, your family.
More information about the construction of frame baths. We read about how to build a frame house with a bath. All about panel baths and their construction - in the article.
Good luck!
If there is a suburban area with a cottage and relatives or friends often come, a small 6x6 bath with an attic will provide excellent washing and replace the guest house.
Sometimes we are irresistibly attracted to the sea, to plunge into the azure wave, and sometimes, for some reason, we would give everything to take a steam bath in a real Russian bath. Such a building can be both in a summer cottage, occupying a small space on 6 acres, and among many other farm buildings. At the same time, it is not at all necessary to build a large complex similar to Roman terms, it is quite enough if it will be. Why is the presence of a living room considered in the under-roof space? It's simple - if there is no cottage in the country, such an addition will become quite comfortable housing.
However, you can think of a lot of appointments for the attic even if you have a completely comfortable suburban area with a solid house. In particular, in winter, being well steamed, you are unlikely to want to return to the house, even if not through snowdrifts, but along neatly swept paths. Therefore, in the attic space, you can pre-equip one or even two cozy rooms with a small kitchen and a bathroom, in which you can sleep well. As a last resort, these premises will replace the guest house. If you already have one, think about placing a billiard room upstairs, combined with a recreation room, allotting the area below the most necessary rooms.
The classic steam room has long been a small building made of logs with a waiting room. In the attic, as a rule, brooms and tubs were kept. Today, constructively, little has changed, however, not everyone knows how to steam with a birch broom, and therefore prefer washcloths with soap, which after warming up in a steam room is also not bad. However, the baths themselves today are often built not from solid logs and not even from a bar, but from ceramic or silicate bricks, from cinder blocks. However, there is an option that will become the golden mean for many - a 6x6 frame bath with an attic will replace a log house with a steam room, which is much more difficult to build.
Let's compare the pros and cons of both building types. Let's start with a resinous log house. First of all, such a bath easily tolerates the effects of steam deposited on the walls as a wet film. Among other things, the logs, as well as the timber, "breathe", or, in other words, they let air through, so it is always easier to breathe in such a building. As for thermal insulation, it is still necessary to insulate the attic, since the thickness of the log, even with well-caulked joints between the crowns, is still not enough to protect against winter frosts. And the steam room does not fit under the inner lining to insulate, so that heating was faster and cheaper.
The frame bath is advantageous, first of all, by the speed of construction, since it does not shrink, unlike a log house, which means that you do not need to wait a year and a half until the crowns have completely settled down. And it is much easier to erect a frame, even one person is able to cope with a small structure, while no one can handle the logs alone. In addition, a complete set of a finished building is much cheaper than rounded sawn timber, and if you build it yourself, then this is a direct saving. As for durability and reliability, with proper assembly, a 6 by 6 frame bath with an attic will stand no less than a log building, and it will be much warmer.
Since space is limited, we will consider all possible options. Let's start with the dressing room, without which it is impossible to do anything, it plays the role of a vestibule, and, often, changing rooms, and the restroom can be fenced off in the same room. Here it is also convenient to place a staircase to the attic floor, where it is also useful to make a small vestibule if there are at least two rooms. In the event that the rest room is upstairs, the entire lower floor should be set aside for premises, without which the bath cannot do.
Let's say that immediately after the dressing room there will be a washing room, in which it is best to install a shower cabin with a deep tray, equipped with the latest technology. You can, of course, make the pool small, or put it as a home alternative - a jacuzzi. Further, if all the rooms are one after another, the "suite" of rooms will be completed by a steam room, in which several tiers of shelves can accommodate up to six people. With such a layout, it is more appropriate to bring the furnace portal into the washing room, adapting a small cabinet for storing firewood or coal, if the firebox is not gas.
Another layout of a 6x6 bath with an attic is possible, when the premises go in two rows, for example, opposite the entrance door from the corner dressing room is the entrance to the recreation room, and on the side two doors lead to the toilet in the next corner of the building and the washing room. Next, we traditionally go from the washing room to the steam room, but in this case it is more logical to place the oven door in the rest room, in which and will be located. Here, by analogy with the living room, you can equip the kitchen, and the attic floor will be divided into a couple of bedrooms and a toilet.
As a rule, the instruction is always included in the set of supporting elements, however, before purchasing it, you should know what you will have to face. That is why a brief description of the stages of work is offered below. Despite the fact that any construction begins with a foundation, we will lower the pouring of the base, since a 6 by 6 meter bath with an attic can be installed on any: monolithic, tape or columnar. The main thing is to prepare the perfect horizontal platform, which can be done using a level. If clay or sandy soil is saturated with moisture, it is better to use screw piles, which do not require leveling the building site.
Before installing the frame, waterproofing is laid on the foundation, and a strapping board is already laid on it, which is fastened with wedge anchor bolts with a step of no more than 60 centimeters... Before final fixation, it is necessary to check the accuracy of the geometry of the harness using a tape measure in accordance with the design plan. A linen-jute cloth of identical width is laid on the strapping (we fasten it with furniture stapler brackets), and already on top of it, wall panels are fastened with 6x80 plumbing bolts twisting every 30 centimeters in a checkerboard pattern, starting from the corner. We fix the first frame element in a vertical position with temporary struts. Between the panels, connected with the same plumbing bolts with the above pitch, strips of jute linen are laid.
The basic rule for assembling the frame: an ordinary wall panel is first attached to the adjacent one (at the beginning of work - to the corner one) with preliminary fixation with three clamps, and only then is screwed to the strapping.
To avoid distortions of the walls, struts are installed every two or three panels. Upon completion of the installation of the side panels, a strip of linen-jute cloth is again laid on top of them (shot with the staples of the furniture stapler), on which the upper strapping board is attached. Be sure to check everything for compliance with the geometry of the project plan. Then, after preliminary marking, we begin to fasten the trusses with reinforced steel corners and profiles, starting with the pediment, fixing them with struts. Floor beams are installed in the intervals.
The frame technology for building a house is widely used for baths, garages, sheds and other outbuildings. Projects of frame baths (6x6, 3x4) are warm and durable buildings, and the speed of their construction is such that it will be possible to bathe in 2-3 weeks after the start of construction. And, of course, the cheapness of materials and workflow does not leave anyone indifferent when planning real estate objects on the site.
Typical drawings of a bathhouse 6x4
Examples of individual projects of frame one-story baths
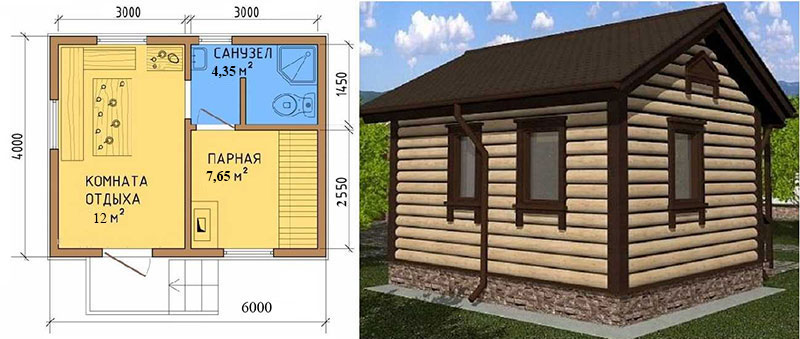
Below you can see an individual project of a 6x4 m frame bath, which shows that in addition to a steam room with an area of 7.65 m 2, the building has a spacious relaxation room, a compact bathroom and a vestibule with a porch. The frame stands on a strip shallow foundation (MZLF) with a depth of 0.7 m, the foundation has a continuation in the form of a basement with a height of 0.4 m, the total height of MZLF is 1.1 m, a layer of crushed stone or gravel under the base of the foundation is 0.2 m. Tambour does not allow cold air masses to penetrate inside when opening the doors.
 A simple drawing of a 4x6 m bath
 Total area - 24 m 2, room sizes:
- Recreation room - 12 m 2.
- Steam room 7.65 m 2.
- Bathroom - 4.35 m 2.
What building materials is the frame made of:
- Vertical posts, upper and lower strapping belt - board 100 x 50 mm.
- Subfloor beams - board 150 x 50 mm.
- Rafters - board 150 x 50 mm.
This project envisages a heater installed and heated in a steam room, and this close arrangement is solely due to the size. A parallel option for the location of the stove is also in the steam room, but with an elongated combustion chamber, which will allow you to lay firewood from the recreation room. This solution will allow you to heat not only the steam room, but also the rest room.
Bath project with an attic
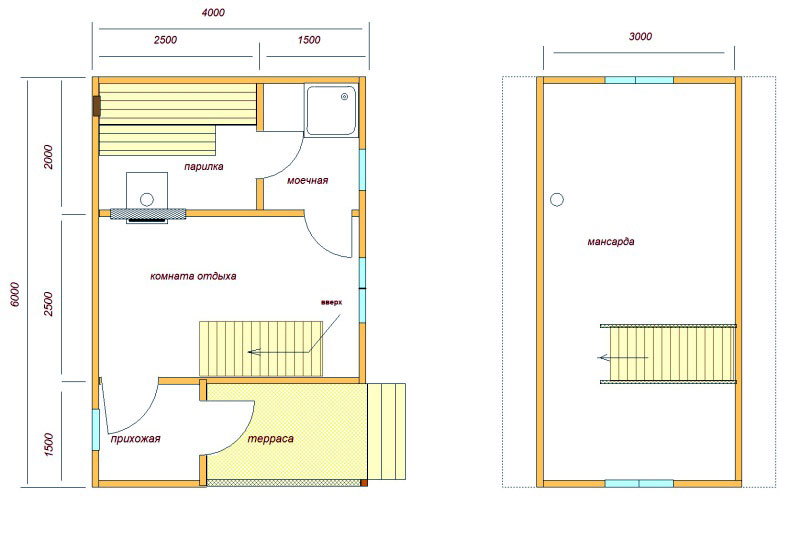
Typical design solutions (6x6, 3x4, 5x4, etc.) are unlikely to offer a project of a frame bath with an attic. This is a purely private decision, due to the small size of the land plot and the desire to place on it as many useful areas as possible. The lower floor has a standard set of premises: a relaxation room, a steam room, a terrace, a sink, a dressing room (in the project drawing - an entrance hall) and, of course, to the attic floor.
 Drawings of a 6x4 bath with an attic
Such a 6x4 frame bath is also quite cramped, but the attic expands its capabilities. In addition, the size of the structure allows the use of standard 300 or 600 cm lumber, which minimizes waste. The bath can be placed on a columnar, strip or pile foundation, since its mass is insignificant due to the frame version of the frame.
The project is more functional, since after the steam room you can not only relax in a separate room, but also just take a shower in the washing room. The steam room is connected to the washing room with a separate door, so the temperature and humidity in the shower room will be quite high. In addition, you can equip a couple of benches in the washing room, which will further increase the comfort of relaxation after the steam room.
The total area of this project including the attic is 42 m 2. Dimensions and area of premises:
- Rest room - 10 m 2.
- Entrance hall - 2.25 m 2.
- Washing room - 3 m 2.
- Steam room - 5 m 2.
- Attic - 18 m 2.
Bathhouse project with a terrace
Typical projects of frame baths (6x6, 3x4, 5x4, etc.) with a terrace (examples can be downloaded for free in the public domain) most often simply divide the total area in half, leaving little space for functional rooms. Therefore, individual design is preferable in this case, and one of the solutions is shown below. The bathhouse is quite spacious (114 m 2), since it is very difficult to arrange a terrace with a size of 6x4.
They are trying to equip such projects (you can download it on the net for free) with more opportunities, since additional space allows you to do this. So, the drawings of this project reflect the presence of a swimming pool combined with a steam room and a corridor, as well as a sauna and a separate furnace room, a living room and, of course, a spacious terrace, which is pleasant to go to. There are enough photos of such finished buildings on the net. 
Since the furnace compartment is fenced off from the rest, it is possible to arrange not just a stove in it, but to equip a small heating system covering those rooms that are not heated by the steam room. Since there are a lot of such rooms, heating will not be superfluous, especially for a winter terrace. According to the scheme of this project (a more detailed one can be downloaded for free on the Internet), the terrace is just intended for winter use, so it is separated by an entrance hall and a corridor, which must also be connected to the heating system.
Even frame baths with a terrace can be easily erected by hand, without the involvement of special equipment and workers.
The total area of the bath, built according to the photo above, is 114 m 2. Area and dimensions of premises:
- Sauna - 11.74 m 2.
- Shower room - 10.45 m 2.
- Steam room with pool - 8.22 m 2.
- Terrace - 33.83 m 2.
- Entrance hall (dressing room) - 3.33 m 2.
- Corridor - 5.29 m 2.
- Furnace room - 4.72 m 2.
- Bathroom - 4.72 m 2.
- Living room (lounge) - 18.88 m 2.
Building materials:
- Strapping - timber 100x150 mm.
- Rafter system - board 100x50 mm.
Small sauna with a terrace
The dimensions of this mini-bath are 4x4 m, the size of the terrace is 4x1.5 m. For a family of 3-4 people, these are quite acceptable dimensions. Functionality does not suffer from size - there is a sink, a steam room for two people, a relaxation room, while there is enough space for a veranda or a terrace, windows with vents are equipped in wet rooms (one in the steam room, one in the washing room).
The steam room is ideal for one person, since there is only one recumbent shelf, on the second one can only sit, which in the concept of a Russian bath is not quite a rest (Finnish ones do not count). The dimensions of the washroom are not critical, since there will always be only one person in it. Therefore, the area of the washing room has been sacrificed for the size of the terrace and restroom.
The area of all premises with the calculation:
- Recreation room - 5.67 m 2.
- Washing - 3.04 m 2.
- Steam room - 3.61 m 2.
- Terrace - 6 m 2.
Construction Materials:
- Strapping bar - 100x150 mm.
- Rough floor - timber 150x100 mm.
- Ceiling overlap - board 150x40 mm.
- Rafters - edged board with a section of 100x50 mm.
- Roofing material - corrugated board, galvanized sheet metal, metal tiles, slate, ondulin.
Frame bath 5x6 m
All frame baths, projects of which are presented here, as well as Finnish ones, are designed for DIY construction with minimal labor and financial costs. For example, the plan below is simplified to a minimum and thus attracts home owners who want to be able to steam even on a small plot. But even such a small building can be equipped with an extension - a terrace measuring 2x5.4 m, along the length of the short side of the bath. 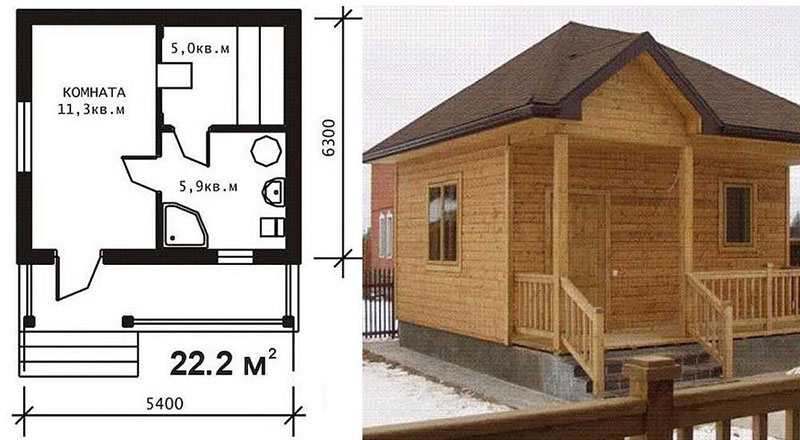 Photo and drawing of a bath with minimal functionality
Options:
- The total area is 22.2 m 2.
- Steam room - 5.0 m 2.
- The area of the rest room is 11.3 m 2.
- Washing room - 5.9 m 2.
- Terrace - 10.8 m 2.
Advantages of building frame-based baths
Frame design includes a lumber frame, sheathed with finishing lumber from the inside and outside. All free space inside the frame is clogged with layers of steam and heat insulation. This form of construction is ideal for private developers, because it automatically falls into the category of low-budget. In addition, construction can still be made cheaper if you use not industrial materials for thermal insulation, but folk methods of warming with shavings, sawdust, etc.
Due to the low weight of the structure, additional advantages appear. So, the foundation on which the frame bath will stand (the projects are described above) can be built lightweight - shallow or shallow, piled or columnar, which is quite cheap compared to foundations of other types and capacities. Of course, if the developer wants to play it safe, then the building will be perfectly exploited both on a slab and on a strip monolithic base, but the cost of the project will increase much. 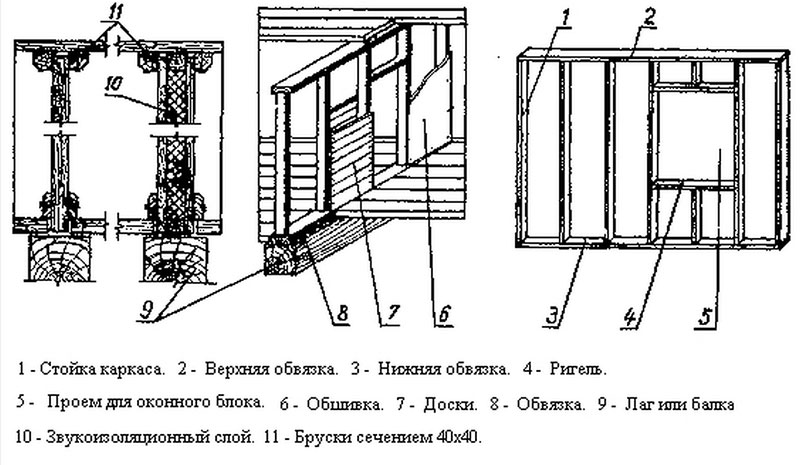 Wall layout
During construction, you will need a set of standard garden tools: a saw or a hacksaw (can be replaced with a grinder), a hammer, wood screws or nails, a screwdriver or powerful screwdrivers, a plumb bob and a building level. If it is possible to mechanize the construction process, the end result will only come closer. The main advantage of construction is that even one person can do this work with his own hands, which means that you can save your family budget.
disadvantages
High fire hazard is the main disadvantage of the bath, which is partially minimized by impregnating the wood with fire retardant solutions. Due to the increased fire hazard, electrical wiring must be laid in a self-extinguishing corrugated hose, which will make the estimate slightly larger. 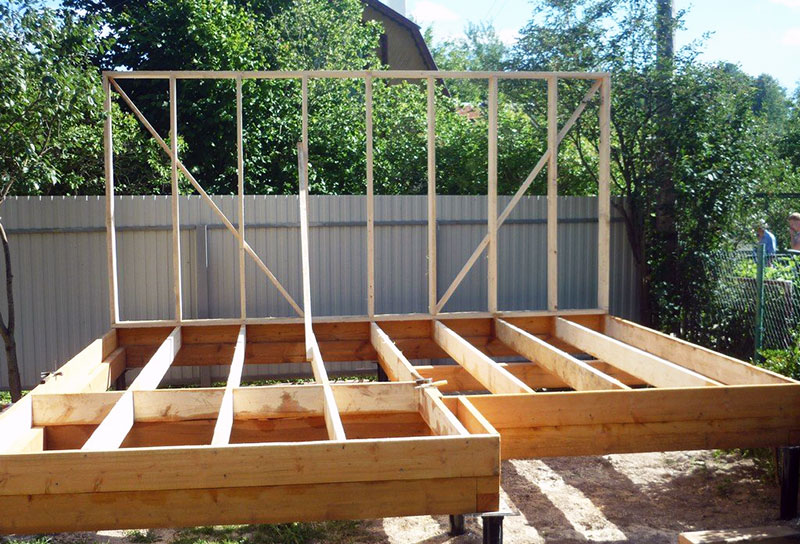 Photo of the "skeleton" of the bath
The constant high humidity in the premises also has a negative effect on the building, therefore, in addition to fire retardants, wood is also impregnated with antiseptics, which cut off the possibility of mold and other fungal diseases. In addition to antiseptic protection, layers of vapor and waterproofing are laid in the frame space.
Bath price with insulation 150mm min. cotton wool and finishing 392t.r.
Bath price with insulation 150mm min. cotton wool, finishing and foundation 452t.r.
Bath price with insulation 150mm min. cotton wool, decoration, foundation, electrics, plumbing and water supply 509t.r.
Standard insulation 150mm walls, 200mm basalt roof min. cotton wool, max. 250mm.
The price of the project for self-assembly is 7.5t. Rub. Download the estimate and read
If, for some reason, you do not want or cannot build a house yourself according to our project, then we can do all this for you, and inexpensively and in the shortest possible time, for more details about the prices and advantages of turnkey construction, read the section "Price Full construction ".
Frame bath 2 floors (residential attic).
Download, Project KD-73 sauna with an attic 0.44 Mb (pdf) >>> detailed description.Drawings of a frame bath 6x6m 72m / sq - a large, but inexpensive and comfortable frame bath with a warm attic. The first bath with the second floor is from our collection of projects, you can build such a bath on your own or ours, and quite quickly, the bath can be used both for summer holidays and for going out into nature in spring and autumn, and, if you wish, during winter holidays. and vacations. The bath house has everything you need for a comfortable stay in it at any time of the year and can be used as a main or guest house. If you wish, you can add a terrace or a verada from the KD-172 projection to the bathhouse.
The decoration of the bathhouse can be changed to suit your preferences, according to the project: the outer finishing OSB and the inner finishing of the gypsum board and the lining in the bath are included in the cost of the project. Also included in the price of the project is the foundation, insulation 150mm min. cotton wool (possibly up to 250mm), electrical wiring and installation products, water supply automation, sewerage with installed plumbing.
Ground floor 36 m2: Ceiling height 2.5m, Lounge 12.5m 2, Bath 8.5m 2, bathroom 4.6m 2, Hallway 5.5m 2, ridge height 7.4m.
Second floor 36 m2: Ceiling height 2.5m, Bedroom 10m 2, Children's bedroom 10m 2, Hall 3m 2, Wardrobe 3m 2.
To enlarge the picture, click on it.

Appearance options:
any finishing possible

Height marks:

Foundation for this house:
according to the project MZLF 50v x 40sh.
piles are possible (screw, bored, etc.) 15 pcs. 
The average market value of such a house is 4 times higher than ours.
Project order
In order to place an order, select the type of foundation and other possible options, then click the "Order a project" button. In the form that opens, enter your email and other necessary data correctly. If the order is completed correctly, then immediately after the order is processed by our specialist, you will receive an order confirmation by mail with clarification of details and payment options.
Project KD-73
Tape (MZLF) Piles
The price of the project is 7.5 tons.
(a set of working diagrams and assemblies: frame house, foundation, electrical engineering, estimate, etc.)
Order a project
Frequently asked questions from customers:
What if you need to change something in a project you like?