Let's face it, everyone knows how to hang wallpaper. The matter is not at all difficult. It's almost like gluing children's stencils - by the way, there are also types of wallpaper on which the adhesive layer has already been applied.
But the material is much larger and you will need not a bottle of glue, but a bucket. Therefore, we get down to business quite quickly, choosing the beginning of the surface to be treated.
Basic provisions
Corners are far from the most visible place in the interior of any room, but it is the quality of their finishing that determines the real class of work

Here we will just determine, for starters, what situations we may encounter.
Types of angles
The order of work will largely depend on what angle awaits us:
- internal between two vertical walls - there are such in any room, there are almost always at least four of them;
- external, also between two walls - these may not exist at all, they can be avoided by finishing the window slopes to the corner; but if there is an outer corner, that is the one that will require the most work;
- internal horizontal below, between the floor and the wall;
- internal horizontal at the top, between the wall and the ceiling - the last two types could not be taken into account if you take a prudent approach to the organization of these corners.
About materials and tools
Before we get started, let's look at what we'll be dealing with:
- Non-woven wallpaper - they main reason of all our activities, the most famous wall finishing material. Wallpaper is made on the basis of old paper - 70% of it is a cellulose layer, but with the addition of synthetic components that strengthen and give more flexibility, which provide the remarkable qualities of this material. For working on corners, the paper provides good flexibility, and the additives provide greater strength, which will prevent the material from tearing at the most inopportune moment.
When it comes to wallpaper, its dimensions are especially important:
- the width should be calculated at 53 or 106 cm,
- and in length (height) - by 10.05 meters.
- Glue – you can use universal glue for wallpaper, but we still recommend a special one for non-woven wallpaper, which, by the way, is not suitable for any others.
- Rollers - it is advisable to stock up on a whole set for all occasions:
- for applying glue;
- for smoothing wallpaper already on the working surface;
- for working at joints, and,
- for working on corners.
- A plumb line, a ruler, a level, a pencil, scissors - you will have to measure and cut a lot, but the most important thing is that from the very beginning you will need to get an ideal vertical line on the wall, from which all further work will begin.

Helpful advice!
If in the future you are able to strictly adhere to the resulting vertical, then one will be enough.
But we advise you to draw these lines on all four walls, closer to each corner, which will allow you to control the process more accurately.
Departure from the vertical always leads to very unpleasant mistakes and even the need to completely re-glue the roll.
- The cutting tool must be comfortable with a well-honed edge;
- A trowel, a trowel, a convenient wide ruler - anything that will allow you to obtain and control the cutting line.

Nuances of preliminary preparation
The stage is preceded by very important actions on preparing the rough working surface.
Regarding angles, it will be very important:
- when working above and below - provide for the installation of skirting boards last, after the wallpaper, then:
- the task of adjusting the joint simply disappears by itself, the edges will be covered with skirting boards, ensuring a perfect joint;
- in this situation, considering standard height rooms are 2.5 meters long, the length of the wallpaper is 10, and the height of the plinth on the wall is 5 cm, then the roll is cut into 4 pieces of 2.5, which is enough for four verticals, and without any waste; otherwise, taking into account the allowances, you will have to cut in pieces of more than 2.5, which means that 3 pieces will be used and one shortened piece will remain neither for the village nor for the city;
- It is very useful to use removable skirting boards - this will solve the problem of joining if you want to change the wallpaper in the future;
- when working on internal corners, they must be reinforced with non-woven paper tape, which is glued directly to the putty, and also putty on top;
- on external corners - it is better to carry out more thorough reinforcement using metal or plastic corners, which are secured with screws; The corners are attached to putty, and the top is also puttied.
Helpful advice!
If your angles are not right, we recommend using plastic corners; they are easier to select the required angle.
There are quite a few options for reinforcing corners, but given that later we will slightly trim the wallpaper at the corners, it is better to use solid corners, without perforation.
- if we talk about the surface as a whole, then it should be:
- thoroughly dried
- aligned
- primed,
- puttied and
- sanded - at least with sandpaper by hand, but better with a machine.

Work progress
Let's look at all the angles in order, from simple to complex.
Corners above and below
Everything here is quite simple, even if you can’t hide the material under the baseboards:
- we cut the wallpaper with an allowance higher (or lower) than the baseboard by 6-8 cm;
- glue and bend the allowance along the plinth line what is convenient to do;
- then, using a spatula as a guide, use a knife to cut off the entire length of the allowance;

- the work must be done while the glue has not yet set, this will allow a small residue of 1-2 mm to be carefully inserted behind the plinth line with a knife.
Corner inside
Here, first we provide ourselves with two reliable verticals on both joining surfaces:
- first we glue the wallpaper on one side so that an area at least 2 cm wide goes to the adjacent wall;
- wait until the glue is completely dry;
- Usually, to glue an adjacent piece, a 2 cm allowance will be enough, if you have done more and it is holding well, then there is no need to cut it, otherwise, be sure to cut it using a sharp knife and spatula as a guide;
- glue a piece on the adjacent wall close to the corner and smooth it with a special;

- There is always a temptation to avoid such a hassle, bend the piece in half along the width and try to create an “ideal” corner from one piece; but, as practice shows, in the future the wallpaper will begin to run together and the entire corner will simply move away; however, we advise you to keep this method in mind; If you have very high-quality wallpaper that does not fade over time, and even under glue, then this option will be simply ideal.
Helpful advice!
When gluing wallpaper, do not stretch it on the glue under any circumstances - when the glue dries, the material will definitely “run together”, exposing wide joints.
Also, be sure to determine what type of wallpaper you have.
There are options that should not be glued overlapped at all, only end-to-end.
Some are glued only with a shift relative to the adjacent piece or even with a rotation of 180 degrees.
Modern wallpaper is hard to call a cheap finishing material - vinyl, non-woven, vinyl on a non-woven base, textured and paintable... You will admire the result of wall covering for the next 5-10 years. Most often, problems arise with how to glue wallpaper in the corners. Let's figure it out together.
Types of wallpaper - choosing the latest materials
Paper wallpaper is an eternal renovation classic. Their unfading popularity is due to two factors - low cost and wide range. However, it should be understood that rolls of paper, no matter how beautifully decorated they are, remain a very short-lived material, and there is no point in gluing them in the hope of a long service life.
In just a year or two they will lose their former attractiveness, and if there are small children or animals in the house, this process can speed up significantly. However, this minus can be used to your advantage in cases where you need to make an easy redecorating in a rented apartment, or when you like to experiment with the interior.
Vinyl wallpaper on paper based– more durable option finishing. Front side, which bears the bulk of all operational loads, in this case is performed by a layer of polyvinyl chloride. And he has a lot of positive qualities:
- it can be washed repeatedly, even with the use of detergents;
- foamed vinyl up to 10 times;
- vinyl does not fade, does not allow moisture to pass through;
- the decorative effect in the case of silk-screen printing or thick wallpaper (vinyl varieties) is comparable to the most expensive ones finishing materials.
Paper-based vinyl wallpaper lasts much longer. Among the disadvantages, you should remember about the airtightness of vinyl, however, if you wish, you can find more on the market modern varieties finishes that do not have this problem. Vinyl rolls on a paper base are glued in the same way as regular paper wallpaper, so for most people it will not be difficult to glue the canvases without special preparation.
Just keep in mind that the vinyl layer significantly increases the weight of the canvas, therefore, ordinary wallpaper glue will not work here; you need glue for heavy wallpaper.
The fact is that the glue is applied only to the wall. There is no need to apply it to the canvases and wait for them to absorb it and swell. To ensure perfect joints, very careful marking is required. Non-woven wallpaper is another type of finishing material made only from non-woven material. Wallpaper may have textured pattern, but, as a rule, these are smooth canvases with interesting patterns. They are glued in the same way as the previous version.
Where to start gluing - do we do it the old fashioned way?
Traditionally the most difficult places during the gluing process these are the corners. In most cases, they are far from ideal, therefore, if you start gluing from the corner of the canvas joint to joint, you can get a significant vertical distortion. Many people mistakenly believe that distortions can be avoided if windows or doors are taken as the starting point for gluing the walls, they say, they are probably perpendicular to the floor.
However, this is not always the case - you can check window and door frames for errors using the most ordinary plumb line. It is quite possible that you will be surprised how you ever got along with such a curvature. The tradition of gluing from the window began, first of all, because of the need to glue paper wallpaper overlapping. If you glue them clockwise from the window, the joints will not be so noticeable. However, in the case of vinyl or non-woven wallpaper, this is absolutely not necessary.
Ideally, if at least one corner is level, you can start from there. But it is best to make careful markings along the perimeter of the walls, focusing on the plumb line. In this case, you will see in advance big picture, and the curvature of the corners will not be so noticeable against the background of perfectly vertical canvases. If you make markings and glue wallpaper on a non-woven basis, then it makes absolutely no difference where you start - from the window or from the middle of the wall.
How to glue wallpaper in corners - be patient!
The first rule for perfect gluing in corners is not to glue the whole canvas into a corner. In most cases, this is fraught with inconsistency with the next canvas and the formation of folds. If you have chosen an expensive type of finishing, for example, vinyl wallpapers type silk-screen printing with a complex pattern, it is best to pre-align the corners using plaster or putty, depending on what kind of unevenness we are talking about.
If the deviations are not so noticeable, then minor irregularities can be hidden using overlaps. To begin with, we glue the canvas onto one of the walls, which abuts the corner, so that it extends onto the adjacent plane by a maximum of 4 cm. Please note that the corner should be very carefully coated with glue so that the canvas has maximum adhesion to the surface. Using a spatula or the blunt side of a knife, carefully press the sheet in the corner - act carefully so as not to tear the sheet. Then use a rubber roller or sponge to get rid of any air bubbles.
The next important step is gluing the canvas to the adjacent wall. To begin, take the measurements again - you need to ensure that the edge of the new canvas closest to the corner overlaps the one already glued by 2-3 cm, while the edge farthest from the corner fits flush with the new one.
Then, using a plumb line, we determine the vertical line that runs in the overlap area from top to bottom. Carefully mark it with a pencil and a ruler and sharp knife cut through two layers of wallpaper at the same time. The excess of the top sheet will fall off on its own, but remove the remains of the bottom sheet by slightly bending the top layer. Reapply glue to the bent edge and press it firmly against the wall. If you did everything correctly, the result will please you.
How to glue wallpaper on the outer corner - subtleties and nuances
With the help of overlap, the problem with gluing external corners is also solved. Only the process looks a little different. The first canvas is glued so that one edge wraps around the corner a few centimeters. During the alignment process, it is likely that you will have to make several cuts to avoid wrinkles. Press the material firmly onto the base using a sponge or spatula and allow time for the glue to harden slightly. Then cut the strip folded at the corner so that only a thin edge remains, no more than 1 cm.
Before you begin gluing the second canvas, take measurements using a plumb line to determine the edge farthest from the corner. Focusing on it, we glue the second canvas so that there is an overlap of no more than 5 mm in the edge closest to the corner. This way you will get an invisible joint of the canvases.
For many decades, wallpaper has remained the most popular and in-demand finishing materials, affordable and with optimal quality characteristics.
For modern species Wall paper, vinyl or fabric coverings do not require careful preparation; it is enough that the walls are level and at the adjacent corners.
It is imperative to learn how to glue wallpaper in the corners, how to follow the rules of pasting, the order of work and the technological conditions of temperature, humidity and ventilation.

Despite the relative ease of applying wallpaper, this type of finishing work requires some preparation. First of all, you should analyze the condition of the walls in advance, remove old wallpaper or wash it thoroughly water-based paint. Before gluing wallpaper in corners and on walls, the surface must be primed with a special solution for better adhesion of the material and reduced glue consumption.
It is very rare to find absolutely aligned corners in a room, both external and internal. Therefore for beautiful location pattern, without displacing patterns or stripes, it is recommended to align all vertical and horizontal junctions in advance.
After preparatory work You should wait until the walls have completely dried to the required humidity level.

If it is not possible to level the corners using plaster and putty, when choosing wallpaper, it is necessary to give preference to coatings with a small pattern that will help hide minor imperfections in the base without focusing on a significant shift in the wallpaper. In addition, experts recommend giving preference to loose materials, so that when gluing overlapping panels, the thickness of the joints does not catch the eye.
Technology for wallpapering in inner corners

To avoid the appearance of folds in the inner corners of the room, before applying the wallpaper, experts advise dividing it in advance into two strips where they are folded. First, wallpaper is applied to the corner of the room.

Then measure the exact distance from the last glued sheet to the corner bend and add connecting 10-12 mm to the result obtained. Then one prepared part is glued to the wall with the cut edge on the adjacent corner. The bottom and top edges are adjusted as usual.
Using a brush or soft rag, press the wallpaper into the inner corner of the room. If unevenness or warping of the material occurs, small cuts are made on it with a sharp construction knife, carefully pressing the canvas against the wall. Next, glue the second part of the strip with an overlap onto the already glued material, constantly pressing the wallpaper to the wall with a brush or rag and cut it at the bend with a construction knife. You can align the blade at the corner without tightly abutting the back of the scissors.

If in the corner its inner, middle part is slightly convex, and the bottom and top are slightly tucked inward, then it is recommended to cut the wallpaper and press the cut edges overlapping. When covering walls with thick vinyl or washable wallpaper, experts advise using transparent adhesive on the joints, specially designed for gluing thick materials.
Wallpaper the outer corners

Before gluing wallpaper in external corners, you should first calculate the placement of the canvases so that the material bends around the convex part of the wall by at least 20-25 mm. When gluing thick wallpaper, experts recommend making small cuts so that the strip lays smoothly, without warping or wrinkles.

On wallpaper that is too dense, using a level or a long ruler, carefully cut off a thin strip of wallpaper with a sharp construction knife, leaving a minimal edge that is not subsequently noticeable under the next sheet. The next strip is glued on top with an overlap of about 5-6 mm. It is recommended to roll smooth wallpaper on top with a roller, and lightly press the structural material with a soft rag or sponge.

There are a number general rules, which should be observed when performing finishing work on wallpapering in the corners:
- Before gluing wallpaper in the corners, you need to coat them thoroughly adhesive composition, because most often the canvases come off from the corner. If the roller cannot cover the entire surface of the corner, you should use a quality brush.
- You should not paste over the corners with solid canvases. Before applying the material, it is imperative to take detailed measurements and cut the wallpaper into two strips, so that the canvas overlaps the next plane by at least 20 mm. It is difficult to glue wallpaper in one piece, even with perfectly aligned walls and corners.

- During the work process, you should always have at hand building level or a special plumb line.
When using wallpaper that is too thick, you can use cutting material, for which you need to prepare a very sharp construction knife and a long metal ruler.
Non-woven wallpaper is wallpaper made using non-woven cellulose non-woven material. Unlike paper analogues Such wallpaper is superbly washable, allows you to hide even quite noticeable wall irregularities and retains an attractive appearance for a long time. appearance. And the process of gluing non-woven wallpaper is quite simple - the material is quite docile, does not “pull” either horizontally or vertically and practically does not produce “bubbles”. And even in such “problem” places. both external and internal corners, non-woven wallpaper is pasted without any problems - for this, when gluing it is enough to follow a few simple rules.
How to glue non-woven wallpaper on internal corners
The first thing that needs to be said about gluing non-woven wallpaper in corners (both external and internal) is You shouldn’t try to cover a corner with a whole sheet of wallpaper.. In other words, do not try to cover both walls adjacent to the corner with one canvas. Otherwise, there is a fairly high probability that the wallpaper will “lead” in the corner, and the resulting wrinkles will be almost impossible to smooth out without trimming, which will certainly ruin the appearance of the wallpaper. But even if this does not happen, the curvature of the corner (and unfortunately, most of the corners in our apartments are curved) will affect the position of the canvas, and since non-woven wallpaper is glued end-to-end, all subsequent canvases will also have to be glued out of level.
The correct technology for gluing non-woven wallpaper on internal corners is as follows:
- We measure the distance from the edge of the last glued canvas to the corner and add 5 centimeters to it. A panel of exactly this width will need to be prepared for sticking in the corner.
Since the angle can be curved, it is better to measure the distance at three points: the bottom, middle and top of the wall. For calculations, of course, you need to take the largest of the resulting values.
- When the panel of the required width is ready, carefully coat the wall and corner with glue for non-woven wallpaper. Please note that when gluing non-woven wallpaper, the glue is applied only to the walls.
- After the canvas is pasted, you should very carefully smooth the wallpaper in the corner and on the next wall using a rubber roller or a dry cloth.
 Using a rubber roller or dry cloth, smooth out the wallpaper in the corner and on the next wall.
 If the wallpaper “wrinkles” in some places, you can make several horizontal cuts at a distance of 5-10 centimeters from each other.

Please note that this canvas must be glued “overlapping” the previous canvas.
- When both canvases are pasted, all that remains is to use a wallpaper knife and a metal ruler of a paint spatula to “trim the seam.” You can learn more about the “corner trimming” technology by watching the following video.
Video about corner trimming of wallpaper
It is very important to cut both wallpaper sheets “in one step”, since otherwise discrepancies may appear in the cut line.
To ensure that the cut is even and the wallpaper does not “stretch” under the knife? You need to periodically break off the dull tip of the wallpaper knife according to the marks specially applied to the blade.
- After trimming, all that remains is to remove the excess wallpaper. The top layer can be removed without problems, and the bottom layer can be removed by slightly unscrewing a small part of the top panel.
If you did everything correctly, the panels will form an almost imperceptible joint between themselves, which will only need to be carefully smoothed using a rubber roller.
Glue on external corners
External or external corners are not found in all rooms, but, nevertheless, they can be found quite often. The technology for gluing non-woven wallpaper to such corners is practically no different from the method of gluing internal corners.
 Pasting technology external corner almost no different from the method of gluing internal corners
 First of all, measure the distance to the corner from the outer panel and prepare new leaf wallpaper in such a way that after sticking they “turn” around the corner by no more than 5 centimeters. From the turning point closest to the corner, measure the distance for gluing the next sheet (roll width minus 1 centimeter). We glue the canvas “overlapping” onto the resulting fold, after which we trim the seam with a wallpaper knife and remove unnecessary parts of the wallpaper.
If the outer corner is fairly even (you can determine this using a plumb line), you can try to cover it with “one sheet”. But keep in mind that the level difference in this case should not exceed 0.2-0.4 centimeters. Otherwise, it is better to glue non-woven wallpaper using the technology described above.
As you can see, there is nothing difficult in gluing corners with non-woven wallpaper, so with a little practice you will be able to do this job perfectly. Good luck with your renovation!
Renovating an apartment or house is a very complex and time-consuming process. And if workers do it for you, it is also expensive, since the price for the services of craftsmen is often the same as the cost of the material. Therefore, if you are at least some part repair work If you do it yourself, you can save a lot. Many people successfully hang wallpaper on their own, and find nothing difficult about it other than gluing wallpaper in the corners.
Wallpapering the corners - responsible and important stage work
Even in very nice apartments there are bad angles. Not good because they are not perfectly even. What do the experts advise?

When gluing the outer corner, you need to ensure that the strip fits snugly against the wall.
Never glue an entire strip of wallpaper. If the angle is uneven, the strip will lie in folds and will not meet the other strip. Leave a protrusion of 1.5-2 cm around the corner, then the strip will lie against the wall. Be sure to use a plumb line if you are gluing thick wallpaper. Glue the piece with a slight overlap onto the adjacent wall so that it is as vertical as possible.
If there are switches or sockets close to the corner, you must first remove the covers, remembering to turn off the electricity in advance. Glue the fabric onto sockets and switches, then make cuts on the wallpaper and trim the circle slightly smaller size casing. After this, return the covers to their place.
When gluing a wall near a door, it is better to approach the doors from both sides. The strip of wallpaper that spans the door should be cut vertically to the beginning of the frame. It is attached along the edge of the wall. The lip should be trimmed and fit over the door frame.
How to properly glue wallpaper in corners: step-by-step instructions
- Step 1: Preparing the Corner
This step is performed long before the actual wallpapering at the stage of wall putty. The corners of the room should be equipped with special plastic corners. They are attached to the walls with putty and must be fastened very securely. After this, you can move on to decorating the corners of the room.

Don't cover all the corners at once. Having chosen the corner from which you will start, prepare a strip of wallpaper of the required length. Coat the area with wallpaper glue along the width of the cut strip (plus 3-5 cm), do not forget to apply glue to the plastic corner as well. When a section of the wall and a corner have been treated with glue, attach the wallpaper there. If you started gluing from left to right, you need to attach the left side to inside angle so that the strip is positioned perfectly even along its entire length.
- Step 3: leveling the wallpaper

Level the wallpaper well in the corners to visually hide existing defects
The wallpaper is rolled out with a special roller or spatula. After this, the next section of the wall is covered with glue, and the wallpaper is glued to the next corner. How to glue the closing corner? The last strip of wallpaper should have a new strip associated with it. Roll the glue towards the corner, and when the wallpaper is glued to the inside of the corner, trim off the excess along the inside line of the corner with a utility knife.
How to glue non-woven wallpaper in corners
Non-woven fabric is a special material that consists of cellulose and non-woven fibers. This is wallpaper that is intended for painting, since it outer layer unstable to mechanical damage. Gluing non-woven wallpaper in the corners is much easier than any other wallpaper, since the glue is applied only to the wall, and the dry wallpaper is attached to it. Pre-decorating the corner of the room plastic corner, stick it in the same way as described above.
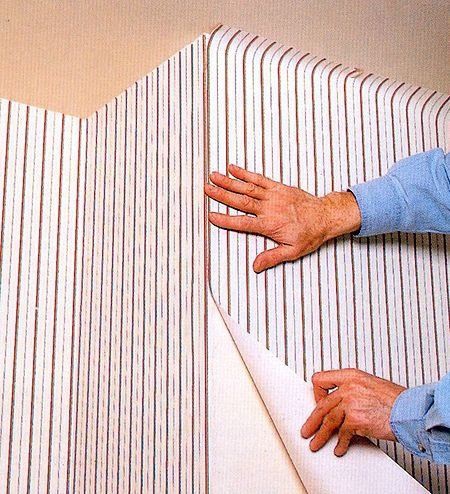
How to hang wallpaper with a pattern in the corners

With a clear geometric pattern on the wallpaper, distortion must be minimized
If the pattern on the wallpaper has vertical lines, its distortion will be especially noticeable in the corners of the room. And if the pattern is horizontal, it will be skewed in relation to the ceiling and baseboards. How to avoid such troubles? It's simple. Firstly, do not forget to make a slight overlap on the adjacent wall, and secondly, hide the existing joint at the top of the corner. Thirdly, try to paste wallpaper in the corners of the room so that the smooth edge lies exactly along the vertical line you drew (plumb line). In this case, the other edge is trimmed along the edge of the corner.
It is unlikely that it will be possible to completely avoid a shift in the pattern - a slight shift will most likely remain. But this is a drawback that only you will know about. After all, to detect it, you need to carefully study the corners of the room. If you follow all the rules, the wallpaper will lie vertically on the adjacent wall, which means that the distortion of the pattern will not be noticeable.