- Room preparation
- Laying on walls
- Practical advice
- Floor mounting
- Some features
For many years, ceramic tiles have been the most popular bathroom material. It is the tile system that has the greatest advantages over cladding made of other materials.
Tiles in the bathroom are laid both on the walls and on the floor.
Room preparation
On the walls of the room is somewhat different from how around the bath, but the beginning is the same - measuring the surface and calculating the required amount of all materials. If you intend to lay products of the same color and without decorative elements, you need to calculate the required amount of material in square meters based on the total area of the future facing. You need to purchase about 5-7% more than the estimated amount (marriage and battle). Decorative elements are considered pieces, and borders are considered linear meters.

You need to purchase after determining the required amount of material and used decorative and finishing elements. By incorporating several patterned tiles or tiles of a different shade into a common canvas, you can create an original and expressive pattern on the bathroom walls.
Today the market of finishing materials offers a wide range of ceramic tiles. Tile is most suitable for the bathroom. It is better to choose products of well-known brands, because savings can very quickly turn into additional repair costs.
For the bathroom floor, you need to choose the highest strength class - the fifth; for the walls, class 1-2 is quite suitable. According to the degree of moisture absorption - choose with the highest moisture resistance indicator. For the floor, it is better to buy elements with a relief pattern, because there is a risk of slipping on smooth surfaces.
Back to the table of contents
Laying on walls
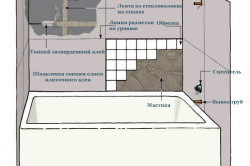
Before laying tiles around the bathtub, it is necessary to prepare the room and all surfaces for installation. The bath, if it is not planned to change it, should be covered with plastic wrap, and all pipes, tubes and taps should be wrapped with thick paper or cardboard. Clean walls from old tiles, plaster and paint. Laying tiles is easier and safer on concrete walls.
For a more reliable adhesion of the adhesive to the wall surface, it is necessary to carefully prime it. A special primer should be used for rooms with high humidity.
The adhesive is sold at a building materials store. You need to cook it, strictly adhering to the attached instructions. However, experienced tilers recommend mixing Ceresit 17 glue with cement in a 3: 1 ratio. This composition is proposed as optimal, since pure Ceresit 17 adheres too hard and the tiles may break. It is important to stir the adhesive to a thick sour cream consistency. For mixing it is worth using a drill with a special attachment.
Before starting, you need to outline the level lines, i.e. horizontal lines that run along all the walls of the room. This line is drawn using any level, not by eye.
It is necessary from below. First, lay out one row of tiles without glue so that you do not have to cut the edges at the joints. And if a part of the tile needs to be cut off at the joining point, then it is better to cut it at the beginning of the row so that it falls on the doorway. Thus, the tiles will be saved and the finish will look more attractive. Now you can put the tiles on the glue. It is more convenient to apply the adhesive to the wall (not to the tiles).
It is more rational to lay in small areas, about 4-6 tiles in height. In order for the tile to lay flat, it is necessary to mark the laying lines with chalk, first mark the vertical row using a plumb line. The accuracy of laying all subsequent rows depends on how accurately the first row is laid.
Back to the table of contents
The glue is applied to the wall with a notched plastic trowel and leveled well so that air bubbles do not appear in the mass. The tile is applied and pressed by hand with a slight back and forth movement. Any protruding glue must be removed immediately with a wooden stick or plastic spatula. This is how the entire first row fits, now you need to let it dry (about a day). And only then can the styling be completed.
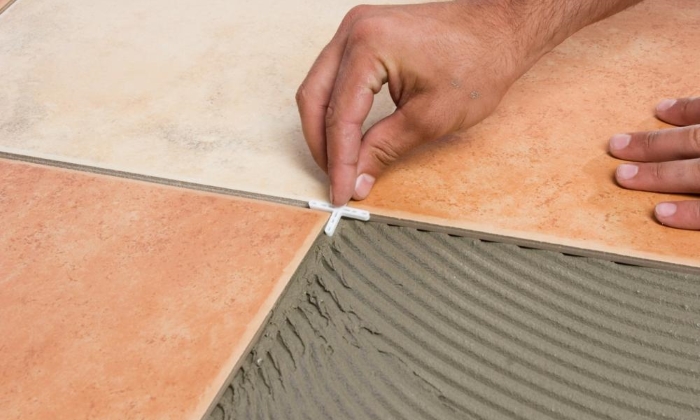
To maintain the gap between the tiles, use special plastic crosses.
The gap between the tiles should be 3-4 mm.
It should be noted that the gap carries not only a decorative load, but also serves as an expansion joint. The gap should be adjusted with special plastic crosses. They are sold complete with tiles or separately in a hardware store.
If there are protruding pipes, switches, sockets or other difficult places on the walls, then the tiles must be cut to size before laying. You can cut the tiles across the entire width with a tile cutter or grinder, the shaped holes need to be reamed. It is better if the hole is located at the junction of two tiles - such holes can be made using simple pliers, biting off in small pieces.
![]()
Grouting can only be started after the adhesive has completely dried. Grout without sand is used for joints, but latex or undiluted latex milk is recommended. It is necessary to prepare the grout in the amount necessary for production at one time; it is impossible to store the prepared mass.
It is necessary to apply the grout with a rubber float on the surface of the tile. In this case, the trowel must be held at an angle and made diagonal movements so that the grout more fully fills the gap between the tiles. Then the surface must be cleaned with warm water using a sponge. The sponge should be squeezed well and the surface should be wiped at an angle to the seams, you cannot rub along the seams - some of the grout may be washed off.
Seams should be sealed no earlier than 3 weeks later. Prior to this, it is necessary to exclude the ingress of water onto the lined surface.
If you plan to close the bathtub with a tile screen, then you must first decide how to lay the tiles. One option is to make a base from a moisture-resistant material (foam, foam concrete or aerated concrete elements) and then stick the products on it. The second option is to buy a ready-made screen, insert OSB instead of the existing panel and put it on it. The third option is to match a screen panel in the same color and style as the bathroom finish and be done with that.