The better the quality of the soil, the richer the crop grown on this land will be. But it happens that the initial data is not very good, and you have to fertilize the soil. To do this, you can use various fertilizers, but it is best to make a compost pit, which will become a source of environmentally friendly material. Consider how a do-it-yourself compost pit should be made: manufacturing options and materials suitable for this purpose.
In order to understand how to properly make a compost pit, you first need to figure out what it is used for. Typically, a compost pit is used to dispose of organic waste, which, as a result of the decay process, turns into organic fertilizer. There are many design options and each owner can only choose the most suitable option for themselves.

A compost heap does a great job of utilizing grass clippings and fallen leaves. Under the influence of time, moisture and microorganisms, all this turns into a fertilizer that can be used to grow any type of crop, both in gardens and in the garden.
Making a compost heap of organic fertilizers with your own hands is not difficult at all, especially since there are many ideas for self-implementation that can be used as a basis. You can make a compost pit yourself using pallets, which are usually used for transporting and storing building materials. They can be bought at a fairly low price, or quite possibly just found on your own site.
How to make a compost pit in the country: choosing a location
Speaking about the arrangement of the compost heap, one cannot but mention the importance of its correct location. First of all, the structure must be sufficiently removed from residential buildings. In addition, the place of its installation should be well blown by the wind in order to avoid stagnation of air and the concentration of an unpleasant odor emanating from it. In addition, access to the compost must be ensured so that the process of adding raw materials or removing ready-made fertilizer takes place as comfortably as possible.

Useful advice! In order for the decay process to proceed faster, it is recommended to periodically mix the layers inside the pile. Therefore, even at the stage of planning and arrangement, it is worth considering how this can be done.
In addition, the following criteria for selecting a site suitable for a compost pit should be taken into account:
- the chosen site should be located at a sufficiently large distance from any sources of drinking water, such as a well or well. The distance between these objects must be at least 25 m;
- if the site is not located evenly, but under a slope, then you need to make a compost pit below the water level (preferably at the lowest point of the site). This will prevent rotting runoff and clean water from entering;
- you should inquire in advance about the most frequent direction of the wind, since the pit often becomes a source of a rather strong and unpleasant odor, and can cause discomfort to both you and your neighbors;
- it is worth taking care that there is not only a free approach to the pit, but also enough space to be able to bring waste or remove ready-made compost using a wheelbarrow.

Useful advice! For a compost pit, it is advisable to choose a shaded place, since the sun's rays adversely affect the process of decay, significantly slowing down the composting process.
What can and cannot be put in a compost pit
In order for the fertilizer obtained as a result of decay to be of high quality and bring benefits to plants, and not harm, each summer resident needs to familiarize himself in advance with the list of those products that may or may not be added to compost. So, for composting are great:
- grass, weeds, leaves, hay, straw, etc.;
- berries, fruits and any peelings from them (raw);
- waste from wood products that have not been painted;
- paper products (napkins, bags, cardboard) in crushed form;
- waste from the preparation of tea, coffee or cereals;
- branches and roots of trees after grinding;
- needles;
- herbivore manure (biennial only);
- wood ash.

Important! The percentage of cleanings from products such as potatoes and tomatoes in the compost should not exceed 15-20%.
- any plants that have been affected by pests;
- plants exposed to diseases such as powdery mildew, late blight, etc.;
- excrement of domestic animals, as they can be infected with helminth eggs;
- bones and leftovers from meat products. They will provoke an extremely unpleasant odor, and will also become food for rats;
- inorganic waste - plastic, rubber, synthetic fabrics and metal;
- plants that have been treated with herbicides;
- the remains of cabbage, the rotting of which provokes an extremely strong and unpleasant odor.
As for the composting of weeds, experts recommend putting them in a separate pile, which is covered with a film on top. So, the risk that the plants will take root again is excluded and one can count on their death with one hundred percent probability.

If, however, weeds are added to the general heap, then often one has to deal with the fact that perennial plants take root, especially if, as a result of regular watering or rain, the humidity is quite high.
Important! To speed up the process of decay of waste, it is recommended to pre-grind them. This is especially true for elements such as branches, roots and paper products.
Having figured out what can and cannot be put in a compost pit, it remains only to familiarize yourself with the rules for caring for waste in order to ensure that it rots as efficiently as possible. Moreover, the duration of the period during which compost will be formed directly depends on the correctness of the care carried out:
- Humidity is the most important indicator that affects the decay of waste and the formation of compost. In order to maintain the desired level, it is recommended to periodically water a bunch of watering cans. At the same time, it is important that in the end it turns out wet, but not wet, since an abundance of water will adversely affect the viability and activity of bacteria;
- once a month, you need to carefully stir up the pile, thus ensuring the access of oxygen. This allows the waste not only to rot, but to burn out. At the same time, if there is no way to completely dig everything up, you can use a pitchfork and pierce a bunch in as many places as possible;
- to accelerate the maturation process of compost, the addition of nitrogen is required, which is found in large quantities in the green parts of plants, as well as in slurry.

The formation of high-quality compost usually takes 1-1.5 years. During this time, almost any waste and residues will fully decompose. The readiness of the compost can be recognized visually and by smell. The finished mixture is a crumbly mass of brown color and has the smell of forest land.
Compost pit: what is it and why is it needed
The issue of compost application is one of the most popular. After all, not every summer resident knows how and why to use the resulting mixture, and how great its benefits are. In fact, you can fertilize the soil with compost for almost any plant. Cucumbers, peppers, zucchini and pumpkins respond best to such top dressing. The result can be seen already in the next harvest season - the fruits grow large, have a bright and rich color, taste and aroma are well pronounced.
But there are also plants for which compost is not so useful. For example, root crops, tomatoes, melons and watermelons should not be abundantly fertilized in this way, as this leads to the fact that the yield decreases, and the amount of green mass, on the contrary, increases.
Strawberries respond well to compost, especially if you first cut it “at the root” and overlay it with a semi-decomposed composition. Then all this needs to be watered, and all that remains is to wait for new fresh foliage, as well as a bountiful harvest next season.
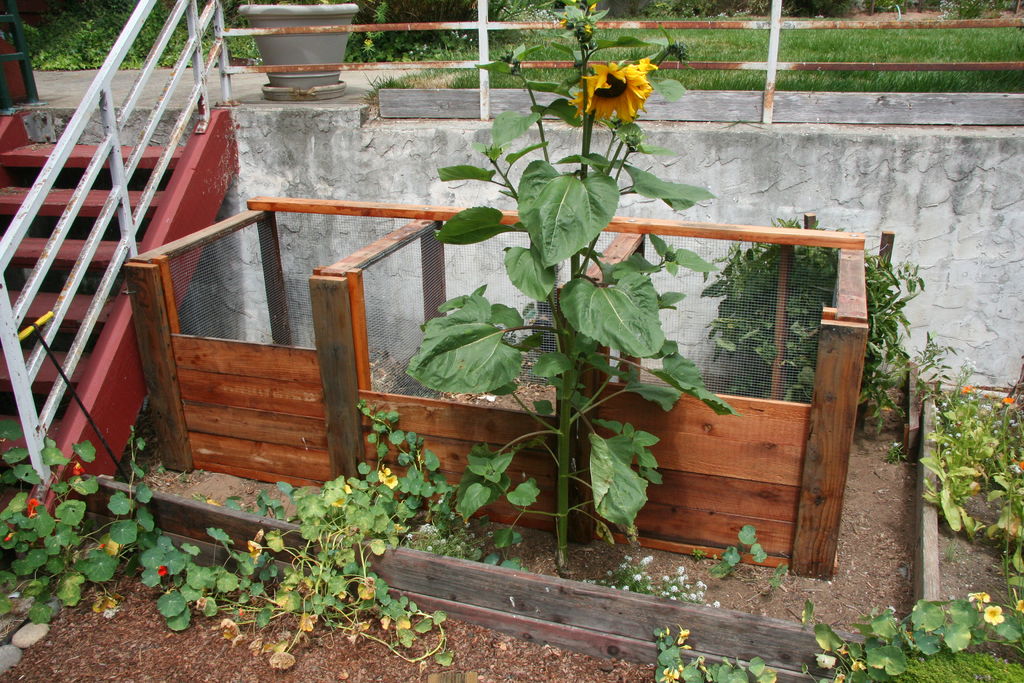
DIY compost pit: manufacturing options and design requirements
In order to properly build a compost pit, you need to understand how the compost heap should be arranged. There are many options for making your own hands, but first of all, you should pay attention to the fact that it should consist of three parts. In this case, you need to install 8 support posts, each of which must be processed with a protective agent.
Useful advice! Machine oil, fuel oil or even tar can be used as a protective composition for posts.
A fence can be used as a fence on one of the sides, and boards are better suited for the rest. Partitions are constructed from them, in which holes for ventilation are necessarily left. This contributes to the process of decay. Also be sure to install a door that allows you to access the compost.

Making a compost pit in the country with your own hands involves ensuring the proper level of ventilation and at the same time protecting the contents from precipitation. So that the compost heap does not turn into a swamp, it must be covered with a special lid of a suitable size during the rainy season. And if the weather conditions are not too severe, then it is quite acceptable to use plastic wrap for this purpose.
Another option is to use construction pallets that are pre-disassembled. Using a circular machine, the boards can be divided into individual elements, and then assembled from them into a suitable structure. In this case, it is better to fasten the boards vertically. The front board can be fixed with adhesive. To give stability to such a structure, it is necessary to use the building level and trim the lower slats.
It is also important that the height of the walls of a homemade composter be such that it is convenient for a person of any height to add, turn and remove compost.
Interesting! You can pay attention to the designs of compost pits made according to Finnish technology. In this case, some design features are of interest, for example, when you extract humus from one compartment, it is automatically filled with raw materials from the next one.

DIY compost pit: manufacturing options, photo examples
The type of compost pit is determined based on several factors. One of them is the installation method. Consider all the existing options:
- allocation of a certain place for organizing a compost pit. At the same time, a foundation pit is initially prepared, which is very similar to a well, but at the same time has a smaller depth. The walls of the pit are additionally strengthened to prevent shedding of the soil and are sheathed with an indent of 20-25 cm from the bottom. This distance is necessary in order to provide the microorganism with free access to waste;
- another option is to install a special container on the garden plot, designed to collect waste and process it into compost. This method allows you to get the finished product at any time. This design is based on a pit with formwork, as well as a special box made of boards. When implementing this option, it is extremely important to pay due attention to the organization of ventilation;
- a do-it-yourself compost heap is the easiest way to solve the problem. To do this, it is enough to make a substrate consisting of sand, gravel and dry grass. Waste is simply stacked on top, which over time will begin to rot.
Related article:
Detailed construction technology of structures: soil preparation, frame manufacturing, its installation and filling.

You can make a compost bin with your own hands using many different technologies and instructions. The proposed designs may differ in the materials that are required for work, dimensions, properties and ease of use.
Useful advice! Regardless of the type of structure chosen, before starting the laying of raw materials inside the structure, it is necessary to thoroughly loosen the bottom and install ventilation holes.

DIY compost bin: manufacturing options and instructions
Before making a compost pit with your own hands, it is advisable to consider as many options and designs as possible that can be used for this purpose. We will analyze in detail the instructions for making the most popular boxes made from various materials.
Garden compost bin: features of installation and operation
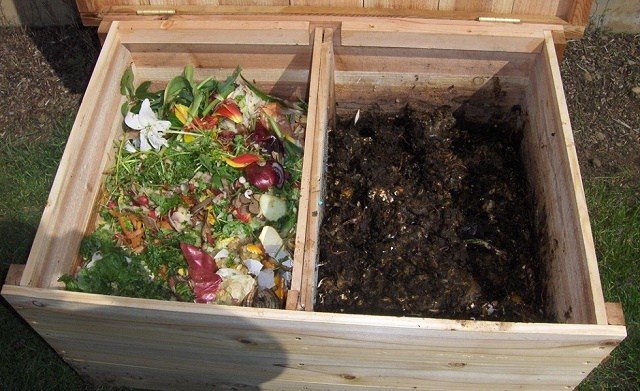
A garden composter may well be presented in the form of a large box, divided into several sections. Usually they make two or three compartments, but experts strongly recommend stopping at the option with three sections, since each of them has its own purpose: the first one is used for laying waste, the second one is for waste ripening, and the third one stores ready-made compost.
Depending on the individual wishes of the owner, the composter can be stationary or mobile (move on wheels). In this case, the recommended height of the box should not exceed 1 meter, and the size of each section should be about 1-1.5 meters.

Important! All wooden elements must be treated with a special protective compound, designed to provide the material with reliable protection against harmful insects, as well as moisture.
To make a compost bin with your own hands, you need to follow the following procedure:
- 8 wooden blocks are dug into the ground;
- With the help of boards, also previously opened with a protective compound, partitions are constructed. To do this, they are attached to supports at a certain distance from each other.
- In the front part, two compartments should be sheathed only to the middle, and only one lower board is nailed to the third. Doors are mounted on the first two from above.
- The back and end parts are completely sheathed.
- The entire structure is covered with two layers of moisture-resistant paint.
- Finally, handles, latches, etc. are attached.
At the bottom of such a box, drainage must necessarily be laid, which may consist, for example, of dry tree branches. Immediately after this, you can proceed directly to the laying of waste inside the structure.

How to make a compost pit in the country using wooden boards
A compost pit is an excellent solution, if necessary, not to spoil the appearance of the site with the appearance of a pile of waste. The formation of fertilizer in such a design takes much longer, and in order for the process to proceed as correctly and efficiently as possible, it is important to take care of the proper arrangement and ensure access to the right amount of oxygen in advance.
Work procedure:
- First of all, it is necessary to dig a compost pit, the width of which will be 1.5 m, the length is 2 m, and the depth is about 1 meter.
- In the corners, you need to dig in wooden blocks, observing an indent from the walls of 20 cm on each side.
- In increments of 5 cm, boards are attached to these posts.
- The resulting box is divided into two parts using a wooden shield.

The bottom of the compost pit is filled with a ten-centimeter layer of tree bark, branches and straw. Such a mixture will take on the role of drainage, which will remove excess moisture and additionally ventilate the raw materials.
Initially, only one of the compartments should be filled with waste. Then, when one is half full, the compost must be transferred to the second compartment. This procedure will allow you to enrich it with oxygen as much as possible.
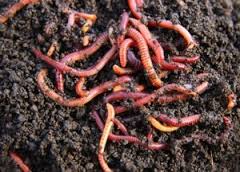
Important! The bottom and sides of the composter do not need to be covered with anything so that earthworms can freely get inside, which take an active part in the waste processing process.
How to make a slate compost bin
Slate is a durable material that is great for creating a structure designed to collect and process organic waste into compost. The procedure for creating a suitable design consists of several stages:
- choosing a suitable location and taking measurements to determine the appropriate size of the pit;
- according to the marks, a not too large recess is dug, in the corners of which supports are installed, which can be used as boards or metal pipes;
- slate sheets are installed along the perimeter of the pit;
- using the same sheets, the resulting container is divided into several parts (two or three).

The use of this design is carried out in accordance with all the same recommendations that are given for compost pits made of wood.
How to make a concrete compost pit in the country
With a little more time and attention given to the process of arranging a compost pit, as a result, it can last several decades without any problems. To do this, it is enough to concrete it. You can do this in the following way:
- you need to dig a hole about 80 cm deep, 2 m wide and 3 m long;
- make a formwork inside the pit;
- then you need to prepare a solution consisting of sand, gravel and cement. To do this, pour 5 liters of water into a bucket and add 5 kg of sand and cement to it so that the ratio of dry components is 3: 1;
- the resulting solution is poured into the formwork;
- using wooden boards and a chain-link mesh (a metal frame is also suitable), a cover is being built for the pit.

It is very important that in the case of using boards for mounting the cover, there should be a distance between the elements necessary for normal ventilation.
Compost pit using Finnish technology: the secrets of mounting the structure
The main requirement for structures made according to Finnish technology is compliance with certain dimensions. The height and width of the box must be the same and be 1 m. This is extremely important, because in a smaller box the raw material will simply dry out, turning not into compost, but into dust. Large sizes are unacceptable for another reason - in this case, there is a risk of burning the contents from too high a temperature.
For the manufacture of such a structure, it is best to use wood. Slate in this case is not a very suitable option, since structures made from it are characterized by a longer period of waste decomposition. Again, a cheap and at the same time quite convenient option is a Finnish pallet compost pit.

Algorithm for assembling a compost pit using Finnish technology:
- From wood pre-treated with antiseptic agents, a box frame of the desired size is assembled.
- Then the finished frame is sheathed with boards. The boards are tightly placed only on the partitions separating the compartments. On the side walls, the boards should be located with an indent of 1 cm.
- The back wall of the structure is also sewn up with boards at a distance of 1 cm.
- The bottom of the box is covered using a slab. At the same time, it is also important to maintain some distance between the elements so that excess liquid can be effectively discharged.
- In the lower part of the front wall of the structure, a small door is equipped, the height of which is usually 30 cm. It is fixed using ordinary door hinges.
- The roof of the structure is made gable, while one of the slopes is attached to hinges so that it simultaneously acts as a door, making it possible to fill waste inside.
Interesting! In one box, the size of which is 1 × 1 m, you can prepare an amount of compost sufficient to fertilize a plot of land of 5-7 acres.

Compost pit-bio toilet: what is it?
Another special type of compost pit is a dry closet, which is able to turn human waste products into compost. It is a structure consisting of two containers, the volume of each of which is 80 liters.
The use of this type of dry closet is as follows: after visiting the toilet, you need to turn a special handle, which is responsible for supplying a portion of a special mixture consisting of peat and sawdust. Thanks to this mechanism, the mixture is distributed evenly and falls asleep the waste that has got inside.
It is quite possible to use such a dry closet composter for the disposal of not too much food waste, simply throwing it inside and falling asleep with a dry mixture. When the first container is completely filled, it must be moved aside and replaced with the second one, which can be used in the same way. At this time, the first container will contain the compost mixture, completely ready for use.
Important! The compost obtained in such a composter will be very concentrated. This must be taken into account, and before introducing it into the soil, it is necessary to dilute the mixture with soil, sand or peat.

Criteria for choosing a ready-made composter for giving
At the same time, an increasing number of owners of suburban areas are striving to move away from the use of home-made structures, giving preference to purchased models. Consider what advantages and disadvantages ready-made designs have, and what parameters you need to pay special attention to before making a purchase.
In most cases, preference is given to simple and convenient composters that are easy to assemble and operate on their own. But since the number of offers on the modern market is extremely large, it can be really difficult to decide on the most suitable option on your own. As a guide, experts recommend using certain criteria, since models can be:
- collapsible or solid;
- with temperature sensor;
- with a special device that allows you to loosen the contents;
- with a mesh instead of a bottom, which provides protection against rodents;
- various shapes and sizes.

Composters also differ in the material that was used for manufacturing. So, plastic is the most popular today, because it has a low weight, which allows you to move it around the site without problems, and its service life is extremely long. If the structure is planned as stationary, then you can consider the option of acquiring a metal composter. Wooden models can also be found on sale, but they are not very common due to their short service life and exposure to external factors.
How to choose and buy a compost pit: an overview of the most popular brands and models
As examples, we can consider several composters that are most popular and have received many positive reviews from users.
Composter L&T Globe: features and specifications
This model is highly valued by permanent residents of country houses, since it can be used throughout the year, and not every product can boast of this. The L&T Globe was developed by Finnish specialists who took into account the harsh weather conditions of the local climate. This allows the composter to function without problems even in the most severe winters.

Another advantage of this model is the absence of small and heavy parts, so the operation of the device is quite simple. The working volume of the container is 310 liters, and durable polyethylene was used as a material for the manufacture. In order for the system to function even in the cold season, a 15 mm thermal insulation layer was provided, which allows maintaining the optimum temperature inside.
Due to the small height of this composter, a person of absolutely any height can fill and empty it. Moreover, for even more comfort, the design provides a removable top.
Thus, all these design features allow creating the most favorable environment for efficient waste composting. The microclimate, which is maintained inside the tank, promotes the growth and development of microorganisms that can process waste. The developers did not forget about the ventilation system, which is presented in the form of drainage holes in the bottom of the composter.
Important! The ventilation system of this model can be used in two modes: summer/winter. It is important to make the switch in a timely manner, using a shutter specially provided for this.

Bulbeo composter: features and benefits
This model is the development of Italian specialists, which exists in domestic markets in two versions that differ in size (700 and 900 liters). Initially, this model was intended exclusively for the processing of plant waste, but, as practice shows, it also copes well with the composting of other organic waste.
This composter belongs to collapsible models and consists of separate parts that are simply assembled and, if necessary, disassembled again. This allows you to rearrange the container from one place to another and even transport it. Moreover, when disassembled, this design takes up very little space and can easily fit in the trunk of an ordinary car.
Among the main advantages of this choice are:
- the ability to get free access to the structure from six sides;
- it is convenient to take out the finished compost thanks to the hinged doors;
- on the site, this model looks quite aesthetically pleasing, because it resembles a flowering bud in shape;
- discreet dark green color allows you to organically fit the structure into any landscape design.

Durable plastic is used as a material for this model, which provides reliable protection of the contents from wind and strong temperature changes. According to the developers, the rounded shape of the walls contributes to the maturation of the compost.
Of course, there are also ventilation holes that provide access to the required amount of oxygen. Anyone can easily assemble this model, because it does not require any tools or additional fasteners. The finished structure weighs only 19 kg, and its height is 885 mm.
Compost pit products: features and benefits of use
Having figured out how to make a compost pile, many expect that they will soon be able to use the nutrient fertilizer made in it. But the reality is that the natural maturation of compost can last up to 2 years. Of course, you can just be patient and wait. But you can go the other way by buying a special tool that promotes the maturation of compost and speeds up this process.

Interesting! The question of the use of excipients is especially relevant for those regions of the country where the warm period is short. If warm weather lasts only 2-3 months, then the compost ripening period has to be reduced artificially.
So, there are several drugs that are well suited for this purpose and are recommended not only by experts, but also by real users. They all have different names but, in general, the principle of their action is the same. As an example, consider the Tamir tool.
Tamir is an extremely complex drug, which includes a whole complex of microorganisms that in the natural environment are responsible for ensuring the decomposition of organic debris and waste. Due to the high concentration of these bacteria, the composting process is many times faster, and after 2-3 weeks, full maturation occurs.

It is worth noting that the compost obtained in this way is not completely decomposed waste and is somewhat different from the usual consistency. But its final decomposition will occur directly in the soil, which will bring even greater benefits to plants.
Important! It is believed that compost obtained as a result of the action of auxiliary preparations, as a fertilizer, is many times more useful than that which was obtained naturally. Therefore, answering the common question whether it is possible to use funds for compost pits, the answer is unequivocal - not only possible, but even necessary.
All funds of this type are used according to the following technology:
- if the heap has not yet been formed, then the drug is added on top of each new layer, after which it is all poured with water;
- in the already finished heap, you need to make a recess to the full height, into which the drug and water are added.

Other ways to speed up the maturation of the compost heap
In addition to complex preparations, other ways can be used to stimulate the processing of organic waste and the maturation of compost in the pit. Let's consider each of them in more detail:
- the use of rotted manure, which is quite capable of replacing biochemical preparations intended for composting. At the same time, it is forbidden to use fresh manure, as it can become a source of not only helminth eggs, but also weed seeds, pathogens, etc.;
- a solution made from ordinary yeast. To prepare it, you need 1 liter of water and about 1 tablespoon of dry yeast. To this is added 200 grams of sugar (1 cup). Such a solution is poured into the recesses made in the compost heap;
- herbal infusion. To improve the effect, it is mixed with chicken manure or slurry in a ratio of 5:2. It is important to know that the amount of nitrogen contained in fresh bird droppings is much greater than in manure, which means that the ratio should be different.
Useful advice! In order to regularly get bird droppings into the compost heap naturally, you can install a feeder above it. This will greatly facilitate and speed up the process.
The methods of accelerating maturation also include artificial moistening of raw materials, its tedding and other measures designed to create the most comfortable microclimate for composting.

How to arrange a compost pit in the country with your own hands
Whatever design is chosen for making compost, it is unlikely that its appearance will turn out to be attractive enough in the end. Most likely, no one will want to look at the compost pit, so it will be useful to think about how you can use the original design to improve its appearance.
The problem of masking the compost pit is especially relevant for small plots, since almost the entire territory is in plain sight. Although it happens that even for spacious plots, the owners use various design strategies to give the compost pit a more attractive look. So, in order to hide such an object, you can use:
- camouflage with plants and hedges;
- artificial decorations and stationary fences.

Works related to the manufacture of artificial fences are necessarily carried out in an open area located at some distance from the location of the compost pit. This is necessary in order to make it more convenient to work and to be able to move freely without being subjected to discomfort from the smell emitted by the heap.
The main requirement for such a fence is that it should hide the entire site from the eyes of guests and owners. That is, the compost heap should be completely hidden behind it, and the appearance of the fence should be as attractive as possible and be in harmony with the environment.
Much longer and somewhat more difficult to create hedges for this purpose. But they look much more natural and elegant. The main thing is to pay attention to the choice of a suitable plant, so that in the end the hedge is not too bulky and lush, and does not break the overall structure of the site.
Useful advice! You can use light translucent screens entwined with vines as a fence. They do an excellent job with the task, and at the same time do not take up much space, so they are quite suitable for both large and small areas.

Best ideas for decorating a silo
Other elements, such as special screens or screens, can also be used to mask the place where the compost heap is located. Bamboo fences have proven to be excellent. Plants also look good if carefully planted in a row.
At the same time, it is strictly forbidden to equip a compost pit directly under fruit trees, as this can lead to their death. Between the compost and plants you need to maintain some distance.
The following design methods are the most popular:
- fruit trees and berry bushes planted in a row;
- potted gardens, placed on several levels to hide the entire structure;
- installation of an object of small architecture: a gazebo or a fenced barbecue (of course, in this case, you should make sure that the unpleasant smell of decaying waste does not interfere);
- flower beds with tall plants;
- supporting wall.

Separately, it is worth noting the masking of compost heaps if a plastic container was used for them. In this case, it is not necessary to completely mask it. You can use it as a decoration of the site by painting it in a bright color and planting beautiful flowers around. You can draw any pattern on such a container, thus giving it originality.
It is easiest to work with small compost pits, which can be hidden with an abundance of flowers or even shrubs. Speaking of which, a compost yard is a great place to experiment with growing new varieties of annuals.
You can clearly see how do-it-yourself composters are made and designed for summer cottages by watching tutorials and detailed instructions. It is enough to decide which design is best suited in a particular case, as well as take into account your own individual requirements and wishes. Otherwise, there will be no problems, since there are as many options for do-it-yourself compost pits as there are ready-made models.
How to make a compost pit with your own hands: video instruction
A compost pit is the simplest design that will allow you to prepare fertilizer from compost in the country.
They enrich the soil, allowing you to harvest more crops. But in order to prepare fertilizer, you need a place for its production - a pit / box.
Making a compost bin is an order of magnitude more difficult than digging a hole. A do-it-yourself compost pit is prepared in just one day, and lasts for years.
Humus as a result of composting is a very valuable mineral fertilizer.
Basic rules and nuances
Although the arrangement of the pit is extremely simple, this process has a lot of nuances that must be observed both during the construction and operation of the pit in order to obtain fertilizer:
- The size of the pit is selected taking into account the garbage that will accumulate in 2 years + the garbage that will constantly rot in the country;
- If the design of the pit is closed, then the compost smell should not penetrate outside;
- The process of lifting the compost humus out of the pit should be simple;
- The pit can be covered and open;
- The pit can be built with a lid for constant air access;
- It is better to dig a hole in the area behind the yard so that it does not spoil the landscape;
- If the pit is concreted, then you need to put earthworms in the compost so that they accelerate its “ripening”;
- The pit must be arranged so that direct sunlight does not fall on it, otherwise the compost will dry;
- Sheets of metal or slate cannot be laid at the bottom of the pit, but the walls can even be made from tires;
- If you pour soapy water into the pit, then you moisten the compost and enrich it with phosphorus, sulfur and ammonia group, from which bacteria extract compost nitrogen;
- The distance from the pit to the well should be as large as possible. So you secure groundwater;
- It takes from several months (with the participation of special additives) to 2 years to make fertilizer from compost! So it is better to make either two holes, or one for 2 sections;
- A pit near fruit trees in the country - their certain death;
- A concrete pit is preferable to just dug;
- If you don’t know how to mix concrete, you can easily put a wall of a compost pit on the sides of a brick.
- The minimum dimensions of the compost pit: 1.5 x 3 meters, depth - up to 1 meter;
- The compost will need to be constantly shoveled / sorted out with a pitchfork, so the pit should not be very deep;
- It is advisable to equip two pits: the compost matures slowly, while one pit is being prepared for the coming season, you are preparing a second compost bookmark for the season in a year;
- Please note that if the pit is open and the wind blows, the compost smell will “kill” any appetite, both in your country house and in your neighbors;
- Always keep an eye on the ingredients you add to your compost. Not all of them are useful for crafting! They will be discussed separately at the end of the article.

Features of the pit device
The device of the compost pit has its own nuances that must be taken into account when creating it. Compost loves good moisture and friability for enrichment with oxygen, which is extremely important not only for decay, but for the decomposition of organic matter into minerals.
The compost heap should be regularly watered and covered with a lid or cling film to create a greenhouse effect in the pit and compost.
Use a pitchfork to loosen the compost, or alternate brown and green materials when laying the pit (they will be discussed separately).
The device of the compost pit can be different, but if we take into account the standard 6 acres and calculate the approximate need for organic matter for the soil, we will get the following dimensions: width up to 1.5 m, length - 2 m, and height - a maximum of 1.5 m.
We will not consider options for a compost bin, for which such a height is always justified, but we will find out why such a depth is needed.
If we do not use special microorganisms when preparing compost, then “on our own” the organic matter on the site will decompose in about 2 years.

For this reason, it is illogical to make a small compost pit, and one at that. Two sections - at least!
In one pit, the laying of the year before last is already “reaching”, and in the other, compost is being prepared for the next year. You can also use barrels instead of the second pit.
It is important to note! Many believe that they dug a hole and it's ready. How to loosen compost?
In the dimensions indicated above, a height of 1.5 meters is measured as follows: 0.5 m of the pit itself and 1 meter of the fence that will hold the compost.
This forces us to build a fence, but such a pit is considered the most effective.
In any case, you can dig a large hole and compost in it, but think about how you can make it easier for yourself to loosen the job.
You can build a fence from wooden pallets or tires.
Pit making options
This section provides examples of technologies on how to properly make a compost pit in a suburban area.

Method 1 - bulk compost, without a pit and a box:
- Choose a secluded place in the far corner of the yard in the country, where there are no plantings;
- As soon as organic waste appears, immediately compost it;
- Alternate bookmarks in layers: added waste from the kitchen, immediately reported grass / manure on top, etc .;
- As soon as the compost heap grows a full meter in height, make a few holes right in it and fill in the compost preparation;
- Cover the compost with a film on all sides so that there is a constantly high temperature and humidity inside;
- Water the compost once a week with water and after 3 months the humus will be ready!
- Do not lay any film, no slate, no tires, no pallets, let alone metal under the compost! Moisture from the soil cannot rise, and humus is not washed out, unlike other mineral fertilizers;
- If it often rains in your area, then cover the pile with a film, and to prevent "leaks" pour a small layer of peat under the bottom of the compost;
- Once a month, worms can be planted in a growing pile of compost so that they loosen it and enrich it with oxygen.
Method 2 - a simple pit:
- We choose a place in the far corner where there are no trees / shrubs;
- We dig a hole, 50 cm deep and 1 m wide;
- We lay straw, dry grass, small branches, bark on the bottom;
- Having thrown away household waste, we immediately cover it with a layer of grass so that flies do not divorce;
- Each portion of the waste must be covered with grass - this is how we alternate brown and green materials.
- Do not throw everything unnecessary into the compost - this is still not a cesspool;
- If the pit is not in the shade, then the compost should be watered regularly;
- If the pit is in the shade, then for ripening, you need to constantly cover the compost with a film.
"Sandbox" - this is the same compost pit, only surrounded by wood (as an option, with the help of slate, rubber tires, metal sheets).

Method 3 - sandbox:
- We remove the sod around the entire perimeter of the future compost pit to a shallow depth (30-40 cm);
- If the sides are wooden, then we hammer in / bury the pegs along the edges of the bare area;
- We nail the boards to the bearing pegs, leaving 2 cm of clearance between them;
- Thus, a middle structure is obtained between the pit and the box. The advantage of this design is that it is easy to turn over the contents, since it is at a shallow depth;
- If desired, several wooden pallets can be used as a ready-made replacement for stakes.
- Fell plant residues without tamping, otherwise you will end up with silage.
- Instead of wooden stakes and boards, vertically driven slate sheets can be used.
- In the heat, you need to constantly water the compost. Cover the top of the pile with a lid / sheet of plywood / film.
Method 4 - concrete pit.
Such a compost pit always consists of at least 3 compartments: one for old compost, and the second for constant replenishment.
The pit is supplied with a cover for a set of fertilizer and tedding.
The construction process is as follows:
- We measure a plot in the far corner of the plot with dimensions of 2x3 m and make markings;
- On the marked area, we evenly remove the sod, but do not throw it away - it will still come in handy;
- We dig a hole 0.8 m deep;
- We construct formwork and pour concrete (10 cm thick).
How to prepare a solution:
- Pour gravel into two 10-liter buckets and shake well;
- Add water in a measuring container. If 5 liters of water entered the bucket, then the voidness of the gravel is exactly 50% (a ratio of 2 to 1 is required);
- Add 10 liters of river sand.
Stir the solution.
Attention! If there is more water than it should be, then the concrete will be in bubbles. The key to good concrete is the ability to thoroughly mix!
The concrete will dry in 2-3 days, and you can start pouring compost components into the finished pit.
Instead of concrete, you can use barrels buried directly in the ground, as a result of which they will be both a pit and protection at the same time, as well as bricklaying or a stack of tires (the sides need to be sawn off).
There is another popular option - creating a compost bin using Finnish technology, but it requires much more time and effort.
How to prepare compost?
First you need to know what you can and cannot put in the compost heap.
- Fruits, vegetables, cereals, berries in any form;
- Ash, leaves, straw, grass, branches, bark;
- I love needles;
- Shredded paper, napkins, cardboard;
- sawdust, wood shavings and dust;
- Manure, bird droppings.
- Any bones;
- Excrement of carnivorous animals (cats, dogs);
- Tomato and potato tops;
- Inorganics: plastic, rubber, iron, synthetics;
- Any organic matter that has been treated with insecticides, herbicides.
The balance of the mixture in the composter is the key to successful ripening, so you need to correctly combine green material (bird droppings, fruits, vegetables, peelings, coffee grounds and tea leaves, fresh weeds) and brown (fallen leaves, sawdust, straw, hay, bark, domestic hair). animals).
Any plant develops better and bears fruit in fertilized soil. One of the most affordable and common fertilizers for the garden and garden is compost. About what ingredients can be used to make compost, how to make compost at home or in the garden, what crops this fertilizer is used for, whether it is worth buying ready-made compost and which of the proposed compositions to prefer, we will tell in our article.
What is compost
Compost (lat. Compositus - composite)- This is a fertilizer that is formed during the decomposition of organic substances under the influence of microorganisms. Composting is a natural method of recycling and processing organic waste, which improves soil structure and saturates poor or depleted soil with substances necessary for plants. But garden compost should not be confused with those soil mixtures that are sold under this name in garden centers and pavilions. If you make your own compost, this best of all organic fertilizers will cost you nothing. There are many recipes for making compost, and we will introduce you to some of them.
What can be composted and what can not?
Can:
- raw cereals, fruits, vegetables and their cleaning and trimming;
- sunflower stalks, corn stalks, garden and melon tops, dry leaves, mowed hay;
- sleeping tea and coffee grounds;
- leftover food;
- thin branches and shoots, untreated and unpainted wood, including sawdust and chips;
- straw, seed husks, nut shells;
- bird droppings and fresh herbivore manure;
- paper - napkins, packaging cardboard, xerox paper and newspapers in shredded form;
- peat;
- shredded natural fabrics - linen, cotton, wool, silk, hemp and linen fire;
- down and feathers of birds, animal hair.
It is forbidden:
- large and hard meat bones;
- ash from a stove or fireplace;
- synthetic materials and fabrics;
- peel from citrus plants;
- perennial rhizomatous weeds, especially when flowering or seeded;
- plant residues affected by diseases or treated with herbicides;
- insect pests and their larvae.
Experts still do not have a consensus on whether it is possible to add human and carnivorous feces to the compost, as well as on the question of whether the remains of milk, fat, meat and fish can be added to the compost.

The process of converting grass, food and household waste into organic fertilizer is conditionally divided into three parts:
- decomposition: at this stage, the waste is heated inside the pile, changes its structure and is enriched with useful substances. As a result of transformation, useful microorganisms, fungi, earthworms appear in the compost, which help to accelerate the processing of the mass into fertilizer.
- humus formation: at this stage, it is important to ensure aeration of the pile, since without oxygen, microorganisms that organize and carry out the process of compost maturation can die. To provide air access, the mass is mixed with a pitchfork or a shovel;
- mineralization: at the stage of mineralization, decomposition of nitrogenous compounds occurs, and humus passes into mineral forms. The process reaches its maximum value after a year of compost aging.
Why is compost useful?
Firstly, it is one of the best mineral fertilizers that fill the soil with a huge amount of important trace elements.
Secondly, this is the cheapest means for soil structuring, which is carried out by increasing moisture conservation.
Thirdly, it is convenient to use compost as a mulch, which slows down the evaporation of moisture from the soil and suppresses the growth of weeds.
Fourth, you no longer have to remove or burn organic waste, as it can be placed in a compost pit and turned into excellent fertilizer.
How to make your own compost
How to make compost in the country
There are two ways to prepare compost - fast and slow, which are also called cold and hot. But first, let's decide on the compost bin and the location of this bin in the garden. It is best to build a box from wooden planks or any boards that have not been in contact with toxic materials - wood stain, varnish, paint, and the like. If you want a box to last for years, make it from pine planks - it won't cost you much. Put together four walls, observing the gaps between the prefabricated planks - these gaps will serve to aerate the compost.
It is better to place the box (burt) on a hill so that it is not washed away by water, and away from the garden, otherwise the roots of all plants will change direction and stretch towards the compost pile. Choose a place, level the surface, dig in four supports and nail three walls to them. It is better to make the fourth wall removable or openable so that it is convenient for you to turn the compost or get it to mulch the beds. It is better to concrete the bottom of the box, or you can cover it with thick plastic wrap or old linoleum.

If you don't want to bother with nailing boards together, you can buy a ready-made plastic or metal composter in the store - a compost container with a lid, the main purpose of which is to prevent the compost from crumbling. The advantage of such containers is that they can add protein waste - meat, fish, milk, because they are tightly closed with a lid, and rodents do not penetrate into them. In addition, they retain heat well and can be moved around. And the disadvantage of industrial composters is that they do not receive air. If you are not on a tight budget, buy a local organic processing station that independently maintains the process temperature and is equipped with a control system. In the end, you can make a cylinder of the desired height and width from a chain-link mesh and put waste for composting into it, but it will be inconvenient to get compost from such a container and dig up the mass in it.
When can you compost? There is no strict framework in this matter: you can start laying layers in the spring, after pruning trees and shrubs, and replenish the layers as organic material arrives. In autumn, fallen leaves, tops of vegetables and melons can be placed in a compost heap. Advances in modern science even make it possible to produce compost in winter. But first things first.
How to make compost? At the bottom of the composter or pile, lay chips or cuttings of branches that will serve as drainage material, and then start filling the composter layer by layer, and the more types of organic matter you put in the compost, the higher its quality will be. Composting involves alternating dry waste with wet and green with brown (nitrogenous with carbonaceous). The so-called green layer is filled with waste that is a source of nitrogen - trimming and peeling vegetables, small twigs, green tops, and in the brown layer - torn newspapers and other paper containing carbon, fallen leaves and dry twigs. You can enrich the composition of the compost with plants that contribute to the rapid formation of humus - yarrow, dandelion, chamomile, valerian. To speed up fermentation, the compost heap is watered with a solution of mullein or bird droppings. The consistency of the mass should resemble a damp sponge, but moderation should be observed in moistening the compost, since the "flooded" microorganisms will not be able to generate heat that promotes decay.
To maintain the temperature and environment necessary for the process, a home-made composter must be covered with oilcloth, an old carpet, linoleum, or a lid knocked together from tight-fitting boards. Once or twice a month, the layers of compost should be turned over with a pitchfork to loosen the mass, achieve uniform moisture and stimulate processes that are fading due to lack of ventilation. In the heat, the compost is watered from time to time to maintain the required moisture.

Well, you have put compost in the box, now you need to wait until it rots. Ready compost looks like a dark, damp, crumbly mass that smells like forest soil.
The production of compost requires compliance with certain rules:
- compost shouldn't smell bad. If there is a smell of ammonia, then the processes are not proceeding correctly, and the mass can turn into poison. In this case, add torn paper to the compost to neutralize the predominance of nitrogen components in it. So that the ammonia formed during fermentation does not leave the pile in the form of fetid gas, but is processed into nitrogen, the following order of filling the container should be observed: each layer of waste should be no more than 50 cm thick, and organic layers are interspersed with layers of soil or manure 5-10 cm thick;
- everything that you put in a compost heap should be chopped beforehand, and the greens should be slightly dried so that it does not sour in the compost, but rot;
- before the onset of winter, you need to shovel the entire pile so that the bottom layer is at the top and the top is at the bottom;
- the height of the pile should not be more than 1.5 m, and the width should not be less than 1 m, otherwise it will be difficult for you to shovel the mass. The height of the heap is measured a couple of months after the compost is laid, since during this time it settles significantly.
quick compost
Many gardeners prefer to make quick compost: they dig a shallow (no more than 40 cm), but wide hole in an elevated area, which is filled with broken branches and chopped wood, and is covered with earth from above. In a year or two, you will have an excellent fertilizer for the garden and vegetable garden.
The fastest compost is obtained from leaves: in autumn, fallen leaves are laid in a shallow pit, layered with garden soil, watered with biostimulants (EM preparations - Baikal-M1, Humisol, Tamir, Urgasa or the like) and covered with a black film, and in mid-May this compost can already be partially used for its intended purpose. To speed up the process, you can put a “sourdough” from already rotted compost into young compost. You can speed up the process of preparing compost by such means as a solution of sugar and yeast, which should be abundantly poured over plant residues put into the composter, or nettle infusion: pour ¾ buckets of nettle with warm water, add a bag of dry yeast and put in a warm place for 5 days, after which the infusion is filtered and watered with compost.

Compost at home
You can make compost in the winter at home.
Making your own compost at home is easy. For this you will need:
- plastic bucket;
- garbage bag;
- several plastic half-liter bottles;
- a bottle of EM liquid that speeds up the composting process;
- spray;
- plastic bag for sugar;
- a bag of garden soil or purchased soil.
Make cylinders of the same height out of plastic bottles, cutting off the bottom and neck, and place them on the bottom of the bucket. Place a trash bag in the bucket with a few small holes in the bottom to drain excess liquid and start filling it with chopped plant debris, spraying each three-centimeter layer from the spray bottle with the accelerator solution prepared according to the instructions. After moistening the residue, squeeze the air out of the bag, tie it tightly and press down with a load - for example, a five-liter plastic bottle of water. About every three days, drain the compost water from the bucket - this liquid can be poured down the drain overnight to clean sewer pipes and drains in sinks. And if you dilute this liquid with water in a ratio of 1:10, you can water indoor plants with it.
As the bag fills with organic matter, spray each layer of fermentation promoter, bleed the bag out of the bag and put pressure on it - do this as long as the bag fits in the bucket. As soon as the bucket is full, put it together with the compost in a warm place to ferment for a week, then mix the compost with a little garden or garden soil, transfer it to a sugar bag and take it out to the balcony or loggia where it will now be stored.

In the empty bucket, place a new garbage bag with holes for drainage of water and start the process of accumulating and turning waste into compost again. If you do everything right, you will not hear an unpleasant smell. A sour smell can occur simultaneously with the appearance of white mold on the surface of the compost - this is a sign that the process is not proceeding correctly. To correct the situation, add finely chopped newspapers or other paper to the bucket. Put the second portion of the ripened compost into the bag in which the first batch of fertilizer is stored. Ready-made home compost can be poured into pots of houseplants, added to the substrate for seedlings, or taken to the country and used as fertilizer or mulch.
Compost in bags
Growing champignons is now a very profitable business, and many adapt to grow these mushrooms in their basements - this method is called intensive, in contrast to extensive, when mushrooms are cultivated in natural conditions. Mushrooms are grown in different ways, but the most effective method is growing in bags: it does not require high financial costs, and diseased mushrooms in one bag do not infect mushrooms in neighboring bags. The only drawback of this method can only be considered that the laying of the substrate in bags requires considerable physical effort. Compost in bags is placed on the floor in parallel or in a checkerboard pattern, and the checkerboard arrangement saves production space.
A high yield of mushrooms can only be obtained on a nutrient medium, and this requires a substrate based on compost. Compost for growing mushrooms, like garden fertilizer, can be prepared independently. For 100 kg of wheat or rye straw, you will need 100 kg of horse manure, 8 kg of gypsum, 5 kg of chalk, 2 kg of superphosphate and urea. Straw is cut 15-20 cm long, poured for 2-3 days with water so that it does not get wet, but moistened, then put three or four layers of straw in a pile or box in line with layers of manure, adding compost fertilizer - all urea and part of superphosphate (500 g). Then the mass is thoroughly mixed, gypsum is added, then the remainder of superphosphate, then chalk, and after adding each ingredient, the compost is thoroughly mixed each time - 4 times in total. The output is 300 kg of substrate - this amount should be enough to lay 3 m² of mycelium.
If you use not horse, but bird droppings, then the proportions will be different: 100 kg of droppings and 100 kg of straw will require 300 liters of water, 8 kg of gypsum, and alabaster is used instead of superphosphate and chalk.

Mushroom compost should mature outdoors in a place protected from the sun and rain for three weeks - during this time the components “burn out”, the ammonia evaporates completely, and the compost can be used: approximately 15 kg of compost mass is placed in special perforated bags and plant mushrooms in it.
Compost in boxes
The box growing system of mushrooms was developed in the USA in 1934 and is still popular today, mostly in the United States, Canada and Australia. Growing champignons in boxes, as well as in bags, allows you to localize the defeat of fungi by diseases and pests and provides the opportunity to keep mushrooms at different phases of development in different rooms.
Boxes are made from spruce, birch or alder boards. The volume of the boxes can be from 0.4 to 2 m², and the optimal depth of the containers is 12-15 cm. Before use, they are disinfected with a 4% formalin solution or a 2% Lysol solution. As for the substrate, the method of its preparation is the same as when growing champignons in bags.
Ready compost - is it worth buying
If you don't have time to make compost or you're afraid of not being up to the task, you can, of course, purchase ready-made compost. The Biud product has proven itself well - a universal concentrated and environmentally friendly biocompost that can be used both for ornamental crops and for fruit and berry crops. To create this biofertilizer, both traditional composting methods and the latest Finnish technologies are used. The basis for the compost of this brand is high-moor and low-lying peat, cattle or horse manure, poultry droppings and fur-bearing carnivorous animals. Chopped straw, sawdust of hardwood trees, dolomite flour, vermiculite and other natural preparations are used as additives. By the name of the compost, you can determine what type of manure is used in it - "Cow", "Horse", "Chicken". There is also a biocompost in the series, created to fertilize the soil in autumn, it is called “Autumn”.
The use of compost during planting has a fruitful effect on vegetable crops - fertilizer is applied to the wells one tablespoon at a time. 2-3 cups of fertilizer are placed in the pits of berry bushes, and a liter jar of compost is placed in the pits of fruit trees.

Mushroom compost is also not in short supply - you can buy it both in loose form and in briquettes. However, it is still worth trying to make compost yourself, because this will require very little effort, and all the necessary ingredients are waste of your life. Start collecting and layering organic waste at home, as described in our article, and the first bucket of compost you make yourself will inspire you to build a large garden fertilizer box and start a compost heap. As a result, you will always have high-quality and free organic fertilizer in your garden.
4.2368421052632 Rating 4.24 (38 votes)
After this article, they usually read
Compost is an indispensable component of nutrient soil in the garden of any gardener. In addition, it is also recognized as the most affordable fertilizer in terms of costs, since the main component of its manufacture is waste. That is, it is made practically from nothing, because in any garden there will always be some kind of waste.
You just need to know that in order to get a complete nutrient for the soil, the compost heap must be properly prepared. After all, compost will not only fertilize the earth, but also serve as an improver of its structure, friability and ability to retain and absorb moisture.
What is compost
In order for the garden to be well-groomed and give a good harvest, it simply needs to be fertilized. You can do this with the help of chemical fertilizers, or you can get by with your free, useful and safe tool.

Compost is a natural organic fertilizer, which is obtained by fermentation under the action of earthworms and bacteria.
To obtain such fertilizer, a compost heap is laid. Often it is done by simply digging a hole in the ground, but it is better if it is a specially equipped place - a compost bin.
Composters are made in the form of closed or open containers, but you can also purchase special plastic boxes equipped with a lid and a door.
The prepared compost is introduced into the holes before planting garden crops in open ground or for planting in greenhouses. Or it is scattered over the site before planting the seed and lightly mixed with the soil.
What is compost made from?
Many people think that to make compost it is enough to dump all kinds of waste in a pile in some corner of the garden. Time will pass, they will overheat, and fertilizer will turn out. But this is far from true.

To get safe and healthy compost, you need to arrange the right compost heaps, so there are some points to consider. First of all, the composition of such a heap. It may include:
- ash, chalk, charcoal, eggshells;
- cut grass, straw and hay;
- sawdust and tree residues;
- vegetable food waste;
- weed grasses and healthy plant greens;
- bird droppings and animal manure;
- compost stimulants.
Compost bin dimensions
Composting ingredients are put into the compost bin. Proper composting does not release harmful substances into the soil and does not cause inconvenience with a strong unpleasant odor.
It is important to observe the dimensions of the compost bin, otherwise it will be difficult to create a comfortable temperature and humidity regime for the compost. The optimal heap sizes are one and a half meters in width and the same or more in length. If you make a pile smaller, it will quickly lose moisture and will not be able to warm up well. This will lead to the fact that the composting process will be delayed for a long time.
compost ban
Before you make a compost heap, you need to know what you can’t add to its composition:
- disinfectants and chemicals;
- weed residues with seeds of long germination periods or roots of creeping plants, since they do not lose their germination during composting;
- remnants of coated glossy paper, rubber, textiles, as well as animal bones and stones - all these substances do not decompose in compost;
- human feces and pet waste, which can be contaminated with worm eggs;
- diseased plants that are affected by pests and fungi, such as late blight - such residues must be burned in the garden;
- food waste of animal origin, which start the processes of decay and cause a persistent unpleasant odor.
Open composting device

You can run a compost maker, as gardeners are taught in specialized publications, in the following way:
- Prepare a site for the compost bin. To do this, you need to choose a suitable place at the end or middle of the garden and level the ground. Shady places without direct sunlight are best suited for this purpose.
- Then fence the area necessary for the composter with boards, shields or slate sheets. Or put together a wooden box with slots for air exchange. You can also fix a special garden grid on metal supports. This can be one container or two separated by a partition, one of which will be filled in the current year, and the second in the next.
- Dig a hole half a meter deep and pour a drainage layer on the bottom. To do this, you can use sand, gravel, large wood residues. It is imperative to make such a layer, since it is impossible to allow the water that will wet the compost heap to collect in the compost bin. It should flow out of the compost bin without obstruction.
- Then, on the drainage layer, it is imperative to lay a ready-made mature compost of the last or the year before last in a small layer. This is necessary to supply the ingredients of the heap with bacteria, with the help of which the compost is fermented.
Building an indoor compost bin
A more reliable and durable design than an open compost bin is a closed compost bin. It is built with walls that have slots for ventilation, and with a lid that will mix the compost. Such a compost heap in the country has a neater appearance, does not interfere with the aesthetic perception of space. As a rule, such a container is made of plastic, which does not rot, does not fall apart and will last for a long time.

To install the ventilation system, pipes are brought into the box, which are protected by a mesh so that they are not clogged with compost.
The advantages of an enclosed compost heap are that it allows heat to build up quickly and retains it well. From this, pests die, and the fermentation process occurs faster.
Another plus is that in these containers it is not necessary to observe the proportions of the constituent ingredients without fail. Various acceptable wastes, residues and grass can be dumped into the pile in any convenient quantities. It is only important to mix it all systematically.
How to make a compost heap
For the correct preparation of the ingredients of the heap, it is necessary:
- Prepare the necessary components, grinding them as finely as possible. Branches can be broken, and plant remains can be chopped with a shovel. The smaller the heap components are, the faster the compost will mature.
- Lay the components in layers, the thickness of each of the layers should be up to 15 cm. In this case, it is necessary to alternate the laying of food waste, wood residues and green mass of plants.
- Layers can be shifted with manure or droppings, or commercially available liquid fertilizers can be applied. Compost stimulants are also used at this stage. As manure for a heap, it is better to use cow or horse manure, and the best bird manure is chicken manure.
- From above, the pyramidal compost heap is covered with straw, spandbond, boards or plant stems. This is necessary for free air circulation. Often gardeners cover the pile with polyethylene, but this is not recommended: when covered with plastic wrap, the compost will overheat without air access. And this is fraught with the appearance of a putrefactive, unpleasant persistent odor.
Compost maturation
The preparation of compost and the duration of its maturation are directly dependent on which fractions have compost components and what fermentation mode is set. In general, fermentation and composting last a very long time, the minimum period is several months, the maximum is two to three years.

The smaller the fractions of the embedded components, the faster the composting will occur. It is also important that the temperature inside the compost pile is close to 60 degrees or higher. This will not only speed up the process of decomposition of the ingredients, which occurs with the help of bacteria, but also help to eliminate the possibility of germination of weed seeds as much as possible. Also, at such a high temperature, harmful insects die.
To ensure the correct fermentation regime, it is important that good moisture and air exchange is provided inside the pyramid.
Ensuring fermentation
In order to speed up the composting and fermentation of the components of the compost heap, it is necessary to perform the following actions:
- When the weather is hot and dry, the compost pile needs to be watered. Moreover, the water should wet all the layers of the heap. This process is most conveniently done with a large garden hose, because a large amount of water will be required.
- Watering the heap must be done in the morning, in this case, during the day, the wet compost will have time to warm up well, and the process of active decomposition will start.
- How to water the compost heap? It is watered with ordinary warm water, but from time to time it is necessary to add a compost stimulant to the water or insist fresh manure in it.
- A couple of times during the season, the compost needs to be shoveled. This helps to carry the well-fermented inner layers to the top. In this case, the upper ones move inward.
- Also, when mixing, the compost is saturated with air and gets rid of accumulated gases.
- With the onset of cold weather, the compost bin needs to be warmed, while the process of active composting is prolonged. For warming, a pile is sprinkled with humus or peat, and then tops from the harvested root crops, sunflower stalks or fresh straw are laid on top. This year, the remains of the plants will keep warm, and next year they will serve as ingredients for a new pile.
Fallen leaf compost
Separately, it is worth mentioning the compost from fallen leaves, popularly known as “leafy soil”. How to make a compost heap from fallen leaves?
Fallen leaves are taken as the basis of such compost. The advantage of this approach is that at the end of autumn the leaves lose minerals, and only lignin, tannin and hemicellulose, which are valuable ingredients of humus, remain in their tissues. And the downside is that these components overheat rather slowly, which prolongs the composting time. A lot of tannin contains the foliage of oaks, beeches, chestnuts, willows and plane trees. Therefore, their sheet mass should not be used for laying in a pile, but only for its shelter.
Leaf compost matures noticeably longer than usual, about two years. But gardeners do it, as it is very valuable in that it improves the quality of the soil. It also contains microfungi within itself, which decompose hemicellulose and lignin. And this becomes useful for those garden plants whose roots interact with fungal microflora in the process of symbiosis.

To get a good composting result, you need to consider some points:
- When creating a compost bin, you need to take into account that microorganisms come from the ground, so you need to arrange it in a clean space where chemicals have not been used.
- Accelerates composting by adding valerian officinalis, yarrow, chamomile and dandelion to a bunch of herbs.
- To speed up fermentation, bioconcentrates are added to the compost. In this case, the so-called fast compost heap is obtained, which can mature in three weeks.
- You need to know that a high content of fresh coniferous sawdust in the compost significantly reduces the potassium balance, so such compost at the stage of readiness must be enriched with potassium-phosphorus fertilizers.
- The presence of green constituents in the compost should not exceed one third of the total volume, because the herbs ferment slowly and may rot. If it turns out that the main volume will consist of grass, then it must first be dried in the sun.
- The highest quality compost is obtained, created using a variety of components. Not only organic components, but also mineral ones should be present. For this purpose, the compost heap is supplied with superphosphates, dolomite flour, and complex mineral fertilizers.
- It should be borne in mind that manure is a concentrated fertilizer, so its content in the compost should not exceed 10%.
- For better stability and increased air exchange processes, the compost heap should be laid cone-shaped or in the form of a pyramid.
- In order for the heap to ripen faster, components containing a lot of nitrogen, such as straw, legumes or leguminous plants, are added to it.
In summer cottages and household plots, the problem of recycling organic debris often arises - leaves, weeds, cleanings, sawdust and other things. Unlike inorganic waste (glass, plastic, etc.), all this can be used to produce clean, environmentally friendly fertilizer - compost. It turns out as a result of the biological process of decomposition under the influence of the vital activity of microorganisms. When compost is added to any soil, its quality characteristics improve. Clay soils acquire a lighter, crumbly structure, while sandy soils retain moisture better. Consider how you can make a compost pit and properly prepare the compost.
The following organic wastes are suitable for raw materials, which are conditionally divided into two large groups.
brown waste
These include those that emit carbon.
green waste
 Green waste is considered to be nitrogen-releasing waste.
- berries, vegetables and fruits unsuitable for food and processing;
- sleeping tea and coffee cake;
- cores and cleaning;
- tufts of wool;
- leftover soups, cereals;
- eggshell;
- waste products of herbivores.
When laying a large amount of freshly cut grass, the composting time will increase significantly. To speed up the process, lightly sprinkle small layers of grass with earth.
What can't be put in?
Not all organics are suitable for laying for fertilizer.

Do not put in a compost pit:
- fresh pet excrement;
- loach, wheatgrass;
- bones;
- leaves and other parts of plants affected by diseases, especially powdery mildew;
- plants treated with any chemicals;
- weeds that have had time to ripen seeds;
- inorganic non-degradable waste (rubber, metal, glass, synthetic materials);
- tops of potatoes and tomatoes;
- fats, meat, dairy products;
- fresh and boiled eggs (except the shell).
Potato and tomato tops, even healthy in appearance, can be a carrier of late blight. Subsequently, such a fertilizer can infect all plants. In addition, this raw material is disposed of for a very long time, the process will take about 5 years.
Everything that is not suitable for a compost pit, but should be thrown into a latrine or taken out of the site as garbage.
Placement Requirements
A place on the site is chosen, as a rule, not in plain sight and one that is not a pity - where nothing grows due to dense shade or infertility of the soil, somewhere behind outbuildings, if any, in the backyards.
There are other important points as well.
- You need to understand that rotting raw materials will not exude the most pleasant smell, so you should think about moving away from the resting place and about the neighbors. It would be nice to know the wind rose so as not to place a pile on the leeward side.
- Consideration should be given to ensuring free access to the pit, since raw materials will be added and taken constantly throughout the season.
- It is advisable to choose a site on a flat surface, and not in a pit, it is possible with a slight slope to eliminate stagnation of water, which interferes with the flow of oxygen, which means it stretches the process in time.
- The compost heap, although called a pit, must be above ground level. In this case, it will warm up better, it will be more convenient to loosen it, water it and generally serve it. The optimal parameters are 50 cm deep, 1 m of the barrier above the ground. Higher walls will make it difficult to loosen and use compost.
- Eliminate proximity to a source of drinking water (should be more than 25 m).
- The place should be in the shade or partial shade - sunlight slows down and dries out the raw materials.
- Do not place the structure under the trees, they can get sick and die. Neighborhood with coniferous and other evergreen crops is especially not recommended. The best neighbors are alder and birch.
Do not cover the bottom of the pit with film, slate or other material that does not allow moisture to pass through! It must penetrate from the soil unhindered (deepening will contribute to this), otherwise everything will dry out. The bottom must remain earthen.
Design features
The ideal dimensions of the structure are usually indicated by the parameters 1.5m x 2m, but in the end they are determined based on the amount of raw materials that can be accumulated in 2 years. This is how long the process of preparing the finished substrate will go. Therefore, the ideal well should be twice as large and two-section, designed for two cycles. In the first compartment there will be a ready-made bookmark, in the other over the next two years fresh waste will be added.
It is important to know that a small pit will not warm up well as a result of decay, and this temperature may not be enough to kill all pathogenic microflora and harmful spores. Experts determine the desired temperature at 60C and the above optimal dimensions.
From above, the structure must necessarily have a removable cover.
Design Options
You can equip a compost pit in different ways, consider a few common options.
regular pit
The simplest construction that does not require additional costs and materials. A shallow pit is made, no more than half a meter deep, into which everything is folded according to the usual principle. Top contents are covered with black polyethylene. In order to make it easier to remove it to add waste or use, it is rolled up on both sides onto a long handle, which also serves as a load. After each new bookmark, it is recommended to cover the waste with grass.

The option is simple, but it is difficult to call it effective and convenient. There will be difficulties with mixing, and such a pile will not be able to warm up enough, which means that in order for it to overheat, it will take a longer period.
Two-section composter
Boards, old slate, metal sheets, corrugated board, walls from plastic containers, brick, etc. can serve as material for manufacturing. The optimal dimensions, depending on the size of the plot, are 1.5-2 m wide and 2-3 m long. To deepen the structure by 0.5-0.8 m. To fix the structure in the corners (stepping back to the required distance from the pit), pipe sections or metal rods of large diameter are dug in that can withstand the weight of the compost heap. Wooden poles are not suitable for this purpose, since the process of decay will invariably affect them, and the structure will not last long due to the load.

Install the walls, not forgetting the ventilation holes. A partition is installed in the middle, dividing the structure into two equal-sized compartments. Ready-made humus will be stored in one of them, and “young” waste will be added to the second. It is better to make the lid hinged, on hinges, so that it does not move out and tightly covers the contents.
It is advisable to treat the supporting sections of metal pipes with an anti-corrosion bioprotective composition, and all wooden parts with a protective impregnation, and then cover with two layers of acrylic paint.
The bottom, as already mentioned, cannot be covered with waterproof material, but straw, sawdust or tree bark are the best fit for this - they will provide the necessary air exchange and allow excess moisture to calmly leave.
If desired, you can make three sections. In the first one there will be a ready-made substrate, in the second - a fully laid ripening one, and the third one will be intended for laying new raw materials.

Single section composter
A simpler and more compact version. You will have to pick up the finished product from below, for which you need to make a hole in one of the walls (or even better - from different sides), from which the ripened fertilizer will be selected. A distance of at least 30-40 cm should remain between the wall of the box and the ground. In this case, it is not necessary to mix the substrate.

Concrete box
A building that will be done literally once and for all. Accurate and reliable. To do this, you need to dig a trench of the desired perimeter with a depth of 70-80 cm and make a formwork. Pour concrete into it, remove the formwork and remove the earth from the box to the desired depth. As a cover, you can use a wooden shield or a film pressed with a metal mesh.

Finished plastic container
The modern market offers ready-made plastic composters. They have a different size (between 400 and 1000l), the necessary ventilation holes (make sure of this!) and a lid.

Their cost depends on the size, design and region and usually ranges from 2 to 10 thousand rubles.
Do not make compost pits too large, their contents will overheat, which is also undesirable, as this will lead to the death of necessary microorganisms.
How to properly fill a compost pit?
Before laying the raw materials, clean the bottom of the pit from the sod and dig it well to a depth of 30 cm. This will provide conditions for the active life of worms and the penetration of beneficial microorganisms, which will provide indispensable assistance in the waste processing process. In addition, excess water will go well into loose soil.

We start laying, alternating layers of wet and dry, brown and green raw materials. Their optimal ratio should be approximately as follows: 3 parts of brown waste to 1 part of green, and there should be 5 times more wet raw materials than dry ones. Everything large should be broken or chopped.
Moisturize (not much) and close the lid.
Raw materials should not be heavily compacted, but excessive looseness is also undesirable. Everything should be in moderation, especially humidity.
Putting compost in storage is not everything. Proper further actions will help speed up the process of decay and make the fertilizer more nutritious. Stick to the following guidelines.

The following additives contribute to faster cooking.
- Rotten horse manure.
- Some types of plants (valerian, chamomile, dandelions, yarrow).
- Specially produced activating preparations, for example, Baikal EM-1, Compostin and Compostar.
- Stale (dried) bird droppings.
- Stalks of legumes.
- Bone and dolomite flour.
- Superphosphate and complex mineral fertilizers.
In the process of rotting the contents, the temperature inside rises, and light steam may even rise from the heap. This is normal and indicates that everything is going well.
Do not spare your time and effort for this uncomplicated structure. This will also solve the problem of recycling a considerable part of organic waste, and will provide the most valuable fertilizer, in the quality and environmental friendliness of which you will be absolutely sure.