At what stage of construction to install windows
Wooden windows must be installed after all wet finishing works have been completed inside the house - plaster and floor screed.
The house should dry out at least a little before installing wooden windows. Otherwise, high air humidity in rooms (up to 96%) causes wood to swell, moisture condensation on the glass further dampens the wooden parts of the windows. As a result, deformation and sticking of parts occurs, the paintwork of the wooden window profiles is damaged.
Plasterboard wall decoration, instead of plaster, significantly reduces the release of moisture into the room air. Wooden windows can be installed after the installation of screeds, before finishing the walls with plasterboard.
PVC plastic windows are not afraid of moisture. They can be installed before finishing work in the house.
If the walls are finished with dry plaster - drywall, then the windows in any case must be installed before the start of finishing work. Drywall can be damaged by atmospheric moisture entering the house through unfilled window openings.
If the premises are finished in winter
Often, work on the construction of walls and a roof of a private house ends in the fall. The owners decide to decorate the house in winter. In this case insert plastic windows and start heating in the house... Wall decoration in winter is best done using drywall. Plasterboard cladding does not greatly increase the humidity in the premises and allows you to quickly complete the following finishing steps.
When installing wooden windows finishing work in winter must be performed using dry plaster.
To quickly reduce humidity, in a house with installed windows, it is recommended to increase the intensity of natural ventilation by installing electric fans in the ventilation ducts, and keeping the windows ajar.
The temperature in the premises during the finishing work, as well as while the plaster and screed have not dried out, it is necessary constantly maintain above +5 o C.
The amount of building moisture in the house can be further reduced, and the finishing of finishing can be accelerated if, when installing floors in all or part of the premises, instead of a monolithic concrete screed, use a dry prefabricated screed.
If home decoration is done in summer
If finishing work in the house begins in the spring, then it is better to install plastic windows before starting work.
After installing the windows, the slopes and corners of the window openings are first plastered. Then the walls are leveled with plaster.
In the case of using wooden windows their installation must be carried out after the end of all wet finishing works.
At the time of finishing work, to exclude drafts in the house, the window openings are covered with foil.
First, the walls are plastered without touching the window slopes. It is better to wait a while to allow the house to dry out from the construction moisture. Then wooden windows are mounted.
After installing wooden windows, you will have to once again invite finishers for plastering window slopes or cladding them with sheet material, for example, drywall.
When to finish the facade
On single-layer walls (without insulation) facade plaster can be applied both before and after the installation of windows. But it is better to finish the facade after installing the windows. In this case, the seals of the joint between the window and the wall will be correctly performed, window slopes are immediately made, and external window drains are installed.
If you finish the facade before installing the windows, then you will have to return to the plaster of the slopes again. The plaster applied later will differ from the previously applied, which will be noticeable.
For double-layer walls installation of insulation and finishing of the facade is performed after the installation of windows.
In a double-layer wall with facade insulation, windows must be installed prior to installation of insulation boards. This will allow you to properly finish the window slopes from the outside.
When finishing the facade with plaster on insulation, the insulation plates should be 2-3 cm. superimposed on the window frame. Insulation plates are placed without joints in the corners of window openings. To do this, the insulation slab is cut, giving it an L-shaped, and installed with a cutout around the corner of the window.
At the time of finishing (plastering) the facade of the window, it is recommended to close it with plastic wrap, securing it with adhesive tape. It is not recommended to protect the window profile with ordinary masking tape - traces may remain after removing the tape.
The protective film on the frame outside the window is removed immediately after installation. Otherwise, under the influence of the sun, the film will stick so that it cannot be removed.
The protective film on the frame inside the room can remain on the window for no more than one month from the moment of installation.
Window installation - rules
To place an order for the manufacture of windows, it is very important to correctly determine the dimensions of the window unit. If the dimensions of the block turn out to be too large, then during installation it will not be possible to correctly perform the slopes, install the window sill and ebb tides. If the size of the window block is too small, compared with the size of the opening in the wall, the load on the fastening elements increases, difficulties arise with high-quality sealing of the joint between the wall and the window, which will create problems during the operation of the window.
It can be profitable to order the production of windows in winter - during this period, manufacturers give discounts on the price. Store purchased windows prior to installation in a dry place, excluding exposure to sunlight.
In winter, plastic windows are not recommended to be installed at an outside air temperature below -5 o C. Although, according to the standards of window manufacturers, they can be installed at an air temperature of up to -10 o C. At a lower temperature, plastic becomes brittle, the risk of cracks and chips in window details increases ...
Polyurethane foam, even "winter" foam, at low temperatures may not have good adhesion to the wall. In a new house, the surface of the wall in the opening is often covered with a thin crust of ice invisible to the eye. Foam hardens very slowly at low temperatures. It is better to postpone the installation of windows for the warm season.
Fixing the window to the wall
The window unit is installed in the window opening on the spacer bars and aligned horizontally and vertically in level.
The window block is attached to the wall in two ways: with steel anchors or frame dowels.

One end of the anchor is a galvanized steel plate, fixed to the window block, and the other end is screwed to the wall. The anchor is attached to the window as recommended by the window manufacturer.
With the help of steel anchors, you can fix any type of windows to a wall made of any material and of different designs (single-layer, multi-layer).
Fastening a window to a wall with a frame dowel is not so versatile.

To fix the window with a frame dowel, a hole is drilled in the window profile. A hole in the wall is drilled through this hole in the profile. A steel frame dowel is inserted into the resulting channel and the dowel screw is tightened. The end of the wall plug expands and fixes the structure to the wall.
This method of fastening forces one to interfere with the structure of the window. Excessive twisting of the dowel leads to deformation of the window profile, restricts the movement of the structure when the temperature changes. It is necessary to follow the recommendations of the window manufacturer for fixing them to the wall with dowels.

The most important thing when installing a window is to ensure a high-quality seal of the joint between the wall and the window. Be sure to check the work of the installation team to fill the joint with polyurethane foam.
Under the influence of ultraviolet radiation from the sun's rays, the polyurethane foam is destroyed over time. therefore outside window and wall adjoining protect from weathering with special tape or liquid sealant for outdoor use.
 The joining of the window to the wall outside the house is sealed with a special tape.
 The seal between the window and the wall protects the joint from rain, wind and ultraviolet radiation.
From inside the room the space between the window frame and the wall is sealed with a vapor barrier tape. Sealing allows you to exclude the penetration of steam and its condensation at the junction of the wall and window.
Location of the window in the wall
The location of the window and door in the thickness of the outer wall should ensure minimal heat loss through the wall in the slopes around the window perimeter (bypassing the window).
Window in a single-layer wall without insulation
In a single-layer wall, it is recommended to place a window or an outer door along the wall thickness, closer to its middle. In this position, the heat loss in the slopes at the junction will be minimal.

In the figure: 1 - weld reinforcement (if necessary); 2 - additional ceramic block; 3 - thermal insulation 10 cm; 4 - window; 5 - masonry from large-format ceramic blocks; 6 - reinforced concrete lintels; 7 - reinforced concrete belt; 8 - often ribbed overlap; 9 - thermal and sound insulation plates; 10 - 5 cm concrete screed; 11 - compensation tape.
The location of the window in a two-layer wall

In a two-layer wall with siding or insulated plaster ("wet facade"), the window unit is installed flush with the outer surface of the wall masonry.

A layer of insulation on the facade of a two-layer wall should overlap the joint between the window and the wall, and overlap the window profile by 2-3 cm.
Location of the window in a three-layer wall

In the picture: 1 - horizontal waterproofing with a curl on the wall; 2 - a hole in the vertical seam between the bricks for water drainage and ventilation; 3 - reinforced concrete lintel in cladding, covered with clinker tiles; 4 - silicone sealant or sealing tape; 5 - window located in the thickness of the heat-insulating layer; 6 - reinforced concrete lintel in the bearing layer of the wall.
In a three-layer wall, with brick lining of the insulated facade, the windows are installed in a layer of insulation, closer to the masonry of the bearing part of the wall. The gap between the cladding and the window block is filled with elastic tape pos. 4. The seal between the window and the cladding protects the joint from rain, wind and ultraviolet radiation.

In the picture: 1 - clinker window sill (shaped brick or tile); 2 - joint sealing; 3 - window box; 4 - groove - drip; 5 - ventilated gap.
 Temperature distribution in the window area in a three-layer wall
 Window in the wall made of timber

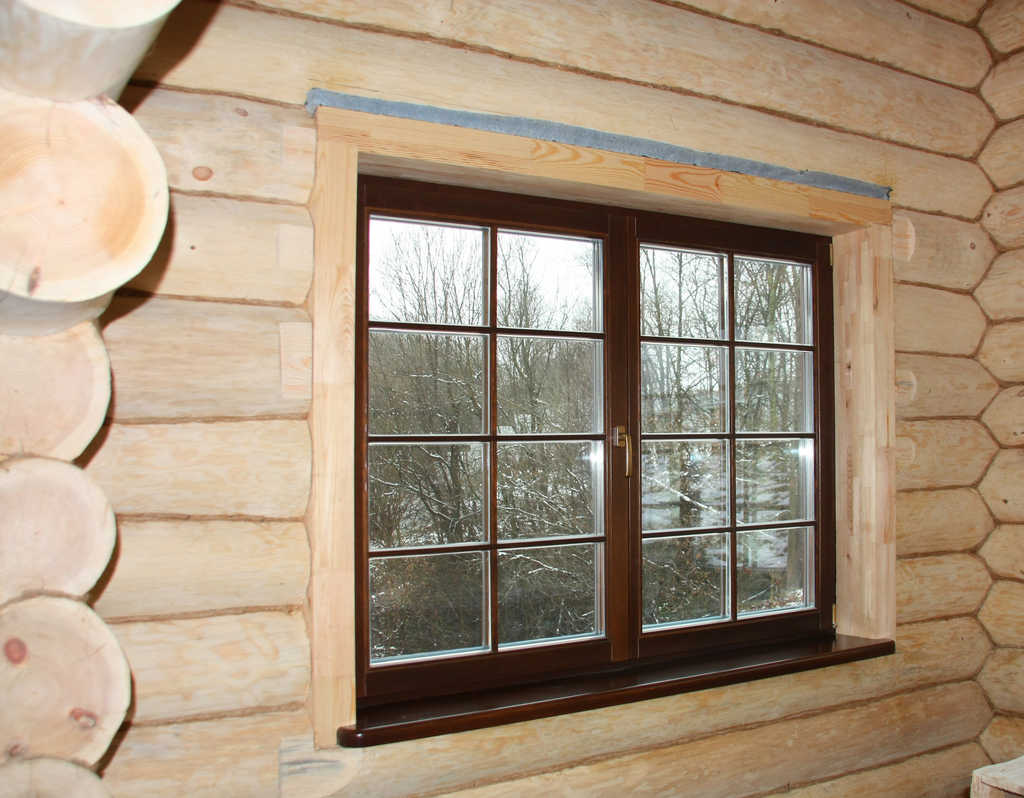
Correct installation of a window in a wall from a bar: 1 - wall; 2 - rail; 3 - platband; 4 - window; 5 - window box; 6 - wall timber above the window; 7 - mezhventsovy insulation; 8 - shrinkage gap over the window and deck; 9 - window frames; 10 - wall beam (wall); 11 - deck; 12 - a nail.
Roller shutters for windows
From the outside to the windows of a private house it is recommended to install roller shutters. Closed roller shutters not only protect windows from burglary, but in severe frosts they reduce heat loss through the windows, and in summer heat they reduce overheating of the house by the sun's rays. It is better to foresee the installation of roller shutters on windows in advance, at the stage of designing a house or placing an order for the manufacture of windows.
I can find articles on this topic:
Due to their operational characteristics, PVC-material insulating glass units have gained particular popularity among the population. They are installed in buildings and structures made of concrete, brick, wood. It is necessary to insert plastic windows in a wooden house, following certain rules.
Important nuances of installation
Starting the installation, you need to prepare the inventory that will be required: a building level and a plumb line, and also know how to insert a plastic window. It is necessary to install a PVC window, strictly observing the placement in the plane according to the level... This will ensure the correct operation of all elements, the sashes will not spontaneously close and open.
The technology for installing a PVC window assumes its correct placement in the plane according to the level
When purchasing structures made of plastic, you need to buy additional special mounts for installation. The frame is fixed in the box of a wooden structure using self-tapping screws and special fasteners... Observing the technological process and correctly performing the installation of plastic windows in a wooden house, you are guaranteed to receive window blocks that will last a long time.
 The window frame is secured with anchor plates
 If you dismantle the sashes, the structure will become much easier and it will be easier to move it, however, it is still not recommended to mount metal-plastic windows in a wooden house alone. To pull out the sash, you need to remove the pins from the hinges.
How to install PVC double-glazed windows
Do-it-yourself installation of plastic windows in a wooden house is done in stages:
- preparatory measures before installation;
- installation of PVC windows;
- control-check of location in space;
- blowing out with foam.
To understand how to install plastic windows both in a wooden house and from a bar or log house, we will consider each stage in more detail.
Preparatory work
First of all, you need to take the exact dimensions by measuring the opening and order the window structure from a trusted manufacturer. To do this, most often they invite a representative of a company that manufactures plastic frames. You can take measurements yourself. After that, they are determined with the color of the structure and the completeness of the fittings necessary for the functioning of the window.

When the manufacturer has delivered the product to the site, the following steps must be followed:
- if a decision is made to replace the installed windows in the old opening, first of all, it is necessary to dismantle the structure;
- after which they clean dust, dirt and remove debris that got into the opening from dismantling;
- it is worth aligning the opening if its geometry is broken.
After completing the preparation, they insert a plastic window into a wooden house with their own hands.
Fastening the window structure to the prepared opening
We install the window sill first, it will be the base for the double-glazed window, so you need to put it strictly on the level (horizontally). For the strength of the fastening, cuts are made on the sides of the box approximately 8 mm deep. Adjustment is carried out using plastic plates or boards. Fastening takes place with self-tapping screws to the bottom of the box. When screwing in, it is worthwhile to put washers under the screw head, this will exclude damage to the surface.
 The window sill is installed strictly horizontally
 The next step is to properly install the handle. The film that protects the structures should not be removed, it protects them from damage when the windows are being installed. When fastening, the handle must be placed horizontally. When all the fittings have been assembled, the installation of metal-plastic windows begins.
First you need to level the PVC frame. A frame is placed on two-centimeter bars and aligned horizontally using a water level. After that, proceed to vertical alignment.
Having received the ideal parameters at the water level, they fix the frame with self-tapping screws to the window, using mounting fasteners that were specially bought in the store. It is important not to get a self-tapping screw into the crest of the log where the jig is installed.
 Fix the frame with self-tapping screws
After fixing the window element, we get 2 cm gaps around it for the mounting foam.
Before applying the foam, you need to hang the sashes so that after foaming the frame profile does not bend and does not damage the window. It is important to remember that foam can only be used when the sash is closed..
Construction control and foaming
After hanging the sashes, you need to check how the glass unit opens and closes. If the window, which is half open, does not close and does not move further, then the frame is considered to be correctly set and the alignment is correct. Having closed the sash, foaming is performed with foam for installation and left for full fixation for a day.
Why is a shedding for plastic windows in a log house done?
To get high-quality PVC windows in a wooden house, you need to strictly observe the installation features, that is, to mount to a special frame (base). The need for such a design is due to the peculiarities of timber buildings. Unlike a building made of stone (concrete or brick), a wooden panel house is unstable for a long period.
 Shrinkage prevents deformation of the frame when the house shrinks
 The building will sit down in the first five-year period after its construction. In this case, the walls dry up to 6 cm.This important nuance must be taken into account when installing a plastic window in a frame house. It is clear that it is impossible to simply insert a plastic window into a wooden house; it is necessary to create a structure for the opening, which has the name of a shedding, they also say - a window. Its direct purpose is to prevent the shrinkage of the walls from affecting the frame, therefore the window:
- strengthens the opening;
- carries a load;
- prevents the effect of shrinkage.
Okosyachka looks like a box made of thick boards. The structure is fastened in the side post to the groove, and fasteners are not used. Above the window there is a shrinkage compensation gap for a wooden house. There are several options for installing it:
- a groove is cut in the log where the bar is laid. Self-tapping screws are screwed into the last element of the embedded beam;
- a groove is cut out in the racks on the sides of the structure, a spike is cut out from the end of the log in the opening;
- a groove is made at the end of the logs, a spike is located on the side racks of the box.
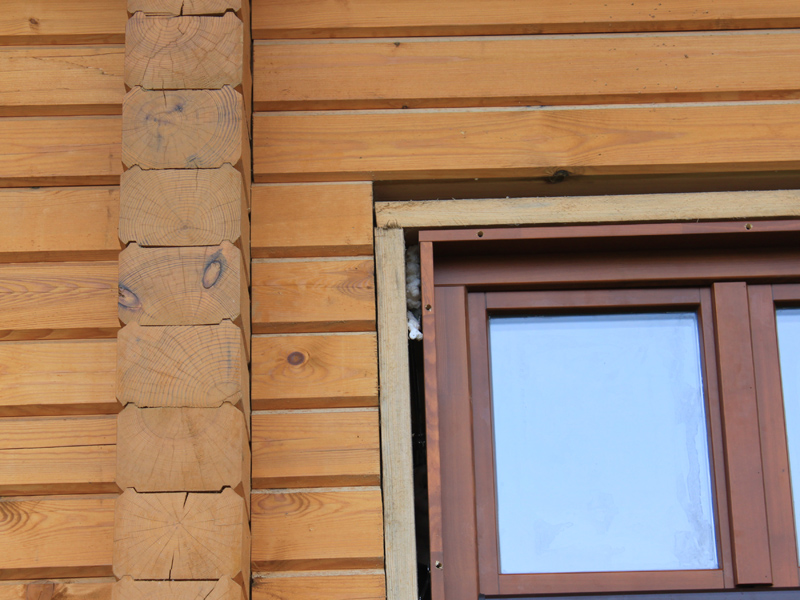
 Casing options
 To get a high-quality design, you need to follow the technology for installing plastic windows in a wooden house. To begin with, they cover the crests of the logs with insulation and fasten it with staples or small carnations. This stage is necessary to insulate the house and eliminate squeaks. Then the lower crossbeam of the casing is mounted, and the carriages (side posts of the scissors) are stuffed onto the ridges, the upper jumper is laid in the upper groove of the posts. After collecting, the boxes are carefully connected with self-tapping screws, it is important that they do not fall into the logs.

The slots that are visible in the opening after installing the casing must be filled with tow or insulation. Then there is a standard installation of plastic windows in a frame house or log house.
 The slots are sealed with insulation or tow
 The expansion gap is filled with flat planks previously wrapped with tow. When the walls shrink, they are gradually knocked out. To do this, remove the upper platband and, knocking out the plank, put it back.
The final stage in the glazing of a wooden structure
Finishing after installing PVC windows in a log house is done in the same way as wooden ones, that is, after installing the frame structure and insulation, they put wooden platbands. When ordering PVC windows in a wooden structure, you should take a closer look at the option for the texture of the tree, this will allow them to look harmoniously against the background of a felled structure.
Many manufacturers of PVC structures offer not only the classic white version of the frame colors. You can order any shade that the customer wishes. Colored plastic frames will cost a little more, but will be a more suitable option for a home made from natural materials.
When ordering, it is important to correctly measure the opening and not be mistaken in the width of the window sill. Self-installation of a PVC window in a wooden house with knowledge of all the nuances is not such a difficult process. You can do it yourself without resorting to the help of expensive installers.
If you own some of the initial skills, you can install a wooden window without any problems with your own hands. We will now tell you how it is easy and efficient to do it.
Increasingly, wooden windows are starting to return to apartments and houses. Despite the advantages of PVC windows, you can push their main disadvantage - plastic ones do not breathe at all. Modern wooden windows make it so that you can easily put the same double or triple glass unit in them and they serve no less than plastic ones. It happens that the openings are slightly skewed and if you call specialists, then the installation of a wooden window will cost a pretty penny. Therefore, we do it ourselves.
First you need to decide which window you will install: with what profile, with what fittings. What wood it should be made of. We decided, ordered and bought. Now installation.
Useful information:
Preparation of a window opening
The first step is to dismantle the old window. No special skills are required here. To break is not to build. Remove plaster from the slopes. You still have to make new slopes.
Once the opening is completely cleaned, you must measure it carefully. The main goal is to determine the configuration of the opening itself, and already according to it, the dimensions of the new window are set. If you have come across or seen how openings are measured when installing plastic windows, then this is done in the same way.
There is such a thing as shrinkage. Every house, even a new one, shrinks. And naturally, this can affect the symmetry of your window opening. Very rarely, the opening is perfect. The window itself must certainly be slightly smaller than the opening, especially if it is not symmetrical. You must maintain the gaps, as it is done in the picture above.
To make your calculations more accurate, it is better to use a laser tape measure. Or a building thread, with which you can beat off the vertical and horizontal. If they are even, then your measurements will also be accurate.
Window fixing methods
Since now a modern window profile allows you to anchor through the wall with anchors, then you shouldn't invent any other methods - this one will be the simplest and no less reliable. Also, this method allows you to open the sash in any direction.
In wooden houses, this method of fastening the window is the only one. Moreover, this method is no worse than all the others, and at the same time it is the simplest. The window can open in different planes, but this will increase the load on the frame itself. With skewed walls, the window sash can wedge. Therefore, when measuring, it is required to calculate the dimensions of the window a little less than the opening itself.
How to determine the width of the window frame
The frame must be chosen so that the dew point is exactly between the glasses. The inner glass must not fog up. The width is at least twelve centimeters, and if your walls are thick enough, then the maximum width should not exceed 22 centimeters.
A wooden window profile is made according to the principle of a plastic window profile. It often happens that the fittings will be the same. By the way, to choose the fittings, you should sweat a little. The durability of your window will depend on it. Therefore, you should definitely familiarize yourself with how to choose the right window hardware.
If, nevertheless, the frame turned out to be more than 22 centimeters wide, you should consider additional thermal insulation, which is installed in the openings during installation. If this is not acceptable for you, then the glass package itself should be triple, but this is an additional load on the sash. More often it happens that the sash begins to sag from this. however, these are additional troubles in the future.
Again, if the thickness of the wall is large enough, then there are certain proportions that must also be observed. Internal slopes should not be less than 17 centimeters, and external 10 centimeters. Often, window openings are made with a quarter and the inner slope does not work according to the specified parameters. In this case, there is nothing terrible, because the quarter itself will be a kind of additional isolation.
How to install in a concrete opening
If you have brick or block walls, then the installation of a new wooden window begins more often with the installation of a window sill. To do this, a cement even cushion is poured on the base of the opening in the horizontal plane to level the surface. Usually, the thickness of the window sill is from 30 to 50 centimeters, so the window itself should be made smaller in height already in size.
The window sill is nailed with several dowels, which are driven directly into the wall. remember that the outside of the window sill should not protrude beyond the edge of the window frame. Preparations for installing a wooden window are completed and you can start this process.
The easiest way to install a window is with pads. Blocks are ordinary boards of equal thickness, which should also be of equal thickness with a gap between the wall and the window frame. One edge of the block is ground a little in the form of a wedge, so that it is possible, if necessary, to correct the window in the opening horizontally and vertically, if the opening itself is not even enough.
At the beginning, support blocks are installed - your new wooden window will mainly rest on them, then spacers are installed. Always check the vertical and horizontal with a level and, if necessary, adjust with the blocks.
As soon as the window frame has fallen into place and you have completely leveled it, then we take out the spacer pads in turn and spill these places with silicone, install the pads back. Wipe off excess silicone with a rag. As soon as the silicone has hardened, the gaps between the opening and the frame can be filled with polyurethane foam. Any excess of which, after complete drying, is cut off, slopes are made outside the window.
More often it looks like this: the gap formed between the wall and the frame is poured with polyurethane foam, after drying, the excess is cut off and plastered. Remember to handle the foam carefully. If you overdo it, it can be so widened that your window will stop closing. The foam puts a lot of pressure on the frame and flexes it. therefore, read the rules for working with polyurethane foam.
To enhance the effect, the frame is fixed with powerful dowels. At the top of the frame and on its sides, two holes are drilled and dowels are driven into the wall. At this stage, the installation of the window into the concrete wall is complete. You just have to make new beautiful slopes from the inside.
Installation in a brick wall, cinder block
If your house is built from cinder block, ceramic bricks, or shell rock - that is, from weak materials, then it is advisable to install a new window with a fastener through and through. First of all, for this, through the frame in the wall, through holes are drilled, two on each side. You can make holes initially in the frame, then put it in two planes evenly and mark the holes in the wall, which are drilled after marking, naturally without a frame. Anchors or screws should be 8 centimeters longer than the frame itself, plus the gap between your frame and the wall. At the bottom of the window, do not install fasteners through the window sill. Usually it is attached to the frame with ordinary self-tapping screws.
IMPORTANT! You do not have to punch holes through the blocks on which the frame is mounted. If this happened, then it is better to remove the block to the side before tightening the self-tapping screw. If you have been adjusting the pads for a long time, then be sure to mark them with a pencil.
Installation in a skewed window opening
It often happens that the window opening is really skewed. In this case, the most durable fastening for the window is anchors - ordinary metal strips with holes. Experts usually advise, first, to fasten small fastening intermediate strips to the frame and, with their help, fasten the anchor to the frame. But this method pays off when there are several employees. If you are alone, then you should not waste time on this.
Anchors are attached mainly at the ends to the frame with self-tapping screws along the outer perimeter. The tails should stick out inward. They will still be hidden by slopes. Once the anchors are ready and bolted to the frame, it can be placed in the window opening. As always, we align the frame horizontally and vertically - after all, our opening is skewed, holes are marked on the wall along the holes in the anchors, metal strips are bent and they are drilled under the dowels. Once all the holes are ready, take out the pads. The frame must be hung on the anchors.
Curved openings are either the careless work of the builders, or the building's shrinkage has affected the opening. Therefore, you should not have rigid connections between the frame and the walls. The slots are blown out with foam and the window sill is installed. More often, with an oblique opening, the window sill is installed in a hanging way.
Note. Some people try to level the window opening with a screed - however, this is a monkey's work, since no screed can stop the uneven shrinkage of the building.
How to properly blow out foam
Window slits are blown out with a pistol or, at worst, with the tube that comes with the foam bottle. This is done in several approaches, squeezing thin sausages from the middle inward and vice versa. This method will not allow the foam to exert any pressure on the window frame and the foam itself will be evenly distributed around the perimeter.
Installation in a wooden house
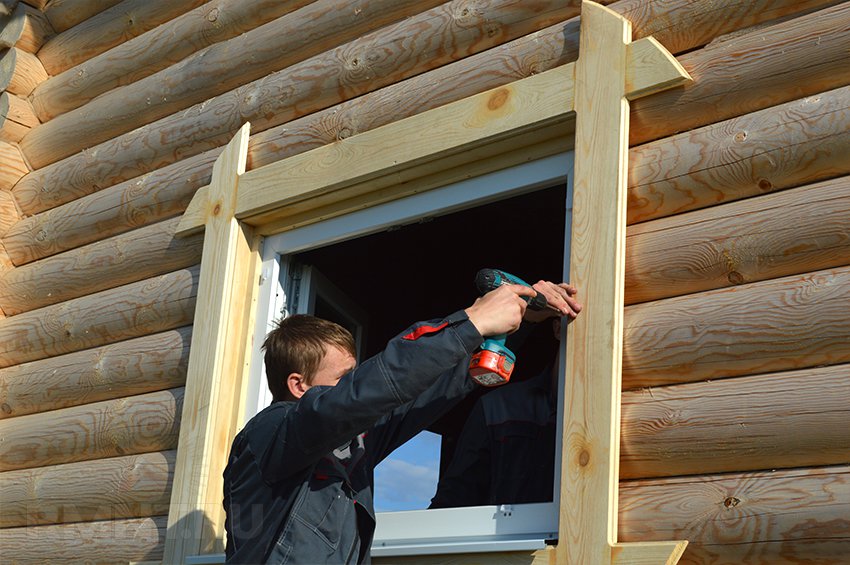
In wooden houses, it is usually easy to install windows. Many experts install them on liquid nails, but most stick to the self-tapping method. If the opening is skewed, then it can be leveled using the same chainsaw or hacksaw. Wood is much easier to work with. Be sure to fix the platbands outside with self-tapping screws. A strong wind will simply rip them off and no liquid nails will hold them back.
Plastic double-glazed windows have better characteristics than wooden structures. Due to their high performance indicators, such windows are actively used in both concrete and wooden buildings.
Installation of plastic windows in a wooden house differs from installation in concrete and block buildings. The technology consists of long-term preparation, the main purpose of which is to prevent the destruction of the glass unit from shrinking at home. During work, you need to follow certain rules that will help extend the life of the structure.
Mounting
The installation of a double-glazed window, regardless of the age of the house, is practically indistinguishable. In both cases, installation begins with the casing. It is this structure that protects the window from destruction in the process of shrinkage and natural expansion of the wood.

Installation of plastic structures requires specific skills and knowledge from the master, without which the work will not work. If you have no experience in joinery work, it is better to turn to professionals. The main difficulty in assembling the casing for the window is the assembly of the tongue-to-groove lock. It is this fastening that ensures reliable connection of parts and protection of the frame from deformations.
The shrinkage of an ordinary wooden house can reach 20-30 cm, which is noticeable when using structures made of metal and plastic, the shape of which does not change over time. The amount of shrinkage depends on the type of wood. So the average shrinkage a year after the assembly of the frame is:
- for log houses 50-60 mm;
- buildings from a bar 30-30 mm;
- buildings made of laminated veneer lumber 15-30 mm.

These indicators are small, but they should be taken into account. The shrinkage of the building in the first year of the felling can lead to windows being pushed through by the upper crowns of partitions and walls.
The shrinkage of a building lasts up to 5 years, depending on the humidity of the air, the size of the house and the season. But even after 5 years, the house still “breathes”, and therefore PVC products are installed in old buildings with casing.

Preparatory stage
To figure out how to install plastic windows in a wooden house, you will need to follow certain instructions. Before assembly, the following work must be carried out:
- disassembly and removal of the old structure (for old houses);
- cleaning the opening from dust, chips and old paint;
- taking measurements of the opening and calculating the dimensions of the future window;
- preparation of a diagram or drawing;
- alignment of the walls of the opening in case of violation of symmetry;
- for leveling, use a primer, sealant and putty;
- choice of the view of the future window (sash format, material color and size of the entire structure);
- definition of the firm of the product.

When all the works described above are completed, they order a window according to the dimensions of the opening. There are several features of installing plastic products.
Installation of the structure
After delivery, the window must be kept at room temperature. For installation you need to:
- screwdriver and drill bits;
- mallet and chisel;
- anchor fasteners;
- wedges for spacers;
- polyurethane foam;
- key for PVC windows;
- pliers;
level and tape measure.
The installation of a plastic window in a wooden house is carried out in pairs, since it is more convenient to lift it and fasteners together. The weight and size of the glass unit does not allow it to be carried alone.
Note! It is recommended to install PVC windows in calm and warm weather (above minus 10).

Functions and types of casing structures
Casing is called a box of boards, installed around the window along the perimeter of the opening. The structure device allows you to mount it yourself so that it "floats" inside the log house and does not depend on the shrinkage of the building. To attach the casing to the frame, grooves are used, they are placed on the sides of the window opening. The casing itself is seated at the ends on the spikes.
To prevent the casing from being blown through in winter, it is fixed with tow, linen or fiber compactor.

A small gap is left in the upper part of the casing, which maintains the integrity of the structure during shrinkage. After assembling such a frame, the movements of the log house do not affect the window in any way, and most importantly, shrinkage will not be able to harm the structure of the glass unit.
In this case, the walls will shrink, and the window will not be damaged. Discussions are divided into several types, depending on the types of attachment:
- In the mortgage bar. The fastening is based on a bar placed in a groove in the ends of the opening. In addition, it passes through the casing posts.
- Into the thorn. Such structures have a special spike that is installed on the side elements of the casing. The groove is in the logs of the opening.
- Into the deck. The thorn in this case is located at the ends of the logs. There is a groove in the casing posts.
The box is a floating mechanism, during the installation of which deformation of the plastic window is impossible. Do-it-yourself installation of wooden windows is carried out using a different technology.
It is necessary to carry out calculations very accurately, because even with a slight error, the risk of deformation of the box will increase. In addition, the structure may be leaky. Correct installation of the box is a prerequisite for the quality of the window service.

Execution of mowing
There are simple and complex jaws. Each of these types of construction has its own advantages. For example, a simple window is quickly erected, and a complex one eliminates vertical deformation of the window. When creating a simple window, the option already described in the article is selected - using grooves and bars.
A complex system requires cutting a ridge in the opening. A carriage with grooves is put on it. This design option is more reliable. During the shrinkage of the house, the ridge moves in such a way that vertical deviations of the plastic structure are excluded.
The casing is made of bars. Using a chisel, it is necessary to knock out a groove in the center of the bar with dimensions of 0.5x0.5 cm.One of the important points is to do the marking of the ridge with your own hands. How high-quality it turns out, the design of the window will depend on the accuracy of the markings performed.

When the ridge is ready, you need to start forming the opening. The bars should be installed using a level. This takes into account the shrinkage gap. It is 0.5 cm at the top and 1 cm on each side. The frame, which is made of beams, is best strengthened using dowels. The resulting cracks are sealed with tow. Then we install the plastic frame.
Installing the plastic frame
After preparing and installing the window, you should start installing the plastic structure. Mounting a window without casing is a mistake. Check the parallels first. The gaps between the frame and the PVC glass unit are determined. For foaming, leave 3 cm on the side and about 5 cm on top. Then you can start directly installing PVC windows in a wooden house.

The structure must be attached to the designated place on special elements. These can be purchased at every construction equipment store. Such fasteners are metal plates with holes.
Advice! It is better to use special fasteners, because the use of self-tapping screws does not ensure the tightness and thermal insulation of the structure.

Installation of a plastic window is carried out with a level. If this rule is not met, the design may turn out to be tilted. This circumstance can significantly reduce the aesthetic appearance of the window and its performance.
Advice! Before installing the structure, the sashes must be removed. This will make the window lighter, which will have a beneficial effect on the ease of installation.

After fixing the window in the opening, the formed gap should be foamed. To securely fix the installed structure, a bar is used. This will avoid shifting the window during foaming. When the foam dries, they should be removed. Care should be taken when installing windows in a wooden house in the casing. In this case, you will have to determine the correct mounting position of the screws. Do not secure the window in the area of \u200b\u200bthe ridge.

At this, the window installation process can be considered complete. Now it remains to put on the sash and let the foam dry. This method of installing a plastic structure in the country is correct. If you are not confident in your own abilities, you should call professionals. However, self-installation of a plastic window is a significant cost savings. To do the job as efficiently as possible, you need to follow the instructions.
findings
Installing a plastic structure in a wooden house is as simple as possible. To do this, you will need to perform accurate calculations and prepare a specific set of tools. All work is carried out as carefully as possible. This is necessary for the long service life of the glass unit.

During work, it is necessary to follow a certain sequence of actions, as well as follow some rules. It is important to take into account the peculiarities of the shrinkage of wooden walls. If you follow the advice of professionals, the plastic glass unit will serve well for many years.
Video editing will help to cope with the task as efficiently as possible:
Self-assembly of the window structure saves money, but incorrect work only increases costs in the future. For houses made of wood, there is a special technology for installing PVC windows.


Advantages and disadvantages of PVC structures
Installation requires special skills and knowledge from a person, if there are none, then it is better to study the topic in detail. The best fixing system is the thorn-groove, it is this that avoids deformation when the tree shrinks, which has a negative impact on the performance properties of the metal-plastic window structure. New buildings are more susceptible to shrinkage, but even in houses built long ago, shrinkage can occur.
Professionals note that a wooden house sags by an average of 20 mm per year. It is not so easy to determine with the naked eye, but by the window structure it is very easy.


Rarely, but it happens that deformation does not occur for several years, and then, under the influence of the environment, a distortion becomes visible. To prevent this from happening in a wooden house, it is necessary to make casing before installing the window. This is a very complex and painstaking process, but it cannot be ruled out. If you make the installation, as in a brick house, you will need to constantly adjust the fittings in the window structure. Plastic structures have a lot of advantages, and from this they are in great demand in the market. Among them are the following:
- low costs during operation, since such a window does not need to be painted or treated against insects;
- the durability of the material, which is resistant to changes in ambient temperature, it is not influenced by ultraviolet light, does not corrode, and it does not rot;
- good frame rigidity;
- fire safety;
- no cracking and warping.


All these advantages make the window structure suitable for all regions of our country. PVC does an excellent job with the tasks set both in the south and in the north. But, like any material, polyvinyl chloride has drawbacks, since it is far from ideal. Among them are the following:
- the inability to maintain the required level of humidity in the house, since such structures are completely sealed;
- such a window cannot be repaired if the surface is damaged;
- there is always a lot of dust on plastic, since it attracts it with static electricity;
- the material has a high coefficient of thermal expansion, so the places where the plastic adjoins the wall is often damaged;
- wood has better sound and heat insulation than plastic.

Important nuances
Installation of plastic structures in a wooden house has its own characteristics. It does not matter whether such windows are mounted in a log or log house, the technology must be strictly observed. When installing a plastic window, it is worth remembering that the shrinkage of the wood causes additional pressure on the frame. This is one of the reasons why casing cannot be dispensed with.
In the space between the upper window strip and the wall, it is not always worth using polyurethane foam, since it becomes quite rigid when it dries and also creates unnecessary pressure on the structure. In this case, all the benefits of casing are nullified.


If you do not take into account the gap between the frame and the wall, having calculated the wrong dimensions of the window, you will have to increase the opening, since it will not be possible to install too large a window without negative consequences. After foaming the gaps on the outside, it is better to mount the PSUL tape, it will not only protect against ultraviolet rays, but also against moisture.
Polyurethane foam, with all its advantages, quickly degrades and loses its properties if not protected.Inside the dacha from a bar, this must be done using a vapor barrier, and waterproofing will help outside. Most of the skewing of the window is observed when it is installed out of level. Fittings in such a design fail twice as fast and require replacement.
We must not forget about the cold zone, in which the window begins to freeze from the side of the slopes, and condensation appears inside.


Manufacturers emphasize the tightness of PVC structures and an excellent indicator of sound insulation as one of the main advantages of this type of window. In fact, the wooden frame has natural ventilation, so that the level of humidity in the room does not increase, the same cannot be said about PVC windows.
During their installation, in order to eliminate the problem with condensation in the future, you need to install ventilation yourself, and if there are no special holes, you will have to try hard.
The situation is greatly simplified by supply valves, which are special profiles installed on a plastic window.

The ease of installation cannot but please. The user will need to remove the seal that is already in the window structure and place the valve on the sash. It is easy to fix it with self-tapping screws, but you will need to think over the exhaust hole, otherwise the system will be useless.
No one will be happy that companies that install plastic structures in a wooden house do not give guarantees for their work, since they cannot fully predict the behavior of PVC. Even if all norms and requirements are observed, there is no guarantee that after several years of operation the window will not stop working.


Casing manufacturing
Only the casing protects the window structure in a log house from distortions, bends and other kinds of deformations. The casing boards must be dry and sturdy, otherwise they will not be able to complete the task. A board is suitable for this, the thickness of which cannot be less than 5 cm or a beam of 15x10 cm. The thickness of the element is always equal to the thickness that the wall has.
Building rules in an old wooden house do not change. The situation with frame structures is completely different, since they do not shrink. Such houses are already being created with openings for windows and doors, they have the necessary rigidity for installation. The frame that has stood for more than ten years does not shrink.

The siege can be done in different ways, such as:
- monolith thorn;
- mortgage beam;
- into the deck.

The most reliable of the three options is the latter, but it is also considered the most time consuming. For those who do not have enough skills and abilities, it is recommended to make casing according to the second method. It is necessary to make grooves in the middle of the window opening, vertical to each other with dimensions of 5x5 cm. As an assistant, you can use a circular saw, a chainsaw, an ax and even a chisel.
Before driving the timber into the groove, it must be wrapped in linen. The seal will be between the wall and the element, but at the same time it should go slightly into the window opening.


An edged board is laid on the bar and fixed by means of self-tapping screws from above and below. Two bolts are sufficient in each case. Before that, it is worth drilling a recess slightly larger than the diameter of the cap. If a monolith thorn is used, then the T-shaped bar is cut out in advance, and then installed in the existing groove, after which it is fixed with self-tapping screws to ensure reliable fastening.
The elements of the window structure, located vertically, should be at a distance of 8 cm from the top of the window opening.That is, a five-centimeter beam laid on the upper jamb should be at a distance of 3 cm from the wall.It is this distance that is taken as the shrinkage gap.


The upper window strip should not dangle in the grooves, enter only with effort.The final fastening is done with self-tapping screws, which are driven in at an angle. The final work at this stage can be considered the installation of insulation. The gap is closed with polyurethane foam, which can be laid in one or more steps. If it is necessary to apply the composition twice, then you should wait ten minutes until the first layer hardens. In hot weather, the foam must be moistened with water from a spray bottle.
The material quickly collapses under the influence of the sun and other weather conditions, therefore, it is closed with a vapor barrier on the inside, and a windproof membrane is used outside.
It is forbidden to use a vapor barrier on both sides, since then moisture will accumulate under it, and it contributes to the formation of mold.


Mounting
You can install a window structure with your own hands, insert the structure into a box, put a window sill, make slopes, but it is better to study the technology first so that everything does not spoil. You will need the following as the main tools:
- level;
- polyurethane foam;
- screwdriver;
- drill;
- spray;
- a key to adjust the windows;
- chisel;
- bolts;
- wedges-spacers.
It is easier to install windows with a partner, as not everything can be done by yourself. It should be understood that a double-glazed window has an impressive weight and it is impossible to keep it at the same time as the work is carried out alone. Before installing, it is better to check the measurements taken, to determine the presence of gaps. For foaming, 5 cm should remain on top, 3 cm on the sides, and 4 cm at the installation site of the window sill.
An incorrect cut in a wooden country house will cause many problems in the future.

Before installation, it is imperative to purchase special fasteners from a hardware store, which are metal plates with holes made. Professionals advise to use them, stipulating this requirement by the fact that the use of self-tapping screws that penetrate the frame completely deprive it of its tightness, and, accordingly, reduce the level of thermal insulation.
The window is installed only by level and nothing else, distortions threaten to get quick damage to the plastic product and breakage of the fittings. Be sure to remove the sash from the window, thereby reducing the weight of the frame at the time of work. The insert should be located evenly, fasten only to the elements dictated by the standard. When foaming gaps, their displacement can be prevented by placing bars under the frame, and then they are removed.


It is important to choose the correct location of the screws; it is strictly forbidden to screw in at the location of the comb.
Okosyachka
The okosyachka is assembled after the preparation of the window opening. The upper part is cut out of the 15x4 cm board and grooves are created by means of which it will be attached to the comb. This part of the opening is located on top, it must be flat, not kinked, otherwise there will subsequently be difficulties with the installation of the plastic structure.
The protrusion, which plays the role of a comb, is covered with rolled tow, and then a carriage is put on - a prepared wooden element with a cut out groove. This is done in order to improve thermal insulation and get rid of squeaks. The upper part of the window must be screwed to this element with self-tapping screws, but so as not to touch the ridge.

Glass unit
Double-glazed windows are delivered to the installation site assembled, they must be disassembled before installation, this is the only way to reduce the weight of the structure. Using a special key, it is necessary to remove the upper pins that hold the sash open.
After the handle is turned and in the open state, the sash can be easily removed from the lower mount, but it is worth remembering that this is the heaviest part of the structure.


To knock out the glazing beads and remove the glass unit, you must use a spatula or hammer and knife. Carefully pushing the element away, you should simply remove it from the frame. The short sides can be pry off a little from the corner and pulled.
Experts advise to immediately remove the protective film from the outside of the window structure until it adheres to the surface, reacting with plastic under the influence of ultraviolet radiation. Then it will be almost impossible to tear it off. It is necessary to drill holes for the pins, which should be no more than 20 cm from the corner, and no more than 70 cm from each other.

Plastic windows reduce heating costs, as the sealed structure prevents drafts. It should be noted the aesthetic appeal of such products, savings in maintenance costs. But plastic windows will meet the requirements only if the installation was done correctly.
Self-installation of PVC structures in a wooden house has some difficulties, which is why it is worth performing it in accordance with the instructions of specialists. The season does not affect the installation process in any way. The presence of modern technologies allows to carry out work with equal success in summer and winter, when a polyurethane frost-resistant sealant is used.


Many users are unhappy with the accumulation of condensation and say that moisture constantly accumulates on the inside. This can be avoided by simply ventilating the room or installing exhaust devices, a high-quality ventilation system. In cold weather, you can immediately determine the presence of poor sealing, the condensation that appears will indicate the places where it is necessary to foamed more.
If the installation is carried out by workers, you should make sure that the installation of plastic windows is carried out according to established standards, then in the future you will not have to face unpleasant surprises. A professional installer will not work in sub-zero temperatures.