Dreams, probably, every motorist. At the same time, the overall lights will become similar to those that are endowed with the headlights of the modern BMW model. With your own hands, you can make absolutely the same spectacular lights, the benefit has a sedent and desire from our person. Armed with nipples, saw on metal, passatages and other ordinary tools, everything can be quickly organized.
In order to make an "Angel Eyes" with their own hands, you need to find a bar from plexiglas and cut four blanks from it. LEDs are attached in them and cuts are cut on every 5 mm. Homemade "eyes" are installed instead of full-time overall lights.
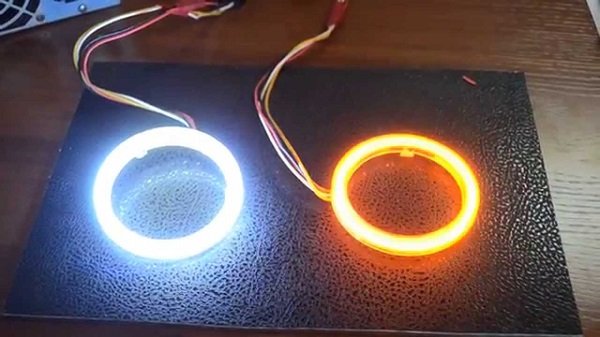
Overall lights from BMW
What is "Angel Eyes"? It turns out that it is just another horse from that did not leave a single motorist in the world indifferent. But it is not only because of the peculiar and original lights to sell your favorite "six" and save on BMW. What do you think?
You can do otherwise. Take for sample overall lights of this manufacturer and try to build something like that.

It should be immediately noted that, as it were, beautiful and spectacularly made these components, the traffic police are not welcome and can cause interest in the last "unhealthy" interest. But still, if you decide to go to it and become the owner of a car with such "angel eyes", you should be desirable with a round front optics. For example, such optics has a VAZ 2106 or VAZ 21213. In addition, it can be any model of a foreign car, for example, the same BMW, only the old version.
Prepared
Before, you need to arm a tool and the necessary material. As mentioned above, it is necessary to have airbases, passage, metal cutter, a file, a drill and a drill of the desired size, a soldering iron or a construction hairdryer. A special transparent plexiglass or plastic rod or plastic is also important, which would have respected high temperatures. Where to find it? Masters Avtunya advise to look for such a bar in stores specializing in selling curtains and blinds. In addition, do not forget to take care of the presence of a large flat container for a plastic rod, round jars, alert, LEDs in one volt (there must be 8 pieces), resistors for 220 ohms and wires with connectors.
All of the above materials and tools to find and prepare will be easy. It is important to remember that the wells in the headlights are of different diameters, which means that our "Angel Eyes" should be of different circumference.
For the rod, you have to choose the desired length, although a piece of thin hose is suitable as a measure (they supply the circle of the car headlights). Sut off the rod of the required length and warm it in the cooked tank with a soldering iron or hairdryer until it becomes soft. If the rod from the plexiglass, then it is placed in a hot water container so that it becomes soft.
Now you need to take the passage and take out the workpiece. Watch the workpiece from under coffee or something else and wait until you cool down (the photo below).

If you have not found a jar, you can use instead of it and a plate. In this case, it will look like this:

In order to make small "angel eyes", you need to wrap the rod around the lid from the can. The smaller the workpiece, the more difficult it is to work with it. Be careful and do not burn your fingers.
Now we work on the workpiece from which the ring turned out after cooling on the bank. You should drill in the ends of each workpiece a peculiar niche where the LED will be installed. It is necessary to drill very carefully, preferably at the low speed of turns drills, as the walls of the twist are very thin.
On the video - "Angel Eyes" do it yourself:
Further, on the external side it will be necessary to cut off with a hacksaw or a born of a couple of dozen lines, but not deeper than a third of the circle. This is done in order for the light of our "angel eye" turned out to be rain.
It is necessary to fix diodes now. This can be done by anything, but it should take into account the high coefficient of temperature expansion of the rod from the plexiglass. This means that "eyes" need to leave a little loose place in niche. Take and solder resistors to the legs of the LEDs. Two diode should be prepared on.
That's what we turn out in the end:

We go further and solder the LEDs to the overall lamp, remembering necessarily about what is soldered to the "plus". It is impossible to confuse polarity. And all connections should be detected specifically designed for this tape. Then check how everything works.
Now it's time to spend the dismantling of the headlights. Unfortunately, without this in any way. We then remove it and be sure to drown the holes. We establish the prepared diodes from above so that they are less than the eyes.
In conclusion, I would like to note that this is the responsible thing. To complement the car homemade details, of course, is good, but it is necessary to do it very carefully, so that they don't do anything, and it usually concerns the elements and parts associated with electricity.
To better understand how to make "angel eyes" to the headlights of your car, we advise you to see this video:
We hope that the article will help you, and you will succeed!
Angel eyes - a popular tuning for headlights, decorating them, making unique. It is used on different cars, whether it is a domestic auto industry or German models. At the same time, on each car, angelic eyes look unique, highlighting it among others.
However, the cost of such tuning is quite high, if you order it in the auto repair shop. And everything would be nothing, but the cost is kopeck. It can be done by himself. Therefore, we will make angel eyes with your own hands according to the instructions.
What is needed to create?
To create angelic eye, some materials are needed. Among them:
- four transparent plastic sticks (better from plexiglass);
- lEDs of 3.5 volts 2 for each wand;
- four resistors for 220 ohms.
Sticks should not be hollow, because they will need to be heated and bend them. The hollow tube will not withstand such a load and will lose the form.
Also necessary tools and auxiliary items. Among them:
- insulating tape;
- pliers;
- soldering iron;
- sealant;
- drill.
And also something that you can heat the tubes to achieve their plasticity. It is still necessary to find a rounded object, which in diameter roughly coincides with the headlights, which will be placed in the future.
Making LED rings
First you need to make rings made of sticks that will be the main for angel eye. It is necessary to choose a rounded subject like banks, its diameter should coincide with the headlight diameter. After that, it is necessary to heat the stick and give it the shape of the ring, wrapped around the item. It can be heated in any way, but an oven or soldering hair dryer will fit in the household setting.
Important! Hook a wand is extremely careful, because it begins under the slightest load. If there will be deep traces of fingers or extra bends on it, it will noticeably on ready-made angelic eyes.
As a result, 4 rings came out. Minor irregularities can be corrected, a little heated in the wrong area, correcting it with his hands. Perfectly smooth rings are needed so that they normally missed the light.
After that, you need to cut the rings so as to open them.
Next, you need to take LEDs and verify their size with a drill. Featuring the appropriate drill (you can slightly more), you need to drill on the edges of the hole rings so that they look along them. After that, insert the LEDs there to compare the dimensions.

After that, it is necessary to connect two LEDs with each other and attach the resistor to them. LEDs insert into the holes and measure the required amount of wires. After that, fasten the LEDs together between themselves, and at the inlet we cling the resistor for resistance. The resulting scheme is tested for the operation of the conversion of a regular battery as a power source.
After that, it is necessary to secure LEDs in the ring itself. We drip thermocons in the drilled hole and insert the LED there.
Important! Do not spare the thermocons, you need a tight contact between the LED and the ring. This will provide better light transmission.
As a result, the rings are ready as the base for angel eye. But if empty blanks were used, then they do not have one important nuance - "eyelashes", creating a unique effect of these headlights.
Create notches

Eyelashes are created by means of notches - marks around the perimeter of the ring. It is necessary to process the front side of the angel eye to distort the light. To do this, you can take a regular knife, after which cut the notches alternately at a distance of 1 cm from each other. This is enough to achieve the visual effect, it will be simple to merge.
The depth of notes we make about 0.5 mm. Again, a smaller depth simplicity does not affect the spread of light, so you need to work efficiently. At this stage, all work is done under measurements, because it will affect the final form of eyelashes. A minor defect can significantly affect the finished product.
Tip! It is worth measuring the location of notes in advance with a pencil or handle. It will be more convenient to create them, and the error will significantly decrease.
Farm preparation
Before installing angel eye, you need to prepare the headlights. It is necessary to carefully disassemble them, then clean the glass and the reflective surface from all garbage and dirt. In this case, cleaning products cannot be used, because they can destroy the surface of the reflector. It is ultimately not recommended to use alcohol, because the surface here is extremely tender.
In the process of cleaning, you can not touch the reflector with your hands. It will leave traces that will be difficult to wash in the future. The surface of the reflector is very gentle in relation to dirt, it is worth considering when disassembling and further work with it.
Tip! When disassembling headlights, mark the glass numbers. This will determine the parties and types of glass.
Headlight glasses are carefully laundered from dust and dirt. It is necessary to increase their adhesion, because in the future they will be attached to the ring of angel eye.
Install the rings in the headlights
It was time to directly install the rings in the headlights of the car. It is necessary to take ready-made rings along with wires, skip the wires to the power supply. Angelic eyes themselves glue on the glass using thermocons for this. There may be quite a long time to frost, but it is not worth it to hastily install the glasses in place. Let the rings are securely fixed.
Important! Shells when installing should be sent outward. Otherwise, there will be no such effect of angelic eye.
As for the electric question, the wires are fought with old wires from headlights. You can connect the angelic eyes in different ways, but often they are connected to as a replacement of dimensions. For this, the following actions are carried out:
- A plug is disconnected. They are disconnected from turns and dimensions. After that, we connect both "dad" to "mom" from turns. As a result, the free "mother" of the dimensions remains.
- We connect lenses. Alternately pairs of angelic eyes are connected to an empty "mother". Minus from the wire can be attached under the fastenings of the signals. As a result, the dimensions button is fixed behind the angels.
This option practically does not affect the functionality of the car. Now the dimensions are included together with turns, and in the place of the dimensions they work in the scene.
Angel eyes on VAZ 2106

These lenses go well on old cars, including VAZ. The technology of their creation is no different. It is only necessary to choose the right diameter of the rings. It will also be difficult to feed food to LEDs, but it depends on the specific car model.
The installation is practically no different from the previously described. It takes place in several stages:
- preparation of lenses;
- glass removal;
- cleaning;
- fastening on thermoclay;
- power connection;
- installing glass.
The functionality is no different from the lenses on more modern cars, the difference is only one. Often on modern cars there are additional power contacts for such devices.
When installing on VAZ 2106, you can encounter one problem - non-removable glasses. They are securely fixed on the spot, it is impossible to remove them. Here the output is only one - break the glass and acquire a new one. Although this is extra costs, but the cost of the new glass on such a car is pretty small.
Angelic eyes look great on the headlights from the VAZ 2106. However, it is recommended to do a larger number of notches, since the factory glass distorts visibility, which is why the effect of notes is almost impaired.
Alternative Tubes with LEDs

Alternative to plastic rings, you can use LED tape. It is based on its basis original angelic eyes created, so it most likes these lenses. To create them, it is necessary:
- Purchase a thin LED ribbon with a small step between LEDs.
- Make a ring based on flexible plastic diameter with a headlamp.
- Crop the tape on the desired length and stick it on the ring.
- After that, connect the batteries.
As a result, a LED ring will be released, having a completely different effect. Installation is carried out as itself, it is not needed here. Such angelic eyes are very popular and manufactured industrially, but their correct creation and connection is pretty difficult without experience. In addition, they do not have such a scattering effect, so they may seem worse than angel eye with plastic tubes.
Tip! It is worth choosing a ribbon in a step of 1 cm. So the effect will be similar to the original angelic eyes.
Check the result

After connecting, homemade angelic eyes are practically no different from the original. They look wonderful on any car, visually highlighting it among the other cars. The appearance of such lenses is really attractive, and with a high-quality assembly will not be seen of flaws allowed when creating this product.
Angelic eyes work perfectly on the basis of the dimensions, radically changing the view of the car at night.
The creation of such a product does not take much time, and the costs of it are kopeck. The hardest to give the correct row shape and connect the power, and the rest of the tasks are able to do each. Therefore, the creation of our own angelic eyes allows you to make your car better and significantly save on the car dealership, where several thousand rubles are asked for it.
And for a more detailed explanation about the technology of creating angelic eyes and their work, you can watch this video. It describes the technology of creating this device from a simple piece of plastic:
You are worried about how to make tuning headlights on your car? One of the most popular ways to give individuality by automotive optics is to make angel eyes with their own hands. On the roads it is often possible to meet cars, having headlights surrounded by luminous rings. These are the so-called "Angel Eyes", the famous invention of BMW designers. Original angelic eyes are made from neon tubes in the form of a ring in the number of four pieces, which are placed inside the headlights.
The mechanism also provides for the presence of a ignition unit. Angel eyes mounted in auto optics give a bright, beautiful glow. Eye can be used as DRL daily running lights or as dimensions. In addition, they can be installed on any machine and in any headlights. They can be of different diameters and size and have a variety of glow colors. Thanks to them, your car will become more stylish and even more noticeable on the road.
Naturally, you can buy ready-made headlights with angel eyes and do not work with independent manufacture and installation. But on the other hand, the independent creation of a beautiful tuning headlights is also not difficult - it is a simple and fast way to decorate your car. Alternatively, such eyes can be made practically for any car, such as car cars VAZ or Priora. Believe me, make angel eyes with their own hands is not so difficult!
How do it yourself make led angelic eyes
Dimensions in headlights are easy to make transparent plastic sticks. The rings will be attached using a conventional sealant. As elements that will be lit, you can apply LEDs. LED angelic eyes are easy to do at home. On one ring you need two LEDs. In addition, resistors will go to the case - 2 com. Plastic wand give the shape of the ring.
Make it easily with a round item.
For example, a bank, its size is selected depending on the size of the ring, which will need to be obtained in the end. To give a stick shape of a ring, you need to heat it, it is possible to do it in the oven or using the usual construction hairdryer. After the plastic wand will be brewing, it must be turned on the jar. Do it follows very neat. As a result, we will get four rings. If the rings came out uneven, and the ends do not want to be located opposite each other, then you need to heat the ring again and make it completely even.
Then we will need LEDs. We measure their length and diameter, and serve the holes in both ends of the rings tube under their size. It is necessary to shorten the legs of the diodes so that their length is no more than 5 mm from the semiconductor housing. Next, you should solder "legs" from diodes to each other. Minus you need to solder to minus, plus - to the plus. The leg with the "Plus" sign is in a wider thickening. The next step is to solder to the legs of the wire. It is recommended to take color so that it is easy to determine their polarity.
Further at a distance of 10-15 cm Cut the wire, then you need to solder ballast resistance to the wire. We solder the wire to the second "leg" of the resistor. With the help of a transparent nail polish, you need to fix diodes. One drop of varnish is enoughTo drop on every end. Then we leave the lacquer, waiting for it until it dries. Varnish is needed in order to fully fix diodes, it will fill all the pores, ensuring the absolute contact of the plastic stick and diode. With absolute contact, the spread of light will be much more smooth.
Some of the most sought-after car lamps when replacing disturbing is. Read our article about the possibility of replacing such LED lamps with a long service life.
You may be interested in classification information. Learn all about the various types of light sources that surround us.
Effect of cereal
Many, having made the angel eyes with their own handsThey want to give them a beautiful eye effect. To do this, make notches along the entire length of the ring. Sheets are made at a distance of 1 centimeter from each other. The depth of notches should be about 0.5 cm.
Installing angel eye

It remains only to put angel eyes in the headlight. We disassemble it, remove the glass. Installing angel eye - a big problem, because to disassemble the headlight without damage. The final assembly must be taken particularly carefully. With cotton sticks, we remove the garbage from the surface of the reflector.
In the process of making angelic eyes, do not touch the surface of the reflector, it is impossible to use chemical compounds for processing it, otherwise the surface of the reflective layer can be corrupted. On the glasses you need to apply the sealant, and then install the ring. We set the ring so that the LEDs are located at the top. We lay the wires in the emblem of the headlight.
Shells on the ring should be sent outward, not towards the lamp. We appline silicone between glass and headlight. Thoroughly smear all the pores. The sealant will dry by half an hour. After it dries, you need to turn on the headlights and evaluate the result. Connect food to angelic eyes. Put the headlights in place, the wires are attached to the headlight wiring harness, carefully hide them under the hood. Disconnect the wire plug from the dimensions and turn signals. The so-called "dads" of the dimensions and turn signals will be interconnected and connect to the "mother" of turn signals. The "Mom" of the dimensions will be free, and we will connect to her "plus" from the eyes. Our "minus" will put on fastening from turn signals.
The moment came when when you turn on the dimensions, we will see the angel eyes that we did with them. Now you know how to make angel eyes alone.
Bixenon lenses with angelic eyes
Specialists and motorists have long known that the advantages of xenon light are the best manifest in the presence of lenses by car. In addition, a motorist and its car is guaranteed comfortable and safe driving in the presence of bixenon lenses.
Such lenses will help to avoid blinding oncoming machines and ensure the formation of the correct beam of light.
Bixenon lenses with angelic eyes look most effectively, stylish and modern. Such lenses are suitable for all types of caps for automotive lamps. Installation is provided in a regular base and does not need to saw a reflector. Often, it is enough to install just to remove the external glass headlamps and put the lens there.
Angel eyes today

Angelic eyes are an element of tuning cars that do not cease to delight motorists. If the kites, tuning of the cabin, spoilers in various configurations can over time can be bored and "arrive", then alternative optics is a pleasant exception. In the early 2000s, the first cars began to appear on the roads with this element of tuning, and very soon fans from Angel eye became more and more. Reasons are understandable. After all, it is not just a beautiful accessory, they are also an excellent way to ensure traffic safety.
Ordinary optics, especially far light, although from afar is visible on the roads, while blinding the counter cars, often creating serious discomfort. This alternative optics is 100% perfectly coping with all the tasks set, but it does not cause any discomfort to other drivers. There is another advantage of angelic eye - it small electricity consumption. All this and, of course, the aesthetic characteristics generates a huge demand from consumers for this type of tuning.
Angel eyes do it yourself photo
Below, we present photos on the topic of the article "How to make angel eyes with your own hands." To open the photo gallery, it is enough to click on the thumbnail of the image.
I met a huge number of car enthusiasts that were unhappy with the angelic eyes installed as BMW. The second well-known name "LED rings." Some shines weakly, others quickly walked, from the other blue tint of light.
At the end of the article there will be a lot of photo installation on popular cars 2110, 2114, prior, Kalina, Mazda, BMW.

- 1. The difference is good from bad
- 2. How to make it yourself
- 3. Installation
- 4. Installation examples
The difference is good from bad

The standard of course serve angel eyes BMW, BMW. At first, motorists will look at high-quality cars, then they want to put inexpensive and painful. But in the end, they receive a large set of flaws, because they think that different models do not differ. Buy the cheapest junk, on the weakest and low-quality diodes, receive the corresponding result. These are also promoted, stores that roll up prices up to 5 times.
Small LED wisdom. If you want to buy a chocolate, and the money is enough only on a piece of gamna, then it is better to sink on the chocolate.
You do not need to buy cheap, they will quickly fail. To replace with others, you will have to disassemble and collect a headlight each time. If you don't do it yourself, then this work is also worth a decent money. Every time you need a new rubber sealant packaging for headlights. Considering all the costs, you will see that it is better to put good and for a long time.

On Aliexpress, ready-made sets of LED angelic eyes for a particular car brand, such as Mazda 3. The price of such products is quite high, above 3-5 times, write a copy of the branded. But as practice shows, the quality is low, the assembly is bad, break quickly. Often you have to advise readers, how to do in this case. Usually there are two options, replacing several LEDs or replacing the entire LED ring.

In order for you to see the difference in the characteristics of Chinese and corporate LEDs 5050, 5630, 5730, 3528. The Chinese in the standard body put crystal 3-4 times weaker, and in quality 10 times worse. It is difficult to distinguish good from low-quality, externally they are the same, it is necessary to calculate the power of one LED. Many online stores cannot resist the temptation to wear a cheap product worth 100 rubles for 1000 rubles.

How to make it yourself

My site readers are interested in how to make angel eyes with their own hands, after the current, how articles are read on the Internet. According to statistics, 99% collide with this for the first time and basically want to save money. Regulations on the strength of light and other parameters, they do not know, respectively, it turns out not a very good result.

As a source of light, you can use the end (angular) LED ribbon or the usual flat.
On the Internet, the most popular version of the manufacture of LED angelic eyes with their own hands from a transparent plexiglass or plastic. A shallow depressions are applied to it, and the LEDs are inserted with 0.2 or 0.5 watts. As you understand, the power is too small, the light will be scattered forward and inward, and decrease inside the transparent material. Such a LED ring will fully be seen only at night, brightness at the level of ordinary dimensions. Let us not help powerful LED diodes per 1W, 3W, 5W.

In order not to break the textolite, first cut the circle and then remove the middle. Make conductive tracks and remained to solder LED. This method is quite expensive in time and materials. For comparison, the cheapest diode ring on 20 LEDs costs 80rup on Aliexpress, delivery is already included with the price.
So that it shines at the prestigious car level, the power of 5-10 watts is required and the luminous flux from 300 lumens, and the light should only go forward.

Another way is to apply a flexible light tube, which is most often inserted into the headlights as overall lights. The tube can cut and make a ring, form it will be held by contact with the reflector. The two-color tube will be able to perform the function of the dimensions and signal signals.
Installation

Installing angel eye with their own hands is quite complicated, the skill is required, sometimes good nerves. For installation requires a disassembly of each headlight headlamp. Most headlights are assembled on sealant, which, when heated, the construction hairdryer softens. Much less often occur on sealant that is rubber. He does not melting anything and does not soften, it falls a few hours to neatly dig and cut. One fair can leave 1 to 5 hours. The first time I went about 10 hours on the analysis. In fairness, it is possible to spoil the commodity view in the area of \u200b\u200bthe glass and the case.
Then they measure the diameter of the seating area and make the installation of angel eye. Degrease the places of gluing and fix the details. The kit is often two-way tape for mounting, but I do not trust him. The halogen lamp of the near light in the spotlight is very heated and affects this tape.

In reverse order, a headlamp is collected using a special rubber sealant. Collect so that you can disassemble without consequences next time. If you collect badly, moisture will fall inside, the headlight will sweat, rot.

There are several options for connecting in the spotlight:
- inclusion together with dimensions;
- instead of overall lights;
- together with the DRL;
- the inclusion of two-color together with the signal signal;
If the connection to the dimensions does not suit you, it is possible to use the controller for the daily running lights of DRL to control the inclusion and shutdown. Search for "DrL Controller". To connect the RGB, schemes from one-color are suitable, only have to look for a place to accommodate the RGB control unit.
If you are not sure about your abilities and does not have enough experience, please contact specialists from auto electricians.


Installations of installation
Mounting leaders are domestic cars VAZ 2114, VAZ 2110, prior. Among the foreign cars BMW, Mazda 3, BMW E39, Ford Focus. Actively installed on motorcycles, scooters, motorcycles, quad bikes.
..


VAZ 2114.

Among the domestic cars, the second place in popularity occupy Angelic Eyes on the VAZ 2114, the first place is divided by priors and VAZ 2106, which have a round form of reflectors.


VAZ 2110.


Kalina Vaz


Mazda 3, 6 Mazda 3, 6

Among the imported cars are popular Angelic Eyes on Mazda 3, Mazda 3. Especially smart look at Mazda 6, in which there are 4 lap in each spotlight. RGB LED rings will be wondering, which will complement the dimensions and turning signals.


Priora VAZ 2170.

The most popular option in Russia, these are angel eyes on the prior. The headlight shape is well suited for such tuning, reflectors have a round shape.


Ford Focus, Kuga


An article about the element of the headlight tuning car "Angelic Eyes", as well as on their installation. At the end of the article - the video about the simple method of making this device with their own hands.

Review content:
Currently, tuning headlights with their own hands is hardly the easiest way to improve the exterior of the machine. Angerian eyes began to use more popular in the driver's environment. They are glowing rings that are embedded in the optics of the car. BMW became pioneers in this area, and many car enthusiasts reached themselves behind them, who were attracted by innovation.
What do you need "Angel Eyes"

"Angel eyes" became an integral part of modern tuning. In the inclusive state, they can perform the role of parking light signals that can highlight the car. In an impenetrable night, it can significantly raise the level of security. "Angel eyes" is consumed a minor amount of electricity - they are not able to provoke a quick discharge of a car battery.
"Angel eyes" and their color

Coloring "Angel Eye", and in what cases they can be installed on the car:
- yellow, red, green, orange, purple - allowed to use like tuning on show-car show;
- white, blue - can be used in the process of everyday use, as backlighting and dimensions.
Products from Orgstecla

The manufacture of "Angelic Eyes" from the plexiglas forces practically everyone. To do this, cook:
- 8 LEDs by 3.5V;
- 8 resistors with a rating of 2200 ohms;
- Leaf plexiglass or round rods from it.
The obtained billets need to give a rounded form. To do this, it is advisable to use a grinding machine. But you can perform this work and manually, with a piece of sandpaper. In the end, there should be three round rods, not just processed, but also polished.
Next, the workpiece must be bent, giving them the shape of the headlight. For this purpose, it is best to use a construction hairdryer. In advance, it should be found a round item, the diameter of which coincides with the size of the headlights. Pre-heated pavers must be bent across the stencil and give them time to cool so that they take the specified form. All surplus must be removed.
In the ends of the billets, the drill need to make holes in which diodes will be inserted. They are connected to wires feeding to overall lights. The plus output of the diode is connected to a positive wire, and the minus - with a negative one. At a distance of about 15 cm ballast resistance. For fastening diodes in holes, you can use nail polish.
All connections must be qualitatively measured. If there is a desire to make "angel eyes" with radiant, then the latter is applied along the entire length of the rods, the depth of which should not exceed 1/3 of their diameter.
Using LED strip

The rings with two LEDs have significant disadvantages. First, this is their opening. Secondly, they have insufficient brightness, which does not allow them to use them as a running lights. These flaws are easy to avoid if for the manufacture of "angel eyes" to use LEDs. To do this, you will need:
- A small sheet of plexiglas. Its thickness should not be less than 5 mm, but also the use of the material is thicker than 7 mm is also inappropriate.
- WITH WITH WOOD METAL.
- Ballerinka - so it is customary to call a device that allows you to cut round holes of large diameter.
- Ribbon having a large number of LEDs per 1 meter length.
- Scattering film.
- Transparent glue.
- line heat resistant tape.
- Soldering iron with a solder.
- Wires having terminals.
- Heat-shrink tubing.
The size of the cut blank must be checked again by attaching it to the spotlight. If there is a need for this, then the workpiece must be corrected. Only after that you can cut the inner circuit.
To achieve a better glow, the outer part of the ring is covered with a scattering film. If there is no one, then the surface can be simply made by matte, finishing it with shallow emery paper.
Now the tape is installed. True, the wires are soldered to it. Place soldering must be pouring silicone sealant. It also makes sense to check the design of the design by connecting it to power in 12 V.
What is better to use, LED or CCFL
We have no unambiguous answer to this question. Therefore, we give lists of advantages and disadvantages of each of them.

The luminous element in Angel Eyes CCFL is a luminous neon tube, which is closed with a protective plastic cover. Their advantages:
- Light is distributed evenly all over the ring.
- Does not respond to vibrations and shakes.
- The emitted light is softer than that of diode analogs.
- Relative cheapness.
- Electricity consumption is very low.
- Run is carried out through inverters (ignition blocks), which fail earlier than the life of the backlight ring itself (20,000 hours).
- To achieve the maximum brightness of the glow, it is necessary about 2-3 minutes after the connection.
- Brightness is significantly lower than that of LED.
- The service life is two times less than diode.
The main advantages of this option "Angelic Eyes" include the following:
- The brightness of the glow is so high that they are perfectly seen in the afternoon and they can be used as a running lights.
- The service life exceeds 50,000 hours.
- Not susceptible to the effects of vibration and shake.
- Low energy consumption.
- Light is distributed evenly.
- It works steadily both at -40 ° C and at + 100 ° C.
Installation of "Angel Eyes" independently

How to install these products yourself, I want to know many car owners who like to upgrade the appearance of the car. But the high-quality tuning in the absence of proper optics cannot be considered.
Consider the process on the example of installing neon tubes. First you need to prepare the boarding place in the spotlight. To do this, the headlight will have to shoot.
After that, you need to dismantle the glass. It should be extremely neat. After removing the glass of the grooves in which it was attached, very carefully cleaned from the remnants of sealant. Very good in this case helps gasoline.
Long exploitation of headlights leads to the fact that microscopic garbage and dirt accumulate in its inner space. Delete them should be extremely soft with a rag or cotton chopsticks. It is strictly forbidden to do it with unprotected hands.
When installing, the aesthetic component should be taken into account. To "Angel Eyes" perfectly combined with the color of the car, you need to know some nuances. So, for example, for light cars it is better to choose neon. If there is no such possibility, they will fit the LED, but they should emit a bluish color. But saturated white LED color is perfect for dark and black cars.
After disassembly and cleaning the headlights can be mounted in her "Angelic Eyes". It is done quite simple. A sealant not having colors is applied to the inner part of the ring. After that, the product is superimposed on the surface of the headlight reflector and pressing it well. Connect the device to the automotive network only after the sealant is completely dry.
The collected device must be checked for performance, for which power is connected to it. Only after this headlight can be collected. To do this, the groove is applied by a layer of colorless sealant, to which the glass is placed. Again, you should wait until the sealant gets completely, and only after that the headlight can be placed in place and connect.
A simple way to manufacture "Angel Eyes" with their own hands - in video: