It is unlikely that you can meet a person who would not have experienced the desire to stop in a comfortable chair and experience smooth swaying movements of the suspension design. Comfortable swings and at all times used great popularity. Today, a series of suspended seats is significantly expanded: the suspension sofas and chairs decorate many country areas, easily fitting into a landscape design.
The basis for the manufacture of suspended seats served ordinary rocking chairs. Wicker structures from rattan or vines became the most promising for furniture experiments, because they weigh quite a little, but at the same time they have excellent strength.

As a result of such furniture experiments, suspended chairs were created, resembling half a ball form
Semicircular structures are attractive in that they allow you to evenly distribute the entire load. In addition, it is convenient to hang, installing the device at the top point.
Suspended chairs can have several options.

Wicker armchairs from the vine, rattan, transparent acrylic or plastic have a hard housing. For convenience, they are complemented by decorative pillows and soft mattresses

The Hammock Chair is a softer suspended design. On swinging soft pillows you can always pamper yourself in moments of a relaxed rest.

Closed on three sides by wicker walls Cocoon Chair perfectly suitable to retire and abstract from the external fuss
Instead of traditional rattan or vines, synthetic materials are increasingly used in the design of suspended chairs, thanks to which structures become lighter, flexible and silent.
Options, as you can see, set. We specifically analyze 2 examples.
It is not difficult to build such an armchair. It is only necessary to own the basic technique of weaving Macrame.

Such a suspended chair will create a special atmosphere on the site, which has a pacification and peace
For the manufacture of the chair, we will need:
- Two metal hoops of different diameters (for seating d \u003d 70 cm, for the back of d \u003d 110 cm);
- 900 meters cord for weaving;
- 12 meters sling;
- 2 thick cords for connecting rings;
- 2 wooden rods;
- Scissors, roulette;
- Work gloves.
For the arrangement of the chair, it is better to use hoops made of metal-plastic pipes that have a cross-section of 35 mm. Metal-plastic pipes of such thickness have inside the metal braid and are able to provide sufficient suspension strength.
To make the hoop from the pipe, first determine the length of the segment, using the formula S \u003d 3.14xd, where S is the length of the pipe, D is the desired hoop diameter. For example: For the manufacture of the hoop d \u003d 110 cm, it is necessary to measure 110x3.14 \u003d 345 cm of the pipe.

Wooden or plastic internal inserts of the corresponding diameter are perfectly suitable for connecting the pipes of the pipes, secured by conventional screws
For weaving, a polyamide cord with a polypropylene campier with a thickness of 4 mm will be perfect, which can be purchased in a construction store. It is good because it has a soft surface, but in contrast to cotton fibers when viscous is capable of creating more dense nodes that will not "lay out" during operation. In order not to be discrepancies in color and texture of the material, the entire volume of the cord is desirable to purchase immediately.
Stage # 1 - Creating a winding for a hoop
Our task is to fully cover the metal surface of the hoop. For the design of 1 meter, the hoop with dense turns takes about 40 meters of cord. The turns do not rush with a good tension, overlapping the cord smoothly and neatly.
To make the winding more dense, every 20 turns make an array, with an effort twisting them in the direction of the winding until it stops. As a result, we should get a smooth and dense surface of the braid. And yes to protect your arms from the corner, it is better to spend this job in gloves.
Stage # 2 - mesh weaving
When creating a grid, you can use any likely pattern of macrame technique. The easiest way to get a "chess" with flat knots.

Mesh weave a double polyamide cord, attaching it to the collapsed braid hoop by double nodes
During weaving, follow the power of tension of the cord. From this will depend on the elasticity of the finished grid. Free ends of the nodes are not worth cutting off. Of these, you can form a fringe.
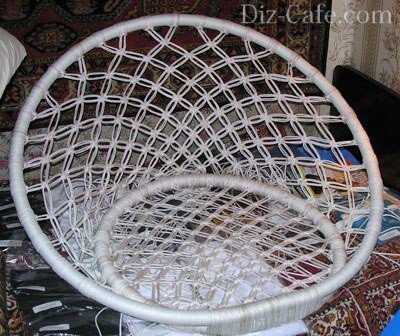
Stage # 3 - Build Design
Braided hoops collect in a single design. To do this, from one edge, we fasten them, winding together with one cord.

From the opposite edge of the opening vertically, we place two wooden rods that will serve as a support for the backrest
The length of the supporting rods can be any and is determined only by the selected height of the back. To prevent the slipping of the hoop, on the four ends of wooden rods make shallow propuls.
Stage # 4 - Armchair Back
The braid of the backrest can also be anyone. Weave begin with the top of the back. Gradually dropping to the seat.
Free ends of the cords tighten on the lower ring, collecting their hanging edges into a loose brush
When the pattern is braided, the ends of the threads are fixed at the bottom of the back and make them the fringe. Strengthen the design will allow two thick cords that connect the back with a seat. Elegant pendant chair is ready. It remains only to attach the slings and hang the chair to the selected place.
Suspended Chair with Case
If you do not want to deal with weaving, or for some other reasons, the first option did not come up, then it can be suitable.

Cozy, smoothly swinging nest - an ideal place where you can relax, forgetting about your problems, or just to build
To make such a suspension chair, we will need:
- Hoop d \u003d 90 cm;
- Cutting of durable fabric 3-1.5 m;
- Flizelin, Dublerin or Brokebeau;
- Metal buckles - 4 pcs.;
- Strupp - 8 m;
- Metal ring (for hanging the chair);
- Sewing machine and the most necessary tailor accessories.
You can make the hoop from a metal-plastic pipe that is sold in the form of a folded bay, or from bentwood bent. But when using a tree, it is worth being prepared for the fact that under the action of the difference in temperature, the hoop can quickly reform and deform.
Stage # 1 - cutting covers
Of the three-meter cut slices of crumb two equal squares, each size of 1.5x1.5 meters. Each of the squares separately fold four times. To make a circle from it, from the central angle with a radius of 65 cm we plan a circle and cut it out. By the same principle, we do and cut the circle from another square. On each of the resulting circles, retreating from the edges by 4 cm, the stroke line is scheduled for the inner contour.
We plan holes for the sling: we fold the quadruple circle and stroke it so that the bends are reference points. The first pair of sling will be placed relative to bending at an angle of 45 0, the second - 30 0. Having placing the corners under the slots for the sling, we again lay down both circles and stroke.

According to the number of four axes, we make rectangular slots in size 15x10 cm. Dresses make the contour of the Y-shaped markup, made inside the rectangles
To make the same slopes on both circles, connect the sections of the fabric and they spin them with pins. According to the contour of the first circumsion of the first circle, we make slits on the second cut of the fabric.

Petals of slots flexing inside out, sizing the edges of the phlizelin. Only then, we perform a complete slot, flashing it around the edge, retreating 3 cm
Stage # 2 - connection of elements
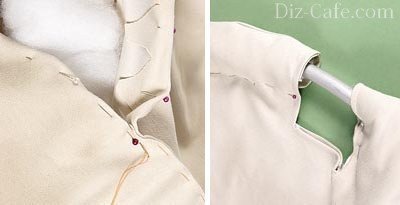
Step both circles together on a pre-intended stroke line, leaving a hole to insert the hoop. Free allowing to cut the cloth. The finished case is turned evident and irrigate.

From the material for filling, cut the strip of 6-8 cm wide, which we are experiencing the hoop. The trimmed frame insert into the case
Having retreated 5-7 cm from the edge, leafing between both sides. The edges of the opening left under the insertion of the hoop, turn inside out.
Non-crushed allowances I spoke with the front side of the pins, and we shoot the edges by recovering from the edge by 2-3 cm. According to the same technology, we proceed the whole edge of the cover
Fill with a case of syntheps, stretching the filler bands and fixing their edges with a secret seam. To strengthen the case on the hoop, in several places gear fabric.
Row mode for four cuts 2 meters long. To prevent the breaking of the threads, we melt the edge of the sling.

The mounted ends of the land stretch through the slits, form loops from them and spend 2-3 times
To be able to adjust the height and angle of the suspended chair, on the free ends, wear buckles. All slings we collect in one suspension, fixing on a metal ring.
Methods for arrangement of the suspension system
Such an armchair can be placed in the garden, hanging into a thick branch of an empty tree. If you are planning a suspended chair to make the functional decoration of the veranda or gazebos, you will need to build a suspended structure.
The suspension system should withstand not only the weight of the chair itself, but also the weight of a person who sits on it.

To secure a simple suspended chair, the weight of which together with the person sitting in it is no more than 100 kilograms, it is enough to install a simple anchor bolt
With this method of fastening, you should consider the maximum load on the ceiling overlap, which is measured in kg / m 2, because the entire suspension system will act on this area. If the permissible load is less than the weight gained in the calculation, it is necessary to distribute the ceiling load, building a power frame that combines several anchor bolts.
Make such a chair, and you will get an excellent opportunity at any time relax, enjoying pleasant swaying movements, gaining peace and philosophical attitude towards all troubles.
From this article, you will learn about the advantages and disadvantages of the foundations built on tees technology. We will tell about how to arrange the foundation with your own hands, we will give step-by-step instructions. You will be able to learn about the nuances of the monolithic pile woodwork and the piles themselves.
Individual environmental construction pursues many goals, one of which is a careful attitude towards natural resources. The gentle technology allows you to get the desired result - a good durable house, without spending excess energy and raw materials. We will tell about the foundation, with the construction of which the master of the middle hand will cope even alone.
Basis of technology
The main advantage, or as it is customary to speak today - "Fishka", such a foundation is that it does not contact with the soil. More precisely, the contact area is minimal and comes down to the surface of the piles. Ribbon woodwork relies on them and is in suspended state. This gives the following advantages:
- Remedy waterproofing of the foundation is not required. On all waterproofing works 5-6 rolls of the usual inexpensive runner.
- Seasonal soil bunchiness * does not affect the ribbon of the woodster. This factor often causes fault of ribbon foundations.
- The minimum volume of earthworks.
- Ventilated space under the overlap - reliable protection against damp and debate.
- Used soil energy. With the right organization of the base and the product under the house in the underground sinus, constant temperature will be maintained.
* Soil bunch - the properties of the soil change the volume when the temperature drops. Depends on the humidity of the soil and the temperature value.

Disadvantages can be called conditional:
- For formwork, the beams will need more boards.
- It is necessary to withstand the minimum of 21 days before the platform.
"Hanging" woodwork does not differ constructively from the inserted. The difference between them is only in the level of the embedding.
Piles tees
The peculiarity of piles tees is that they have a developed reference part in the form of expansion along the pile radius. This is difficult to call it - such a design is used in industrial construction from the middle of the 18th century. The main problem is to increase the space in the bottom part of the pile shurt, was solved in different ways - from special nozzles on the bora rod to the explosive way.
The work of industrial mechanisms was taken as the basis of tees engineers and created a special car with a folding knife. Another way to make in these conditions the expansion at a depth of 1.8 meters is not yet invented. By itself, the bur has a pretty primitive design and consists of the following elements:
- Vertical rod with handles.
- The groundcarrier equipped with cutters in the bottom part for the insertion into the ground.
- Folded knife with a handle.

The drilling of the shurph under the pile occurs elementary - reaching the desired level by ordinary drilling, the operator folds the knife with the help of thrust and chooses the cavity, continuing to rotate the boring. The soil is assembled into the ground-collector container and the operator removes it to the surface. The depth of pile is established from the only rule: the support portion of the pile should be completely under the level of ground freezing.
At the moment, you can find two original Bura Tis-F200, F250 and F300, as well as countless copies of their copies and analogs. Figures in the title - the diameter of the shurt in millimeters. Cost of boils:
- TISE-F200 - 75 y. e.
- TISE-F250 - 80 y. e.
- TISE-F300 - 85 y. e.
Piles and Dr. Tees on video
Construction of foundation
The foundation of TISE consists of two structural elements - the pile row and the screening beam, respectively, and the work will be broken into two stages. First you need to arrange all the piles, and then make as Ruralka.
Concreting piles
After drilling all the shurts, it should be proceeded to the workpiece of frames for piles. These can be simple frameworks from A3 Ø 12 - 3-4 working rods per pile. Take the length with a reserve at 400-600 mm. Work rods link clamps.
Progress:
- We make a concrete - add a minimum of 50 mM concrete to each shurt. If your work needs accuracy, at this stage you need to level the horizon at depth. To do this, pull the cord in the horizon so that it does not interfere with working, and adjust the layer of concrete level, focusing on the cord.
- We set the frames and concrete the pile support grandmother.
- Install the "shirt" from the rubberoid.
Video - how to make a sleeve for pile
- Concreting piles through the conductor, as shown in the video. The height of the pillar of concrete from 100 to 200 mm above the ground level.
Concreting piles tees on video
Further actions will differ depending on the stuffing material. If he is wooden, like the rest of the house, then the piles can be cut through the baccoon along the desired horizon after the hole. If Scarlet is monolithic, it is necessary to navigate the tensioned cord during concreting, so that the pile concrete level is appropriate.
Concreting Ruralka
After hardening the solution (3 days), you can continue the foundation device.
Progress:
- The space between the piles to fall asleep with soil or sand / slag to the clove with a concrete level (horizon) on a width equal to the width of the tape + 200 mm. Becoming the boards or manual traam.
- Pour the contact plane to rubkeroid or polyethylene.
- Break outlets of piles fittings at the level of future working rods of the beam frame.
- Tie a frame in accordance with the requirements of reinforcement. At the same time, the editions of the skeleton of the piles should be entered into the beam frame.
- We establish a formwork according to formwork requirements.
- Concreting beams, focusing on the horizon, which is better to transfer to the inner side of the side. To do this, use high-quality concrete made of pure raw materials with proportions 1/3/3-4. When laying, use the vibrator - hanging beams should be reliable.

After laying concrete, it is necessary to withstand at least 7 days to continue work. After removing the formwork, after 21 days, you need to remove the beam submissions. The landscape will align, and the gaps between the bottom of the beams and the level of land will appear. The beam can be coated with one layer of liquid waterproofing (except for the contact surface with the further construction of the walls of the TISE).
The final view of the foundation of tees on video
Further exploitation of the foundation will require the organization of underground ventilation. This can be done, breaking the clearance by a perforated sheet of laminated galvanized metal. The described technology is extremely economical. Attempts to make it even cheaper due to the use of poor-quality raw materials will inevitably lead to great troubles that will begin with the foundation. A decent concrete and a sufficient number of reinforcement will extend the service life of the foundation up to 180 years.
The hanging garden on the gutters is a great way to use the vertical space around your home to grow flowers, edible and create a stylish separation of space or a garden screen, without spending too much money.
Materials
1 - 8 "White PVC Rain Groit Cut 3 Sections 32"
6 - White PVC Headers for Ghelobes
2 - 1/8 "Steel cable cut to the desired length
6 - clamps (see the image below)
6 - 1/8 »Steel Rods
2 - galvanized hooks
Instruments
Rechargeable Drill Screwdrift
Hand saw or nippers
Straight corner
Roulette
Permanent marker

1. Determine the center of your gutters and note (otherwise your gutter will not hang exactly).

2. Note and drill holes for steel cable rods. Find a drill with a diameter equal to the diameter of the cable to minimize the space for the maneuver.
3. Drill holes a few sizes more, make sure that you get a good drainage (roots of plants do not like to sit in water for a long time).


4. Find a place that illuminates the sun at least 4 hours. I placed my gutter on the gazebo, which I built a couple of years ago.

5. Drill the guide holes (the hole is slightly less in diameter than the diameter of the auger) to simplify the screwing of the hooks. Make sure that the holes are at the same distance so that the cable hangs straight down.
6. Stretch the gutter through the holes and secure them with transverse clamps at the desired height. You will notice that I placed the grid (usually used for drywall seams), remaining from another project, over drainage holes to save the soil from seepage. Nevertheless, I think that the holes are small enough, this step is not mandatory. I did it in a habit.
7. Fasten the gutter with transverse clamps and semicircular steel rods.


Now everything is ready to fill the organic soil and landing small root plants on your choice.
If you liked this material, we offer you a selection of the best materials of our site according to our readers. The selection is the top of the existing ecosalions, the generic estates, their history of creating and all about Ekodoms you can find where you most convenientlyBefore building a roof of the house, it is necessary to study the possible options for rafter systems and select the optimal scheme depending on the individual features of the construction. Among the most common schemes of the rafter frame, weighing systems are allocated, suitable for buildings with an inner bearing wall, and hanging systems in which rafters can only rely on the outer walls of the roof. This article will consider the nodes and the design of the hanging rafters.
The device hanging rafal
Hanging rafters are called that is so no accident - in fact, they are constantly in suspended state and do not have a different support, except for the outer walls of the building. Despite the apparent unreliability, hanging rafter systems are quite effective and are able to fully fulfill their functions in flights up to 17 m.
Of course, the mounted rafters themselves would cost a little, but they are used in conjunction with a solid system, which includes a lot of additional elements that allow forming large nodes like farms or arches.

An example of a simple farm can perform a construction consisting of two rafting beams, which are connected at the top point, due to which the triangular form of such a farm is ensured. In the horizontal plane, a rafter tightening is installed, represented by a conventional wooden beam. Of course, it can be made of metal, but then it needs to be called gravity.
The role of the protracted beam can not be underestimated - rafters under load are constantly trying to break the triangular form of the farm, and the tightening of the rafter prevents this effect. In addition, the emerging suspension force is not transferred to the walls of the construction, but accounts for the tightness itself, so that the building is experiencing only the effort of vertical orientation.

The tight can be installed at any vertical level, but for this you need to know exactly what functions are imposed on it. For example, when the tightening is arranged at the bottom of the rafted, it can also be used as a beam of flooding the floor below. If a residential premises be located under the roof, then the tight should be installed above so that it interferes with the arrangement of the attic.
With the arrangement of large spans, the hits of hanging rafters will have to be further reinforced. In the event that the span between the walls exceeds 6 m, then the rafters are strengthened with disclosures and suspensions, and the tightening should be made of two beams interconnected.
The tricky rafters can be performed according to several schemes, and they should be considered more.
Triangular hinged arch
The considered type of construction is considered to be one of the easiest. Constructively, such a scheme involves the creation of a simple farm in the form of a triangle, which includes two rafting beams directed towards the skate. At the bottom of the rafter, they rest on a horizontal beam, in addition, at the lower level, fastening the tighters to the rafters is carried out. For the normal functioning of such a design, the height of the skate must be greater than 1/6 of the Farm span.
In such a scheme considered to be traditional, the main load falls on rafters, flexing them so that they disperse in different directions. This force is compensated by a tightening, which, working on stretching, allows you to unload the solo system. The tightening in this case does not apply to the number of carrier elements, so instead of a wooden part you can use metal.

To reduce the bending load, which the rafter feet are experiencing, the skate elements in this case are installed with a slight deviation from the central axis. Such a scheme causes an additional effort to appear with the oppositely directed vector. In addition to lowering the load on the rafter frame, it also allows the use of beams less thickness - and this is a direct path to justified savings.
Most often, triangular hinged arches are used to create an attic, and in the lower part of the tightening design perfectly serve as the beams of overlapping. All susceptible rafter schemes described below are variations of the described three-stroke arches, in which additional elements only increase the rigidity of the rafted.
Hinged arch with grandmother
This design is more complicated by the previous one, it is quite possible to use it for overlapping the spans longer than 6 m. The main problem of long designs is a long tightening - there are significant loads on it, so it bends under their own weight. To compensate for these loads, a grandmother is used - wooden bar, with which the tightening is suspended. If necessary, metal rods that have sufficient tensile strength can be used as a grandmother.
Using such a suspension, you can install hanging rafters with a tightening of a long length, because its bend will be compensated. The main point when installing such a design - a grandmother should not be compressed, that is, it cannot be used as a vertical rack. Of course, a constructively rack and suspension is very similar, but these elements perform completely different work.

The main difference between grandmother is that it is suspended to the cornice node, and the tightening is attached to it by means of a clamp. To create a tightening of the desired length, constituent elements are used that are adjusted by bores and are fixed by bolts. Before assembly, it is worth carrying out a tightening rafter so that the design is optimal.
This design today is rarely applied due to moral obsolescence. However, the ideas and principles laid in it are still being used in other, more modern rafaling systems.
Raised Tightening Design
Such a scheme is mainly used when creating residential premises under the roof. The height of the tightening in this case determines the height of the ceiling of the future attic. The tightening in such a design rises to the ridge part of the roof, and the higher it is installed, the larger load it has to be experienced.
A rafter frame as a support uses Maurylalat, not a tightening. In order for the roof to independently change its dimensions depending on the external factors, the rafters are fixed mobile to special devices that ensure the necessary freedom of movement of the structure.

When exposed to the roof of balanced loads, the design will be stable, but if the forces that are on the one hand will prevail, the roof will be slightly roasted. To prevent such a situation, rafters must be taken out of the walls on both sides of the building.
In an arc with a raised tightening, the latter does not perform the functions of the support. It is influenced only by tensile loads, if the attic is placed under the roof, or stretching-bending, when creating attic. In the latter case, the tighten can be used for mounting ceilings or insulating materials.
To protect the tightening from sagging the suspension is installed. Here, too, there are nuances: with small loads and a small length, the tightening can be simply nourished to the riglel and the skate, but for a long tightening with large loads, several suspensions will be required and additional fixation of the clamps.
Hinged Arch with Rigel
This scheme is constructively similar to the previous one, but there is one difference - instead of moving support elements for a hinged arch with a rigle, a rigid fastening of the rafter is used, which is quite reliable. The rafters are swayed in Mauerlat or are attached to still supporting bars. Due to the change in the design of the support, the voltage occurred in the voltage system - the main load becomes the cutting, which comes to Mauerlat and the walls.

The tightening is fixed at the top of the arch, but instead of stretching it is now having a compression. Together with the change in the nature of the loads, the tightening name changes - now it is referred to as the Rigel. Such an arc with an elevated riglem can only work under the condition of a small expanding load, and when it increases, the rigleel must be additionally increased in the tightening. The result is a hanging rafyled, similar to the traditional arch with three hinges, and Mauerlat in this case will no longer need.
Arch with suspension and pink
Such a scheme is a logical continuation of the topic of the arches with grandmothers. The arch with the suspension and the pink is used to overlap the spans up to 14 m long - in such structures the load is so large that the rafters be defeated due to their own weight. To compensate for these loads, soap are used.
As a rule, the sozer in the rafter system rests on the inner walls of the construction, but hanging rafters are used only in their absence. The grandmother is helped to solve this problem, which is the only available support.

The design assembled in this way works on the following principle:
- The rafter accounts for external load;
- Sloca take on the same part of this load;
- The suspension is stretched and pulls the skatear;
- The rafters are captured behind the upper part and stretch down, due to which the sootion is pressed.
For long rafting feet, characteristic of such a design, the long tightening is used. It is best to use a timber from two rigidly connected beams. The tightening is attached to the grandmother by a clamp.
Types of compounds of individual elements and nodes
In order for the design of the hanging rafters, it turned out sufficiently high quality and reliable, it is necessary to take care of the quality connection of its elements, choose fasteners for the rafter system, which is capable of listening for many years, for which the following methods can be used:
- Butt joint. This method is used to connect the upper parts of the rafted, that is, the skate node. The rafal beams are cut off at an angle, combined and fixed by wooden or metal linings.
- Connection of Vangest. To implement this method, the upper edges of the rafting legs are closed and fasten with a bolt with a nut or hairpin.
- Word compound. Before the connection of the rafter is cut on half of their thickness. The prepared parts are reduced and fixed through the drilled through hole with a bolted joint. The same method is actively used to mount the cornis nodes - in the lower part of the rafter, a tooth is cut down, which is supplied to the supports and is fastened with bolts or plates.
- Sliding connection. This method of connecting the lower parts of the rafter is used in systems with a movable support. Special metal elements are used to connect.
Calculation of hanging rafter system
The roof with hanging rafters should be calculated at the design stage - it avoids further problems. It will be best to order the calculation of specialists or take advantage of the finished project, but if you wish, you can make all the work independently, using an online calculator or more traditional methods for holding calculations.

In any case, for calculations will need to know:
- The area and sizes of the undergrade space;
- The presence of attic;
- Expected load on the roofing system;
- The angle of slope;
- View of the rafter system;
- Material manufacturing wall of the building;
- Roofing material.
The calculation of hanging rafters is needed in order to determine the thickness of the rafter, the step of their installation and the form of the necessary farms.
Installation of hanging rafal
When all the preliminary stages are completed, you can proceed directly to the installation of the solo system, which is performed according to the following algorithm:
- First you need to place the center of the roof and the height of the skate, after which two boards with marks are displayed on the front;
- Next, you need to make a pattern of installation of rafter feet, for what you need to take the cutting board and lean it with one end to the Mauerlat, and the other - to the height of the skate, and make a stall on this board;
- Using the template, rafting beams are manufactured in the required quantity;
- Prepared and treated rafters are unfolded in pairs;
- First, the first farm is mounted, which, after the assembly, you need to install on the front of the building, using a self-tapping screw or corners with nails for fasteners;
- On the other side of the building, the second farm is installed;
- Between the two installed arches stretches the lace from which it will be necessary to repel when installing the rest of the farms;
- All other farms are set sequentially, with the calculated steps and level.

After completing the installation of the hanging of the rafter system, you can proceed to the following stages of the roof mounting.
Conclusion
Wooden hanging rafters are quite convenient and are suitable for solving a variety of tasks. Installation of the hanging system is quite simple - it is necessary only to competently plan the future design and carefully spend each stage of its assembly.
The hanging garden on the gutters is a great way to use the vertical space around your home to grow flowers, edible and create a stylish separation of space or a garden screen, without spending too much money.
Materials
1 - 8 "White PVC Rain Groit Cut 3 Sections 32"
6 - White PVC Headers for Ghelobes
2 - 1/8 "Steel cable cut to the desired length
6 - clamps (see the image below)
6 - 1/8 »Steel Rods
2 - galvanized hooks
Instruments
Rechargeable Drill Screwdrift
Hand saw or nippers
straight corner
Roulette
Permanent marker

1. Determine the center of your gutters and note (otherwise your gutter will not hang exactly). 
2. Note and drill holes for steel cable rods. Find a drill with a diameter equal to the diameter of the cable to minimize the space for the maneuver.
3. Drill holes a few sizes more, make sure that you get a good drainage (roots of plants do not like to sit in water for a long time). 

4. Find a place that illuminates the sun at least 4 hours. I placed my gutter on the gazebo, which I built a couple of years ago. 
5. Drill the guide holes (the hole is slightly less in diameter than the diameter of the auger) to simplify the screwing of the hooks. Make sure that the holes are at the same distance so that the cable hangs straight down.
6. Stretch the gutter through the holes and secure them with transverse clamps at the desired height. You will notice that I placed the grid (usually used for drywall seams), remaining from another project, over drainage holes to save the soil from seepage. Nevertheless, I think that the holes are small enough, this step is not mandatory. I did it in a habit.
7. Fasten the gutter with transverse clamps and semicircular steel rods. 

Now everything is ready to fill the organic soil and landing small root plants on your choice.