I’ve been wanting to dry oranges for decoration for a long time and finally tried it. You are reading the second edition of this article - the template that I wrote before I saw the result was rainbow-colored, like a unicorn's mane. But something went wrong. At the end of the article I collected tips from blog readers. I hope you find them useful.
A colleague at work has a piece of fruit. It consists of whole dried grapefruit, orange and tangerine. After my experience with drying oranges, I cannot understand how these fruits dried out without rotting, becoming moldy, or starting to emit horrid odors.
I have a more than relaxed attitude towards citrus fruits, so, without any regrets, I donated several oranges and one lemon for drying. Before I started torturing fruits, I read a dozen articles about how to dry oranges, and found out that there are several ways.
1.In the oven. But why use an oven, especially since I have an electric one, if there is a completely budget option.
2. Behind the battery. They promised a bonus in the form of a wonderful aroma that should fill the room while the oranges were drying.
Before things went wrong
1. I took 4 oranges, 1 lemon, 2 large cardboards, strong threads, scissors and a knife. I washed the oranges and lemon and cut them into circles about 3 mm thick.

2. I took out sheets of cardboard and made a lot of fairly large holes in them with a knife for ventilation.

3. Placed the oranges on one of the cardboards and covered the second one on top.

4. She wrapped the structure tightly with strong threads and sent it behind the battery.

All articles about how to dry oranges promised results in three to four days.
And then something went wrong
Four days later, ready to see the mugs evenly dried and without losing color, I decided to disassemble the cardboard structure. But instead of joy from the result, complete disappointment awaited me. Almost all the oranges remained as juicy, but 30% became moldy.
Having removed the missing, bad-smelling comrades, I left the remaining fruits to dry on the windowsill. Two weeks passed, but only four mugs dried completely. I can’t understand what’s the matter. The room is ventilated and not humid, oranges and lemons are cut thinly. We can only blame genetic modification.
I regretted ten times that I didn’t use the oven and decided that I would buy a new portion of citrus fruits and dry them there no matter what. It’s good that I consulted with my mother, who has extensive experience in preparing dried fruits and dried berries. She said that it takes her several days to dry high-quality preparations in the oven, but not several hours. I’m not ready to use an electric oven for several days, even intermittently. Apparently I’ll be drying oranges all summer at the dacha on a rope, like mushrooms.
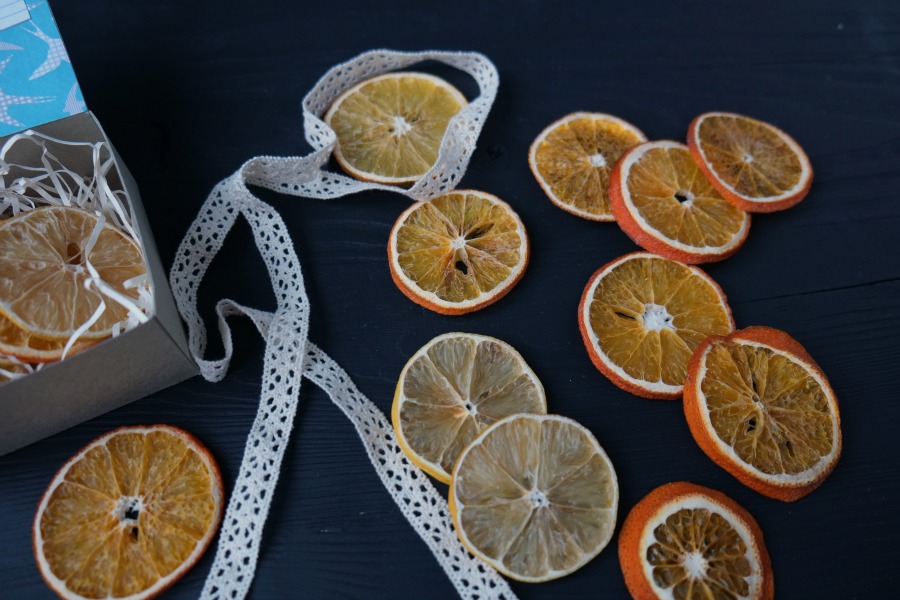
In general, dried oranges are good for decoration. These circles can be used in gift wrapping, as a filler in a vase or as Christmas decorations a la naturel. I hope mine will be dry by the New Year :).
How to dry oranges for decoration - the experience of blog readers
- Electric dryer. You can dry berries, fruits, mushrooms, and herbs in it. Apple slices take 8 hours to dry. Electricity consumption is not high at all. Oranges can take up to 10 hours.
- Air fryer. Oranges dry in an hour at 100 degrees. If the slices are not very thin, then about 2 hours.
- Periodically dry in the oven. After something is baked, you can put the cardboard with oranges in the heated oven. Make bigger holes in the cardboard, make the batteries hotter.
- Pierce orange slices in several places to drain the juice.
- Blot slices with a paper towel.
Have you tried drying oranges? Have you ever had a difficult experience preparing something?
Moms and dads know that the New Year must certainly smell like oranges, tangerines and... cinnamon. Grandparents will definitely add Olivier with champagne to the list of New Year's scents, but we will not use this for New Year's decor. We will create beautiful Christmas decorations from citrus fruits and create pleasant aromatic memories of childhood.
Preparing for the New Year 2019 should not turn into an endless race with the goal of fulfilling all the points that are included in your child’s letter to Santa Claus. Is it true. There are many wonderful ways to make a child happy. A gift is just one of these ways.
When all, all wishes come true, it’s good, but gradually MIRACLES created by the hands of parents or Santa Claus still begin to be taken for granted, for granted. But if you teach your child to rejoice not only when he receives, but also when he creates and gives, then consider that you will give him more chances for happiness in the future.
So making wonderful New Year's decorations from citrus fruits can be such a step towards enjoying creativity and the opportunity to please your loved ones with a handmade gift! And also... this wonderful aroma!
Just imagine: it gives a child great pleasure to do something with his parents, this wonderful evening smells of oranges, tangerines, cloves and cinnamon - 20 years and 30 years pass, but every time, inhaling the aroma of citrus fruits, your child (already grown) will experience a rush positive emotions, return to childhood and draw strength from the source that FAMILY once opened for him!
Gift ideas
- A bag of assorted fruits and spices for decorating them
- Books about the New Year: Andreas H. Schmachtl “The Adventures of Julius Dandelion. Save the New Year”, Clement Clarke Moore “New Year’s Eve. A Mouse Tale”, E. T. Hoffman “The Nutcracker and the Mouse King”.
- A new set of children's dishes, cutlery or a bright sippy cup.
Assignment for parents
Organize an evening of scents. Show your child what cinnamon, cloves, and nutmeg look like. Decide together what decorations you will make for the New Year. You can rehearse today: then, on the eve of the holiday, creating decorations for the New Year 2019 with your own hands will not take you much time.
Assignment for a child
Together with your mother, read the poem “Orange” by L.V. Zubkov. Isn't sharing great?
We shared an orange.
There are many of us
And he is alone.
This slice is for the hedgehog.
This slice is for the swift.
This slice is for ducklings.
This slice is for kittens.
This slice is for the beaver
And for the wolf - the peel.
He is angry with us - trouble;
Run away - in all directions!
Which neighbor would you like to treat to a delicious orange or chocolate Santa Claus? How about the lonely grandma on the second floor?
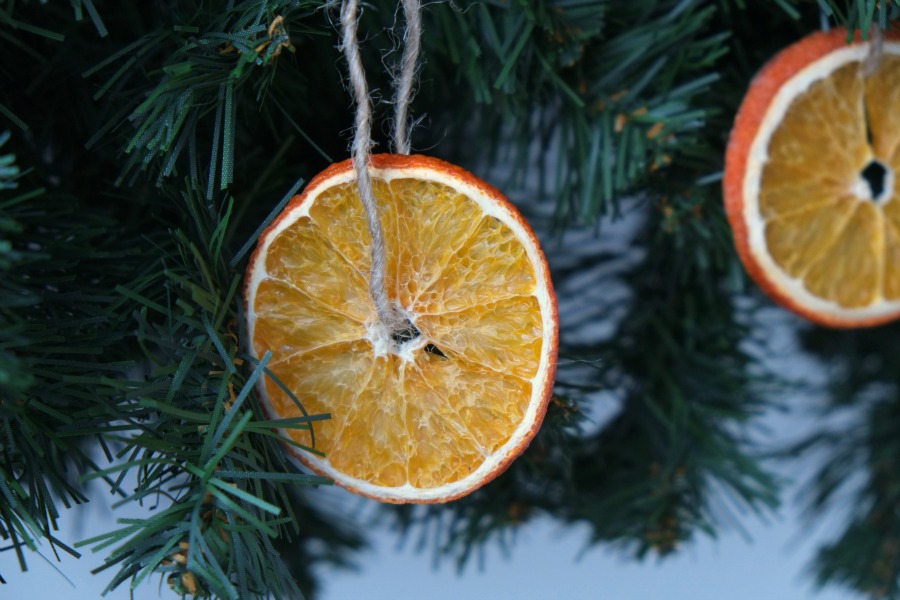
Christmas tree decorations made from citrus fruits
To make Christmas decorations from orange slices, you first need to dry them.
Cut the orange into slices 2 mm thick and place them in the oven on a baking sheet with a stainless mesh (not a regular one, otherwise they may burn). Dry the citruses in the oven for 3 hours at 120°C. Cool and use for New Year's decor!

For decoration you will need:
- dried orange slices
- carnation
- ribbon or rubber band

Source: ourlittlehouseinthecountry.com
After you have dried the orange slices, all that remains is small work. Take a clove and decorate it in a circle around the middle of each citrus circle. Did you feel the aroma? Soon he will delight you right up to the New Year!
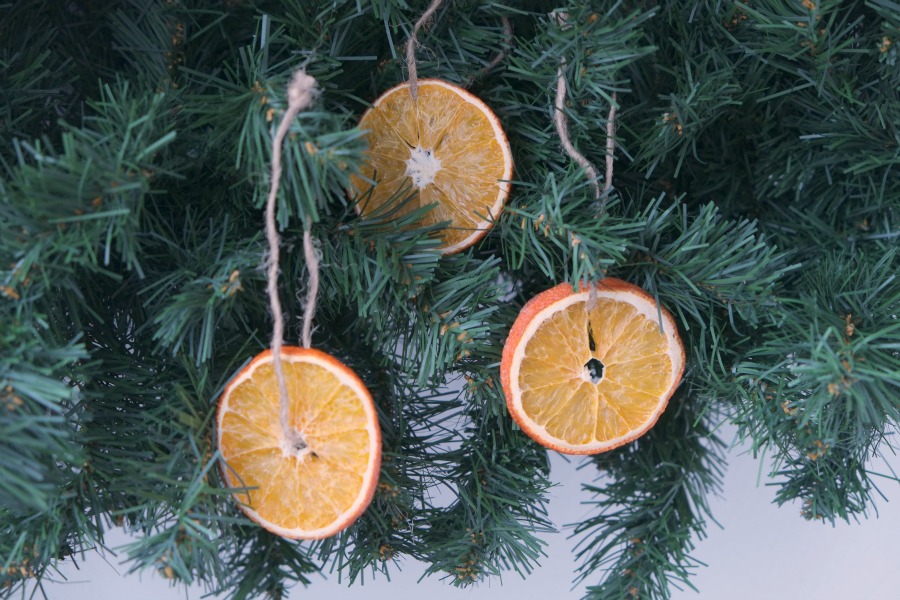
Now you just need to stretch the beautiful ribbon through the small hole in the slice and hang it on the Christmas tree!

Source: ourlittlehouseinthecountry.com
Citrus decorations made from peels will look no less beautiful on the Christmas tree!
To do this you will need:
- orange, lemon or tangerine
- iron cookie cutter
- stationery knife
- thread

Source: instagram @happy._.pappy
Process:
- Peel the citrus so that the peel remains as intact as possible. Straighten and trim it so that it lies flat on the table.
- Using a cookie cutter, press the shape of a Christmas tree, star, etc. into the peel.
- Trim the area around the hole from the cutout with a stationery knife so that it is several centimeters larger in diameter than the cut out figure.
- Insert the cut out shape into the picture with the reverse, soft side.
- Stretch a string on top of the toy and hang it on the Christmas tree!
Citrus garland
For such a garland you will need:
- dried orange slices
- whole dried oranges
- cinnamon sticks
- tapes
- thread

Source: saga.co.uk
We have already told you above how to dry citrus fruits for decoration (in circles), but in general, oranges are dried according to the same principle. Only on fresh fruit you need to make many longitudinal cuts, as shown in the picture, and put in the oven for 2-3 hours.
To create a garland, alternately string whole dried oranges and citrus slices, tie cinnamon sticks and ribbons in contrasting colors!

Source: saga.co.uk
You can also create a simple but cute orange peel garland. Using Christmas cookie cutters, squeeze out stars or Christmas trees, dry them in the oven and string them on a thread!

Source: instagram @mamavkurse
Together with your baby, make an eco-garland for your home from citrus flowers!
For it you will need:
- wooden stick
- rain
- thread
- beads
- bumps
- orange peels

Source: krokotak.com
Process:

Orange Christmas tree
A small Christmas tree made of orange circles can be a wonderful decoration for the New Year's table!
For it you will need:
- dried orange slices
- wooden rods
- orange peel
- small pot or bucket

Source: Instagram @all4mammy
Process:
- String the orange rings onto a stick, and place a star made of dried peel on top of it using a glue gun or super glue.
- How to strengthen a craft in a pot: there are many options - you can make salted dough or other modeling mass, compact it into the pot and insert sticks. You can pour sand and stick twigs in the same way. Well, the most durable way is to use alabaster (can be purchased at a hardware store).
- After you have strengthened the Christmas tree, put some wood shavings, cotton wool or sprinkle its base with artificial snow.
Another very beautiful decoration for the holiday table can be made from fresh oranges!
For the Christmas tree you will need:
- oranges
- gvorzika
- foam cone
- live spruce branches
- toothpicks

Bright citrus decor makes home crafts original. Lovers of handmade crafts love to use fruit additions for gifts, because citrus fruits always remind us of the holiday.
You can buy similar decor at any craft store. But such natural supplements are always expensive. You can significantly reduce the cost of crafts and achieve the maximum effect of handmade work if you dry the fruit yourself. But there are several subtleties of creating dry citrus slices that will make the decor beautiful and bright.
Preparing the decor regardless of the chosen drying method, it is the same. First you need to wash whole fruits to remove any possible contamination. Dry them well or dry them with a towel.

Cut the fruit into the desired shape, usually a circle. Each slice should be at least five millimeters. During drying, the thickness may decrease several times.

.jpg)
If you decide to dry the fruit entirely, then make long vertical cuts in the peel. Each cut should be one centimeter apart.

There are several ways to dry citrus decor.
Oven. The simplest and most commonly used drying option is to use an oven. Line a baking sheet with parchment. Place the cut slices on it. Try not to let them touch each other.
.jpg)
We put the sheets in the oven and dry the fruit for six hours at 160 degrees. After three hours, you need to carefully monitor the oven. The slices may burn, in which case you need to reduce the temperature.

And to speed up the process, every two hours you need to take out the sheets with slices and let them cool.

This method has the main advantage of simplicity and speed. But there is also a significant drawback. During drying, the slices may change shape and acquire an uneven color.

Electric dryer. If you become the owner of such household appliances, then the process of drying fruits for decoration is greatly simplified. Place the slices on the mesh and turn on the electric dryer.

This method is just as simple, but requires a longer drying period - about a day. Deformation of the lobules is also possible.
Battery. This drying option is especially loved by needlewomen. It produces smooth blanks for decoration, but the process takes four days. It is also possible only during the heating season. In this way you can dry it on the windowsill, but in two weeks.
For this drying technique you will need:
- corrugated cardboard;
- awl, scissors;
- stationery clips, clothespins or twine.
We cut out two rectangular blanks from cardboard according to the size of the battery sections. Make holes across the entire surface of the cardboard using an awl.

Place the prepared fruit slices on one of the sheets of cardboard.
.jpg)
Cover them with a second piece on top and tie them with twine.

Instead of a cord, you can use clips, clothespins or any other holder.

We place the cardboard with citrus between the sections of the battery or on top of it. Leave in this position until completely dry.

Pros - simplicity, even decor, no additional skills required, no need to check every hour, no household appliances required. But at the same time, it takes longer to dry and can only be used at certain times.
But you can dry not only whole fruits for decoration. Keep the tasty pulp for yourself, and you can use it to make shapes. For example, squeeze out stars or cut out petals.


You can store dried figures in a tightly closed bag in a dry place.

If you dry citrus decor correctly, you can use it as a separate decoration for the holiday, or in composition with other elements.
With the New Year holidays approaching, many people are thinking about holiday decor, and want all the decorations to not only look impressive, but also fill the air with a light, unobtrusive aroma. Citrus fruits - tangerines, oranges, lemons and limes - will perfectly cope with this mission. They can be placed in beautiful vases fresh, or dried. Moreover, it is dried citrus fruits that will look most interesting and uncluttered. In this connection, today the “Comfort in the House” website intends to tell you how to dry oranges for decoration at home.
How can you dry orange slices?
1. In the oven
What you will need:
- Orange;
- Sharp knife;
- Cutting board;
- Parchment;
- Baking tray;
- Oven (oven);
- Powdered sugar optional.
Cut the orange into slices (pre-washed and wiped dry with napkins). By the way, the circles should not be too thin, the thickness should be moderate, do not forget that they will dry out and the thickness will disappear (3 mm will be enough). Then all the orange slices need to be blotted with a paper towel, which will slightly remove excess moisture.
Line a baking sheet with parchment paper and lay out the orange slices. Next, place the baking sheet in the oven, preheated to 100-120 degrees, for 4-6 hours. If the oven does not provide for air outflow, then the door should be left slightly open. During the entire drying time, open the oven, turn the slices over and make sure they do not burn. If you see the oranges starting to burn, reduce the temperature. After which, all the fruit slices should be placed on a tray and left for 1-2 days to dry naturally in the air.
If you sprinkle the slices with powdered sugar before drying, you will end up with an interesting stained glass effect, the caramel will crystallize and give the citrus a very nice glow. We do not recommend dusting all oranges with powder, as the sugar may begin to burn at some point, and they will have to be taken out much earlier and then further air-dried.
2. In a frying pan
What you will need:
- Bake;
- Pan;
- Parchment;
- Orange sliced into slices.
Cover the pan with parchment, lay out the oranges and place on low heat. During this drying process, you need to turn the citrus slices over as often as possible.
3. Microwave
What you will need:
- Microwave;
- Fireproof flat cookware;
- Orange sliced;
- Parchment.
Cover a plate with parchment, lay out citrus slices, and put them in the microwave; it’s better to do batches of 30 seconds. Constantly monitor the condition of the slices; in extreme heat they can quickly burn.
4. In the air
What you will need:
- Sliced orange slices;
- Spacious flat dish;
- Parchment.
Cover the dish with parchment and place orange slices on it. In this form we send them to the balcony; owners of private houses can simply take them outside - in the sun they will dry quite quickly (1-3 days depending on the degree of dryness of the air).
5. In an electric dryer
Everything here is extremely simple, and the result is beyond praise. The slices just need to be placed on the dryer shelves and left for about a day, perhaps even drying overnight, depending on the power of the device. The result is bright, beautiful slices that really look very impressive.
6. On the heating battery
What you will need:
- Sheet of cardboard;
- Awl, you can use a screwdriver;
- Citrus fruit cut into slices.
We take a sheet of cardboard and pierce it thickly with an awl or a screwdriver to create holes for air to pass through. We poke oranges onto the cardboard and put them all together on top of the batteries. Leave to dry for about 1-3 days, remembering to periodically turn the fruit slices. After which the oranges can simply be left on the table for a day for final drying.
How to dry orange slices in the oven (video):
Well, we have answered the question - how to dry oranges for decoration, we hope that one of the presented methods will help you in creating the much desired orange slices. And here you can see compositions made from dried orange slices. See you again on the pages of our website.
Dried orange slices have become very widespread not only in cooking. They are increasingly being used as a basis for creativity. DIY New Year and Christmas compositions using dried citrus fruits will not only decorate your home, but also bring a festive aroma to it. We will talk about how you can dry an orange at home in this article.
For decoration, you can use oranges of different diameters, the main thing is that they are bright orange in color and, preferably, do not contain seeds.
First of all, the fruit must be thoroughly washed. Next, the cutting is done into rings up to 5 millimeters thick. For uniform drying, it is important to maintain even cutting across the entire diameter. You should not cut it too thin, as the slices will eventually turn out translucent and will look less impressive in the composition.

To speed up the evaporation of the liquid, the slices should be thoroughly blotted with paper towels or napkins.
Now let's decide on the drying method. To do this, you can use an oven, an electric dryer or a regular room battery. The last option is relevant only during the heating season. In the summer months, you can dry oranges for decoration on the windowsill under the influence of the sun's heat.
In the oven
Place the prepared citrus slices on a baking sheet covered with parchment. The layout should be carried out at some distance from each other to avoid sticking of the products.

The tray is placed in an oven preheated to 100 - 120 degrees. To allow air to circulate freely, the door should be left slightly open.
Drying time varies from 4 to 8 hours and depends on the thickness of the oranges. The drying process must be strictly controlled to prevent overdrying and burning. You will need to remove the baking tray several times and turn the fruit over.
You can also dry whole oranges as decorations. To do this, the fruits are washed, and then the skin is cut in several places around the entire circumference. The blanks are placed in the oven and dried for approximately 10 hours.
In an electric dryer
The process of drying orange slices in an electric dryer takes a little longer, but it is more comfortable, since this unit heats the surrounding air much less compared to an oven.

Sliced orange slices are placed on trays in one layer. The pallets are placed on an electric dryer heated to a maximum value of 70 ºС. Approximately every hour and a half, the trays will need to be swapped so that the fruits dry more evenly. The total drying time is 10 – 12 hours. Readiness is determined by the rustling sound of the crusts and fragile pulp. Under-dried oranges will be elastic inside, which can later lead to their rotting.
On battery
This method allows you to make the slices absolutely even, without dents or bulges. But to use it, you need to build a special drying chamber.
To do this, 4 blanks are cut out of thick corrugated cardboard: two – 30*10 centimeters, two – 10*2 centimeters. Large parts are pierced with an awl in several places, and then small strips are glued to them. You can see how to do this correctly in the photo.

The prepared orange slices are placed between the plates and secured with paper clips or rubber bands.

In this form, the design is sent to the battery. Drying time takes 3 - 4 days.

If the heating season has not yet begun, then you can simply place the cardboard with oranges on the windowsill and wait for the fruit to dry completely under the influence of the sun’s heat.
To ensure that the cardboard structure retains its shape for as long as possible, do not forget to thoroughly dry the oranges before storing them.
Watch the video from the “Vekoria Handmade” channel - how to dry citrus fruits for decoration
How to dry oranges for culinary purposes
You can dry oranges for food using all the methods described above, except for drying on a radiator.
It is best to cut tea slices in half, and chips can be made round. To make chips, you can use a topping in the form of powder or ground cinnamon.

A video from the “Let’s Chew” channel – Orange Chips – will tell you in detail how to cook orange chips in the oven. Simple recipe.
Don't forget that orange zest is also used in cooking. The channel “IVSkorohodov” will tell you how to properly dry peels at room temperature, as well as how to use them - Orange peels drying and use