Let's talk about how you can make a bas-relief with your own hands. This issue worries many property owners, and therefore deserves a detailed study. Many people in our time are trying to bring some zest to the created interior.
For example, the bas-relief in the interior is gradually gaining new fans. It makes it possible to implement interesting ideas for decorating the interior of a living space into reality.

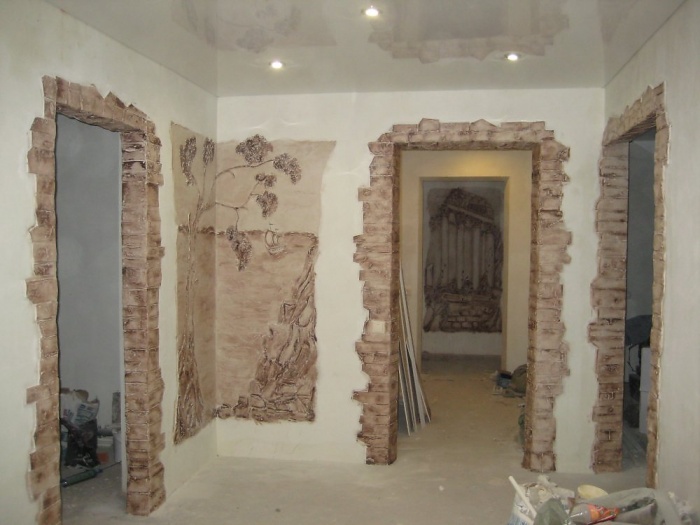
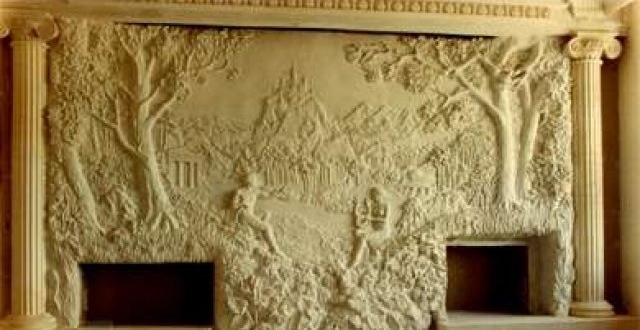
How to make a bas-relief on the wall with your own hands? Stylists often use this design technique when decorating mansions that have a real fireplace.
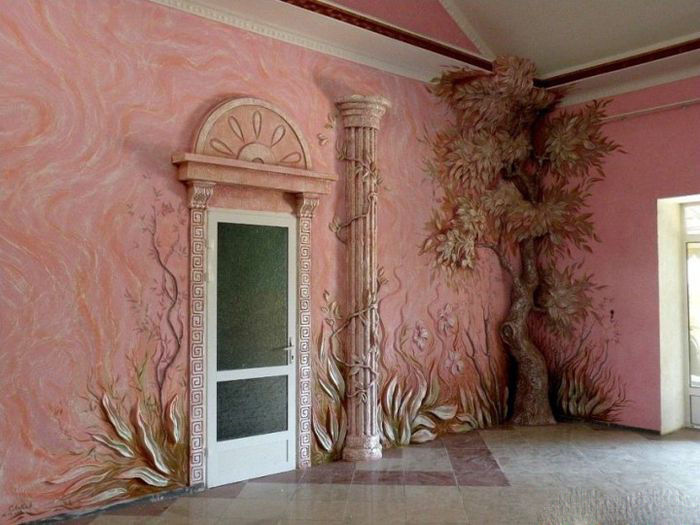
Original gypsum ornaments can encircle the fireplace, as well as decorate window and door openings.
Attention! Aerobatics in the interior world is considered a decorative pattern, which includes additional lighting. With its help, you can give images the volume of 3D graphics.
How to make a bas-relief on the wall with your own hands? We offer step-by-step instructions, the observance of which will allow you to create an original relief on the wall with your own hands.

How to create a three-dimensional drawing with your own hands
Those owners of country houses whose profession is not related to repairs believe that such a decorative element as a bas-relief is a prefabricated structure cast from plaster. In reality, this decorative element is made by hand, so it can be considered an original work of modern art.
Any elements of gypsum and putty are unique decorative elements; when they are created, a sketch is first drawn up.

Advice! In order to create a three-dimensional drawing on the wall, you need some skills and abilities, compliance with technological features.
Before creating bas-reliefs on the wall, it is important to first select materials. Currently, alabaster, gypsum, plaster, and clay are used to make bas-reliefs.
Having chosen the material for making the decor, you can proceed to the manufacture of the base, which will be the basis for the future bas-relief. For work, you will need a wooden box with low sides.
Attention! The bottom in the created box will be plywood.

The dimensions of such a box will correspond to the dimensions of the created bas-relief. Instead of a box, you can use a box that has a rigid base and walls. The base of the box is carefully covered with a polymer film, making sure that wrinkles do not form. Then you can proceed to the process of preparing the solution, fully observing all the recommendations of the manufacturer.
After the solution is ready, it is carefully poured into the mold.
Attention! In the manufacture of bas-reliefs with high patterns, wire will be required for the reinforcement process.
The poured mixture remains in the box until completely dry, the drying time depends on the composition of the solution.
Then you can proceed to the direct manufacture of the future bas-relief. The main condition is the creation of a certain contour of the intended ornament, followed by filling it with a mixture. The decor builds up gradually, and the previous layer must dry completely, only then it will be possible to create a new layer.

Advice! To draw contours on the finished surface, you can use the film. After all the contours are drawn, the film can be removed.
Interior stylists consider plaster to be a good material for making an original bas-relief. Among the many advantages of this material, we highlight the convenience of working with it when wet. This material is quite malleable, so you can remove excess plaster, adjust the shape of the pattern being created.
Plaster that is not completely dry can be sanded, giving the finished bas-relief a sophisticated look.
As a prerequisite for creating a high-quality and beautiful bas-relief, professionals note the complete hardening of each fragment.
In order to create recesses in the wall panel, you can use several methods:
- cut through the material and remove some parts of the created bas-relief with a chisel;
- build up the background around some point, which, after finishing, will be lower.

Basically, a flower is used as the basis for the images on the created bas-relief: a tulip or a lily. Not everyone will be able to make such a complex drawing on their own, so many owners of country houses try to order a bas-relief from professional craftsmen.
In order to simplify the process of creating a lily from gypsum or plaster, you can immediately apply it to the wall surface.

In such situations, all other interior elements must be covered with a special masking tape to prevent damage. Then the base of the pattern being created is covered with putty, and after complete drying, a primer is performed.
Advice! Professionals recommend choosing paint for priming - a primer, the properties of which make it possible to create an excellent coupling with the decorative elements of the bas-relief being created. It takes three to four hours for the finished mixture to dry completely.
With the help of a trowel, Marseille wax, which is a quick-drying material, is applied to the bas-relief. By fixing the film on the surface of the created bas-relief, it will be possible to draw small details.
Attention! The film must be fixed so that, if necessary, one of its edges can be bent.
The outlines of the planned pattern on the film can be drawn using a colored marker. Further, having unfolded the polymer film, on the traces made, you can draw a lily using Marseille wax. The painting is carried out on the wall, so there is no need to use a special substrate.
Many interior designers choose white wax for work related to the manufacture of bas-reliefs. The main task of the master is to give the created bas-relief optimal realism.
Advice! Acrylic paints are suitable for making the final layer of the created composition.

Conclusion
For a person who does not encounter such a decorative element, it is difficult to decide on an independent creation of an unusual bas-relief in his country house or city apartment.

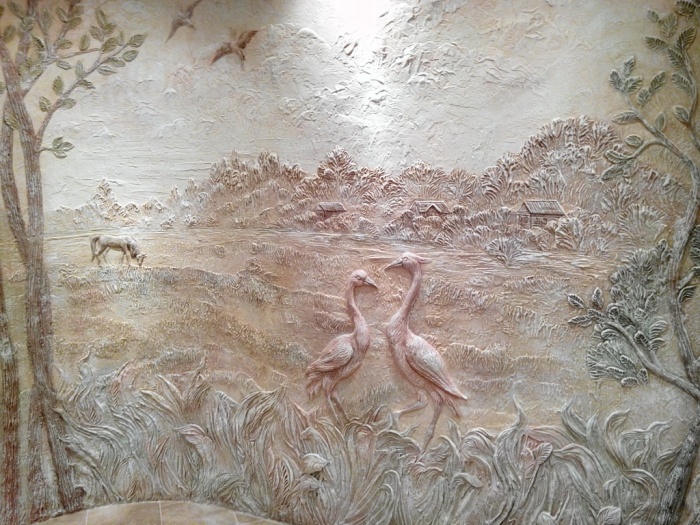
Basically, the bas-reliefs depict trees, flowers, animals, birds, and also create original plot compositions.
The fashion trend of the last season is the creation of three-dimensional images, which are initially created in a box, then fixed on the wall.
Even when creating the simplest version of gypsum stucco, you can count on getting a solemn and elegant interior.
To obtain complex compositions, professionals recommend creating bas-reliefs directly on the surface of the wall.
The bas-reliefs fit perfectly into the interior of the bedroom, the living room space. With it, you can make the kitchen individual and unique, focus on its decoration.

Ready-made bas-reliefs are suitable for interiors of different styles, from modern to fusion. To create large paintings, you will need perseverance, accuracy, desire.
To make an individual genre painting, which will depict wild animals, you will need a professional master.
A bas-relief is a three-dimensional relief on the wall surface - an ornament or pattern that protrudes above the plane. It helps to create an exclusive interior, because each work is unique, and it is impossible to repeat it exactly.
Advantages of a bas-relief on the wall
Not a single type of finish can be compared in terms of aesthetics with a bas-relief. It attracts attention at first sight, looks unusual and interesting. You can create a drawing yourself. The advantages of the bas-relief are:
- originality and showiness of finishing;
- the ability to mask the unevenness of the walls;
- the ability to act as a means of zoning a room.
Even more interior design ideas can be found on the website https://masterinterera.ru/

You can create a bas-relief in the interior with your own hands, and this is another advantage of this type of wall decoration.

I don’t want to glue wallpaper, and painting the walls seems not an interesting enough way of finishing - complement it with a bas-relief, which can be created from various materials:
- gypsum;
- plasters;
- clay.

The base can be made of wood or metal - they are poured or processed, creating original compositions on the wall.


Types and themes of bas-relief
Not every relief pattern on the wall is called a bas-relief, but only one whose elements protrude from the surface by no more than half. If more - this is a high relief.

The wooden bas-relief looks original in the interior, if you choose it according to the design style of the room, the color that matches the color of the furniture. In this case, it will harmoniously fit into the overall style.

Bas-relief ideas can be varied. Depending on the style, these can be plant and animal motifs, abstract elements or antique scenes look aesthetically pleasing. Size, plot and difficulty will depend on:
- the volume of the room;
- decoration style.

Often a three-dimensional image is made directly on the wall, however, it is possible to install pre-prepared plates with a ready-made relief. We also recommend that you look at the options for finishing with decorative panels on this site http://mirstrojka.ru/dekorativnye-paneli/


DIY bas-relief
Many people order wall decoration with volumetric drawings from specialists, however, knowing what to make a bas-relief from, you can do the work yourself.

For a bas-relief based on putty, you will need:
- putty;
- glue;
- putty knife;
- cutter;
- acrylic paints;
- brushes;
- stained glass outline.

At the first stage, a sketch of the future three-dimensional picture is transferred to the wall surface. It is transferred to paper, covered with a film and the contour is transferred to it. An abrasion-resistant marker or felt-tip pen is suitable for this.

Foundation preparation is the second stage. It is necessary to apply acrylic putty, fine-grained gypsum is the basis of the future bas-relief. They need to be leveled and allowed to dry, but not completely. After 15 minutes, you can get to work - transfer the drawing to the wall.

Fix the film on the wall with masking tape, circle the pattern so that the image is printed on the wall. Simple ways to create a bas-relief for beginners involve the following steps:

Putty is applied along the contour on the wall - one layer after another. Subsequent layers are applied only after the previous ones have dried.


Then, with the help of palette knives, they cut through the image, outlining every detail. The largest and most convex elements must be reinforced with self-tapping screws. So the image will be strong.


When all the details are drawn, the panels need to be dried well, treated with sandpaper. It is necessary to smooth out all the roughness, corners, convex and concave elements. Work at this stage requires accuracy and caution.

After finishing, the drawing is primed and painted. It is better to use water-based paint. In order for the surface around the three-dimensional drawing not to look unnaturally even, apply a small layer of plaster and treat it with crumpled paper, polyethylene, so that the surface becomes rough.

Do-it-yourself gypsum bas-relief has a slightly different manufacturing technology. It is better to use ready-made molds for casting elements from a mixture of gypsum and PVA glue. The mass should be like plasticine.

Using ready-made forms, you can cast individual elements of the ornament, dry it and stick it on the wall. Those parts for which there are no molds, or they are too small for casting, can be molded by hand.

When the whole drawing is ready, all the cracks are sealed with white sealant. Further, as in the case of putty, the bas-relief is coated with a primer and painted. You can apply paint, wax, add gilding.


Bas-relief in the interior
The bas-relief goes well with many finishing materials:
- plaster;
- marble;
- skin;
- tree;
- mirrors.

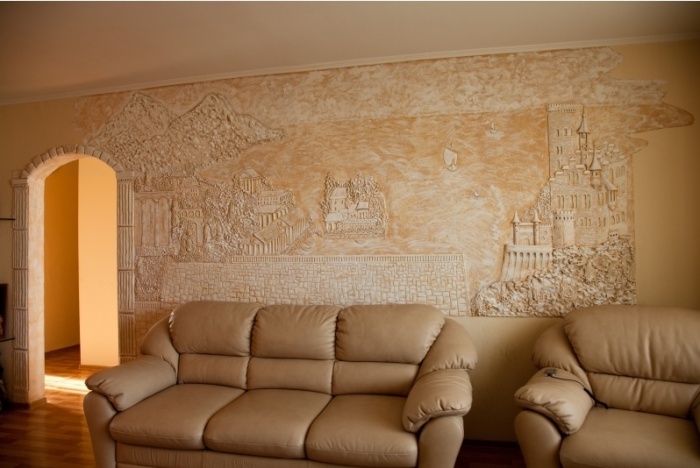
Numerous photos of the bas-relief on the wall of the living room or ceiling, in arched openings, niches, in bedrooms of different styles indicate that it looks harmonious both in a classic and in a room stylized as an antique interior.

A bas-relief that is simple in shape and pattern will give an original look to a modern minimalist interior, while a classic one is appropriate even in a loft style.

The bas-relief will be appropriate in different rooms:
- in the living room, with the help of a bas-relief, you can recreate the interior of an ancient castle, palace, or, conversely, complement a modern interior with it;
- in the bedroom, an original solution would be to place a large panel above the head of the bed or in the entire wall;
- in the kitchen, a three-dimensional panel is appropriate in the dining area or on the kitchen apron. You can decorate a whole wall or a free niche in this way;
- in a spacious bathroom, a bas-relief can complement the decoration of the walls with marble.
- in a large hallway, you can decorate part of the wall with stucco molding; for a small room, it is better not to use three-dimensional images.

Small stucco elements can complement a plain wall if paintings, photographs, shelves with souvenirs, collections are placed on others. This way it won't look empty.


Volumetric floral pattern fills the space well, without overloading the interior.

The room can be transformed if you complement the design with a few stucco elements on the walls or ceiling. Sometimes a bas-relief can become a compositional, organizing center of a room.

When creating a bas-relief, it is important to provide the right lighting so that the three-dimensional image “plays” - this will achieve the maximum decorative effect.

Photo of a bas-relief on the wall


The bas-relief on the wall with your own hands will give your home an original and unique look. Ordinary and plain walls quickly get bored, and original and beautifully executed bas-reliefs, with the right arrangement, will delight the hosts for a long time and amaze guests.
People have always sought to make their home beautiful by decorating their homes with wood or stone carvings, original plasters and other materials. But bas-reliefs have always been considered the most expensive, exquisite and status elements of decor. They look elegant and creative and harmonize with almost any design.
The bas-relief is a three-dimensional decorative element protruding above the wall, with images of people, animals, mythical creatures, birds, plants, flowers, fruits or flowers.
The bas-relief is appropriate in different rooms. In the living room, with the help of this three-dimensional element, you can make a unique modern interior or give your home the look of an ancient palace or castle. In the bedroom, a large voluminous panel looks great above the bed or on the entire wall. In the kitchen, the panel is appropriate in the recreation area or in the kitchen apron. If the area allows, then the bas-reliefs can be placed in the hallway and in the bathroom.
The bas-relief goes well with many finishing materials: wood, plaster, leather, marble and mirrors.
The bas-relief can be made the main compositional center of the room. But the dwelling will be transformed even with the addition of several stucco elements on the walls.
What are the bas-reliefs on the wall?
It all depends on the design decision. Here are some options:
Simple bas-reliefs on the wall in the form of baguettes for paintings of different sizes look rich and respectable.
Bas-reliefs in the form of edging at the top of the wall look luxurious, but not defiant. Such bas-reliefs will complement a plain wall with photographs or paintings, shelves with collections or souvenirs.
Floral wall panels or paintings with floral designs look especially good with backlighting. The maximum decorative effect can be achieved with the correct illumination of the three-dimensional image. Such bas-reliefs fit perfectly into the space.
The bas-reliefs depicting trees, mountains, lakes and any other corners of nature are distinguished by their originality.

Plot volumetric bas-reliefs are the most difficult to perform. They can occupy the entire wall or be located in one corner.
Bas-relief advantages
The wall volumetric panel always attracts attention at first sight. In terms of aesthetics, no type of finish can be compared with a bas-relief.
Bas-relief advantages:
- originality;
- showiness;
- volume, which allows you to hide the irregularities of the wall;
- creation of smooth transitions between different functional areas;
- an excellent solution for decorating fireplaces, arches and openings.
A three-dimensional image can be performed immediately on the wall, or assembled from slabs with a pre-prepared relief.
If the curly element protrudes above the surface by less than half the volume, it is called a bas-relief. If higher, then this is a high relief.
Bas-relief as an interior element
wall panel- a universal solution for all styles. For example, a three-dimensional tree with branches, a climbing vine or an abstract pattern is used when you need to fill an empty wall without overloading the space. The use of bas-reliefs in apartments helps to visually change the room and hide surface imperfections.
The bas-relief can be made in the form of an ornament, decorate the walls with small scattered fragments, or make it a central composition. Volumetric compositions can decorate a niche or any recess in the wall. Additional lighting will place accents and give the interior a sense of completeness.
In the kitchen, bas-reliefs with still lifes, with images of domestic animals, kitchen utensils, fruits and vegetables, are appropriate.
In the children's room, the wall panel should be light and airy so that the child learns the world in bright colors from childhood. Bas-reliefs should be decorated with angels, fairies, magical birds, fairy-tale castles, butterflies, flowers and cartoon characters. Such compositions fill the children's room with charm and a fairy tale.
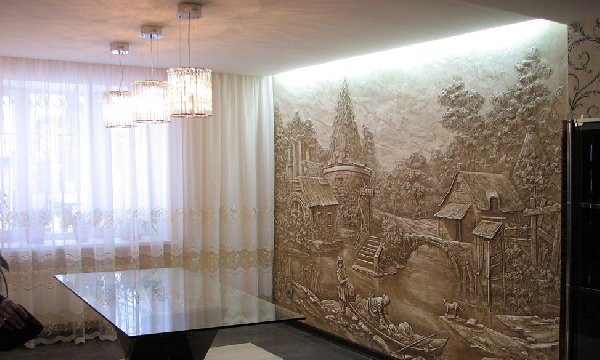
Bas-reliefs in the living room go well with wrought iron and stone. Therefore, if a fireplace is installed in the living room, then the bas-relief above it will become a real decoration of the room.
Bas-relief in the living room above the fireplace
Flowers, angels, gentle, amorous scenes from the paintings of the Middle Ages look organically on the bas-reliefs in the bedroom. The room is filled with peace and tranquility.
A bas-relief can be created in several ways:
- fashioning a bas-relief directly on the surface of the wall;
- having made individual elements with subsequent fastening to the surface;
- creating a three-dimensional picture on a solid basis.
A novelty in the field of creating a bas-relief - new bas-reliefs. They are flexible plates with an already applied pattern.
Distinctive features of the new bas-reliefs:
- installation is possible on any surface;
- high rates of noise and heat insulation;
- plates are flexible, do not break;
- increased thermal and moisture resistance;
- safe for humans and the environment.
- easy installation, using a special adhesive, according to the numbering.

Bas-relief painting
Even the simplest three-dimensional picture will ennoble the room, make it solemn and elegant.
You can try your hand at starting with the creation of a bas-relief painting.
Why from a picture? The advantages of such a voluminous panel:
- for a bas-relief of a picture, preparation of a wall is not required;
- the decoration in the room will not be spoiled even if the picture is not successful: you can postpone and redo the work later;
- bas-relief - a picture can always be moved to another place, donated or taken to a new apartment.

Necessary tools and materials
To create a bas-relief with your own hands, you need to purchase materials and tools for work in construction and art stores.
List of tools and materials for work:
- pencil;
- drawing sketch;
- pen or marker;
- stencils;
- palette knives;
- brushes;
- polyethylene film;
- trowel;
- container for mixing the mixture;
- putty knife;
- scrapers;
- sandpaper;
- abrasive sponges with different hardness;
- colored colors or paint;
- gypsum, gypsum putty, clay or alabaster;
- primer;
- masking tape;
- gloves.
Palette knives are special spatulas of different sizes, with the help of which three-dimensional images are created.
Materials for creating bas-reliefs
To create a three-dimensional panel on the wall, use materials to your liking. It could be:
- gypsum;
- alabaster;
- putty;
- clay;
- gypsum or decorative plaster.
Gypsum has been the most popular building material for many years. This natural and environmentally friendly material is the best option for creating bas-reliefs. With it, you can create decors of a simple complex configuration. Acrylic paints will protect the bas-reliefs from ultraviolet rays and from precipitation if they are located outdoors. And the use of modern varnishes, primers and glue will make your masterpieces durable and strong.
A few years ago they began to make bas-reliefs from polyurethane. Plastic foamed using a special technology has become very popular and in demand due to its advantages:
- it is practically eternal;
- does not fade;
- not afraid of moisture;
- does not absorb odors;
- resistant to temperature extremes;
- It does not require special care;
- ecologically pure.
Polyurethane bas-reliefs are an excellent solution for installation in kitchens, bathrooms, saunas and swimming pools.
How to start work on creating a bas-relief?
- The first step is to decide on the interior of the room.
- The second step is the choice of the room and the surface on which it is planned to place the three-dimensional composition.
- The third step is preparing the sketch.
When choosing a sketch, it is necessary to take into account its dimensions and the area of the wall: the picture should fit harmoniously and naturally into the space. Lighting is also taken into account: the perception of the picture depends on it. In case of insufficient lighting, the bas-relief will need to be additionally highlighted.
When choosing a sketch, if you are a beginner, you should not choose too complex and voluminous figures, plot pictures with many characters. For the first bas-reliefs, it is better to opt for simple forms in the form of flowers, fruits or leaves. Although, despite the lack of experience, we do not recommend choosing too primitive sketches: they will be lost on the surface and will not look interesting.
The most accurate drawing of the sketch will help you in further work.
- The fourth step is transferring the sketch to film.
The outline of the image must be transferred to paper. Put a transparent film on top and circle with a helium pen or pencil. The main thing is that the contour is not erased ahead of time.
- The fifth step is preparing the base.
The surface must be carefully prepared before applying the bas-relief. For this, the wall is treated with putty.
The solution must be mixed well. Gypsum plaster hardens quickly, so we do not recommend preparing a lot of the mixture at once.
You can facilitate the work if you use a screwdriver or a mixer nozzle on a drill to prepare the solution. In order not to splatter the walls, we advise you to add a little water to the dry mix before kneading and mix with a spatula. After that, mix the mixture with an electric tool, let stand for five minutes and mix again.
- The sixth step is to draw a picture on the wall.
After complete drying, put a stencil from the film on the prepared surface and trace the outline of the pattern with a hard pencil. A relief image should remain on the surface.
The drawing can be applied directly to the wall. If you are not a very experienced artist, then you can transfer the image to the wall using the old and proven method: by cells.
- The seventh step is the formation of the pattern.
This is the longest and most important stage, especially for a person who has no experience in modeling from plasticine or clay. But nothing is impossible. Following our advice, anyone, even without experience, will be able to create a real masterpiece.

Before you start making a relief, you need to mark the voluminous places of the bas-relief and fix the screws in the thickest places.
Gradually begin to add volume to the objects drawn in the figure. This work is carried out in several steps: putty is applied to individual areas layer by layer.
When applying the first layer, pay special attention to the relief areas. No need to try to make the relief even, the ribbing will help to bind the second layer of plaster to the first one more tightly.
Then, using a palette knife, it is necessary to cut through the image so that the details begin to emerge.
We prepare the material for modeling in advance. Beginners are advised to work with gypsum plaster or gypsum. In addition to the fact that these materials are plastic, they still seize quickly enough and keep their shape well.
- The eighth step is the coloring of the bas-relief.
Before you start painting, you need to perform a few more steps:
- completely dry the fashioned bas-relief;
- clean concave and convex elements, sharp, protruding edges and corners with fine sandpaper;
- clean and prime the wall panel.
Work at these stages requires caution and accuracy. Try not to overdo it and remove the excess so that the volume is not lost and you do not have to return to sculpting again.
After the primer has dried, you can begin to apply paint.
If you use paint of the same color, then we recommend using white water-based paint in different shades. Lighter paint is applied to all protruding elements that carry the main stylistic load. For staining, use not a brush, but an ordinary sponge. This will avoid unwanted streaks.
. 
The wall around the wall panel will not look too flat if you apply a layer of plaster on it and make it textured. To do this, you can use crumpled paper or a plastic bag folded into a rose.
Bas-relief with a stencil
If you do not have great artistic talent or are not confident in it, it is advised to decorate your home with a bas-relief using a stencil.
Learn all the subtleties and nuances of the work, practice on a small piece of drywall and boldly proceed to the decor.
Templates for bas-reliefs can be made independently from transparent plastic or purchased at a hardware store. If you do not find the desired pattern, feel free to proceed with the independent manufacture of the stencil:
- find on the Internet or draw a pattern yourself;
- transfer it to plastic using carbon paper for this;
- cut the pattern on the stencil without leaving burrs and cuts.
Stages of work:
- Preparatory work.
Make markings on the wall so that the pattern is evenly placed on the wall. Prepare several stencils, as they are used once.
Glue masking tape or apply glue to the back of the stencil. Attach to the wall and hold until you are sure that the stencil is firmly stuck to the wall.
- Wall primer.
Go over the primer on those areas where the putty will be applied. After priming, the wall should dry well.
- Putty application.
Fine-grained putty is best suited for these works. It can be bought ready-made or as a dry mix. In the second option, the mixture is diluted with water to the desired state.
Putty putty on the stencil, completely filling all the holes. Each next layer is applied after the previous one has dried.
- Removing the template.
When all layers are dry, you can begin to remove the template. To do this, gently pull the stencil towards you and separate it from the wall.
Clean uneven edges with sandpaper or correct defects with a palette knife.
- Bas-relief decoration.
You can start finishing the bas-relief after removing the stencil. Depending on the idea, you can use one color for painting, or several different colors.
For painting, it is better to use a roller with a foam nozzle and a special paint tray.
The pattern will be even more beautiful if you first go through the stencil with darker tones, and then with light ones, leaving a dark outline. Mother-of-pearl or gold paint looks good on such bas-reliefs.

Plaster bas-reliefs from ready-made molds
Doubt your artistic ability? Then you can make a wall panel of plaster. Even a novice artist will cope with this material. It is enough to purchase a ready-made form in the store, mix gypsum and PVA glue, pour the mixture into the form and wait for it to dry completely.
After these steps, you must carefully remove the workpiece from the mold and fix the composition on the wall. Too small and small details that are difficult to cast are molded by hand.
When the bas-relief is ready, it is necessary to seal all the cracks with white sealant. Then cover the entire composition with a primer and paint. You can apply wax and gilding.
The hardest part of this process is finding the right shape. The main thing is that the form can withstand the heating and expansion of the gypsum during solidification. Forms with thin plastic are unsuitable for these purposes. But silicone molds are what you need. And taking the product out of such forms is a pleasure.

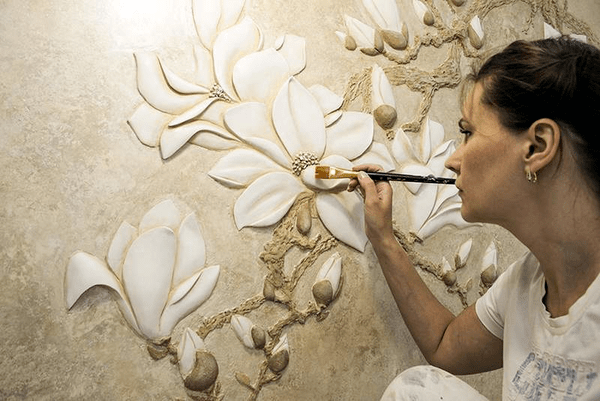
Use of artificial flowers
To create bas-reliefs, you can use any artificial flowers: from fabric, paper or plastic.
The process of creating such a composition begins with the preparation of a solution from a mixture of plaster and PVA glue. The consistency of the solution should be similar to sour cream. Artificial flower several times, dip into the solution. After each dive, pause for the solution to harden a little.
Do this with the right amount of flowers or other artificial plants. Wait for complete hardening and attach with thick alabaster to the wall panel.
Thus, you can make several fragments and use them to compose a composition for the entire wall.

Conclusion
Despite the huge number of advantages, the bas-relief is not the most popular option for decorating apartments today. The problem most often lies in the high cost of arranging volumetric wall panels.
But if you make a bas-relief with your own hands, then this problem will not exist and you can please yourself and your loved ones with a beautiful element of decor.
For those who want to unusually decorate the interior and give it a decorative originality and exclusivity, you can use the technique of gypsum stucco molding on the walls - a bas-relief. This is both a simple and intricate technique, somewhat similar to applying Venetian plaster, but more complex and interesting. It all depends on skills, imagination and patience. However, this work can be done even with children. Their reliable handles will come to the rescue when you need to mix the gypsum mortar.
Bas-relief - what is it?
Quite a long time ago, people began processing and decorating walls with various decorations. It could be stone or wood carving. But in comparison with other techniques, the bas-relief was considered the most popular and status.
This concept includes a convex decorative element. It can be a figure of an animal, a person, a plant, as well as a pattern or a mythical creature. It all depends on the imagination and design of the apartment.
For the implementation of such projects, special template forms made of a transparent polymer are often used. Stencils can be made independently or ordered in the workshop, there are also ready-made matrices for sale.
Bas-relief master class
Before starting work, you need to prepare a place on the wall where the modeling will be done, decorating the interior. And also decide on the design of the picture, that is, find directly the drawing for the sketch, which is planned to be reproduced using plaster or putty. For novice masters, you should not immediately take on the creation of global works. Try to start by making a simple image on the wall in your apartment, for example, a tree or a simple flower -
We present a small master class on making a bas-relief on the wall at home:
1. Find a suitable pattern. You can draw it on the wall with chalk or pencil in the required scale.
2. The next step is to prime the wall surface inside the outline of the drawing. Be sure to let it dry.
3. In a small container, dilute the gypsum plaster to a viscous state with a ratio of 1:1. It is necessary to ensure that the batch is homogeneous and without lumps.
4. Using a small spatula or a special palette knife (or use an ordinary dessert knife), apply the mixture in small portions on the drawing from the bottom up, along the entire tree trunk. You can even leave empty spaces to better indicate the structure of the bark. While the putty is damp, form a relief by making shallow cuts and notches with a knife.
When applying putty to the location of the foliage, you need to use a little more solution. In this case, the mass should be sculpted with perpendicular movements to the wall with frequent, chaotic punctures.
5. After the putty has dried, paint over the wood. For this, ordinary acrylic paints are used. The first layer of the trunk can be painted yellow. When it dries, apply a second coat of paint - already brown. Let it dry again, moisten the sponge and wash it off the tubercles so that the paint remains inside the recesses. Should be a nice overflow. The foliage is painted using the same technique in a greenish color.
Master class for advanced masters
Advanced masters will be able to increase the level of skill with a more complex design and the globality of the plot of the bas-relief image.

When performing the bas-relief "Rose", you will need the following materials:
- gypsum putty (you can use alabaster, a tool for starting and finishing work);
- gypsum plaster;
- quartz soil;
- set of palette knives;
- a set of chisels;
- a set of artistic loops;
- rubber spatula;
- abrasive mesh;
- abrasive sponge;
- container for kneading;
- film for protection against pollution;
- sponge;
- rag;
- sprayer with water;
- gloves;
- art paint (water-based acrylic, etc.);
- dust mask.
It is conditionally possible to represent the stages of the bas-relief as follows.
Wall preparation
Before starting the artistic painting of the wall, you need to prepare the surface itself. It should be perfectly even, well-plastered, treated with a special adhesive (adhesive or non-woven primer) and 2 layers of putty for painting. Then it is primed with ordinary soil.
Drawing a sketch of a picture on the wall
The drawing is selected, on which the sketch is performed. It can be transferred to the wall with a pencil, often a stencil or carbon paper is used. With the help of quartz primer, which is applied inside the borders of the image, the surface is prepared for applying the initial layer of stucco.
Application of the first layer of gypsum plaster
The first layer of the applied composition must be very thin and durable. Gypsum plaster is usually used for this. About 200 ml of water is poured into the mixing container, and then gypsum plaster powder is poured with a palette knife in a 1: 1 ratio with water. You can knead with a drill with a nozzle, a spatula or a palette knife until a homogeneous mass is obtained, resembling thick sour cream in consistency.
It should not drain from the spatula and hold firmly on it. The purpose of applying the first layer is to make an initial stucco molding for good adhesion between the wall surface and future layers of bas-relief putty. With the help of two palette knives, the gypsum composition is thinly applied over the entire surface of the drawing, trying not to go beyond the boundaries of the applied sketch. In the first layer, you can highlight the volumetric parts of the future bas-relief, using a slightly thicker layer in the places indicated in the figure.
At the end of this stage, the surface of the workpiece is wetted with water from a spray bottle. You can gently smooth with your fingers what happened, and allow time to dry.
Application of the second layer of gypsum putty
On a well-dried first layer, it is necessary to apply a second one, already from gypsum putty. Similarly, a water-putty mixture is prepared - approximately 1: 1. Using a small palette knife, a gypsum composition is applied to the drawing and gently smoothed in the direction from the edge to the center.
Next, slightly moisten the drawing with water from a spray bottle and, using palette knives, artistic special devices - loops and fingers - smooth and form the desired relief on the applied layer of putty to obtain a smoother image. Correct all irregularities and flaws until the composition "seizes". When the second layer dries, you can putty visible defects with a finishing acrylic putty. And let the painting dry again.
Most people want to make repairs in their apartment somehow special and unique. First of all, this concerns the decoration of the walls. After all, by painting the walls or pasting them with wallpaper, you are unlikely to make such a finish unique and there will certainly be apartments, if not with the same, then very similar finishing materials. And in general, the standard methods of finishing are already boring. The solution in this situation would be a bas-relief on the wall.
Such a three-dimensional image will give the apartment the very desired zest, because it is handmade and each piece is unique. Specialists in this business can create a real masterpiece on the wall. However, not everyone can afford their services. In this case, you can make a bas-relief on the wall with your own hands.
In addition to decorative functions, a bas-relief on the wall can hide irregularities or decorate the engineering communications in an original way. But, even with such numerous advantages, it is not a popular finishing option, since not everyone can afford it even if it is done independently. Yes, and creating a large three-dimensional drawing is not so easy, especially for a person who does not have special creative skills. However, it's definitely worth a try.
Work materials
To create a bas-relief with your own hands, you need only high-quality materials. Basically it is putty, primer and glue. The strength and durability of the bas-relief depends on the quality of the materials. In addition to creating volume directly on the wall, ready-made plates are also used. They are made independently or ordered from craftsmen and installed on the walls. A distinctive feature of the bas-relief from other types of textured plaster is that the volume is created by light and shadow. So painting the bas-relief itself is not required.
All you need to make a bas-relief on the wall with your own hands is:
- Primer
- Putty (can be replaced with plaster)
- Paints and brushes (as needed)
- PVA glue
- Adhesive for gypsum boards
- Pencil
- Cutter, craftsmen
Bas-relief technology - option 1
The first option for creating a three-dimensional image is the manufacture of three-dimensional slabs with subsequent mounting on the wall.
We tried to complete the whole process of creating a bas-relief with our own hands in the simplest, but at the same time, detailed instructions. You just have to follow the steps below step by step.
1. From plywood slats, a form is assembled into which the base solution will then be poured. The form can be created from any materials, the height of the walls should be no more than 3-4 cm. If you have a small image, then you can take a candy box as a form, the main thing is that the area of \u200b\u200bthe form is enough for the image.
2. The form is covered with plastic wrap. Be careful to keep this film to a minimum of wrinkles. Most often, the solution is prepared on the basis of gypsum or plaster, but sometimes craftsmen add PVA glue to this mixture. Using a drill with a nozzle or a construction mixer, it is necessary to stir the mixture until the consistency of liquid sour cream is obtained. The solution is poured into a mold and left to dry for 10-12 hours.

3. Next, using a pencil, draw the planned image on a large canvas of paper. If the image is too large, it can be composed of several parts. Do not immediately try to draw complex shapes if you do not have artistic skills. It's best to start with simple silhouettes and try to add details as you draw. Also, you can print the picture you like using a printer.
4. Now we take a transparent film, put it on the drawing and transfer the image to it. Be careful not to tear the material under the pressure of the pen or pencil.

5. A layer of putty must be applied to the previously prepared slab and leveled. Then wait 15-20 minutes until it hardens a little and you can begin to outline the relief. Attach a film stencil to a layer of putty and once again circle all the contours and details with a hard pencil. This way you will get a detailed relief image already on the surface of the putty.

6. This stage is the most labor-intensive, since right now the work is being done to create the volume. Putty is applied layer by layer and trimmed with various trowels. Also, after applying each layer, they need to be treated with sandpaper. After you have completely formed a three-dimensional pattern, the plate can be transferred to the wall.

7. Before proceeding with the installation of the bas-relief on the wall, it must be prepared. To do this, it must be cleaned of the old finish, and the existing irregularities corrected with putty, carefully leveling the surface. In place of the future plate, you need to knock out a "nest" under it. The depth and dimensions of the nest must correspond to the thickness and dimensions of the slab. The entire surface is treated with a primer, now it must be left to dry.
8. The final step is to install the plate with a bas-relief pattern in the "nest". To do this, “liquid nails” or “dragon” glue is applied to the wall and to the slab (but it is better to choose a special glue for gypsum), the slab is inserted into the wall, and the gaps between the slab and the walls are sealed with putty. At the end, with the help of the same putty, surface defects are corrected, if necessary, the bas-relief on the wall is painted with water-based or acrylic paints.
Thus, you can create various three-dimensional patterns and paintings.

Creating a bas-relief on the wall - option 2
The previous option for creating a three-dimensional image from plaster is only suitable for small paintings, but what if the desired image is large enough? After all, the gypsum blank in this case is quite heavy and it will not be easy to attach it to the wall. In this case, you can create a bas-relief directly on the wall using the stencil technique. As in the previous case, we will need all the same materials, as well as the selected stencil.
So, how to make a bas-relief on the wall with your own hands? First you need to attach the stencil to the wall. As a stencil, you can use ready-made ones sold in building hypermarkets and creative stores. Or you can cut it out of thick cardboard yourself.
Recall that the wall must be primed before applying the bas-relief.

Gathering a small amount of putty on a trowel or spatula, we apply images to the slots, smoothing them well. Layer thickness - from 0.5 to 2 cm, depending on the desired volume of the pattern.


When the entire stencil is filled, it can be removed from the wall. You will get a three-dimensional image that needs to be corrected:

While the gypsum is not dry, with the help of a trowel and various brushes we give the desired volume to our drawing - we draw veins in petals and plants, feathers in birds, create a wood texture, etc.


Now you need to wait until the plaster dries - about 12 hours. Then, if necessary, process the edges of the pattern with sandpaper.
If desired, the three-dimensional gypsum pattern on the wall can be left white, because all the beauty of the bas-relief is in its volume. But it can also be painted (and dusted and primed before painting).

As you can see, creating a bas-relief on the wall with your own hands is not so difficult. And if you involve masters in the work, you can get a real work of art. We hope this article was useful to you, good luck!