Recently received an order to the shield and the Viking ax. And if I do quite a long time with axes, then the shield had to do for the first time.
At a simple way, I did not go, i.e. I did not cut out of plywood or buy a furniture shield. I purchased several pine pine boards from a covered warehouse so that you were. The thickness of the board is 20 mm, width is 95 mm.
I bought good carpentry glue, built a small arrogant for gluing boards of two pieces of plywood and studs. The boards saw into fragments of 90 cm long, not very economically, but it was easier for me that the stock was more when cutting the circle.

Then, as the glue dry (in my case the next day), screw in the center of the workpiece screws, we bring the rope to it, and by the end of the rope of the pencil.
Shield I decided to make a diameter of 78 cm (like and not the smallest, but not huge), before this read historical certificates on the shields of Vikings.

After the markup, the circle saw the circle with the electroll bison, and then processed one side with a wire nozzle in order to brush the tree.

Yes, I forgot, I took 5 mm of blackboard thickness. I wanted more, but the knives on the plane became very unevenly removed to remove the wood and I refused to continue the procedure.
In short, the thickness of the shield was released 15 mm. Then slightly polished the front and back side of the big burrs. Umbon made from a sheet with a thickness of 2 mm.
A circumference cut out from the sheet (about 21 cm), nailed the tube suitable in diameter and pulled out the hemisphere. In the process, a bit was heated a blank in the mountain. He used a bit rounded hammer (finalized by the grinder) and a half of the Soviet dumbbell in the form of a ball. First Umbon I broke (most likely because of the rusted sites), but the second came out not bad. The depth is about 5 cm.


After I twisted the holes in Umbon and the shield and blung aluminum rivets. The shield handle saw a jigsaw of a birch board (from the pallet was not bad stayed) and planted on the furniture bolts, so that it could be possible to hang it out (like the shield wall was going to hang, and there it knows it). Photos at this stage did not do, I repent.
By the way, the holes came out a bit asymmetric, and all because I really wanted to make it harder, and the forces had no longer left. It would be better to sleep, well, oh well.
Since the topic of the shield - Valkyrie, sketched the semblance of wings (found a similar picture on the Internet with a tattoo sketch). In the photo, the shield is already covered with Morilka - Mahagon.

Feed the drawing with pyrography and covered the shield of the Olifa to the wood fibers be better manifested.
Then he began to cover the edge of the shield of the skin. Sewed a sideline seam, used the skin with a thickness of 2 mm, in the shield pre-screwed holes.
To be honest, she darned to sneak (the fingers so far), it would be better to come with cloves. (After the trim, it also sampled a little skin with waterproof universal glue).

This is how the shield looks like on the reverse side. This strap while temporary, most likely later, how suitable skin appears, make a carrying belt.

Pads at the joints of the skin with a thickness of 3.5 mm. I do not pretend to historicity, but I tried.

- Boards. Part of the pallet, part simply lying on the cottage.
- Carpentry glue. Suitable any wood glue.
- Rivets.
- Head of iron.
This is the most basic, you will need something in little things, but about it later.
Manufacturing shield
We are not looking for simple ways, so they will not make the shield from plywood or furniture shield (shield shield, cool), and from the boards. These are these:

And you ask me how to do something cool from the heap of these old boards? And in no way! First you need to shoot all the blanks.

In the process, some of the initial boards I replaced. Easy loss time with a tree gives a special charm, but the frank rot is already superfluous. If you buy a cutting board (one is one long, and then cut it into the necessary parts), it does not have to strict it, and if you go through a difficult path and take old boards, you will have to customize ends. It is me for the fact that all the billets should be good to put together to each other. It is necessary for the next stage - gluing. Oh yes. All boards should be thick no more than 10 mm. The shield must be lightweight, the historic wiking shield could be in the middle of 8 mm, and the edges are already 5 mm. More than 1 battle of the shield and should not have enough, only Umbon Living, but about it later.
I glued all the boards on the workbench, from three sides to which the stops in the form of bars were attached. I glued the ends with a carbon black glue. Very good glue, by the way, I am the deck of electric guitar, and the furniture was lined, well, the shield. All the ends were in turns are punctured and docked. Then the third focus on the workbench was attached, which covered all the boards, and on top there were two more boards, and there were plaster blocks. This is for all gluing not led. I left drying glue about a day.


After the circle of 74 cm with a diameter was drawn. Not the biggest or small, in general, this size I chose specially for myself.

Next, I started making Umbon. In general, it should be made of steel about 4 mm, but then I decided to go along the way of smaller resistance. I found the iron plate with a thickness of a little more than one mm, and began to bend it into the hemisphere.

To do this, I was covered with a pipe to the ground, put a plate on top, he heated her constantly burner and beat the old dumbbell.

After the edges of Umbon, the holes are drilled, and I also cleaned it from old paint and swallowed at the bore. Also from the inside of Umbon was glued with leather.


Now I place a hole for Umbon in the center of the shield and conduct drilling windows. That is, we drill around the edges of the markup, and after you knock the circle of the chisel, those places that did not abuse. And also drilled by the Umbon himself and the shield along the edges of the rivet hole.


Krepim Umbon to the shield on the rivet. And paint the shield by a verse. I used a mixture of mahogany and mocha. It turned out quite interesting. With different lighting and different angles, the color is dark saturated, then dimly light.


The handle is attached to the shield also on rivets and to each board to strengthen the shield.
Next, I found black and brown skin, she was cut into strips and nailed to a shield on small carnations. From the back side, all the skin had to additionally attach a large stapler, because the cloves were too short. Go to the store and buy carnations of the desired length? No, not our option.


On this shield is completed. And yes, we tried to beat an ax and, about a miracle, he stood! It is better not to repeat it, even if you make a shield and you will not be sure of it.

Rune ax is, the shield is, it remains to do a dragon and hike!

Wiking shield with her own hands recently received an order for the shield and the Viking ax. And if I do quite a long time with axes, then the shield had to do for the first time.
At a simple way, I did not go, i.e. I did not cut out of plywood or buy a furniture shield. I purchased several pine pine boards from a covered warehouse so that you were. The thickness of the board is 20 mm, width is 95 mm. I bought good carpentry glue, built a small arrogant for gluing boards of two pieces of plywood and studs. The boards saw into fragments of 90 cm long, not very economically, but it was easier for me that the stock was more when cutting the circle.
Then, as the glue dry (in my case the next day), screw in the center of the workpiece screws, we bring the rope to it, and by the end of the rope of the pencil. Shield I decided to make a diameter of 78 cm (like and not the smallest, but not huge), before this read historical certificates on the shields of Vikings.
After the markup, the circle saw the circle with the electroll bison, and then processed one side with a wire nozzle in order to brush the tree.
Yes, I forgot, I took 5 mm of blackboard thickness. I wanted more, but the knives on the plane became very unevenly removed to remove the wood and I refused to continue the procedure. In short, the thickness of the shield was released 15 mm. Then slightly polished the front and back side of the big burrs. Umbon made from a sheet with a thickness of 2 mm. A circumference cut out from the sheet (about 21 cm), nailed the tube suitable in diameter and pulled out the hemisphere. In the process, a bit was heated a blank in the mountain. He used a bit rounded hammer (finalized by the grinder) and a half of the Soviet dumbbell in the form of a ball. First Umbon I broke (most likely because of the rusted sites), but the second came out not bad. The depth is about 5 cm.
After I twisted the holes in Umbon and the shield and blung aluminum rivets. The shield handle saw a jigsaw of a birch board (from the pallet was not bad stayed) and planted on the furniture bolts, so that it could be possible to hang it out (like the shield wall was going to hang, and there it knows it). Photos at this stage did not do, I repent. By the way, the holes came out a bit asymmetric, and all because I really wanted to make it harder, and the forces had no longer left. It would be better to sleep, well, oh well. Since the topic of the shield - Valkyrie, sketched the semblance of wings (found a similar picture on the Internet with a tattoo sketch). In the photo, the shield is already covered with Morilka - Mahagon.
Feed the drawing with pyrography and covered the shield of the Olifa to the wood fibers be better manifested. Then he began to cover the edge of the shield of the skin. Sewed a sideline seam, used the skin with a thickness of 2 mm, in the shield pre-screwed holes. To be honest, she darned to sneak (the fingers so far), it would be better to come with cloves. (After the trim, it also sampled a little skin with waterproof universal glue).
And in this article will be described in detail how to make a knight shield. You can make a shield of almost any form as you wish (historical or not), and for the most part methods of manufacture will be the same. Yes, and to the question of historicity: in the Middle Ages, the foundations for shields did from the boards, but the modern plywood shield in the manufacture is faster and easier and is not inferior to the board. A "not historic" plywood shield is easily hiding under canvas or skin painted with authentic paints.
I hope my drawings and examples will give you enough information to try to make your own shield.
 |
| Stock Foto Closeup of my shield. I painted this shield so that he matches my surco. Since this shield is mainly for games, I used the bolts - because they are much easier than rivets. |
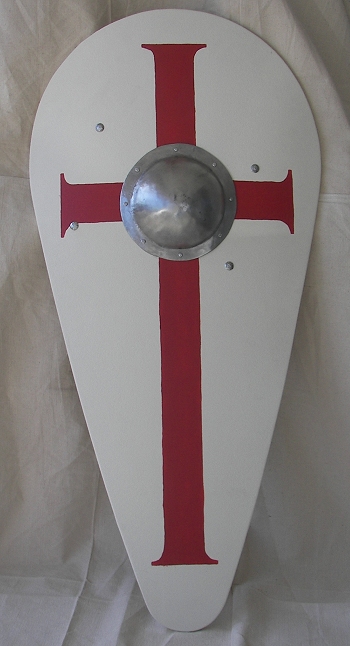  |
| This is a rather standard almond shield. I painted him as a shield of the Templars. I tried to make this a little more historical, and the belts joined with rivets. In addition, I did not use any buckles for adjusting the belts. I will show it in detail later. |
  |
| These photos simply show some large plans. |
  |
| A few more pictures from different sides of the shield. Here for adjusting the straps used buckles. This shield has just been trusted, and ready to paint. I always paint first before attaching the armrest and strap pillow. So it is much easier to do what to try to paint around them. |
The base of plywood shield
top
The first thing you want to make a definition of its size for making a shield. They may differ slightly, but let's assume that we are going to make our heraldic shield 53.3 cm (21 inches) wide at the top. Such a triangular form is much easier to draw a shield figure before flexing it in the press.
I prefer my shields to be deployed, but it is in principle optional. I use 2 pieces of 0.63 cm (1/4 ") plywood, and when they glued in the press, the shield turns out that 1.25-1.3 cm (1/2") thickness. If you want to just make a flat shield, then you can simply use a piece of 1.3 cm (1/2 ") plywood.
The standard shield is designed using 3 to 1. Note the photo above that the shield 3 in the width point, the direct portion on each side is 1 item and the curve is created using 3 items. So, if the shield is 53.3 cm (21 ") width, then you divide these measurements by 3, and you will receive 17.8 cm (7"), that is, one item.

Above in the figure shows the old stunt markings of a large line curve. I use a piece of plywood 0.63 cm (1/4 ") with a thickness of 3.8 cm (1 1/2") the width of the board, but almost any blackboard that lies at hand will work. I make a slot at one end of the board (where the nail goes), and I drill in some predetermined distance at the opposite end the hole is quite large for a pencil, which will be placed the edges of the future shield.
The distance between the point of origin and a hole for a pencil 3 of the point, in this case, 53.3 cm (21 inches).
You will score a nail at the end of the left side of the straight line (which, in our example, will be at a distance of 17.8 cm (7 "). Do not score a nail too deep, enough to hold quite a bit. Then you put a pencil at the end of the line on the right side And draw the curve. Repeat for the other side, and your shield is ready to be glued, pressed and cut out.
After drying the workpiece of the shield in the press (several days), you can pull it out and cut it with a jigsaw or a ribbon saw.
After you cut out the future shield, you spell the sandpaper edge to make them smooth and fix any offering and disorders. You can also, if you want, a little bit of the front and the inner side of the shield, just to smooth them out a bit. I also spin the rashpil edge, a little, so that the edges are not sharp.
Covering edges and front panel
top
I like when the outer part of the shields covers some material, as it gives them more historical look, adds strength and makes them more comfortable for painting. I prefer to use the canvas (burlap drive), as it is inexpensive, easy to work and you can get it in any fabric store. You can also use linen fabric, but it is not as strong, it is harder to find it and it is more expensive than canvas. You can also use the skin, and it is best to apply to that shield where you are going to cover the edges of raw leather ribbons. Further instructions suggest that we use canvas.
I start to cut a piece of canvas with a calculation of 5 cm. Most of all from the size of the workpiece under the shield. Then I use carpentry glue to stick it to the front panel. I take a cheap brush and shortening the bristle until it remains 1.6 cm (1/2 ") is long or so. It makes a good brush to use joinery glue. Next, apply glue to the front panel of the shield, closing while about half of the panel. You do not You need a lot of glue, a good smooth layer keeps very good. After you have applied the glue for half the shield and put the canvas, and on your part you need to smooth it down so that it comes into contact with the glue. If you have glue come out of the material. And there was a lot of hands, you most likely put too much glue, but it will not really hurt. Repeat these steps for the rest of the shield until the entire front panel is closed. until you worry about covering the edges of the shield, first wait for Glue will freeze.
 |
 |
After drying the glue on the front panel (after 1 hour) you are ready, wrap the shield blank around the edges. If you use rawly skin upholstery at the edges, then you do not need to wrap the canvas at the edges.
The first thing you need to do is place the fabric, where and how it will need to be reduced. You will probably want to canvas 254 cm (1 ") on the reverse side of the shield (see right drawing above). To do exactly and save the shape, you can use a zirkul (picture above on the left) to place everything around the canvas, along the edge Shield. Since the shield with a thickness of 1.27 cm (1/2 ") you must so that all this material was about 3.8 cm (1 1/2") wide.
If our shields were square, then it would be easy to hit the edges, it was necessary to complete the canvas and stick it to the edges and back, but since our shields have the sides curves, then we need to overlap the material from time to time and keep it in such position.
  |
When you stick canvas, make sure you apply glue to the edge and, of course, on the rear. If the glue is growing out of the canvas, do not worry. The paint covers it when you draw the back of the shield. Scroll with your fingers (this work can become a bit complicated:\u003e). Joinery glue, a little slippery and lead canvas down, even in a wet state, but like glue dries, you can go back and work over the districts that could not be combined.
When you cut a canvas for overlapping - do not cut all the ways to the rear panel of the shield, only those that are bent on the rear edge, the area markup is shown in the drawings above.

The host will form beams in the corners and bends of the shield. I have no magic, but only if I was able to trim the canvas so that it was sufficient as well as possible. Use a sufficient amount of glue here to glue the canvas. Then scroll the canvas and wipe the excess glue. Then I use clamps on each of the corners to hold the canvas until the glue dries. Then I check the canvas, which I stuck on the back side one more time, smoothing any beams that could be glad a little. You can also add a little more glue and use it to smooth the bundles a little down.
Now you can put the shield aside and let him dry.
Use the skin to cover the shield.
If you cover the front panel of the skin shield, you just have to cut your skin so that it corresponds to the front panel of the shield and take it with the help of joinery glue. Remember that you will need to use rawlifted skin to wrap edges. Read more about this below.
If you feel the strength you can try to bend the skin around the shield, how so it would be canvas. It is not easy, but you can do. You would have to have water impregnated with water, such a skin will be easier to form a shield covering.
Adding belts, edging and armrest
top
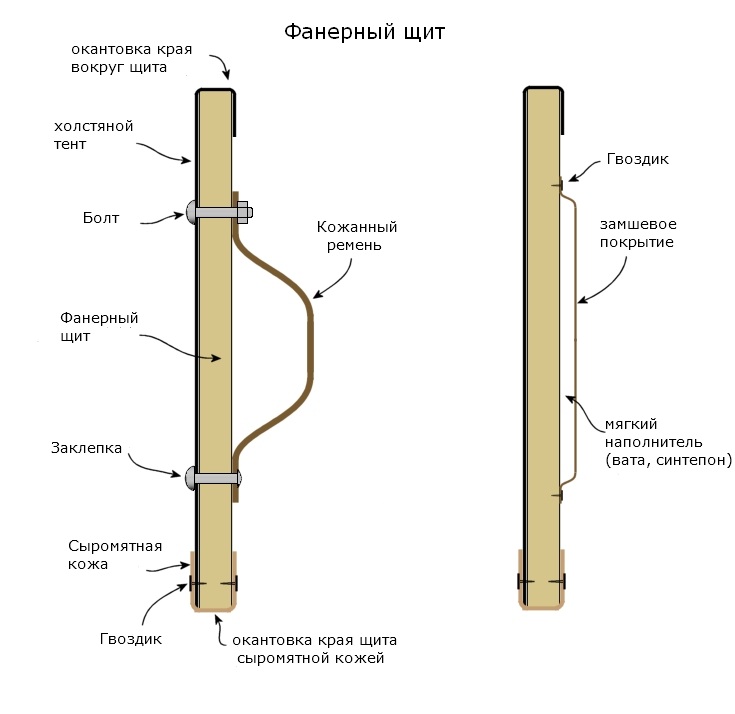
The picture above shows some ways to attach edging, straps, and a soft armrest.
Coloring shield, setting belts
top
Paint, I use only standard latex paint for walls. I put 2 layers on the front and back of the shield. I took a small set for painting and it is enough for me for painting the shield. You may want to paint the front and rear panels of the shield before putting on the belts and the soft armrest. Color is your choice! Again, I just used standard latex paint for walls. I used what is called egg tempera for finishing, which glitters, but again, it depends only on you. Historically, painting was probably flat. Egg temperatures will be a little tougher. I use it on the front and back of the shield. If you cover the front panel of the shield of the skin, then you will need to use the paint, which is compatible with the skin, the more acrylic paint will be.
If you put Umbon to your shield, then you need to do it now before adding armrest and belts. You can draw a place for Umbon on the front panel, depending on the design. Again, it is easier to draw when Umbon is not yet installed, then you can already enlighten holes and so far only for the test to install it.
Soft armrest
top

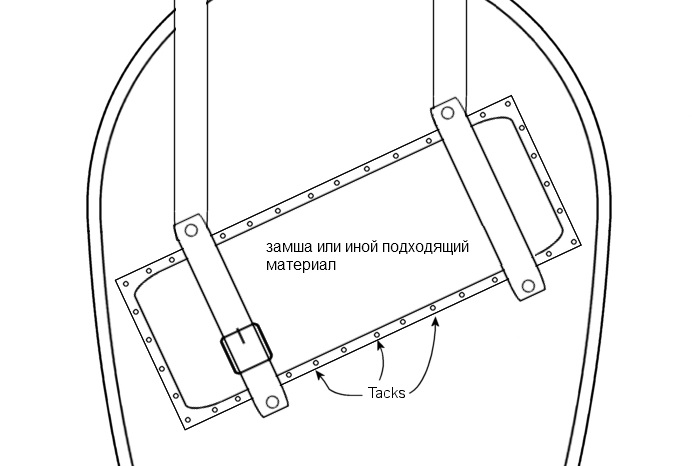
In the installation of the armrest, you are limited only to the size of the place under the site and belts, the size of the rear panel of the shield, own sizes, and just personal preferences. To give you instructions, I painted the above drawing that shows the dimensions that I used on my personal panels. The angle of inclination of the armrest is about 30 degrees, but you can ask someone to keep the shield while you move your hand around to get a convenient angle for you personally. Keep in mind that all sizes are approximate, and can be changed at your discretion.
Next, we want to make our armrest. I use suede for the top tire, as it is durable, but flexible. You can use other materials, just make sure that they will be strong enough. You might use canvas, just make sure that you will slightly drive several times the edge of it down so that it does not raise. I use 1.9 cm (3/4 ") thickness of a piece of syntheps, from a fabric store. Just make sure you get a syntheton but, not expanded foam. Your hand will thank you later.
I use small carnations for fastening suede to the back of the shield. Before fastening, you need to try and find out where your hand will be on the shield. You can use my photos as examples. When I realized where I want, I nailed to suede from top down, and on the side. I use 1 cm (3/8 ") cloves. You do not want the carnations sticking out of the front panel - so they are shorter than the thickness of the shield. After I attach suede from above and on the side, I lay the filler under suede. The filler is trimmed so So that it was a little less than a slice of suede. And then you feed the rest of the suede.
Belts
top

Figure above shows several different belts that can be used. The first standard belt that uses the buckle for adjustment. The second belt consists of two crossed belts. Crossed belts work best for the strap that you hold in your hand. If you notice my red and black shield (at the top of this page) are made using this method. It works very well.
The last belt is a lace strap, uses a series of holes for leather shoelaces that allow you to make changes. It is used on my telescope shield (also at the top of the page). It is not so easy to configure how, say the belt with a buckle, but this method is historical.
For reference belts on a heraldic shield 1.9 cm (3/4 ") width, on the shield of the templar they are 2.54 cm (1").
For belts, it is necessary to use thick grade of the skin, and you can just buy ready-made leather belts that are supplied in different widths. You can also use the old belt. Just make sure that it is really a leather, and try to avoid a leather belt that consists of two parts stitched together.
 Now that we have belts we need a way to attach them to the shield. You can use bolts or rivets. The bolts are the easiest way and make it easy to install belts to another shield in the future (when this shield will break). Rivets are more historical, but require more skills in their mount. I use 0.63 (1/4 ") bolts or rivets.
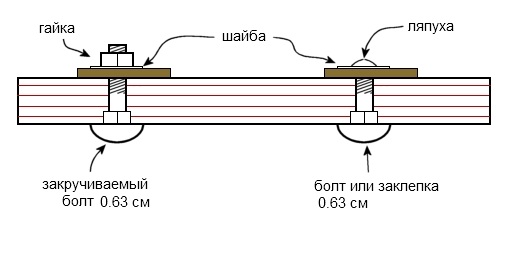
In the figure above, I showed how bolts / rivets work. I use bolts and rivets that can be bought at any economic store. Depending on the thickness of your skin and filler 2-2.5 cm - 0.63 rivets and bolts should work normally. You should always use the shear with the skin so that it does not jump. Some bolts will have some inscription on the head, which does not look very good on the outside of our shield, so make sure when you buy that it is not there.
I wanted to give my shield of the Templars a more reliable appearance and took the bolts and crushed their heads on my anvil to get rid of the inscription, and gave them the sight of them that the village of Kuznets did. I then rooted them in length, and then scored them just like rivets. Work is great. I even scored the washer so that she also looked from a rural blacksmith. (See Figure Right).
I also made my own rivets for Umbon on the shield of the Templars. I used standard general nails. I crushed the hats to make them more rounded and not very wide. I then rooted them and used as ordinary rivets.
Picture on shield
top
(See information about how to use what paint).
Here you can make your paint work as simple or difficult how you yourself wish. If you are confused, you can just paint the shield, and start all over again. If you want the shield to match Surko or other equipment, it may be worth taking a shield with a paint store to assist in the corresponding colors. If you are really brave - you could actually skip this question and go further. The best way is to ask knowledgeable people ....
I draw the front panel and the edges of my shields in my main color. As an example, I painted my templar shield first with a white base color. Then I used a pencil and a ruler and slightly read the cross on the shield. Next, I used several different sizes of brushes to draw the cross. I strongly recommend that you do all this manually. The shield painted with hand painted has a medieval look. If you are a terrible artist, then maybe you could find someone to help you with this.
If you put Umbon, then you can continue if not, then you are finished! Good job! There is something magical when a good shield in one hand and sword in another .... it is difficult to explain.
Remember that you can produce a shield that is simple or difficult, since you want. Just do one. If you want a piece of plywood to cut under the shape of the shield, without covering the cloth or skin, with some belts, it still looks pretty good.
Edging of edges shield
top
If you add edging, now just time for this. The use of raw crops or thick skin means the same steps. Cut off the stripes in 5 cm (2 ") width. It is more likely that you will not have one piece quite large to get around the entire shield, (from the cow skins, is that so big), so you will need to have several parts to go through All the edge of the shield. You will need to make some additional pieces of raw crops to cover these seams. See the picture below.

The thickness of the strip in 5 cm (2 ") should work normally, but you can adjust it as needed. If you want, you can impregnate the skin in the water until it softened. Then we work with the stripes during the bending of the edging over the shield and get down. Continue until all edges will not be covered. Now add additional parts to cover the seams, all this is fixed using the clamps. Let's dry, come up with cloves and you will finish.
Drawings of the almond shield
top
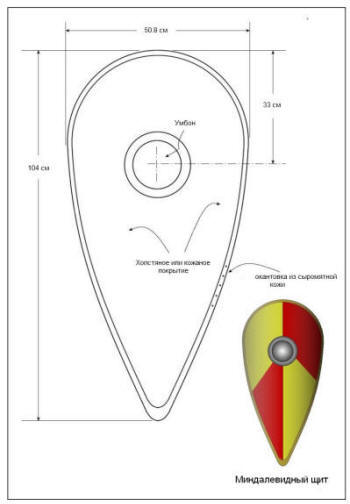
Below are some sizes for a standard drop-shaped shield (Kite Shield), it is also known as the almond and Norman shield, it is described in more detail here - the Knight's shields of the 11th-mid-12th century. The proposed sizes are only suggestions, and do not hesitate to adjust them to your needs.
Shield of Vikings.
Good day Reader! Today I will tell you how to make a simple round shield Viking. This is certainly ne. , But in Cousse it is interesting and necessary !!
A bit of history: Shields This type, that is, the Scandinavian, had a round shape, and the size ranged from 65 to 90 cm. According to archaeologists.
 Vikings made their shields from various breeds of a tree of pine, ash, maple, linden, oak, depending on where they lived in this period. The greatest preference was given to the shields made of ash or oak because of the strength of these breeds, the easiest of the shield from the linden. Tolenschists also depended on the tree of the tree and varied in the tails from 12 to 6 mm. In connection with such data, I recommend to use for you as the easiest and most optimal option and who is a cheap, a simple conventional fane with a thickness of 6 - 8 mm with a diameter of up to 90 cm.
Let's proceed to the manufacture:
Material:
Plywood 6 - 8 mm thick;
Glue (preferably PVA) or casein fish (with skin pasting); Burlakovina either flax (I recommend several layers) I took a bag of sugar;
Strong piping threads;
The skin is desirable thicker (you can save and pick up another suitable material);
Metal thickness from 1 to 2 mm.;
Paints I used the enamel (this is the choice);
Nails for rivets;
Morida;
Varnish;
Tool:
Hammer, pencil, line, electric jigsaw, Bulgarian with a circle thickness 1.5 - 2 mm, sandpaper. It seems I haven't forgotten anything, well, you yourself know what kind of tool you need you!
 Getting to manufacture
: We take the cooked Phaneur and get two circles one diameter of your shield take approximately 800 mm. The other by the diameter of Umbong (a little more than your fist).
Getting to manufacture
: We take the cooked Phaneur and get two circles one diameter of your shield take approximately 800 mm. The other by the diameter of Umbong (a little more than your fist).
Tip: In order to get a good circle, we take a hundredmary length of any width
3 - 4 cm from one end to twist screws, and in the required distance drill a pencil hole. In this way of drawing, smooth circles are obtained.
Making the necessary movement, we already get the first result.
The next action was cutting on the inside of the shield to simulate the boards, as well as the opening of the verse and varnish (do not overdo it with the tone).

 After everything dried, proceed to the manufacture of handles and two side slats (we take the material - oak, birch, ash) and scream them in accordance with your drawing on the boards (as a ripples used nails, those who appear on the other hand to bite off with nipples and split).
And here are the first hints that you have shield, And not a piece of plywood.
We turn to the following action: you need to glue the shield shield from the outside (for shielding shields). We take glue and apply to the front of the product, and I advise you not to regret. We take burlap and adjust on the shield, smoothing, so that there are no air traffic jams, and a different type of irregularities. Smooth? So we are wonderful waiting for a little frown and repeat the operation several times not regretting the glue. When everything dried, cutting the burlap on the contour of the shield.
 Umbon is deducted from a metal billet with a thickness of 1.5 to 3 mm. It is desirable steel (so reliable). If the steel thicker is 3 mm, the process occurs in two stages with an intermediate annealing gas burner. Remember Umbon you need to make the most convenient for your fist in future battles.