After installing a new entrance door, it remains to be updated with new slopes. They can be entered into the interior design in different ways, drywall, laminate, MDF, PVC sandwich panels as well as non-standard materials (for example, imitation of natural stone) are suitable for design. In order not to spend funds for the specialist services, the installation of slopes can be made with your own hands, adhering to instructions.
Outcasting
Mocking the slopes most often together with the whole apartment when the finish is not completed.
Required tools:
- Putty knife.
- Level.
- Master OK.
- Rule.
- Painting grid.
- Tape painting.
- Painting corners.
- Mixer construction.
Materials:
- Plaster (dry mix).
- Shpening finish.
- Lodder primer.
- Paper emery.
- Water-emulsion paint.
The sequence of action of shuttering with their own hands:
- Clear surface.

- Protect.
- Install and fix beacons using a level.
- The joint of the wall and slope to close the painting corner.
- Cut the painting tape front door and box

- Secure a painting grid.
- Make a solution.
- Seared potholes.
- Apply a solution on the entire surface, stretch along beacons, after waiting for drying and close the cracks.
- Progress.
- Align the finish shta.
- Wait for drying and handle shallow sandpaper.
- Paint with water emulsion.

Finishing completed.
If we are talking about a private house, it is advisable to treat the antifungal primer before working before work and add a bit into the solution itself.
Ducks from drywall
Plasterboard - a popular material for finishing the slopes of the entrance door with their own hands. It is inexpensive and reliable, it is easy to install.
Necessary materials:
- Plasterboard.
- Dowel.
- Saws.
- Guide profile.
- Glue.
Required tools:
- Drill.
- Roulette.
- Simple pencil.
- Rag.
- Level.
- Putty knife.
- Mixer construction.
- A hammer.
Procedure to perform the installation of slopes with your own hands using drywall:
- Clean the dust from dust, the remnants of the mounting foam.
- In the perimeter, drill connectors for the dowels at a distance of 20 cm - it is necessary to improve the clutch of the material with the surface.
- Using the roulette, measure the width and height of the doorway and cut the guides: two side and one top.
- Rates from the doorside of approximately 1.5 cm to attach the guide to the self-tapping screw to its narrow edge in the inside of the slope.
- Measure the size of the strips for slopes and cut from drywall. When cutting, trying the edge of the plasterboard does not crumble and was smooth.
- Dilute glue to a state of homogeneous, thick sour cream.
- The parts of the drywall are cut into the adhesive weight with pile.
- Loose with a dowel glue.
- Sheet of drywall is started in the guide and press.

- Check the level of the location of the slope, after fixing for 6 hours.
- The protruding glue to remove the rag.
- Periodically pull the surface with a hammer over the trim.
The day after installation, the slopes can be further handled: putty, paint.
Slopes from laminate
Laminate - flooring, often used for slopes inlet door, it is not necessary to additionally process it, it is opposed to mechanical effects. Finishing with your own hands has a lot of nuances.
There are two ways to install slopes from laminate:
- Frame installation. With this technology, you can warm the discourse: fill in mineral wool or mounting foam. Lack of design - the bar is placed only in a horizontal position.
- Adhesive installation. For it, a smooth surface of the opening is necessary, or it must correspond to the laminate dimensions. Laminate on the foam (under low pressure).

The first way is preferable for apartments, the second is universal.
Sucks from MDF panels
The most common finish: available at a price, looks good, easy to install.
Necessary materials:
- MDF panels.
- Wood bars, width 3 cm.
- Dowel.
- Saws.
- Liquid nails.
- Platbands.
- Corner decorative.
- Guide strips.
Tools:
- Perforator.
- Drill.
- Scissors, knife.
Installation of slopes of door from MDF - installation algorithm with your own hands:
- Clear outdoor.
- Drill around the perimeter of the hole for the dowels.
- After, attaching the rails guides.

- Measure the dimensions and make details templates for slopes.
- Cut details.
- Install the top item on the tapping screw. Check for no gaps.
- Install the side parts into the guides: inside on the nails, outside on the self-tapping screw.
- External angles to salary a flexible decorative corner to hide the screws, irregularities.
- Inside the corners, it is ready to leave the decorative rail and finishing.
After the end of work, you need to install platbands. If there is still pasting with wallpaper - they are installed after the repair is completed.
Advantages: Finishing looks presentable, simple installation.
Suns from sandwich panels
Sandwich PVC panel is two thin sheet of plastic with a layer of insulation (sheet thickness 1 cm).
Materials, tools for installing slopes Sandwich panels PVC to the entrance door:
- Sandwich PVC panel.
- Profile (starter, cover).
- Liquid plastic.
- Roulette.
- Saws.
- Screwdriver.
- Drill.
- Screwdriver.

Installing slopes from sandwich panels, or how to make it yourself:
- Clean the opening from dust and foam residues.
- Make measurements of parts sandwich panels (width length): one top, two side. It is possible to cut a cardboard pattern for convenience so that there are no clearances between the details of the PVC panels after installation.
- Cut the starting profile, attach to the self-tapping screw (indents 10 cm) on the edge. You can not use a profile: Make an opening in a penalty depth 1 cm, insert the edge of the sandwich panels there.
- Install the top panel PVC.
- After, chop the starting profile on the width of the slope, install under the ceiling and at the base of the floor. This can not be done if there is liquid plastic - the slots can be seen. But not to use sealant - it darkens.
- Installation of lanes Sandwich panels.
- Sections of the panel sandwich close the "lid" profile. Cut and install. In the corners of the structure formed Fasting.
- In the location of the flask, trim the profile at an angle of 45 degrees.
If desired, the space between the sandwich panel PVC, the wall by the wall is filled with the mounting foam. This is done after installing the sandwich panels.
More about the installation of slopes with your own hands after installing the entrance door to look at the video
Non-standard solutions
In addition to the above standard methods using popular materials, you can use more original options that emphasize the interior will decorate the entrance door and surprise familiar:
- Artificial stone - non-standard breakdown of slopes. The main advantage is resistance to mechanical stress (if it is not a gypsum model - it is fragile). Not a cheapest option, requires the participation of a specialist.
- Tile. It is suitable for such a type as clinker (imitation of brick or stone).
- Plastic panels - affordable, but unreliable finish.
- Decorative plaster - in terms of aesthetic, endurance she has no equal. But it will be necessary to work hard to find a good specialist in this area, because creative approach and professionalism is necessary for this work.
Materials can be combined if their properties are similar (parts of sandwich panels + stone, laminate + tile and others).
Door slopes are the distance between the door clove and the wall, which is made up with any material (, putty, MDF, laminate, plastic).
The decoration of door slopes in most cases is done with their own hands, in order to save money. If special skills and tools are required for mounting the door box, then the slopes can be issued with the help of sweater and materials.
In contact with
Odnoklassniki.
Basic Rules for Mounting Door Silence
In order to make slopes with your own hands, you should consider several basic rules. It is necessary to remember that the door leaf freely opened, the slopes are made on 2 centimeters higher than the level of the box. Measurements are also one of the significant moments when installing slopes. With produced faithful measurements, it is very easy to purchase the required amount of material. Also, when finishing, the slopes requires the correct markup and fastening the material, which will allow the maintenance of the installation. An important point when designing door sluts is the presence of a intercom or alarm. If in the future it is planned to install them, you should think in advance all the necessary submachines in the room.
The main methods used when finishing door openings
For the finishing of door sluts currently use various types of materials and the methods of their installation. The most popular are performed using, installing panels, drywall, laminate, plastic or MDF. Often designers offer the use of extraordinary approaches to the design of doorways. For example, with the help of artificial or natural stone, ceramic tiles, mirrors, it is also advantageous and modern trimming.
Door slopes do it yourself video:
Preparatory work for mounting door slopes
Before starting work on the finishing of doorways, determine the way, as well as prepare the opening, door and all the surrounding space. It is advisable to cover the door fabric and nearby walls with a plastic film so as not to damage the material and not stain the surface. You should also take care of the floor covering, it is best to protect it with cardboard. Release the door surface from all elements that act and can interfere with installation: doors handles, as well as locks.
If unnecessary plaster remains on the slopes, it is better to remove it and clean the surface from unnecessary substances (dust, dirt). To improve heat and noise insulation, you should use the mounting foam to get rid of all the cracks. For a better working process, it is necessary to moisten the concrete. Fill all the slots and wait for a complete drying and expansion of the mounting foam. After that, cut the surplus using the stationery knife.
If in the future it is planned to install additional lighting over the doorway, at this stage you need to spend all the wires and the cable to hide them under the layer of plaster.

Slopes from MDF.
Processing door openings plaster
The plaster is applied before the process of painting or before finishing the doorway panels. Usually plastering with cement mortar, in which sand is added, components that contribute to a faster frozen material are added, which can be attributed to the alabaster.
Note!
If the subsequent painting of the surface is planned, it is necessary to further align it with the spatlement.
To finish the doorway with the help of plaster, it will take:, cement and sand, level and, putty for alignment of the surface, alabaster and sulfur mesh, brush for applying a soil composition to the surface.
Work technology:
- First of all, the purified and prepared surface of the slopes is covered with a primer in concrete. For the necessary time to withstand it.
- At the next stage, there are beacons on the construction level. In order for profiles on the surface of the slopes, they can be consolidated by applying a small amount of the mixture to the surface, and add an alabaster accelerating the process of frozen. Lights are aligned with the construction level.
- Then the finished solution is applied with the Kelma (construction blade) and is distributed on the beacon displayed. In order for the solution to finally dry and score the maximum strength, it is necessary to wait a day.
- If the design of the room involves painting openings, maximum surface evenness should be achieved using a layer of putty for finishing work. All stakes of the material, in order to avoid cracks, it is better to smoke with sickle.
- The finished design is optionally can be placed by wallpaper or paint various types of paints.

Finishing door slopes MDF
You can also separate the door slips from MDF, plastic or vinyl, which are attached using an adhesive base. This type of finish fits well in a holistic picture of the doorway, a single texture and color gamut. MDF is a material that is made of pressed wood species.
To finish the doorway with the help of MDF, it will be necessary: \u200b\u200ba corner of plastic, finishing panels, platbands, glue, a stationery knife and a logs for sawing material, as well as a roll and a spatula.
Work technology:
- Door openings to launch as described above. After the complete pouring of the plaster, the surface is covered with primer and give it to dry.
- Measure and cut out the material, try on the place of the future location and, if required, clipped. Currently, the assortment of stores offers the consumer to purchase a ready-made material based on door slopes.
- The adhesive base is required to be applied on both planes - and opening and material, you should withstand a mixture for several minutes, then press with the force to the surface. Excess glue that appeared between the surfaces - delete. If it is necessary to support the design, additional boards are installed until the glue is completely drying.
- The final stage when installing panels from the MDF, the fastening of decks is considered.

Panel door slump with frame mount
Door slopes are easiest to do with the help of fastening panels on the frame, it is not necessary to pre-shock the surface of the slopes. There is a significant drawback of this option - finishing with panels with fastening on the frame at times is inferior to plaster in terms of noise insulation and thermal insulation. A significant advantage over other species is the speed of dismantling old panels and mounting on the same frame of a new material. In this case, the panels are attached to frames made of metal or wood. The entire design is set strictly by level, which allows you to smooth out the existing irregularities and differences. For finishing this method, various materials are used in this way: panels, drywall and in some cases - laminate.
To finish door slopes, you will need: finishing materials, wooden boards or profile for fasteners of finishing materials, screws and screws, screwdriver, if the selected material - plasterboard, it will be necessary to stick the seams, roulette and
- The guides for the material are attached (for drywall - metal guides, wooden structures are usually used for other types of material). If the surface is rather uneven, it is possible to fix with the help of bars of various sizes. It is important to make a rough design by level so that the future opening looks as soon as possible.
- If it is supposed to put slopes to the entrance door, it is better to warm it with mineral wool.
- The selected finishing material is adjusted in size. Then fixes on the frame.
- Screws screwed into the entire design, followed by a step of sickling all seams with sickle and putty. Material from MDF is enough to attach to liquid nails.
- If it is planned to be fermented with a laminate with a laminate, then the first board is fixed on screws, the following are attached with the help of the factory lock, the fourth is also attached with liquid nails or screws.
Want to offer photos on the topic?
Please help us make the site better! Leave the message and your contacts in the comments - we will contact you and make a publication better together!
The installation of the entrance door can be considered complete, as soon as the canvas is placed in place, all accessories are attached and the maintenance of locks is checked. However, at this stage, only installation works are finished, and still ahead of the door sloping is to come. For a fee, you can entrust the performance of this task to those skilled in the art that set the input structure, but this process is most often not immediately, because it is necessary to choose the finish method and choose the material. And does it make sense to spend finances if you can arrange door slopes with your own hands? It is only necessary to choose one of the variants of the decorative finish, to prepare the necessary tool and the material itself, and devote some free time to devote to this lesson.

After installing the metal door, its front side looks perfectly: the completed type of construction provides platbands, but there is an indoors on what to work. We will have to eliminate all the consequences of the installation work: to hide fasteners, close the outbreak of the outlook material, simply speaking, - decompose the slopes for the entrance doors. This can be done in one of three ways:
- align with cement mortar and launching;
- glue the finishing material;
- perform a frame design and strip it with sheet material.
To determine how it is better to make door slopes with your own hands, consider each of these options.
Plaster slopes
If you set out the goal of how to make the most durable slopes to the entrance door with your own hands, then you should choose this option. This is not the fastest, but the most reliable way. The layer of solution and plaster will be an additional barrier from heat loss, and at the same time will improve sound insulation. In addition, the frozen layer of cement mortar provides additional strength of the door design. The minus lies in the fact that plastering is the most time-consuming process of sealing of slopes for doors. In addition, it is not the final stage of the design: you will have to paint the slopes or choose another way of finishing finish.
Printing finishing material
For this method, you can use various materials, but that they keep well, the surface of the slopes should be smooth. If during installation on the input door was broken by the geometry of the opening, it may be necessary to pre-align the walls with a solution.
Making and painting frame
Arrange the door slope frame design - the fastest and "clean" option. As a trim, you can use various materials: plasterboard (followed trim), MDF panels, PVC, laminate. For insulation and improve the soundproof properties of the door inside the frame laid insulation.
Preparation for the installation of slopes

Before proceeding with the design of slopes for the front door, it is necessary to produce preparatory work:
- First we provide the protection of the door leaf and the box from dust, dirt and random damage. This will require greasy tape and plastic film.
- Next, it is necessary to align the base of the opening. We shy strongly protruding irregularities, remove fragile loose materials.
- We clean the surface from dust very carefully using a rigid or broom brush. Especially important is the purification, if the use of cement mortar and plaster - dust and garbage particles strongly reduce the adhesion of the material.
- The next stage is the primer of the surface. If the walls are made of porous material, like foam concrete, you can use conventional primer. In other cases, the composition of deep penetration.
- At this stage, it will be not bad to envisage the possibility of laying the cable to subsequently do not have to drill the wall. For through hole, you can use an aluminum tube, the diameter of which exceeds the thickness of the cable. The tube is fixed at the bottom, next to the plinth. If the input door passes will be decorated with a frame, then the pipe for the cable is placed after assembling the design.
The process of plastering of slopes

Consider in stages how to make slopes on the doors using the plastering mixture.
- To get a smooth surface, first install the beacons. So that they secure as quickly as possible, we use a gypsum solution for this, which solidifies literally for one to two hours. By the length of the slope, it is necessary to arrange 2-3 bugs of the solution, divorced in accordance with the instructions, put beacons, using the level to check their position and adjust so that they are in the same plane.
- When the solution in which the beacons was installed, firmly grabbed, proceed to the preparation of cement-sand plastering mixture. The number of cement and sand takes 1: 4 ratio. In order for the solution thoroughly mixed, you should use a membracer for a drill. Tools we run on small revolutions. If you add a small amount of gypsum to the knead, the finished mixture will be captured faster.
- For applying a solution, we use Kelmu and a spatula. I put the mixture on the slope area and align on the installed beacons.
It is possible to proceed to the finish finish after complete drying of the plaster. The term of complete solidification depends on the layer thickness. It is better not to rush to apply putty, and wait a day. When the finish putty dry dries, the surface of the wall is prepared under painting or another finish option at will.
Adhesives on adhesive basis

Now consider the way to make the slope of the front door using the sheet material and the adhesive base. For this option, the cement-sand mixture will also have to be vested, since the wall surface must be previously aligned. Adhere in the following procedure:
- In the purified and projected surface of the wall screw the screws. Our task is to get from the hats of self-tapping screws, to which the material of the trim will be laid. Hats should be placed in the same plane. Blowing screws, it is necessary to take into account the thickness of the casing material.
- When we prepared a peculiar "landing site", the entire slope space is beginning to fill in cement-sandy solution. The thickness impose such that the hats of the screws are slightly towering. We are waiting for the day while the plaster dries.
- We measure the slopes on the door and cut the appropriate panel. We use any suitable material for this: plasterboard, plastic, MDF.
- We select the glue composition, which is suitable for the material. Covered with glue covered slope and the opposite side of the material. Tightly press the sheets to the slope so that they rest in the hats of the screws. Levels check the position of sheets.
- The gaps and emptiness that can remain along the perimeter of the slope, close in a gypsum solution or hide the corner.
- We carry out the decorative trim of the slope.
Installation of slopes on the frame

To set off the entrance door with your own hands to the frame structure, wooden bars or metal profile will be required, as well as facing material to your taste: plasterboard, MDF, plastic or laminate. It will be not bad at the same time to prepare the insulation to improve the heat resistant of the door design and its sound insulation properties. Insulation, we will lay in the cavity of the frame base.
For mounting the frame to the wall surface, we will use selflessness or dowel nails. We produce the installation of a material that takes out the size of the slope in advance. Shakes decorate a decorative corner.
Features of the choice of material for slopes
MDF laminate plastic
Playing and then painted slopes are considered the most durable and durable. If you are going to arrange the slopes of the entrance doors with your own hands in another way, you should consider the feature of the materials: their compliance with service conditions and stability.
If the slopes are mounted at the front door of the apartment, which is not subjected to the drops of humidity and temperature, then the material can be used any. For cottages should be able to choose from materials that are not affected by drying and damage from moisture. As an option - to purchase moisture-resistant panels.
For decoration of slopes, it is customary to use:
- Plasterboard - inexpensive material. Installation is made on glue or screws. Corner elements from this material must be reinforced with special corners. Needs subsequent finishing finish.
- MDF - durable, wear-resistant material with decorative design facial surface. It has many shades and textures. Fastened by kleimers or screws.
- Laminate - material, after installing which the slope acquires an aesthetically finished look. Installation of lamellas is performed both in the longitudinal and in the transverse direction. Thanks to the locking attachment, it is quickly and just joined each other. To the wall it is necessary to attach the first and last element of the vertical slope. The horizontal slope is fixed to the wall surface along the entire edge.
- Plastic has less durability than all listed materials. The installation process is similar to the slopes from the laminate. To protect the plastic from shock loads, the skin is mounted every 10-15 cm. The advantages of plastic panels are equipped hygienic care and many variants of decorative design.
From the presented design options for door sluts, it will be easy to choose the most suitable method and material. Upon completion of the work, remove the protective film from the canvas and the door box.
By installing the entrance door to the apartment, it is necessary to remember two folk spokes: " meet the clothes ..."And" king makes sweet" What is it? Entering the room, the guest forms its first impressions of the owners and housing on the door. Therefore, they should look presentable, emphasizing wealth in the house, to harmonize with the entrance hall and, at the same time, to be a reliable protection against uninvited visitors.
However, such an effect cannot be achieved without work on the device of slopes both outside and from the inside. They are the same previously mentioned retinue, which turns even the most ordinary door to the most important element of the apartment interior. If anyone doubts, can look at the photo below, which shows the doorway without finishing door sluts.
What needs slopes
About the installed entrance door always remains part of the unknown wall. By its plane from the side of the landing and the apartment, platbands are installed. On the front part of the doorway put slopes. They are needed for several reasons:
- give the door aesthetically finished look;
- isolate the hallway from the penetration of noise and cold from the entrance;
- provide a harmonious transition from the entrance door to the inner surface of the wall;
- hide the mounting elements of the door frame from intruders;
- seared excavations, cracks, cracks in the doorway.
When installed
Installing the slopes to the entrance door is made:
- when replacing the door block. Conduct installation of a new door without damage to the walls, it will not work nearby, especially since the installation recommendations expire to the need to remove old slopes;
- damage to the material from which the slope is made: Cracks, ships, deep scratches, etc. appear. Defects may appear both as a result of mechanical impact and during the operation of the door due to microvibriations;
- change the interior of the hallway. The finishing of the slopes of the entrance door from the inside is carried out with their own hands and with the new design of the corridor, when the doorway begins to fall out of the overall style. That the slope affects the general view of the room, they began to pay attention quite recently;
- the appearance of mold or fungus. Quite unusual, but with enviable regularity there is a reason. It is almost impossible to get rid of such an attack without replacing slopes. Antiseptic processing does not help, since the problem hides inside the finishing materials.
Preparation options for input doors
Options for shoal finishing can be a different, unusual, but harmoniously fitted in the design of the apartment.
Plaster
One of the most conservative methods for finishing the slopes is shuffling. For the first time was used for several centuries ago and immediately became a unconditional leader. With the advent of new finishing materials, the popularity of plastered slopes has sharply fell. The method has many advantages:
- in the technological process, power tools are not applied;
- lower finish cost compared to alternative options;
- high strength - at the same time strengthens the ends of the walls in the doorway;
- insulates the technological gap;
- easily washed away from pollution;
- without consequences, tolerates leaps of temperature and humidity;
- long service life.
Reverse side of the process:
- work time-consuming;
- a lot of dust and dirt;
- need plaster skills;
- required several days so that the solution has typed strength;
- not the most attractive look - you can only paint or caught with wallpaper.
At the last point you can argue. The appearance of a reflective decorative film with a 3D effect largely removes the problem. In addition, you can use decorative plaster, which is not cheap in every sense.
Plasterboard
The decoration of slopes by plasterboard leads with a huge margin among budget options. And it is not surprising, since the method has a lot of positive sides:
- low finish cost;
- high heat and sound insulation;
- environmentally friendly materials;
- easy, available to beginner builders Mounting technology;
- Glk can close the openings of any form;
- a long period of operation.
By minuses experts include:
- weak water resistance - when flooding an apartment, in 90 cases from 100 will have to change the slopes. They are necessarily drawn by moisture from below, even if moisture-resistant types of drywall are installed;
- the need for finishing decoration (soil treatment, putty, painting, plating wallpaper, pasting decorative films);
- low strength.
With the last point you can also argue. There are several ways to increase several times the strength of sheet cabarton sheets:
- put it on solid glue, without forming voids;
- buy a 12.5 mm thick bark (wall);
- when applying the crates, prevent distances between the profile more than 20 cm.
Tree
Another old way to finish the slopes is facing them with natural wood. For many, it is strange, it seems to be a manifestation of provincialism.
But expensive wood species with the possibilities of their artificial aging, with several ways, allow you to get very beautiful, richly looking with a very long service life, both for metal entrance doors and wooden. All small damage can be restored. A few more advantages:
- with their help, there is almost perfect insulation of the space between the door of the door and the wall of the opening;
- environmentally friendly material;
- you can buy in the store, and you can make slopes to the entrance door with your own hands, applying the most original design ideas in practice.
In apartments, this method is rarely found due to the high cost, unlike the villas and cottages, where it is in the first place.
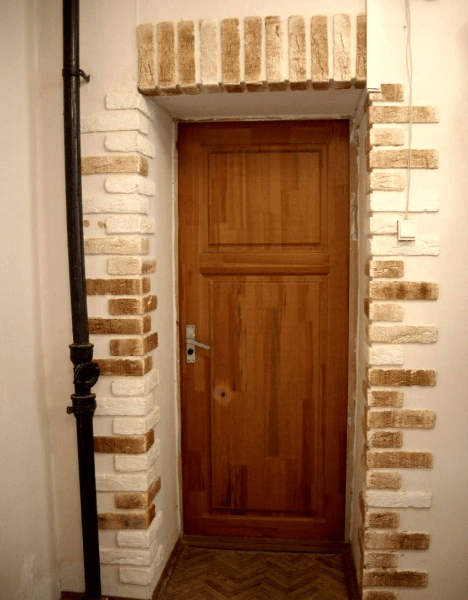
Laminated MDF panels
Digure the popularity of slopes from laminated MDF panels. Especially in demand are good, made of this material.
For reference: it is possible to close the shoals and nubnimized MDF plates, which is much cheaper. The only thing, the problem arises: how to separate the slopes of the front door inside the apartment - paint or salary.
The use of MDF panels to arrange slopes has many advantages. They are:
- hold the middle strength strikes, not destroying. When in the apartment of heavy and bulky furniture items, the risk of damage is reduced to zero;
- produced in various design design (relief, color gamut, imitation of valuable wood species, etc.), which makes it easy to enter in any interior, from classics to high-tech;
- easily mounted by one person;
- have good noise and thermal insulation properties;
- can be placed with wooden, and with metal doors.
There are few minuses, but they are essential:
- the panels are very expensive, yielding only a tree, as well as natural and artificial stone;
- scratches remain from acute items;
- a constant care is necessary - the dirt accumulated is difficult, and often almost impossible, washed;
- it is impossible to install in rooms with high humidity, which, however, has nothing to do with apartments.
PVC panels
Attempts to transfer the experience of installing slopes on plastic windows from polychlorvinyl panels to the entrance doors does not give the expected result, despite the simple installation, diverse design and low cost PVC. There are several reasons here:
- the thin material enters the disharmony with the door material, although if you try hard, you can choose acceptable types of panels;
- easily deforming and damaged - no gentle mode of operation, like on the windows;
- holds geometry well with deep slopes.
Sandwich panel
The slope of the slopes of sandwich panels is made of plastic. But from the slopes from PVC panels, it has a significant difference: the interior is not hollow with rigidity ribs, but is filled with polyurethane sealant. You can find a thickness of 10, 24, 32, and 40 mm and up to 1.5 m wide and width.
Among the undoubted advantages:
- beautiful appearance;
- simple care - the most undemanding material in this regard;
- not afraid of high humidity and sharp temperature drops;
- simple installation technology - all works are performed in one apparatus;
- finish finish is not required;
- allows you to separate a wide slope, up to 1.5 m, with one sheet;
- it has absolutely smooth geometry.
At high-quality panels, shortcomings during operation are the same as PVC panels: scratch and poorly wash. The inexpensive sandwich panels are yellowing with time, as well as crack in mechanical exposure (shuffles).
Natural and artificial stone
Fashion - a capricious lady. That comes without asking, it goes away. This fully refers to the slopes from natural and artificial stone. They were very popular at the end of the last century, but then they came up. Now the fashion is coming back. They are bought not only inexpensive, under sandstone, stone, but also natural, very expensive, marble and granite.
Stone has many advantages:
- there is no need to level the surface of the jamb;
- you can do all the works on the facing on your own - the technology is similar to the laying of the tile;
- the material is combined with any interior;
- stones have unique drawings, shades and textures;
- not afraid of water, frost and fire;
- safe for the health of the owners of the apartment;
- durable - it is difficult to damage;
- it has a long service life exceeding the door service time.
Among the shortcomings:
- very high price for most types of stone, including artificially created;
- requires virtuoso work when finishing walls on the border of two materials: the stone of slopes and wall material.
If finance is allowed and everything is done correctly, according to the instructions, the stone slopes look fantastically beautiful. This is the case when the price corresponds to the quality.
We looked at the basic finishes, found quite often. In practice, many other finishing materials are used (laminated chipboard, ceramic tile, parquet, one-sided sandwich panels, etc.).
It makes no sense to consider them separately, no - they are derived from those discussed (laminated chipboard is similar on the installation technology and characteristics with panels from MDF, tile with natural stone, one-sided sandwich panels with double sided, etc.). Rally apply materials are found: laminate and lining.
Lining
Any material from wood has undoubted advantages. In the case of clapboard for slopes, specialists and designers speak more about minuses:
- it is difficult to enter in the interior;
- little slope to do problematic;
- capricious belongs to moisture drops;
- need treatment with antiseptics and fire impregnations;
- high price, approximately equal to MDF and just below the natural tree from a solid massif.
As a result, specialists advise in such cases it is better to spend a little more finance, but make a choice in favor of natural wood.
Another option to finish the slopes "on an amateur" - laminate. Him:
- high enough strength;
- a large selection of color and textures, which makes it easy to choose the necessary material for the design of the hallway;
- good thermal insulation properties;
- simple care.
Among the minuses:
- good noise conductor;
- it is afraid of drops and temperatures, and moisture;
- the service life does not exceed 15 years - one of the lowest indicators among all the materials applied to the sealing of materials.
Instructions for finishing the slopes with their own hands
All technologies can be divided into three basic species that are found in everyday practice with variations.
Materials and tools
1. Walking with a cement-sand mixture. It is the cheapest, but the laborious way. For work you will need:
- cement with sand or dry cement mixtures;
- primer deep penetration;
- putty;
- fiber fiber or serpent;
- metal perforated corner for strengthening the outer corner;
- finishing finishing materials (paint, wallpaper or decorative film);
- painting tape to protect the door frame;
- short rule;
- level;
- master OK;
- painting brush (roller) for the priming of the wall;
- bath for primer;
- capacity for the stirring of the solution;
- electrock with a nozzle mixer for mixing the solution;
- set of spatulas;
- grater;
- small sandpaper or painting mesh.
2. Sticking on the wall of finishing materials using various adhesive mixtures. This method of finishing is more expensive, but easier and in shorter the plaster process. In addition, it provides a huge selection of design solutions when making an interior of the hallway and the entrance door. To work will be required:
- finishing materials (plasterboard, PVC panels, chipboard, MDF, natural wood boards, etc.);
- adhesive mixture (specialized glue, putty, mounting foam, dry plaster plaster);
- primer;
- antiseptic solutions;
- level;
- set of spatulas;
- painting brush;
- cuvette for primer;
- construction pencil;
- roulette;
- long level item for applying a line of the panels or GCC;
- cutting tool (knife for drywall, hacksaw for panels or bollard with cutting circle);
- capacity for stamping solution or glue, if it was bought in dry form;
- construction mixer or electric drill with nozzle.
When working with plasterboard, a perforated corner will be required to strengthen the angles and the serpent for sealing the joints of the upper slope with the side.
3. Mounting slopes on the crate. The method is available only with a significant gap between the doorway jammer and the box. If it is 2-2.5 cm, then the only option is glue.
The method has many advantages: fast installation, a convenient case to hide various cables, the ability to make an opening with a significant "dawn" and install hidden lamps to illuminate the inner doorway. The disadvantages of the method of neither consumers nor specialists notice.
During the work, you will need:
- facing materials;
- carcass bar - from wood, metal or metal profile;
- dowel with self-drawing for fastening the crate to the wall;
- self-tapping screw or "liquid nails";
- antiseptic;
- perforator with a set of drills;
- screwdriver or cruciform screwdriver;
- construction knife for plasterboard;
- bulgarian for cutting metal;
- woodlet on wood;
- level;
- plumb;
- roulette.
When working with GLCs, the materials listed in paragraph 2 will be required.
Having everything you need at hand, you can proceed to work. Consider how to make the sloping of the entrance door with your own hands from various materials.
Walking
Step-by-step work performed in the following order:
- the ends of the walls are preparing for applying a cement-sand solution: the old plaster, the remaining fasteners, the surface is cleaned by contaminants, weakly holding brick pieces and sucking concrete. Cuts a foam from under the box;
- the shoals of the opening are ground, twice. The second layer is applied after drying the first. The beam above the door is treated with "Benonokontakt", also twice;
- outdoor angles are strengthened by a perforated corner, which will simultaneously serve as a beacon when applying a solution. He fastened with putty;
- near the door on the self-tapping screw is the second lighthouse, also from a plastering corner;
- the door box and canvas are closed with a plastic film, which is attached to a painting ribbon;
- the CPS is divorced in the ratio of sand and cement 1 to 1, for applying "spray";
- a spray is applied;
- after drying the first layer, the second - soil is applied. The solution for it is prepared according to the instructions, with the addition of fibra to reduce shrinkage and prevent cracking. The soil layer should not exceed 3 cm - otherwise it is necessary to repeat the procedure;
- after the soil gains strength, but does not completely dry, the finish operation is carried out - the thin, 1-2 mm layer, layer of the liquid solution, is superimposed, in the tongue of the plastering - covering, which allows you to get a smooth surface. If the slopes are bold with wallpaper or decorative film, this is sufficient. Under the paint, the surface of the plaster is sweeping.
The technology of plaster is considered in detail in the work: "".
Plasterboard
The technological process of the device of slopes from drywall is completely coincided with the technology of mounting panel slopes from MDF and chipboard. And there and there can be mounted on glue or frame.
Therefore, on the example of the GLC, we will show a step-by-step algorithm for work when attaching glue, MDF - on the crate.
When working with glue, it is necessary:
- clean the surface of the walls from dust and dirt, remove the excess mounting foam, and then process the antiseptic and primer (or primer with an antiseptic already added to production);
- on the floor and on the door frame, we apply a pencil line of the passage of the slope;
ATTENTION: If you plan to run drywall for the box profile, the width of the sheet should be 1 cm more, the slope of the passage of the slope is drawn only on the floor, the grooves are cut into the mounting foam.
- measure the slopes, then cut into the size of the sheets of HCL;
- glue the upper slope for which the adhesive weight of the bunch (when using the mounting foam, it is applied fine snake);
- two-three stops are installed for better fixation of the slope;
- after setting the glue, the side slopes are attached, the joints are stuck with sickle and shit. After drying the putty, they are cleaned with shallow sandpaper, after which the surface of the drywall is spacing;
- after complete drying, the swept off the slopes sneaks or become decorative film.
You can also use the combined method: the wooden bar is attached near the box. Glk is attached by self-draws. From the side of the apartment leaf takes on glue. The only thing that needs to be not forgotten is to lay the insulation between the wall and drywall from the door of 2/3 of the width of the slope.
In detail, the process is described in the work "".
MDF panels
The frame method is used in a technological gap of more than 3 cm. For elements of a frame for plasterboard, all types of bar can be used, including a metal profile, for panels only a tree.
Works are performed in the following sequence:
- the tree is processed by an antiseptic, after which it is cut into size;
- with the help of dowel screws, the bar is vertically attached to the opening close to the box and flush with the edge of the wall on the other side;
- horizontal strips are attached if the mounting of the panels will be produced by liquid nails (when the screws are attached to the screws, two vertical slats);
- all cells are filled with insulation - the procedure is mandatory;
- the dimensions are measured;
- the panel is cut in accordance with the obtained results of the industrial;
- with the help of liquid nails or self-sneakers, MDF is attached to the crate.
PVC panels
A more or less erudite apartment owner knows that plastic panels are fastened with special profiles fixed on the wall. These strips are always visible and perceived as granted. But not in the case of slopes.
Here you can mount the panels in a special framework (they will be located horizontally) or take on glue. However, there is a limitation: the width of the slope cannot exceed the width of the panel, because No docking seams are envisaged.
Operations are performed in the following sequence:
- the surface of the wall is prepared. If the height differences are more than 2 mm per meter, the surface or spitting is placed. The type of work depends on the curvature of the surface: the large difference is eliminated by plaster, up to 1 cm - putty;
- walls are carried out, after which the slopes are cut. As in the case of plasterboard, when the panel is started behind the door frame, its width increases by 1 cm. Trim is necessary from the sip side;
- to increase the adhesion (clutch), the wall is processed by a primer, and plastic with the back side by sandpaper;
- the adhesive mass is applied around the perimeter with a solid ribbon, and inside the panel - snake;
- sucks pressed against the wall and immediately removes. In this way, glue is applied on the wall, which absorbs into the pores and grasps. After 5-7 minutes, the slope fragment is finally glued.
Laminate is produced for flooring. However, Russian craftsmen found him another application: Write out the slopes. The process completely repeats the technology of the device of slopes from polyvinyl chloride panels. Lamellas can be accomplished on glue (only mounting foam is used) or installed in a predetermined frame.
Artificial stone
When working with a stone, artificial or natural, most importantly, make a scheme of the location of each element, draw it in real scale on the slope and the wall, if it comes in the form of a platband, and also lay out on the floor.
The stone is fastened with glue or a special mixture on a seamless method. Seams are present when cladding the slopes with ceramic tiles. The wall should not have drops exceeding 1 cm. If more, the CPS alignment is carried out.
Clapboard
The lining is attached to a wooden crate with self-draws. So that the material does not crack, the holes under the screws are drilled in advance. The diameter of the drill must be 1-2 cm less than the cross section of the screws. Hats can be treated and close with a special composition, and may remain in sight. Here is the case of the taste of the owner.
Conclusion
The choice of slopes became the headache of the owners due to the huge number of possible options. Can be used:
- stucco, including decorative;
- plasterboard;
- natural tree;
- laminated MDF and chipboard plates;
- PVC panels;
- artificial and natural stone;
- lining;
- tile;
- laminate;
- sandwich panels single and double-sided.
A glue method and frame applied for fastening the facing material. The main thing when choosing - to enter a slope in the interior of the apartment.
Video on the topic
No one want to overpay when installing doors. That is why it is often decided to make the slopes of the entrance door with their own hands and not hire builders. If you come to the process with fantasy, you can even cope with a non-specialist.
Not always at home there is a complete set of tools for all occasions. And the owners of apartments in the panel houses perfectly know how difficult it is to drill holes in the concrete walls of another Soviet buildings. Therefore, in some cases, you can donate the correctness of the breakdown of slopes, significantly simplifying work.
Suns from PVC on the frame and without
It is hardly the easiest, fast and "clean" way of finishing of slopes - to arrange them with the help of PVC panels. There are even universal panels in the market that combine slopes, a corner and a platband.

The advantage of such a slope is a flexible connection between the panel itself and the platband, which allows you to adjust it to walls with angles deviating from 90 degrees.
The installation process of these slopes is simple to disgrace:

Due to the flexibility of plastic, such slopes can be installed even on uneven walls. But the perfect result will not work - the slots are necessarily formed, and in places with an insufficient number of mounting foam plastic will "walk". But this is the fastest solution to the problem!
Much carefully and more reliably looks from PVC on a primitive wooden frame. You can even use the PVC panels with a design under a tree or stone, hopping at all without platforms.
For this:

So that the panels do not flake when the entrance door opens, the empty place between the bars can be filled with the insulation of a suitable thickness or blew the mounting foam. This will also provide additional sound insulation.
"Wet" way of finishing of slopes with their own hands
Alignment and plastering of slopes remains the most economical option. And even if everything is perfectly, everything will not work, it will not affect their service life. The process takes place in several stages:
- Training:

- Application:
- cement mortar is mixed - you can make it yourself or get ready;
- per 1 kg of cement It is necessary to take 1 kg of lime and 5 kg of sainted sand - the solution should be in moderation thick and not spread, they are aligned with the vertical walls and the top of the slope;
- after drying, the screed can be applied to conventional primer and proceed to applying plaster.


- Putclone of slopes:

- Decorative finish:
- slopes can be painted or stuck with wallpaper, creating a monolithic cloth with walls;
- in both cases, primer is applied to the putty, and on top of the already decorative coating.
You should not try to save and skip some of the stages - it will only worsen the end result and it will have to redo it again.
Ducks from drywall
If work with the perforator does not frighten and bother the cement screed does not want, you can make a door opening sheets of plasterboard. Especially relevant for houses with thick walls, where the slopes are obtained very wide.

Frame for slopes from drywall
So that plasterboard sheets were securely fixed and could even withstand the finish with artificial stone or tiles, it will take a wooden or metal frame:

For slopes of the entrance door, especially if it goes outside, it is better to use moisture-resistant plasterboard. It is also important to remember - there is always a small gap between the floor and GLC to prevent the wetting of plasterboard. With a decorative finish, this gap will still hide.
Distille from plasterboard on plaster
Instead of the GLK frame, it can be mounted on the mounting foam plaster. Is it not strong enough? But if the load on the sheets is small, then the stock of the strength should be enough. The technology itself is simple, even a non-specialist will cope with it:

What you can not forget when finishing the slopes
Sucks are not only aesthetic appearance of the doorway, but also its protection against drafts, moisture and noise. Therefore, regardless of the method of finishing, it is important not to forget:
- Check the tightness of the installation of the door frame. For this, it is enough with a closed door and an open window to spend on the entire perimeter of a lit candle. If the flame is deflected aside - in these places you need to add an installation foam.
- Protect the walls under overhead slopes from fungus and mold. For brick and concrete walls, there is a special primer-antiseptic, for wooden and frame walls, you must not forget about the device of vapor barrier and the processing of wooden elements of flame-coolant.
- Delete all garbage and weakly hold items around the door even when installing slopes on the frame. Otherwise, the abrasive dust remaining after the repair will still be seeded into the room, and the pebble leaves will add gray hair with an impressionable residents.
- Warm down the door leaving right to the street, and not in the pre-banner. Otherwise, additional heating costs are provided.
Even the slopes from the MDF can be made without a perforator and extra debris. Visually about this is shown in the video: