Roofing of four slopes - how is she good? The numerous operational advantages of this species will certainly exceed the disadvantages. Is there a simple rafting system of a four-page roof, as many newcomers are thinking? Soon you will definitely learn! Important nuances and features of the stages of the construction of a holmic roof we describe in this article.
What you need to know about four-page rafting systems?
There are two options for fourth roofs: hip and tent. The first type has a form of a rectangular envelope consisting of two main trapezoidal skates and a skate, and two frontal (side) rods - triangles:
Tent roof - these are four identical isceived triangles connected at the same top point (reminds the tent):

Both options include the installation, both urban and hanging rafters, which are installed using standard technologies.
How to choose a type of rafter system for a 4-stranded roof?
In the absence of a central roof support, the choice is made in favor of the hanging of the rafter system. If you can find the upper and lower supports for each rafter, then you should choose a sleeve design. This option is easier and more affordable for non-professional masters. It is only necessary to remember the two main conditions: with hard attachment of the Niza and the top of the stopil, a strengthened Mauerlat is needed, since it is passed on to it; With a hinge fastening or semi-rigid connections (for example, the top of the hinge, and the bottom is hard or vice versa), Mauerlat does not need to increase:


The choice of one of the types of four-page roofs should be due to the form of the house itself. For square houses, tent rafters are erected, for rectangular - hip. Also, you can find complex multicate roofs of the combined view, which contain both hip and tent elements.
And the hip and tent structures retain the main functions of the bartal roof (for example, the possibility of arrangement of the attic) and look very aesthetic:

Why is the four-tight roof more popular than two-tie?
"Why is the depriving headache and complexity?", "You ask:" After all, you can build a simple bartal roofing much faster and cheaper. " Here, the masters emphasize some important points in favor of the choice of four slopes for the roof:
- High wind resistance. Four-sheet roof does not have frontones, all its planes are tilted to the skate. Such a structure minimizes the impact of strong wind and reduces the possible destructive consequences to "0".
- The most successful load distribution. The multi-sinking roof maintains the maximum amount of precipitation, since the colors take part of the main load. Therefore, the sagging, deformation and destruction of the rafter system, in this case, have a minimal probability.
- Availability of the choice of any way of insulation of the roof. Straight frontones require a special approach when choosing a type of roof insulation, as it is located vertically and exposed to blow out wind. The fields of hip and tent rolling systems allow you to evenly insulate the roof by any available material.
In addition to the listed "advantages", the roof with four slots is well saved to heat, it can be lined with any roofing material and always has a neat look.
Four-page solving system
The rapid four-tight design consists of such elements: Maurylalat, skatear, central and hollow rafters, emergency legs, as well as, ice, racks, riglels, pier and other firming parts. Consider the most basic elements.
I. Mauerlat
Mauerlat is the most important part of the design, as the entire rafter system holds on it. It is a powerful wooden timber 100x200, 100x250, 100x100, 150x250, 200x200 cm. Mauelalat made of solid high-quality wood, mainly coniferous breeds. The rafting hip roof system, as well as any multi-sighted roof, requires a solid fastening of the base bar. Mounting procedure Mauerlat in this case: the formation of a monolithic foundation in the end of the bearing walls with the installation of spiers; Laying waterproofing; Processing and installation of Maurolalat around the perimeter of the whole house; Enhancing by anchors and other fasteners for maximum basic reliability.
Maurylalat can be laid on the edge of the wall, or in the pocket of the bricks provided for the brickwork from the inside of the bearing walls.
II. Sound legs
The cable legs are called four angular rafters, which are based on the edges of the skate and the corners of Mauerlat. They are the longest among all the sropling legs of the system, so they must have a cross section of at least 100x150 mm for maximum stiffness.
III. Sking bar
The ski run is a horizontal beam that connects all the rafters, the top of the rafter system. The bar must be strengthened with racks and pins. Konk should be located strictly parallel to the plane of the attic overlap and perpendicular to the racks.
IV. Rafyla
Rafters for a four-piece roof are divided into: central (attached to Mauerlat and Konk); Basic hollow (attached to the axis of the skate and Mauerlat); Intermediate and shortened (installed on the savory legs and Maurylalat, connect the corners of the rods).
V. Strengthening elements
Additional reinforcing elements include racks for skating timber, riglels or overlap beams, rapid legs, wind beams, etc.
System rafters for a four-page roof with your own hands
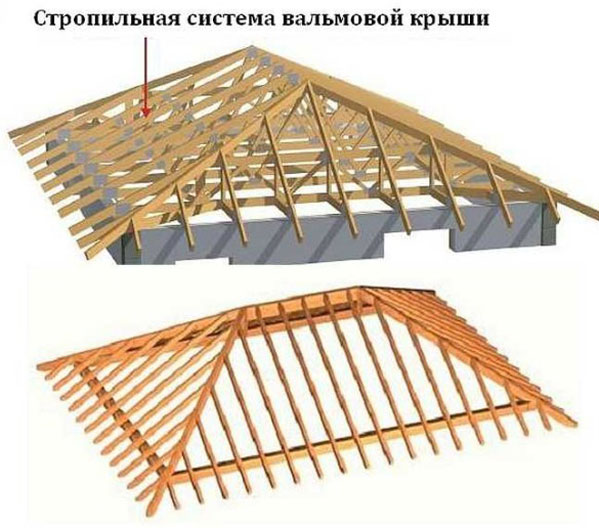
Consider a phased process of building a rafter design. We have chosen for clarity the most popular option - a hip roof. The rafting system of the holm roof of the scheme of which step by step is presented to your attention below:

Step I: Project Creating
To portray your version of the holmic roof in the drawing, it is necessary to calculate the height, length, slope slopes and roof area. It is necessary for a clear and high-quality project implementation and selection of the desired amount of consumables:

Calculations should be started from choosing an angle of the roof rods. An angle of 20-450 is considered an optimal bias. The magnitude of the slope must comply with the climatic characteristics of the region. So, in particularly windy areas, the slope should be made minimal, and precipitation often falls out and abundantly, you need the highest angle of the skate. In addition to the weather environment, it is necessary to take into account the roofing material that is planned to be used. For the soft roof, the degree of inclination should be less for solid - more.
And one more small, but an important nuance on this issue - the angle of the slope is better to do the same for all four slopes. So the load will be distributed evenly, and the design will be maximum sustainable, and the aesthetic appeal will remain "at the height".
Now, knowing the angle of tilt and the width of the house, we can take advantage of a simple mathematics to calculate the height of the skate, the length of the rafter legs, racks and other parts of the solo system. When calculating the length of Stropilin, do not forget to take into account the nearest sinks (as a rule, its length is 40-50 cm).
The area of \u200b\u200bthe roof for purchasing the desired amount of roofing material is calculated as the sum of the area of \u200b\u200ball rods of the design.
How to make a drawing of the roof?
- Select the scale of the drawing and carry the size of the house on the scale of the paper sheet;
- Next, we transfer the selected sizes of our roof on the scheme: the height of the skate, its length, the number and size of the rafter legs, so-in, racks, and all parts, in accordance with the calculations made earlier;
- Now you can calculate all the necessary materials and search them.
Step II: Preparation for work
To build a roofing frame, you will need standard tools and equipment: drills, screwdriver, jigsaws, hammers, chisels and so on. We already know the required amount of materials for the rafter system, so we can make them purchased. The lumber for the frame must be solid, not to have cracks, wormochin, have a bright shade, without gray or yellow plaque, smell fresh wood. The wet forest should not be laid on the roof immediately, it must be dried, to handle with antiseptic solution and dry again. The moisture content of the tree should not exceed 20%.
Step III: Mounting Mauerlat
Mauerlat is the basic part of the entire rafter system. It transmits the spacer on the bearing walls of the house. Installing the Mauerlalate for a four-piece roof is no different from similar designs with two or one skate. This process is as described in the most detailed in our previous articles.

The base base, the parameters of which are described above, is placed on the armpoca and high-quality waterproofing. If you need to connect Mauerlat, then the bars are cut into half the cross section and combine the brackets with strong fasteners.
Step iv: Laying of Lenhing or Bay Overlapping
If inside the house there are bearing walls, then their ends need to be installed - the basis for the reference racks of the roofing system. If the bearing overlaps in the house is no longer, the attic floor is overlapped with reinforced beams, for which the roofs are subsequently installed, and after - the cake of the thoughtful overlap is stacked.
Beams must have a cross section of at least 100x200 mm. The step between them is 60 cm. You can correct this figure a bit, depending on the features of your home. The distance between the extreme beams and Mauerlatt should not be less than 90 cm. This distance is used to mount the semi-bullies of the cornese swelling (removal). Movers are attached to two extreme beams with strong anchors and reinforced metal corners.
Step V: Setting support racks, runs and skates
Racks are an important detail to maintain the design, they redistribute the weight of the rafter system on the ice or overlap beams. Stands are installed strictly perpendicular to the layer plane. In four-page systems, the supports are mounted under the ski bar (hip roof) or under the angular rafters (tent roof):

Racks must be securely attached to the base with metal plates and reinforced corners. Ramans are installed as an additional support for racks. In the tent roof, the runs have a form of a rectangle, and for the Valm is ordinary skate runs.
After we were convinced of the correctness of the installed supports (using meter and level), you can mount the upper skiing bar. It is mounted on vertical racks and is enhanced by reliable metal fasteners (plates, corners, anchors and self-drawing). Now we take care of the corner deposits:

Step VI: Installation of Stropilin
The first it is necessary to install side rafters, which are based on the ski bar and Maurylalat (or fixed with the removal). To do this, make a template rafylic with appropriate cuts. We apply a rafter foot to the skate, we celebrate the place was drinking with a pencil, then we celebrate the place of the rafter for docking with Mauerlat and we make a pressure. Once again, attach rapid to the supports to make sure that the dock is true and to correct the shortcomings. Now this sample can be used for the manufacture of all side rafalines. The installation of the rafter feet of the main skates is carried out according to the general rules described in the device of the two-tie rafaling system (see article and video).
The following are mounted diagonal (angular) rafters. Their upper edge is installed on the rack and docks with the edge of the skate bar. Before that, measurements and the corresponding marble of the rafter feet are made. The lower end of the diagonals is fixed in the corners of Mauerlat:


Since diagonal rafters are longer than all other legs, they require an additional support. This feature is performed by Sprengel - support beams, which are installed under each diagonal foot, in its lower quarters (it is here that the greatest load is happening). Shprengel, as well as skate racks, are installed on the support corner beams located in the ceiling beam plane.

Between the corner ribs, the space is filled with auxiliary rapid legs - naturines. The lower part of them is based on Maurylalat, and the upper one is on the diagonal rafter. The step between these fourths should be equal to the step between the side rafters (50-150 cm).
Step VII: Dome
It remains to complete the final stage of the formation of a roofing skeleton - the installation of the crate. These are boards or bars of 50x50 mm, which are attached to rafters parallel to the skate run and Mauerlat. Step shape boards - 50-60 cm. This is quite enough to lay roofing pie. When a soft roof is envisaged, the lamp is placed in 2 layers (a control and a doomle).
Finally, several video materials:
So, we described the installation of a rapid system of a four-page roof, its basic principles, and even deepened a little in some nuances. Walm and tent structures - although not the easiest, but quite feasible option for each novice master. Especially if he has good helpers. We wish you success in your work!
The construction of the roof frame with four slots is a difficult process with characteristic technological features. When erected, their own structural components are used, a sequence of work production is distinguished. But the result will affect the spectacular form and resistance when refilling atmospheric attacks. And the home master will be able to be proud of personal achievements in the field of the roofer.
However, before deciding to the device of such a design, it is necessary to familiarize yourself with the algorithm, according to which the rafter system of the four-tie roof and the specifics of its device is constructed.
The class of four-tight roofs combines two types of structures resembling a square and rectangular envelope. The first variety is called the tent, the second - Walmova. Against the background of scanty analogues, they highlight them the absence of frontones, referred to in the roofing case with forceps. In the construction of both variants of four-tie structures, sleeve and hanging rafters are used, the installation of which is carried out in accordance with the standard technologies of the fabrication of scanty rafting systems.
Characteristic differences within the four-page class:
- At the tent roof, all four slides have the shape of an equally chained triangles whose vertices converge in one highest point. There is no skate as such in the tent construction, its function performs a central support in the sleeve systems or the peak of the hanging farm.
- The holm roof a pair of basic rods has a trapezoid configuration, and the second pair is triangular. From the tent assemblement, the hip design is characterized by a mandatory presence of a skate, to which trapezoids with upper bases. Triangular rocks, they are hips, adjacent to the skate of the vertex, and their parties are docked with the inclined sides of the trapezium.
Based on the configuration of the roofs in the plan, it is clear that the tent structures are taken to hoister over square buildings, and the holm over rectangular houses. The coating is suitable as soft and. A characteristic square or rectangular form repeat the drawings of the rafter system of the four-tie roof with a clearly designated arrangement of elements in terms and vertical projections of the skates.
Often, the hip and tent systems are associated with the construction of a single object or effectively complement the duplex, single, broken and other roofs.

Relying the designs with four slots can directly on the upper crown of a wooden house or on Mauerlat, which serves as the upper strapping of brick or concrete walls. If you can find the upper and lower supports under each ralfiline, the roofing frame is constructed on the sleeve technology.
Installation of removal rafting legs is easier and more affordable for inexperienced home roofer, which needs to be taken into account.
- With a hard fastening of the upper and lower heel of Stropilin with metal corners or with a support wooden lining, a reinforced mount of Mauerlat will be required, because it will be passed on to it.
- With the tight fixation of the upper heel and the hinge attachment of the line of the rafter, the Mauerlat is not needed, because If the load is exceeded on the roof, the hinge mount, for example, in the slider, will allow the rafter to shift slightly, without creating pressure on Maurylalat.
- With a hinge fastening of the top of the stringlin and hard fixation of the Niza, the retriverest and pressure on Maurylalat is also excluded.
Mounting Muerolat and closely related method of installing rafting legs according to the rules are solved at the design stage of the house. If the structure does not have an inner carrier wall or there is no possibility to build reliable supports under the central part of the roof, in addition to the hanging scheme of the assembly of the rafter system, nothing is suitable. True, in most cases, the utilization method of the structure is applied, to implement which it is necessary to provide a carrying support in advance.


Specific structural elements are used in the device of rafter systems for tent and holmic four-tight roofs, this is:
- Diagonal rafting legs forming ridge connections of skates. In the hip structures, diagonally, they are the same rafters, connect the skate run consoles with roof corners. In tent systems, the savory legs connect the vertex with corners.
- Nonocents, or rafting midnights installed perpendicular to the eaves. They are based on diagonal rafylics, are located parallel to each other, therefore they differ in a multiple length. Nonocents form planes of tents and holmic rods.
Diagonal rafylics and narigines are also used to build funds, then the concave roof corners are suitable, and not convex as holm.

The whole complexity of the structure of frames for the roofs with four slopes is to install diagonal rafalines, which determine the result of the formation of the structure. In addition, the shorts are required to keep the load in one and a half times greater than ordinary rafting legs of the pitched roofs. Because they are part-time working as a skate, i.e. Support for the top heel of nurses.
If you briefly describe the procedure for the construction of a changeable frame for a four-page roof, then you can put in several stages:
- Device Mauerlat on brick or concrete walls. The process of the device of Mauerlat on the walls of a log or timber can be abolished, because It can successfully replace the upper crown.
- Installing the central support for tent construction or support frame of the main part of the holm roof.
- Installation of conventional sling lines: pairs for a tent roof and a certain design solution of a row for a hip structure.
- Installing diagonal rafting legs connecting the angles of systems with a top of the support or extreme dots of the skate.
- Production in size and fastening of narigines.
In the case of a hanging frame scheme, the start of construction of the tent frame will be the installation of a triangular rafting farm in the center. The beginning of the installation of a four-tie hipper system will be the setting of a number of rafting farms.


Construction of a hipper system
We will analyze one of the common examples of the device of a holmic roof with urban rapid legs. It will be relying on the beams of overlaps, laid on top of Mauerlat. The rigid fastening of the word will be used only for fixing the top of the rafter legs at the skate run, so that there is no need for Mauerlas in strengthening. Dimensions of the box provided in an example of a house of 8.4 × 10.8m. The real sizes of the roof in the plan will increase with each of the sides by the magnitude of the cornese swell, by 40-50cm.

Mauerlat base device
Maurylalat is an element is purely individual, the method of its installation depends on the material of the walls and architectural features of the construction. The method of laying Mauerlat is planned according to the rules during the design period, because for reliable fixation, Mauerlat is recommended:
- Light foam concrete, gas silicate and similar walls to equip the reinforced railway belt, filled around the perimeter, with anchors installed during the filling period.
- Brick walls finish with a side of one or two bricks along the outer edge so that a leakage of a wooden frame was formed along the inside edge. During masonry between bricks, wooden tubes are laid for mounting Maurolalat brackets to the wall.
Mauelalat from a bar of 150 × 150 or 100 × 150mm is made. If the operation is assumed to operate the piercing space, it is desirable to take the bars. In a single frame, the timber is connected by oblique wrist. Then, the compound areas are enhanced by self-draws, ordinary nails or chophary, and the corners are strengthened with brackets.
On top of the Mauerlat, built optimal in the horizon for a particular building, laying overlapping beams. Used timing segment 100 × 200mm. The first thing is stacked by the beam, passing precisely along the central axis of the construction. In the example of the length of the bar for the construction of solid beams, there is not enough, so they are going out of two bars. The plot of dusts should be located above a reliable support. In the example, the inner bearing wall is used.
Step between the beams of overlapping 60cm. If the core box does not differ in perfect parameters, as it happens in most situations, the distance between the beams can be changed a bit. Such an adjustment allows you to slightly "to rod" construction of construction. Between the extreme beams on both sides and the walls of the house, the lumen of the 90cm wide, which is necessary to set the removal.

Because Overlapping beams will independently be able to form only two cornese swells, the short semi-bits of overlapping are attached to their ends. They establish them first only in the area of \u200b\u200bthe main part of the holm roof, exactly where the rafter legs will have to be mounted. To Mauerlata, the removal is nailed with nails, they are attached to the beam with screws, large-caliber nails, copulings, enhance fasteners.
Construction of the skate part
The central part of the holm roof is an ordinary batch design. The rafter system for it is arranged according to the rules that dictate. In the example, there are some deviations from the classic interpretation of the scoop principle: the pregnant is not used, which is installed by the traditions for the skate run. Lenzny work will have to perform a central overlap beam.
In order to build the skate part of the rafter system of the hip roof:
- Build a support frame for rafting legs, the top of which will rely on the ski run. Run to rely on three supports, the central of which is installed directly on the central beam of overlapping. To install the two extreme supports, two transverse bars are first stacked, overlapping at least five beams of overlapping. Stability is increased by two subposses. For the manufacture of horizontal and vertical parts of the support frame, a bar bit of 100 × 150mm was used, the saws are made from a 50 × 150mm board.
- Make the rafter legs for which you first need to make a template. The board of suitable sizes is applied to the place of installation, the lines of future marks are stuck on it. It will be a template for streaming production of rafaline.
- Set the rafting legs, the tops of them on the ski run, and the lower heel on the removal located opposite.
If the beams of the overlap were stacked across the box, the rafters of the main part of the roof would relieve the overlap beams, which is much reliable. However, in the example, they rely on the removal, because they need additional mini-supports to be arranged. These supports should be positioned so that the load from them and the stringly located above is transmitted to the walls.

Then mounted three rows of deposits from each of the four sides. For the convenience of the implementation of further actions, the roof circuit is drawn up by a cornice board. To nourish overlapping and ending it, it needs to be strictly horizontally.
Installing angular deposits
In a limited cornice board, the space remained corner areas, unfilled by the details of the rafter system. Here will require angular deposits, for mounting which is carried out as follows:
- In order to designate the installation direction, we pull the lace. We stretch from the point of conditional intersection of the extreme support of the frame with the beam of overlapping to the corner.
- Top on the lace we apply a bar on the place put it. Holding the bar, from the bottom to the outline of the sleeve line at the place of intersection of the Bar of the beam overlap and the angular connection of the cornice boards.
- A finished removal with scaled surplus is attached to Mauerlat and to the beam overlap.
The remaining three angular deposits are similar and mounted.

Installation of diagonal rafaline
The diagonal, they are the same, the rafter legs are made of two cross-shrinkable boards with a cross section of equal size of ordinary rafaline. In the example, one of the boards will be held by the stop above the second due to the difference in the corners of the valves and trapezoid rods.
Sequence of work on the manufacture and installation of nosov:
- From the highest point of the skate, we stretch the shoelace to the corners and to the central point of the skate. These are auxiliary lines for which we will celebrate the upcoming drums.
- A carpentry tilter - a small measurement the angle between the cord and the upper side of the corner takeaway. So the angle of the bottom washed. Suppose it is equal to α. The angle of the top was calculated by calculating the formula β \u003d 90º - α.
- At the angle β spire one edge of an arbitrary cutting board. We apply it to the site of the upper attachment, together with the edge of this billet with a lace. Delaying the surplus that interfere with a dense installation. On the outlined lines you need to cut again.
- At the angle α, we cut down the bottom heel on another trimming of the board.
- We make the first half of the diagonal rafylic, using the upper and lower support patterns. If the whole board is not enough in length, you can smack two segments. It is possible to combine them planted on a self-tapping screw to a metering piece of inch, it should be arranged from the outside of the constructed covered leg. Install the finished first part.
- We make the second part of the emergency rafter, but we take into account that it should be slightly lower than its first half. The area of \u200b\u200bconnecting boards to one element should not coincide with the splicing site of the first half of the wind.
- We sew two boards with nails in the dispersion with a step of 40-50 cm.
- On a lace, stretched to the center of the skate, blacksuate the line, which will need to be adjusted to be removed to dock it with an adjacent hostess rafylic.
Following the described algorithm, you need to install three more diagonal legs. Under each of them should be installed in the place of attachment of angular deposits to beams. If the span is more than 7.5 m, another support is installed closer to the skate in diagonal.


Production and installation of hip rafters
Lace between the top of the skate and the center of the skate is already stretched. She served asses to outlining the marbles, and now it needs to measure the angle γ and calculate the angle Δ \u003d 90º - γ. Not retreating from the proven path, we harm the templates for the upper and lower support. The upper trim apply to the place intended for him and mark the lines of the marbles for the dense entry between the diagonal rafylic. According to the billets, we make a central foot of the Walm and fix it, where it is relying.
In the space between the angular deposits and the cornice board, we establish short removal to impart the stiffness of the design and to ensure strong fixation of the extreme, shortest nurses. Next, it should be done by the manufacture of templates for the nashelnikov:
- The cutting of the board was stored at an angle δ and put it on the place of attachment to the diagonal rafylic.
- Delayed by the fact that the surplus you need to cut again. The resulting pattern is used in the manufacture of all nigsions, such as the right side of the hip. For the left side, the upper pattern will be squeezed from the opposite side.
- As a template for the bottom heel of narigines, we use the cutting of the board, sipped at an angle γ. If all previous steps were performed correctly, then this template is used to manufacture the lower nodes of fastening all other nurses.
In accordance with the actual length and "testimony" of templates, these are manufactured by narcents necessary to form the planes with hollow and unfilled by ordinary rapid feet parts of the main rods. They establish them so that the upper nodes of fastening of narins to the diagonal rafalines were located in the dispersion, i.e. The upper connecting nodes of adjacent skates should not be converged in one place. Noncentas are attached to the covered rafter legs with corners, to the beams of overlapping and removal, as reasonable and more convenient: corners or metal gear plates.

Based on the technology of the tent roof device, already familiar hip principles are laid. True, the skunk part of the rafter system in their design is not. A construction starts with the installation of a central support, to which the covered rafylics are joined, and narrows are already narrowed. If the envelope is used in the roof of the roof, then the finished rafter farm is installed.
We invite you to take advantage of our free online calculator for the calculations of the building material with a hip roof device - and follow the instructions.
Useful video instructions
Briefly with the sequence and rules for mounting the rapid system of the four-tie roof of the tent and holm categories will introduce the video:
After reviewing the specifics of the device and having learned the details of the installation of the roofs with four slots, we can safely begin to implement plans for its construction.
The roof is an equally important element of the house than the foundation and walls. Its design sets the mood of the entire architectural ensemble, makes the building neat and attractive. The four-tailed roof has gained wide popularity due to high reliability and external attractiveness, but also due to the opportunity to equip additional facilities - attic and hearing windows, erkers, etc. despite the fact that the installation of such a roof is a bit more expensive and more complex , it is still easy to build it with your own hands.
Advantages of four-tight roofs in front of duplex structures
One of the main tasks that appears at the design of your own home is the choice of the type of roof. The presence of many options among the duplex and four-tight designs requires a response to the question of which roof is preferred. And at least the aesthetics of the structure plays not the last role, the criteria of reliability and practicality act on the foreground.
The bartal roof is a classic structure that form two opposite skate and a pair of vertical end parts, called the frontones. The spacious underpowering space allows you to equip the attic, residential premises or use the attic for domestic purposes.
A classic duplex roof is easy to find out a pair of rectangular slopes, which are adjacent to each other along the central axis of the building, and two triangular frontones from his ends.The structures of this type due to its simplicity and practicality for a long time remained the most popular in individual construction. At the same time, the dependence of the geometry of the roof from the size of the structure, as well as the complication and appreciation of the structure during the arrangement of the attic forced to find other, more practical and functional options. And they were found in the form of a variety of four-tight roofs, which basically have a couple of triangular and two trapezoid skate. The latter are often called Valmami, and the roof itself is Walmova. When the design of this type is built, there is no need for the front and the ability to make the building more modern and original.
 The skates of the simplest holm roof determine the surfaces in the form of two trapezoids and a pair of triangles
 You can call a few advantages of hip roofs in front of traditional batch facilities:
- the possibility of arrangement of attic windows right on the rods;
- increased strength, reliability and stability of the rafter system;
- increased resistance to weather factors;
- the possibility of increasing the area of \u200b\u200bthe attic room by simply decreasing the width width;
- a more uniform distribution of the roof weight;
- improved temperature in the arrangement of the attic room.
Let you not be misled with the numerous advantages of a more stylish four-tailed roofing - it also has disadvantages. These include a more complex design, a slight decrease in the size of the attic room and the uneconomical spending of roofing material. As for the costs, the budget, which will be required to the construction of the other roof, is slightly different.
 The four-tight roof is not a know-how in architecture - its design is known with deep antiquity
 Classification of holm roofs
Differences in the form of buildings, as well as the requirements for the functionality and practicality of the traditional holmic roof, contributed to the emergence of many variations. If you do not consider the most exotic ones, you can select several basic types of four-tight roofs.
- The traditional hip roof, the side skates of which reach the level of the cornice. For the construction of its main surfaces, straight rafters are used, and Röbra Valm form bars, departing from the end of the skate. The developed design and distribution of the roof weight on the enlarged area allows not only to arrange the sinks on the same line, but also to increase their departure. Thanks to this, the facade of the building is reliably protected from rain even with severe wind gusts.
 In the skates of the classic holm roof, glazing elements are often built
 - The tent roof can be installed on the house, which in the plan has a square shape. A feature of such a design is the skates of the same configuration. Their ribs converge into one point, and the Valves have the shape of an equally chained triangles.
 Tent roofs are widely used in modern individual construction.
 - The semi-walled roofs received their name due to the shortened valves. Unlike the traditional roof, their length is reduced by 1.5-3 times compared with the size of the main rods.
 Side raids of half-range roofs have a shortened length, so do not get to the cornice line
 - The Danish semi-haul roof has a small frontout under the skate and a short hip from the cornice side. Such a design allows you to install ventilation and lighting elements directly into the vertical end of the roof, thereby eliminating the need to install the attic windows.
 Danish project is good because it allows you to easily equip the attic rooms
 - A semi-haul Dutch roof has a vertical eponton separating the hip for two short skate. The rafting system of "Dutch" although it has increased complexity, but it allows you to make a more spacious and practical attic room. In addition, this design is perfect for mounting vertical glazing in the attic.
 Built over the Dutch project, the roof is still rare in our area
 - The broken four-tight roof has several slopes of different sizes on one slope. Due to their different inclination, it is possible to increase the volume of the undercase. Although the broken design and can not be called a simple, houses with such a roof are found very often. The reason for popularity is the ability to equip additional living rooms on the top tier. For this reason, the roof with broken rods is often called the attic.
 The broken roof is somewhat weighting the architecture of the building, but it allows you to equip several residential premises in the attic space.
There are also more complex facilities from a set of hips, as well as those in which the four-tight roof is combined with roofing systems of other types. Designing and installation of such a roof requires many years of experience and knowledge, so the construction of a surround roof is better to charge specialists.
Design of four-tight roofs
When developing a holm roof, all types of loads that will affect it are taken into account. For this, several important issues should be solved first:
- the purpose of the attic;
- roof material;
- the degree of atmospheric influence in the construction region.
Based on these factors, the degree of inclination of the rods and the roof area are determined by the calculation of the loads and decide on the design and parameters of the soling system.
Geometric parameters of the skate
The angle of inclination of the skates depends on the snow and wind load, therefore varies in very wide range - from 5 to 60 degrees. In areas with rainy weather and high snow cover, roofs with a depreciation from 45 to 60 degrees are erected. If the region is distinguished by strong winds and a minimum amount of precipitation, the slope can be reduced until the minimum.
By determining the angular parameters of the roof, it is necessary to take into account what material it will be covered:
- slate sheets, ondulin, roofing metal and rolled materials are laid on a slope with a slope from 14 to 60 degrees;
- tiles are mounted on the surface with a degree of subtleness from 30 to 60 degrees;
- rolled coating is used at run-down skates - from 5 to 18 degrees.
Deciding with the angle of inclination of the roof, it is absolutely difficult to calculate, at what height is a horse. To do this, use simple trigonometric formulas for a rectangular triangle.
Roof Square
Even the most complex hip roof consists of separate slopes that repeat the contours of the simplest geometric shapes, therefore, most often it is enough to know the linear size of the base and angles of inclination of the Valm.
 To determine the roof quadrature, it is necessary to fold the area of \u200b\u200bthe skates, of which it consists
 The total area of \u200b\u200bthe roof is calculated by summing the square of individual valves. Skates of complex configuration are separated into several simple surfaces, after which they carry out separate calculations for each of them.
 The principles of calculating the geometric parameters of the four-tight roofs are based on calculations for simple surfaces.
 Calculation of loads
Loads affecting a four-screen roof are divided into two types:
- constant
- periodic.
The first is the weight of roofing materials, rafters, dohes and other framework parts. The second is the efforts that are precipitation and wind power. In addition, when calculating, the payload should be taken into account in the form of a variety of engineering systems and communications attached to the elements of the solo system.
Focusing on SNiP, when designing the roof, it is necessary to take a snow load of 180 kg / sq. m. With the danger of snow accumulation on the roof, this parameter rises to 400-450 kg / kV. m. If the roof has an angle of inclination of the slopes of more than 60 degrees, then the snow load can not be taken into account - no precipitation is delayed on the surfaces with such a steep slopes.
The strength of the wind load is significantly less - up to 35 kg / kV. m. If the bias of the roof ranges from 5 to 30 degrees, then the impact that the wind is becoming neglected.
The above parameters of atmospheric influences are averaged values \u200b\u200btaken for the middle strip. Performing calculations should be used by the correction factors depending on the construction region.
Calculation of the rafter system
When calculating the rafter system, the rafters step and the maximum load that they can carry are determined. Based on these data, make a decision on the installation of separations that contribute to the redistribution of the load, and tightening, protecting the framework from loosening.
 The main load of the holmic roof falls on diagonal rafters
 The presence of a hip on four-paced roofs, besides the usual rafters, requires to install also diagonal (differently, covers) - those that are attached to the skate and are sent to the corners of the building. Their length is more transverse node elements of the roof. In addition, shortened elements are fastened to diagonal iron. Compared to conventional rafters, the covered legs are tested by 1.5-2 times the load, so their section is doubled, and to ensure a lot of widespread, they propheted with one or two racks.
Often, the hip roofs have a complicated rafter system, which, unlike a simple four-tone design, has an additional load in the places of installation of vertical supports. This feature should be taken into account when calculating the strength of the wooden frame of the roof.
The laying distance of the rafter is called a step and are determined based on the length of the rafter foot and the cross section of the sawn timber used. To determine this parameter is most convenient for special tables, one of which is given below.
Table: The dependence of the section and step rafters from their length
Manual calculations are quite laborious. To reduce the design time, you can use one of the online calculators to determine the parameters of the hip roofs. With it, it is possible to determine not only geometric parameters, but also a lot of other equally important factors:
- the amount of moisture and thermal insulation taking into account the adolescents;
- the number of roofing material, including forming waste;
- the volume of sawn timber required for the arrangement of the rafter system;
- the length of the soles, etc.
Video: Using a construction calculator to calculate the roof
What materials will be needed to build a rafter system
For the construction of a holm roof, a bar and a plaque from larch, pine and other wood conifers are best suited. Choosing material for construction, it is necessary to carefully rebel defective boards. Damage to the fungus, knots and cracks reduce the strength of the boards and affect the durability of the roof. With wood moisture, more than 22% of lumber are stacking outdoors and dried. It should be understood that non-seamless boards may vary, and this, in turn, will lead to a violation of the geometry of the roof with possible damage to the finish coating.
To assemble a wooden frame, a rectangular beam is used by a cross section from 80x80 mm to 150x150 mm - the exact parameters are determined by the calculated way or using the table below. As an alternative, you can use the board with a cross section of 50x100 mm or 50x200 mm. If there is a need to strengthen the rafting foot, then use paired boards.
For reliable fastening, as well as an increase in the rigidity of the wooden frame, steel brackets and other metal elements are used. Often, unloaded skate runs are installed not wooden, and steel supports. Combined frames have increased strength and reliability.
Features of the rafter system
In order to properly design and install four-minded roofs, it is necessary to deal with it in detail with its design, as well as the features of the recovery of the hip roofs of the most common species.
The device of the rafter system in the details
A buckle roof frame consists of most of the same parts as a double, but more complex rafter system requires installation of additional elements. With a detailed consideration, it is possible to detect such components:

All these elements can be found in a four-screen roof of any type. The exception is only the tent roof, which side rafters and the skate timber does not have.
In wooden and frame houses, the rafter system is mounted without Mauerlat. In the first case, its functions take on the extreme crowns, and in the second - the upper strapping.
Varieties of rafter systems of hip roofs
Since the basis of the rafter system of the holmic roof is the axial rafters, when installing the roofing frame, you must follow the following rules:
- In constructions, where the covered legs experience an increased load, a double thickness bar is used for their manufacture.
- The splicing of individual parts of the diagonal rafters is performed in places with a maximum load (most often in the upper part of them) and are strengthened using subposses and vertical racks installed at an angle of 90 ° to rapid legs.
- In the manufacture of the savory rafters, it is necessary to provide a margin on trimming at the place, so the calculated length of the bar is increased by 5-10%.
- Responsible nodes of the compound of the hosted rafter feet must be enhanced by metal mounting elements - brackets, twists or perforated construction stripes.
When choosing a rafter system, it is necessary to take into account the size of the building and the presence of internal supports or capital congestions. Based on specific conditions, choose a scheme with hanging or sprinkling rafters.
System with hanging rafyles
Roofing design with hanging rafters does not have a support in the midline, so the main weight falls on the walls of the external perimeter. This feature manifests itself in the redistribution of internal efforts - the rafter system is subjected to compressive and bending loads. As for the walls, there are significant driving efforts on them. To eliminate this factor, each pair of rafters is connected to each other so-called tightening - jumpers from a wooden bar or metal.
The tightening can be located both at the base of the rafter legs and above. In the first case, the jumper will also perform the role of the transverse beam, which is a successful option in the construction of an attic roof. If the tightening is installed in the midline area or higher, it will only perform the functions of the fixing link. It should be noted that it seemed that there would seem a minor moment as the height of the installation of the fumes, the cost of the rafter system depends. The higher the transverse jumpers will be located, the greater the cross section of all components of the wooden frame.
 Walp roofs with rolling and hanging rafters have differences between the supporting elements of the structure
 Construction with sleeve rafters
The holmic rafted roof is suitable only for those houses whose internal space is divided into two equal parts by the overhaul or installed to support the overlap by supporting columns. In this case, the lower edge of the rafter legs rests on Mauerlat, and the middle part is to the carrier of common. The presence of additional points of the support allows you to unload the elements of the rafter system, removing from them, as well as from the walls of the building, the alternate horizontal effort. Like roofing beams, the rafters begin to work only on bending. The cutting rafter frame becomes more rigid and durable compared to the design in which rafters of a non-absorbable type are used. And this is despite the fact that in the first case you can use a smaller bar. And this helps to reduce the weight of the wooden structure and reduces the cost of purchasing lumber.
Installation of a four-grade roof
The assembly of the rafter system must be performed in a strictly defined order. This is necessary in order to properly install and secure all the structural elements of the roof.
- For the redistribution of the load, which roofing, wind and precipitate are on the walls, Maurylalat is laid on the outer walls. In individual construction for these purposes, a timing is used by a cross section of at least 100x150 mm. Anchor studs are used for attaching longitudinal beams. They must be put in the upper rows of masonry at the stage of the construction of the walls. Waterproofing Mauerlat is performed using two layers of runneroid, which is placed on top of the bearing walls.
 Mauerlat to the bearing wall is fixed using bolts or anchors
 - If it is necessary to install vertical supports, litters are placed on the bearing simpleness. Wooden lining is used for horizontal alignment of the elements of the rafter system. In the future, this will significantly simplify the installation of racks and runs. If the capital partitions of the building plan are not provided, then the vertical supports are mounted on the beams of overlaps. For this, they are enhanced, splicing two boards 50x200 mm or using one bar 100x200 mm.
 The support of vertical racks on the beams is allowed only if the design will rest on the capital congestion
 - Exhibit support racks. For their alignment, we use a plumb or laser level, after which the temporary supports are installed. For fastening the vertical support to a litter or horizontal beam, metal corners and plates are used.
- On top of the racks are stacked. The traditional hip roof needs to be installed one run, which, in fact, forms a horse. Tent structures need to install four runs. As with the installation of racks, the mount is performed using metal corners and screws.
 The ski run can be mounted as directly to the rafter foot and through wooden linings.
 - Preparation of rafters. Side rafal legs of simple four-tight roofs are mounted in the same way as the rolling roofs. First make a template. To do this, from the side of the extreme support to the skate, the board is applied as the same width as rafters. Its thickness should not exceed 25 mm - the template must be light. On this board, they note the released for reliable support and accurate fit of the rafter foot to the skate bruse, as well as the cutout, corresponding to the place of docking with Mauerlat. The marked seats are cut down and further used to quickly prepare the rafter feet.
 Making a template will be able to reduce the time of preparation rafters to the installation
 - Applying the made sample to the run bruster, it is necessary to check whether the exact fit of the rafter is needed. In the presence of gaps, the shot in the rafter is carried out taking into account the amendments. After all the support legs are ready, they are exposed to 50-150 cm increments and attached to Mauerlat and the skate. For the installation, it is best to fit brackets, but you can also take a powerful metal corner.
- As already mentioned, the diagonal rafters are made of scrambled boards or a larger cross section. To install them, you will also need a template that is prepared in full compliance with the method described above. Since the covered rafters of one side are adjacent to the corner of the Mauerlalate, and the other is based on the rack, it washed at an angle of 45 ° to the plane.
 The layout of rafters and narigines on a holm roof are performed by a template
 - In the intervals between the offshore rafters fasten these fasteners. Their step corresponds to the distance between the rafters, and the plots of supports protrude diagonal legs and Maurylalat. The load, which other people experience, do not compare with the weight that falls on rafters, so the first can be built from the boards with a thickness of 30-50 mm. To speed up the installation, you will need a template with a diagonal rafter and Mauerlat, but cutouts on half of these nurses need to be done in a mirror image.
 The use of metal mounting elements makes a truly rigid and stable system
 - If there is a need, the kills are fixed to rafters and narins. The ends of the rafter elements are cut through the cord.
 Mounting rafters to Mauerlat can be performed in several ways.
 - Strengthen the covered and side rafters. In the first case, vertical shprengels are used, and in the second - installed at an angle of 45 °. They are based on the ice or beams.
- After the rafting system is collected, roofing pie is installed on top of it.
 The rafting system is prepared for the installation of roofing materials
Dooming and insulation
Before starting the installation of the root, on top of the rafter stacked vaporizolation, and, if necessary, rolled insulation. From above, the insulation layer is closed with waterproofing film, which is mounted with an adhesive width of 10-20 mm and fasten to Brusa with a construction stapler. After that, the rakes are nauseated to the rafyles. If the roofing pie is mounted without insulation, then the vaporizolation is not required - there will be a layer of moisture-resistant material. Of course, no additional rails will not be needed, since the boards supporting the boards will be attached directly to these people and rafting legs.
Depending on the type of roofing material, one of two kinds of dohes are used on the hollow roofs:
- solid;
- rewrked.
The first most often is placed under the soft roof and only in some cases - for the arrangement of the attic room. The makeup of this type is made of a width of 100 to 200 mm wide and a thickness of at least 20-25 mm. Installation is performed without gaps. In addition, the use of plywood sheets and OSB plates is allowed. Their dignity is an extremely smooth surface that allows you to lay roofing material with minimal spending time and strength.
 Under the soft roof it is equipped with a solid peel from OSB, plywood or boards stuffed without gap
 For rarefied dohes, the same boards are used, as in the first case, however, they are mounted with a gap. Since this type of base is used to lay slate, professional flooring, metal tiles and roofing iron, the distance between the individual boards should take into account the peculiarities of the roofing material.
The fastening of the roasters is performed by nails, the length of which is equal to the tripled thickness of the boards. If screws are used for fixation, you can use a shorter threaded fastening with a length corresponding to the dual thickness of the sawn timber.
 For fastening the slate, ondulin and other sheet materials use a rarefied incracing
 The wooden base of the roofing pie is mounted from the bottom up, while the first board of each slope is displayed parallel to Mauerlat. First, the shap is stuffed on the charms, after which they cut the protruding edges with a knob with diagonal ribs. Next, begin to fasten the lumber on the main rods, the release of the edges of the boards for the covered rafters. After that, the ends of the boards are poisoned similarly to the first case.
Video: Construct the Walm Roof with your own hands
Typical project of a hip roof
During the construction of a simple holm roof, you can use a typical project that specialists developed. Project documentation includes:
- technological card;
- roofing design;
- schemes of the rafter system;
- drawings of cuts and corner adjoins;
- the statement and the specification with the full list of materials used.
As a sample, the following is a documentation for a typical project of a holmic roof for a house of 155 square meters. m.
Gallery: Drawings and Four-Screw Roof Schemes
The drawing indicates the exact dimensions of all elements of the roof at the base of the rafter farm lie triangles of the trapezoidal slot triangles are based on the long carrying walls of the tightening walls are installed at the base of the rafter and perform the role of overlap beams when creating a project must be taken into account the length of the rafter, their step, the recommended section of the timer or the board for Mounting rafters are applied wooden and metal fastening products allow you to transfer the load from one system element to another
Despite the seeming complexity of the four-tight roof, it is harder to build it with their own hands than a bantal design. It is only important to carefully deal with the appointment of individual elements and the principles of building a rafter system. Otherwise, the reliability and durability of the roof will still depend on the observance of technology and accuracy of the installation. As for additional difficulties and costs, they will pay on full satisfaction from work, which will make the construction more brighter and attractive.
The final structural element of the building should not only securely protect against precipitation, keep warm, but also emphasize architectural advantages. The form is classified by: angle of inclination (flat, pitched); availability of arches, domes; the number of external and internal ribs; The number of planes (skates). The harder the system, the most likely, it will have to hire a construction team. It is necessary to choose not the easiest option, but interesting from the point of view of design. Four-sheet roof is an ideal solution.
Types of execution:
- Walm - consists of two triangular slopes, resting by the vertices at the end of the skate. Two other planes - trapezoids.
- The half-haired - differs from the first execution by the fact that part of the inclined surface occupies a fronton. The roof of one or two planes has a shortened appearance. Tested smaller wind and snow loads. Another plus is the ability to install full-fledged windows or balconies in the field of frontons.
- Tent - triangular slots converge at one point. The use of such a decision is suitable for the house with the same size of the external walls.
Features of four-sheet roofs:
- A more uniform distribution of the load on the foundation, throughout the perimeter.
- The reduction in the amount of attic space is to reduce heat consumption for heating, complexity of the organization of the attic room.
- Good confrontation with wind and snow loads.
- Higher stiffness of the structure by increasing the number of external ribs.

Nuances of a four-page roof:
- In the end of the skate bar, the central intermediate and diagonal rafters are converged. The organization of the node is quite complicated.
- Mountain rafters are attached to the corner.
- It is necessary to power the angle of inclination of the elements to create a plane for the installation of the roof.
- The bias of the angular rafter is always less than the central and intermediate. This is the longest element.
- Support serves Mauerlat and the ski run.

Instructions for the choice and calculation of the rafter system
The construction of the house begins with the design of the project. Independent drawing development is impossible without:
- study of construction technology;
- farm calculation.
Factors affecting the choice:
- the angle of slope;
- walm roof material;
- the weight of "roofing pie";
- wind and snow loads;
- seismic danger;
- overall dimensions of the house of the house, the presence of inner bearing partitions, columns;
- planning the organization of an attic room.
The slope slope will be determined not only from aesthetic considerations. It is important to find a gold middle between the positive visual perception and preservation of reliability, the functionality of the design. The magnitude of the angle is closely interconnected by almost all the above factors:
- The use of all types of roofing materials is limited to the range of this parameter.
- The less the angle of inclination, the insignificant effect of wind load.
- An increase of up to 45-60 ° guarantees an independent approach of precipitation. The impact of snow cover is minimized.
- Reducing the angle of inclination, we obtain a decrease in the area and weight of the entire system. Falls the consumption of thermal energy to warm the attic space.
- The organization of the attic floor is unlikely at the low inclination.
Types of rafter farms
1. Wissing - the design of the holm roof is performed with a support for:
- external walls (Maurylalat);
- run (skne);
- on the internal bearing partitions, the columns inside the house through the litter.
The load distribution occurs due to the installation of additional racks under the ski bar. Lena shares the pressure over the entire surface of the inner partition (columns).

2. Hanging - used for buildings with a maximum foundation size up to 6 ~ 7 meters. The rafters are based on the walls. Load distribution using racks, tightening, riglel, dyspnosis. For hip roofs, this kind is rarely used.

Instructions for calculating the rafter system
The fulfillment of the drawing of a four-sheet roof is impossible without making mathematical calculations.
1. The size of the run is determined on the basis of the dimensions of the house. Standard solution: The length is minus the width. The middle of the skate bar is located clearly over the intersection of the base diagonals. Rock line parallel to frontal walls.
2. Skate height: H \u003d B x TGα. B is half the length of the end walls of the house, α - slope slope. The numeric value of Tangent is determined by the Bradys table.

3. The size of the central and intermediate rafters of the skate: LCTR. CATT \u003d √ (H² + B²).

4. The length of the central rafting feet of the hip: LCTR. Ralm \u003d √ (N² + B²). With a non-standard selection of the size of the skate, the value of B is defined as half the difference of the length of the house and run.

5. The size of the diagonal elements: LDGN. \u003d √ (LCTR. Ralm² + B²).

6. Calculate the lengths of these triangles is used - the property of such triangles is used. If the angles are equal, one of the parties is the proportion of lengths, the ratio of the remaining components of the figures will be observed: D \u003d 3/4 C, it means: Lar \u003d LCTR. Ralm x 3/4.

7. The distance between the rafyles depends on the choice:
- Size size, wood quality. The weaker material, the less should be a step.
- The presence, the type of thermal insulation layer - is determined by the convenience of installing the insulation (60-120 cm).
- Roofing material, its weight and geometry. The greater the total mass, the less step. As with thermal insulation, leaf dimensions take into account.
The minimum step between farms is 60 cm, maximum - 2 meters.
8. The formation and calculation of the soles depend on the preferences of residents and the height of the house. The minimum size for a 1-storey structure is 500 mm. The task is to protect the walls from atmospheric precipitation.
Building a holm solry system
Mauerlat - Bar or Upper Crown, a home strapping to which rafters are fixed. Provides uniformity of the distribution of the load on the outer walls. Section: 10x10 cm ~ 15 * 15 cm. Armopoyas - concrete reinforced construction on the upper perimeter of walls. His task is to strengthen the base under Mauerlat, to ensure a reliable coupling with the roof.

Maurelat installation options:
- On the reinforced concrete belt using mortgages, anchors.
- Anchors in the body of the wall - brick single-storey houses with a slight slope of a holmic roof.
- On the last crown of a wooden log cabin or an upper strapping of a frame structure.
- Installation on studs laid in brickwork.
- Brackets scored in wooden liners inside the brick wall and the body of Mauerlat.
- Wired from the neaned steel, laid at the time of the construction of the facade.
- On the heels, fixed in the wall by a chemical anchor - two-component composition. The glue is entered into the drilled holes in the laying of the house, hidden, securely holds the element.
Features:
- The number of studs, brackets, anchors should be greater than or equal to the number of rafting legs.
- Under the timber fit or applied to the base of bitumen mastic.

Installation Guide:
- Marking of holes for heels, anchor is carried out by laying the rails on the fastening elements, followed by a blow on the surface of the tree. On notching is drilled. The bar is dressed on the studs, fixed with a washer and nut.
- Wire connection - Ends are passed on top of the slats, make a twist.
- Schemes of extension in long sections:

- They carry out the laying of the ceiling beams either on the same level with Mauerlat, or on the bar, fixed to the wall. Step - 0.6-1 meter.
- The screed of Mauerlat by the rails, to which the racks will be fixed in the future.
- After completion on the surface of the Mauerlat, the layout of the arrangement of the rafter.
Installation of runs
The skiing timber is experiencing significant loads, installed on the rack. The correctness of the work depends:
- Symmetry of construction, uniformity of weight distribution.
- Reliability of a four-tie roof with maximum wind and snow loads.
Brief Installation Instructions:
- The scheme (hanging, mounted) depends on the presence of internal supporting partitions. Fastening racks can be to screed or overlap.
- In the houses with large sizes, the design must be strengthened with pins to ensure the resistance to the loads.
- The material for the skate and the supports are chosen the same cross section, not less than 100x100 mm.
- Before work, it is carefully measured and determined by the central and extreme points of fixing racks. The amount of run is affected by their number. Step - no more than 1 meter.
Install rafted with your own hands
There are two orders of work:
- First, the central rafters, then diagonal. Nonocents are installed last.
- Installation of diagonal elements, after that - central.
The first method is considered simpler. The second allows at the initial stage of work to monitor symmetry.
Mounting options to Mauerlat:
- Hard - in the rafters performed was carried out, the depth of which is not more than 1/3 of the width of the bar. Deepends (saddle) can be cut according to the template.
- Sliding - applied to facilities giving shrinkage. For fixing to Mauerlat, special fasteners are used, floating supports for rafters. With this method, the foot connection over the skate is performed by a hinged method.
- Crowing - the end of the rafter relies on Mauerlat. Rights of the hollow roof are made up by increasing the legs with additional cross sections (lifting) of the legs. This method saves on the material.
Registration of the skate assembly of the central, intermediate opposite rafters:
- Job is a connection with the cutting of the end of the legs at an angle. Coming cross sections. The node fastener produces nails. Additional fixation will provide a metal plate or wooden pad.
- Vancest - rafters are superimposed by each other side surfaces. Fastening - hinged (bolt), nails.
- To the skate blade - docking of the cross section of the rafted with the side surface of the run.
Diagonal foot mounting features:
- The placement of the upper node with the stop of the cutting rafter to the side surface of the central elements of the system.
- To enhance the diagonal legs experiencing the greatest load, the installation of shrgel farms is required, racks.
Installation of narinses to diagonal rafters are carried out by docking and docking with its side surface, fixation with nails.
At the end of work, it is necessary to check the equality of the angles of inclination and the lengths of the opposite rafters, compliance with the plane of the rods and the valves.
Nuances and possible errors
1. By purchasing lumber, you need to make sure that:
- The moisture content of the tree does not exceed 20%. When drying, the board changes geometry, which will lead to a change in lengths, rectinence. Violation of proportions entails flowing, reducing the resilience by wind and snow loads. The best quality in wood, harvested in the winter in the regions with a cold climate. Before making a purchase, contact the seller asking for moisture measurement.
- There are no cracks in the body, ingrown knocks, traces of insect vital activity.
- By purchasing glued bar, make sure that the seller's decency, the manufacturer. The use of poor-quality products will lead to a violation of strength.
2. Elements of the rafter system can be ordered in enterprises with a specialization in the construction and manufacturing of turnkey houses.
3. The wood before starting the installation works is treated with antiseptics and antipirens.
4. The length of the acquired rail sometimes does not correspond to the calculated size. Extension technology:
- Spit river with maximum fitting of mating planes. In the through hole, the bolt or heel is inserted with tension, without a backlash; Spin the nut.

- Vangest is more than 100 cm. Conducted with nails, bolts, stagnation spills.

- Job in cross section - dug under 90 °. The place of docking from opposite sides is overlapped with overlays. Fastening - as in the previous method.
5. Nodes are additionally fixed with metal fasteners: angles, plates and others. Each of these elements has holes for hardware. It is advisable to apply products with oval slits that allow minor displacements of mating surfaces. In the process of shrinkage, the exposure to loads may occur a risk of a hard connection.
- Lack of calculation of loads, weight. Excess valid indicators entails the destruction of the foundation, the roof frame. The required calculations can be performed independently or applying online calculators. Attracting specialists is the most correct decision.
- Step exceeds the calculated value. Saving on materials, the master will acquire many problems.
- The plane is not controlled and the hip with the cord. Deviations will cause roof sagging, the tightness and reliability of the roof will disturb, right up to its deformation.
The problem of choosing the most successful roof frame device is always accompanied by two contradictory desires. It doesn't matter what kind of building is planned for construction, any developer would prefer to get the most pretty, durable and durable design, with relatively low costs for its construction. The most fully qualified requirements are answered by the four-tie roof of the rafting system, which is one of the optimal design solutions for the housing stock.
Advantages and disadvantages of using four-tight roofs
Even a surface glance at a four-tight roof system suggests that such a truly frame system of two pairs of symmetric slopes will look much more elegant and prettier than simplified dual-tissue design.
It is clear that most of the future customers prefer to build a rafter system for the house not only because of the more interesting design, although the factor of the appearance of the construction is also important. First of all, such a solution to the design is chosen due to the tangible advantages of the fourth system:
- The use instead of the roofs of two additional opposite rods reduces the wind load on the entire design of the solo system;
- Installing two additional inclined surfaces makes it possible to remove and dump any amount of rain water, snow and ice, the most dangerous type of moisture - water condensate;
- The use of the roof of the four-page system allows to reduce heat loss by reducing the total area of \u200b\u200broofing and frontal surfaces.
Important! The roof in four slopes cannot be built "on the eyes" and the fit method, therefore, before making rafters on the roof, the sizes of the rafting beams of the four-page system are necessarily calculated on the tables and check the lengths and corners of the docking before performing the guilt and assembly.
The four-tie truck system is a balanced design, in which the loads entering the roof frame from roofing cake, snow and wind are mutually compensated as in the card house. If you try to assemble a frame without careful design training, instead of maximum strength and stability, you can get an emergency object.
The disadvantages of the four-page rafter system is also enough. Most often, the problems arise due to the need to take additional measures to protect the joints on the cutting line. In addition, it will take 30% more roofing material, insulation and expensive long bar.
Options for fourth roof circuit
In addition to the classic option, in which two triangular and two trapezoid planes are used, the roof of four slopes can be built on one of the skeletal types:
All modifications of the four-tie or hip circuit are calculated on specific climatic conditions of the roof. For example, Danish roofs are well opposed to the wind and a large number of snow, while "Dutch" is designed to resist heavy rains and snowfall in urban development. Tent schemes with small slope angles are used for buildings on open windy terrain. The classic option can be used for any conditions, but in this case it will take carefully to take the position of the building relative to the wind roses.
Construction of a rapid frame of a four-tie roof
The easiest way to understand the device of the rapid system of a four-page roof according to drawings. In a conventional two-tie design, the weight of the rafter beams was partially transmitted to the ski run and on the brusade strapping of walls or Maurylalat.
Balanced the two roof slide relatively simple, the usual fit of the rafter and the installation of the troops.
In the four-page rafter system, everything is much more complicated, therefore, in addition to ordinary rafters, in the roof frame, you have to use a much larger amount of power elements:
- Costed or diagonal rafters. With their help, the side rods of the roof are formed, the rainstream system is equalized in the direction along the main axis of the roof;
- Central rafting beams. Often the strength and stability of the diagonal rafters becomes not enough, especially on large roofs, so you have to use central rafters installed on one axis with a skate run;
- Nonocents are short rafters forming the side rods of the roof. The length of each narigin is calculated and cut off at the place of installation raftered on the frame.
In addition to the rafter elements, when building a four-tie roof, Sprengel, soils and struts are used. With their help, the load in the roof power elements is performed.
For your information! It turns out a rather complicated multi-element design, in order to take into account all the requirements for the strength and stability of the rafter system, it is best to use a ready-made software package, even the easiest.
Of course, you can build a truly system and without any design and calculation. For example, a timber and an increased cross section board can be used, and instead of the recommended strength coefficient of 1.4 units to get two or three-time reserves on the bearing capacity. But it is worth understanding that in this case the weight of the rafter system and the cost of the fourth-tip roof will increase in 3 and 8 times, respectively.
Methods for calculating lengths of the four-tie system
For the simplest buildings, such as gazebos, a barn or a small garden house, you can use a simplified option for calculating the lengths of the rafting beams. To do this, you will need to draw up the drawings of the rapid fourth roof system. To simplify the calculation, choose a classic option with two side triangular hips and trapezoidal main skates.
The basis for calculating the rapid roof design is the system of rectangular triangles. Each raftered is a rectangular hypothen. The smaller cathe is equal to the height of the skate racks, and the larger coincides with the projection raftered to the plane of the ceiling overlap, which is also called the embedding. The line of projections intersects with axial or projection of the skate beam at an angle of 45 o, which greatly simplifies the calculation.
Initially, it will be necessary to choose the angle of inclination of the slopes, usually it is 20-35 o, depending on the design of the four-sheet roof and the type of roofing coating. For calculations, you can use the Pythagora theorem for a rectangular triangle or standard tables with ready-made sling length recalculation coefficients for specified angles. In such tables, the angle value is indicated in the form of a decimal fraction, for example, 3:12. This means that at a given angle and the length of the attachment of 12 m, the height of the rack will be 3 m. Here is the coefficient of recalculation for the diagonal rafter, it is sufficient to multiply the length of the attachment by the value of the corresponding timetable amendment.
At the first stage, we define the coordinates of the installation of vertical racks of the skate and its length. To do this, measure the distance from the angle to the point of intersection of the axial line and Mauerlala, then we put the resulting segment from the angle along the axis of the skate and carry the line parallel to the wall. The axis intersection point and the line will give the place of installation of one of the skate racks. A similar procedure will be required to be performed again on the opposite wall, as a result we obtain the point of installation of the second rack and the length of the skunk beam.
At the second stage, using a construction plumb, you will need to measure the line of the diagonal rafter, knowing the angle of the slope, you can calculate the length of the hosted rafting beam. Similarly, the length of the ordinary and central rafters is calculated.
A little more complicated is the calculation of these aurities. First, the diagonal rafal beam is placed a step of installing nariors, as a rule, it is 70-90 cm. Each narigin can be viewed as a triangle catat. Knowing the size of the category and the height of the point of the adjoining of a narrower to the diagonal beam, you can easily calculate the size of the nunroot rafter.
If shprengel is used in the design of the four-page roof, the magnitude of the diagonals is used, then their value can be calculated even easier. Most often, they are installed at a distance from an angle of 1/3 on the downstream length.
Features of the frame of a fetal roof frame
The process of assembling a rapid system of a four-page roof always begins with the installation of the central frame element - the skate run and vertical racks. The skating bench can be collected from a bar, a cross section of 70x100 mm, but most often the racks are made from a 25 mm paired board. To increase the rigidity of the entire skunk beam system and racks, metal plates are stuffed on the angular joints, and the frame itself is enhanced by the inner strut.

Typically, the assembly of the rafter beams is performed on nails, and the expansion places with steel linings are fixed with bolted compounds. Before putting the rafter beams, a digging pattern is usually made in the form of a rectangular triangle from plywood sheet. The sharp angle must correspond to the corner of the slope. With the help of the template, the railway platforms for supports on Mauerlat and Konk are cut on the rafters.
The installation process of the rafter begins with the installation of central rafting beams, which will provide the necessary rigidity of the skate frame in the axial direction. Sometimes they do without them, in this case immediately go to the installation of extreme pairs of ordinary rafters, but the timber is only grabbed by nails, without final fixation to the skate.
After amplifying the ski frame, the angular diagonal rafters are installed. Typically, the length of the timber or beam is cut out with a reserve, since the upper edge will need to be styled at a double angle, first at an angle of tilt the slope, after the oblique edge is mounted at an angle of 45 o. At the last stage, they put Shpregel, the pitchpiece, nickels and ordinary rafters.
Conclusion
The most difficult stage of assembling a rapid system of a four-tie roof is the docking of two diagonal beams with a skate. From how far exactly the insertion of the diagonals is performed, the strength and stability of the entire four-sheet roof depends, so most of the time has to spend on fitting and trimming sizes of rafters. The rest of the assembly operations is practically no different from the construction of a two-tie rafter system.