One of the brightest tools in landscape design is the decorative pond. Of course, most of the suburban areas are limited to the traditional six hundred square meters, and the owners simply cannot build a large reservoir, but because of this, you should not give up the dream of acquiring an artificial pond. As for the technical part, it will not become an obstacle, but subject to the availability of good instructions and desire. So, today we will find out how to make a pond in the country with our own hands step by step.
First, you should find out what purpose the construction of a pond on the site will pursue. From this point of view, water bodies can be conditionally divided into four large groups.
Table # 1. Functionality classification of artificial reservoirs
| Group name | Short description |
|---|---|
| They are an element of the landscape composition and are intended primarily to decorate a particular area of \u200b\u200bthe garden. Active rest is not provided near such reservoirs. |
| They are deeper and are often decorated with fountains, bridges, sometimes they are equipped with lighting. Such ponds are erected near a house or a gazebo, benches with awnings are placed next to them. Therefore, it is quite obvious that such reservoirs are the heart of the recreation area for residents of the house. |
| This option is suitable not only for avid fishermen, but also for families with children - the latter will enjoy watching bright fish while relaxing in nature. |
| They also belong to artificial summer cottages and not only perform an aesthetic function, but also provide an opportunity to freshen up or even swim (it all depends on the size). |


Then, based on the goal and our capabilities, we proceed to the choice of style, location, size and shape.
Second phase. Determining the style
An artificial pond can be made in one of two possible options, and each of them also has a great variety of modifications.
Table 2. Styles of artificial reservoirs
| Name | Short description |
|---|---|
| This name exactly reflects the essence - these are designs that differ in clearly defined outlines. The geometry of the pond is correct in terms of geometry, suitable for those areas that are decorated in the style of minimalism, high-tech, modern or classic. But, which is characteristic, the shape can be not only rectangular, but also square, round, oval, broken. |
| They are more popular, because they are characterized by naturalness and irregular outlines of the banks, which means they seem to bring people closer to nature. The shape of the reservoir here depends only on personal preference, but the more complex it is, the more difficult it will be to lay the film (more on this later). |


The relief of the site also plays an important role in choosing a style. So, if the surface is sufficiently flat, then the shape of the pond can be any. If there are irregularities and drops on the site, then they need to be given special attention, but they make it possible to additionally equip a cascade or a waterfall. In addition, against the background of all this, an artificial slide, for example, will look great.
Also, the reservoir can be raised somewhat above the ground. In this case, the construction technology will differ only in the arrangement of the foundation, which will prevent possible distortions of the bowl.

When creating such a reservoir, earthwork is minimized, and it will be much easier to care for it.

Note! If the reservoir is to be built with a fountain, then preference should be given to a high construction.
Stage three. Choosing a place
To begin with, we place the reservoir in the most convenient place so that you can admire your creation from anywhere on the site. That is why, when choosing, we take into account several important factors.
- Land area. Not only the size of the pond, but also its shape directly depends on it.
- Illumination... It is preferable to place an artificial reservoir in a shaded place, in which the exposure to direct sunlight does not exceed five to six hours a day, otherwise some of the water may simply evaporate. Moreover, sunlight can develop biological activity, which is unlikely to be able to decorate the pond. Therefore, having chosen a specific place on the site, we observe the solar regime for several days.
- Relief... The shape of the pond depends on it, and it also simplifies the arrangement of additional elements (for example, fountains).
- Groundwater level, soil composition. These indicators affect not only the depth of the reservoir, but also the complexity of the work and the need for additional consumables.
Note! The deeper the pond, the more illuminated it should be placed. If the reservoir is intended for fish, then we treat the location even more responsibly, since the oxygen content in highly heated water decreases.
- Expandability... We do not forget about the perspective, so on the one hand we leave free space.
- Visibility... It is advisable to arrange the reservoir so that it can be seen from home and recreation areas.
- Power supply... If a fountain or lighting is additionally equipped, then we will think over electrification in advance. It is better to lay the wires even during development, moreover, underground and in a reliable protective corrugation. There should be small access hatches at the connections.
- Reflection. The pond will look more attractive if the surface reflects the sky or beautiful buildings, and not some kind of utility structure.
- Landscaping. The vegetation near the pond is, of course, beautiful, but the leaves will pollute it and form silt. Moreover, the root systems of trees can damage the waterproofing layer.
- Compatible with general design and other objects.
We begin work in the spring - so we will have enough time for the reservoir to "take root" on the site.

Fourth stage. Determining the size
It is difficult to say that a large pond will cost more than a small one, since there are many nuances here. Therefore, we will consider the key points.
1. Dimensions. They depend on the location of the reservoir. Many say that the pond should make up on average 3-10% of the total area of \u200b\u200bthe site, although there can be no clear recommendations in this case. As for specifically the length and width, they depend not only on the area of \u200b\u200bthe land plot, but also on our capabilities. After all, we will dig a hole under the reservoir by hand.

2. Depth. It depends on the purpose of creating a reservoir, as well as its size.
3. Difficulty of content. The larger the pond, the easier (no matter how paradoxical it may sound) to care for it.

4. Zoning. The reservoir is divided into the following zones:
- coastal (from 10 cm to 40 cm), which will serve as an entrance and for planting a plant;
- shallow (from 40 cm to 100 cm), where crops that grow deeper will be planted (for example, a winter-hardy water lily);
- deep-sea (more than 100 cm) - it is required only in those reservoirs where fish farming is planned; the area of \u200b\u200bthis zone depends, first of all, on the number of fish, but on average it should make up more than 20% of the total area of \u200b\u200bthe reservoir.

5. Biological balance. In any case, living creatures will settle in the pond, which means that it is necessary to provide such conditions so that it can self-clean. No oxygenation or chlorination of water is envisaged here. It is worth remembering: no more than ½ of the entire area can be allocated for plants.
Note! The lowest point should be lowered below the soil freezing line, especially if fish breeding is planned - so they can survive the winter in non-freezing water.
Fifth stage. Choosing materials
The next question that needs to be dealt with is the choice of consumables. There are many options on the market today that can be used to create an artificial reservoir. Let's consider them.
Concrete pond

The most expensive option, which, nevertheless, allows the reservoir to be exploited for a long time. Although concrete fill is more suitable for arranging the pool.
Finished plastic container

This option is more suitable. The form, made of fiberglass or PVC, allows you to build a pond in record time and use it for up to 30 years (the specific period depends on the quality of the container).
The procedure itself will consist of only four steps:
- digging a pit;
- set the form;
- fill the remaining voids with sand;
- we plant the plants, fill the reservoir with water.

The disadvantages of this method are the difficulty of transportation (if the volume is large) and the need for basic knowledge of installation (otherwise the bowl may be damaged). Moreover, plastic containers are destroyed over time by UV radiation.
Note! It is preferable to use a fiberglass bowl, which is reinforced with rubber - this design is more reliable and suitable for repair.

Polymer film
In terms of the shape of the pond, this option provides simply unlimited possibilities. The most accessible material is plastic wrap, although it will not last long.

A PVC film has a longer service life; with proper installation, it can last up to ten years.

Perhaps the most reliable option. For ponds with rocky bottom and great depths, it is recommended to use a butyl rubber membrane (EPDM) with a service life of up to 50 years. In addition, this material is able to withstand multiple frosts.

There are several popular ways of making a reservoir, in which scrap materials are used. Let's take a look at the most popular of these methods.
Pond from the old bath

A great option, because a bathtub is a container that was originally intended to hold fluid. The bathtub can be painted in bright colors and placed in a picturesque corner of the site, or, alternatively, deepened into the ground.
Tire reservoir
A simple way to create a mini-reservoir on the site. The manufacturing procedure is shown in the photo below.

Basin pond
An even easier way. The basin is able to hold water well, so it can be installed in the same way as a bath. With proper decoration, such a mini-pond will be an excellent decoration for the yard.

Note! The choice of material depends not only on the aesthetic characteristics of the pond, but also on its service life. It is desirable that the selected material is environmentally friendly.
Sixth stage. We prepare the equipment
To create a simple artificial reservoir, we need a level, a cart with a shovel, a cord, a hose that is used for watering, and pegs.
If the pond is more technologically advanced, then the following equipment will be needed:
- cleaning filter;
- a sterilizer (it will remove algae so that the water is clear);
- pump for pumping / pumping out water;
- aerator for oxygenation (especially important for fish breeding).

Seventh stage. Create an artificial reservoir
There are plenty of materials that can be used to create a reservoir, but we will focus on polyvinyl chloride film. The fact is that it is cheaper, takes the desired shape better, it can be repaired, and it does not require specific knowledge or skills to work.
Step 1. First, select the color of the film. There are several possibilities here.
- Black film - it will turn the bottom into a mirror (plants, clouds, etc. will be reflected).
- Cream, blue- so the pond will look more like a pool, and fish on a light background will be seen more clearly.
- Brown - will imitate the soil of natural reservoirs. A great option for a landscape pond.

Also, when choosing a film, pay attention to the composition (PVC is more durable than PE) and thickness (for a pond, you will need material thicker than 0.5 mm). Moreover, the greater the depth of the reservoir, the greater the film thickness should be. No less important is resistance to UV radiation and mechanical damage.
Note! If the depth of the pond exceeds 1.5 m, then we use butyl rubber. Such a film is resistant to stretching, deformation and UV, moreover, it can withstand temperatures of 40-80 ° C.
- pond width + (depth x 2) + stock (55-60 cm) \u003d material width;
- pond length + (depth x 2) + stock (55-60 cm) \u003d material length.
For gluing, we will use a special glue (for example, "Tagnet") or adhesive tape (Quick Seam 3).

Step 3.The next step is to create the schema.

First, we draw it on paper, and then transfer it to the ground. We indicate the sizes of steps or "shelves" for plants - this will avoid possible problems. We use sand or a flexible garden hose (preferably a bright color) for marking.

After that, we cover the marked area with a piece of light film and examine it from different angles. We make adjustments if necessary.
Step 4... We dig a foundation pit. To do this, we perform the following actions.
- First, remove the sod.
- Then we dig the foundation pit itself. At the same time, we move from the edges to the center, going deeper in the required places - this is more convenient. For laying out the stone and decorating, we equip a ledge with a depth of 60-70 cm.
- We remove the soil, and along with it roots, stones, debris and everything that can damage the film. By the way, you can make an alpine slide from the excavated soil.

When carrying out earthworks, we pay attention to ensure that the shores of the future pond are located on the same line. If a waterfall is created, then we maintain the required height difference.
Note! If a large level is required, we can make it ourselves. To do this, we lay the usual level on a long flat board.
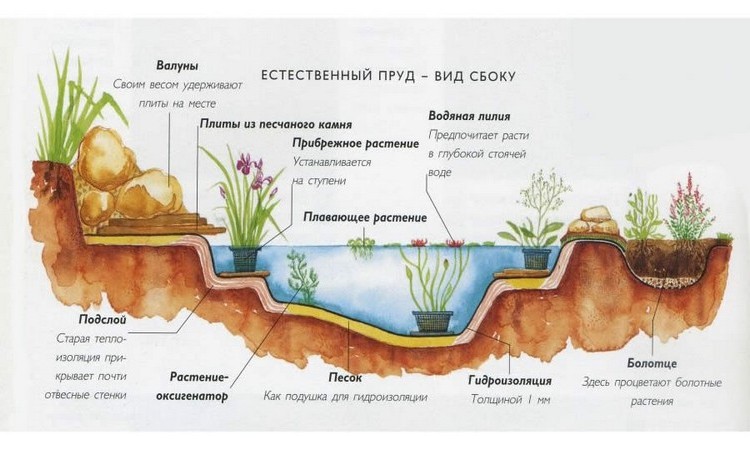
Step 5. We lay the substrate. We carefully tamp the bottom of the finished pit, after which we proceed to the waterproofing layer, which will prevent the penetration of water into the ground.
The underlay can be done in several ways:
- we cover the bottom with stones and fill it with sand (this kind of waterproofing will lose its properties after a few years);
- we lay a layer of geotextile, which we cover with sand (it will cost a lot);
- we lay PVC film (the most reliable way, so we will focus on it).
Step 6. Next, we lay the film, preferably on a sandy "pillow" (the latter will prevent damage from stones and other dangerous objects). It is advisable to do styling on a hot day - as it warms up, the film becomes more pliable.

In this case, it may be difficult to form folds. We try to make one large fold, and not a large number of small ones, then glue it or press it down with stones. The film should be loose, loose.
To secure it, we dig an additional trench along the perimeter. We put the film there, after which we fill in the crushed stone. Next, fill the trench with large stones with a flat bottom (so that the film does not break). We lay the walls with round stones (flat ones will slide). At the end, we fill the pond with water - we serve it without pressure, directing it to the center of the pit. After two days, cut off the excess film.
Step 7... Strengthening the shores. Their slope depends on the type of soil: if it is sandy, then the walls should be sloped, if we are talking about clay or black earth, then vertical. The optimum slope angle should be approximately 45 °.
The fortification itself depends on the type of coast.
If they are shallow, then you can use:
- geomat;
- geogrid;
- polymer geogrid.

You can also use a regular mesh netting, clogging its cells with soil with seeds of perennial grass (for example, clover). There is another option - to strengthen the banks with shrubs or plants.
If the coast is steep, then we can use:
- piles;
- gabions;
- retaining walls.

Can be effectively strengthened using biological methods (planting). Ideally, biological enhancement methods should be combined with engineering ones.
Eighth stage. We design an artificial pond

There are several ways to decorate a pond. To make it a full-fledged design element, we use one or more of the methods below.

As a conclusion. Care features
As a result, a few words about the further care of the artificial reservoir.

Video - Creating a pond from film
The garden pond is a wonderful place to relax on a hot summer day. Those lucky people whose dachas are located on the banks of a river or lake are incredibly lucky. If there is no natural reservoir nearby, you will have to build an artificial pond yourself.
We outline an action plan
First, let's try to figure out where to place a man-made reservoir in the country. It is advisable to allocate space for it even at the design stage of the summer cottage.
Photo: marking the territory for a decorative pond on the site
Users often search:
The pond must meet the following criteria:
- be in an open place - foliage and branches from trees will clog the water, and the roots will damage the artificial bottom of the pond;
- do not get under prolonged exposure to direct sunlight - constantly heated water provokes the rapid development of microorganisms and algae. The pond will quickly become cloudy and start to exude an unpleasant musty smell.
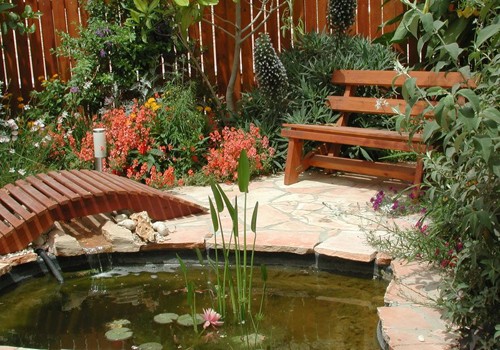
Photo: a small reservoir on the site with a wooden bridge
It would be useful to provide for the option of expanding the surface of the man-made lake over time. Perhaps the mini-pond will want to be transformed into a full-fledged water complex - with a bridge and a small fountain.
Experienced builders recommend making the pond shallow, because it is used primarily as a beautiful detail of the surrounding landscape. In addition, immediately think about how you are going to care for the reservoir. Make a comfortable approach to the pond - certainly not through the garden or the alpine slides.
The water will have to be changed on its own, because it is not purified naturally, as in natural lakes and rivers. Therefore, make sure that the tap in the country is in the immediate vicinity of the artificial reservoir.
Choosing the base material
Before grabbing a shovel, decide what will serve as the basis for the artificial pond. There are several standard solutions. Consider the pros and cons of popular options.
Reinforced concrete structure
With this material, you can create a durable pond. The bottom and banks, filled with concrete and reinforced with reinforcement, will withstand various additional loads - the installation of a fountain, for example, or sculptural compositions on the banks.
The complexity of the process makes it impractical to use this technology for the construction of small reservoirs or decorative ponds in the country. The negative aspects of this solution include the high cost of building man-made lakes from reinforced concrete. We'll have to use a lot of building materials, rent special equipment. Dismantling the structure will also cause difficulties, so it is immediately necessary to carefully consider the location of the pond.
PVC film
This is a budget solution for creating a simple summer cottage. The shape and depth of such a structure can be easily changed, it is also possible to expand or reduce the size. A pond with a PVC base is often made seasonal - for example, they fall asleep for the winter and redecorate in the spring.
The disadvantages of this solution include the fragility and fragility of the film coating - this material can be easily damaged, and if the tightness is broken, the water from the pond will quickly go into the ground. Therefore, it is not recommended to swim or indulge in such home lakes, they are intended to decorate a summer cottage.
Photo: decorative reservoir with a bridge in the landscape design of a summer cottage
Artificial store ponds
This option is the golden mean for those who dream of their own pond and at the same time do not want to bother with materials for its creation. Shop molds for artificial reservoirs are made of strong and durable materials - polyvinyl chloride or fiberglass.
The latter option is much more expensive. But the cost of such a product is fully compensated for by the high performance characteristics of the material. It is easy to establish such a form on your own without involving friends or acquaintances in the process. The disadvantage of this option is that the foundation pit will have to be dug under the shape, and not vice versa.
At the same time, the opportunity to use the unevenness of the relief to create natural coastal outlines is lost. In addition, the method will cost significantly more than using film or scrap materials. The photo below shows a finished form for arranging a pond in the country.

We make a pond from scrap materials
Another interesting option is the use of various containers that have become unusable. Old cast-iron baths, troughs, wagons - all unnecessary containers will be useful for construction.
The advantages of this method are that you do not have to buy standard forms or build bulky reinforced concrete structures. The disadvantages include the low decorativeness of old containers - you have to show imagination and skills in order to make, for example, a small pond in Japanese style from a dilapidated trough.
Mini Tire Pond
For those who have a sorely lack of space in the country, craftsmen recommend using a simple and convenient pond made of tires. Old automobile rubber is dug in, a film is laid inside, and the banks of the mini-reservoir are made out at their own request.
The result obtained sometimes surprises even experienced landscape designers - a ready-made reservoir in the country becomes an exclusive detail of a personal plot. For example, who can say that this body of water in the photo is made from an old car tire?
Pit
After the material has been selected, it is time to start excavating. It is best to do this in the summer, when the groundwater is drained as much as possible. The depth of the pit is calculated based on the material chosen as the basis. If this is a ready-made form or an old bathtub, they dig a pit 20-30 cm deeper than the parameters of the container.
If you plan to build a pond made of PVC film, you will have to dig to a depth of about 80 cm, since a shallow pond will completely freeze in winter and dry quickly in the summer heat. For ponds made of reinforced concrete, they dig a foundation pit more than one and a half meters deep - here you cannot do without special equipment.

Technology for the construction of a film reservoir
When the pit is ready, it remains to clean up the bottom and make small terraces on the sides of the future mini-lake about a third of a meter deep and up to 20 cm wide. The bottom of the reservoir is tamped, stones, rubble, pebbles, and foreign objects are removed. The cleaned surface of the pit is sprinkled with washed sand and lined with geotextile fabric. Such preparation of the bottom will significantly increase the strength and service life of the coating.
The next step is to lay the film. The size of the canvas is calculated as follows: it is necessary to add the length of the coastline to the doubled depth of the reservoir. The material is fixed on the terraces with a margin of about 50 cm. The laid film is laid with bricks or stones - this is done to maintain its shape.
Then the pond is filled with water, the film is checked for leaks and work begins on the design of the coastline. Do not cut off the remaining film under the bricks too quickly. It will serve as a hydro-sealant in the construction of the blind area.
We build a pond from an old tank
To equip a summer cottage mini-lake from an unnecessary bath or other container you will need:
- a piece of netting;
- some rubble;
- decorative stones;
- a coil of aluminum or steel wire;
- cement, sand or ready-mixed concrete.
After the pit has been dug and a bath is installed in it (30 centimeters below ground level), they begin to arrange the coastline. To do this, around the entire perimeter of the future pond, remove the top layer of soil at least 40 cm wide and dig a trench, the depth of which reaches the upper edge of the installed container.

To give naturalness to the man-made lake, tile adhesive is applied to the bottom and walls of the bathtub. After processing, the container is allowed to dry well - usually this requires at least two days.
Then, a mesh-netting is laid around the entire perimeter of the bath, which is necessary to reinforce the sides and bottom of the pond. A concrete solution or a sand-cement mixture is applied to it and allowed to dry. Next comes the turn of decorating the banks: planting plants, decorating with stones, paving paths, setting figures and other design techniques.
Thematic material:
Pond from the finished form
The pit prepared for the reservoir is cleaned of branches, bumps of earth and other debris. The bottom and walls of the pit are tamped. If the soil is too loose in the country, they are strengthened. For the finished shape, a perfectly flat pit surface is important. The plane is leveled using a building level.
The bottom of the future pond is covered with clean washed sand, which is also tamped. This layer ensures the integrity of the finished shape.

After that, the container is placed in a pit and filled with water. The empty spaces between the sides of the form and the walls of the pit are filled with sand, and this is done gradually. First, a layer 25-30 cm thick is poured and poured over with water. After even distribution of the sand, the steps are repeated until the space between the installed bowl and the walls of the pit is completely filled.
This procedure is mandatory, since the shape for an artificial reservoir is rather fragile and easily deformed. Even pressure on all sides will prevent bending.
After 24 hours, check the gap between the sides of the container and the walls of the pit: if there are voids, add sand to them. Then they pump out the water from the pond, finally wash the mold and fill it with clean water.
The final stage is decorating the finished mini-lake at your own discretion. There are no strict rules and trends here. Just make the cottage pond bring pleasure and joy. After all, it is for this that it is installed.
Water has always attracted man. That is why many are thinking about how to make a mini-pond in the country with their own hands, because then the landscape design will have its own zest. Being near water is natural for a person. You can relax on the shore, launch fish into the water, make a fountain or waterfall.
What are the ponds
The tradition of decorating areas near the house with reservoirs came to us from the East. But let's not consider the simple stone bowls in the courtyard. After all, we are interested in integrating the pond into the site design. So the East. There are 2 design options: Chinese and Japanese. In China, a mini-pond was a body of water richly decorated with lush plants. It resembled a corner of the wild. In Japan, ponds were designed differently - in the style of minimalism. Having adopted this tradition, European designers began to make ponds in their own way. They were often of the correct geometric shape. Which style to choose is a matter of taste for each owner.

There are no fundamental differences in the construction of reservoirs, so this material will be useful, no matter what style you choose for your structure. It can be a traditional Chinese or Japanese mini pond, or a high-tech creation. Building a pond is fun, and you can get everyone in your family involved. This is especially true for the design. Well, if you start the fish, then the children will be happy to feed them. The only thing that is not recommended to do in the pond is to swim. The pool is intended for this.
Pond construction
Just like in any other construction, you need to choose the right place. You should not build a reservoir where the water will be under the sun all day. Plants will wither from the excess of sunlight, and algae in the water will multiply intensively, and the reservoir will overgrow. At the same time, if you make a pond on the shady side of the site, it will adversely affect plant growth. The best option is when the sun's rays illuminate the reservoir for at least 5 hours a day. Avoid placing the mini-pond near trees. When making a pond in the garden with your own hands, keep in mind that in the fall all fallen leaves will be in the water and rot. Plus, overgrown tree roots can damage the bowl, even if you make it out of concrete. Such a garden pond should be located at some distance from the trees. As a last resort, choose a spot where old trees are growing, chop them down, remove stumps and use this spot for a garden pond.
You should be able to admire your creation. What is the use of a reservoir if it is located in the depth of the site and will not be visible? It is good to place a pond near a garden gazebo or a house terrace. Or set up a comfortable bench on the shore so you can sit and enjoy the beauty.

You need to choose the size of the reservoir. There are also recommendations here, according to which the pond occupies 3% of the site. This is the best option. However, not all people who want to decorate their site in this way follow it. They often make mini-ponds from old baths or even basins. They also build a pond from a tire. Well, lovers of large reservoirs spend a lot of effort to dig the appropriate foundation pit. Or they make two ponds and a small river channel connecting two reservoirs. This is everyone's personal business. In any case, no matter what body of water you are thinking of making, look at the different options for how you can make a pond in the country with your own hands, photos will help you with this.
Having chosen a place, start digging a pit. The markings can be done using a regular rope. If the volume of work is large, it will be more rational to use the labor of hired workers or an excavator. Well, you can dig a small pond yourself. But before you take out the ground, you need to decide in what way you will make a reservoir. There are different options. You can install formwork and fill the walls and bottom of the pit with concrete with the addition of liquid glass for waterproofing. Or buy an annual plastic pond container and dig a hole for it. And you can use the most budgetary option - PVC film, which will cover the bottom and walls of the pit.
The pit is dug in ledges (usually 2-3). Plants are then planted on them. It is not recommended to make the deepest part of the pit deeper than 1.5-1.8 m. The pond should not be made too shallow, as in this case the water will be very hot by the sun. Some owners drain it for the winter, while others do not. Usually water is left if fish are brought into the pond. If the depth of the pit is normal, then they hibernate in the deepest place. Well, if the bowl is too shallow, then the water freezes in winter and the fish die.

So, a pit for a small pond has been dug. What's next? It is necessary to seal the walls and bottom. Consider the option with PVC film as the most budgetary.
It is recommended to work with the film in the warm season, when it is most elastic. A thick layer of sand is poured onto the bottom of the pit and onto the terraces and compacted. The film is laid on it. Sand is needed in order not to accidentally damage the material with sharp stones or plant roots in the ground. The film will serve as an excellent waterproofing, preventing water from entering the soil. On the surface of the earth, around the pit, the film is bent and pressed down by large stones. By decorating this garden pond, you will arrange the stones more beautifully, but for now you need to finish with the bowl. When the film is laid, it is recommended to sprinkle a layer of sand on it. If the plants on the terraces will be planted in the ground, then you need to fill in the earth, but it is much easier to plant the plants in pots.
Another point that must be considered when building a mini-pond is that the water must be running. This way, you will have to spend much less effort cleaning the bowl and changing the water. It is easy enough to make the water circulate. You need to install a submersible pump in the pond. The water supplied through the hose will pass through the filter and drain back into the bowl. When making a reservoir in the country, you can choose any design of the drain. It can be a trickle flowing down from the nearby alpine slide (this is where you can put the earth from the pit), or you can make a fountain, which is also easy to build. You just need to beautifully design a pipe connected to the pump and towering above the surface of the water. Having built such a pond in the country with your own hands, take enough time to design it. You can use natural stones, paving slabs, decking and other materials. Your imagination is not limited by anything. You can also envisage multi-colored illumination, which will light up in the evening. Different options for the design of reservoirs in the country will help you in choosing.

When making a pond with your own hands, you must strictly observe safety measures if lighting is planned, since water and electricity are a dangerous combination. Use only factory sealed luminaires that are specifically designed for underwater installations. If you do everything right, then such a pond for a summer residence with a fountain and illumination will become a real gem of your summer cottage.
DIY mini pond (video)
Mini ponds
As already mentioned, in addition to a large bowl, you can also make a pond from a tire. It will be very small, but beautiful in its own way. It is much easier to make it than a large body of water. You need to pick up an old large tire from a KamAZ or tractor and dig it into the ground. The pond from the inside is also laid out with PVC foil. There will be 1 small terrace for planting plants. Small tires are not recommended. After all, the reservoir will turn out tiny. But tires from cars can be used when you want to make a cascade of small ponds, in which water will flow from one to another. A structure like this looks great too, especially if well decorated. For this purpose, you can also use basins or old baths. The tires can also be used to build flower beds around a large pond. In this case, they can be painted with bright colors.

Conclusion
As you can see, making a pond with your own hands is quite simple. You just need to fulfill the following requirements:
- choose the right place;
- make good waterproofing;
- provide for water circulation;
- beautifully arrange the space around the pond.
And then, having created a pond with your own hands, you can rightfully be proud of it. Creating a beautiful artificial pond is a creativity where you can fully use all your imagination. Keep in mind that it should harmonize well with the rest of the landscape design. Although options for building on a summer cottage were considered here, a pond can also be built in the courtyard of a private house in the city. Beautifully designed small ponds can decorate any patio.
Mini pond on the balcony (video)
It has long been customary that water soothes, but more and more people say that if it is near the house, it brings wealth and money. Natural reservoirs can not always be located on the territory of the site, more often they are created artificially. That is why we decided to tell you how to create a corner of extraordinary beauty in your garden with our own hands, using available tools for this.
A very important point in creating an artificial reservoir is the terrain that surrounds your house, and therefore you just need to pay attention to it. Look carefully over the entire available area, perhaps there are natural depressions or small pits on it, if any, then we advise you to use them.

Where to place an artificial pond in the country
It is better to place an artificial reservoir closer to the house, so it will have natural light. It is also important that if you have small children, you can always control their games near the water. From the point of view of Feng Shui, reservoirs must be located in the eastern or southern part of the site, then the water is beneficial, it is also not recommended to use areas planted with trees and shrubs, especially if they are fruit.


The fact is that any plant has roots that can adversely affect the condition of the walls of your reservoir, and fruits and leaves, falling into the water, will begin to rot over time, which will quickly deteriorate the water. If you really want to have a small pond in the garden on your site, then make sure that it is always clean and well-groomed.

Artificial ponds do not need to be made deep, since they are not intended for swimming, but are part of the decor of your site, in addition, it is much easier to care for small lakes. It is also worth noting that it is necessary to change the water in them, and carry out cleaning, and therefore make sure that the water source is as close as possible, thereby it will be easier for you to fill it.

What to make a pond in the garden
It is possible to arrange a reservoir from ready-made containers in the form of fiberglass, insulating floors, flexible and rigid, polyethylene, PVC film, or butyl rubber. At the same time, if you want to achieve originality, then we advise you to carefully study your shed and see if there may be large containers or an old bathroom lying there, which is perfect for the foundation of your lake. It is better to start work in the summer, or closer to it, because at this time of the year, groundwater subsides, which will greatly facilitate the tasks.


DIY pond in a finished container
The easiest way to make a pond in the country is from a ready-made container, which can be purchased at the store. It is done very simply - digging a hole code container, placing the container and leveling its edges. Cover the excess space with earth, the edges of the container can be masked with stones or left as it is. pour water, plant plants, decorate the pond itself. Here is a photo instruction:

Digging a hole
We put the capacity
We put stones
We decorate the pipe with water
Making a fountain
Night view
Backlight on the bottom
Night pond
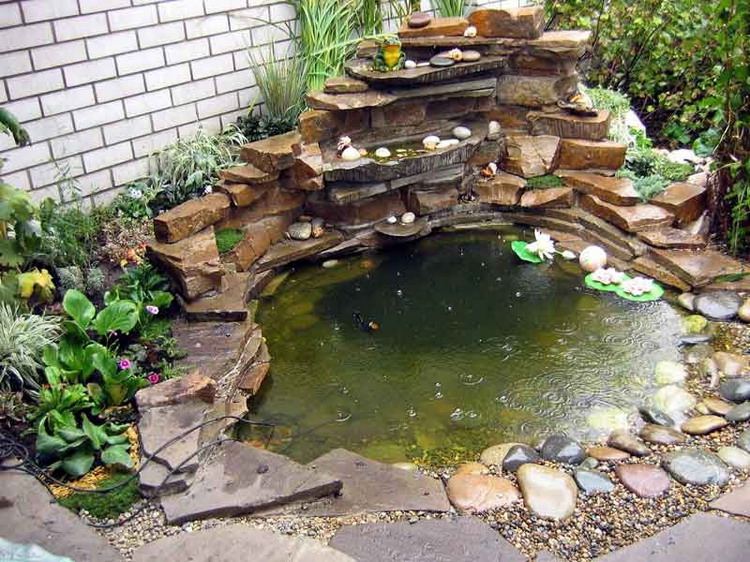
As you can see, work has been done for water here, in order to make two fountains. One is just a pipe with water disguised in an old clay pot, the other is a beautiful fountain in the center of the pond. Here are some more ponds with a fountain and a waterfall:


Also in the photo in the instructions for making a pond from a finished container with your own hands, you saw a beautiful backlight. You can do the same in your country house.

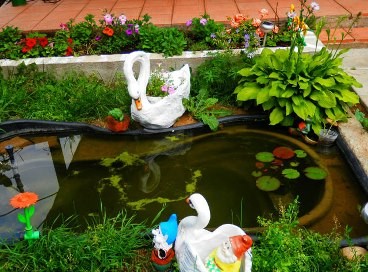
And of course, the pond needs to be decorated. You can plant plants both around the pond and inside it, you can use garden figurines - put something next to the pond or let the swan swim in the water. Here are a couple of ideas:

Diy polyethylene reservoirs and ponds
It is recommended to use polyethylene for the pond, the capacity of which is from 130 to 4200 liters of water. For its formation, the sides of the pit must have a stepped shape and gentle slopes. Look closely at the raging bottom. Free it from stones, roots and sharp objects. For polyethylene, it is recommended to use just sand, in the form of a mound with insulation of 10 cm, followed by impregnation with waterproofing. To do this, it is necessary to make a cement screed with a thickness of 3 to 5 cm and leave it for 7 days. Waterproofing will keep the sand bed from being washed away by groundwater.

After this time, fill in a layer of coarse grain sand from 5 to 10 cm and lay a polyethylene film. Instead of sand, you can also easily use a layer of oily clay, glass wool, artificial wool, old newspapers. A dense modern material, a two-layer membrane, has a higher density and elasticity than polyethylene. It will last longer, use it if, after building or renovating a house, you will have a suitable segment. When cutting materials, leave a margin of about 60 cm, this is necessary to ensure fixation. From the edge of the reservoir, make a small moat around the perimeter, roll up polyethylene into a tube and put it in it.

Sprinkle with earth and flat pebbles on top. Filling with water must be carried out evenly and ensure that there is no air left under the film. We recommend laying a layer of a mixture of clay and sand, or pebbles at the bottom of the reservoir.

It is better to plant water lilies or any other aquatic plants in pots, as this will allow you to quickly pull them out when you carry out the prevention of your small pond.


Plant any plants around the edges that are not afraid of water, and from the north, protect your pond from strong winds with shrubs.

Do-it-yourself pond with fish
Another idea is to launch real goldfish into the pond in the garden.


DIY raised pond
It is done in the same way as a polyethylene pond, only after you dig a hole for the pond - you need to lay a foundation of bricks - to the desired height of the pond. The foundation must stand for at least two days. The film, similar to the previous case, is laid on the bottom, the excess is cut off from above and an additional layer of bricks is placed on the foundation to cover the edge of the film.


Do-it-yourself ponds and ponds from the bath
If after the repair you still have an old and unnecessary bathroom, then do not rush to take it to the landfill, since in a private house it can be used for various purposes, including for creating a small decorative pond.

To place the bathtub like a reservoir for a pond, you need to make a recess. Fill the bottom of the bottom with river sand and make a cement screed. This will prevent groundwater from eroding it. Observe the ratio - sand 10 cm and clean cement for the screed 3 - 5 cm. After a week, add gravel 20-30 cm and lower the bath. Fill the side openings with gravel (at least 10 cm from the tub to the cut). The edges of the bath should not be higher than the shoreline, as this will look unnatural. Cover the pond around the perimeter with pebbles, preferably flat. A bathtub installed on a slope should be reinforced on one side with a large stone, making a tunnel for one side and a partial one for the other, which will be free. Outwardly, the free side will resemble an alpine slide formed of stone.

Making a bath pond
Bath pond
Photo of the pond from the bath
Diy ponds and ponds from a barrel
An excellent option for creating a small decorative reservoir is to use old barrels or tubs that were previously intended for pickling. These containers must be placed on their side. Make an oval hole and place it in the pre-prepared hole on the sand and gravel embankment.

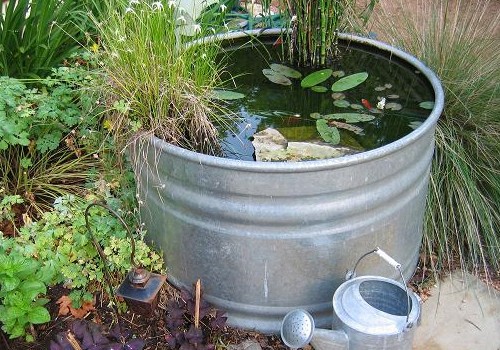
When the barrel is installed, fill the empty spaces with sand or rubble. Put cellophane in it, you can dig in its free edges, and put pebbles on the bottom. Cover the approach to your pond or pond with rubble and pebbles. Decorate with low plants on one side and sides. You can install the backlight if necessary. You can also make a waterfall, fountain or some unusual composition.


DIY mini ponds in the garden
In addition to the above methods, you can also make your own small pond using a large basin, an old trough, or a tractor tire. Such reservoirs can be made slightly elevated or deepened. In order to decorate it, use decorative brick, natural large stones, sand of different shades or gravel, it is also quite possible to decorate it with various kinds of plants, which will only complement your overall interior.


It is quite possible to create an artificial pond on your site, even if it is small in your area, for this it is enough just to turn on your imagination and carefully look around.

Remember! In order for your artificial reservoir to serve for a single year and not deteriorate, it must be freed from water in the winter season.
Photo gallery: pond in the country
And now I propose to look at what pond in the country house has already been made with their own hands by those who decided to start creating decorative ponds on their site. Someone makes big ponds, someone small. Some people like strict shapes, and they make square, rectangular and round ponds, while someone likes natural spontaneity, and they try to make oval and elongated ponds of an uneven shape. Also, everyone decorates their pond as much as they can - they add a bridge or a bench, plants and flowers, fish and garden figures, or come up with and implement their own ideas that no one else has. And we collected you photos of various ponds so that you choose the one that will decorate your own summer cottage.
Big pond in the country
Small pond in the country
Pond design options in the country
Aquatic plants in a pond in the country
Benefits of a basin pond:
- arrangement takes a minimum of time;
- fits perfectly into the design of any site;
- if necessary, the pond in the basin can be easily transferred to another area of \u200b\u200bthe yard;
- needs minimal maintenance;
- is a budget option, practically does not require financial costs.
Artificial basin from a basin it's very simple to do... An old metal or plastic basin is taken and dug into the ground. If the basin is leaky, then its bottom is covered with construction film. It is desirable that it be thick and strong. Optionally, the bottom of the basin can be decorated with stones and shells. Already filled with water, the pond is decorated with live or artificial plants, and the "banks" of the reservoir are lined with natural stone or pebbles. Can also be laid out with paving slabs.
A mini-pond from a basin will be much stronger if the bottom and walls of the basin coat with cement mortar... In addition, if you plan to plant frogs in a pond, it will be much easier for them to get to the surface on a cement surface than on a slippery film.
The solution is prepared as follows: mix cement and sand in a ratio of 1: 3 and dilute with water. Stir well until sour cream is thick so that there are no lumps left, and coat the basin. Layer thickness - 2cm. Until the solution at the bottom of the basin has frozen, you can make various compositions of stones in it. A basin covered with cement is left to dry for at least a day. After that, it can be painted with black water-repellent paint. When the basin is filled with water, the black color will give the surface of the water a mirror effect.
For mini-reservoirs with aquatic plants, it is better to use pots with a depth of more than 15 cm. In shallow basins, the water will quickly heat up in summer, and in freezing it will freeze to the bottom and the plants will die.


Device
In order for a decorative pond to please the eye, first of all, it is necessary to choose the right place for the reservoir.
Basic selection rules:
- Choose a spot in partial shade, so the water will bloom less and the aquatic plants will not wither in the sun.
- Avoid open and well-ventilated areas.
- You should not place the pond under trees, otherwise you will have to constantly remove leaves from the water, and the water will clog.
The pond should be located so that it can be clearly seen from everywhere. Choose a location so that the reflections in the pond are interesting and varied. For example, it can be clouds, trees, a house.
As a visual aid when choosing a place for a pond from a basin, you can use ordinary plastic wrap. Put it on the site of the planned reservoir, and walk, see: will the pond be visible from the main viewpoints of your site?
Mounting
How to make a small decorative pond from a basin in the country? The basin is done, the place is chosen, now we are starting to build a mini-pond with our own hands.
Tools and materials:
- Shovel.
- Pump (if a fountain is planned).
- Clay or sand for the interlayer.
- A small amount of grout.
- Natural stone in various sizes.
- Ground pebbles or gravel with smooth edges (if the basin is covered with foil).

Stages of work:
- Dig a hole slightly larger than the pelvis. The edges of the basin should rise 5 cm above the ground.
- Make a layer of clay or sand under the bottom of the pelvis and between the walls of the pelvis and pit. This "pillow" will allow you to set the basin more evenly, and the water in it will not heat up quickly.
- The dug-in basin along the edges is poured with cement mortar. This is necessary in order for the reservoir to hold on tightly, and so that during the rain the earth is not washed out from under the edges.
- At the bottom of the basin, soil is laid, aquatic plants are planted in it (duckweed, vodokras, urut water). You can decorate the pond with artificial flowers.
- Fill the basin with water.
- The area around the reservoir is decorated with pebbles or stones. It will look better when large stones are laid out first, and then medium and small ones.
- Water-loving plants such as ferns or calla lilies can be planted near the pond, and lawn grass can be planted in the adjacent area.
If the water in the pond comes from the water supply, it must first be allowed to settle. The best option is water from the nearest natural body of water, but you can also use rainwater.
Photos of finished ponds from a basin.


Pond care from a basin
For a miniature water garden to be clean and well-groomed, it needs change water regularly... Water from the pond is scooped out with a jar or ladle. If there are no planted plants at the bottom, they choose a pebble and rinse it with water. If the soil is shallow and difficult to select, then a small amount of water is poured and the soil is stirred by hand, and then the water is removed with a rag. This is repeated several times.
Walls and bottom of the basin wash with a sponge or cloth. This should be done about once a month, otherwise the water will begin to "bloom" and microorganisms will start in it.
In nature, the role of natural orderlies of reservoirs is performed by snails... Therefore, you can populate your mini-pond with them so that they clean both the plants and the pond itself from algae.
In hot weather, water from the water garden evaporates very quickly, and you need to constantly monitor that its level is sufficient. Add water it is necessary in small portions and slowly, so as not to damage the plants and decorative compositions at the bottom of the pond. If necessary, the pond in the heat can be protected with an awning or canopy.


A miniature pond from a basin can be made on any site, and there are a great many ways to decorate it, it all depends on the author's imagination.
Subject to all the simple rules for arranging and maintaining such a mini-pond, the artificial water garden will become a real decoration of the country landscape and pride of the owners.