Making furniture with your own hands is considered a creative and interesting process. Everyone can create stylish and budget products. The master has the right to independently choose an interesting design for furniture, equipping it with interesting details and high-quality fittings. The easiest way is to make a console with your own hands, which will fit perfectly into the interior of the living room.

Product for a narrow room
If there is an old table available that has lost its former appearance, then it can be used as the main raw material. This option attracts many craftsmen in that it requires a minimum of tools and financial investments to work:
- Pieces of beautiful fabric 130 cm wide.
- Rectangular table (Ikea or ISALA is ideal).
- Screwdriver, pencil, jigsaw, spray adhesive, sandpaper, sharp scissors, one metal corner, two self-tapping screws.
The prepared table must be cut in length into two even parts. All edges should be cleaned with sandpaper. If the table has removable legs, then you need to securely fix two of them. On the back of the console, you need to fix the corner (in the center). The edges of the table are pasted over with ordinary masking tape to prevent the ingress of glue. A piece of fabric prepared in advance is sprayed with an aerosol agent. There should be no bubbles on the surface. Excess fabric on the sides of the countertop is cut off with scissors. After the glue dries, you can carefully remove the tape. The free part of the metal corner is screwed to the wall as firmly as possible so that there are no gaps.

The use of cinder block
From this material, you can make a console with an original design with your own hands. To work, you need a minimum of materials: two durable wooden boards and four cinder blocks. This option is quite simple, since it takes only 30 minutes of free time to make it. Cinder blocks are placed on both sides, varnished boards are placed on top. Then the actions are repeated again. On the middle board, you can lay out your favorite books, but on the top shelf it is better to put photo frames, candles and flower pots.

aristocratic model
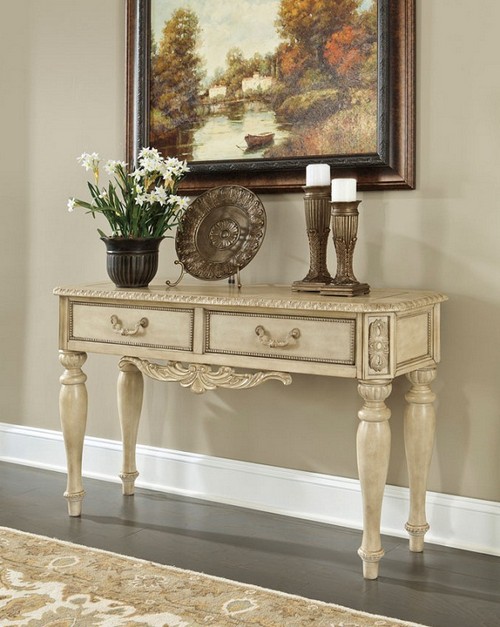
This option is the most popular. Using a minimum of materials, you can make a console with your own hands, which will become an ornament not only for the living room, but also for the room of a young fashionista. The master will need:
- Roller and brush.
- Old console or chest of drawers.
- Plain gift paper with an interesting pattern.
- White paint.
- Sandpaper.
- Wallpaper glue.
- Scissors.
It is necessary to sand the surface of the chest of drawers and remove all fittings. The product is free of dust. Apply two coats of paint to all surfaces. From gift paper, it is necessary to cut the blank to the size of the countertop with a small margin. The product is glued to the chest of drawers. It is necessary to remove all air bubbles by running a cloth from the center to the edges. Excess paper needs to be cut off and outlined with white paint. It remains only to fasten the fittings and the product is ready.

Compactness and sophistication
From improvised materials, you can make a console with your own hands, which will look harmonious in any interior. To work, you will need an old dining table, two bars and paint on wood. All actions correspond to the standard scheme, but there are some differences:
- It is necessary to shorten the legs quite a bit, since the bedside console is low.
- The cutting of the table should be carried out not along, but across.
- Those products that are painted in a bright, solid color look more aesthetically pleasing.
- The console is attached to the wall not with corners, but with a pair of wooden bars. They are pre-fastened together and screwed to the wall. On top of the bars, they simply “put on” the prepared bedside table.

Transformation of old boxes
Chests of drawers that have long been cracked and shabby are considered an excellent material from which you can make stylish home furniture. For a good example, you should study the numerous photos of consoles. With your own hands, you can build unique products from standard wooden boxes. For the manufacture of furniture you will need:
- Frame boards.
- Two plywood boxes.
- Screws.
- Primer.
- Screwdriver and drill.
- Strong board.
- Dye.
- Circular.
- Wood glue.
- Furniture clips.
First of all, the master needs to sand the boxes and cover them with paint. With the help of a circular, it is necessary to make the necessary parts and frame. The blanks are fastened with screws and glue. All irregularities are carefully filled with putty. After complete drying, the product is coated with a primer and paint. Drawers are placed on top of the frame and fixed with glue, self-tapping screws.

Sarah Dorsey Proposal
You can make such a console table with your own hands in just a few hours. The technology is in great demand in different parts of the world, since both sawn parts can be used at once. One blank can be used as a stylish TV stand, but the second can be installed as a bedside table in the living room.
Progress:
- You need to take an old round table and remove all paint or varnish from it. All irregularities are carefully sanded to apply a thick layer of primer.
- An electric jigsaw is ideal for cutting countertops.
- The edges need to be sanded and painted in the desired color, which will harmoniously fit the interior of the room.
This is a great option for transforming an old table into two original consoles.
A budget option
Experienced craftsmen know many options for making a console with their own hands. From PVC and old kitchen furniture you can build interesting products. For beginners, it is best to make multifunctional products from cabinets of suitable size, which must be combined into one, long structure. A solid board must be stuffed from above. A small bar is attached to the back of the table. The board itself can be rough and unpolished. If desired, it can be ennobled, thereby constructing a less weighty and bulky product. If the master has the necessary skills, then you can use all your imagination to create a truly original console.

Variety of materials
For the arrangement of personal housing, you can use different types of furniture. The living room console allows you not only to emphasize the existing design, but also to create an additional corner for placing personal items, flower pots or cosmetics. In order for a hand-made product to last as long as possible, you need to choose the right consumables. In the factory, pine, oak, ash, mahogany, beech are most often used. Of course, such furniture is not cheap, which is why not all citizens can buy it.

To save the family budget and get high-quality furniture, it is best to choose veneer products. This material is absolutely safe for humans, well resists the negative effects of moisture and mechanical damage. The surface of the plates can be decorated at your discretion: stick a laminate, fill it with a high-quality polymer, use a PVC film. Not only the amount of expenses, but also the durability of the console depends on the choice of a specific material. Among the finished furniture, stone models have gained great popularity: granite, marble, turquoise. These materials are durable and expensive. A forged product will perfectly fit into a classic interior. Thin coils are obtained from thin rods.
What could be better than a beautiful comfortable table? Maybe two of these tables? Or the same table, but much more compact? We know how to turn the most ordinary table into a narrow console table with two legs with our own hands. Or divide it into two and make a rack. Do you know?
You can create a real exclusive from a sawn table with your own hands. Surely you admired them in stores, where prices often "bite". But you can make such a "piece copy" yourself. And it will come out much cheaper than the store version.
The best part is that this table can be made from absolutely any high table. You can even take an old countertop and screw beautiful legs to it (for example, from IKEA). And there are plenty of ways to decorate this item.
Another opportunity to save money is to buy a beautiful (high-quality, new), but heavily discounted table. After all, as you know, for furniture that has stood on display or has at least a tiny defect, stores cut prices well.
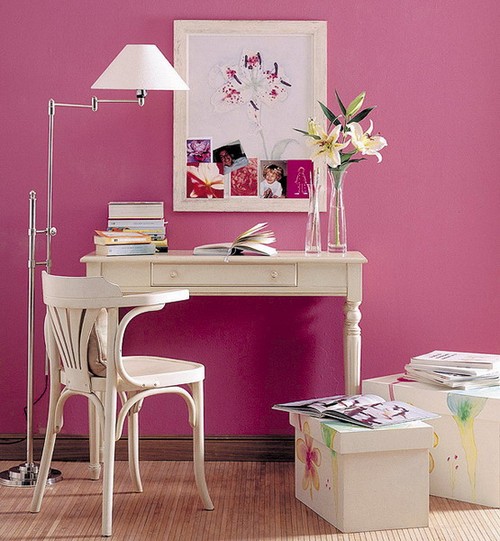
master class number 1. console table for a narrow hallway
Is there a lot of free space in your hallway? Or do you like miniature things? Or maybe you are attracted to the idea of a classic console table, but you cannot afford such a thing? In any case, you will certainly love this idea - a tiny console table from ... the most ordinary table.
Here's what you'll need:
- rectangular table (for example, ISALA from IKEA),
- piece of fabric 30 cm with a width of 1.20 m (choose any you like),
- glue spray for fabric, jigsaw, screwdriver, tape measure, pencil, scissors, sandpaper, 2 screws and 1 metal corner (for greater reliability, you can take 2 corners and 4 screws), masking tape.
How to make such a console for the hallway with your own hands.
1. First, cut the table into two parts, along the length. A tape measure and a pencil are useful for marking. Sand the edges with sandpaper to avoid splinters.
2. If you have a table with removable legs - fasten two of them, if the legs are not removable - your console is almost ready.
3. Then fasten the metal corners on the reverse side of the tabletop: one in the center or two along the edges (see step 7 for what to do with the corner).
4. Paste the edges of the table with masking tape - this is necessary so that glue does not get on them. And then prepare a piece of fabric of the right size and spray glue on the surface.
5. Gently place the fabric on the countertop. Make sure that there are no bubbles left (if they appear, smooth the fabric). If there is excess fabric left on one of the edges, cut it off with sharp scissors.
6. Once the glue is dry, the tape can be removed. And admire the work of your hands - the original designer console.
7. Attach the free part of the bracket to the wall, making sure that there are no gaps between the console and the wall.
What else can be added to such a table?
If it is a mirror, it will play the role of a dressing table. Hang shelves or a writing board on top - useful for the kitchen or dining room.
If you made it for the hallway, hang a couple of hooks for bags and umbrellas.
Don't want to mess around with fabric and glue? Choose beautiful stickers.
And the table can be painted in advance in some interesting color, varnished, covered with patina ... In general, there are many options. And all you need is a tabletop and beautiful legs.
master class number 2. bedside table on two legs from a sawn table

This compact item can decorate your living room or bedroom. It is done in a similar way. However, there are some nuances.
You will need an old dining table, wood paint and 2 bars.
Here differences from the previous master class.
1. Shorten the legs, because the sofa (or bedside) table is usually lower than the dining table.
2. It is necessary to cut the table not along the long part, but along the short one.
3. The product painted in a bright color (with a brush or spray gun) looks especially impressive.
4. A stable position is fixed not with corners, but with a pair of bars (approximately 1/2 of the width of the already sawn tabletop). They need to be connected to each other and screwed to the wall. A ready-made bedside table is “put on” from above.
master class number 3. two consoles from one sawn round table
 |
 |
And this guide from Sarah Dorsey is a great example of using both sides of the table. One of them (yellow) became a console under the TV in the bedroom. The second one (painted blue) serves as a bedside table in the hallway.
How to make such semicircular console tables with your own hands.
1. Take an old round table, remove old paint or varnish, sand the bumps. Apply primer.
2. Saw the countertop with an electric jigsaw into 2 equal parts.
3. Sand the edges and paint in colors you like and match the color palette of the room.
4. If desired, you can also create an accent section of the wall, as Sarah did for the yellow model.
And lower - another example of using two parts of the same table. One (only the tabletop is painted) is for the hall or dining room, the second (fully painted) is like a dressing table in the bedroom.
 |
 |
what other consoles can you make if you cut an old table
The same technology can be used to narrow dining table with two legs.
This compact model will be met with a bang by the owners of small kitchens, where there is no place even for a snack. To do this, again, you need a square table - you can buy a modern one, but grandfather's legacy will look especially chic. The technology is exactly the same. Just do not forget to first remove all the "insides" - boxes, folding mechanism, etc.
But what to do with the second half of the table if you don't need the second console?
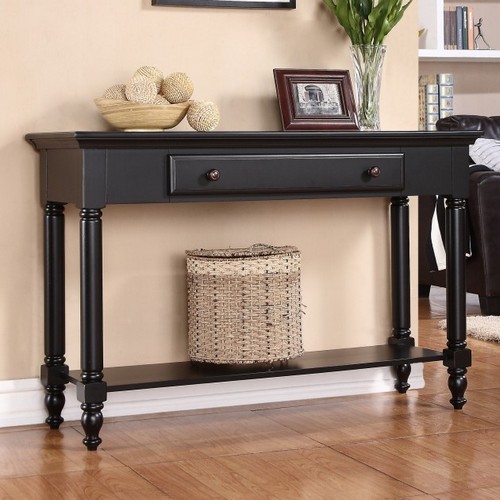
If you want to use such a valuable resource to the maximum benefit, do two-tier console-bar with a shelf. The main difference is that the legs of the upper part are shortened by about half (they can be more or less, depending on the tasks of the rack).
How can such a console be used? Yes, whatever! It is ideal not only for the hallway, but also for the dining room or minibar. By the way, pay attention to how the author of the idea coped with the task of storing bottles: they are in tubes for stationery. And the glass holder can be hung from the bottom of the second tier.
 |
 |
In addition to the kitchen and dining room, such a compact table on two legs will come in handy in other rooms.
If you strengthen a small rack from above, you get workplace needlewomen or in the nursery.
And if you still have an old door leaf, a shelf and a couple of brackets, you get original design with vintage charm(do not forget to paint everything in one color and make a patina effect).
 |
 |
And in this section - a few more examples of such narrow consoles, made by hand from sawn tables.
And one more variant of "non-waste production". Do you recognize the good old LACK from IKEA in this turquoise table? Yes, that's what he is. How did they make it so tall, you ask? Very simple - by connecting two legs into one. If you are in need of free space under the table - take the idea into service.
The female class has always devoted a lot of time to the process of setting up a “marafet”. The attributes of this sacrament were also appropriate - lush boudoirs, furnished with massive wooden dressing tables with huge mirrors, were considered the holy of holies, where the ladies of previous eras spent most of their lives preening and tormented by the eternal question: “Am I the most beautiful in the world?”. Today, the fair sex is in permanent time trouble, when it’s not only possible to spend half a day in front of a mirror, but even five minutes for makeup is sometimes not possible. It is logical that such a lifestyle left its mark on the "ladies'" furniture: bulky dressing tables were transformed into small dressing tables, which are absolutely not difficult to make with your own hands, even from solid wood.
Especially if you choose the configuration and dimensions of furniture that require a minimum of material, financial investments and labor costs. If we are talking about something “sort of” - a dressing table with radial surfaces, sophisticated decor and carved legs, then not all home craftsmen will be able to handle it: professional cabinetmakers are always ready to help you here.
The modern interior cannot boast of elegant and beautiful items. Today, most often, laconic and functional furniture is selected for him.
But it was not always so. In the times of kings and castles, each object in the room was distinguished by its originality and ornate elements.
It was in those days that the classic in our understanding of the console table appeared.
Of course, its analogue was used before, but in the 17th century, King Louis XIV of France introduced the fashion for baroque console tables, which can be seen in the paintings of many artists of that time.
And although we associate console tables with something old, they can look quite modern and take their place in an apartment or house.
Article content
- Console table in a modern interior
There were few uses for a console table in its heyday. Most often, he served as a beautiful stand for expensive and exclusive things. It can still be used for the same purpose today.
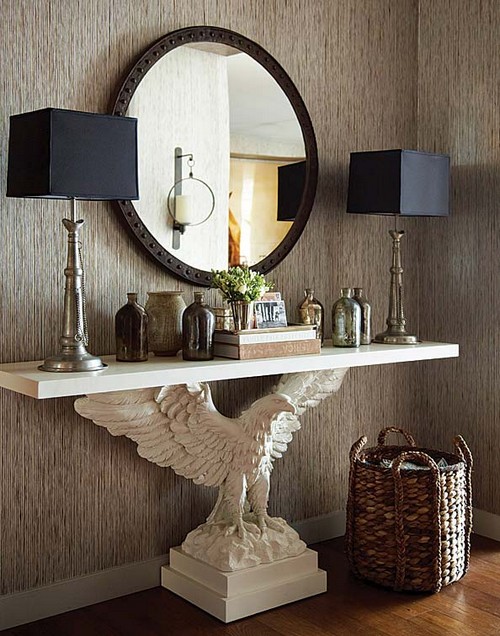
In this case, a small console table is placed against the wall in the living room and not only supports beautiful accessories, but also serves as a spectacular addition to them.
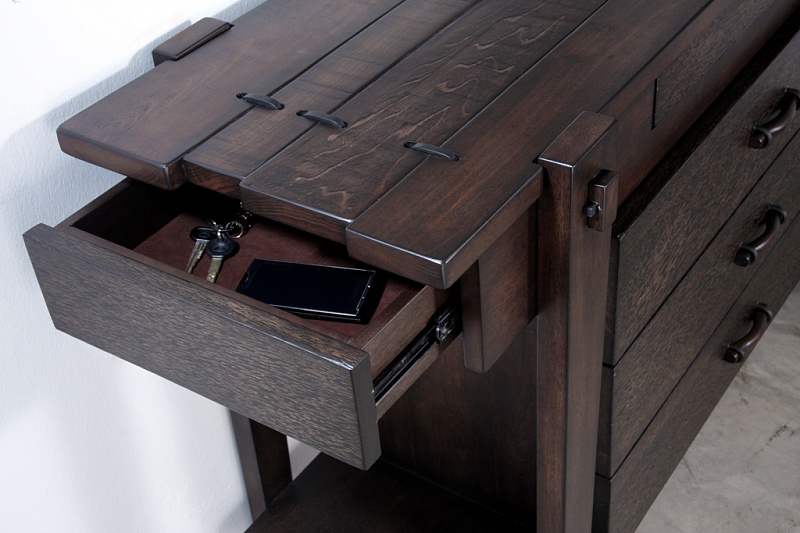
In addition, if earlier a console table consisted only of a tabletop and legs, then in a modern version such a table can be supplemented with drawers or open shelves.
Therefore, the options for using this piece of furniture has become much larger.
Organically looks console table, located behind the back of the sofa, located in the middle of the room. It can be used as a bar counter or place indoor flowers in beautiful pots.
The installation of a console table in the hallway has become traditional. In this room, such a table is complemented by a mirror or soft poufs.
Also, in addition to the console table in the hallway, you can hang a hanger or put a basket for umbrellas.
This option looks especially relevant for small hallways.
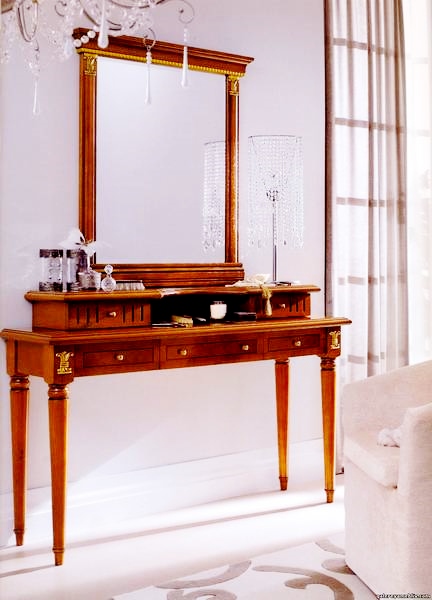
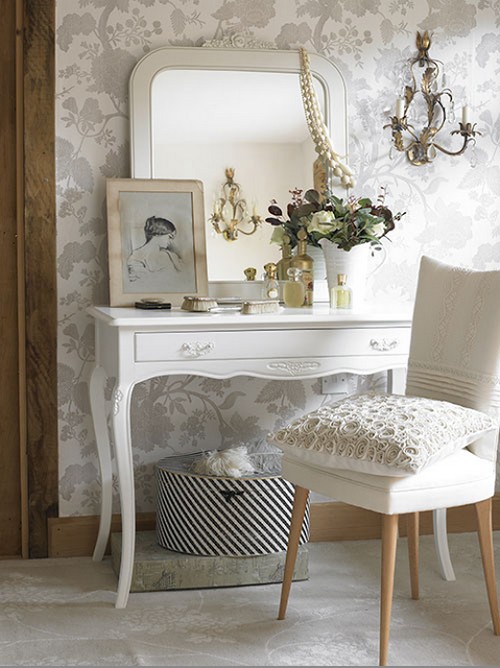
The console can also be found in the bedroom, where it is used as a dressing table. Complemented with a mirror and a matching chair, this small table will bring an element of femininity to the interior.
If you are puzzling over how to arrange an office in a room that is used for a completely different purpose, then a console table can also help here.
Complementing it with drawers, you will get, though small, but a separate comfortable workplace where you can sit at the computer or do needlework. In the same capacity, the console table can also be placed on the loggia.
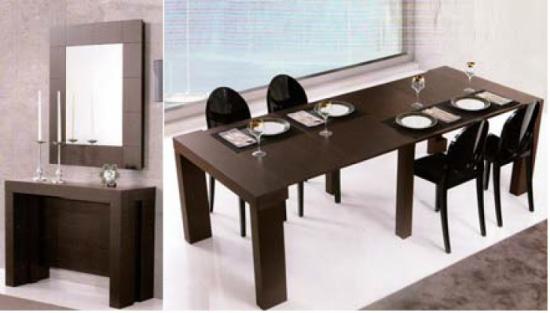
In small kitchens, a console table can replace a dining table.

There are models that are easily laid out, increasing in size at times. And if, when folded, it can easily accommodate a couple of people to have a bite to eat, then in a full-size form, large groups of guests can be received at such a table.
Console models depending on functionality
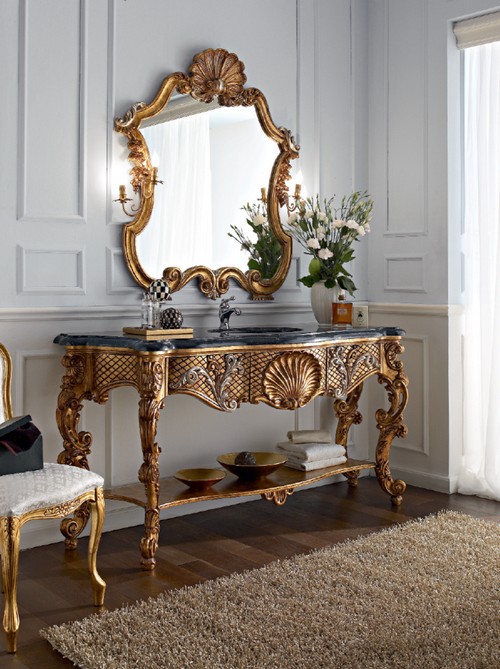
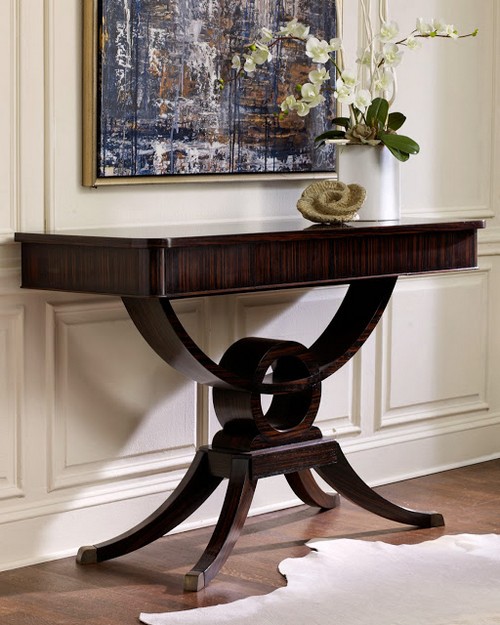
There is a huge variety of design models of the console table. So it can be a table with carved legs in the Baroque style.
Instead of classic legs, a figured base in the form of an animal can also be used. They can be mobile or wall mounted.
Laconic console table with drawers located under the tabletop, it is convenient to use even as a small desk.
And if you put the console on wheels, then it can not only be easily moved from place to place, but also used in the living room as a coffee table.

But there are also console tables - transformers. So a small console table from a coffee table can, unfolding, turn into a fairly large dining table.
Modern console table can be made from a variety of materials - wood, stone or plastic - which allows you to fit it into any interior.
And the choice of consoles with carved legs or straight lines guarantees that you will be able to pick up this piece of furniture in any style.
Photo of a console table in the interior

The manager's desk is more than just a work…
A do-it-yourself table is an amazing variety ...
Orthopedic chair - photo tips for choosing ...
DIY dressing table: sizes and drawings

Before you start making a dressing table with your own hands, you need to consider its overall dimensions, based on the space of the room where the future furniture will be located, and develop drawings. The height of the dressing table is standard and is 750 mm, but you can experiment with the length and depth. A dressing table with dimensions of 800x400 mm or 1000x500 mm will definitely look advantageous - the proportions are good both from an aesthetic point of view and for installing a considerable number of shelves and drawers.
In addition, a tabletop with the above dimensions is convenient and roomy: on its surface, you can freely put a couple of dozen more beauty accessories that did not fit in hidden storage areas.
As for the configuration, the makeup table can be: freestanding, side or console. A stand-alone table has a rigid structure of a tabletop and supports - sidewalls or 4 legs. The attached version is assembled from a tabletop and two racks that partially carry the load: such furniture is additionally attached to the wall plane. The console dressing table is hung on the wall with a hinged mounting plate or rests on decorative brackets. Of all the listed types of design, the most budgetary and rational for small rooms is console furniture: it does not take up a significant area, and not so much material will be used to create it.
DIY dressing table: detailing and assembly
A do-it-yourself dressing table with a cantilever design is the best option. However, despite its attractiveness, due to its small capacity, many people prefer to make traditional free-standing furniture.

The most elementary frame for a free-standing dressing table with dimensions of 1000x500 mm is assembled from five parts:
- countertops with a thickness of 35 mm, the edges of which must be processed with a manual milling cutter;
- two sidewalls 20 mm thick with approximate dimensions 720x440 mm;
- the front bar, which performs the functions of the tsargi;
- back wall.
All the above dimensions of the table parts may vary depending on the thickness of the purchased material. There are several available ways to assemble a dressing table with your own hands: on confirmations or dowels. The option with confirmations is simpler, but to mask the fasteners, you will have to use not very aesthetic plastic plugs. Assembly on dowels refers to professional methods, it requires the accuracy of manufacturing both the dowel itself and the mating part - the notch. The tabletop will be easiest to attach to the frame of the table using furniture corners.
We recommend ordering a mirror sheet in a glass workshop, having previously prepared a surface for it and accurately calculating its dimensions. You can attach the mirror to the wooden plane of the base with a special double-sided adhesive tape designed for glass, with liquid nails, or using professional mounting hardware. Get ready for some difficulties at the stage of “reunification” of the frame of the dressing table with the mirror: for this, metal or wooden planks are usually used, with the help of which the plate with the glued canvas is attracted with self-tapping screws to the back wall. Fasteners must be chosen so long that it does not pass through, damaging the front surface of the rear wall. When the basic design of the table is ready, they start assembling the boxes on all the same confirmations and attach guides under them.
A more simplified solution for organizing storage spaces in a dressing table is a built-in nightstand. It is always much easier to install shelves, screw on hinges and hang doors than fiddling with drawers that require careful fitting and laborious fastening of rails.
Selection of accessories in the manufacture of a dressing table with your own hands
An important touch that gives furniture completeness is fittings: handles, hinges, legs and various decorative elements. When choosing the "finishing chord" for the dressing table, as well as for any other furniture, it is necessary to strive to achieve harmony in form, style and color scheme. Laconic handles in aluminum or stainless steel are the details for the design of a dressing table in a modern style, and ornate elements in brass or "bronze" look for a classic or rustic piece.
The frame of the mirror is chosen in the same style as the fittings, although in the design of a modernist dressing table, the mirror sheet can simply be fixed on a hard surface of a wood board without any frills. The console dressing table will look original if you complement the straight-line design made by yourself with a frame for a mirror made of a patterned baguette.
A wooden dressing table is not the most difficult carpentry product of all possible, quite doable with your own hands at home. If you don’t aim for something beyond the original, then even with minimal skills, such simple furniture is quite within the power of a “hands-on” craftsman. An exclusive wooden product with complex detailing and finishing is, of course, the parish of a specialized workshop. Here you can order a dressing table of any configuration, made in any style, including exclusive
model or stylized antique

Console table - support for expensive things
The heyday of console tables came during the reign of the Sun King Louis XIV, who lived in the 17th century. The 17th century entered the history of art as the age of the Baroque, which is characterized by a love for everything elegant and pretentious. It was at this time that the fashion appeared to decorate interiors with various expensive figurines, vases, bowls, paintings and mirrors in heavy frames, high candlesticks and other decorative accessories. Louis XIV was known to the world not only as the king of France, but also as a noble collector of objects of exquisite artistic execution. However, having collected a truly huge collection of beautiful things, Louis XIV faced a problem - he could not find a worthy support for his collection.
At this time, small console tables made of wood were especially popular. Such tables were most often installed near the wall, and one or two curved legs served as a support for them. Despite the fact that the console tables themselves looked very elegant and stylish, Louis XIV felt that they were not luxurious enough to store his favorite accessories on them. And then he asked the court master to make several tables according to his own project. According to the plan of Louis XIV, the legs of console tables began to be covered with gold, and in some tables, huge figurines of animals represented the support instead of legs.
Since then, for a long time, console tables in the interior have been a sign of luxury and belonging to the aristocracy. Now some tables from the collection of Louis XIV adorn museum rooms. However, they can be seen not only in museums. Since then, they have changed somewhat, but have not lost their elegance and perfection.


Console tables in modern interiors
If earlier this piece of furniture was extremely concise, in fact, it consisted only of a table top and legs, then a modern-style console table can be equipped with drawers, cabinets and additional open shelves. Since a modern console is made of any known materials - wood, plastic, glass, artificial or natural stone, etc., it becomes a harmonious object in the interior of each room.
Traditionally, this type of table is used to equip the hallway. By installing a console table in the hallway, you will get a great alternative to the usual furniture and the opportunity to free up space for other interior items. For example, depending on the material and design of the console, you can choose an elegant hanger, an umbrella basket, an ottoman or a stool for it. Some consoles for the hallway come with a mirror, which makes up a single ensemble with the table.


However, the territory of the console table should not be limited only to the hallway. It can also become a wonderful art object in a guest room if, following the example of Louis XIV, you store various figurines and interior accessories on it. The console looks very interesting in the interior of the living room, where the sofa is located in the middle of the room. By setting the table close to the sofa, you will get an additional area that can be used as a bar or flower shelf. Depending on the interior style of the living room, you can choose the most suitable and harmonious console. For example, wooden products on elegant legs will perfectly complement classic styles, and a light transparent table will not burden the space of a minimalist living room.


The console is also indispensable in the bedroom, because if it is equipped with drawers or shelves, it is convenient to use it as a dressing table. A white dressing console table will look especially stylish in the interior of the bedroom, which will immediately give this room the grace and mystery of a women's boudoir.


Also, the use of a console table will be an excellent solution for decorating a work area in any room. Due to its compact size, the written so-console will not take up much space, but it will be convenient not only to store the office, but also to work at the computer. If there is a catastrophic lack of space for organizing a working area, pay attention to modern console corner tables or transformer tables that can even fit on a loggia.


In addition, a transforming table of the type of console is ideal for small kitchen spaces. The design of such a table allows you to complement or expand its tabletop. As a result, the dining console in the kitchen occupies a minimum of space, but if necessary, it becomes so spacious that it can easily accommodate not only households, but also guests.


Unusual console table functionality
In addition to design diversity, models of modern consoles differ from each other and design characteristics. For example, the legs of some consoles can be equipped with rolling casters, making such a product convenient to use as a breakfast table. Also, the console can be attached, that is, attached close to the wall with the help of special elements.
Despite the fact that the console table is, first of all, a display of designer beauty, it is also a fairly functional piece of furniture. By choosing the right model for your interior, you can effortlessly add additional bright accents to it.
Chests of drawers - the trend of the season Fashionable design and space solution - podium bed
Console types
A console table can be compared to a table that is cut lengthwise. As for the number of legs, they can be either all four, or one, or two. There are several types of consoles: free-standing console. It is a narrow table that can be placed against a wall, near a sofa, or even in the center of a room. Original models on rollers are offered by furniture manufacturers. This console table can even be used as a breakfast table. side console table. This model is very reminiscent of a table sawn in half and having only two (sometimes one) legs. Usually, the console is screwed to the wall or leaned against it. wall console. This model is a shelf with a decorative leg, "hanging" above the floor. The main difference between such a shelf and the usual one on brackets is a stylish oval or drop-shaped tabletop, decorated with carvings or overlays.
Console tables in solid walnut
 Watch this video on YouTube
Table console-transformer
Furniture transformers will help to find a solution to the eternal problem of lack of space. Perhaps the most striking example of such a solution is a transforming console table. Their advantage is that they do not have to exist separately. If you want - put not one, but two or even three of these tables near the wall, and they, like invisible ones (except for the trace from attaching to the wall), will help save space and at the same time they will look great in the interior! Do you have a very tiny kitchen, and there is not enough space even for a full-fledged dining table? No problem! Made of polymeric materials, tables-console transformers are easy to use and durable. If necessary, they can be easily disassembled, freeing up space, and reassembled if you are expecting guests or want to arrange a large family lunch or dinner. Just unscrew the support leg and the mounting bracket and you're done! A separate issue is the appointment of such tables. From here you can smoothly move on to the requirements for the material of manufacture, color scheme and design. So, for example, two transforming console tables will look great in a high-tech interior, for example, with modular kitchen furniture. On such a table, you can preserve fruits and vegetables, sculpt dumplings, and iron bed linen. If you put a special cover on the table top, it can be used as a cutting daughter and as a decorative panel on the wall. You can, for example, attach a calendar or poster to it. At the same time, such a table can serve both as a dining table and as an addition to it. And for family tea parties, such a transforming table is completely necessary - in the kitchen or living room.


As you can see, the use of transformer console tables in the interior is quite functional. Made of precious wood, with side panels, one or two curved legs, inlaid on the lid, such a table will be appropriate in the interior of a bedroom, office, living room and at the same time will not cause any stylistic dissonance with its bright appearance. In summer, a transforming console table can be used as a coffee table.
in the interior of the living room or on the glazed balcony. Do you want to place
Console table from an old chest of drawers
When an old chest of drawers appears in the house, as a rule, we throw it away. But creative owners have learned to give such furniture a new life with the help of a few, not very complicated, tricks. Moreover, they are so simple that even a novice master can cope with such a task.
And if you want to do such a thing yourself, then first you need to remove the drawers from the chest of drawers, and carefully process all surfaces with sandpaper.
With the help of furniture panels or ordinary plywood, we give the front of the drawers a more presentable look.
You can add regular wooden frames on top (for example, photo frames).
In this case, they must be connected with a strong adhesive. It would be ideal if, during the gluing process, the frames can be attached with furniture clamps. 
With the help of a nailer, we attach the front parts of the boxes to their rest.
This is how the finished boxes will look in the future table.
At the same time, the upper drawers of the old chest of drawers must be thrown away, and instead of them, attach a piece of plywood or furniture panels using self-tapping screws and glue.
To give a presentable look, paint the frame and the top of the table white (you can use a different shade).
We attach handles to the finished boxes.
This is how the console table should turn out in the end.
Console table made of drawers
Old chests of drawers are not the only material from which you can create stylish furniture. For this, the most ordinary wooden boxes can come in handy. A table made from such improvised means can successfully complement the interior of the living room and another room. In order to create it, you will need:
- 2 plywood boxes;
- Boards for the manufacture of the frame;
- Stable and strong board for the top;
- Primer;
- Drill and screwdriver;
- screws;
- Putty;
- High quality wood glue
- Circular;
- Clips for furniture;
- Dye.
To begin with, we sand the boxes well and cover them with paint.
Then, using a circular saw, we cut the necessary parts and make a frame, as shown in the figure. We connect all the parts with screws and glue.
After the design has turned out to be quite stable, we fill in all the gaps and uneven places with putty.
We put the boxes on top of the prepared frame and glue them with glue and clips.
This is what the finished table looks like.
Also, from such boxes you can create a more simplified version.
There is no need to create a framework that is difficult for many. It is enough just to connect several boxes together.
Wooden console table with sliding doors
This version of the console looks very interesting, which can be created in different colors and stylistic solutions according to one drawing.
All it takes is:
- 2 boards 2.5 m long, 5x25 cm;
- 2 boards 2.5 m long, 2.5x25 cm;
- A sheet of plywood 0.7 cm thick for the back wall of the console table;
- 3 boards 2.5 m long, 2.5x5 cm;
- 4 boards 2.5m long, 2.5x10 cm;
- 6 boards 2.5 m long, 2.5x7.6 cm;
- 2 thick panels for furniture (1.9 cm) or plywood - 91.5 cm x 45 cm;
- Sliding door hardware;
- Bolts 6*35;
- wood glue;
- Primer;
- Dye;
- Wood putty.
- Tools;
- Yardstick;
- ruler-triangle;
- Pencil;
- Glasses for safety;
- Noise protection earmuffs;
- Drill;
- Miter saw with laser ruler;
- Portable table saw with stand;
- Nailer.
The main nuances in the work:
- Make sure the work area is free of debris and other contaminants.
- Always measure the details after every step you take.
- Before connecting the bolts, you must first drill holes in the tree.
- Remove excess adhesive from areas that do not need to be glued. The remaining dried glue will not allow the paint to go well.
- Be careful at work. Especially when it comes to circular, nailer, etc.
All dimensions shown are indicative only, and you can change them yourself, using the drawings as an example.
Blanks:
Framework
5x7.5x213 cm 4 pieces;
5x7.5x45 cm 4 pieces;
5x7.5x36 cm 4 pieces;
Parties
2 thick panels for furniture (1.9 cm) or plywood - 91.5 cmx45 cm
front frame
5 pieces. - 2.5x10x91cm;
8 pcs. - 2.5x10cm and 45cm.
Shelves
2 pcs. - 2.5x20 cm;
2 pcs. - 2.5x10x220 cm.
Medium shelf supports
5 pieces. - 2.5x5x36 cm;
5 pieces. - 2.5x5x45 cm;
Back wall
Plywood 0.7 x92 cm.
Bottom trim
1 PC. - 2.5x5x230 cm. Both ends must be cut at an angle of 45 degrees, at the longest measuring point.
2 pcs. - 2.5x5x47 cm. One end must be cut at an angle of 45 degrees at the longest measuring point.
Top finish
2 pcs. - 5x25x231 cm.
Doors fitted 51x76 cm.
Step 1
Make 2 frames out of 2 crossbars and 3 windows in the middle. All parts must be screwed, and the joints must be glued.
Step 2
Attach the side panels to the sides. They can either be screwed on with bolts, or you can use nails and glue.
Step 3
We make the front frame. We lay out all the measured pieces, as shown in the figure. (All designations are in inches). You will get 2 rectangles of 45 cm wide and 2 of 55 cm.
Step 4
We put boards on the bottom. One is 20 cm wide (closer to the front), the other is 25 cm. We nail everything and glue it well.
Step 5
For greater durability of the structure, it is necessary to nail small glazing beads on the lower boards on the reverse side with an interval of 55 cm.
Step 6
In exactly the same way as the bottom of the console, we create an internal shelf. We also nail the glazing beads at the bottom. Using self-tapping screws and glue, we attach it to the inside of the future table.
Step 8
We attach pieces of plywood to the back. It can be either a solid sheet or several connected finished furniture planks.
Step 9
We strengthen the lower part of the table with the help of appropriate thin strips attached around the entire perimeter.
Step 10
We fasten and glue the furniture panels to the top of the console. This should be done in such a way that the top is wider than the bottom. And the upper part itself should hang over the lower part.
Step 11
We install sliding doors.
Step 12
We cover all the necessary gaps with putty and hide the bumps. Let's dry.
Then, with sandpaper, rub the surface in the direction along the fibers.
We clean the surface, at the end we wipe it with a damp cloth.
We prime the surface. If necessary, paint.
From these examples, you can understand that absolutely any thing can be created with your own hands. The main thing is to put some effort into this and connect everything with a capable fantasy. And then the results obtained may surprise you.
Console tables
Console models are wall-mounted narrow tables. Looks like a bureau, but without the drawer extension. They fit very organically into narrow corridors or in the bedroom as a work table or dressing table.
The console table makes it possible to complement the interior with a compact and beautiful item. At the same time, the creation of this piece of furniture does not require high professionalism. Further, we offer a simple instruction, which makes it possible to obtain not only high-quality furniture, but also aesthetic pleasure from the independent creation of a quality product with your own hands.
The essence of the console table
This furniture option is extremely narrow, it is half the size of a simple table or even less. They say that these tables appeared quite a long time ago and were first used at the royal court in France, starting from the 17th century. Probably, in some palaces there were rather narrow corridors, and such furniture could also be relevant for the bedroom.
For the most part, these tables stand against the wall and adjoin it tightly with their canvas. Therefore, only two legs that support the canvas can be used, and just wall mounts are also used.
The easiest option
First, let's point out the simplest option, which requires a minimum of work. For this, almost any old table is used. The task is to cut such a table in half or even make a narrower part, which will remain as a console table.
Note. This refers to old tables that can be used normally, if there are defects somewhere in such a table, then only the normal part should be left.
After the workpiece is received, you need to complete the decoration. Since we are talking about an old table, then, as a rule, such a table is sanded, and then primed and painted. It is quite possible to use other compositions, mixtures and decor.
Additional Variations

Of the additional variations, quite interesting are those where improvised materials are used, something that can be thrown away and not used:
- canvases of old doors;
- window frames and windows;
- furniture details;
- simple boards (unedged);
- remnants of plastic window sills.
In general, any plane that will look more or less aesthetically pleasing and at the same time have sufficient size and strength.
Here the question arises of what to make the legs from and the answer will also be the search for improvised and free materials that could perform such a function. For example, if you treat the work competently and with imagination, then it is quite possible to take, for example, pvc pipes, which are used as a support for the table cloth. Also, the legs can also be simple boards or bars, if the table is made in the style of natural materials, then halves of raw logs can also be used.
Note. When choosing legs, evaluate the likely load, you should make a design with a sufficient margin of safety, even when it comes to a simple coffee table.

It should be noted that the console table is not always attached to the wall, it may be separate. At least there are such models. Then they are just a separate thin table for a variety of purposes.
How to make a table without legs and a wall mirror with your own hands. To save space and ease of use, the dressing table for the bedroom can be hung on the wall. So the legs will not interfere with movement and cleaning, which will significantly free up space in the room.
The table itself can be placed anywhere in your home. It's just that this sample is made for the bedroom. Since the table is supposed to be used as a toilet, two drawers are made in it, and a mirror is separately attached to the wall.
Console table with your own hands.
Let's start making a table from solid wood. The width of the product along the wall is 1000 mm. , depth 400 mm. and thickness 200 mm. .
Tabletop made of carpentry board 1000/400 mm in size. , 30 mm thick. . It is undesirable to make the countertop thinner, it will be attached to the wall on the consoles and, accordingly, carry the entire load. In addition, the style of the table is assembled from massive thick parts, just like the entire suite in the bedroom.
There will be additional articles about the rest of the items in this headset.

For details:
Two sidewalls from planed boards 400 mm long. , 170 mm wide. and 30 mm thick. .
Middle transverse partition, part length 370 mm. , width 160 mm. and thickness 30 mm. .
The bottom is made of furniture plywood 10 mm thick. , length 960 mm. , width 370 mm. .

We collect the body of the table.
We put the side parts from below, flush with the ends of the tabletop and fix it on steel furniture corners. Along the lower edges of the sidewalls, from the inside we pass with a manual milling cutter a quarter of 10/10 mm. .
We pass a quarter without reaching the front end of 30 mm. .
We mark and install the middle partition in place, we also fasten it on the furniture corners. The front end of the middle partition should be recessed inward by 30 mm. , relative to the front edge of the tabletop.
We sink the middle partition and do not get a quarter on the sidewalls for one purpose, during installation, the drawers, together with the front strips, will move inside the case.

Next, put the plywood bottom in place, in a quarter, also sinking it by 30 mm. relative to the front ends of the sidewalls. The front edge of the bottom should be flush with the front end of the middle baffle.
We install custom-made boxes on telescopic guides 350 mm long. .
We put the front strips after installing the guides, aligning them with the sidewalls and the countertop. Facades are attracted with self-tapping screws from inside the box.

The table is hung on the wall using consoles for heavy drawers. In extreme cases, you can take powerful mounting corners, fix them on the wall with dowel-nails and hang a table on them.
About making a frame made of wood, an article like. This is not all the furniture, there are two more bedside tables and a large double bed, but that will be later.
(Visited 164 times, 1 visits today)