Plasterboard is used in repair work of various volumes and purposes, and this is the case when two hare are killed at once. That is - the practicality and budget of the structure, all this provides plasterboard. But maybe you do not know how to work with it, and what methods of mounting drywall to the ceiling are.
The composition of the plasterboard plate includes a gypsum filler, in which there are various binding additives, and layers of cardboard of facing destination. The weight of one sheet will be from 12 to 35 kg, it depends on the thickness of the material. There are sixmillimeter plasterboard, nine-millionth, and plasterboard thickness in twelve and a half mm.

Why plasterboard sheet is so popular in repair:
- If it is fixed on the ceiling surface, it will become perfectly smooth;
- Under the plasterboard, you can hide communication systems - not in all cases such stack is possible, but the plasterboard is perfectly coping with this;
- It provides sound insulation and thermal insulation;
- It can be mounted on the ceiling in different rooms, there is classic drywall, moisture resistant, fire-resistant, universal;
- It is easy to put it, the carcass assembly is also a completely saturated event for non-professionals.
Finally, it is the plasterboard that will allow you to implement a complex design project. It can be cut, it will correctly accept the specified form. That is, with him you can really assemble the ceiling of your dreams.
How to attach plasterboard to a wooden ceiling
Plasterboard to a wooden surface can be fixed in three ways: on glue composition, on wooden sweatshops, on metal frame. The adhesive method is possible not in all embodiments - the surface surface must be perfectly smooth. As a clutch mass is used gypsum mastic (bone gluing and crumb of plaster stone are connected in it). The mixture is applied, ranging from the edges of the sheet, in small layers of 30 cm from each other, and gradually moving towards the center. Well, after the stove is pressed on the finished surface.

The second method is a wooden frame. It is used when erecting single-level surfaces. When the device it will require a well-dried bar, otherwise the supporting elements will very soon cover mold.
Over the entire plane, the ceiling is placed the main bar, the interval is 80 cm. Then relative to it at an angle of 90 degrees are fastened at a distance of half the carrier partitions from each other. They are after and become the holding base for drywall.
When the mounting of the frame is complete, you can directly mount the plates. Self-tapping screws across the perimeter of the sheet in a step of 15 cm, and it is in a checker order. In this case, the head of the rod must drown a little in the material. Then these places will be put off, and the entire surface will be smooth.
What is used for fasteners for plasterboard to the ceiling
The third method of fastening is a metal frame. It is used not only for fixing GLCs on a wooden ceiling, but also on the standard concrete ceiling. Technology is actually such as in the case of a wooden frame, but there are nuances.

The guide profiles must be fixed with a 40 cm interval, and it is done so that one standard plate of 120 cm is attached to four metal rails. When the guide base is equipped, you need to fix the suspensions. These fixtures are attached to the ceiling of a dowel-nail at a distance of 40 cm one from the other. After that, the carrier profile is fixed, its ends must be strictly on the guide tank at an angle of 90 degrees, well, the body is in the suspension.
All elements of the frame are attached to each other with special scores for metal. When mounting works are performed, the horizontal profile level is always checked, well, the locations of the possible load are amplified by jumpers or anchor fasteners.
Scheme: How to screw the plasterboard to the ceiling with your own hands
Standardly put plasterboard on the ceiling falls in two pairs of hands. Work together and comfortable, and quickly, and there is no such load that a person is experiencing alone. But it happens that everyone has to do. In this case, you need special devices - usually this is a platform and backups.

Such a situation involves the structure of a small design of hinges, pairs of boards, supports. And in the disclosed form, the retractable platform in height per centimeters is six below the ceiling level. At this interval, the width of the plasterboard sheet also includes the design.
The stove is rising in several stages: at the height of the hand first set the first backup, then the main one. Then take to the prepared forests prepared, and start the frame to secure plasterboard sheets.
How to fix plasterboard on the ceiling (video)
It is worth noting that such work is though heavy, but do not simplify it with an embodiment of the adhesive method. In case there are irregularities on the base ceiling, they will be noticeable under drywall. Therefore, the skeleton fastening method is the most reliable, and the metal frame is suitable for this to a greater extent.
Excellent results!
Today we have to find out how to fix the plasterboard to the ceiling. We will get acquainted with the general principles of creating the framework of single and multi-level ceilings from GOC and find out how to see the frame and prepare it to finish. But first, let's determine in which cases the finishing of the flow drywall makes sense.
Areas of use
Fasteners of plasterboard to the ceiling allows you to:
- Hide any irregularities (defects of the fill of monolithic overlaps and plate height of slab, damage to plaster, etc.);
Note: The costs of time and money will be noticeably less than in the case of a plastering ceiling. The price of a leaf of plasterboard with an area of \u200b\u200b3 square meters (1200x2500 mm) varies from 250 to 400 rubles, and the installation on the finished frame takes a few minutes.

- (Sophytes, SPOT, LED panels);
- Hidden dilute over ceiling wiring, ventilation, local network, air conditioning system highway;

How to sunmate the ceiling with your own hands
- With an arbitrary form of level boundaries.
Small text
Do not secession: as a material for the ceiling of GLC is not ideal. It is useful for us not only to not only a list of its advantages, but also, as the socialist press, separate flaws, wrote in one time.
- Plasterboard - fragile material (see). Fixed 9.5 mm thick on a leaf ceiling (ceiling GLC) will have to be at least two, otherwise it will break under his own weight;

- The leaf gypsum core does not have water resistance. Even G Clac (moisture-resistant plasterboard) after the flooding of neighbors can swell and deform;
However, G CLEB is successfully used in wet rooms, provided that it is protected from direct contact with water with waterproofing finishing. For example, the author of the article plasterboard walls and bathing ceilings protect the tile and rubber waterproofing paint.

- Like any suspended ceiling, the plasterboard will make the room below. The minimum difference between the surface of the ceiling and the plane of the ceiling is approximately 4 centimeters (the thickness of the ceiling profile + the thickness of the ceiling GCL, 27 + 9.5 mm). Exception from this rule is the alignment of the ceiling without a frame, with which we will get first.

Captain Obviously suggests: Frameless installation eliminates the wiring over the ceiling of engineering networks and the installation of built-in lighting. It applies only if you need to eliminate minor overlap defects without losing the height of the room.
Installation on glue
How to fix plasterboard on the ceiling without a frame?
Auxiliary materials
In the role of glue can be used:
| Picture | Description |
|
|
Gypsum mounted glue (for example, domestic wet installation or German Knauf Perlfix). |
|
|
Any gypsum putty or plaster. They, like gypsum glue, have excellent adhesion to mineral bases and a shell of GLC, but grab a little longer (up to an hour). |
|
|
Mounting foam. When it is used, it is important to fit the sheet to the ceiling tightly: if there will be a gap of more than 1-2 millimeters between the glued surfaces. The expansion of the foam can deform the surface of the drywall. |
|
|
Liquid Nails. The best clutch, among the famous author, has rubber mounting glue. |


In addition to glue, we will need soil. For plaster ceilings, this is an acrylic primer - deep penetration soil; For weakly absorbing water concrete floors - adhesive quartz soil (concrete contact).

Preparation of the foundation
Fastening drywall to the ceiling on glue requires the preparation of the base. It should be flat enough (with no more centimeters), clean, durable and providing reliable adhesion with glue.
Preparation includes:
- Stripping whitewings. Lime is removed with a spatula after wetting, the chalk whitening is washed off with plenty of water;

- Purification from dust (vacuum cleaner or brush);
- Primer. Penetrating soil for maximum penetration depth is applied in two receptions without intermediate drying. He binds the plaster and a solid base. Adhesive soil is applied with a roller in one layer.
Installation
So, how to fix plasterboard on the ceiling with glue? Very simple:
- The glue is applied on the back of the sheet. Gypsum mixes are superimposed by cakes every 15 centimeters, liquid nails or mounting foam are applied by strips;

- The sheet is tight pressed against the ceiling throughout the area. If foam is applied for installation - it must be inserted by a pair of sliding movements. When using gypsum glue or putty, GLCs should be additionally aligned according to the rule, having occurred to irregularly rubber hammer;
- To fix the sheet at the time of setting the adhesive, the backups are used, and when installing onto a wooden overlap - self-tapping screws.

Single-level ceiling
How to attach plasterboard to the ceiling, if it has significant irregularities (as an option - do you plan to mount the built-in lighting or hidden layout of engineering networks)?
Auxiliary materials
To assemble the crate under the suspension ceiling we will need:
| Picture | Description |
|
|
60x27 mm in size. It will be the basis of the crate. The length of the profile should be at least one of the dimensions of the ceiling. And the number of profiles must match the step between them at 600 mm. |
|
|
PNP profile (ceiling guide) for fastening the crate to the walls. The total length of the PNP is equal to the perimeter of the room. |
|
|
Direct suspension to fix profiles of crate to overlapping. |
|
|
Dowel-nails are responsible for fastening the ceiling of plasterboard to overlapping and walls. Usually used fasteners in size 60x6 mm. |
|
|
Self-tapping screws for metal 9 mm long is needed to connect the elements of the crate with each other. |


Useful: in narrow corridors (no more than 120 cm wide) you can do without suspensions. In this case, the lamp holds only on the guides, and the lack of sagging is provided by the rigidity of the PP profile.

Preparation of the foundation
In dry rooms, it is not required in principle, but the wet ceiling and the top of the walls should be pre-treated with antiseptic soil. The suspended ceiling will limit the overlap ventilation, which can lead to the appearance of fungus.

Installation
So, we need to assemble the crate under the plasterboard on the ceiling: how to fix profiles?
Here is a step-by-step instruction on the build of the frame:
- Follow the line of the future suspended ceiling on the walls. Tool - laser or water level and chalk cord for chop;
Tip: If there is no installation of hidden communications over the crate, its level should be in the lower point of the overlap at least 27 mm - the thickness of the PP profile.
- Secure the marking guides. A step between mounting points - no more than half a meter;

It is useful: holes under the dowel-nails roam the perforator right through the profile pressed against the wall. Initially the edges of each guide are attached, then its middle.
- Seam on the axis axis of the shared profile shaft with a step of exactly 600 mm. With this step, the seams between the sheets of plasterboard will be accurately in the middle of the PP profiles;
- In step in the same 600 mm, fasten along each axis suspension;

- Insert the PP profiles into the guides and press them to the ceiling bent perforated sides ears;
- Tension between the guides perpendicular to the crate of several cords (2-4, depending on the width of the room);

- Alternately align the profiles of PP on the cords and attract the sides's ears with self-taps, curling the free part of the ears. So you with the minimum time spent time to put the entire crate in the same plane;
- Take PP to the metal guide screws. The doom is ready.

IMPORTANT: If the size of the room exceeds the length of the plasterboard sheet (2500 - 3000 mm), perpendicular to the crate of the PP profiles are attached on the transverse joints of the edges. Fastening adjacent edges to a shared profile excludes the appearance of cracks on the seams.

Frames of multi-level ceilings
How to mount plasterboard to the ceiling when creating a multi-level construction?
Obviously, the differences will be reduced to different designs of the frame. With multiple structures, we will now meet.
Figured box

Glk's perimeter boxes allow you to build a two-level ceiling with minimal time and materials. The role of the top level is a plaster or stretch ceiling (in the latter case, the frame is enhanced by additional hips), as the bottom - the roof-paced GKK box.
In the boxes are built-in lamps and pass communications. The center of the room does not lose in height, which allows to be used as a main lighting chandelier.

For assembly of the frame, all the same profiles of PP, PNP and suspension are used. The curly edges of the boxes are formed by guide profiles with an outbound in a step of 5-10 cm by the side walls.
Control box

How to put on the ceiling of drywall, if you plan to mount the hidden backlight?
This two-level design involves highlighting the top ceiling level with LED ribbon. To hide the tape, the plane of the lower ceiling must partially overlap the top level. A niche frame is formed by PP profiles standing.
Duplex Gl

Before you, a full-fledged two-level plasterboard ceiling: under a single-level crate, a box of the box is laid around the perimeter of the room. As a frame of the edge on the level of level, a guide profile of a PN width of 100 mm is used.
Multi-level curvilinear

Each new frame level is attached to the profiles of the previous level through the GLC layer. For the manufacture of edges, an outbrap profile is used.
Saving framework
How to fix on the ceiling plasterboard to the finished frame?
The installation of HCL is performed on a 25 mm long-length screw, screwed up 15-20 cm in increments. Self-cutting screws are screwed into all overlapped profiles, including guides and bent.

Several practical advice:
- For cutting of drywall on curved lines, use an electric jigneling with a tree filling (with teeth directed toward the lyubic ski).

According to the direct lines of GLCs, it is better not to cut, but to break the cuts on the knife made: so much smaller dust will rise in the air.
- The sheet is caught with a knife along a steel line of a quarter of thickness and is shaken on the edge of the table or any other elevation, then the cardboard shell of the sheet is cut through the back side. Uneven edges right by the plane;

- To screw the screws, it is convenient to use bits with a limiter. It will not allow you to drown a deeper millimeter hat from the surface level;

- The fastener is screwed up not closer to the pair of centimeters from the edge, otherwise the sheet core is likely to be reassigned;
- The curvilinear surfaces use a thinner, arched GLC thickness of 6 mm.

Alternatively, bends can be made by a wall or ceiling sheet with cuts every 5-8 cm. The resulting broken surface is twisted when putty.

Putty and reinforcement
We found out how to fasten the plasterboard on the ceiling; However, before finishing is still far away. We will have putty seams and (in the presence of several levels and / or curvilinear surfaces) of the ceiling planes.
To do this, you will need:
| Picture | Description |
|
|
Gypsum putty. Preferably - finishing or universal. Starting putty contain a large-scale filler and give a coarse surface. |
|
|
Fluster for reinforcing junctions between sheets (so-called serpent). Without reinforcement, seasonal fluctuations in temperature and humidity lead to the appearance of cracks after the operation of the room. |
|
|
Angular reinforcing profile (hard for direct edges and flexible for curvilinear). |
|
|
Flat spatulas are narrow and medium (10-12 and 25-35 cm). We have to fill the seams and put the ceiling plane. |
|
|
Corner spatula for finishing internal and external corners. |
|
|
Capacity for the lifting of plaster mixture with a volume of at least 6-8 liters. The author of the article usually uses a 11-kilogram bucket from water-dispersion paint. |
|
|
Mixer or drill with a wish to knead the putty. |


Cooking putty
The gypsum mixture is covered in a container with clean water at the rate of 1.5-1.6 kg of gypsum per liter. At the same time, the mixture is necessary to evenly distribute on the water mirror. After 3-5 minutes, when the plaster will swell, it is mixed with a mixer to homogeneous consistency.
Several subtleties:
- When mixing the mixture, water can not be pouring into dry gypsum. In this case, on the bottom of the bucket will remain dense lumps, which are almost impossible to destroy the mixer;

- The size of the one-time portion should be such that you can work out it for 30-40 minutes. The author of the article usually prepares about 2 kg of finished putty when seeding seams and approximately 5 kg when the plane of the ceiling or wall is splashing;
- Dishes and the entire tool need to wash after developing another portion of putty. If you do not do this, dry lumps remaining on the gypsum instrument will leave the grooves in the finish.

Sealing seams
It begins with the bunch: from all the rectangular edges, cutting around the places of sheets, is filmed with a sharp knife chamfer. The extending will allow maximum densely, without cavities to fill the seams, thereby reducing the likelihood of cracks.

The first layer of putty is applied by a narrow spatula simultaneously with the reinforcement (sticker of the serphenka or laying under the gypsum of the angular reinforcing profile). When putty, internal and external corners are more convenient to use the angular spatula.

If the reinforcing corner of the profile is moving, it can be fixed with 20-millimeter cloves or screws: their putty will hide with the profile.

The second layer is applied with a wide spatula after the drying of the first (after 6-12 hours depending on the level of humidity and temperature) and hides the texture of the reinforced seam. Fasteners, as well as seams, is sweeping at least twice: the second layer compensates for the shrinkage of the gypsum during hydration.

However: if the entire surface of the ceiling is to be poured, in the applix of the second layer of putty on the seams there is not the slightest need.
Puttles of planes
The putty is applied with sliding movements with a wide spatula. Gypsum is superimposed on it a narrow tool.
The newcomer is easier to apply not one layer of about a millimeter with a thickness of about a millimeter, and two as thin layer movements "on the Sadir" perpendicular to each other: so there will be less strips from the edges of the spatula.

Preparation for finishing
It is performed after complete drying of the gypsum (at least after a day after applying the last layer of putty) and consists of three stages:
- Grinding. It can be done with their own hands (using a hand-grinding grid) or grinding (vibration, tape or disc). At the time of grinding, it is desirable to organize bright ceiling lighting under the oblique angle to the horizon: the shadows will allocate all flaws and allow you to make the surface perfectly smooth;

- Purification from dustcapable of preventing the grip of the paint with the surface of the ceiling. Dust is removed by an industrial vacuum cleaner or a regular blizzard;
- Primer. Penetrating acrylic soil reliably glues dust residues and improve the adhesion of paint to the surface.

ATTENTION: from putty to painting the ceiling by water paints should be at least 14 days. During this time, hydration processes are completed in the gypsum. If you hurry, plots with a thick layer of putty (in particular, the seams) will be highlighted with a dark tint.
Conclusion
We hope that we managed to give the reader the overall idea of \u200b\u200bthe installation of plasterboard ceiling structures. Attached video will show you more clearly, how to fix the plasterboard to the ceiling. Successes!
Finishing works often cause a lot of difficulties, especially when conducting processes on their own. The greatest problems occur when fixing sheet materials on elevated horizontal bases. Fix the plasterboard to the ceiling is necessary in compliance with all the rules to avoid serious problems in the future.
Fixing the plates is carried out in the most convenient way, which is selected taking into account the available capabilities and the type of base and ensures the receipt of a smooth and reliable surface.
Metal carcass
Plasterboard laying on the profile is most popular. This is due to the fact that such installation allows you to correct significant differences of heights and hide communications.
Fasteners of the framework parts are as follows:


If you do everything correctly, you will get a metal frame that has a single plane.
You should know! To avoid problems with a possible shrinkage, the details should not be located.
Wooden doom
This option is more suitable for works with wooden bases, since a close temperature expansion is provided. The bar must be without defects, succeeded and necessarily processed with antipirens and antiseptics.
Step-by-step instructions of the crate device:
- The base is prepared by the same scheme as when installing a metal frame.
- Marking is carried out. Due to the lack of the guide system, the line is beaten on the walls, which takes into account the greatest irregularity and the supply of 3-6 cm. It will be a point of reference to pull the cord.
- The bar is attached to the installed suspensions that are fixed to the concrete base or wooden lagas if significant irregularities are observed.
- It is the first to install lateral parts with an indentation from the walls of 10-15 cm. The edges of the elements should also not be in contact with the vertical structures, so 10 mm clearance is exhibited.
- Between the details stretches the cord. Further installation is accompanied by alignment in terms of level and stretched rope.
 Bar is usually used to arrange suspended ceilings in wooden houses
 Reiki can be fixed directly to ceiling lags, but for this there should be no height drops. If the work is carried out with attic floors, the thermal insulation and waterproofing can additionally fit.
Adhesive way
This process is performed with your own hands extremely rare. The base should not have significant deviations and open communications systems. In addition, the surface needs mandatory preparation.
Before attaching the HCL plate, the following procedures are held:
- The old coating is completely removed. Especially carefully removed by whitic, paint and wallpaper. The ceiling must be clean.
- The primer is applied. The compositions with deep penetration are used, allowing to significantly improve the adhesion.
- Eliminate gaps and cracks that can skip moisture.
 Sheet gluing is most often used at low ceilings or arrangement of multi-level structures when one of the levels is the basis.
 On a note! Large format sheets are very problematic, so they are allowed to saw in half.
Installation of plasterboard on the ceiling alone
Before starting work, you need to think over all actions to avoid problems. Screen the plates are very difficult, for this you will need auxiliary devices.
If a suspension skeleton system is used, can be fixed with a few methods of plasterboard.
Telescopic lifts
There are a device with the stops where the stove is located and evenly rises to the desired level. The lack of this option is a high price of equipment that does not allow you to purchase it for home use.
 Types of professional telescopic lifts exist mass, but all these models have one serious minus - this is a high price
You can make such a system yourself, but not always. For this, tubes of different diameters are used:
- Thinner parts are welded into a single lower frame. There should be a design with two extreme supports on the legs, resembling an open hanger for clothes.
- Racks drill through increments from 5 to 10 cm. All points on two pillars should be placed on the same level.
- Thick fragments are dressed on top. At their upper edges there is a vertical crossbar, cursed rubber. The general system is two T-shaped columns.
- As the larger diameter pipe is raised, they fix the pin at the desired level.
 The lift of 4 poles and the upper support frame is real, but without experience to use such self-made technique alone difficult
 Use brackets and suspensions
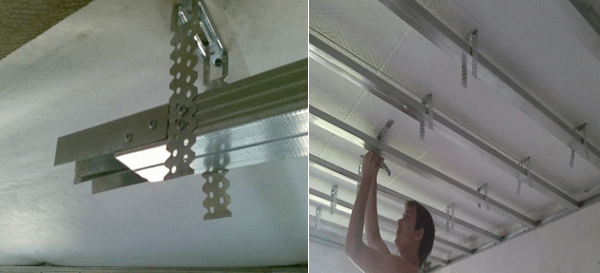
Faster and simple method, allowing to fasten the sheets of plasterboard. Algorithm of actions:

The technology may seem difficult, but if you adapt, then the work will not take much time and will provide an excellent result.
Attention! It will help to simplify the procedure to make the manufacture of a special belt on the wrist, on which there is a magnet or ochered holes for self-tapping screws.
Fastening on glue
To glue drywall sheets directly to the ceiling, you need to do the following:

Further work is performed in the same order. Although the process takes a lot of time, it will allow to glue all items extremely securely.
To hang drywall itself, some nuances should be taken into account:
- Everything needs to be thought out in detail, it is impossible to rush.
- The tool is selected extremely light.
- Manufactured stops should be collected hard, without breakdown parts.
- The main thing is to securely secure the main part, because it accounts for the main weight.
- In the event of fatigue, it is worth postponing, otherwise the risk is not only damage to the material, but also health problems.
Although one to fasten or glue the HCL plates is not easy, compliance with technology and recommendations makes it possible to achieve a qualitative result.
For alignment of ceilings, builders and owners themselves are used by plasterboard sheets. This choice is explained by the excellent characteristics of the material: moisture resistance, light weight, ease of installation, so that in a short time without excessive noise and dust create a smooth, neat surface, give it a different texture or curly outlines.
The fastening technology of GLC sheets includes several steps and is performed in various ways, each of which can be carried out independently. The most common is the installation of a frame of metal profiles with a dowel or self-tapping screws. A wooden design of carrier and support beams can become a frame. Well, the cheapest option remains gluing a sheet of plasterboard to the ceiling.
Whatever technology is used, it is impossible to skip the planning stage. It includes measuring the height of the ceiling, the preparation of the tools and the purchase of materials. At the same stage, the ceiling drawing is performed, which indicates the scheme of placing the wiring and outputs for the lamps, the parameters of the level and outlines of the frame are given if the mounted figure type ceiling.
The initial level of the frame is measured as follows:
- laser beam or water level at an altitude of 1.5 meters from the floor on each wall surface, markers are made, which connect with each other with a solid horizontal line;
- measure the distance from the ceiling to the resulting line;
- in the lowest to the ceiling, the point is noted (at a distance of 25-30 mm from the vertex);
- exactly perpendicular to her on another wall make the same notice, which is connected from the first with the help of a strained thread or chocline;
- the same is done all over the perimeter of the room.
The resulting solid horizontal line is the lower level of the framework to which the profile or wooden beams is attached, we will tell about the distance or step between them below below. If plasterboard is planned to be glued, such a scheme for calculating horizontal markup is not used, however, we note that the significance of the foundation and durability of the structure depends on the correctness of these calculations.
Making framework
Consider how the GLC fasteners on the metal frame occurs. To do this, you will need a profile of two types - guide and ceiling (carrier). According to the finished horizontal markup with the help of dowels (or self-tapping) and the damper tape the UD profile is fixed, after which the ceiling plank is determined. This parameter calculates the number of frame suspensions and the distance between them.
To do this, on the ceiling perpendicular to the UD profile, in the direction in which it is planned to fix the sheets of plasterboard, at a distance of 50 cm make marks that connect the horizontal line. On these lines at a distance of 80 cm make labels for P-shaped suspensions.
With the help of a drill, holes are done under the anchor-wedge and insert the suspensions. Such a step of profiles is the most reliable: it strengthens the design and protects the plasterboard ceiling from the deflection.
 So fix the planks to the suspension
 So that in the future the sheets of GLCs are smoothly, the self-tapping screws are strictly horizontally. After installing the metal frame, it is completed, proceed to insulation and sound insulation. Pouring wiring, reinforcement for ventilation or television will help the ceiling drawing diagram, compiled at the preparatory stage.
Finish work
Go to the installation of plasterboard. It is cut to the desired size, the holes are drilled under the lighting appliances. How the fastening technology occurs, from the planning stage to the finish finish, you will see on the video in which it is described in detail how to make a frame properly, make marking, calculate the step of the guide and carrier planks.
As can be seen, it allows you to securely secure the GLC on the ceiling allows a convenient scheme of the crossing of the profiles, because each sheet comes from the middle of the carrier plank. Often, metal jumpers are installed in a step between carrier straps, which even better fix the GLC to the ceiling, reliably protecting the edges of the sheet from sagging in the air.
Plasterboard are fixed with self-drawers, which are not very strong in order not to damage the paper layer on the drywall.
 Fix the sheets of a screwdriver with a special nozzle
 Their number should not exceed 60 pieces on the sheet, that is, they are screwed up at a distance of 30 mm each other. Then the hats of the self-tapping screws, as well as the distance between the sheets close to the putty, after which the surface of the ceiling becomes smooth. The finishing finish provides for the processing of the resulting surface of the primer, staining, plastering or use of other methods of decorative design.
The most simple installation technology is described above, which provides for the manufacture of a frame under solid plasterboard ceiling. For the same principle, curious or multi-tiered ceilings are made. As can be seen from the article, the work does not represent much work, the only thing, it is only possible to correctly calculate the height and step of the frame profile, because the ideal basis is a pledge of durability and safety design.
In contact with
Among the finishing materials for the ceiling, plasterboard is considered the most profitable if it takes its cost and characteristics. The most simple in terms of implementation is a single-level suspension design, which is depicted in the photo. Having understood with the technology of creating a frame and how the plasterboard mounting is made to the ceiling, you can make the repair at home.
There are different methods for fastening drywall to the ceiling: directly to the basic overlap, on a metal frame, on wooden rails. And for each of the named cases, there are its own requirements for fasteners and materials used.
The order of attachment of plasterboard ceilings
Suppose it is necessary to perform the installation of plasterboard structures as close as possible to the basic overlap, since it is necessary to maintain the height of the room at the maximum. Installation will be made on a metal frame.
First stage - Marking. The device of plasterboard ceilings start with marking. On the base ceiling, it is necessary to find the lowest point and transfer it to one of the walls in an arbitrarily selected room corner. The distance from this point to the lower part on the frame should not exceed 25 millimeters (profile thickness). Rates from the lower point of overlapping about 30 millimeters, a label is made, which is transferred to all angles using the construction level. Thus, in each of the corners there will be two labels (on each wall one).

Then with the help of a chocline or thread with blue, markup is made around the perimeter of the room. For this, a thread is stretched between two labels, it is delayed and discouraged sharply. As a result of the strike of the surface of Chokline leaves the control line. According to it will be fastened with a suspended ceiling of plasterboard, it means the lower level of the frame.
Next, it is necessary to determine the direction of laying of plasterboard plates - according to it required every 50 centimeters to place two opposite walls. Between the printed marks with the help of Choklain, the lines are beaten - they are a guide to which the suspensions will be attached.
Fastening the carcass
Second phase - Creating a metal. According to the perimeter, the line is screwed up the UD profile in such a way that the lower part of the plank coincides with it.
It is advisable to use 6-millimeter plastic dowel ducts and screws with a diameter of no more than 4 -5 millimeters. For screws and dowels, it is necessary to select a length based on the density of the material of the concrete room.

After that, CD profiles are cut into segments of the required length and insert them into the UD profiles mounted around the perimeter. In order for the CD profiles to level, under them stretch the durable cape. It is fastened from the wall to the wall perpendicular to CD profiles with small self-draws on UD profiles.
Each profile is exhibited by stretched thread and fasten with self-stroke suspension designed for drywall profiles. In the same way, the CD profile and the UD profile are connected to each other, and the sides protesters are rejected to the sides. When the frame for drywall ceiling is almost ready for the installation of finishing plates. It is still necessary to make electrical wiring for mounting lighting and put the wires to a special corrugated cable channel.
Third stage - Installation of plasterboard plates. Each sheet has a lot of weight (about 15 kilograms) and therefore it is desirable to perform work on installing GLCs with an assistant. It should be noted that on the extreme segment of the CD profile it will be necessary to attach two plasterboard sheets, so the edge of each of them should be located at half the profile.

Fastening the stretch ceiling to the ceiling: installation system "). In this case, the fastening of the stretch ceiling to plasterboard is a difficult task with which only professionals can cope with:").