Decorative plaster with your own hands is not so difficult, as it may seem at first glance. Decorative stucco wall decoration is now gaining great popularity. Such an option in carrying out repairs has become a serious competitor to ordinary wallpaper. There are different types of plaster for interior decoration. The main difference is the texture and method of application.
Types of decorative plaster can be as follows:
- structural, which contains the inclusion of certain size;
- textured, which allows you to form a smooth embossed surface;
- venetian, imitating marble.
Before applying decorative plaster, you need to carefully examine the peculiarities of each option and application technology.
Structural
Methods for applying decorative plaster to obtain a structure involve the use of inhomogeneous grainy compositions. The variety of material is obtained by adding small pebbles into the plaster, quartz fragments, wood fibers, etc. The finishing material is made on the basis of cement and limestone. Also add synthetic latexes or silicates. Select the composition is better from the finished mixtures. Only so manage to seek good results. With independent mixing of the components, a good result is not guaranteed.
For the preparation of high-quality plaster, it is better to use ready-made mixes
The walls of the texture plaster is easier to use compositions on aqueous solvents. This is due to the fact that before applying the decorative plaster with their own hands, the residents of the apartment will not have to "evacuate". Water based material is not distinguished by a strong smell.
The decoration of the walls of the type of type under consideration is easily performed. This is justified by the high plasticity of the material and its obedience when working. The technology of applying decorative plaster is simple and convenient. Works can be performed immediately. There is no need to prepare a mixture, since it is already sold in liquid form in banks or buckets.
 With the help of decorative plaster, you can create any structure of different shades.
 Application technique looks like this:
- It is necessary to prepare materials and tools for decorative plaster. For structural composition, a roller, culma or spatula will be required.
- Before putting decorative plaster, you need to prepare the surface. Ideally, the ideal reason is not necessary. The thickness of the plaster layer and its structure can hide small defects. First, the surface is purified by contaminants, dust and fat. After that, they are knocked down and lubricate large cracks and potholes.
- Clean and dry base are strengthened by primer. With him, decorative paints and plaster will be better held on the surface. Such a layer also prevents the exchange of moisture between the base and finishing material. Applying decorative plaster with your own hands can be started only after the complete drying of the primer for the walls.
- The principle of work performed is suitable for all compositions: on mineral, silicone or silicate basis. Watching is carried out using a cell or a spatula in one layer. The coating is applied on the wall with circular or rectilinear movements.
- After applying the layer, you need to give dry. At the same time, it is necessary to control that constant temperature and humidity keep in the room so that there were no drafts. Failure to follow these rules can lead to a deterioration in the quality of the decorative layer, the appearance of cracks.
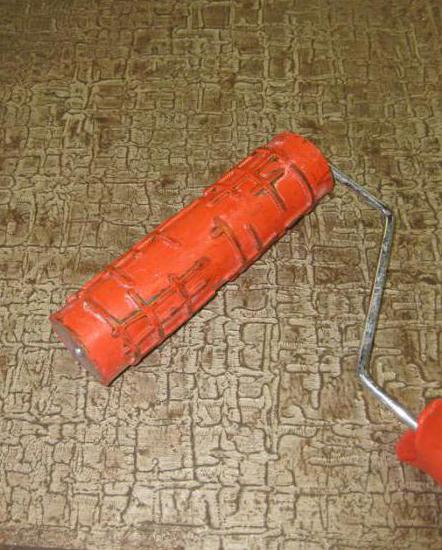
 To apply the composition and creating structure use roller or spatula
 Structural decorative plaster of walls with their own hands is perfect for finishing common rooms, such as an entrance hall, kitchen or corridor. In some interiors, it will be able to harmoniously fit into the bedroom or living room.
Before starting work, be sure to get acquainted with the manufacturer's instruction. There is a more specific application technique and how to use the material.
Textured
The method of applying decorative plaster with their own hands allows you to get the original texture. The border between textured and structural plasters is carried out sufficiently conditionally. Methods for applying the composition under consideration allow to obtain complex options. For example, imitation of wood, stamped paper, natural stone.
 Imitation stone
 The option is suitable for almost any room. The execution of decorative plaster textured type allows you to support any design.
Most often, flour is introduced as the main ingredient. But you can also meet plasters on a polymer basis. Polymers allow you to improve performance. This composition does not crack when drying. In the work of the polymers allow you to create more embossed and interesting drawing.
The properties of the finish are largely dependent on the fillers. In a flat solution, fibers of various materials, crumb of granite or marble are introduced. The flow rate of decorative plaster largely depends on the complexity of the selected pattern.
 Textured plaster can be selected for any design.
 How decorative plaster textured type is applied:
- Before properly apply the solution, it will be necessary to prepare the basis. The inner surface is treated in all cases almost the same. Here the requirements are the same as for the structural composition: the lack of pollution and strong irregularities.
- Before working with decorative plaster, you need to cover the wall of the primer. This layer needs to be given to dry.
- After the primer, the paint-substrate is used, which is applied by brush. There are compounds that combine two functions in themselves: primer and substrate. They should be bought to reduce time costs and simplify the process.
- Decorative plaster of walls, the technology of application involves the use of a spatula, a trowel or brush, laid in a 1-2 layer. The thickness depends on the complexity of the relief. The more interesting, the more the solution is required. It is not recommended to apply a layer of more than 20 mm with a thickness.
- The master class on decorative plaster should be completed with the finish layer. As such a composition, transparent paints are used, which are also called lesing. They not only protect the surface, but also give her a pleasant pearlescent shine. Application options for decorative plaster can also consider the use of paint, impregnation or special wax as the final layer.


Decorative plaster, with pluses and minuses of which it is worth familiar with separately, will allow the premises to be completed and a unique look. The advantage of this composition lies in high plasticity and the ability to give the finished surface rather complex texture. But the medals have a reverse side: the complexity of application. Get the original drawing is not so easy. It may be necessary to take a master class to apply decorative plaster from an experienced master.
It will help to understand how to properly and high quality plastering brick walls inside the house and surfaces from other materials.
Venetian
This type of decorative plaster for internal work allows to obtain a marble imitation. The texture is very beautiful. The material is perfect for almost any premises.
 Imitation marble
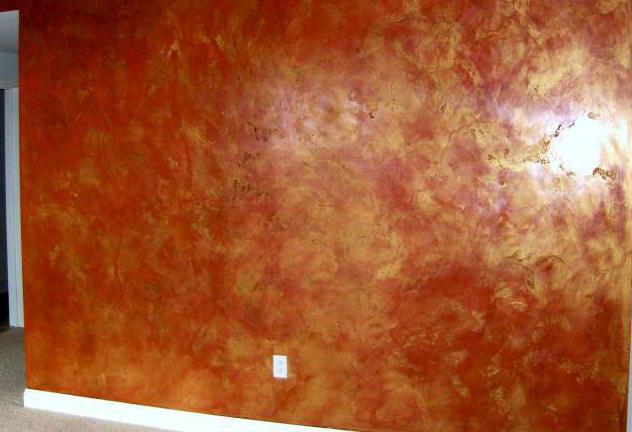
 The composition is sold in an already finished liquid form. Mass of cans or buckets usually ranges from 7 to 25 kg. The stucco includes marble flour and harated lime. An aqueous emulsion is used, which avoids an unpleasant odor when applied.
Before plastering brick walls will need to align them. Apply decorative plaster on the walls only after the base is ideal. This type of material does not tolerate flaws. This is the difficulty of working with Venetian plaster.
If necessary, the solution can be painted in any color. With such plaster, you can create amazing mosaics or whole pictures. Also, it is also worth attributed to environmental friendliness and safety. The composition is suitable even for the bedroom. The surface is performed by fireproof and wear-resistant. After applying the layer, it dries fast enough.
 Venetian plaster allows you to separate the walls for marble
 Learning decorative technique may look like this:
- First you should prepare materials and tools for applying decorative plaster. Here you will need a solid spatula and sandpaper with very small particles.
- After cleaning the surface, the base is proceeded. It should be perfect. First of all get rid of chips. After that, it is necessary to level cracks and depressions with a cement-sand solution or putty. For maximum elimination of defects, an alignment layer of portland cement plaster is applied. The layer thickness is prescribed depending on the severity of base defects. On average, it will be 20 mm. Equality is controlled by the Rules for Lighthouses. To do this, prior to the start of work on the wall, special planks with a certain step are installed. Another option for alignment - plasterboard sheets.
- The leveling layer needs to be given to dry. After that, you can apply primer. It will allow finishing material to be better seized with the wall.
- Venetian plaster than before applying. After that, they take a spatula and begin to apply a mass on the base with thin strokes. It is necessary to process the entire surface. If necessary, the solution is applied in several layers. The maximum thickness for one application cannot exceed 12 mm.
- After applying, they give time to dry. It is important to control the temperature and humidity regime. It is recommended to close the doors and windows so that there are no drafts. Violation of this rule will lead to the fact that when dried on the surface, cracks may appear.
- When the surface dried, proceed to stripping. This will require sandpaper. Work is performed by circular motions. It is worth doing everything very carefully.
- The last stage is protection. The separated layer should be covered with a special white wax in one layer.
 The technique of finishing Venetian plaster involves the masses of small strokes
Which is better?
This answer cannot be accurately replied. Each case should be considered separately. In one case, the plaster will be better structural, and in another textured. The choice should be done depending on the interior of the room. But it is worth considering the experience of the master and his skill. Before choosing decorative plaster, you need to objectively assess your capabilities. For example, this option, as a Venetian coating, is far from all.
 Creating a marble crumb
 Application on the ceilings
By repairing your home, you need to take care not only about the walls. Performing work on the ceiling is more difficult. Here you have to constantly raise your head, which can be very tired. The general principle is practically no different from technology for walls.
 The thickness of the plaster layer on the ceiling is 5 mm
 The difference is only one. If on the wall, the maximum thickness of the layer for the structural and textured mixture is 20 mm, then it decreases to 5 mm on the ceiling. To equalize the base, it is recommended to use drywall, and not special compositions.
- One of the sought-after materials in modern repairs, but the high cost of ready-made mixtures makes it look for alternative ways to implement the idea. And it should be noted, homemade craftsmen managed to invent several successful compounds in which the decorative plaster with their own hands cooked at all inferior to the highest quality finished solutions.
The article will discuss how to make decorative plaster itself, which components will be needed for this, in what proportions, how homemade compositions for internal and external work differ. And also offer several recipes and methods of preparation and.
Decorative plaster - one of the spectacular ways to finish the premises with their own hands
Composition of decorative plaster
Decorative plaster is profitable, beautiful, practical, coating ecoly friendly and maintainable. There are many application techniques, which allows you to create. If necessary, you can add a color to some formulations, and the surface is always - it is weighty arguments in choosing a material during the embodiment of various. Look a few ways how decorative plaster is done with your own hands, video lessons will prompt you interesting ideas on the scenery of surfaces.
To understand how to make decorative plaster with your own hands, you need to deal with the composition of the material. In essence, the base component of the mixture is the binder: cement, gypsum, lime, putty, silicate glass, silicone, acrylic, and even clay.

Volumetric drawings can be created by stencil
To make the material decorative characteristics, mix various components into the composition:
- To mineral, and cement - sand, stone crumb or flour, small particles of minerals, fragments of seashells, etc.
- To the polymeric based acrylic resin, to the silicone (silicate) or silicone - synthetic fillers, which give the effect of the skin, suede, silk, wood texture, as well as stone crumb, which allows you to create holistic surfaces (without joints and seams), as if carved from natural stone.

Volume is achieved when applying layers in several stages
For viscosity, good clutch and elasticity to make up additives - plasticizers, at home is most often used PVA glue.
We suggest familiarizing yourself with the materials, how to make decorative plaster, video tells both with your own hands.
Important: Almost all decorative plasters have a white, beige or grayish tint, so it is necessary to choose a pigment to silicate, acrylic and silicone, and to mineral.
Decorative plaster recipes that can be prepared at home
We have already figured out the composition of decorative plaster, each of the components can be bought in a construction store or in nature. Natural materials are important to prepare properly: sand, stone crumb, sewer particles - rinse, sift dry, try to use fractions from 0.7 to 3 mm, if clay or lime is used, then soak them and wipe through the sieve.
See how Venetian decorative plaster is performed with their own hands from putty, a video lesson, how to turn the usual putty into a refined decor.
Decorative plaster with your own hands from ordinary putty
The most simple and budgetary plaster decorative for internal works with your own hands is the usual putty: small, thin - for embossed coatings with strokes, serpentine - for pronounced, but not catching the structure of the type of cored. So that it was stronger, more elastic, kept tightly and easier was applied to the wall to it admire the Glue or primer deep penetration in the ratio of 2.5-6% by weight (the more percentage, the stronger the finishing layer, but it dries significantly longer).

Decorative plaster with your own hands, in the photo a factory, decorated with 2 types: Washing and patination
Decorative plaster with your own hands from a conventional putty 3 mm, and after the top layer grabbies, texts with girlfriends (crumpled paper, polyethylene, sponges), purchased stamps (usually under brick or stone masonry) or rollers with various patterns. The embossed pattern is applied with a small soft spatula, chaotic stroke movements.
Another way how decorative plaster is applied with your own hands from the usual putty - first the first, smooth layer, it will serve as a background when it snacks, it must be sublipped and preferably covered with soil. Next, the stencil is superimposed and an additional convex layer is made on it, a volumetric pattern. Here beautifully looks in vegetable patterns: bunches of grapes, curly plants and geometric ornaments. After drying, sharp edges, for naturalness, are processed by a thin abrasive, after which the surface is chosen, and the decor is processed by hand with colored paints, patina, gilding, etc. decorator receptions.

Surface textured under masonry from natural stone
For your information: The thickness of the convex pattern should not exceed 3-5 mm, the thicker decor will be cracking over time.We offer a way to make decorative plaster with your own hands, the video gradually tells how to issue textured waves.
Homemade composition of decorative plaster
If you get ready to buy for some reason for you expensive, we offer and easily the composition of the polymer-glue decorative plaster with their own hands. Required:
- pVA glue - 800 g;
- 5% solution of CMC - carboxymethyl cellulose, powder material, is used to stick wallpaper - 2000 g, soaked according to the manufacturer's instructions specified on the package;
- 10% solution of the soap of the economic, grate and soak in water, stir the homogeneous consistency, to the state of the thick gel:
- Clear powder (calcium carbonate) - 6500 g, can be replaced with plaster.
Components are connected and mixed with a moxing plant to a pasty state. Applied to the wall as described above. Such a homemade decorative plaster made of putty for a very long time.
The master class in the next video will tell you several ways as decorative plastering from putty, video lessons will help you choose the right tool for the desired texture.
A few more recipes, how to prepare decorative plaster, with explanations
Composition for internal works:
- River sand, washed, diluted - 3 hours, you can career, but it should be soaked to wash out clay impurities;
- Satengips - ready-made dry gypsum thin putty with mineral additives - 3 hours;
- FUGHENFULLER - finished dry drying mixture with polymer additives - 1 hour, for moisture resistance and strength of decorative plaster.
The ingredients are mixed in a dry form, indulge in water and are carefully laid out.
The next mixture that can be imitated consists of soil and stengips. We take the soil of deep penetration, increasing adhesion and improving moisture resistance, suggests that do not form an impenetrable film - aqueous dispersions of the synthetic polymer. The soil is divorced with water 2 to 1. Gradually add stengips, kneading, there should be a pasty consistency. The solution must be late for several minutes and again wash it out to remove the air from the mixture.

Methods of texturing of decorative plaster from ordinary putty
Good to know: If in the composition of the decorative plaster, then with the applix of the mixture with metal objects there may be dark strips.From any finished with additives, which can be bought in the store, you can safely prepare a decorative plaster, getting the composition with water and adding PVA glue into the mixture. In fact, a thick solution is obtained, applied with a spatula, depending on the application methods, various embossed coatings are obtained.
Below a video lesson how to make a roller with your own hands for decorative plaster.
For wet rooms, it is possible to prepare decorative plaster made of tile glue. It is bred according to the recipe on the packaging, they are applied to the surface with a thin layer, and then the textures are drawn using templates or submitted items. Usually mimic a stone or brickwork, smooth the drawing, to give naturalities with a tassel moistened in water.
Good to know: For external work to decorate the base or facade, cement-sandy solution is used instead of glue.Easy method of decorative outdoor plaster
It is even easier to carry out the outer decorative plaster with their own hands, the usual one is mixed here. Lime to the solution for facade works can be added only in the regions with a dry climate where the humidity does not exceed 65%. The larger the sandstone fraction, the structural surfaces the surface.
Decorative plaster with their own hands is preparing in proportion: 1 h. Powder (preferably white) is not lower than m 400 to 3 hours. Sand, dry components are mixed and put on with water to the consistency of the source of medium density.
The secret of decorative in the method of applying a solution to the surface - spray, it is better to do with a pulvizator or with your hands with a brush (brush) with a long bristle. The result is a coating under a fur coat.
To create a drawing with your hands like a rain (coroed), a cement-sandy solution is mixed with your own hands in a ratio of 1: 3, another part of the coarse-grained components - marble grades, shells, onyx are laid by water to the consistency of thick sour cream so that the finished mixture does not flow with Stretch.

For facades more often than others use the texture of a fur coat and a coroede, the relief is achieved by adding grain of a large fraction
Such decorative plaster is applied with their own hands on the surface of the grater, the thickness of the layer is equal to the size of the grain of the filler. When the solution grabbed, the same grater moistened in the water, the layer is rubbed along the vertical or diagonally, tightly pressing the tool to the surface, under pressure, the grain as it should be watched in the smooth surface of the groove, forming a texture.
In conclusion, look at how to make decorative plaster from putty, on video external finish with your own hands with a 3D effect.
A variety of finishing materials presented on the market cannot not be impressed. You will meet various, and decorative panels, and paints, and even. How to choose the perfect suitable material? How to find a compromise between spectacular appearance, excellent quality, long service life and low cost? These questions are asked by many people who thought about independent repairs. I want to create a unique and unusual interior, without investing huge funds. And ways to transform your home a lot. The use of decorative plaster will allow relatively fast and without much costs to complete the decoration. At the same time, even a beginner can cope with such work.
But the usual smooth wall is too boring. Decorative plaster can be much more spectacular. And for this it is not necessary to acquire expensive types of material or special tools. Folk craftsmen have long found all ways to modernize ordinary plaster to coating with an extraordinary texture.
What is decorative plaster?
The decorative appearance of this common material differs significantly from its "predecessor". The usual mixture of cement and sand ceases to be exclusively a means of eliminating cracks and other flaws of the walls. Adding dyes, decorative elements and special ingredients to the plaster led to the fact that now this material has deservedly become one of the most popular on the market. With it, you can quickly transform the interior with our own.
There are several types of decorative plaster: structural (The surface is obtained by a grainy), " venetian"(Imitates natural stone, but difficult in work), mineral (the most eco-friendly and budget option) and textured (High plasticity allows you to create unique patterns).

Decorative plaster with the film with your own hands
Possing the surface an unusual view can be in different ways. There are special stencils, rollers with patterns and other tools that allow you to change the appearance of the plastered wall. But they will all be useful to masters who are constantly engaged in housekeeping. Acquire expensive tools for finishing one - two rooms is irrational. But leave the walls without an unusual texture - not the best option.
The masters have found a way out of the situation and decided the question with the patterns of the most familiar and simple things. One of them was plastic film. Its price is low, it is very simple to work with her, and the effect is obtained amazing and unusual.

Selection of tools and materials
But one film, of course, could not do. To finish the walls you will need:
- metal spatulas (big and small),
- kelma one-handed
- acrylic putty finish,
- painting tape
- polyethylene (1.5 times more of the area of \u200b\u200bthe walls),
- bucket,
- pigmented semi-wax wax
- sponge,
- brush,
- paint bath
- waterproofing soil,
- roller for painting.

Preparation of the Wall
Special attention should be paid to the preparation of walls, since the strength of your finishing and its appearance depends on this stage. Get rid of the whole old finish: Wallpaper, plaster, paints. Apply a new layer to the previous one is categorically prohibited.
To begin with, tie the "inspection" of the wall. Carefully inspect it, noting all the irregularities and recesses, cracks and bulges. The wall should be smooth. If the surface is far from ideal, it must be pre-aligned.
In order not to spoil the existing interior details, use the painting tape. It can be sealed with frieze, adjacent surfaces and other decor elements. After the work, carefully remove the tape, do not leave it for a long time.

Decorative Plaster With Film: Step-by-step instructions
We recommend that you use it acrylic plasterSo how to work with it is much easier than with dry. However, both types are suitable for finishing internal works. Prepare the material. Carefully stir plaster, achieve homogeneity. It should be pretty thick and tight. If the contents of the bucket flows, like liquid sour cream, then the composition cannot be applied to the walls. It just will not hold on the surface.

- Step. To evenly apply plaster, use a spatula. Crouch them with the desired amount of material and apply to Colelma. And you can neatly distribute plaster on the wall surface. You need to start work from one corner, and finish - the opposite. The recommended layer thickness is 2 mm. Do not put the plaster with a thicker layer, it simply will not hold onto the surface. Remember that the plaster is applied to the entire wall at once. It is impossible to stop working in the middle of the wall in the middle, and the next day to engage in another half.
- Step. So, with a smooth layer applied plaster on the wall. But how to give it the desired texture? To do this, the film is useful. It is best to work in a pair, then one person will be able to create a pattern, and the other - to hold polyethylene, so that it arbitrarily fell on the wall. You need to start with the corner. Gradually attach polyethylene to the wall, forming patterns due to folds on the film. The stronger the material is shame, the deeper will be the relief. You can adjust the pattern and after sticking the film to the entire surface of the wall. Do not forget to remove the painting tape.
- Step. Leave the wall at rest for 12-15 hours (the time of complete drying of the plaster is usually indicated on the package). After that, you can safely remove the film. Give the wall to dry, if necessary.
- Step. Stick up the painting tape again to protect the adjacent surfaces. Rottented wax apply roller or sponge. To achieve homogeneity and emphasize the texture, carefully pass the sponge all embossed places. Excess paint can be removed with a dry white cotton cloth. Leave the wall for 4-6 hours for drying.
After that you can apply another paint, tint relief units or pearlTo achieve an unusual effect of "overflowing" colors.
Decorative Plaster With Film: Video Master Class
If the question arose about the finishing of the walls, it is safe to say: repair is close to completion. But it is even early to relax, because it is one of the most responsible stages, especially if the finish is done with your own hands. And here the question is not so much in the technical side as in the aesthetic! Options are infinite set, and everyone strives to be original in this matter, trying to realize their own ideas. The benefit that today the widest choice of materials that make it possible to realize the most bold ideas.
Decorative plaster from ordinary putty, with their own hands made, can give the walls the most original look.
Stucco and shtclock as finishing materials
In general, the plaster is a coarse coarse material designed for primary wall cladding, but the decorative plaster has almost nothing to do with it and may well be prepared from a conventional putty. The shplanke, in turn, is just the material that is used to align the walls and hiding small defects. At the same time there are two types of putty:
Start - eliminates cracks, scratches and other small surface defects.
Finishing - allows you to make the surface with absolutely smooth. Prepares the walls to paint, pasting with wallpaper, etc.
Often the decorative plaster finish attack is created. Such a coating looks very effectively and allows not to resort to expertly specialists in order to get rid of various defects. Decorative coating perfectly disguises all roughness.
Preparation for decorating
So, if you combine patience, diligence and your fantasy, then the decorative plaster from the usual putty will turn the wall into the work of designer art.
Getting Started, you need to make sure that everything is prepared. Namely:
Materials for the preparation of decorative plaster;
Necessary tools for work;
The surface of the walls is prepared (leveled);
Paint, if there is a desire, give your creation color.
Tools and textured rollers can be purchased in specialized stores, and you can use undergraduate tools, remove the old coating of the existing roller and enclose it with a foam rubber with large pores or to make holes in the usual foam rubber. An interesting result can be achieved using a conventional sponge, brush, polyethylene, but everything is in order.
Before starting finishing work, it is worth determining not only with what I want to do, but also how to do. The decorative plaster from the putty recently is often used to implement the most bold ideas, but without certain skills will be complicated. But if difficulties are not frightened, you can safely be taken for business.
An aligned and cleaned surface to be placed, and the boundaries of the plots are gradually gradually, a plot behind the site.
Cooking the mixture:
Shtclowing, dry mix;
Grout for seams;
Soil (white).
We mix the putty and primer so that the composition was the consistency of sour cream. If you wish, you can add to this mixture the paint of the desired shade. In order not to make a mistake with a dense, first you can apply the composition on a small piece of drywall. If the mixture does not spread and is not strong, it can be assumed that decorative plaster from a conventional putty, with their own hands made, ready to apply. Nothing difficult, as you can see, no.
There is also a recipe that can be prepared by decorative plaster from plaster putty:
6 kg of plaster mix (dry);
2 liters of water;
0.2 liters of PVA glue.
Press the gypsum mixture into water and mix using a building mixer, to a homogeneous mass, then add glue and mix again. The mixture should be homogeneous and thick. To change the consistency slightly, if necessary, you can either dilute the mixture with water, or to plug dry plaster.
Important! It is necessary to use the composition of the gypsum replacement for 20-30 minutes. Therefore, it is worth thinking about your capabilities and how much the solution must be prepared at a time.
How to make decorative plaster from ordinary putty
Unfortunately, complex textures and patterns independently, without proper training, it will not be possible to create, but reproduce simple reliefs forces to everyone, despite what they look no less effectively and original. It will help in this decorative from usually the shtlocks is prepared by a solution and applied to the wall of the wall by a layer of no more than 10 mm. The mixture must then give a little time so that it grabbies, and start applying patterns.
Venetian decorative plaster
From a conventional putty with their own hands prepare a solution that can imitate the valuable rocks of natural stones. And the walls decorated with "Venetian" will look unforgettable beautifully, in the spirit of the Middle Ages.
Classical Venetian plaster is a mixture of sand from natural stones (quartz, marble, malachite) and gas-free lime with the addition of dyes.
You can take a ready-made mixture and add it to the water capacity in accordance with the manufacturer's instructions. Using a building mixer, mix thoroughly. The solution must have a consistency of sour cream.
The application process is presented in the photo below.

You can use Venetian plaster only on perfectly smooth, dry and clean surfaces.
The shplanke is taken by small portions, smears are made using a spatula. The smears can be made of swallow and small, you can simulate any material or create a repeating pattern. Having finished the first layer, he is given to dry carefully, then accepted for the next. The first layer is made solid, subsequent, finishing, are applied by a flexible spatula. The layers are slightly rubbed so that no irregularities arise.
The next stage of the creation of decor is grinding. The main thing here is not to rearrange and smooth only sharp protrusions in order not to damage the structure. Use non-bubbling or mesh for this.
Then the surface can be painted. This is a responsible stage in the creation of the Venetian outfits of the walls. The paint is applied by layers, and the subsequent layers should differ by saturation from the first. Paint is applied quickly into small areas. We must try to remove part of the color from the convex sections.
Completion can be the coating of walls by acrylic varnish or adding the effect of gilding. But you can leave everything as it is, there is a matter of taste.
The creation of Venetian plaster is a difficult and having many nuances, but with due diligence subject to everyone.
Patterns, embossing, roller textures
To create beautiful patterns, embossed, the textures also uses decorative plaster from a conventional putty. The roller, covered with foam rubber with large pores or steel mesh, process the surface of the applied plaster. What can I show fantasy here: use different rollers, combine movement directions, use texture rollers. You can make a factory roller alone using:
Lowering rope or cord that should be hounded on the roller. It will be a smooth winding or with a multitude of tramplers, to solve the designer.
Decor Kelma

Also interesting drawing can be achieved by Celma. The first layer is applied, and then the solution is distributed on the Kelme and is transferred to the base. The movements of the Kelma will create an unusual surface.
Another pattern, using Kelmma, can be obtained, simply applying it in different places and pressing a little. The chaoticity of these movements will provide a non-repeating pattern of walls.
Coroed
I use a wooden or plastic tool, you can recreate an independently common type of finish, which is called the croroede and resembles wood eaten by insects.
To do this, apply the composition on the surface of the wall and give it some time to grab. Then take the tool and perform horizontal, vertical or circular movements.
Patterns with sponge and washcloth

The most original way decorative plaster walls. You can create a grainy texture with your own hands from a conventional putty and sponge. To do this, you just need to walk with a sponge over the entire surface, slightly pressing it to the wall.
Hatching
It is possible to decorate the walls with a metal comb, "having" freshly mounted plaster in different directions. You can get interesting "wicker" patterns. The direction of movements can be wave-like, and circular, and semicircular, and crosswise crosswise. The shp can dry and clean the rags to get rid of small particles that are not associated with the surface. Decorative plaster made in this way, with its own hands from the usual putty made, allows you to get patterns, not similar to any other.
Snowball
Execution technique very much resembles the creation of Venetian plaster. But it uses contrasting colors. A more dark put on the first layer. And the splashes are made by light tones. To simulate snowfall, the upper layers are best made white.
Silk
Another simple way to create a decorative surface. Using a polyethylene film, you can get a pattern resembling a compressed silk. So:
First, a smooth layer with a thickness of about 2 mm we apply a putty to the surface.
Immediately after applying to the sharpclown section, there is a polyethylene film (this "canvas" does not need to smooth out, the more folds formed, the more interesting the texture is).
The covering approximately a third of the surface, begin to pull up the folds, slightly twisted, so new patterns will be formed on the shtclotch (repeat the action until the whole wall is covered).
After 12-15 hours, remove the film. After that, give the walls for some time to dry.
After complete drying, the surface is slightly cleaned, removing the lambing parts and smoothing the strongly protruding areas.
The next stage of work is painting the surface. Paint is applied roller or sponge. A damp clean sponge is cleaned by part of the color. To remove abundant columns of paint in the corners, a spatula wrapped with a clean rag, they need to be confused. The finished surface is given to dry. Then, to enhance the "Sheoche" effect, pearl paint is applied.
Ideas of patterns and textures
Having a good fantasy and certain skills, you can create the most original patterns, very fell in terms of creating new textures. Decorative plaster material from a conventional putty. Photo, video, instructions will help cope with any difficulties. The main ways to create original textures are given in the article, but there are many variations.
Conclusion
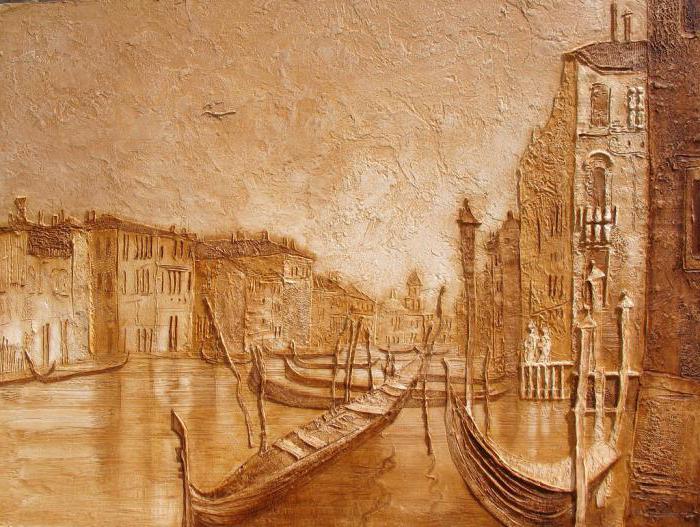
It is safe to say that having patience and good fantasy, the decoration of the walls can be performed independently, minimizing material resources for repairs. On the walls of the walls you can create and incarnate any idea. If there is a talent of the artist, then the decorative plaster used, with its own hand-made hands, will allow you to reproduce even the pictures. Of course, to embody the most grand ideas to better contact the finishing professionals. But if nevertheless it is decided to independently arrange the surface, but there are no special experience in this business, it is worth practicing on a small piece of drywall and then boldly accepted for the main decor.
 Decorative plastering was and remains a popular form of decoration both indoors and the facade walls due to its practicality and a variety of created surfaces. In this article, we will consider all popular methods and techniques for applying decorative plaster, whose features will be clearly shown in the video lessons.
Materials and tools
Covelma application technology includes the following work techniques:
- A portion of the solution is superimposed on the tool and is distributed over the wall with short strokes. Stacking layers of plaster make peaks on each other. Their direction can be both in one direction and in different. If Kelma moves not in a straight line, but on the arc, the relief will be completely different, more freaky.
- Another popular option to put a decorative finish - torching celma. The plastering solution is also taken on the celma, then it is easily pressed with the entire surface to the wall and is given. Moves make quickly "on the low", turning the instrument in different directions. The effect is obtained shallow "fur coats" . You can also first apply the plaster with a smooth layer of 2-3 mm, and then make turning throughout the area. It turns out in the photo.
Roller
For decorating walls during repair, conventional fur (paint rollers) and special rubber with a specific pattern are used. Also, a structural roller for decorative plaster can be made with their own hands, wrapping its rotating part, for example, a rag, package or rope.
Pattern appliances with structural roller is very simple:
- the wall is plastered into one layer with a thickness of 2-4 mm;
- the roller is carried out by plaster in one direction, leaving the drawing.
To give the walls the effect of type "fur coat" use a fur roller. There are two ways to perform:
- the roller will plunge into the plastering and rolled along the wall;
- the wall portion is completely shrouded with a celma or spatula, then the roller shapes the texture.
After grapping the solution on the wall, you can walk the wet mochelmy and smooth the protrusions, to sweat.
Important: If the mixture lies unevenly, it is necessary to remove excess with a spatula. It is not recommended to make big breaks when working with a roller, as the material is dry, and the joints will be noticeable.
Brush
With the help of a brush, a finishing coating is created, as a rule, using ready-made plaster for the decor. This method has several advantages:
- Efficiency. The brush distributes the material with a thin layer.
- Rapidity. When applied to the mixture on the wall, the texture is immediately created.
- Simplicity. No special skills and techniques are required, decorative plaster is simply superimposed and is distributed to smears in different directions.
Often as part of such mixtures there are mineral fillers, such as sand, marble crumb. They give the roughness of the plaster and complement the texture created by the tassel. More about the application technique will be told in the video lesson below.
Sponge
For the textured coating device, underwrite means, such as foam or sea sponges, polyethylene packages, rags, are also used.
At first put a smooth base layer, use cells. Then the sponge is buried with a small number of plastering and smears are applied to the wall. You can close not the entire surface, but only to make islands from plaster. After, it will begin to be captured (after 15-20 minutes), the tops smoothed by a celma or spatula.
In this way, mimic the texture of the stone, create arbitrary drawings.