It is quite difficult to create optimal growing conditions for vegetables without a special shelter. During the day, the plants will languish from the heat, and at night they will grow poorly due to the cold. By installing a polycarbonate greenhouse with your own hands, you can create comfortable conditions for various seedlings. We propose to consider in more detail the existing types of greenhouses and the features of their creation.
Read in the article
What is the Difference Between a Greenhouse and a Greenhouse
To begin with, let's note what are the features of such covering structures. In the greenhouse, a positive temperature is maintained mainly by sunlight. It is permissible to use additional heat sources, for example, coal, firewood, gas or fuel oil. This design is larger than a greenhouse. An adult can walk inside the greenhouse to his full height.

The greenhouse belongs to the category of self-sufficient energy systems. Heating of the interior space is provided by the biological decomposition of organic materials and the greenhouse effect created by sunlight. Such buildings are usually carried out without doors. For access to plants, a reclining or removable upper part is provided. The greenhouse is actively used for growing seedlings. There is not enough space for grown plants.

Common to a greenhouse and a greenhouse is the storage of thermal energy within the structure. Based on this, it is worth carefully considering the design of each shelter and the materials used during construction.
Advantages and disadvantages of polycarbonate for the manufacture of greenhouses and greenhouses
The choice in favor of polycarbonate is made because of its undeniable advantages:
- durability. Compared to the film coating, it is able to last much longer;
- security. There is no need to be afraid that during operation it will break like glass;
- high throughput. A large percentage of sunlight passes through the formed coating;
- resistance to mechanical stress;
- sufficient plasticity. Polycarbonate can be used as a covering material for arched greenhouses;
- long service life, reaching 20 years;
- attractive appearance and wide range of colors;
- low weight, allowing you to abandon the device of a powerful foundation.
Among the disadvantages, it should be noted that the price is higher compared to other covering materials.

Projects of greenhouses and greenhouses made of polycarbonate with photos of structures
You can independently create a structure of any shape and configuration. If you are thinking over the appearance of a future polycarbonate greenhouse, photos of ready-made options can serve as a good example. We invite you to get acquainted with possible solutions.

Polycarbonate greenhouse with a house
Gable roof greenhouses have certain advantages. A polycarbonate greenhouse with a house, if properly located on the site, is able to provide plants with heat energy throughout the day. We offer you to see photos of interesting incarnations.


Polycarbonate mini greenhouses
You don't need a large shelter to grow seedlings. Polycarbonate mini-greenhouses do an excellent job with this task, the photos of which you can see below.


How are greenhouses and greenhouses made of polycarbonate
According to the device, the covering structures are usually divided into ground and in-depth ones. The latter represent a trench with a top harness made of bricks, boards and other materials. The roof can be of any shape: single, gable or arched.
Attention! Recessed greenhouses with a pitched roof are called Russian, with a gable roof - Belgian.

Ground structures are often portable. The heating pad is usually placed under a layer of soil. As soon as the "coolant" is completely rotted, you will have to add a new portion. If you decide to buy a polycarbonate greenhouse, it will definitely be ground-based.

What types of support base are used when installing greenhouses and greenhouses
For the construction of greenhouses, bases of various types can be used. For buildings that are installed for a long time, you can choose a strip, brick or pile foundation. For seasonal greenhouses, a base made of wooden beams is suitable.
Attention! With a high occurrence of groundwater, it is worth abandoning the device of a strip or brick foundation.

DIY polycarbonate greenhouse: materials for the manufacture of the supporting structure
The greenhouse frame can be made of various materials. Many people make a greenhouse made of polycarbonate from wood with their own hands. The assembly of such a structure is not difficult. The frame is stable and durable. With proper care, processing with a special composition and the use of dried wood, it can serve for a long time. Easily attaches to a wooden base. A greenhouse does not need a solid foundation. There are enough support pillars.

If you decide to buy a polycarbonate greenhouse, then you will most likely be offered a product with a metal frame. You can independently make such a greenhouse from thick fittings or a profile pipe. The elements are connected by welding. Due to its high weight, it requires careful preparation of the base.

For the manufacture of the frame, metal-plastic pipes with high performance characteristics can be used. They bend well and are strong enough to support the weight of polycarbonate. Suitable for making arched structures.
The cheapest option is a frame made of polypropylene pipes. Using the nodal elements, you can form a greenhouse of any shape and size.

How to choose polycarbonate for greenhouse or greenhouse cover
Manufacturers offer cellular and solid polycarbonate. When choosing a covering material, you should immediately pay attention to the first type, which is capable of transmitting up to 88% of the light and has good thermal insulation characteristics. An important criterion when choosing polycarbonate is its density. It should be around 800 g / m² on average. Visually, this parameter can be determined by the absence of distortions in lying sheets, bends and other types of deformation. However, it is better to check the specifications with the seller. The thickness of the selected polycarbonate depends on the characteristics of the shelter being erected.
Advice! If you decide to buy polycarbonate, contact a trusted seller. There is a large amount of low-quality material on the market.

Calculation of the required amount of building material
The procedure for calculating the required amount of materials depends on the design features of a particular structure. We offer you to watch a thematic video that will allow you to understand the intricacies of the calculation.
Preparatory stage before building a greenhouse or polycarbonate greenhouse
For those who decide to make a polycarbonate greenhouse with their own hands, a drawing of the future design will help determine the required amount of material and the procedure for performing installation work. In addition to the design documentation, the site on which the construction will be carried out should be prepared. You should decide on the location of the greenhouse in the allocated area.
Advice! For better illumination of the vegetables grown, the greenhouse should be located from east to west.

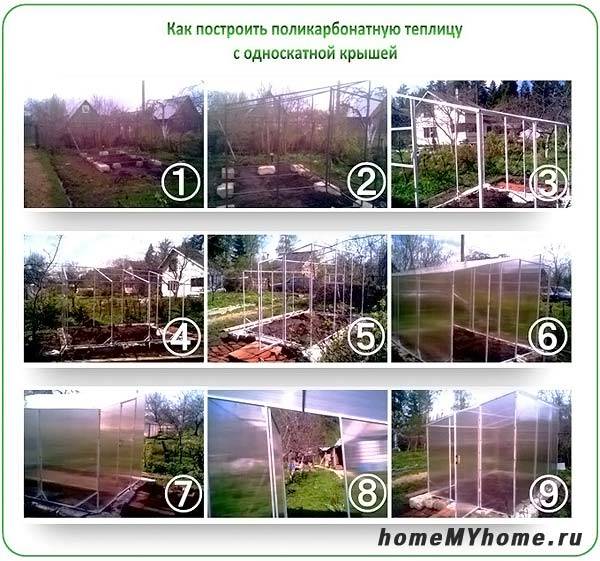
How to build a greenhouse or polycarbonate greenhouse with your own hands - step by step instructions
If, instead of buying a ready-made structure, it is decided to build a unique structure with an optimal configuration, we suggest figuring out how to build a greenhouse with your own hands from polycarbonate. Below is a step-by-step instruction that allows you to thoroughly understand this issue.

What tools are needed to work
The list of tools used depends on the design features of the greenhouse and the material from which the frame is made. Be sure to have in stock:
- hammer;
- screwdriver;
- sledgehammer;
- measuring tool;
- building level;
- sharp knife.

Laying the foundation
The question of where to start and how to install a polycarbonate greenhouse with your own hands should be answered from the foundation. Work begins with the marking of the territory. It is imperative to drive in the pegs to outline the contours of the future greenhouse. By their location, it will be possible to determine how correctly the markings are made. When constructing a pile foundation, instead of pegs, you can immediately install metal pipes. Before digging in, the pipes are coated with a special compound to slow down corrosion. Piles are driven in to a depth of 0.9 m, leaving about 20 cm on the surface.
For the strip foundation, a trench is dug, the formwork is installed and the mortar is poured. After the concrete is completely dry, installation work begins. The elements of the base from the timber are pre-treated with a composition that inhibits decay. After that, it can be laid on bricks, dug in or simply put on the ground.

A video of installing a polycarbonate greenhouse with your own hands allows you to understand in more detail the peculiarities of laying the foundation.
A video on how to cover a greenhouse with polycarbonate with your own hands will allow you to deal with the nuances of the process.
How to make do-it-yourself windows and doors in a polycarbonate greenhouse
For the manufacture of vents and doors, the remains of polycarbonate are used. They are attached to previously prepared places. Three hinges are required to fasten the door, and two for the window. Thinking over how to make a greenhouse with your own hands from polycarbonate, you should decide on the direction of opening the window. It can be opened up, down or sideways.

In the following video of assembling a polycarbonate greenhouse, you can find interesting information.
 More details on Otzovik: http://otzovik.com/review_712853.html
 Review of the greenhouse "Element"
More details on Otzovik: https://otzovik.com/review_3072322.html
We hope the video on how to assemble a polycarbonate greenhouse turned out to be useful for you. Share in the comments how much time you spent on installing the actual greenhouse, what size it is and what it is made of.
With all the variety of indoor structures, a polycarbonate greenhouse remains one of the most popular ways to speed up harvesting at a summer cottage. The adherence of gardeners to these products is explained by several factors - this is the strength of the material, and a large selection of models, and ease of installation and operation.
But the most important reason usually becomes the versatility of such a design, because almost everything can be grown under polycarbonate - cucumbers and tomatoes, seedlings and strawberries, greens and even mushrooms.
Polycarbonate is a strong and durable material
The use of polycarbonate for cladding greenhouses and greenhouses has opened up new perspectives for manufacturers of these structures. Since this material is highly durable, but at the same time remains flexible, it became possible to create greenhouses of various shapes and designs, taking into account the characteristics of each culture grown.
Butterfly greenhouse - beautiful shape and practical design
The butterfly greenhouse is a popular model among summer residents. The simple design with a swing-open double roof is suitable for forcing seedlings as well as for growing cucumbers and other tall crops.
For this shelter, you do not need to build a massive foundation - in the photo, a polycarbonate greenhouse is installed on a simple formwork made of boards.

Butterfly greenhouse is convenient for growing many crops
Due to the fact that the roof can be opened from both sides, it is convenient to take care of plants in such a greenhouse. In addition, it is convenient to ventilate it without creating drafts, to control the humidity and temperature under the shelter.
Such a model can not only be purchased ready-made, but also easily assembled independently, using metal-plastic pipes or a galvanized profile for the frame.
Snail greenhouse - original shape and maximum comfort for plants
"Snail", or as it is also called - "bread box", is convenient for growing seedlings and low plants - greens, strawberries, low-growing tomatoes. The greenhouse got its name for the original roof structure - the movable sash simply moves around the axis of the body. Thanks to this shape, it is not necessary to allocate a lot of space on the site for the "bread bin" and it is convenient to serve the seedlings.

Installation of the frame in the ground
The snail greenhouse can be with one movable sash or with two. They do not equip the foundation for it, but sometimes for high crops the "snail" is used as a roof on a box made of glass or polycarbonate.

In such a "bread box" tender seedlings are reliably protected from the weather
Belgian greenhouse with a pitched roof
The simplest polycarbonate greenhouses are the so-called "Belgian" ones. An ordinary single-pitched box with a hinged lid does not take up much space; it can be installed under a wall or near a fence, on an apartment's balcony or in garden beds.
You can assemble such a greenhouse yourself, especially since not so many materials are required for it - a few bars or a galvanized profile, polycarbonate and screws.
Most often, this design is used for sowing seeds, forcing seedlings and greenery. The only drawback of this greenhouse model is that it is not very convenient to work with plants, since only the roof opens, and to access the garden you have to bend over the side.

It's very easy to assemble a Belgian greenhouse yourself.
Polycarbonate greenhouses - functional structures for high yields
Greenhouses are larger than greenhouses, so it is more convenient to work in them. But the dimensions and internal arrangement of these structures are much more complicated, and depends on how the shelter is planned to be used - for winter growing vegetables, to accelerate the ripening of fruits, or for industrial purposes. The photo shows polycarbonate greenhouses, which are easy to assemble on your own.

Variety of forms of greenhouses
Classification of greenhouses by shape

Gable greenhouse made of polycarbonate on a wooden frame from a bar
The shape of polycarbonate greenhouses is also diverse. Manufacturers most often offer arched models (such a design is convenient not only for installation, but also for operation). But on the plots, gardeners independently build structures of various shapes:
- single-pitched;
- gable;
- drop-shaped;
- arched;
- domed;
- greenhouses of complex shapes (for example, according to Meatlider).

Polycarbonate drop greenhouse is suitable for growing flowers and vegetables
The choice of the frame shape is determined not only by the peculiarities of the agricultural technology of the grown crop. The ease of building and the cost of materials often play a decisive role.
Therefore, polycarbonate greenhouses are more often mounted on a wooden frame of simple shapes - with a pitched or gable roof.

Single slope wall greenhouse with glass
The peculiarities of agricultural technology of some plants require the creation of special conditions inside. Therefore, for certain crops, special designs are created that best meet the needs of the grown species. So, a polycarbonate greenhouse for cucumbers is equipped with a window on the opposite facade from the entrance to ensure uniform ventilation and the necessary humidity.

Arched borage
What is attractive about a greenhouse according to Meathlider
Recently, specially designed greenhouses have become popular, invented by the American vegetable grower Jacob Meathleidnre.
His invention - a two-level roof with vertical ventilation vents - can significantly improve the microclimate and optimize the very process of caring for the crops grown.
This roof arrangement is used not only on classic rectangular frames. Modifications of arched greenhouses with vertical vents on the roof turned out to be more convenient than the standard version, since they allow you to easily solve the problem with condensate accumulating under the roof and overheated air.

Arched "mitlider" greenhouse
What materials are better to use for the frame
When building a polycarbonate greenhouse with your own hands for cucumbers, tomatoes, herbs and other crops, it is very important to choose the right material for the frame. Usually, three types are used in home construction:
- wooden;
- metal;
- metal-plastic.
Wooden frames - advantages and disadvantages
The most accessible material for construction is wood. Beams and planks are relatively inexpensive. The wooden frame is easy to install, has high strength and stability, long service life, it is easy to attach polycarbonate sheets to it. It is not necessary to fill a massive foundation under such a frame; you can simply strengthen the support pillars well.

The wooden base is easy to assemble by yourself
The disadvantages of wood include the ability to deform under the influence of high humidity and sunlight.
Therefore, for the construction of a greenhouse, it is necessary to choose good quality material - well-dried wood without signs of rotting and insect infestation. It is also recommended to paint the finished wooden building with moisture-resistant paint.
Pros and cons of metal frames
Very often, solid polycarbonate greenhouses are built on metal frames. The main advantages of such structures include their durability and strength. For construction, pipes, profiles or large diameter fittings are usually used. A strip foundation is usually poured under metal structures, in which pipe sections are immediately attached to fix the frame.
But metal frames also have disadvantages:
- high cost of materials;
- certain difficulties with the installation of structures (the need for welding).

The frame made of shaped pipes is installed and fixed on the foundation
Reinforced-plastic and plastic pipes are the ideal material
One of the most acceptable materials for the frame of a greenhouse or polycarbonate greenhouse is metal-plastic pipes. The costs of purchasing pipes are fully offset by the absence of costs for protective treatment. In terms of its strength and durability, such a frame is not inferior to a metal one, and in terms of ease of installation work - a wooden one. Due to its flexibility, this material is ideal for the construction of arched greenhouses.

The frame made of PVC pipes is easily mounted at the summer cottage
The relative disadvantages of this material include the need to purchase special fasteners and connecting elements of the required diameter.
But this method of installation makes the greenhouse mobile - if necessary, the sheathing is removed, the frame can be easily disassembled and transferred to a new site.

Greenhouse scheme for polycarbonate pipes
How to build a polycarbonate greenhouse for cucumbers with your own hands
It is not difficult to build a home greenhouse or greenhouse for cucumbers on your own. The easiest way is to assemble such a structure on a wooden frame with a gable roof. For construction you will need:
- cellular polycarbonate;
- drawing;
- wooden beam 10x10 cm for the frame;
- bolts for assembly;
- screws or self-tapping screws for fastening the sheathing;
- dye;
- concrete for the foundation;
- hinges for doors and vents.

Scheme of an arched greenhouse for polycarbonate or film
When planning a drawing, it is worth considering that a polycarbonate greenhouse for cucumbers must be equipped with vents and devices for tying plants.
It is not worth building a frame with a height below 2 m and a length of less than 4 m - it is inconvenient to work in a low building, and in a shorter one it will be difficult to place all the necessary equipment (lamps, heaters, irrigation systems).
How to build:
- After preparing the drawing and calculating the required amount of materials, you can start preparing the site. The earth must be leveled and tamped. Mark the place for the foundation and the installation of the corner posts.

Wooden structure
- Pour the foundation and pillars, leave the solution until it solidifies completely.
- Mount the lower and upper strapping on the support pillars.
- Install vents and a door, as well as support beams and a ridge for the roof.
- Treat the assembled wooden frame with an antifungal agent and paint.
- After drying, you can start covering the greenhouse with polycarbonate.
When building a polycarbonate borage with your own hands, it is important to remember that cucumbers require a special approach in growing - they need a lot of space for development, they are afraid of drafts and high humidity, and are also very sensitive to sunlight. Therefore, when choosing a place, be sure to take into account the shade of the site and correctly orient the greenhouses to the cardinal points.
We will send the material to you by e-mail
O camping is a great option, especially if you spend time at your dacha or in a country house. Most people have a small vegetable garden on their personal plot, where a pretty greenhouse will fit well. It is very expensive to order such a product in a store, but a do-it-yourself greenhouse made of polycarbonate, the drawings of which are easy to get, is the most suitable option. Let's find out what we need for this and how to make the installation.
Polycarbonate greenhouse
Among the advantages of greenhouses made of this material, it is worth noting:
- Durability;
- Reliability;
- Better and longer retains heat than a greenhouse, covered with foil or glass, subject to high-quality material;
- Retains up to 92-95% of natural light;
- Year-round operation;

- Ease of installation when choosing a simple greenhouse frame;
- Fire safety, when exposed to high temperatures, polycarbonate melts without emitting harmful substances;
- Aesthetic look.
Video: how to choose high-quality polycarbonate
How to make a polycarbonate greenhouse with your own hands drawings
If you decide to assemble a polycarbonate greenhouse yourself, you will need a construction plan and certain materials, a list of which you can find below.
conclusions
- It is durable and has a number of advantages over film and glass greenhouses.
- Easy to install, when choosing a simple design; you can make and assemble yourself.
With the onset of the planting season every gardener strives as best you can prepare to the beginning of planting vegetable crops.
At the same time, sincere adherents of dacha farming try to grow seedlings on their own site with their own hands. For this absolutely it is not necessary to build large sizes, but it is quite possible to get by with the construction of a mini-greenhouse.
Design features
Polycarbonate mini greenhouses - compact and lightweight structures in which you can vegetable crops. Cellular polycarbonate is an excellent option for covering greenhouses.
He is a two-layer material with rows of cells located inside. Polycarbonate is much stronger, much lighter and bends well, which allows it to be shaped like an arch.
Mini greenhouse equipped with this material, has the same degree of thermal insulation as is the double-glazed frame construction.
Such a structure can be successfully used on the backyard plots of private houses, it is also an indispensable option for gardeners.
Advantages and disadvantages
Like any construction, a mini greenhouse made of polycarbonate has positive and negative sides... The advantages include the following indicators:
- easy and simple installation of the structure;
- high degree of thermal insulation;
- excellent level of light transparency(not less than 92%);
- protection of plants from ultraviolet rays, due to the presence of a special coating;
- the strength of the material (200 times more than that of glass) and the ability to withstand shock loads;
- polycarbonate resistant to aggressive environments and provides plants with good protection from acid precipitation;
- due to the low weight of the cladding (16 times lighter than glass), the cost of the supporting parts of the structure is reduced.
Design flaws made of polycarbonate:
- the ends of the cover should not be left open, as moisture and insects can penetrate into the cells, as a result of which mold and mildew will form and deterioration of the operational properties of the material and the entire mini-greenhouse;
- it is necessary to clean the sheets from accumulations of dust and dirt very carefully, using soft materials and neutral detergents;
- it is prohibited to use products containing salt, alkaline, ether and chloride components;
- it is forbidden also use abrasive pastes and sharp objects to avoid damaging the UV coating.
Photo
Options for a mini greenhouse made of polycarbonate (see photo below):
What can be grown?
Polycarbonate mini construction excellent suitable for growing different types seedlings, undersized crops and even a small amount of vegetables.
, - the seedlings of these plants can be grown in a reduced version of the greenhouse. You can also grow early ripening beans in it.
When growing pepper sweet and bitter varieties should not be planted together, since in this case it will be difficult to avoid cross-pollination.
We build with our own hands
There are several options construction of a polycarbonate mini-greenhouse. Two possible models will be considered below.
Recessed mini greenhouse
The optimum temperature for the construction of a polycarbonate greenhouse is 10-12 ° C, since at temperatures exceeding this indicator, sheets of material increase in volume, and further, with decreasing temperature, they will decrease.
In-depth option greenhouses are characterized by a simple device and able to retain heat well, which is released during the debate of manure. The length of the structure can be any (within reason). As a rule, such structures are built no longer than three meters.
Width should be no more than 1.5 m... With a large width of a mini-greenhouse, it is inconvenient to work with it, while a structure of a small width is not able to accommodate the required amount of manure, as a result of which heating will be insufficient.
The level of the deepening depends on the conditions in which the structure will be used: for low temperatures optimal would be depth 80 cm, and when using a greenhouse during small cold weather, 30 cm will be enough.
Top filling of the pit - soil (layer thickness 20 cm), the rest is filled with manure.
The polycarbonate structure is installed on a log frame, which is mounted around the pit. For framing, logs with a diameter of 100-150 mm are used.
To protect wood from the effects of moisture with should be treated with hot linseed oil or close the perimeter with pieces of old linoleum. The roof of a mini-greenhouse can have a different design: arched, one- or two-pitched. Here we will talk about a single-slope design.
The roof frame can be assembled from wooden beams. First, the side structural elements are hammered or twisted with self-tapping screws, which are triangular-shaped parts ( the bottom of the parts must correspond to the width of the excavation).
Further, the finished "triangles" in the corners are fastened together with bars, the length of which is determined based on the length of the pit. The upper and lower bars should also be fastened together with 2-3 transverse strips.
The frame is ready. It remains to close it on all sides (except for the bottom) with pieces of polycarbonate, securing them with self-tapping screws, and glue the places where the sheets adhere to the tree with tape.
Hinged cover in this design not provided, therefore, during operation, the structure will need to be completely removed for a while.
Mobile mini greenhouse
This is a practical and economical option for a compact greenhouse that retains heat as well as a recessed structure. Such a model can be use at stabilized temperature, in the second half of the spring season. Equipped with wheels, the mini-greenhouse can be easily moved around the site if necessary.
For the manufacture of DIY mini greenhouses made of polycarbonate, will need:
- support frame;
- four-wheeled device;
- plywood sheet for arranging the bottom;
- two bars with which the rafter legs will be attached;
- polycarbonate;
- self-tapping screws.
To assemble the support frame, small thickness bars are used, which are fastened end-to-end with self-tapping screws. Wheels can be attached to stand legs... The side bars of the mini-greenhouse serve as a harness to which the rafter legs are attached.
At the top, a gable roof is mounted, which is assembled from frames equipped with polycarbonate, fixed with self-tapping screws.
From the ends construction worth equipping with hinged doors so that you can ventilate the greenhouse. The bottom of the structure is covered with foil and covered with manure and soil.
Mini greenhouses made of polycarbonate - great alternative traditional glass options. The lightness and strength of the material, combined with the ease of assembly and installation during the construction of certain models, induce the choice in favor of polycarbonate structures.
If you find an error, please select a piece of text and press Ctrl + Enter.


To grow seedlings and greenery in a personal plot, it is enough to build a small polycarbonate greenhouse with your own hands. Those who want to provide themselves with fresh vegetables all year round will have to spend money on installing a capital polycarbonate greenhouse. At the planning stage, it is important to decide on the purpose and dimensions of the building, the material for making the frame, the type of foundation and the acceptable polycarbonate sheathing technology.
Features of a polycarbonate greenhouse
Before making a polycarbonate greenhouse, you need to find out the basics of construction (optimal location, typical dimensions, assembly schemes) by studying the theory and watching thematic videos. Thorough preparation for construction and an understanding of the tactics of work will help to avoid a number of typical mistakes.
Portable mini greenhouse made of polycarbonate
Location on the site
It is impossible to install hotbeds and greenhouses on any free area of the site. A competent and consistent approach to placement contributes to high yields and determines the energy efficiency of the structure. Electricity consumption for additional lighting, ventilation and heating depends on the amount of sunlight and wind protection.

Polycarbonate tunnel greenhouse
Aspects of choosing a place for a polycarbonate greenhouse:
- illumination;
- relief;
- cardinal points;
- soil quality;
- proximity to communications.
Illumination... The primary criterion is the sufficiency of light. The greenhouse should be in the sun for the maximum time during the day. The proximity of trees, high hedges and fences is unacceptable.
Important! If it is impossible to provide access to light all day, you should choose an area where the sun reigns in the afternoon. The advantage of such an installation is the protection of plants in summer from scorching rays.

Convenient location of the summer cottage greenhouse
- the light falls unevenly on the "inclined" beds;
- in the lowlands, the soil is prone to moisture accumulation and frequent frosts.
A slight slope should be leveled - pour crushed stone and fertile soil. Tamp the laid out "pillow".
Accounting for cardinal points... Experienced agronomists insist on choosing a location with an eye to the size of the greenhouse:
- large greenhouse complexes with a length of more than 6 m - west-east orientation;
- compact buildings - north-south direction.

Orientation relative to the cardinal points
Soil features... Clay, sandy and swampy soils should be avoided - on "soft" soil, even a monolithic foundation of a structure can lead. If no alternative is available, compact the earth with gravel.
Supply of communications... During the construction of a greenhouse next to the house, there is the possibility of arranging a single heating network, which will significantly reduce the cost of operating the greenhouse.
The place should be isolated from drafts, have a convenient approach and access to water resources.
dimensions
The dimensions depend on the purpose of the greenhouse (seasonality of use, type of crops), the expected volume of the harvest and the possibilities of the site. Three parameters are taken into account: length, height, width.
Standard sizes of polycarbonate greenhouse for early crops:
- width - about 1-1.2 m;
- height - up to 1.5 m.
When determining the dimensions of an all-season greenhouse, it is necessary to take into account a number of nuances of arranging the beds, ease of use and heat capacity.
Width... The parameter depends on the number of intended rows of planting and the size of the row spacing. Optimal layout:
- two ridges of 90-100 cm;
- passage - 40 cm;
- the total width of the greenhouse is about 2.5 m.

Typical polycarbonate greenhouse
A greenhouse of 3.5 m accommodates three narrow beds (60 cm) and two rows of 35 cm each.
If it is planned to use a wheelbarrow for harvesting, then the minimum aisle width is 90 cm.If it is necessary to equip a greenhouse with a longitudinal central rack (90-95 cm) and two aisles, the width of the structure will be 3.8-4.3 m.
Height... The main requirement is that there should be space between the plants and the "ceiling" of the greenhouse. For example, if low-growing crops (pepper, cabbage) are planted in the soil, then the distance from the upper edge of the door to the covering material can be 40-60 cm. When growing vegetables on high ridges, the height of the greenhouse is increased by the size of the shelves.
- door height - from 1.8 m;
- greenhouse height - human height + free space for plants (40-60 cm), that is, about 2.3 m.

Regardless of the shape of the polycarbonate greenhouse, the height in the ridge must exceed the height of the side walls. Compliance with the norm provides a sufficient roof slope at an angle of 30-50 ° for unhindered sliding of snow masses.
Length... The parameter is chosen arbitrarily. It is convenient when the length of the greenhouse is a multiple of 120 cm, 60 cm - polycarbonate is cut with fewer scraps.
Greenhouse advantages and disadvantages
The operational characteristics of a greenhouse are largely determined by the type of covering material. Polycarbonate is a thermoplastic polymer with a number of unique properties. For cladding greenhouses, a material with a honeycomb structure is usually used - in the cross section of the canvas, triangular or rectangular honeycombs filled with air are visible.
The material is characterized by increased resistance to external influences, excellent thermal insulation combined with transparency.

Cellular structure of cellular polycarbonate
Advantages of polycarbonate greenhouses:
- Strength. The polymer shelter resists gusts of wind and hail. Polycarbonate is 200 times stronger than brittle glass.
- Thermal and biostability. Boundary values of the tolerated temperature: -40 ° С, +130 ° С. Polycarbonate withstands multiple freeze-thaw cycles and is not subject to spoilage by rodents.
- Thermal insulation. The air gap and thermal resistance of the polymer itself explain the low heat transfer value: 4.1 W / (m2 * K) - at a thickness of 4 mm, 1.4 W / (m2 * K) - 32 mm.
- UV protection. A light stabilizing film is applied to the outer side of the canvas, which retains hard UV radiation. An additional action is to equalize the daytime and nighttime temperatures inside the greenhouse.
- The lightness of the material. To cover greenhouses, polycarbonate with a thickness of 6 mm is used, the specific weight of the canvas is 1.3 kg / sq. m. When constructing a structure with a typical width (up to 3 m), reinforcement of the frame is not required.
- Durability. When using a quality product and technologically correct installation, the service life of polycarbonate reaches 15-20 years.
- Versatility. Due to its elasticity, plastic sheathing is suitable for greenhouses and greenhouses of various shapes.

Arrow-shaped polycarbonate greenhouse
Disadvantages of using polycarbonate:
- Susceptibility of the shelter to chemical and organic reagents (cement, insecticides, alkalis, ammonia, methyl alcohol, acid).
- Risk of damage to UV protection. Without a film, polycarbonate quickly degrades under the sun. The coating is resistant to scratches, cleaning with abrasives and impacts with sharp objects.
Drawings and diagrams of polycarbonate greenhouses
In addition to the location and dimensions of the future building, it is necessary to determine the shape of the greenhouse and develop a drawing. The assembly diagram of a polycarbonate greenhouse should display:
- all significant sizes;
- frame material;
- nodes of connection of elements;
- number and location of stiffeners;
- installation locations, dimensions of doors and vents.
Consider several options for different shapes of greenhouses and greenhouses with polycarbonate shelter.
Arched greenhouse... Compact structure in the form of a tunnel 2.7 m wide and 2.22 m high. The frame is a galvanized square profile (30 * 30 mm, thickness - 1.5 mm). Thanks to the sturdy frame and small footprint, vertical supports are not required. There are two doors and two windows for ventilation.

"Arch" made of metal profiles and polycarbonate
Greenhouse house... Spacious version with wooden beams. The basis is a strip concrete foundation. The classic version is easier to build on your own.

Gable wooden building
According to Meatlider... A variation of a gable roof with a ventilated channel. The model provides sufficient air circulation, but the heat capacity of the greenhouse deteriorates somewhat.

"American" with an asymmetrical roof
Single-slope building... Recessed wall-mounted thermos greenhouse with polycarbonate coating. The facility is designed for year-round cultivation of crops in high beds.

Single-slope greenhouse-thermos
Greenhouse-breadbasket... A practical solution for a greenhouse. Despite the abundance of details, the project is easy to implement.

Greenhouse assembly diagram
Explanation of designations:
- 1 - bottom harness made of logs 120 * 120 mm;
- 2, 8 - wall strapping with a beam of 35 * 35 mm;
- 3.6 - wall cladding with tongue-and-groove boards;
- 4 - cord for insurance;
- 5 - wooden rod;
- 7 - temporary technological scaffolding (35 * 200 mm);
- 9 - fastening brackets;
- 10 - loop;
- 11 - cover strapping (40 * 30 mm);
- 12 - reinforcing cage (section - 5 mm);
- 13 - polycarbonate;
- 14 - sealed tape;
- 15 - handle.
Shed greenhouse... A simple version of a summer cottage, assembled independently from metal pipes 20 * 20 mm. A strapping with a bar is suitable as a foundation.

Greenhouse drawing for undersized crops
Building a polycarbonate greenhouse step by step
After reviewing the available options and schemes and having studied how to build the most uncomplicated structure, you can proceed to practice. Two solutions are proposed below: a greenhouse made of profiles and a greenhouse made of wood. In both cases, the cladding material is polycarbonate.
Foundation construction
Greenhouses and greenhouses made of polycarbonate are characterized by significant windage, in order to prevent overturning, it is necessary to "ground" the structure with a reliable foundation. This requirement is equivalent for structures of any shape and size.
Acceptable types of foundation:
- Wooden tape. Simple and cheap in execution, but unstable to moisture - it begins to rot and deteriorate. The method is suitable for seasonal and portable greenhouses.
- Concrete and brick. A versatile option for heated greenhouses and large greenhouses. Strengths: light weight, ease of erection, resistance to deformation.
- Blocky. Easy to install and resistant to external influences. Minus - insufficient heat capacity, the need for insulation.
- Concrete strip base. Differs in durability and reliability, but requires considerable investment.

The device of a tape concrete-brick base
The step-by-step technology for laying a concrete-brick foundation for a greenhouse with your own hands includes several steps.
Step 1. Preparation. Remove debris from the site and apply markings:
- mark the boundaries;
- put wedges in the corners, pull the rope;
- check the evenness of the diagonals.

Site preparation: marking the greenhouse perimeter
Step 2. Digging a trench. Dig a ditch 30-35 cm wide and 25 cm deep. Pour fine gravel at the bottom and tamp - the height of the "pillow" is 5-10 cm.
Step 3. Installation of the reinforcing frame. Assemble a reinforcing "belt" from metal rods and install it in a ditch - the frame will give additional rigidity to the foundation.
Step 4. Mixing and pouring the solution. The composition of the mixture: cement, fine sand and broken stone (1: 2.5: 4, respectively). Fill the trench with mortar, cover with plastic and leave for three weeks. At temperatures above +23 ° C, the fill must be regularly moistened.
After the concrete has set, waterproof it with liquid bitumen or roofing felt.

Protection of bricks from moisture
Step 5. Bricklaying. Nuances of work:
- pre-mount mortgages for the subsequent fastening of the frame;
- place the brick with bandaging, fill all the cracks with mortar;
- 2-3 rows are enough.

Laying brick foundations
The choice of materials for the frame
In the construction of polycarbonate greenhouses, three frame materials are mainly used:
- wood;
- steel pipe;
- galvanized profile.
Wood... The material is affordable and easy to process. Wood is best used to build a small greenhouse. With capital construction, you should take care of a more resistant frame.
Disadvantages of wood: susceptibility to rotting, the need for regular treatment with antiseptic compounds to extend the life.

Polycarbonate greenhouse according to Meatlider
Steel pipe... The supporting frame, assembled from rolled steel, withstands significant mechanical loads and does not deform under the weight of snow. Provided that the protective layer of the anti-corrosion paint is preserved, the steel does not rust for a long time.
Cons of the steel frame:
- the complexity of the assembly - you will need welding skills and equipment for bending metal arcs;
- the severity of the structure - the arrangement of a "lightweight" foundation made of wood is unacceptable;
- high price.

Arched structure made of steel pipe 20 * 20 mm
Galvanized profile... The optimal solution for erecting a frame for polycarbonate. The use of a galvanized profile has a lot of advantages:
- resistance to corrosion processes;
- the lightness of the profiles and the possibility of rearranging the frame;
- assembly is carried out using fasteners, so the frame can be disassembled and reassembled;
- reasonable price - the "skeleton" of a galvanized greenhouse is twice cheaper than a similar version of a steel pipe.

Portable frame for polycarbonate sheathing
The weak point of the galvanized profile is insufficient strength. At peak wind and snow loads, the profile can be deformed. In regions with an abundance of precipitation in winter and gusty winds, the supporting frame will have to be reinforced with additional horizontal jumpers and vertical struts.
Installing the frame
Building characteristics:
- frame made of galvanized metal profile 50 * 40 mm using rack and guide profiles (horizontal parts);
- the presence of stiffeners - jibs on the walls and roof;
- fastening by means of self-tapping screws;
- foundation - concrete-brick tape.

Dimensions and structure of the metal frame
The foundation laying technology is described above. The next stage of construction with your own hands is the assembly and installation of the frame. For work you will need: scissors for metal, a screwdriver, measuring tools (tape measure, level).
Sequencing:
- According to the drawing, cut the profile for assembling the front end.
- Fasten the parts into the frame, separate the door, mount the crossbars and jibs.
- Carry out a control measurement.
- Assemble the bottom trim from the guide profile and fix it to the foundation through the embedded fittings.
- Set the first fragment - the front end.
The work progress is illustrated below.

Preparation of end wall parts


Metal profile frame ready for sheathing
Fasteners for polycarbonate sheets
To figure out how to make a polycarbonate greenhouse yourself, you need to know the sheathing technology. Compliance with the installation rules will extend the life of the greenhouse. There are two most popular methods for fixing polycarbonate.
# 1. One-piece fixation through rubber pads:
- Place an airtight strip on the galvanized profile at the joints of the canvases.
- Place polycarbonate sheets on the rubber seal.
- Place a "soft" and a metal plate on top of the casing.
- Twist the sheets with self-tapping screws and cover with a decorative strip.

One-piece polycarbonate joining technique
# 2. Mounting by means of a split profile. A special H-profile is used, consisting of two parts: base and cover. The elements are snapped in and fixed with roofing screws.
To prevent polycarbonate from sailing, it is additionally secured with self-tapping screws through a thermal washer. The open ends of the covering material are covered with punched tape and closed with an end profile. These measures will prevent moisture from entering the plastic honeycomb.

Assembly through a split H-profile
Mini greenhouse assembly instructions
To build the simplest home greenhouse with your own hands you will need:
- wooden beam - 50 * 50 mm;
- boards 30 mm thick, 120-150 mm wide;
- slats with a section of 30 * 20 mm;
- metal-plastic pipes for water supply with a diameter of 25 mm;
- film waterproofing;
- antiseptic for wood;
- metal corners.
Assembly order:
- On a strip foundation, build a box with a height of about 25-50 cm. Fit the parts to each other, assemble them into shields using rails.
- In the shield corners, mount the racks (bars - 50 * 50 mm), cut off the top of the supports at an angle of 45 °. Treat the wooden box with an antiseptic and sheathe the inside with waterproofing material. If necessary, insulate with foam.
- Install vertical beams in the end walls corresponding to the height of the greenhouse. Cut out the transverse supports from the timber, connect them to the central and side posts through the corner at 135 °.
- Install intermediate struts and ridge bar.
- Bend the rafter frames from the metal-plastic pipes. The pitch of the rafters is 0.5-0.6 m. The pipes are fixed to the lower piping with metal clamps.

Photo illustration of a mini greenhouse assembly
Fastening polycarbonate to the greenhouse is carried out using one of the above methods.
Video: polycarbonate greenhouse at their summer cottage
A selection of videos on how to make a polycarbonate greenhouse with your own hands will help outline the general procedure.
Video: Homemade Steel Pipe Cucumber Greenhouse
Video: Step-by-step technology for arranging a pile foundation and assembling a greenhouse from a galvanized profile.
Video: Sheathing the metal frame with polycarbonate.
Even a novice gardener can build a small greenhouse on a personal plot with his own hands. It is better to entrust the construction of a capital all-season structure with heating to professionals. Alternatively, you can purchase a ready-made kit and follow the instructions to assemble a home greenhouse yourself.