Sewerage in a private house is a pipe distribution, consisting of two parts: internal and external. Therefore, when the sewerage system is being installed, the process itself is divided into two stages: the assembly of the internal sewerage system and the external one. Everything is done separately, taking into account the calculations of the diameter of the pipes and the choice of the material from which they are made. Gone are the days when the sewerage system of a private house was collected from cast-iron or asbestos pipes. They have served their time by handing over the reins to plastic pipes. Therefore, first of all, it is necessary to correctly approach the choice of sewer pipes.
Types of sewer pipes
Today, two types of polymer pipes are used to assemble sewers in private houses: PVC and polypropylene. The former are used for the external system, the latter for the internal.

Sewer pipes
Polypropylene sewer pipes are gray in color and range in standard diameters from 20 mm to 400 mm. At the same time, their connection is bell-shaped with the use of a rubber cuff, which ensures the tightness of the joint. To facilitate the installation of the sewer system, manufacturers offer various fittings: elbows, bends, crosses, tees, adapters, plugs and other profile products of different diameters.
As for PVC sewer pipes, then everything is the same with regard to connections and fittings. But they are orange or red, so it will be impossible to confuse them. Plus, a diameter that starts at 50 mm and ends at 1200 mm. For the external sewerage of a private house, diameters of 110-200 mm are most often used.
Internal sewerage of a private house
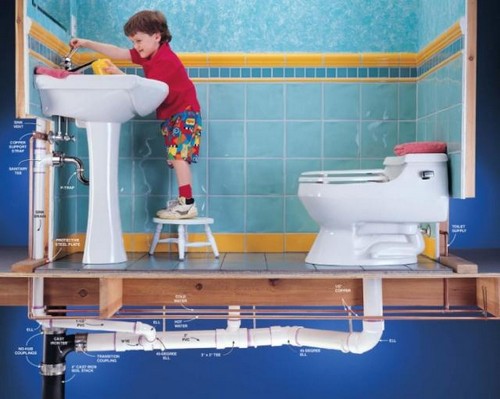
The installation of an internal sewerage system in a private house is more difficult than an external one. The thing is that there is a large number of water consumers inside the house: taps, faucets, shower, washing and washing machine, toilet. And they are all located in different rooms. Therefore, the piping has a complex scheme, which is assembled into a single system and brought out to the outside, connecting with the outer part of the sewage system. If the house is built on several floors, then each of them has its own system, and all floors are united by one vertical riser, which is assembled from a pipe with a diameter of 110 mm.
Usually, the riser is installed in the place where the sewer will be taken out to the outside of the house. It is important to observe one important rule here - the shorter the distance, the more efficiently the system works. Therefore, the riser is installed against the wall of the building, which will be closest to the sewer well or septic tank.
As for the piping of the internal sewerage system, you have to take into account the volume of water that must pass through it.
- A pipe with a diameter of 25-32 mm can be diverted from the sink.
- From the kitchen sink 32-40 mm.
- From shower or bath 32-50 mm.
- From washing machine or dishwasher 40-50 mm.
- From the toilet 110 mm.
And the more connections are made in one system, the larger the diameter of the pipe must combine them. For example, if a sink and a dishwasher in the kitchen are connected into one network, then a pipe with a diameter of 40 mm is installed under each of them. But they are connected when they are taken out of the kitchen into a pipe with a diameter of 50 mm, which further, for example, will be combined with a sink and a bathtub, which in the final result will give a combined pipe with a diameter of 110 mm.
Therefore, it is very important to first draw a piping diagram with the exact installation of plumbing fixtures, and only then calculate the dimensions of the piping with an accurate determination of the diameters of the purchased products.
 Sewerage wiring diagram of one floor of a private house
Installation process rules
There are certain rules for installing sewer pipes that are installed in the internal wiring.
- The socket of the sewer pipe, which is connected to the very first and last consumer, must be located at least 80 cm from the floor level. That is, this is the consumer farthest from the riser. If there are not so many fittings on the water path, then the installation level can be lowered to 30 cm.
- The toilet should be connected to the riser with a pipe of the same diameter as the riser itself. And its length should not exceed 1 m.
- Each plumbing fixture must be supplied with a water seal (siphon).
- The slope of the sewer pipes should be 2-3 mm per meter of piping length.
- Fastening to the supporting structures of the building is carried out using special clamps, which should be two for each element. Clamps are usually installed at socket connections.
 Internal sewerage in a private house
The plastic pipe is easily cut, so it can be cut to the required length using a metal hacksaw or a grinder. All connections, as mentioned above, are bell-shaped. Therefore, it will not be difficult to assemble the sewer with your own hands. The main thing is to follow the sewerage system installation scheme exactly.
Attention! Where to start the installation of the sewage system: from the riser or from the plumbing fixture, everyone decides for himself.
If a private house has a basement in its design, then all the wiring of the first floor can be carried out there. It is convenient in terms of installation and maintenance. Secondly, the pipeline will not be visible, which will increase the space of the premises and the aesthetics of their appearance. It is not recommended to lay sewer pipes in the walls. For them, boxes of various finishing materials are usually constructed with a frame device.
 Sewerage installation in the basement of the house
External sewerage of a private house
It is simpler than the internal one in terms of its installation. But in addition to pipes, a septic tank or a well, as well as several viewing wells, are included in the sewer system. The installation of the sewerage system (external) begins with earthworks. With the help of shovels, a pit is dug under a septic tank or a well, or there may be several pits if the septic tank is built in the form of several overflow wells. Further, a trench is dug from it to the house. The main requirement for it is straightness without a lot of bends and turns, plus adhere to a slope towards the well.
By the way, about the slope of the pipeline for the outdoor system. It all depends on the diameter of the pipe used. For example, for pipes with a diameter of 110 mm, the slope should be 20 mm per one running meter of the assembled pipeline. For 160 mm pipe - 8 mm slope, for 200 mm - 7 mm.
 The slope of the installation of sewer pipes
As for the minimum number of taps, this is an important component on which the efficiency of the entire system depends. The fact is that any even the smallest turn from the straightness of the pipeline is a place where a blockage can form. And if the angle of inclination is chosen incorrectly, then it is guaranteed to form exactly in this place.
Installation rules
If a standard septic tank made of plastic or metal is installed, then there should be no problems with its installation. The bottom of the pit is leveled horizontally, covered with sand 15-20 cm thick, compacted. After that, a septic tank must be lowered into it.
Attention! The septic tank inlet must be oriented exactly along the sewer pipe. It is optimal if they are located on the same axis. Deviations are possible, but small.
 Installed septic tank
If a well or septic tank is being built from different materials, that is, an unprepared option, then the complexity of installing a sewage system in a private house increases sharply. For example, a well made of reinforced concrete rings. It is necessary to dig a pit, fill it with a sand or crushed stone pillow 15-20 cm thick, tamp it, pour a concrete layer with a thickness of at least 7 cm, if possible, lay a reinforcing frame made of metal mesh or reinforcement into it.
Then you need to wait a few days for the concrete base to dry out. And after that, collect the reinforced concrete rings themselves with the help of a crane. And before that, the rings are additionally waterproofed from the outside. All this is complicated and costly. Therefore, the easiest option is to install a ready-made septic tank, at worst, a sealed or leaky container.
 Connection of two sewer pipes
Now with regard to the installation of sewer pipes. With their bias, everything is clear. But there is one important process - their thermal insulation. More recently, sewer pipes were laid below the level of soil freezing. For this, a huge amount of earthwork was carried out, because in many regions this figure is more than 1.5 m.Today, you can not use this method of insulating the sewage system. The use of different types of thermal insulation materials solves this problem.
Of course, many are faced with the question of which pipe insulation to choose. Today, the ideal option is heat-insulating cylinders (shells), which are made from almost all types of insulation: mineral wool, foamed polymers of various kinds, and so on. The shell is simply put on the pipe and secured with clamps or tape. By the way, internal sewage pipes located in an unheated basement must also be insulated with this material.
 Sewer pipe insulation
If the external sewage system is very long, then it is necessary to install inspection chambers in it. One well for 50 m of straight pipeline length. A well is necessarily mounted near taps or connections (for example, when a branch from an outdoor pool or summer kitchen joins the main branch). Their purpose is to control sewage flows and, if necessary, carry out repairs and cleaning of the system through them.
You can buy ready-made wells, these are now offered by manufacturers of sewer pipes. And you can make them with your own hands from the same pipes only of large diameter, for example, from 400 or 500 mm. They are installed in trenches in a vertical position and are connected to the ends of the pipes to be connected.
Attention! Where to start the installation of sewer pipes: from a septic tank or from home, everyone decides for himself.
Installation diagram
- The bottom of the dug trench is leveled taking into account the slope of the sewage system. Great precision is not required here.
- A sand bed is made with a thickness of 15-20 cm. It is this that will need to be strictly leveled under the slope of the pipe laying.
- After that, the pipes are installed itself. And at this stage, the angle of inclination of the system is checked using a long level.
- Connection of a pipe with a septic tank and a pipe of the inner part of the sewerage system of a private house.
- As for the insulation, the cylinders are put on before the connection is made. That is, first, the pipe is exposed strictly along the slope, then a heater is put on it, and after that it is laid in a trench.
- The trenches are backfilled with soil.
 Installing pipes at a slope
The question of arranging a full-fledged bathroom in a private house arises before each owner. Technologies make it possible to equip a domestic sewage system without special investments, both material and temporary. And fewer and fewer residential private buildings remain with amenities in the yard. In this article, we will consider such popular questions: what types and types of sewerage exist, the sewerage device in the house with our own hands, what is a septic tank and how to make it, how to make a septic tank from concrete rings, what is a cesspool and how to make it, as well as related questions.
Sewerage types for private households are divided into two parts.
For cottage settlements or urban areas where the private sector is close to apartment buildings, the sewage system for a private house is supplied to the centralized drain collectors. This solution is convenient, since all the difficulties consist only in the high-quality laying of sewer pipes to the place of the tie-in. However, there is also a negative side of connecting a private house to the city sewer network - payment for sewerage services. For apartment buildings, a tariff is set and the total volume of water disposal corresponds to the total amount of water consumed. Accounting is carried out according to the number of registered, according to the norms or according to water metering devices.
For a private house, where the lion's share of the water used is not discharged into the sewer, charging payment according to the readings of a water meter can significantly complicate life. To many, this issue will seem unimportant, but some of the owners strive for autonomy, therefore it remains relevant.
The traditional method of drainage in private houses is a cesspool, it is also a septic tank, it is also a sewer pit.
Before proceeding with a detailed guide to its creation and arrangement, it is necessary to carry out all the plumbing work in the house.
Diy sewerage device in the house
Most of the buildings in the private sector have one floor. Where there are two of them, the bathroom is located on the first floor. Modern private development projects provide for the placement of plumbing on each floor, but all objects are adjacent to a common riser. As an example, consider a standard one-story building, where it is necessary to carry out the sewage system with your own hands.
So, you need to place a sink in the kitchen, a washbasin and a bath / shower in the bathroom, and a toilet in the toilet.
Bathroom and toilet can be combined or separate. In any case, the drain will be common for them, therefore, the distribution of drain points in the room must be done in such a way that the distance to the "riser" (the main pipe with a diameter of 110 mm, which will bring the waste to the street) is minimal.
The kitchen where the sink is located, according to design documents, often has an adjacent wall with a bath or toilet. In this case, no difficulties arise. If the kitchen is remote from the main riser, it is necessary to lay a separate drain before connecting it to the riser. Depending on the situation, this can be done both in the perimeter of the house (the drain connection is included in the riser, which includes the drains from the washbasin and bath / shower), and outside the perimeter (if the placement of the kitchen and the bathroom does not allow the pipes to be brought down in the perimeter, they are displayed outside outside the house, where they can connect or enter the drain pit separately).
The above difficulties are caused by the fact that for a high-quality water flow, it is necessary to observe the slope of the sewage system, which is not always possible to do in situations where the distance from point to point is large. The slope of the sewer should be a certain percentage, depending on the diameter of the pipe. See the slope values of the sewer depending on the pipe diameter in the figure below.

Sewerage pipes are laid under the floor. Most of the buildings have wooden floors raised above ground level. The cavities under the floor are empty, which gives a lot of options for solving the problem. The slope is measured by the building level or marks on the masonry, along which the pipe should pass. The assembled pipe spans are tested at intermediate stages by pouring water into the system and controlling its drain. It is important that even a small part does not stagnate anywhere, since a blockage forms there, which will be difficult to remove after flooring. Sewer slopes of more than 5% are permissible if it is dictated by the convenience of placing the system or by the margin of distances under the floor.
Final assembly
When the drains are removed from the places of each discharge to the final place, the final assembly will take place. PVC pipes for sewage have all the necessary elbows and adapters, as well as tees with various transitions, allowing you to join together drains from a sink, shower and washing machine. Next, the riser and drain from the toilet are combined. After completion of the work, final testing with a high load is required to eliminate leaks, if any, and to avoid blockages and water accumulation.
Sewerage is released outside the perimeter of the house at a depth of at least 300 mm. It depends on the climatic features of the region, as well as on the slope of the site, the proximity of groundwater, which affect the depth of the drainage pit.
At each of the drain points, except for the toilet bowl, an elbow is made from a flexible hose, in which a small amount of water constantly stands, the so-called water seal, which excludes the penetration of an unpleasant odor from the drain. If necessary, it takes 10 minutes to clear the blockage in such a knee.

Drain system
It is she who becomes for many homeowners a stumbling block in matters of arranging a domestic sewage system in a private house. Technology has greatly simplified the work with the contents of such pits, allowing them to do without maintenance for many years.
Domestic sewerage is divided into two types - a septic tank and a traditional drain pit.
Septic tank
A technological solution promoted in the construction of cottage townships and small country houses. They are a plastic or metal container that collects all waste and organic waste. It uses only its usable volume, which is partially increased by the use of microorganisms (septic) that convert organic matter into gas (removed through the ventilation duct, does not harm the environment) and clean water (suitable for irrigating the site with a small pump). For a full-fledged residential building for a large family, large capacity models are offered.
The bottleneck of this type of sewage is its price. The cost of containers is quite high, moreover, transportation and installation are imposed on it, which must be performed in compliance with the technology so that the container remains intact.
The advantage that is worth noting is that the septic tank can be mounted in areas with high groundwater levels. The containers are sunk in dug holes, then loaded with a load so that the water does not push them out of the ground during the flood.
The average maintenance period with proper use and adequate space saving is 2-5 years.

Concrete ring septic tank
One of the subspecies of a septic tank is a device from factory concrete rings. This type of septic tank is quite popular, because it is relatively cheap, fast and easy to install. It is quite simple to make a septic tank from concrete rings with your own hands. To do this, we dig a hole of sufficient depth. To cut off water, a layer of rubble is placed on the bottom.
Usually they put 3 one and a half meter rings on top of each other, then cover them with a lid with a hole. Another small ring is placed on this hole to access the septic tank. Such a ring is closed by a sewer hatch. The rings are fastened together with cement mortar. If you are making a septic tank with an overflow, then you need to make 2 or 3 such pyramids from rings. The more overflow chambers, the cleaner the outlet water will be. The bottom in the first chamber is waterproofed and concreted. A hole is punched in the upper part of the upper large ring and a 110 mm pipe is inserted onto which tees are put on on both sides.
If you want to make 3 chambers, then we repeat the procedure with the hole and pipe, but place them just below the overflow level from the first chamber to the second. From the last chamber, a pipe is diverted to the drainage field, or the bottom is left open in it and large crushed stone is laid on it. On the sides outside, the rings are covered with sand to cut off the water. Do not forget to bring the ventilation pipe out of the chambers for air access.
Video about a septic tank made of concrete rings
Cesspool
It has been used for many decades without complaints and special problems. Even in areas with a high level of groundwater filling such pits during the flood period, a solution was found in the form of placing a pit at a shallow depth, but with a large area.
The place to place the pit and drain the sewer from the house must be determined before the start of all work, since reorienting the system already divorced under the floor will require recalculation of slopes and additional time.
The pipe leading from the house to the pit is deepened by 500 - 800 mm, if the water level allows. Otherwise, it is necessary to insulate it as much as possible and leave the revision windows (a special butt block with an opening cover) for easy cleaning every 3 meters of the pipe length.
The average volume of a pit for this type of sewage system is 5 cubic meters per one adult. At the same time, one should not neglect organic septic tanks, which will make it possible to do without pumping out the contents for decades at all.
We build a drain pit
Having chosen a place, you need to determine the linear dimensions and depth, dig a hole and carefully align the walls. The perimeter near the walls at the bottom is dug under the edge by 300 mm and deepens by about 500 mm in depth. A small layer of rubble is placed on the bottom, then 2-3 rows of a half-block without holes are placed on the mortar. This will be the base for the walls of the cesspool.
Walls (only he is able to withstand the microenvironment for a long time), making gaps between bricks at 20 - 25% of their length, starting from 5-6 rows. Through these intervals, water will flow, which will make it possible to service the pit less often.
The masonry is not removed to the edge of the pit, but with a 400 mm shortfall. The main thing is that the sewer outlet pipe is completely lined.
At the bottom of the pit, medium crushed stone is laid out in a layer up to 200 mm thick, from above it can be strengthened with stones collected from slag heaps, similar to pumice for the legs. This trick allows you to pump out the pit even less often, since microorganisms that absorb organic matter develop well in the pores of such a drain.
The overlap can be anything from a curly finished reinforced concrete slab to a self-poured product. Such a product is created from flat slate or galvanized sheet, laid out on top of the masonry cut. The future overlap should protrude at least 250 - 300 mm beyond the edges of the masonry. Reinforcement from bars is laid on top. A mesh made of reinforcement with a diameter of 8-10 mm with a cell of 20 by 20 cm will suffice. The lower edge of the mesh must be raised from the base by at least 20 mm (it is better to lay it on stones or protective layer clamps). On the sides of the reinforcement we build the formwork and fill everything with a layer of concrete of 100-200 mm.
If the linear dimensions are large, a support made of brick or cast-iron pipe is placed in the center of the pit on which the floors rest.
It is imperative to leave the hatch for access to the pit, as well as for pumping it out if necessary.
An excellent solution would be to make the upper edge of the slab below ground level and lay the space around the hatch with sod.
It is imperative to leave the outlet for ventilation (standard PVC sewer pipe). Many people make gazebos or parking spaces for cars on top. But in this case, the reinforcement and the slab above the pit must be seriously strengthened.
We hope you have figured out the basics of sewerage in your home. If you still have questions, ask them in the comments to the article, we will definitely answer them.
If desired, even a private house in the countryside can be equipped. The first thing that a resident of a country faces is the lack of a warm toilet in the house. Without sewerage, a person is deprived of many amenities. This is not a luxury, it is a necessity. Sewerage laying in a private house is a complex process that requires taking into account every little thing. How can this be done?
External and internal
The work related to the arrangement of the sewage system in a private house begins with the design of the internal and In the first case, the installation of a drain pipe, a riser is required, as well as the distribution of pipes to all rooms where this is required: a kitchen, a toilet, a bathroom, and so on. As for the external system, this is everything that is located outside the house. Its arrangement requires piping to the septic tank. You can also connect the sewer to a deep cleaning station.
The task is greatly facilitated if it is possible to discharge waste water into a centralized system. If the house is located in an isolated area, then a system with a homemade septic tank should be created. It can be with or cumulative. A cesspool is not suitable in this case.
Layout in a private house
Before starting work, a plan should be drawn up for laying pipes inside a private house. The process is greatly simplified if all wet rooms are located in close proximity. The scheme is drawn up strictly individually. In the process, you should take into account all the features of the house and the location of the premises. The finished version can look anything you like.
When designing a sewage system inside a house, it is necessary to accurately calculate the location of the collector pipe. Only then can you determine where the rest of the system will be laid.

How to draw up the correct diagram
The sewerage scheme in a private house is an important stage. The quality of the system and its reliability depend on how correctly the plan is drawn up. Stages of drawing up a diagram:
- On a piece of paper, preferably in a box, you need to recreate the plan of the house. When drawing up a plan, it is worth considering the scale.
- Then it is worth deciding on the location of the riser or collector pipe.
- At all levels of the building, it is necessary to note the location of the plumbing. At this stage, you should learn about how to connect it.
- From plumbing, it is necessary to lay pipes on paper to the riser. In this case, all connecting elements, tees, branches and corners should be taken into account.
- It is necessary to measure the length of each element of the internal system and summarize the data. The result will be the required number of pipes. In this case, the diameter of the material must be taken into account.
The final stage is drawing up a diagram of the external system: the release of pipes, their laying to the septic tank. In this case, it is necessary to take into account all the requirements specified in SanPiN 2.1.4.1110-02, as well as SNiP 2.04.03-85.
What you need to consider when arranging an internal system
The laying of an internal sewage system in a private house begins after drawing up an approximate diagram. There are several nuances to consider at this stage:
- To drain wastewater from the toilet, pipes with a diameter of 10-11 cm are required. Their total length must be at least 100 centimeters.
- For gray drains that enter the common riser from the kitchen and bathroom, pipes made of PP or PVC are required. The diameter of the material should be 5 centimeters.
- To arrange turns in the system, it is necessary to use several plastic elbows made at an angle of 45 °. This reduces the risk of blockages during the use of the sewer.
- It is best to use polypropylene for arranging the sewage system inside the house, or this material is more durable, reliable and relatively inexpensive. When using such pipes, laying a sewage system in a private house is simplified.

Choosing pipes
Sewerage installation in a private house requires careful preparation. After drawing up a scheme and carrying out the necessary calculations, the purchase of materials is required. For wiring inside the house, gray pipes are used. For the arrangement of the external system, orange pipes are required. You can explain the difference in color based on logic. Orange hues are best seen in the ground. In addition, pipes have differences in properties. First of all, it concerns the material. Pipes underground must be able to withstand more severe loads. The material for their manufacture must be more rigid.
In order for the laying of a sewage system in a private house with your own hands to be successful, you can use two-layer corrugated pipes. But, as practice shows, their use is often inappropriate. After all, the depth of the sewerage in a private house is from 2 to 3 meters. It is much cheaper and no less effective to use orange pipes. Most often, a material with a diameter of 11 centimeters is used to equip an external system. This is quite enough for normal wastewater disposal.
How to lay pipes? It's simple!
Do-it-yourself sewerage installation in a private house requires certain skills and patience. The most difficult stage is the placement of the pipes and their fastening. It is almost impossible to do this alone. Therefore, an assistant is required to work. This will not only speed up the process, but also improve quality.
The simplest option for laying sewage is the use of PVC or PP pipes. A fairly wide range of similar products is produced. If necessary, you can purchase material of the required diameter, tees, elbows and revisions. It should be noted that each part is equipped with a special rubberized insert - a cuff. Thanks to this element, laying the sewage system of a private house takes a little time. Joints are connected easily and reliably. If desired, you can process the seams additionally. A silicone-based plumbing sealant is suitable for this.

Things to Consider
When laying pipes, it is necessary to take into account some of the nuances:
- If pipes run through walls or ceilings, then they must be placed in special sleeves that reduce the load on the fragments of the system.
- The slope of the elements of the sewer system depends on their diameter and is spelled out in SNiP 2.04.03-85. For example, for a material whose diameter is 5 centimeters, this indicator should be 3 cm / m, and with a diameter of 10 to 11 centimeters - 2 cm / m.
Sewerage outlet arrangement
If a problem has arisen and the internal system has a mismatch with the external one, then the laying of sewer pipes in a private house should begin with the release. This is the border area between the systems. At this point, the riser is connected to the pipe leading to the wastewater collection tank.
It is necessary to mount the outlet through the foundation wall. The depth of its laying should be lower than the depth of soil freezing. Otherwise, during the winter period, difficulties may arise during the operation of the sewage system. If an outlet hole was not specified during the construction of the building, then it will have to be punched. Its diameter must correspond to the dimensions of the pipe in the sleeve. The latter should be longer than the hole. On each edge, the sleeve must cover the pipe by more than 15 centimeters. These are the basic requirements for a sewer outlet.
Installation of a riser and further wiring
The pipe size from the riser to the toilet should be 1000 mm. This allows you to determine its location. It is better to mount the riser in the toilet itself. The installation can be hidden or open. It all depends on where the pipe will be installed. You can install the riser close to the wall. For this it is worth using pendants and clamps. You can also mount the pipe in a niche, in a channel or in a box.
To connect the riser and the rest of the system, you can use oblique tees. If the pipes are different in diameter, then adapters should be used to connect them. They eliminate the need for a sealant. In those places where there is an intersection of elements coming from a shower, sink or bathtub, it is necessary to install a collector pipe. Its diameter should be between 10 and 11 centimeters. Do not forget about water locks. These elements prevent unpleasant odors from entering the living space.
On each floor, a revision is installed in the riser - a kind of tee designed to clean the system with a strong blockage.

What is a fan pipe
Observing the rules for laying sewers in a private house, you can easily create an external and internal system. In addition to installing a riser, a fan pipe is also required. This is its continuation, which is displayed on the roof of the house. This part is installed on the riser. The revision is mounted at the junction. After that, the funnel is led out into the attic at an angle. Do not connect it to the building ventilation system or to the chimney.

Varieties of septic tanks
Laying an external sewage system in a private house is no less important stage than installing an internal system. With the wrong arrangement, problems can arise not only with comfort, but also with environmentalists. One mistake can turn sewers into a big smelly problem that will take a lot of time and money to fix.
You should start with a septic tank device. Sludge type structures are most often used. This is a container or their combination through which the drains pass. Gradually they are cleared. This is due to the deposition of heavy inclusions. After that, the drains undergo additional purification in the filtration well or on the field. In this case, both mechanical and biological cleaning methods are used.
There is another, simpler type of septic tank - accumulative. In this case, a closed container of a sufficiently large volume is installed. All drains are collected in it. To empty such a septic tank, a sewage pumping out is required, which is carried out.This method of arranging an external system is easier to carry out. Plus it's cheaper.

How to calculate the required volume
Calculating the dimensions is not that difficult. The volume is determined based on settling for 3 days. At the same time, the average consumption per person per day is 200 liters. If desired, this indicator can be calculated individually. If two people live in the house on a permanent basis, then the volume of the tank for the septic tank should be:
2 x 200 x 3 = 1200 liters or 1.2 cubic meters.
Stages of installation of the outdoor system
Sewerage in a private house does not end after the complete installation of the internal system. After all, the arrangement of the outer part is required. Stages of arrangement of the external system:
- First, you need to prepare materials: a ready-made container of the required volume from PP or a ring of reinforced concrete. If desired, you can lay out a brick or pour a monolith.
- The next step is to determine the appropriate wastewater treatment method.
- After that, earthworks are carried out: a pit is dug under a container and trenches for laying pipes.
- All structural elements must be connected. At the same time, do not forget about the comfortable maintenance of the septic tank.
- Pipes should be installed at a specific slope. This indicator should be 2 cm / m. The joints must be sealed.
- The septic tank should be equipped with a ventilation system.
- Having carried out work on heat and waterproofing of individual fragments of the system, you can fill the structure with soil.
When placing a septic tank, it is worth considering the location of buildings on a personal plot. You should not place a waste container near a recreation area or playground.
In conclusion
Now you know how the sewerage of a private house is carried out. If you follow all the rules, you will get a reliable system. Before starting the operation of the sewage system, it is worthwhile to run it. For this, the system must be flushed with clean water. This will allow you to identify all the shortcomings and correct them. Only then can the operation of the sewer system begin.
In fact, the process of editing individual fragments is not difficult. The main thing is not to make mistakes when drawing up the sewage scheme, as well as to make the correct slope of the pipes. Otherwise, the system will not function normally.
A separate section of the design of utilities is the planning of the sewerage system. Owners of cottages and country houses often have to independently deal with drawing up a diagram and installing equipment, so it is simply necessary to know the nuances of organizing work.
The efficiency of the system largely depends on whether the sewerage system in a private house is correctly laid out - the internal pipe system and the equipment connected to them. For competent design, it is important to take into account everything: from the choice of components to the material for the manufacture of individual elements. And we will tell you how to do it correctly.
Unlike electricity, gas, and water supply systems, which are installed according to the documentation certified by certain authorities, the sewage system on your own land plot and in the house is allowed to equip without permits.
However, one cannot do without a project, as it will insure against errors associated with violation of generally accepted requirements.
For example, one of the most frequent violations is non-compliance with the boundaries of the sanitary zone when installing a drain pit. The supply and drain systems must not come into contact with each other.
An option for arranging communications in a private one-story house - external water supply and sewerage system are located on opposite sides of the building
The internal wiring device is often associated with errors in the organization of ventilation, the wrong choice of pipe diameter or angle of inclination.
The construction of the axonometric diagram is usually carried out by specialists. They also make hydraulic calculations of the internal network and the mains located on the outside of the building. Now there is a more interesting option - creating a sewer model in 3D format.
3D modeling programs allow you to draw up an accurate and complete project that makes it as easy as possible to select pipes, fittings, fasteners, as well as installation methods.
They turn to specialists for a project when they want to reduce risks. But there is another option - to study sanitary and technical standards, familiarize yourself with internal wiring diagrams, learn to understand the quality of plumbing equipment and draw up a project yourself.
Placement of important system nodes
The peculiarity of an autonomous sewage system is that the principles of its arrangement depend on each component in the overall system.
For example, the criterion for choosing a wastewater storage tank is not only the number of people living in the cottage, but also the number of connected sources of drainage of technical and utility water - from the house, garage, bathhouse, summer kitchen.
Work planning and scheme selection
Installation of sewer pipes is usually carried out together with the installation of a water supply system, respectively, and it is better to design these two systems together.
If you summarize all the documents that make up the project, and try to act according to the rules, you get the following list:
- General data - description and conditions of installation of water supply and sewerage systems based on regulatory documents.
- Explication of the premises (explanation to the diagram) indicating the wet zones and the method of their waterproofing.
- Calculation of the volume of water consumption and wastewater disposal, taking into account the norms.
- Floor plan for the location of the water supply system and axonometric diagram.
- Floor plan for the location of the sewerage system.
- Specification - a listing of all constituent elements with an indication of the quantity or footage.
You can refuse to install additional ventilation equipment, but provided that the private house is not higher than 2 floors, and the load on the sewer network is minimal.
If a lot of people live in the building, the number of bathrooms is more than 2, the drains are discharged into the treatment plant, then the installation of a fan pipe is required. Thanks to her, the atmosphere in the house will be healthy, and the water from the water locks will not disappear anywhere due to the pressure difference in the network.
Features of the wiring in a multi-storey building
The number of risers does not increase due to the presence of the 2nd or 3rd floors, but the connection diagram becomes more complicated, since taps are present on all floors. For multi-storey houses, there is a "code" set out in the SNiP documents.
Sewer drains in the house must be collected and directed to the central sewer or to or to.
This task is performed by the piping system inside and outside the house - internal and external sewerage.
How to properly lay sewer pipes in a private house
The sewer diagram shows two vertical pipes crossing the house from basement to roof - these are sewer risers, which collect drains from nearby sanitary appliances.
Waste from sanitary appliances is moved by gravity to sewer risers, and from there to horizontal drain pipes and further to the outlet of the external sewage system.
Features of the movement of wastewater through sewer pipes
When developing a sewerage scheme, be guided by the following.
With a salvo discharge of water through the toilet, a portion of water filling all, or almost all, of the section of the sewer pipe, moving along the pipe, acts like a piston. A vacuum is created behind the water flow in the pipe, which, if there is no ventilation, sucks water from the siphons of sanitary appliances connected to the pipe downstream.
A pressure builds up ahead of the water flow, which pushes water out of the siphons of sanitary appliances connected upstream.
The effect of increasing the pressure in the pipe is usually less pronounced, since the sewer pipe in front usually has an open outlet at the end. Discharging in pipes with an incorrect sewerage system in the house often leads to the suction of water from the siphons of sanitary appliances and odors in the house.
Similar processes in sewer pipes can occur:
- When emptying the bathtub or when draining water from the washing machine under the pressure generated by the pump.
- In very long pipes from sanitary fittings to the riser.
- With a large difference in height between the beginning and end of the liner pipe.
Rules for laying sewage in the house
When developing a sewerage scheme for a private house, the following rules are observed:
1. The toilet must have a separate connection to the riser. No other sanitary appliances should be connected to the pipe between the toilet bowl and the riser. Failure to comply with this rule may lead to the fact that when the toilet is flushed along the full section of the pipe, water will be sucked out of the siphons of other sanitary devices.
2. The connection to the riser on the floor of other sanitary devices should not be lower than the connection point of the toilet bowl. Otherwise, when flushing the toilet, waste water may appear in the drain hole of adjacent appliances.
Other sanitary appliances, besides the toilet, may have one common pipe to the riser.
3. When choosing the diameter of the pipes, they are guided by the rule - the diameter of the supply pipe to the riser should not be less than the diameter of the drain pipe of the sanitary device. If several devices are connected to one pipe of the supply line, then the diameter of the pipe is taken over the largest section of the branch pipe of the connected devices.
The diameter of the riser pipe should not be less than the diameter of the toilet drain pipe - 100 mm.; or 50 mm.- for a riser without a toilet.
4. The length of the supply pipe to the riser from the toilet should be no more than 1 m. The length of pipes for connections from other sanitary devices is not more than 3 m. For longer connections (up to 5 meters), it is necessary to increase the pipe diameter to 70-75 mm. Liners longer than 5 m made of pipes with a diameter of 100-110 mm. It is not necessary to increase the diameter of the supply pipes if the upper ends of the supply pipes are ventilated using an aeration vacuum valve or by connecting the supply pipe to the ventilation pipe of the riser. The length of the piping to the toilet can be increased by ventilating the end connected to the toilet.
5. The slope of the pipes for effective self-cleaning should be within 2 - 15% (2 - 15 cm. per meter of length). The difference in height between the beginning and the end of the piping to the toilet should not exceed 1 m. For other connections - no more than 3 m. If the height difference is greater, then ventilation of the upper end of the liner is necessary.
6. Avoid the installation of corner fittings with an angle of 90 degrees on pipe bends. The angles of rotation and connection of pipes must be formed smooth, from standard parts with an angle of 135 degrees in the direction of the fluid flow.

7. Sewer pipes are laid with a bell in the direction - against the flow.
8. Be sure to perform ventilation of the risers. For this, the pipes of the risers are brought up, at least by 0.5 m. above the roof surface. Lack of ventilation leads to the appearance of a vacuum in the pipes when draining water, emptying the siphons of sanitary devices and to the appearance of a sewage smell in the house and on the site. The ventilation of the sewer riser should not be associated with natural ventilation channels of the premises.
9. For ventilation of risers and connections, in the cases indicated above, an aeration vacuum valve is installed at the upper end in the room. The aeration valve only lets air into the inside of the pipe, but does not release gases outside. The operation of the valve prevents the formation of a vacuum in the pipe, which leads to the emptying of the siphons of sanitary devices. If an aeration valve is installed, it is not required to ventilate such a riser. But ventilation of at least one riser in the house should be done without fail.
10. It is necessary to provide for noise insulation of sewer risers. To do this, it is better to place the risers in the niches of the walls, cover them with a layer of mineral wool, and sheathe the niches with plasterboard.
11. The riser pipe at the floor level is rigidly fixed. On the floor, between the ceilings, the pipes are connected and fixed so as to ensure movement during thermal deformations. On the lower floor of the house, in an accessible place, a hatch is installed in the riser - an audit.
12. Horizontal pipes connecting the risers and the outlet of the external sewage system are laid in the basement of the house along the walls, in the ground under the floor. Every 15 m. and at each turn, a revision hatch is installed in the pipes.
13. The diameter of the horizontal pipes must be no less than the diameter of the riser pipes. The angles of rotation and connection of pipes are made at an angle of no more than 60 degrees. Pipes laid in the unheated part of the house are insulated.
 It's dangerous to do that! A horizontal groove in the wall for sewer pipes reduces the strength of the walls. The possibility of arranging a horizontal groove in the wall must be confirmed by the calculation of the designer.
 A device for laying sewer pipes of a vertical niche in the wall, for the entire height of the floor, or a horizontal groove, leads to a weakening of the strength of the wall. You should not make niches and grooves anywhere, at your own peril and risk. Niches and grooves with a depth of more than 3 cm. for laying communications in the walls should be provided for in the project of the house.
It is allowed, without agreement with the designer, to arrange vertical grooves in the lower part of the wall to a height of no more than 1/3 of the floor height.
External sewer outlet
Sewerage outlet - the outer section of the pipe from the house, is connected to the well of the central sewerage system of the village (if any), or to a drainless storage septic tank for the removal of wastewater by a sewage machine, or to a septic tank of local treatment facilities at the site.
Outside, directly near the house, it is recommended to install a revision well on the exhaust pipe. It is recommended to install a non-return valve in the well in the pipe. The valve will prevent flooding of the underground part of the building (for example, when a septic tank is overflowing) and prevent rodents from entering the house through the sewer pipes.
The outer pipe at the exit from the inspection well is connected to the central sewerage system or to the septic tank of the autonomous sewerage system of a private house.
The outer pipe to the septic tank is laid with a slope of 2.5 - 3%, at a depth of about 0.4 m. If the length of the release is more than 5 m., then the pipe is insulated along its entire length with a shell made of polystyrene or extruded polystyrene foam.
The outlet pipe should not be buried.- otherwise, this will lead to the need to install a septic tank at a great depth, which will cost more and complicate the operation of the septic tank.
Siphon in the sewer
The drain pipe of each sanitary device is connected to the supply pipe through a siphon. The siphon is a U-shaped elbow, in the lower part of which there is always a layer of drained liquid.
Some sanitary appliances, such as the toilet, have a built-in siphon. The water layer in the siphon serves as a barrier for gases, preventing them from escaping from the sewer pipe into the room.
The siphon of a sanitary device may not be filled with water and let gases into the room in the following cases:
- With prolonged inactivity of the sanitary device, the water in the siphon dries up. For the period of inactivity (more than two weeks), it is recommended to close the drain holes of the sanitary devices.
- When sucking water from the siphon as a result of the vacuum created in the pipes. The risk of water suction from siphons increases with increasing length and decreasing diameter of the supply pipe, as well as in the absence of ventilation of risers and long supply pipes.
Sewage pumps with a chopper for home
The drains move in the sewer pipes by gravity, due to the laying of pipes with a slope.
However, situations sometimes arise in the house when it is difficult to create the necessary slope of pipes from sanitary appliances. For example, if a sanitary room is installed in the basement of a house. Or it is necessary to move the drains a considerable distance (from the bath), but the required pipe slope cannot be created.
 A fecal pump with a chopper is attached to the toilet. The pump receives waste water from the washbasin.
 To receive and forcibly move wastewater, special electric fecal pumps are installed. The fecal pump has a device for crushing the contents of the effluents and pumping them into the upper pipes of the sewer system.
A pump for forced movement of wastewater is installed after each sanitary device or for pumping wastewater from a group of closely located sanitary devices.
The fecal pump can lift wastewater to a height of 10 meters and move it by several tens of meters.
Air supply to sewer pipes for ventilation occurs through the open end of the pipe in a septic tank or a receiving well of the central sewerage system. The outlet of the sewer pipe, through which the waste flows from the house to the septic tank, should always be above the level of drains in it.
On the processes occurring during the movement of sewage through the sewer pipes, on the device and the correct use of the aeration valve watch this video:
Sewerage options - sewage disposal from a private house
What to do with drains in a private house if there is no central sewerage system nearby ?!
There are two drainage options- drainage of waste water from a private house:
- Drain water into an endless storage septic tank (reservoir, cesspool) with periodic, as it is filled, pumping out and disposal of wastewater by a sewage machine to the treatment facilities of the nearest settlement.
- Arrangement of local treatment facilities at the site and discharge of treated water into the natural environment - into the ground or onto the relief.
The first method provides the lowest construction cost sewage systems, but the annual operating costs (waste disposal) can be significant.
Sewerage option with local treatment facilities is more costly during construction, but can provide lower running costs for system maintenance.
Methods for cleaning sewage drains of a private house
In local treatment facilities, a biological method of purifying wastewater from pollution is used. Wastewater treatment is carried out by microorganisms capable of decomposing organic pollution. The main task of biological treatment is to remove organic substances from wastewater. Biochemical reactions occurring in the process of biological treatment partially remove from wastewater and many chemical elements, reducing their concentration in wastewater.
Distinguish anaerobic(bacteria without oxygen) and aerobic(bacteria in the presence of oxygen) biological treatment processes.
Two types of local sewage treatment plants for a private house
For wastewater treatment of a private house, use:
- Anaerobic septic tanks, supplemented by ground treatment facilities with filter drainage through the soil layer. In the ground filters, the wastewater treatment process takes place with the help of aerobic bacteria.
- Active septic tanks- treatment devices, in which the process of intensive biological wastewater treatment with the help of aerobic bacteria has been established. Treated wastewater after an active septic tank, as a rule, is discharged into the ground or onto the relief.
First option, anaerobic septic tank with drainage into the ground, as a rule, cheaper in design and operation. Here, in the treatment facilities, conditions are created for the vital activity of microorganisms that are close to natural. A simple device ensures long-term and reliable operation of the sewage system.
The second option with an active septic tank- more expensive and more difficult to operate. An active septic tank is a high-tech factory-made apparatus, in which artificial conditions are created for the vital activity of aerobic microorganisms, which significantly speeds up the cleaning process.
Sewerage of a private house with an active septic tank provides the highest degree of wastewater treatment. Treated wastewater from an active septic tank is directed into the ground through the drainage system. With waterproof soils on the site, the drains are discharged onto the relief, into a ditch.
An active septic tank requires an electrical connection, does not tolerate long interruptions in the supply of drains, is sensitive to power outages, needs constant monitoring of work, as well as timely repair and maintenance.
Advantages - small dimensions, quick installation, independence from soil conditions on the site. For an economy-class house, it makes sense to use an active septic tank if there is not enough space on the site for placing a ground filter drainage or with a high level of groundwater.
Treatment of sewage drains of a private house in an active septic tank Topas
 The autonomous sewage system Topas is an effective and rational solution for the private sector, country and country estates, where it is impossible to connect to the central sewage system. Many consumers have already appreciated the presented system and characterize it from the best side, but what is it?
Septic tank Topas is a system of accumulation and treatment of waste water, as a result of which the purest industrial water is brought to the surface. The range of such devices is very wide - each buyer can choose the optimal product that can serve both a separate private house and a small cottage village.
The essence of the autonomous sewage system Topas
In the production of Topas septic tanks, expanded polypropylene is used; additionally, the storage chambers are equipped with stiffening ribs. This production technology allows you to achieve the following device parameters:
- High strength characteristics.
- Installation of the system in all weather conditions.
- System operation even in winter time.
- Independence from the type of soil and the level of groundwater.
Let's note some advantages of an autonomous sewage system:
- high level of water purification;
- there is no need to equip additional aeration sites;
- long service life;
- compact size, which allows you to install a septic tank in a minimum space;
- environmental friendliness;
- ease of maintenance with a minimum of labor costs, financial costs and no need to call special equipment;
- secondary products of processing can be used as fertilizer, and purified water for irrigation of plantings;
- no extraneous odors, noise;
- absolute tightness of the structure.
It is worth noting and cons of the system, although it is difficult to call it cons:
- dependence on electricity;
- the high cost of the product, but over time the costs will pay off;
- for installation, you will need to call a team of specialists, although independent installation is possible.
The principle of operation of an active septic tank
 The principle of operation of an autonomous sewage system can be divided into several stages:
- Wastewater enters the receiving chamber, where it is cleaned from impurities and heavy contaminants. The filling level of the chamber is regulated; after filling, the drains enter the aeration tank.
- The aeration process takes place, as a result of which the sewage is treated with oxygen and special bacteria.
- Treated wastewater accumulates in a sump, from where the sludge settling at the bottom is subsequently pumped out.
- The process water flows into the stabilizer, from where it can be disposed of in the ground or used, for example, for irrigation.
Rules for the operation of an active septic tank Topas
Any model of the Topas septic tank is equipped with detailed operating instructions, but we will highlight a few rules that must be followed:
- In the event of a power outage, try to limit the flow of wastewater into the collection chamber to avoid overflow.
- Do not allow aggressive chemicals, alkalis, acids, etc. to enter the system. - they will destroy the beneficial microorganisms of the device.
- Do not throw garbage into the sewer that is not intended for it - food scraps, bags, plastic, and other solid household waste.
- The sludge is cleaned twice a year.
- Some parts of the device are subject to mandatory replacement, for example, "Air Mac" compressor membranes - every 2 years, aeration elements - every 12 years.
Installation of an active septic tank Topas
 The installation of an autonomous sewage system will not bring any particular difficulties, the whole process is divided into several stages:
- Searching for a place where a septic tank will be installed - a distance of at least 5 meters must be maintained from the foundation of the buildings, while it is worth remembering about the trenches, foundation pit, drainage point that must be dug.
- Digging a pit, the dimensions of which vary depending on the size of the station. If the type of soil is unstable, formwork will have to be installed.
- Laying a sand or concrete cushion to prevent the station from floating up. For small models, a sand cushion is arranged, and for stations designed to serve a large number of users, a concrete cushion.
- Installation of the station in the pit - manual or automatic method.
- Sewer pipe laying.
- Sealing of sewer pipes at the points of their connection with the device. A special polypropylene cord supplied with the station is used.
- Connecting the power cord that runs underground in the corrugated pipe.
- Backfilling with soil is the last stage, in which water is simultaneously poured into the pit to a depth of 35 cm and covered with sand. The station must be completely submerged in the ground, otherwise the external pressure will not normalize.
Selecting a stand-alone station model
When choosing a septic tank Topas, the following factors should be considered:
- the number of future users;
- the depth of the drain pipe;
- method method of discharge of treated effluents - forced or free.
Any model of the Topas septic tank will last a long time, subject to the rules of operation and installation. It is worth contacting professionals who will not only quickly and competently provide all services for the selection, installation of an autonomous station, but also provide warranty obligations for all installation work.
How to make an anaerobic septic tank and ground treatment facilities for autonomous sewage in a private house with your own hands