When building a house from gas silicate blocks, a prerequisite is the manufacture of an armored belt from a concrete solution. Armopoyas for aerated concrete is a monolithic layer of concrete, evenly distributed around the entire perimeter of the walls of the house. This design increases the reliability of the aerated concrete wall and the entire structure by an order of magnitude. For a one-story house, it is recommended to make an armopoyas in the middle part of the wall and under the roof, and for a two-story house, between floors and under the roof.
What is it needed for armopoyas in aerated concrete house
Many novice builders do not fully understand why an armored belt is needed for the walls of the house. Especially if the building is one-story. In fact, the need for its construction comes from the following reasons:
- The belt ties together the entire structure, being a kind of stiffening rib. This increases the building's resistance to wind loads, seismic activity, ground movements in the building area, shrinkage of building material. Without such reinforcement, the likelihood of cracking in the walls increases.
- The entire load on the walls is evenly distributed, which prolongs the service life of the house.
- Thanks to the armored belt, it becomes possible to make window and door openings of any width.
- It is necessary to fix the rafter system on the roof very reliably, but gas blocks cannot provide this.
Armopoyas dimensions
The dimensions of the armopoyas depend on the dimensions of the wall itself:
- Armopoyas runs along the entire perimeter of the building, including along the inner walls.
- The height of the armored belt can be less than or equal to the height of the gas block. It is not recommended to make it more than 30 cm. This is an unjustified expense of funds with the same degree of protection. In addition, there will be an increased load on the walls.
- The thickness of the armored belt for aerated concrete can be equal to the thickness of the wall, or maybe less.
- It is recommended to make the section of the armored belt square. There is a rule of resistance: a square section is more resistant to mechanical stress than a rectangular one.
Armopoyas manufacturing options
Some builders, in order to save money, make an armored belt out of bricks. It consists of 4–5 rows of bricks, between which reinforcement or reinforcement mesh is laid. Since the brick belt is inferior in strength to the concrete one, it can be used for the construction of small buildings or utility blocks.
We will analyze how to correctly make an armored belt for aerated concrete using the method of monolithic pouring. There are several options for making an armored belt, which are given below:
Using off-the-shelf U-blocks
These products are commercially available. In the section of each U-block there is a cutout where the reinforcement is laid and concrete is poured. The thickness of one wall is - 10 cm, and the second - 5 cm. U-blocks are installed on ordinary aerated concrete glue, first at the corners of the wall, and then connected in one row. The blocks are placed with their thicker sides on the outer wall of the building.
Wooden lintels are mounted above the door and window openings, which are fastened with vertical supports. The jumpers should be flush with the top of the previous row of gas blocks.
This method is easy and quick to install, but it is not popular due to the high cost of U-blocks. Alternatively, you can make your own U-blocks by cutting out the middle parts with a hacksaw.
Using add-on blocks
Additional blocks of different thicknesses can be used to make an armored belt. For the outer walls, blanks with a thickness of 10 cm are used, and for the inner ones - 5 cm. They are installed on the glue on top of the previous row. Insulation must adjoin the outdoor units. In the gap between the blocks, a reinforcing cage is laid and concrete is poured.
Option with one-sided add-on block
Additional blocks with a thickness of 10 cm are used. They are installed on the glue from the outside of the wall. Immediately near the blocks, sheets of extruded polystyrene foam with a thickness of 5 cm are inserted. They are necessary to reduce the heat capacity of the armopoyas, in order to avoid the appearance of cold bridges. Formwork is mounted on the inside of the wall. In the resulting niche, a reinforcing cage is made, after which concrete mortar is poured into it.
From the outside of the house, the concrete belt will not be visible, so you can perform any external decoration with the same material.
Application of double-sided formwork
The formwork is installed on both sides of the wall. A layer of insulation is inserted inside the formwork, close to its outer side. After that, the reinforcement frame is mounted, and then concrete is poured into the formwork. After the concrete has hardened and the formwork has been removed, the insulation must be repaired. Most often this is done in conjunction with wall plastering or finishing with foam sheets.
How to make a formwork for pouring concrete
If at least one side of the armored belt goes outside the building, the construction of compulsory formwork is required. It can be made from flat boards, OSB, plywood sheets, laminated particle boards. The formwork is attached directly to the aerated concrete walls using wood screws. If boards are used, then it is necessary to provide for the presence of vertical jumpers to ensure the rigidity of the structure.
Tip: The top of the formwork must be perfectly flat so that the concrete layer is the same in thickness. Then the row of blocks that will fit on it will not change the geometry of the wall of the house.
On top of the formwork, horizontal lintels are attached, fixing it on both sides. The jumpers are screwed on with self-tapping screws or nailed every 80–100 cm.
If the layer of insulation extends onto the outer wall of the house, and wall decoration has not yet been provided, it can be masked. For this, the formwork is not installed flush with the wall, but directly on the wall. After removing the formwork, a cavity with a depth of about 3 cm remains, which is quite enough for a layer of finishing material.
Tip: the formwork is installed immediately around the entire perimeter of the walls. This ensures the filling of the armopoyas in 1 run.
Reinforcement of concrete
To increase the strength and rigidity of the concrete layer, it must be reinforced. For this, metal or fiberglass reinforcement with a cross section of 8–12 mm is used. Usually four rods along the walls are sufficient. The reinforcement is tied together with a knitting wire every 50 cm to form a square or rectangular frame. It is not recommended to use welding for connecting rods, since the metal will quickly begin to rust even inside the concrete layer precisely in the welded places.
The reinforcing frame should not lie on aerated concrete. It needs to be raised above it by about 3 cm. For this, special plastic clips are used for reinforcement. It is more convenient to knit the frame inside the formwork.
Filling the armopoyas
Let's consider how to properly fill the armopoyas with concrete mortar. For this it is recommended to use concrete M200 or higher. It can be bought ready-made or made independently from sand and cement of the M400 brand. When making it yourself, you should adhere to the proportions of the solution:
- Cement - 1 part.
- Sand - 3 parts.
- Crushed stone - 5 parts.
- Water - until thick.
- Plasticizer - according to the manufacturer's recommendation.
The concrete solution is mixed manually or using a concrete mixer. After that, the mortar is poured into the formwork. Using a metal pin, the concrete is compacted and air bubbles are removed from it.
Advice: it is recommended to pour the armopoyas in one go to prevent delamination of several layers of concrete. If this is not possible, then wooden lintels are installed on the surface of the poured layer. After their removal, the concrete surface is moistened, and then pouring is continued.
After about 5 days, the concrete will completely harden. The formwork can be removed. During these days, it is advisable to water the armopoyas with water to give the concrete increased strength.
Features of the concrete belt under the Mauerlat
We talked about the need to equip an armored belt on aerated concrete between floors. Is such a layer of concrete needed at the bottom of the attic floor? Wouldn't a house with multiple belts be too bulky? Mauerlat cannot be attached directly to a number of gas blocks, since this material does not differ in increased strength. From the impact of wind loads, the mountings will simply loosen, and the timber will move from its place.
In addition, the walls will be strengthened to prevent cracks from appearing on them. 2 concrete belts will not make the whole structure too heavy, so you don't have to worry about the safety of the walls. Therefore, the armopoyas is necessary, but it has its own characteristics.
Armopoyas under the Mauerlat may differ in its dimensions in the smaller direction, since it carries a lower load. In addition, only 2 reinforcing rods are often used to strengthen the belt frame.
The Mauerlat must be securely attached to the armored belt. For this purpose, even before pouring the concrete solution, the studs with nuts are lifted vertically upwards. The wooden beam of the Mauerlat is attached to the concrete with these pins and is fixed with nuts from above.
There are no other differences in this design.
A concrete armopoyas made according to all the rules will provide a building made of aerated concrete with strength and durability, prevent cracks on the walls, and make a reliable roof. Having spent 2-3 days on the manufacture of a reinforced concrete belt, you will extend the life of the house several times.
The roof is one of the most important and critical parts of the house. And the strength of the connection between the roofing system and the walls largely determines the ability of the house to withstand the effects of natural elements: snow and wind loads.
Mauerlat - definition
Mauerlat- an element of the building structure, connecting together all the elements of the roof truss system with each other and with the walls of the building. The main functions of the Mauerlat:
- keeps the roof from shifting in relation to the wall;
- evenly distributes and transfers to the walls the load concentrated at the points of support of the rafters.
Mauerlat is laid and secured along the entire perimeter of the upper part of the outer wall of the building with a slight offset from the outer edge. Each Mauerlat element is firmly connected to two adjacent ones.
Together with the rafter system, it creates a reliable, stable spatial structure of the roofing system. Provides a strong connection of the roofing system to the walls of the building, evenly distributes the load from the roof along the entire perimeter of the wall.
Selection of material and calculation of parameters
For the manufacture of Mauerlat, a bar with a cross section is used:
- 100x100 mm;
- 100x150 mm;
- 150x150 mm.
There is a use of a board with a section of 50x150 mm. However, for a wall made of aerated concrete without a reinforcing belt, it is advisable to avoid this option. A plank laid flat does not have sufficient rigidity to absorb and distribute the vertical point loads from the rafter legs on the wall.
To create a one-piece structure that can withstand the load transmitted by the rafters, the edges of the beams are connected in series using a straight lock. The Mauerlat beams are strengthened closer to the inner part of the wall so that the distance to the outer edge remains at least 50 mm.
The top of the Mauerlat should be located at a distance of 300 to 500 mm from the top of the ceiling slab. Such a gap provides sufficient conditions for ventilation of the under-roof space and does not obstruct access for periodic inspection and repair of the Mauerlat and the lower part of the rafter legs.
The strength and reliability of the connection of the roof and walls largely depends on the correct choice of design, the method of attachment to the walls and the accuracy of calculating the dimensions of the Mauerlat.
Consider the main factors affecting the choice of the Mauerlat section:
- the shape and area of the building to be roofed;
- type of roof structure (hanging or layered rafters, step size and angle of inclination of the rafter legs);
- material and weight of the rafter system and roofing;
- the presence or absence of an attic floor in the house;
- calculated snow and wind load of the roof, determined by the climatic conditions of the region.
When choosing the design and section of the Mauerlat, it should be taken into account that the aerated concrete wall is weakly resistant to horizontal loads (spacer). The presence or absence of spacer forces at the lower ends of the rafter legs is determined by the design of the rafter system.
Non-thrust designs include:
- hanging rafters using puffs;
- layered rafters with upper freely rotating fastening, and lower fastening freely rotating and movable in the direction of the beam axis.
Rafter systems that create horizontal loads in the walls (spacer):
- hanging rafters without puffs;
- layered rafters with rigid support.
Horizontal forces transmitted to the wall by the spacer structures of the truss systems must be absorbed by the reinforcing belt. Attempts to compensate for these efforts only by increasing the section of the Mauerlat bar are a building mistake and lead to negative results.
The volume and mass of a bar for the manufacture of a Mauerlat is calculated by the formulas:
- (Mauerlat volume) = (Bar section) x (House perimeter);
- (Timber weight) = (Mauerlat volume) x (Wood density).
Varieties of fastening the Mauerlat to aerated concrete
Aerated concrete, as a wall material, has a whole range of positive properties:
- light;
- perfectly processed;
- has good thermal insulation properties;
- the blocks have a clear geometric shape.
But there are also some peculiarities. Aerated concrete is a rather fragile material. It handles moderate compressive loads well, but the application of tensile or shear forces readily leads to cracking.
Accordingly, when choosing a method for attaching the Mauerlat to the wall, this must be taken into account.
Mauerlat on aerated concrete without armopoyas
In the practice of construction, it sometimes becomes necessary to attach the Mauerlat to the aerated concrete wall without arranging a reinforcing belt. The fragility of aerated concrete imposes a number of restrictions on the choice of fastening method, but does not exclude this possibility.

Fastening with steel wire
The simplest mounting option.
It became widespread due to the low cost of materials.

Sequencing:
- several rows (at least three) before the masonry is completed, pieces of soft steel wire with a diameter of 6 mm are laid across the wall;
- the Mauerlat is laid after the completion of the wall masonry and the strength of the glue;
- by twisting the ends of the wire, the Mauerlat beams are firmly pressed against the wall.
The length of the ends of the wire must be sufficient to cover the upper rows of the wall, the Mauerlat bar and to twist.
The laying pitch must match the pitch of the rafters.
Fastening with anchor bolts
 Anchor bolt (mechanical anchor) consists of:
- from an inner rod with a threaded part;
- outer spacer part.
When screwing the nut onto the inner rod, the spacer part is deformed and fixes the anchor bolt in the channel of the wall hole.
Sequencing:
- Mauerlat bar laid out along the entire perimeter of the wall.
- Holes for anchor bolts are drilled along the entire length of the Mauerlat... The distance between adjacent holes is no more than 1 meter. It is necessary to strive to ensure that the location of the anchors must fall on the corners of the building and the joints of the beams.
- Through holes in the mauerlat with the help of a drill, the wall masonry is drilled to the length of the anchor, but not less than 2 - 3 rows.
- An anchor bolt is inserted into the hole at least 500 mm long and M12 or M14 thread.
- The washer is put on. The nut is screwed on with effort. The plastic or metal dowel included in the anchor structure is expanded, pressed into the channel walls and securely fixes the anchor bolt in the wall.
Fastening the Mauerlat with mechanical anchors is widespread. Limited by the relatively high cost of fasteners.
Chemical anchor
 Modern technologies for the manufacture of mechanical anchors for anchoring in aerated concrete have reached perfection. However, the main disadvantage inherent in the principle of operation remains. Attaching the anchor in aerated concrete by creating a bursting force. With an increase in the load on the anchor, the aerated concrete block may split.
The so-called chemical anchor... Instead of a dowel, a synthetic adhesive is used. It penetrates deeply into the pores of aerated concrete. When solidified, it firmly fixes the metal rod in the wall material.
Sequencing:
- a hole is drilled as for a mechanical anchor bolt, but with a slightly larger diameter;
- using compressed air or a special brush, dust and material crumbs are removed from the hole channel;
- the hole channel is filled with adhesive;
- a threaded rod M12 - M14 or a piece of reinforcement of a similar diameter is inserted into the hole;
- at an ambient temperature of 20 degrees Celsius, the composition gains strength in about 20 minutes.
The positive qualities of a chemical anchor include:
- The fastening strength is significantly higher than that of a mechanical anchor.
- Absence of bursting stresses in aerated concrete. Mounting on the edge of the wall is allowed.
- Chemical resistance.
- Can be attached to damp material, work in the rain.
- Long service life (over 50 years).
Disadvantages of a chemical anchor:
- The adhesive does not withstand high temperatures.
- Do not weld directly with the metal anchor rod.
Arrangement of a reinforcing belt
And yet, if the design of the house allows you to make a reinforcing belt, it is recommended to take advantage of this opportunity. It is much easier and more reliable to fix the Mauerlat to the aerated concrete wall through the armored belt. In addition to facilitating the fastening of the Mauerlat, the armopoyas also has other positive qualities.
- Armopoyas, like a hoop in a tub, pulls together the upper part of the walls of the building and maintains its geometry with uneven shrinkage of the foundation, seasonal movements of the soil.
- Increases rigidity and the strength of the entire building.
- Evenly distributes point loads from rafter legs on the walls of the building.
- Is the best(and in the case of aerated concrete walls and the only one) means of counteracting the bursting loads on the walls with the spacer structure of the rafter system.
- By changing the thickness of the armopoyas it is convenient to align the upper cut of the building walls horizontally. Level errors made during masonry are leveled.
Armopoyas is made in the form of a concrete tape along the entire length of the bearing walls of the building.
Formwork manufacturing
- Convenient to use U-shaped blocks... With their help, a continuous gutter is formed in the upper row of the masonry, which serves as a permanent formwork. With this manufacturing method, cold bridges are not created. The wall will not freeze through.
- The top row on the outside of the wall is made of blocks with a thickness of 100 mm... On the inside there is “ribbed” brickwork. More labor intensive compared to the use of U - shaped blocks. Thermal insulation properties are somewhat worse. The cost of the material is lower.
- A removable formwork is formed over the entire width of the wall from boards or OSB slabs. The method is often used due to the low cost of materials. Cold bridges are formed. It is necessary to take measures for additional insulation of the wall in the area of the armopoyas.
Belt reinforcement
A frame in the form of a spatial box is made with four - six threads of reinforcement with a diameter of 10 - 12 mm. Cross ties are made with a wire with a diameter of 6 mm. The connection of the frame elements with each other should be carried out using twists of soft steel wire or plastic ties.
It is advisable to fill the armopoyas with concrete of the M200 brand at a time, avoiding long interruptions in work. The use of a vibrator for compacting concrete significantly increases the strength and durability of a reinforced concrete structure.
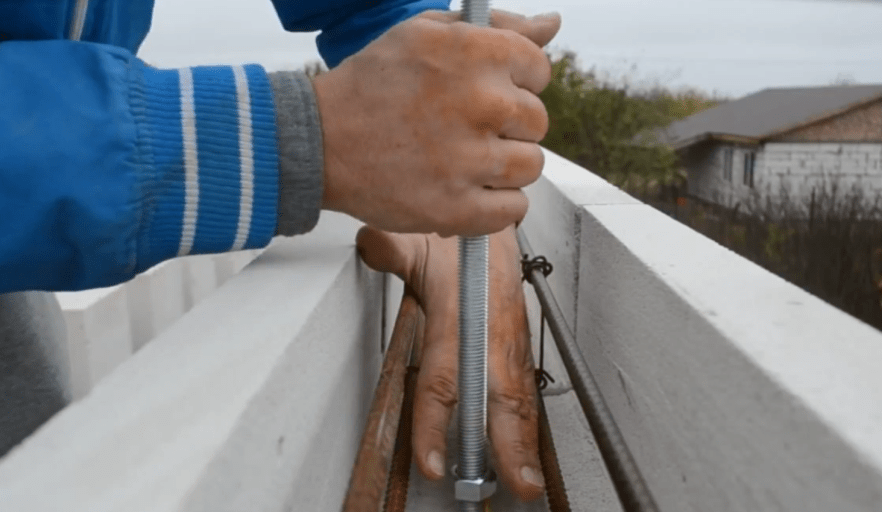
Fasteners with metal studs
 Threaded metal studs are rightfully considered the simplest and most convenient element for attaching the Mauerlat to the armored belt. Stud diameter from 12 to 14 mm. The length is sufficient for the upper edge of the hairpin to protrude 4 - 5 cm above the surface of the Mauerlat. The lower edge of the hairpin is bent in the form of the letter "L".
The use of bolts is allowed. In this case, metal plates in the shape of a rectangle are welded to the caps.
Sequencing:
- studs with a step of no more than 1 meter are placed in the formwork of the armopoyas before the concrete pouring operation is performed;
- attached to the reinforcement cage using knitting wire or plastic ties;
- the accuracy of the installation is controlled vertically and horizontally;
- after the concrete hardens, the Mauerlat bar is put on with holes on the protruding ends of the studs, tightly attracted by nuts to the surface of the armopoyas.
The importance of waterproofing during installation
Regardless of the chosen method of fastening, the Mauerlat and the wall surface must be reliably separated from each other by a layer of waterproofing. Condensation, which forms during the temperature difference at the junction of various materials, leads to wetting and destruction of the Mauerlat wooden bar.
There is a large selection of materials for waterproofing during installation. Usually, two layers of roofing material or one layer of waterproofing material are laid. It will not be superfluous and the processing of a wooden bar with an antiseptic composition.
Building a house is a long and difficult journey. Regardless of whether you are building a house with your own hands or entrusted the work to third-party specialists, you need to clearly understand how to correctly take EVERY step along this path. Only personal control of the correctness of the chosen decisions and the quality of work will allow the house to serve for a long time and bring joy to you and your children.
It is well known that aerated concrete block walls require reinforcement with steel reinforcement. The entire box of the future building is consistently reinforced with a steel bar, and even more so, it will be necessary to put the Mauerlat on aerated concrete with an armored belt. There are schemes, for example, for relatively small buildings, when the base of the future roof can be made without reinforcement. Direct laying of the Mauerlat on aerated concrete blocks without reinforcement, in principle, is also allowed, but such situations can be considered an exception to the rule rather than normal practice, since the risk of destruction of the support row under the weight of the roof is quite high.
What is an armopoyas for a Mauerlat for?
Many experts believe that you can replace the reinforcement by installing a Mauerlat on aerated concrete from a massive bar or using a package of boards of increased thickness. It is difficult to assess how successful such a replacement will turn out, so most craftsmen and designers prefer not to take risks and use a full-fledged armored belt made of a steel bar.
Structurally, the Mauerlat is a thick board or timber laid out on a horizontal plane or on the upper end of the wall. It is used on any walls, with the possible exception of squared or log buildings. Its functions include:
- Combine and tighten the lower parts of the rafters into one structure, give the base of the rafter frame greater rigidity;
- Evenly redistribute the load from the weight of the roof and the layer of snow over the entire supporting surface of the wall;
- Partially compensate for the temperature and sediment stresses at the wall-roof transition line.
The Mauerlat wood board is a kind of spacer between the heavy roof and the walls of the building. It just so happens that most of the overturning forces arising from gusts of wind, the weight of the snow cover is transferred directly to the top row of the wall.

Even bricks and concrete blocks, laid along the perimeter of the top, are not always able to successfully withstand the pressure of the roof, especially if the angle of inclination of the slopes exceeds 35-40 °. Moreover, you need to use an armored belt when planning the installation of a Mauerlat on aerated concrete, because it does not have the proper rigidity and strength, it is inferior to traditional materials in all respects, except for thermal conductivity and vapor permeability. The direct method of attaching the Mauerlat to aerated concrete will lead to the fact that the wire or anchor will destroy the relatively soft foam material of the walls, and the wooden roof frame will simply tear off the base.
For your information! Armopoyas is made of a solid concrete casting with embedded reinforcement with a steel ribbed bar.
Any other aerated concrete reinforcement schemes, including those with brick re-laying or pouring concrete into the perimeter, are usually ineffective. Armopoyas without reinforcement will only increase the load on the walls made of aerated concrete, but it will not really add strength and plasticity of the base for the future Mauerlat.

Armopoyas installation technology
The design of the reinforcing belt largely depends on the size of the structure, the thickness of the aerated concrete walls and the length of the spans. Most often, two schemes for constructing an armored belt are used:
- On the basis of wooden formwork laid on the upper edge of the aerated concrete wall;
- Pouring concrete mass into aerated concrete blocks of a special configuration.
In order to strengthen the upper edge of the walls under the Mauerlat armored belt, it is not necessary to fill the plane with concrete over the entire thickness of the wall. A concrete belt is only needed to tighten and hold the last row of aerated concrete from tipping over and cracking at the seams. For wide walls, it is enough to secure the Mauerlat with an armored belt to aerated concrete at a width of at least 15 cm.

Internal version of the armopoyas under the Mauerlat
For sufficiently large walls, at least 400 mm thick, the armopoyas is built by pouring it into the formwork of an arbitrary design. Most often, for pouring the base under the Mauerlat, the outer wall of the formwork is laid out of cut blocks of aerated concrete 100-200 mm thick, the second wall is attached to the masonry with self-tapping screws, as in the diagram.
For your information! After pouring the concrete mixture, the armopoyas will be reliably closed from the outside with a thick layer of aerated concrete, sufficient to reduce heat loss and prevent the Mauerlat from freezing.

Mauerlat is fastened to aerated concrete with anchors, pieces of reinforcement, wire or special U-shaped ties, depending on the installation site, the size and dimensions of the roof. At the bottom of the assembled formwork, a connected package of reinforcement with a diameter of 8-10 mm is laid.
We build an armopoyas on standard aerated concrete
This method of arranging a reinforcing belt under a Mauerlat is used for small buildings, one or two floors with a height and wall length of up to 5 m. The standard width of the blocks for such buildings does not exceed 250 mm. In order to simplify the process of arranging an armored belt, manufacturers of wall aerated concrete produce blocks of U-configuration with a hollow groove inside. Such structures are used for the manufacture of a whole range of various auxiliary and reinforcing parts and lintels from aerated concrete.
Stage one, we build aerated concrete formwork
Standard U-blocks are used to make the mold into which the concrete will be poured. Most of the perimeter of the walls is laid out on an adhesive basis in the usual way, and only at the corners of the building box will you need to be smart to dock the individual parts of the aerated concrete so that the formwork is a single cavity shape without any internal bridges.

In the formwork for pouring the future armopoyas, not only should there be no jumpers, the thickness of the future concrete tape should be the same along the entire perimeter of the walls. Otherwise, any mistake with laying the Mauerlat can lead to the formation of cracks and the separation of the armored belt from the base of the aerated concrete.

Important! When laying hollow blocks, it is necessary to carefully align their position along the horizon using a laser, a cord or, most often, an ordinary building level.

Usually, in aerated concrete, a part of the wall is cut off from the end to a length equal to the width of the block. This can be done using an ordinary hacksaw for metal. To avoid leaks of cement laitance, all the gaps between the walls in the formwork are sealed with alabaster.
The second stage, the formation of embedded elements of the armopoyas
The main part of the reinforcing belt is a steel frame made of reinforcement. As soon as the fill form is ready, you can start making the bookmark. Many experts claim that the armopoyas, poured under the Mauerlat, works only for bending, like a beam laid on edge supports. In this case, it is best to lay the steel rods of the reinforcement on the bottom of the mold. But a similar, almost ideal version of loading an armored belt is quite rare, only in the simplest buildings of a square or rectangular shape.

In ordinary buildings made of aerated concrete, it is rather difficult to predict how a concrete belt reinforced in this way will behave. Therefore, craftsmen prefer to knit reinforcement in the form of a frame of four rods, as is done when making a foundation.
To simplify and speed up the knitting process, support frames are pre-prepared, as in the photo. They help to assemble the frame in a few minutes.

Important! For strength reasons, the reinforcing bars should be located at a distance of at least 3 cm from the walls of the aerated concrete mold, so the frame is exposed on wire supports or plastic "chairs".

The third stage, filling the armopoyas under the Mauerlat
After the reinforcement cage has been laid and fixed inside the aerated concrete formwork, you can start pouring. For the preparation of the concrete mixture, the same recipe is used as for the foundation. Three sand and gravel screenings are taken on a bucket of cement. On a bucket of water 50 ml of plasticizer, pour about a liter of the resulting solution into a separate container. With this solution, we will process the reinforcement and walls of aerated concrete before pouring.

It is necessary to fill in parts, compacting and knocking the mixture in the formwork of the armored belt with a wooden mallet. Immediately after pouring, we cover the concrete support of the future Mauerlat with plastic wrap and maintain the armored belt for three days.
How to fix the Mauerlat to aerated concrete
When arranging a reinforcing belt, you must choose one of the methods for attaching the Mauerlat to the aerated concrete wall. The most common is the installation on anchors or embedded studs.
In this case, M12 threaded rods with a nut and washer are used to hold a beam or a package of boards on a reinforcing concrete belt. Before pouring concrete into the formwork, holes are drilled at the bottom of the U-shaped blocks to a depth of at least 5 cm.
Next, a very thin layer of silicone grease is applied to the upper part of the stud, for a length of 10-15 cm, a nut with a washer is screwed on, and then wrapped with tape or plastic wrap. The hairpin is driven into aerated concrete with silicate glue and at the same time vertically aligned using a building level. After pouring the concrete, the anchor should protrude at least 10 cm above the surface of the reinforcing belt. It is better to do it with a margin, since the height of the Mauerlat bar may be higher than the calculated one, it is easier to cut off the excess hairpin with a grinder.
How to attach a Mauerlat to aerated concrete with wire
The use of pins is not always convenient, especially if the building box is small, or it is not possible to determine in advance the support points of the rafter legs on the Mauerlat. In this case, the easiest way to do the fastening is with wire loops tied to the reinforcing cage before the concrete is poured.

Despite the fact that fastening the Mauerlat to aerated concrete with a wire looks more artisanal than when using an anchor, sometimes this method of connection remains the only acceptable one.
For example, if a roof installed on aerated concrete walls has a large wind capacity with a low weight. In this case, if an anchor is used, then the boards or timber of the Mauerlat, weakened by through holes, may not withstand the periodic load, and there is a risk of cracking and destruction of the wood.
The wire holds the Mauerlat on aerated concrete no worse than anchors, leaving a gap for wood shrinkage due to changes in humidity and air temperature
How to properly put the Mauerlat on aerated concrete blocks
Three to four days after pouring the concrete, you can proceed to fixing the Mauerlat to aerated concrete with an armored belt. First of all, you need to measure with a building level and determine the places where the concrete surface deviated from the horizon line. These places are marked and adjusted so that the surface of the casting is flat and at the same time as close to the horizontal line as possible.
At the second stage, a primer is applied to the concrete, which improves the adhesion of the waterproofing to the Mauerlat. Next, a film is glued to the surface and an ordinary roofing material is laid, as is done when preparing the basement part of the foundation. Most importantly, before laying and securing the Mauerlat boards, it is necessary to check the fastening points again with the installation lines of the rafter legs, so that when assembling the frame, you do not have to cut off the rafter bases.

The most important points in the arrangement of a concrete belt are considered to be competent bandaging of reinforcing bars and correct pouring of the mixture. The work is quite hard, and not everyone can carry buckets of concrete to the level of the ceiling. But it is necessary to knead and fill the entire volume of the armopoyas as quickly as possible.
The dimensions of the tightening belt on aerated concrete are small, therefore, any delamination or the appearance of a strand in the future will lead to the formation of a crack. This is not a foundation, therefore, it is necessary to lay the concrete mixture under the Mauerlat in a maximum of four hours.
Conclusion
It will take at least 20 man-hours of working time to assemble an armored belt for a Mauerlat on aerated concrete walls. At the same time, most of the work will be associated precisely with mixing and lifting concrete to a height. For each meter of formwork, up to three buckets of mass will go away, therefore, if possible, it would be correct to acquire at least one assistant for the concreting stage. This will make work easier and improve the quality of the casting.
Any developer, having conceived to build a house from aerated concrete, is faced with the need to manufacture an armored belt (it is also called a seismic belt). Armopoyas on aerated concrete is a monolithic reinforced concrete tape, poured along the entire perimeter of the walls (between the first and second floors, etc.). This element is necessary for even distribution of the load and the connection of the walls together. This reduces the risk of cracking when the building shrinks unevenly. Also, the armopoyas is laid under the Mauerlat when installing the roof.

Maxim Pan User FORUMHOUSE, Moscow.
It is impossible to fasten the timber (Mauerlat) directly to the aerated concrete on the studs. If this is done, then over time, under the influence of wind load, the fasteners will loosen. When arranging an attic floor, an armored belt on aerated concrete with a wooden floor will redistribute the point load from the timber to the entire wall.

An illustrative example is a forum user with a nickname mad-max, which exhaustively answers the question when you need an armored belt in a house made of aerated concrete . He did not have time to fill the armopoyas under the Mauerlat, and the house went into "winter". Already during the cold weather, the arched openings under the windows in the house cracked exactly in the middle. At first, the cracks were small - about 1-2 mm, but gradually they began to increase and for the most part opened up to 4-5 mm. As a result, after the winter, the forum member poured a 40x25 cm belt into which, before pouring the concrete solution, he installed an anchor under the Mauerlat. This solved the problem of growing cracks.


mad-max FORUMHOUSE user
I would like to add to this that the foundation for my house is tape - monolithic, the soil is stony, there was no movement in the foundation before I started building the house. I believe that the reason for the appearance of the cracks was the lack of an armored belt under the Mauerlat.

An aerated concrete house, and even more so a house with two floors, needs an armored belt. When making it, you should remember the following rule:
The main condition for the correct "operation" of the armopoyas is its continuity, continuity and looping along the entire perimeter of the walls.


There are several options for arranging an armored belt in an aerated concrete house. The manufacture of an armored belt begins with the calculation of its cross-section and the choice of the type of formwork - removable or non-removable, as well as the "pie" of the entire structure.

Eyeonenow FORUMHOUSE user
I am building a house of aerated concrete with a thickness of 37.5 cm, with brick cladding and a ventilated gap of 3.5 cm. I do not want to use special factory-made U-blocks for pouring an armored belt. I saw on our forum the following scheme during the construction of a house, how to insulate an armopoyas - a partition block 10 cm thick is installed on the wall block, then insulation (EPS) takes place, and a removable formwork is mounted from the inside of the house. I also saw an option when the insulation is pressed close to the brickwork. With this scheme, a belt of greater width is obtained.

To understand which option to choose, let us turn to the experience of FORUMHOUSE experts.

44alex FORUMHOUSE user
I was building a house of aerated concrete 40 cm thick. In my opinion, a ventilated gap between the wall and the cladding of 3.5 cm is not enough, it is optimal to leave a gap of 5 cm. If you look at the "pie" of the armored belt from the inside out, it was as follows:
- removable formwork;
- concrete 20 cm;
- EPS 5 cm;
- partition block 15 cm.

- vertical, created by the weight of the roof, as well as external influences such as snow, wind and others;
- when the rafters are resting on the wall, a thrust force arises, as a result of which the walls of the building tend to move apart. In this case, the spacer load increases as the effort on the roof increases.
- Prevents wall deformation during soil movements or in case of uneven shrinkage, thereby maintaining the strict geometry of the structure.
- Allows you to align the structure of the walls along the horizontal plane, to correct errors during masonry.
- Provides additional rigidity.
- Distribute any load on the load-bearing walls evenly.
- Due to its mechanical strength, it allows reliable fastening of all important structures, including the Mauerlat.
- the height of the armopoyas under the Mauerlat, as a rule, is 20 cm (minimum 15), but in any case not more than the width of the wall;
- width - as close as possible to the width of the wall;
- length - to the corresponding walls;
- the minimum section is 250 by 250 mm.
- wooden boards (slabs): they are attached to the wall using bars, and are also fixed from above. When the formwork is disassembled, the upper ones are taken out. As for the lower bars, they remain in the monolithic fill.
- side stops;
- threaded rods. They are installed in holes pre-drilled in the formwork. Tubes of the following sizes are cut:
- the ratio of the diameters of the tube and the stud is as follows: the inner of the first is slightly larger than the outer of the second,
- the valley and width of the armopoyas should be equal.
- unscrew the nuts,
- disassemble the formwork,
- knock out the pins;
- method with U-shaped blocks. To ensure the solidity of the belt, they must be cut at the corners of the building;
- on the outside of the wall, lay a row of 10 cm blocks, and inside, several rows of bricks laid on the edge, or replace them with boards.
- working longitudinal rods Ø 10–12, at least four pieces;
- intermediate jumpers in the form of clamps made of reinforcement with a diameter of six to eight millimeters, placed with a step of 200-400 mm.
- knitting wire that holds them together. It should be noted that welding cannot be used for the connection, since, on the one hand, it weakens the reinforcement, and on the other hand, favorable conditions for corrosion are created in these places.
- cement M400 - 1 hour;
- washed sand - 3 hours;
- crushed stone - 3 tsp
- Firstly, on the voids, which, one way or another, are formed during the pouring process. They are removed either by piercing the concrete mix with reinforcement or by vibrating it in increments of about 1 m.
- Second, the importance of wetting the concrete. Not everyone knows that this procedure increases the strength of concrete. It is recommended to moisturize daily.
Mauerlat, a kind of "intermediary" between the building and the roof, plays an invaluable role in terms of reliability and strength of the structure. Therefore, the utmost attention is paid to its design and construction.
Professionals, as a rule, recommend the device of an armored belt under the Mauerlat, thanks to which the latter does not budge. Armopoyas under the maeurlat helps to increase the rigidity of the structure and allows it to be used as a reinforced support.
Purpose and functions
Such reinforcement is a rather important stage in the process of building a building. First, let's look at what the installation of a reinforced belt is for.
The structure is affected by various efforts:
For some modern building materials, point loading may well be destructive. Therefore, for them, in particular, expanded clay concrete walls, an armored belt under the Mauerlat is an extreme necessity. Thus, the question of whether an armored belt is needed for a Mauerlat on walls made of similar materials has an unambiguous answer.
On a note
In those rare cases, if it is impossible to perform reinforcement, the Mauerlat is attached to expanded clay blocks, a foam block without an armored belt is performed using chemical anchors.
Really,

As for the brick walls, they have excellent mechanical strength. For the device of the murlat, in this case, it is quite enough to use anchors or embedded elements. Nevertheless, in regions with seismic activity during the construction of houses, it is recommended to install an armored belt under a brick Mauerlat.
In practice, a reinforced belt performs the following functions:

Dimensions and characteristics
To ensure the strength and reliability of the structure, it is necessary to correctly select the dimensions of the armopoyas for the Mauerlat:
In this case, it is necessary to achieve the continuity of the structure. It should also be taken into account that it should have the same strength as possible. The concrete belt is made monolithic. Pouring the armopoyas under the Mauerlat is performed at a time, and a reinforcing layer is inserted inside. Metal fittings are selected with a diameter of at least 10 mm, firmly fastened and tied together.
The size of the armored belt for expanded clay concrete blocks under the Mauerlat depends on the thickness of the blocks used. Let's make a small calculation for such structures. According to SNiP, the reinforcing belt is already made of the load-bearing wall by about a third of its thickness. Therefore, if we assume that the wall is 40 cm thick (one third of it is 133 mm), then the arm belt cannot be narrower than 300 mm (rounded value 267). Thus, with a wall of 400 mm, 300 will fall on the inside of the U-shaped block, which serves as a formwork, and outside the blocks of 80 and 20 mm.
If the wall is brick, then the outer formwork is built in half a brick, while the inner one is made of planks.
Arm-belt construction technology

Formwork installation
Formwork can be done in various ways using:
Next, the pin is placed inside the tube so that its ends come out through the previously prepared holes. The entire structure is tightened with nuts, placing large washers. In the end, only pipes should remain in the cast-in-place concrete. To do this, after filling the armopoyas with concrete, they give it a preliminary hardening. Further, it is necessary
Attention!
It should be noted that the wall at the level of the armored belt requires insulation, especially in the case of formwork from boards, since concrete can freeze in winter.
The upper edge of the formwork is set strictly in a horizontal plane using a water level.

Reinforcement cage installation
Reinforcement mesh is:
Attention!
Using an excessively large step when placing clamps is fraught with displacement of the working rods during concreting, and this, in turn, will subsequently disrupt the correct operation of the armature belt.
At the junctions and at the corners of the walls, the mesh is additionally reinforced to add rigidity to these areas. For these purposes, bent reinforcement is used and inserted on each side by 300-400 mm.
How to fill the armopoyas under the Mauerlat

The maximum strength of the structure is achieved by a one-time continuous pouring of concrete of a grade not less than M200. The volume of such work is usually significant, therefore it is better to pour ready-made concrete using a concrete pump directly into the formwork.

However, if this is not possible, the concrete can be prepared by yourself. To ensure the appropriate fill characteristics, take:
The formwork is removed in about four to five days, but the concrete reaches full maturation within a few weeks.
What to look for when pouring concrete?

Options for attaching the Mauerlat to the armopoyas: anchors, pins and others
The support bar must be processed before fastening in order to protect it from decay and ignition. To make the Mauerlat monolithic, it is spliced in a special way - either with a straight lock or an oblique cut. As for how to attach the Mauerlat to the armored belt, the most common methods use the following scheme.