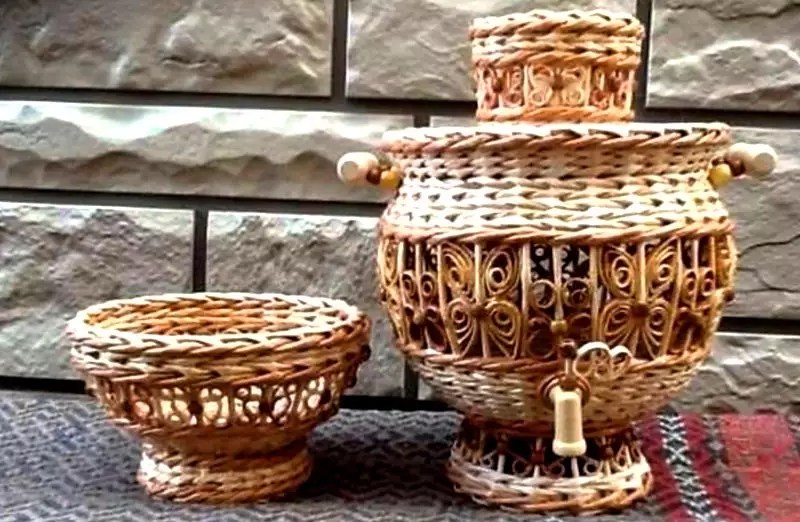
Some experts condescendingly claim that handicrafts are something bordering on art. Looking at the masterpieces of our craftswomen, we can say with confidence that such things have a place in an art gallery and this is precisely true creativity. Here there is a flight of fancy, exquisite taste and the most complex technique of execution. Today we will look at weaving from newspaper tubes step by step. New ideas for beginning needlewomen, basic techniques and useful tips are in this material.

In the finished work it will be difficult to paint all the weaves with high quality.
You should not use watercolors for painting. It gives a dull color. Gouache or acrylic paint is more suitable. It is worth considering that acrylic cracks after drying, so if you decide to paint with acrylic, treat the finished product. To add color to the work, some craftsmen use spray paint, water-based composition and food coloring.
For shine, finished works are coated with several layers of varnish. In addition to its decorative purpose, varnish also serves as a hardener.

Weaving methods
It is enough for a novice craftsman to master several basic weaving methods. All other options are based on them and will not be difficult to deal with.
- Spiral weaving. A simple option that even a child can master. The tubes are successively built up and threaded through the base in a continuous manner.
- Layer weaving. Two tubes sequentially go around the posts so that one passes in front of it, and the other behind it. This principle is used on cotton fabrics.
- Rope technique. The strips are intertwined with the posts on the product and with each other.
Mastering these basic techniques will lay the foundation for further experiments.
For more information about weaving techniques from newspaper tubes, see the video at the end of the article.
Related article:
In the article we will look in detail at the technology of making flowers from paper with a photograph of each step, as well as other original crafts that even a beginner can make.
Weaving from newspaper tubes for beginners step by step: different products
After mastering the basic techniques, you can begin your first job. It's better if it's a basket. This simple option will help you master the technology, and the finished product will certainly be useful in the household.
How to make a basket from newspaper tubes step by step
To make a basket you will need:
- newspaper tubes;
- base - pot or jar;
- for the bottom;
- acrylic paint;
Sequence of weaving a basket from newspaper tubes photo:


- Two circles are cut out of cardboard. Newspaper tubes for the stands are glued to one of them at equal distances. The structure is closed from above with a second circle. The tubes - racks are bent upward. A form is inserted inside the frame. The top of the posts can be secured with a wide elastic band. The frame is ready.
- We weave the walls. To do this, we take a tube, fix its edge at the base of one of the racks and begin to weave it around the racks. When the length of the tube does not allow you to continue weaving, you need to increase the newspaper vine. To do this, the ends need to be inserted into each other, after dropping glue at the junction.
Important! When you twist the tubes, one end is narrower than the other. Accordingly, when connecting, the narrow tip is inserted into a wide hole.
- To decorate the edges of the basket, the posts are sequentially intertwined with the main vine and secured on the inside with glue.
- The last stage of work is decorating the product. To do this, the basket is completely covered with acrylic paint and two layers of acrylic varnish. Then you can decorate the basket with ribbons, beads, braid and other accessories.
Advice! The base of the basket can be made not from cardboard, but from tubes. To do this, a flat base is woven, the axes of which become racks.
In the same sequence, you can make a vase from newspaper tubes:
Secrets of weaving a rooster from newspaper tubes
The rooster is not only a symbol of the year, but also a talisman for the home. In Russian culture, the symbol of the rooster signifies wealth and prosperity in the family.
To weave a talisman you will only need newspaper tubes painted in bright colors.
- It is necessary to create a basis. For strength, you can thread a wire inside the newspaper tube.
- The cockerel's body, head, beak and beard are successively entwined with colored tubes.
- The tail and paws are done last. If the weave is tight enough, the cockerel can be placed on its feet. For additional strength, it is better to coat the product with varnish.
Photo of a cockerel step by step (crafts from newspaper tubes for beginners).
Surely you have old newspapers in your arsenal that have already been read and are lying idle. They can be used to create an unusual and original souvenir in the form of a basket or vase.
If you are not yet familiar with the technique of weaving such a product from newspaper tubes, then you should familiarize yourself with the step-by-step instructions.
To make a vase or basket from newspapers, prepare:
Old newspapers;
jar or bottle;
brush with PVA glue;
knitting needle with scissors;
cardboard with a ruler;
white acrylic paint with a hot gun (you don't have to use it).
Let's start weaving from newspapers


Useful video: How to twist newspaper tubes
About 30 pieces of such blanks are needed.
When the tubes are formed, you should take a jar or bottle and place it on a sheet of cardboard, circle the base and cut out circles (2 pieces).
Watch the video tutorial for a detailed weaving process.
Related video: A simple newspaper basket for beginners
Let's start preparing the frame tubes. We flatten one edge of the tube (by 3 cm).
Apply glue to one circle and glue the blank tubes onto it with flattened ends. The result is a vine made of newspapers, located at an equal distance from each other. Initially, before gluing, measure the pieces on the cardboard. Apply glue to the cardboard with a hot gun or use a press.

We lift the tubes up and fasten them with an elastic band. The frame for weaving is ready.
We take one tube with a flattened edge, glue it to the base and wrap it behind the nearest tube on the right so that it wraps around the frame from the outside.

We alternate the blanks until the bottom row is completed.

We weave the vase to the required level.
We cut off the end of the last tube and place it in the middle of the vase, fixing it with glue.
The first frame tube on the right should be cut, but bring its end inward and glue it.
We also cut off the second frame tube, coat it with glue and place it inside.
Now we are decorating the basket. We paint the craft inside and out with one layer of acrylic paint, let the paint dry, then apply a second layer.

We taught you how to weave a basket from newspapers, now you can safely move on to more complex weaving techniques that decorate the interior.
A handmade basket is a very useful thing in everyday life. You can put accessories in it, place indoor flowers, and carry not very heavy things.
A homemade basket will also decorate your home if you make it bright and positive.
And in order for your interior to be replenished with such a useful thing, you will need a material that can be found in any home, namely newspapers: they will be rolled into tubes that are not inferior in strength to natural materials.
Are you interested in how to make a basket from newspaper tubes step by step for beginners? Then see our tips.
Features of weaving from newspapers
Weaving flower baskets from newspaper tubes is a budget-friendly and quick way to decorate your home.
In addition to unnecessary newspapers or old magazines, the work will require a cardboard box that will serve as the base of the basket, a knitting needle or a wooden skewer, as well as paint and glue.

Advice: if there is no newspaper or there is not enough newspaper, you can weave paper baskets.
Before you start creating a basket, figure out how to make a tube for weaving from newspaper.
The denser the material, the more reliable the basket will be, although much will depend on the technique of weaving the constituent elements itself.
Having gained a little experience in weaving, you will be able to make spectacular openwork, polygonal and other varieties of such baskets. It is worth deciding in advance not only on the material, but also on the shape and size of the product: will your basket be square, round or oval.

The master class on a basket made from newspaper tubes, presented in this article, will help you create not only a base for flowers or a storage accessory, but also large laundry baskets, boxes for sewing equipment and much more.
You can also make an Easter basket from newspaper tubes for the holiday. Such products will look harmonious in any interior style.
Let's find out how to make baskets from newspapers - and get down to needlework.
Basket weaving workshop
To weave a basket from newspaper tubes, you need to make the initial elements. How to make newspaper tubes for weaving? Take a newspaper and draw horizontal lines to divide the material into strips up to 10 cm wide. Cut the strips along the borders and attach a skewer or knitting needle to the edge.
Attention! For better twisting, the knitting needle must be positioned at an angle of 45-60 degrees. Then the elements of the basket will be strong enough.
The next stage of the master class on weaving a basket from newspaper tubes is winding the strip on a knitting needle. After twisting the paper element, seal its edge so that you get a tube.
Press the side on which the glue was applied with your finger and do not let go for a while so that the glue adheres well.

When the shape of the tube is fixed, you can carefully pull out the knitting needle and proceed to the next element.
After such manipulations, the thickness of the tube may differ on both sides. This is convenient if you have to lengthen them to create a basket: then you can easily insert the tubes into each other.
We told you how to make newspaper tubes for weaving step by step. Having prepared a sufficient number of newspaper tubes (the more, the denser the basket will be), you can begin the main work.
How to weave baskets from newspaper tubes:

By the way, tweezers will also come in handy if you decide to process the upper border of the basket with stand tubes. The stand is threaded under the transverse weave, passing the other two.
It is not at all necessary to make a basket according to this principle: you can choose other weaving patterns from newspaper tubes for your craft.

The bottom of the basket does not have to be designed in the same way if you still have little experience. You can choose fabric for the interior decoration, and also use colored cardboard for the outside of the bottom.
How to make a handle for a basket
Let's talk about weaving a basket with a handle from newspaper tubes. As with the basket itself, there are many interesting schemes for this part, but we will focus on the simplest option.To quickly make a handle, you will need four long tubes (they should be more flexible than the rest, so a little moistening of the material with a spray bottle will not hurt), as well as clothespins.
Master class on weaving handles from newspaper tubes:

Check out MK to see how you can weave a handle for your basket:
To create a handle, you can use tubes of different colors. Then the basket will turn out brighter and more positive.
Basket design ideas
Not everyone will like the design of a homemade basket in the form of many printed letters. And the standard forms of such crafts will not always look bright and presentable enough.
Therefore, if you have already mastered the weaving technique earlier, you can try something more unusual. This could be weaving an Easter chicken basket from newspaper tubes or other original shapes, not just the classic rectangular or round ones.

If you plan to make the basket more noticeable through additional decor, start by repainting it. It is better to take acrylic type paint: it is resistant to moisture, so as the dust settles, you can easily clean the basket with a damp cloth.
Instead of acrylic paint, you can use gouache, but then the surface of the basket should be treated with a protective varnish.
Adjust the saturation of the shade by applying additional layers of paint to your craft. The best option is two layers.
Multi-colored baskets are very popular. You can use paint of several colors or implement an even more interesting idea: create some kind of thematic design on the surface of the basket.
It is enough to take a napkin or rice paper with a patterned print, cut out an element that will decorate the basket, apply it to the surface and cover it with office glue diluted with water. This work should be done carefully, since the thin layer of the napkin may tear, which will distort the design.
After drying, brush the surface with varnish.

Another decorative idea is to use bright satin ribbons. If you decide to diversify the decor of a small basket in this way, leave room for ribbons even at the weaving stage. Do not braid the basket at a level that matches the width of the satin decorative elements.
After completing the creation of the basket, all you have to do is pass the ribbon between the newspaper tubes. This element is secured with threads or glue.

Attention! Beads, coins, rhinestones and stones along the edges of a homemade basket will look original. They stick to a paper or fabric surface.
To decorate a basket made of paper tubes, you can use pasta made in the form of unusual figures. They are treated with metallic or golden spray paint and are also glued to the surface.
Faux leather flowers will look very stylish on a wicker basket. To make them, cut out teardrop-shaped pieces for the petals and sharp-angled ovals for the leaves.
To bend the component elements of the flower, take the blanks with tweezers and hold them a little over the fire. After this, you can begin gluing the elements together and securing the flower to the surface of the basket.
The photo below shows examples of round baskets made from newspapers:

Now you know how to weave a basket from newspaper, and you can diversify your home interior with new bright crafts. By the way, such an accessory can not only serve as a container for fruits, spices, balls and other things, but also become a wonderful gift: you just need to think about how to use it.
Video
A video on how to weave a basket from newspaper tubes will help you with basic work.
The article will tell you how to weave beautiful baskets from simple newspaper tubes and present you with detailed master classes.
Weaving from newspaper tubes is a very unusual, but very popular handicraft that almost anyone can do. In addition, this handicraft is not expensive, because it does not require purchasing materials. Any product woven in this way is made from the most ordinary newspapers, rolled into a thin tube and fixed with varnish.
What is required for this job:
- Form - any square-shaped object that allows the product to have a given silhouette: vase, box, jar, drawer, toy, and so on. Choose an item that suits you in size.
- Newspapers – any newspaper sheets, double sheets preferably.
- Clothespins – ordinary or stationery, needed for fixation while weaving a basket.
- Scissors - for work
- Glue - dry or PVA for fixing and twisting tubes.
- Decorative materials – to add design to the finished product.
- Long wooden skewer - necessary for curling a sheet of newspaper.
- Cardboard – necessary to create the bottom of the product
How to weave a basket:
- Flatten the newspaper sheet
- Take a skewer and place it towards the edge of the newspaper sheet.
- Roll up the newspaper sheet and begin rolling, rolling the sheet tightly.
- Newsprint should be coated with glue so that it curls and sticks in place.
- If you used PVA, let the twisted tubes dry a little.
- Cut out the base for the basket, a square: large or small.
- Glue the tubes to the base and secure with clothespins, let dry completely.
- Remove the clothespins and glue a second square (exactly the same), press and secure. Let dry.
- Place the form on top of the bottom and begin weaving, tying each vertical tube with a horizontal one.
- The weaving looks very solid, because you shouldn’t weave several tubes. Each time you glue several tubes into one long strip, which you work with.
- Press the ends of the protruding tubes onto the mold with clothespins
- When weaving, you need to use patterns to create a pattern and carefully weave the edges of the tubes inside.
Detailed master class in photos:
Square basket
Video: “Weaving a square basket from newspaper tubes”
Weaving a rectangular basket from newspaper tubes: patterns, diagrams, description
You need to weave a rectangular basket from newspaper tubes according to the same principle as a square one. If you wish, you can also weave a lid, which should be only 1 cm in diameter larger than the product itself.
Step-by-step weaving in photos:
 Materials for work
 Twisting tubes with a skewer
 Gluing tubes
 Thick tubes are vertical, thin tubes are horizontal
  Gluing the cardboard base, fixing with clothespins
 Gluing the second cardboard, inner bottom
 Fix with clothespins until dry
 Establishing the shape and braiding it
 You can weave using only vertical tubes or weave horizontal ones
 You can adjust the height of the product yourself
 Secure the product with clothespins at the top for easy operation
 Completing the weaving
  Wrapping the tubes
 The final stage of work
 Rolling the tubes inward
  Cutting tubes that are too long: the ends can be left or glued
 Video: “How to weave a rectangular basket from newspaper tubes?”
Weaving an Easter basket from newspaper tubes: patterns, diagrams, description
You don’t have to buy a beautiful Easter basket; you can weave it yourself from scrap material – newspaper tubes. These baskets can be filled with Easter treats and given to your loved ones. Depending on how many treats you want to put inside or how much skill you have, there are several designs and ways to make such a product.
IMPORTANT: Weaving is similar to the previous lessons, however, to create such a basket you should not use cardboard for the bottom, but a round shape (a dish or a deep plate), which you will tie.
In order to create a small basket with a handle, you will need about 90-100 tubes, which should be twisted in advance. Let the tubes dry and only then get to work:
- Weave together 8 tubes with a double cross
- Start tying in a circle to make the base.
- Place the base form on top of the knitted small round bottom.
- Tie it, lengthening the tubes and creating patterns (for this you should use weaving patterns).
- To ensure that the product is neat and even, the tubes should be secured vertically, pinching them to the edge of the mold.
- The handle for the basket is knitted separately in the same way as weaving a braid from several tubes at once (see photo).
Step-by-step weaving with photos:

 Creating the bottom
  Tying the base: deep dish
 Fixing with clothespins
  After tying, remove the form
  Tying the edges, rolling the tubes
 Handle weaving: preparation
  Weaving into the edges of the warp
 Fixing handles with clothespins
  The handle weaves at both ends
  Tying the ends and tying them with tubes for a neat look
 Video: “Easter basket made from newspaper tubes”
Weaving an oval basket from newspaper tubes: photo, description
An oval basket woven from ordinary newspaper tubes can serve as an excellent piece of furniture and a dish for some food products, for example, sweets, fruit or bread. Making such a product is not difficult, and upon completion of the work you can paint it with any color and even varnish it. This coating will give the basket strength and moisture resistance.
In its principle, weaving an oval basket is similar to other products (square and rectangular, ordinary baskets), however, in this case, special attention should be paid to creating the bottom. You, of course, can use a cardboard base, or you can weave it by hand, which is much more beautiful.
How to weave an oval basket:
 In order to make the base, you need to intertwine several tubes together
 You can fasten the tubes together by tying them together
 After the base is made, start weaving in the usual way.
  When you have tied the required diameter of the bottom, wrap and lift the tubes up
 Secure the tubes with clothespins and continue weaving
 Video: “How to calculate the diameter of the bottom and weave an oval basket from newspaper?”
Weaving a “chicken” basket from newspaper tubes: photo, description
The “chicken” basket is very impressive and is perfect for making surprises for loved ones during the Easter holidays. It can be filled with dyes and Easter cakes and given as a gift to family and friends. Of course, such a product is much more difficult to weave than a regular basket, however, using video lessons and master classes, you can create a basket of incredible beauty.
Prepare a sufficient number of tubes in advance. Do the weaving according to the usual method: first create the bottom, and then put the form down and tie it. Choose a shape that is not very large, since the chicken should not be huge - this product is miniature and decorative.

 Beginning of work
 Ready product:

 Chicken baskets
 Video: “Detailed master class on weaving a basket in the shape of a chicken”
Weaving a round basket from newspaper tubes: photo, description
A round basket made of newspaper tubes is a beautiful and practical product that can be used as a box to store personal items: jewelry, money, cosmetics, threads and much more. Depending on your preferences, you can make a basket of any diameter, with a lid or handle, and decorate it with different accessories.
Square baskets
 Marine style baskets
 Video: “Unusual basket made of newspaper tubes”
Surely the housewife has a stack of unnecessary newspapers at home that it would be a pity to throw away. A DIY newspaper basket will give them a second life. The product, depending on its size, can be multifunctional: it is a box for small items, a box for papers, and a basket for things. With the help of such a unique detail you can decorate your interior. Also, a homemade basket will appeal to needlewomen, as they can experiment with its design, relying on their limitless imagination.
Flower basket
A bouquet in a basket made from newspaper tubes will look great. Of course, you can store not only flowers in it, but also other things. Making this basket is not difficult even for beginners.

This master class will help you easily create a beautiful thing that will become a decoration in any interior. So, you will need:
- a stack of newspapers;
- an object that will be braided;
- ruler;
- scissors;
- pencil;
- thin knitting needle;
- PVA glue.
Preparing the “vine”
First, let's prepare the parts for the future product - newspaper tubes.

To make them, you will need to divide the newspapers into double sheets and line them into strips, and then line them into strips about 10 cm wide.


When the strips are cut, you should wind them one by one onto the knitting needle, starting from the corner.


When winding the strip, you need to make sure that the newspaper is pressed tightly to the knitting needle and glue the joints from time to time.

When the strip is wound, glue the edges and remove the knitting needle. The process is shown in more detail in the photo.

Creating an organizer
When the newspaper tubes are ready, it’s time for the main process - weaving the basket. The master class will help you understand this difficult matter. There are two ways to make braid.
Having decided on the size of the finished product, you need to cut out the bottom from cardboard and glue the ends of the tubes to it so that there is approximately the same amount on each side. Then, when the glue dries, cut out the second bottom using the same measurements and glue it to the base, thus covering the junction of the tubes. When the bottom of the basket dries, you need to bend the tubes up and place an object inside the future basket, the shape of which the product will take. Next, take the tubes and intertwine them perpendicular to the existing ones in a checkerboard pattern. Glue the places where the tubes connect to each other. When the product reaches the desired height, carefully tuck in the vertical parts and coat the top row with glue. After the glue has dried, cover the basket with paint and varnish. The photo shows the manufacturing process.

The second method is more labor-intensive; it involves weaving the bottom of the basket. In order to weave the base of 4 tubes, place two at a distance of 1-2 cm. This is the first row.
Second row: place 6 tubes in pairs and perpendicular to the first row in the following order: the first 2 tubes are under the first pair and above the second pair of the first row. The other 2 tubes are nearby, but mirrored (above the first pair and under the second pair of the first row). Place the remaining 2 tubes in the same way as the first two.

Next you need to take a new tube, fold it in the middle and put a braid on some pair of rays. Cross the working tube once and continue braiding other pairs of tubes. After each pair, cross the working parts of the tube.


The third and fourth rows are made with a single working tube. To make an edging at the bottom of the basket, the ray where the row ended should be folded over the next one, and repeat the same with the remaining rays to the end. Insert the last tube into the loop formed from the first ray.
The next rows are woven according to the pattern of the third row of the bottom. You can decorate the basket with beads; to do this, when weaving some rows, you need to put beads on the working tube.
When the basket reaches the desired height, cut off the remaining tubes and secure them between the rows.
Weaving a basket handle
The handle should be strong enough, so after the basket has reached the required size, you should leave 3 tubes on each side and fasten them with clothespins. When the edge of the basket is glued, you can start weaving the handle.
The three tubes that remain on the sides need to be connected. Then glue a working tube to their base and braid the remaining three with it. Glue the end of the working tube to the opposite side of the basket at the base of the handle. The weaving of the handles is shown in more detail in the video.
Glue the finished product with glue, cover it with paint and varnish.

Video on the topic of the article
Even more ideas can be found in the video.