It will be useful for every owner to know how to disassemble the doorknob on the interior door. This element is daily exposed to the influence of the residents of the house, and the handle is not always handled with care, and therefore sooner or later it may break or you just want to change it to a new model. In this case, in order not to call the master, you can do everything yourself. In addition, it is not so difficult to disassemble and assemble the door handle on your own.
Different types of door handles are disassembled in different ways
Types of pens
Before starting work, you need to decide on the type of fittings. All door handles can be divided into several groups. This classification is perhaps the determining factor when disassembling a structure. So let's take a look:
- Stationary. It is not connected in any way with the lock and latch. Serves exclusively to move the door leaf. Fastened with simple screws or self-tapping screws. It can be one-sided and two-sided, connected by an axial element.
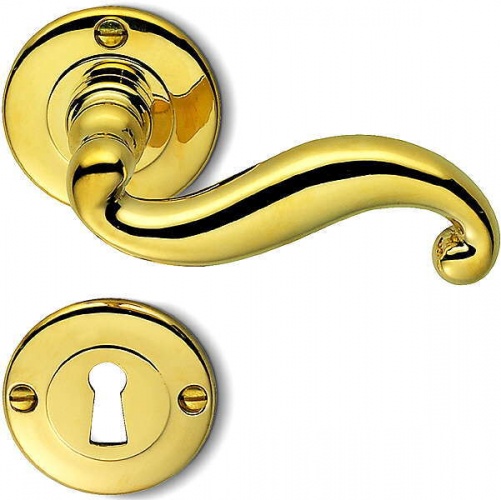
- Push. Usually it looks like an L-shaped structure with fastening on both sides of the canvas. When a load is applied to the handle, it sets the latching tongue in motion and allows the door to be opened by pressing.
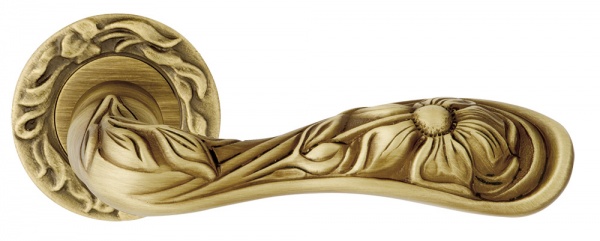
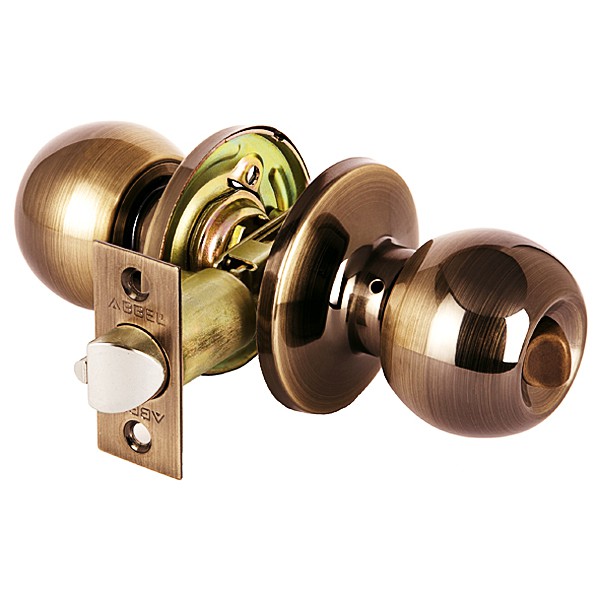
- Swivel. The principle of operation is the same as that of the pressure model, but at the same time you need to turn the handle, most often such models look like a ball or a button.

The main types of handles for interior doors
Due to its shape, the push model has a certain disadvantage: it can be easily hit against it. The disadvantage of rotary samples is that a person's hand can slip along its surface, which makes it difficult to open the door.
A distinction is also made between models with a decorative flange and with a socket. What are their main differences? Using the socket does not require drilling a huge hole in the door. In addition, such a pen is full-bodied and heavy. But decorative overlays are usually large in diameter and are installed on light hollow nobs with a lock or latch. Both options are noteworthy.
Why disassemble the handle
Since the indicated models of door handles are disassembled quite simply and according to a similar principle, each person can learn how to do this without any problems. But disassembling and assembling the handles is not a routine process, the need for this does not always arise. What can lead to such a need?
- Breaking. This is one of the most common reasons, especially for cheap Chinese products. Over time, or as a result of rough handling and neglect of preventive measures, the mechanism wears out and some of its parts fail, therefore, it is necessary to carry out timely repair of the fittings.
- Replacement of an outdated model. Every year, new models of products enter the market and it makes sense to replace old samples with more advanced ones in technical and aesthetic terms.
- Repair. When carrying out repairs in a house, most often the interior changes dramatically in terms of style, so the old handle for the door may turn out to be unsuitable and then it must be disassembled and replaced.
- Scuffs. The lower the quality of the decorative coating, the sooner such a handle will become unusable due to the appearance of scuffs, peeling paint or chips on its surface. It is better to replace such fittings if you do not want to spoil the overall impression of the room.

During long-term use, the handle mechanism often breaks down
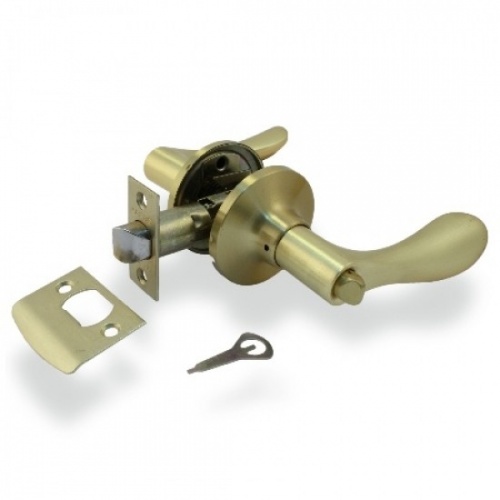
Push
The most popular model of interior door handles is push. In order to disassemble this type of product, you need to take only one screwdriver. First, unscrew the handle itself, that is, the pressure element. On the side or bottom of such models there is a small recess with a hidden screw, you need to unscrew it with a screwdriver and then remove the element from the axis. In some cases, you may need a hex wrench instead of a screwdriver.
After that, remove the decorative strip that masks the main mount, in most models it has a thread, so you just need to turn it several times. The screws will open in front of you. Gently unscrew them and pull the structure towards you, holding the handle on the other side, now you can remove it together with the rotary axial element.
If you need to disassemble a latch or lock, the actions are carried out in the same order, but in addition you need to unscrew the plate from the end of the web and remove the mechanism installed in it.

Push door handle
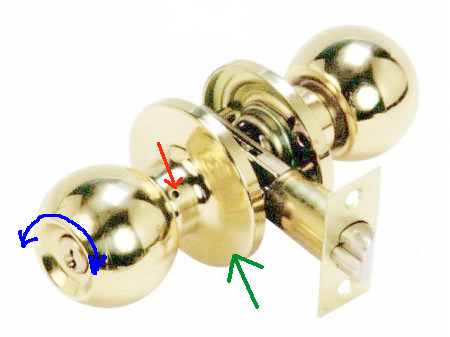
Round with rosette
Now let's take a look at how to disassemble the round doorknob. The principle of work is very similar, but the main difference lies in the way of removing the decorative turning part. If there is no hole for a key or a screwdriver on the side of the handle, then you need to manually separate the elements. To do this, hold the handle on one side of the door motionless, and turn the other part of it and remove it from the thread, you may just need to pull it towards you.
After that, remove the socket in the same way and unscrew the screws. Remove the axle and proceed with other elements: a lock or latch, if necessary. When removing decorative parts, it is important not to overdo it, so that some elements of the mechanism do not burst.

Round door handle with rosette
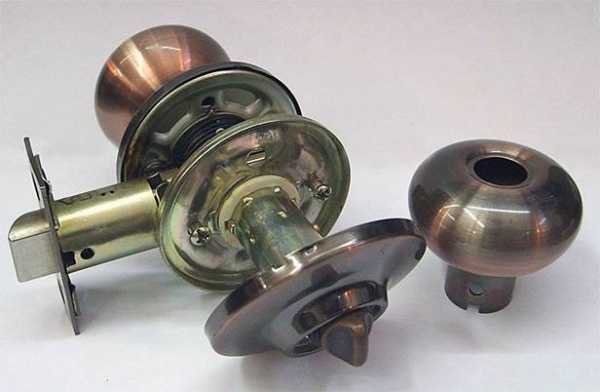
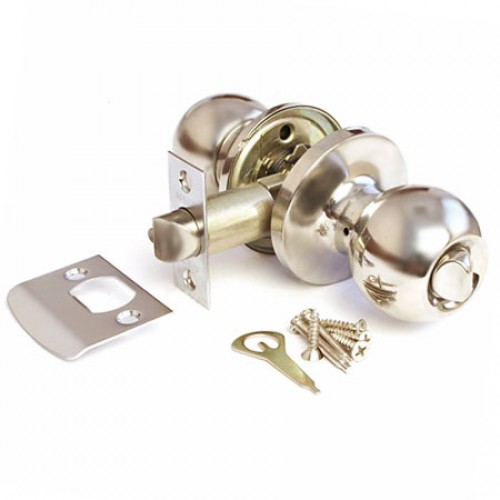
Nobs
In order to disassemble the round knob of the nob, you will need an additional special key for clamping the spring mechanism.
The key included in the kit may not fit in length, in which case it can be replaced with a nail or other thin object.
First, remove the decorative trim on the top. Using a wrench or a nail, slide the spring-loaded pin, pushing the tool into the technological hole from the side, at the same time pull the handle and remove it together with the cap. After that, you need to pry on the latch of the decorative flange and also remove it. Then unscrew the fixing screws on the plate. Now you can completely disassemble the handle and remove both of its parts together with the axis.
As you can see, there is nothing complicated. In order to assemble the handle, you need to perform all the manipulations in the reverse order: first, the lock is installed and fixed with a plate, after that the axis is inserted and fasteners are put on, and only then the decorative parts are assembled. Do not forget that first you need to thread the decorative flange, and after that, put on the push or rotary part itself.
The most popular are oak, alder, pine and spruce doors. In our catalog you can choose and buy veneered, laminated, metal, painted, eco-veneer and PVC. Construction doors stand out separately - they are the cheapest to buy, they are installed temporarily while repairs are underway and you do not feel sorry for them.
Our entrance doors are reliable and aesthetic models from the factories "Stardis", "Argus", "Condor" and "Logika". They are made in accordance with OS security standards, have a pleasant look and are equipped with reliable locks. We sell only original products from the manufacturer, so you are guaranteed to receive reliable protection against burglary and other types of penetration.
How to order
- Make a purchase on the site, indicating all the necessary characteristics of the product (color, size, accessories). You can also call us to clarify all the details.
- After agreeing on the application, our measurer leaves for you and makes all measurements free of charge, conducts a consultation. Without measuring, we cannot guarantee the correctness and speed of installation.
- A contract is concluded, payment is made and the door is made according to your size.
- Our experts will install the selected model. For installation prices, see the website or check with the measurer. They depend on the number of doors and the complexity of the work, as well as the characteristics of the opening and walls.
If you have any questions regarding the choice, payment and warranty service, please contact our managers by phone and through the website for advice!
It is difficult to imagine a comfortable and high-quality door without a handle. This element allows you to use the door leaf with maximum convenience. You can install a new or dismantle an old handle with your own hands. This process does not take up a lot of effort and free time. Today we will consider in detail how to change the door handle correctly, and also find out what types of such fittings exist.


Varieties of door handles
Do not think that absolutely all doorknobs are the same. In fact, these elements differ in design and installation method. Let's consider in detail what types of pens exist on the modern market.
- Overhead (incised). These handle options are very common. They are considered simple and straightforward. Overhead handles are installed as simply and quickly as possible - even a beginner who has never been involved in similar work can cope with such a task. These handles just need to be fixed on the door leaf itself.


- Mortise. These doorknob varieties are more complex and install trickier. To fix such elements, it is required to pre-drill a hole of suitable dimensions in the door leaf.


Mortise subtypes of door handles are divided into the following types.
- Swivel and knob models. These options unlock the door leaf. All operations are performed thanks to the rotation of the holder itself. At the same time, no pressure is made on the handle itself, as many users think. In many cases, these devices are equipped with special locking mechanisms (latch) that block the locking tongue. Thanks to the presence of such details, the door can be closed from the inside. It should be noted that these pens can be safely called very convenient to use, since they have a round shape.


- Push-on or with a latch. The second most popular are these types of door handles. Their names speak for themselves - the mechanism in such elements is activated by light pressure on a special lever.


- Hidden type. We should also highlight interesting hidden door handles. These devices are most often purchased specifically for various kinds of sliding systems. For example, these can be compartment doors that are relevant in our time. In the process of moving the shutters, these products do not interfere in any way, do not harm either the walls or wallpaper in the room.


At what height to install?
Many users wonder at what height it is customary to install door handles. There is no specific regulation here. There are simply no norms for the height of the handles. Usually, in canvases made of MDF or timber, they are mounted at a distance of 1 m from the floor. Of course, the handle can be lowered or raised at will - it all depends on the preferences of the owners.

It is important to consider that the choice of a certain distance of the handle from the floor is influenced by the growth of household members. In practice, a handle 1 m above the floor is optimal for both adults and children. When installing the door handle, one must also bear in mind the level of the handles on the rest of the door leaves in the dwelling. Remember - all fittings must be located at the same height, otherwise it will look ridiculous and attract unnecessary attention.
Required tools
If you have decided to install the door handle yourself, then you will need to stock up on all the necessary tools. These include:
- pencil;
- injection;
- roulette;
- chisel;
- screwdriver;
- drill;
- drill;
- crown.


Instead of a screwdriver and a crown, it is permissible to use other improvised devices, however, it must be borne in mind that the quality of all work can be significantly affected by this, and it will take more time. For this reason, experts recommend using only high-quality tools and not replacing them with analogues.
Replacing the door handle step by step
If you have stocked up with all the required tools, then you can start replacing the door handle yourself. Do not be afraid to carry out such work with your own hands - they are very simple, even beginners who have never encountered such things before can easily cope with them. All that is required of you is to strictly follow the simple step-by-step instructions.

Door markings
It is necessary to start such work with the marking of the existing interior linen. Having calculated at what height the handle will be located, it will be necessary to place marks in those places where the necessary holes will subsequently be made. In this case, it is advisable to use a simple pencil, tape measure and a corner. With the help of these devices, you will need to draw a horizontal line on a flat plane. Then transfer it to the end and opposite half of the sash.

On the front half of the door in the middle of the transverse strip, one more mark must be set. It represents the space reserved for the tongue recess. From the extreme line of the sash, keeping a step of 0.6 cm, you need to draw a point (on both sides of the canvas). It is this place that will be allocated for the installation of the handle.
Drilling holes
The next step is to drill the necessary holes for fixing the handle and lock. It does not matter in what sequence you punch the holes. The main thing is to remember that there is no need to rush in such matters. Be careful, take your time. Otherwise, you can seriously complicate the work. In order to cut the handle itself into the interior doors, you need to drill a hole with a drill and a special crown. To make the hole even and aesthetically pleasing, it is required to make it inside and outside the sash, maintaining a depth of ½ the thickness of the door itself.


Professionals recommend making marks of this depth with a felt-tip pen on the crown for greater strength and reliability. If everything is done correctly, then you probably will not cause any damage to the product. To keep the hole straight, the drill will need to be held straight - the tool should not deflect to either side, so you need to be careful. To correctly insert the latch, you will need to arm yourself with tools such as a pen and a drill. In the course of such work, you will need to be as careful and accurate as possible, because the distance between the chisel drill and the angle of the end is usually insignificant.
Installation of the lock
Next, you will need to install a locking mechanism in the door. It should be inserted into a specially drilled opening. Press the trim into the end frame of the door leaf. Circle it with a simple pencil (always on all sides). Then you need to clean the base from the top layer using a chisel and make a notch for the thickness of the overlay. This stage is required in order to press the lining into the door base. Further, the cover will definitely need to be fixed with screws. The notches are made especially for them, of course, even before the installation of the fasteners.


Handle insert
Models with screws on the outside do not need to be disassembled. When mounting one of the parts of the structure in its place, it is very important to try to get into the holes of the latch with two guide parts that have a thread specifically for the bolts. After inserting the second guide piece, the device will need to be tightened with the bolts. It is required to tighten the fasteners with uniform movements in order for the handle to work correctly.

As for products with hidden screws, they must be disassembled. Here, a detailed instruction, as well as a specialized key, will come in handy. The handle can be removed without any problems by pressing the stopper with a key. The fittings must be installed in place only after the collapsible component is attached to the bolts.
Loot markup
Having correctly installed the door handle, you will need to make a special recess for the tongue in the loot. For this purpose, it will be necessary to transfer the dimensions correctly. Meticulously and accurately executed markings in this case will guarantee the correct functioning of the lock and door structure. To set the marks, you need to close the door, and then mark the gap from the top to the bottom of the tongue on the strip. Find the center of the lock using the square. Place a mark on the tray there. A recess should be made in the place of the marked mark, and the excess material should be removed with a chisel.

Cutting a groove in a slot
Even before you screwed on the invoice component, you need to look again at how the interior door in the apartment closes. If there is no friction and other similar defects, then this will mean that the groove for the tongue was made according to the standard and is correct. Then try to close the door structure and not jerk it too much. If the sash begins to swing, then this should indicate that there is a backlash in the structure. Do not be afraid of this - there is nothing to worry about. When the groove is completed with a striker, everything will be in order.
The otvet will need to be fixed in one level with the loot. As during the fixation of the locking mechanism, it will need to be "drowned" in the loot. There are times when, after fixing the overhead part, the backlash does not disappear, and the door structures continue to stagger further. This defect can be eliminated by bending the tongue with a hole with a screwdriver.

Care of fittings
It is not difficult to change the handle with your own hands, but the procedures with this part will not end there. These fittings will need to be properly looked after so that they serve as long as possible and do not cause problems during operation. It should be borne in mind that over time, door handles begin to wear out and age, which, of course, affects their quality and performance. In order to care for the door handles, you will need to do the following.
- Wipe them from dust deposits using specialized cleaning agents. Try to avoid formulations containing corrosive acids, alkalis and abrasive components. These substances can seriously damage door hardware. Moreover, under the influence of such means, the handles can rust. After completing the wash, the products will need to be wiped with a dry cloth.
- It will be necessary to tighten the handles if they become loose. If you neglect these simple procedures, the mechanism will simply fail.
- Try to handle the door handles as carefully and carefully as possible, so as not to cause mechanical damage to them. These can negatively affect not only the design of products, but also their functionality.

Do not forget that you will need to competently take care not only of the handle itself, but also of the locking mechanism. In this case, you will need to regularly lubricate the existing mechanism using specialized tools. In certain cases, compositions such as sunflower or vegetable oil are used to replace them. We must not forget that it will not be so easy to get to most of the details of the existing structure, therefore, when lubricating, a convenient nozzle is often used, made in the form of a long and thin tube. For this purpose, some users completely remove the overhead elements or dismantle the handles.
Take advantage of the advice of professionals, to choose the right door hardware.
- Before going to the store to buy a new doorknob, it is advised to unscrew the old cover in order to take it with you.
- Experts recommend buying grips with an internal armor plate. Such models are more expensive, but they are more reliable and better protect against burglary.
- If you are looking for the simplest grips, you can go for anything from plastic to metal. The scheme of their installation will not change from this and will be the same.
- If you are choosing handles for double doors, then it is better to give preference to models designed for swing doors. If you buy simple options on an outlet, then their installation may not be the quickest and easiest.

The Chinese iron door is an economical and even quite nice solution. But there are many questions to its quality. Starting from the main material (metal sheet), which is easy to cut with an ordinary can opener, and ending with the supplied accessories. And one of the typical problems faced by owners of Chinese doors is that the handle of a Chinese iron door is broken. This will be the subject of further discussion.
So what can you do in this case!
The first is to completely replace the lock along with all the accessories. The most expensive and not the easiest way, but reliable.
The second is to find exactly the same set of handles with decorative frames together. It is difficult to find them, but it is possible. At the same time, the price of the issue is about 600 rubles.
The third is the replacement of the Chinese door handle. This is the cheapest option, since a suitable set of pens can be found for 200 rubles. But you have to tinker. It is this option that we will consider.
Chinese Iron Door Handle Replacement
If the handle of the Chinese door is broken, then we start by unscrewing the screws that secure the decorative frame of the lock.
 Next, just remove the frame with all the content, including the broken handle.

 Next, we disassemble the spring mechanism of the handle. The main problem can arise with the clamping washer. Without fear that it will break or burst, bend it back with a small flat screwdriver.
 Everything! The frame was disassembled, the broken handle was taken out.
 The frame can be put in place, but you will need a piece of the handle to go to the store. We will choose a new one according to it, more precisely, according to its fastening. And the frame is put in place so that the door can be closed.
 After the set of pens is purchased (sold only in sets) - install one handle instead of the damaged one, or both at once. We act in the reverse order.


 And at the end, we install the decorative frame of the lock along with a new handle on the door.
Interior doors are sold without fittings, the delivery set includes only the door leaf and posts, from which the door frame will be assembled. There are no factory-made holes in the canvas for the installation of locks and handles. This is because the handles, being standardized, come in a variety of designs and sizes. In addition, the choice of fittings depends entirely on the preferences of the buyer. Therefore, a person who has started a renovation with the replacement of interior doors is faced with the problem of choosing - to invite a master or install the handles on his own. It should be noted that, having decided to install doors with your own hands, you will definitely cope with the installation of door handles.
Types of handles for interior doors
Door handles for interior doors can be classified according to installation method, method of operation, shape, material, and the presence of a lock.
According to the installation method, stationary (overhead) and mortise models are distinguished. Overheads are attached to the door leaf, and for mortise it is required to drill holes in it.
By the way of work there are:
One of the most popular materials for the manufacture of doorknobs is brass. In addition to its excellent aesthetic properties, brass is practical and durable.

As a rule, complex locking systems are not installed on interior doors. The exception is the plumbing lock installed in bathrooms and toilets.

Installing a handle on an interior door
Consider the installation features of the most popular model for interior doors - knob handles. Handles are usually installed on a hinged door, but many experts recommend removing the canvas for installation. True, this can not always be done easily.
Advice. If the curtain cannot be removed from the hinges and the installation is carried out in the hinged position of the door, move a chair or some object to it so that the door is motionless during your work.
Installation tool
The tool will need the most common one, which is in every home:

A marking scheme is attached to the door latch, but it is easy to mark the holes without it. From the bottom edge of the canvas, 1.0 meter is measured on both sides. Measure 6 cm from each edge of the door and make a mark. With the help of a square, a strictly horizontal line is drawn that will connect these two points. At the end of the canvas, a mark with a pencil and an awl is placed on this line in the center. A latch strip is applied and the veneer is cut with a sharp knife. Remember that the strip must be recessed into the door leaf so that it forms a single surface with the door leaf.
Some experts advise starting drilling from the end of the blade with a pen drill. With this order of work, when drilling with a crown, the chips will fly out into the already made hole, and not clog the teeth of the crown.

The drill bit should go to the depth of the blade, no more. The drill is pressed against a point on the end of the blade and a hole is drilled. Then, with the help of a crown, holes are drilled alternately on each side of the canvas, they do not need to be made through. As soon as the tip of the crown appears on the opposite side, the drill must be stopped and start drilling from the other side. So the veneer will not be damaged when the crown comes out.

After the holes are ready, using a chisel and a hammer, we make a selection along the line cut with a knife under the latch bar. Install the latch and tighten with two self-tapping screws. It is better to take self-tapping screws not "regular" ones, which are attached to the latch (they have ordinary soft metal), but high-quality ones.

Using the key included in the kit, we disassemble the handle into two parts so that it can be installed. For this, one fastening screw must be loosened, the other must be unscrewed. The center rod is inserted into the hole and on one side the fixing screw is tightened tightly. Then the second half of the knob is put on the rod, and the second screw is tightened. Self-tapping screws are twisted on both sides, which will cover the decorative overlays and the screws will not be visible.

After installing the knob handle, it remains to install the "return" on the box. The door is closed, but not completely, and the upper and lower edges of the tongue are marked with a pencil. Using a square, the distance from the edge of the leaf to the center of the latch strip is determined, and this dimension is transferred to the door frame. Then a "return" strip is applied to the box, a veneer is cut with a knife, and a chisel is used to cut under the strip and tongue. The door is closed and the operation of the latch is checked.

Then a strap is installed on the box. Special "pockets" are sold for grooves under the tongue, they are made of plastic or metal. The self-tapping screws that fix the "return" bar can be closed with self-adhesive plugs. The installation is then complete.
How to disassemble and assemble an interior door handle?
An installed knob can be disassembled in two ways, depending on its design. Unfortunately, most of these models are of rather low quality and often fail.
Dismantling one structure begins with the fact that you need to carefully pry off and remove the decorative strip. The lining has a special groove, usually it looks down. The ball-shaped handle will interfere with unscrewing the screws, so you need to squeeze the locking pin and, at the same time, with a little effort, remove the handle from the central rod. Once the ball of the handle is removed, it will be very easy to unscrew the screws.

To disassemble the second design, which does not have a locking pin, it is necessary to press the spring pin through the technological hole using the supplied key and remove the handle ball. If the length of the key is not enough (it happens), use a simple nail. Then the decorative strip and self-tapping screws are unscrewed. If you cannot find the spring pin through the technological hole, it means that the knob was assembled incorrectly. Rotate the decorative strip 180 ° and the problem is solved.
The handle is assembled in the reverse order.