To create garden decorations with your own hands, you can successfully use willow branches - it is easy to build a wattle fence, a flower bed or a support for climbing plants from them.
]]> ]]>

Very nice, wattle fence looks like a fence for a garden - a fence made by weaving from twigs. This method has been known since ancient times, besides, the wattle fence was used not only, but also as an element for a hut-hut or outbuildings, after that the walls were coated with clay. Such a dwelling turned out to be quite strong, retaining heat well.
Let's think about how to make wattle with your own hands, especially since its manufacture will not require you to have any special experience or any special tools.
Photo of garden paths and photo wattle:


As a material, you can use shoots of shrub willow (vine), or hazel (). It is better to harvest material in August and September, the rods are already ripe by this time and the sap flow in them slows down. Willow wattle, as well as hazel wattle, is better to weave from freshly cut twigs, as they are more elastic. If the vine has time to dry out, then it must be soaked before use.

Stakes can be made from pine, hazel or other wood, about five centimeters in diameter. The ends that will be hammered (it is advised to drive the stakes upside down), we treat with an antiseptic (can be tarred) and drive into the ground, not less than 30 cm. We make the distance between the stakes 30-50 cm, depending on the size of the wattle fence, as well as thickness and elasticity of the rods used. At the beginning and at the end of the fence, we drive in two pegs side by side, for better fixation of the rods. It is desirable to do the same where, along the length, some rods will end and others will begin. In order for the wattle fence to turn out to be even and beautiful, we fill the rail on top of the stakes driven into the ground. How to make a fence can be seen in the figure, the rod of the lower row is braided around each subsequent peg from the opposite side to the previous one. With the second rod, the stakes are bent around from the back. For compaction, the rods can be seated, periodically tapping them with a hammer. The thin and thick ends of the rods should periodically be allowed to meet each other so that the height of the fence is approximately the same. The protruding ends must be cut with a knife or secateurs.
You can do the same with vertical wattle. The manufacture of such a fence differs only in that horizontal poles from slats or long straight branches are attached to the stakes at the same distance. Everything else is done in the same way as with horizontal weaving. Such a wattle fence in the country can be made. It is desirable to weave such a fence before the buds open, the bottom of the rod is stuck deep into the ground and the poles are braided and so on. When good, it forms quite quickly.
DIY
Possibilities of wicker
 To create unique and attractive corners in your garden, it is not necessary to spend big money. There are many simple, cost-effective ways.
To create garden decorations with your own hands, you can successfully use willow branches - it is easy to build a wattle fence, a flower bed or a support for climbing plants from them.
This simple Russian element of garden decor is successfully used by my neighbor Faina Pavlovna at her summer cottage.
Tyn - wicker fence
Willow wattle can divide your site into zones: a playground, a garden, a recreation area. With it, you can unobtrusively fence yourself off from neighbors in the country. Such a fence looks quite colorful, but you need to take into account the style of buildings on your site and the general style of the garden. If your garden is decorated in a rustic style, wattle will come in handy.
Willow vines are harvested in the spring, it is advisable to choose annual rods that will need to be soaked before weaving. The more bends in the process of work, the thinner the rods should be.
Along the perimeter of the future masterpiece, even pegs with sharpened ends are driven in at the same distance. Then, willow rods are threaded from different sides of the stakes - this is how a horizontal wattle fence is obtained. You can also create a vertical wattle fence, which can turn into, since willow branches with constant moisture have a greater ability to root.
A low wattle fence looks nice as a frame for a flower bed: it can be of any shape, or it can even be a flower bed basket.
The potential of willow twigs is not exhausted by this: any wicker structures, benches, chairs, funny figures can be created from the vine.
Hut hut, construction
 The usual Ukrainian hut hut is simple, but quite practical, combining the traditional Ukrainian flavor, increased strength and comfort of housing. And this is its main attraction for customers, thanks to which the hut has gained incredible popularity.
Currently, houses of this kind are used mainly as country cottages, tourist houses, restaurants and even decorative buildings that bring comfort and create a unique environment that is very different from any modern home. So, although innovation in construction is the engine of progress, we should not forget about traditions that are rooted in the distant past.
The technology of building clay houses was known more than six thousand years ago. The hut, due to the practicality, availability and low cost of materials, as well as the speed of construction, was built everywhere. The main materials from which these clay dwellings were made over the centuries were brushwood, straw, reeds, wood, clay and other improvised means that can be found in abundance on the territory of Ukraine.
 It is worth noting that historically there have been several ways to build huts. Previously, most often houses of this kind were built on the basis of a carefully prepared frame of thin branches, insulated with a layer of reeds, on top of which clay and straw were applied layer by layer.
At the present stage, the construction of the hut is carried out according to the traditional technology with some amendments made due to the development and improvement of the construction industry. This is well known to the specialists of our company, which offers its clients the construction of traditional Ukrainian dwellings.
How do we build a mud hut or a technological process
Stage one. Foundation device.
So, if we are building a hut, then the very first stage is laying the strip foundation. You should not make it too strong, since all the same, the low weight of walls made of adobe or based on a wooden frame insulated with reeds has a low load on the foundation.
Stage two. The erection of the supporting frame.
 The wooden frame on the basis of which the wall of the hut is built is usually made of pine or oak wood. The walls of the house, in addition to the traditional method on plows (framework), are usually made on the basis of specially made adobe blocks or are made of raw bricks. And although their thickness reaches about thirty centimeters, but in terms of energy saving they are much superior to brickwork of a similar thickness.
Stage three. Warming.
 Our company offers turnkey construction of a hut in Ukraine. During our work, we have accumulated extensive experience, high qualifications and recognition of customers not only throughout Ukraine, but also far beyond its borders. At the request of the customer, we often travel abroad, thanks to which the hut made by the skillful hands of our craftsmen is a frequent guest on the lawns of many summer cottages in Russia.
A hut with a reed roof, produced by the efforts of our specialists, is an environmentally friendly house, which not only has all the necessary characteristics (water resistance, strength, acceptable cost), but also perfectly accumulates heat.
So the modern hut is a colorful, original and original corner of history right in your yard. Forget about stereotypes even for a moment, take a step towards the new, and you will not regret it - the hut will transform your life, make it brighter and more colorful!
How to weave a fence from rods
 You will need
Willow twigs
Metal stakes that will serve as a support
Wire
Instruction
1 First you need to harvest willow twigs. The optimal time for harvesting is early spring or late autumn. At this time, it is easier to get close to the bush, as there is solid frozen ground under your feet. In order to get a good fence, you need to carefully select the rods - they must have sufficient flexibility, be long and even. For a solid fence of great height, you need to choose branches about 2.5 cm thick. If you are going to make a small decorative fence, 1-2 cm thick is enough.
2 The workpiece must be carried out with a knife, the cut must be oblique. Tie the blanks into bundles and dry. Before weaving a fence of rods, to give them maximum flexibility, they should be steamed in hot water.
3 ]]> Before weaving, decide on the direction of the rods - the vertical one will resemble an ordinary fence, and the horizontal one will look like a wicker basket. As a support, wooden stakes are usually used, the diameter of which is about 6 cm. For maximum protection against decay, the pointed ends that are hammered into the ground should be treated with an antiseptic and charred at the stake.
4 You can also use metal pipes - usually a piece of pipe is buried in the ground, to which a wooden peg is attached. Stakes should be placed at a distance of about half a meter. Be sure to make sure that they have the same height - the level can be tracked with a cord.
5 Weaving a fence from rods with a vertical position requires additional crossbars needed as a base. Usually, branches that are thicker than the rods themselves are usually used as crossbars. The optimal number of crossbars is 3.
6 During weaving, wicker twigs should rest with one end on the ground and braid the fixed crossbars with them. If the rods are long, cut them at the level of the cord. In the case of weaving a horizontal fence, crossbars are not required. For reliable fastening, the ends of the rods are screwed with wire to adjacent ones. Start weaving from the ground.
7 Weaving occurs as follows: the thick end of the rod is wound behind the second peg, after which a “figure eight” is made around the first. To give the fence sufficient strength and density, it is worth periodically tapping the bars with a carpenter's hammer. To increase the service life, cover the resulting fence with varnish.
The cost of wet facing works is currently one of the highest. It can be several times higher than the cost of the original building materials, plus they are quite dirty. It is not surprising that most of the people who start repairs seriously think about how realistic it is to do plaster work with their own hands. I will not assure you that it is easy and simple, but believe me, it is real. Next, we will talk about the methods of arranging standard and decorative plaster, as well as how to make plaster with your own hands.
Important: in a professional environment, such work is divided into dry and wet plaster. So the term dry implies frame lining with drywall and other similar things. In this article, we will only talk about the wet method, that is, about applying a layer of a particular solution to a load-bearing wall.
A few words about whether it is worth doing
The average price in the vastness of our great power fluctuates around 250 - 300 rubles, for finishing 1 m² of a wall with a layer of 10 mm. With a forty-millimeter layer, it will grow to 550 - 600 rubles. A large order from 5000 m² will cost less, the savings will be about 50 rubles. on every meter. You still need to add about 150r to this. on the material, meaning a layer of 10 mm/m².
More complex jobs cost more. So for the slopes they will ask for at least 400 rubles. for 1 running meter. Ceiling prices start at 600 rubles, and a simple curved cladding will cost 800 rubles. for 1m². For complex surfaces, such as stucco, flutes, fireplace trim, etc., there is no fixed rate as such, here you will have to negotiate individually.
There is one subtlety here. Now it is fashionable to make simple arches in the house, just by the cost of this arch you can judge the professionalism of the master. A normal master will take about the same for the arch as for the ceiling, the work is not difficult.
If they ask for a curved surface or even more, then in front of you are either hacks or extra-class professionals. But, unfortunately, you can distinguish them only by the finished result.
Important: it should be noted that the indicated tariffs are average for the cities of the Russian Federation. For Moscow and St. Petersburg, the price will be 3-5 times higher, the same applies to the remote outback, where you will have to pay extra for the master's business trip.
The choice of plaster composition
I don’t see the point in writing about how to breed and where to use dry factory, for this there is an instruction in which everything is clearly and clearly stated. The only thing on which some of the beginners “stumble” is the process of dilution with water. Remember, the mixture must be added to the water, and not vice versa.

Imported mixtures like Knauf are certainly good, but they are too expensive. Our manufacturers, in particular, such as Prospectors, Volma, Prestige S and others, are now producing goods that are in no way inferior to German ones, especially if you remember that most of the world brands are made by us.
To be honest, the manufacture of home-made solutions is slowly becoming a thing of the past. In terms of quality, they remain far behind the factory ones, and the economic effect is noticeable only with serious volumes.
But there are times when it makes sense to mess around. For example, plastering basements and utility rooms does not require high quality, and a do-it-yourself mixture will be quite appropriate.

clay mortar
Such solutions are more intended for finishing various kinds of stoves or fireplaces.
In some cases, utility rooms are trimmed with clay, but there is an indispensable condition - it is undesirable to use clay in rooms with high humidity.
- As a basis, oily clay dough is taken, which must be rubbed through a 5x5 mm mesh. For greater strength, lime dough is most often added, with a total volume of about 30% of the mass of clay. The filler here is pure quartz sand 0.5 - 1 part, again guided by clay;
- Some people prefer to take M200 brand cement instead of lime dough. It needs only 15% here. Such a solution hardens faster, is less afraid of moisture and holds tighter. But in the finish you get a dirty gray tint. In outbuildings, this option will still pass, but in the house it will need to be covered with finishing putty or decorative plaster, which will be more expensive;

- The instructions are traditional. Wiped wet clay is laid out in a heap, a hole is made in the center, into which, in addition to sand and water, lime dough or cement is added. After thorough mixing, the solution in this state can be up to 2 days;
- If the break in work is more than 1 hour, then the solution will need to be covered with a wet cloth so that it does not wind;
- After application, such a solution dries for about 2 - 3 days;
- The so-called adobe or do-it-yourself daub plaster is made with the addition of chopped straw. But as you understand, now this option may be of interest only from the point of view of a hobby and for fans of natural, natural, environmentally friendly compositions.

Mortar
Such solutions in dry rooms can stand for an arbitrarily long time. It is no secret that in ancient buildings there are surfaces that are already several hundred years old.
But in this case, for different stages of finishing, different compositions are prepared:
- If you work on stone, then a lime-cement mortar is prepared for spraying in a ratio of 1: 1: 7, lime dough - 1 part, cement M200, also 1 part and sifted sand 7 parts;
- Cement is not needed for the soil, here is 1 part of lime mortar and 3.5 parts of sifted sand;
- Covering is done in a ratio of one to two, lime-sand. Only in this case, the finest sand is taken, plus it is well washed and sifted.
The so-called winding, used for wood finishing, is prepared with the addition of gypsum. Lime dough with gypsum (or a type of gypsum - alabaster, which hardens faster) is mixed in a ratio of 3: 1. But you need to stir and work quickly.
First, 6 parts of water are added to 1 part of the dough and thoroughly mixed until “liquid sour cream”. After that, without stopping kneading, gypsum is gradually poured. As soon as the gypsum is covered, a maximum of 5 minutes remains for kneading, plus 10 minutes for the development of the composition.
Tip: Don't try to make lime dough yourself. Extinguishing lime is a rather responsible process and, having no skill with such work, you do not need to get involved. In this case, it is really better to buy than to try to do it yourself, it will cost less.

In my opinion, homemade plaster based on lime paste is one of the best options. For large volumes, I usually calculate the approximate amount of material and order a lime test dump truck. Under a film or wet cloth, this pile can be stored for at least 2 weeks. For lime-cement mortar, I add a couple of cement trowels to one stretcher, it turns out fine.
cement mortar
There are no special subtleties in the preparation of cement mortar, in fact it is an ordinary masonry composition. Classically it is considered that the standard ratio is 1:3 (cement/sifted sand), but for walls with good adhesion, the proportion of cement can be reduced to 1:6. And vice versa, for smooth high-strength surfaces, sometimes you have to make a solution of 1:2 and even 1:1.

Important: on smooth and dense concrete, polymer additives will need to be added to the water. The concrete itself is covered with a special primer. And in the plaster mortar, to increase the fat content, an additional 20% (of the cement volume) of lime paste goes in addition.
Bringing the solution to readiness
Whatever solution you mix, for normal operation it must have an optimal consistency. There are 3 states of the solution: skinny, normal and fat.
They are defined quite simply.

- The trowel is vertically immersed in the container and removed;
- If the solution drains from it, exposing the metal in whole or in part, then it is skinny;
- If the trowel is covered with a thin even layer, this is a normal composition;
- And when the solution sticks in clots, it is a fatty composition.
The main binder is added to the lean solution, sand is added to the greasy solution.
Plaster work
Plastering requires a phased work. In this case, compliance with the technology is especially important. Conventionally, the entire cycle can be divided into several stages.
These are surface preparation, priming and spraying, formation and grouting of the rough layer and finishing. But any work begins with the preparation of the tool.
Briefly about the tool
The main tool here is considered to be a trowel, in other words, a trowel. Professionals use a rounded trowel with a pointed end. It's a multipurpose tool, but you need to know how to use it.
It will be more convenient for an amateur to work with a square trowel. From the mandatory set, you will also need a pair of spatulas (medium and wide), a plaster falcon and a rule.

I think the purpose of the spatulas does not need to be explained. A stucco falcon is a wide metal plate with a handle in the bottom center. In addition to the fact that it is convenient to throw from the falcon, it is also good for them to apply the solution and rub the finish surface.
You will definitely need a grater and a grater. Between themselves, they differ in size. The grater is smaller, under one hand, and the grater in length can reach 1.2 m.

The rule is called a flat metal bar up to 2 meters long. This tool is indispensable for plastering on lighthouses. In addition, a construction mixer or a mixing attachment for a drill is useful.

Surface preparation
This process is not particularly difficult, to break is not to build. Wallpaper, as a rule, is enough to moisten with plenty of water a couple of times and arrange a draft. In most cases, they fall off on their own. If this number does not pass, buy a wash and use it.
Approximately the usual whitewash is also removed, although in the case of whitewash, it can be covered with a paste, after the paste dries, the cakes are removed with a spatula easily and quickly.
There are more problems with oil paint. Ideally, it is better to remove it completely, of course. This can be done with a building hair dryer and a spatula, washes are also suitable, but they have a terrible smell.
I prefer not to fool my head and just make a frequent notch with a chisel or hatchet. If doubts creep in, you can additionally stuff fiberglass or metal reinforcing mesh from above.
Naturally, all large cracks and defects will need to be puttied. Small cracks should be expanded with a knife or some kind of cutter, after which they should also be repaired with a starting putty mortar.

Important: a notch is made on smooth surfaces. Some sources say that there should be about 1000 notches per 1 m². I did not try to count the number, I will only say that the more strokes you make, the better the plaster will take.
Before spraying and installing beacons, the surface will need to be well primed. The soil is selected depending on the type of base, now there are enough specialized compositions on the markets.
Lighthouse plastering
Lighthouses are flat planks that are vertically mounted on the wall. The principle is simple, after throwing the solution, the master takes the rule, applies it horizontally to the beacons and, moving up, levels the surface. In this case, the lighthouses play the role of a kind of supporting rails. As you can see, the technology is available even to an amateur.

Most often, beacons are metal perforated profiles. Although, in addition to metal, such strips can be made of carbon fiber, these guides are lighter, plus they do not rust and do not require mandatory removal after leveling the surface.
But carbon fiber is an expensive material and the price of such products is much higher. Some craftsmen manage to make lighthouses from drywall scraps, but I don’t advise you to do this, skill is needed here.
The most common are beacons, providing a plaster thickness of 3 mm and 6 mm. The layer is thinner than 3 mm, this is putty. And if you need thicker, then the strips are installed on the "cakes" from the solution at the right distance from the wall.
As you understand, the most difficult thing in this process is the markup and the installation of beacons itself. With smooth and even walls, everything is simple. Lighthouses are fastened here with small self-tapping screws. But when the wall is clearly curved or the layer needs more than 6 mm, you will have to tinker with leveling the planks.

Each master sets the bars in his own way. To begin with, it will be necessary to clearly "beat off" the vertical. A plumb line, cord or fishing line and self-tapping screws will help us with this.
In the upper corners of the wall, at a distance of 150 - 350 mm from the ceiling and the adjacent wall, a self-tapping screw is driven. Along the plumb line, the same self-tapping screw is driven below.
After that, 2 horizontal cords are pulled between the upper and lower screws. The distance between the cord and the wall must correspond to the thickness of the plaster layer.
Now we need to mark intermediate verticals. To do this, I prefer to use self-tapping screws with a slot for a flat screwdriver, it is convenient to pass a plumb line through it. The beacon installation step depends on the width of your rule. It is believed that the rule should look out for the beacons on both sides of 200 mm.

As you remember, we have cords stretched from above and below. So the screws are screwed in so that the hats are flush with this cord.
The bar during installation may slightly bend, therefore, guided by a plumb line, it will not be superfluous to screw in another 1 - 2 screws vertically. The caps of these self-tapping screws will become the standard for the installation of lighthouses. Beacons are attached next to the reference screws.

Now we need to mix a little gypsum mortar, make some kind of cakes out of it and stick them to the wall with an interval of about 250 mm along the track of the lighthouse. The bar is applied to a soft solution and slightly sunk into it to the depth we need.
After half an hour, the solution will seize, and it will be possible to begin work. By the way, the screws that served as our guides will need to be unscrewed so that they do not rust and do not spoil the plaster.

Tip: Self-tapping reference points work great. But as soon as the beacon is installed, it will be useful to additionally check the vertical and horizontal by applying a large building level along the entire length of the plank.
Plastering technique
The technology of work itself is approximately the same in all cases, and here it is absolutely unimportant that you work with beacons or without them. The lighthouse is just a good help, a supporting cage, with which it is easier to level the solution.
If a plaster layer is planned thicker than 10 mm, then the application is done in two approaches, not counting the base primer coating.
First, the so-called spray is performed. For him, a solution with the consistency of liquid sour cream is kneaded. A small part of the composition is recruited on a trowel and abruptly rushes to the wall. Brush movements here are similar to playing table tennis.

After that, the main layer is also thrown, here the solution should already resemble very thick sour cream. If you use beacons, then this layer is aligned using the rule, slowly moving along the beacons.
In the case when beacons are not used, the main draft layer is leveled with a trowel, falcon or wide spatula. Here already as who is accustomed. By the way, there can be several such layers, it all depends on the required thickness of the plaster.
In general, the instruction requires that the alignment be done from top to bottom, so there is less chance that the solution will float. But as far as I have seen, the opposite is always done, to be honest, it is more convenient to move from the bottom up.

The tool is applied at an acute angle to the surface and the solution is leveled like a small bulldozer. All excess is immediately removed and dumped into a plaster box.
But no matter how hard you try, a perfectly flat, clean surface cannot be removed at this stage. There is more grout ahead of you.
It is performed at a time when the solution has already begun to set, but is still wet. Here it is important not to make a mistake with the time. The wet layer is easily damaged, and the frozen monolith can be rubbed for a long time and to no avail.
Important: beacons (especially metal ones), if any, before mashing, while the solution is wet, should be removed, and the resulting rusts should be immediately filled with a thick solution and leveled with a wide spatula or square trowel.

They are usually rubbed either with a grater or with a falcon. The tool must be lightly, without fanaticism, pressed against the plane and leveled by means of numerous circular movements. Here you need to step aside more often and look at the results of your work at an angle, close up you will not notice minor flaws.
What we have done is quite enough for thick textured wallpaper, but for coloring you will also need to apply a thin layer of up to 2 mm covering. There will be a coating of gypsum, cement or made on the basis of polymers, depending on the operating conditions.

The coating is evenly applied with a narrow spatula to the blade of a wide spatula, after which it is leveled over the entire surface. It, as in the previous case, will have to be overwritten, but to achieve a glossy surface, a grater covered with felt or felt is used. But the most beautiful surface is obtained with the help of decorative types of plaster. We will dwell on them in more detail.
As for the technology for removing external and internal corners, for arranging external corners, first a board is nailed on one side and the adjacent plane is plastered.
After that, the board is rearranged to the other side, pressed against the slopes and similar actions are performed, the principle is shown in the diagram. The inner corner is removed using 2 trowels knocked down at the right angle.

Important: do not try to throw and process the entire wall at once, you simply may not have enough time to grout, and after the solution has set, rubbing is useless. The most reasonable way out will be to work in sectors, so you can correctly distribute your forces and gradually find out what volume is the limit for you in one run.
Wood plaster
Another important point is the plastering of wooden surfaces. Wood is a specific material and if you simply apply a layer of mortar to it, it will not last long due to temperature and humidity deformations. Therefore, a reinforcing mesh is needed here.
Of course, you can fill the finished metal mesh with a chain-link or fix a similar fiberglass mesh with a stapler. But there is a proven method for stuffing the so-called shingles for decades. The point is that thin wooden planks are stuffed onto a wooden surface, and a solution is already thrown over them.

Such bars can now be bought in any market, they cost a penny. It's easy to hit them. First, small notches are made on the wooden surface with a hatchet, the frequency here is small. After that, the tree needs to be primed. For these purposes, a five percent solution of copper sulphate was used, but no one forbids buying a modern composition for wood with an antiseptic effect.
The planks themselves must be wetted before fixing so that they do not crack when nails are driven into them. Then everything is simple, the shingles are stuffed crosswise at an angle of 45º relative to the floor, the cell is 40 mm in size.
Nails are driven into the intersection, through two strips to the third. A deformation gap of about 5 mm is left between the shingle and adjacent surfaces.

Important: wooden shingles are good, first of all, because their expansion coefficient is the same as that of the base. As a result, when temperature and humidity changes, unlike metal or fiberglass mesh, there is no imbalance between the wooden base and the reinforcing frame.
Available types of decorative plaster
No matter how strange it may sound, but for an amateur, decorative plaster is often an excellent way out. With its help, you can easily hide a minor marriage or pass off inaccuracies as the artistic intent of the author.
Of course, painting on plaster with your own hands is only available to a person who has the talent of a painter, but besides this, there are several other more affordable options.

Polyethylene to the rescue
Do-it-yourself abstract drawing on plaster can be applied quite easily using a regular piece of polyethylene.
True, you will still have to spend money on liquid acrylic putty, it is sold in buckets and is immediately ready for use.

- The wall is plastered as for painting, that is, it must be perfectly flat. Otherwise, all serious defects will immediately appear. First you will need to cover the base with a latex primer. After that, adjacent walls, ceiling and floor around the perimeter are pasted over with masking tape;
- Although the instructions indicate that acrylic putty is immediately ready for use, it will not be superfluous to mix it with a mixer immediately before application;
- The technology here is the same as in the arrangement of the covering. Putty with a medium or narrow spatula is applied to the blade of a wide spatula and is evenly distributed in a circular motion over a plane with a thickness of about 2 mm. In this case, it is desirable to cover the entire wall at once;
- When the wall is ready, crushed polyethylene is applied to it, preferably without air bubbles. and left in this position to dry. The drying process takes about 16 hours. After 3 - 4 hours, the masking tape will need to be removed so that it does not dry out;
- After 16 hours, the film is carefully removed, and the wall is left for a day for final drying.

Important: no matter what kind of plaster you use, and no matter how it is applied, in no case should you use extreme, accelerated types of drying. Various types of heaters and heat guns can cause cracking of the layer. Any solution must dry naturally.
- The final touch will be cleaning the surface with a wide spatula or square trowel. You will just need to scrape off the excess particles. Do not be afraid, acrylic is a strong enough composition, and when the mixture hardens, it is impossible to damage it with a light scraper of a spatula;
- If desired, the mixture can be tinted before application. or apply a light tone after drying;
- There is one more thing. You cannot decorate 2 adjacent walls at the same time. In a standard rectangular room, 2 opposite walls are decorated at a time. And only when they dry, you can proceed to the remaining two.

Use of stamps
This method of plastering allows you to apply a rather refined and highly artistic ornament. As a rule, textured rollers with a finished pattern are used for this. Although, if desired, it is quite easy to make a stamp for plaster with your own hands.
The principle itself is similar to the above method with polyethylene. The surface of the wall must also be pre-levelled. After that, a layer of finishing plaster is applied to it. The thickness of this layer is chosen according to the depth of the texture on the roller, but often it is still the same traditional 2 mm.

Applying a drawing with a plot is more difficult, here you need to have a firm hand and control every movement. It is better for a novice artist to use stamps with an abstract ornament. By the way, they are the easiest to make with your own hands.
So an ordinary rubber roller, randomly wrapped with a tourniquet, thick fishing line or ordinary rope, on the wall gives the texture of wood fibers. The texture from the grid with large or small cells also looks quite original. In general, try, there is no limit to perfection.
Combing
I think that the so-called combing is the easiest to do. In this method, it is enough to apply decorative plaster with a spatula and “comb” the surface with a brush with stiff synthetic bristles in different directions.

Do-it-yourself antique plastering is not much more difficult. Raw plaster will need to be “combed” with a metal float or a stiff brush. After that, the surface is trimmed with a simple hair brush and again slightly smoothed with a “comb”. At the end, the wall is embroidered under the laying of natural stone.

bark beetle
The texture of the bark beetle appeared about 20 years ago. This decor looks good both on the facade and in the interior. The name speaks for itself here, a pattern is displayed on the surface, reminiscent of wood eaten by a bark beetle.

Equipping a "bark beetle" is a little more difficult than "combing" travertine, but with your own hands it is quite realistic. On the main, base layer of plaster, you need to apply a thin but durable ball of putty. After that, the decorative bark beetle plaster itself is applied.

The mixture will have to be bought. The principle here is simple, mineral granules are added to the total mass. The thickness of the finishing layer of decorative plaster will depend on the diameter of these granules.
After throwing, the solution is pressed at an angle with a spatula or trowel and is carried out in the right direction. The granules leave furrows that resemble bark beetle marks.
Good old coat
It is impossible not to recall such a popular and simple decorative plaster as a fur coat. Now it is less common, but even 20 - 30 years ago, at least a third of all houses in the private sector got off that way.
For its manufacture, a liquid cement-lime or cement-sand mortar is used. If desired, a dye is added to it, particles of mica can be added, in which case the house will simply shine in the sun.

Now there are machines for putting on a fur coat, but if the work is one-time, there is no point in spending money on a machine, in this case it is worth turning to the experience of ancestors. You will need a maklovitsa brush or a regular broom and a simple stick. A solution is picked up with a broom or brush and near the wall the tool hits a stick, so that the splashes of the solution fly onto the wall, that's actually the whole technology.
When using a brush, the texture will be fine, with a broom the surface is more expressive. There is a small nuance here. One layer of spray is not enough, for a normal result there should be several of them, but the surface must be finished in one run, it is impossible to throw after the first spray. Therefore, it is better to work by sectors.

Conclusion

This group of capitalization includes the usual Ukrainian hut hut.
The technology of building clay houses was known more than six thousand years ago. Mazanka, due to the practicality, availability and low cost of materials, as well as the speed of construction, it was built everywhere. The main materials from which these clay dwellings were made over the centuries were brushwood, straw, reeds, wood, clay and other improvised means, which can be found in abundance on the territory of Ukraine and southern Russia.
Among the huts, there are: an adobe-block hut, an adobe-cast (adobe) and a hut itself. All these types of dwellings were used in the steppe and forest-steppe, where clay is in abundance, and there is almost no construction timber.
If the hut was built on the site of an old burnt one, then the removed clay was sorted into good and bad (the one in which there was a lot of wood chips or the one that was baked from the fire was considered unsuitable).
|
|
|

Cob-block hut. It was made in two ways. In the first case, adobe blocks were used, into which they sawed an old unusable adobe hut with strong walls, for one reason or another, sawed into transportable blocks. They sawed with a string saw made of barbed wire with handles. After the material was prepared, laying began on clay mortar.
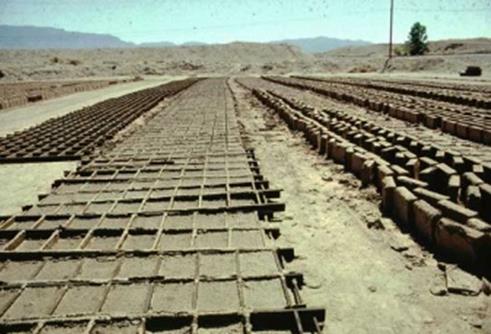
In the second case, new blocks were made, but in this case it took a year to prepare adobe blocks. In the first construction season, the family worked on making blocks: they mined clay (for which they would dig a well and a cellar or get it in a quarry located not far from the village). Clay received the best building qualities during freezing, so it was stored on the site for the winter. Then the clay was kneaded with straw or hay (sometimes wood chips), but more often with the floor (grain milking waste) and blocks were formed. The blocks that had dried up over the summer were stacked for the winter, sheltered from snow and rain.
Milk whey, blood, dung could be added to adobe mixtures to improve the properties of adobe. They not only increased the strength of adobe, but also increased its moisture resistance and durability.
 Until the collapse of the USSR, rural factories for the production of adobe worked on the territory of Ukraine. Now there are only a few such factories, their products continue to be in demand among the villagers.
This technology is characterized by convenient and fast construction, it was very easy to work at height without serious scaffolding. Walls were built very quickly from blocks on clay mortar. But often the villagers forgot to bandage the seams or the walls were made too thin, because of this, such houses eventually fell apart into “cubes”. But at the same time, the walls could turn into a monolith, which is very difficult to disassemble or destroy.

Cob-cast (adobe) hut. The walls of such a hut are more durable and require much maintenance. The clay was soaked and kneaded next to the future home. One or more pits were dug, in which a clay-sand mixture was mixed. Kneading could be carried out with the help of animals (horses, oxen) and special devices (cart wheels). The technology was divided into clay stone and clay stone.
Claystone- This is a technology for laying plastic clay in a formwork in which straw already lies. adobe- This is a mixture of clay and straw with less water, also placed in the formwork. In both cases, the mixture is carefully compacted.
The hut was erected according to the principle of climbing formwork. This process was quite difficult and lengthy. It was necessary to prepare the mixture, install the formwork, lay the mixture with layer-by-layer compaction, wait for the structural strength to gain, after which the formwork was removed, the scaffolds were placed and everything was repeated from the beginning. Filling height at one time 300-400 mm. Up to 20 people, or even more, could work on one house at the same time.
|
|
|

The complexity of manufacturing consisted in feeding the compaction of the mixture above human height. With this technology, it was necessary to strictly follow a number of rules for arranging a complex dressing of a thin frame of poles and reeds.
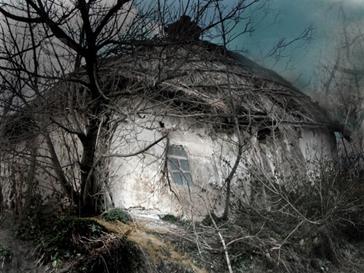
Mazanka. Mazanka is the warmest clay dwelling, the fastest in construction, but no less labor-intensive. Burnt firewood, large stones were used as a foundation. The branches of a felled acacia served as the crossbars of the frame. The frame was made without nails, I must say, all connections were made with the help of tie-ins and cuts. When a large tree was cut, one trunk with a diameter of 300-400 mm was pricked into 2 or 4 parts and used as supports at angles. If younger trees were used, then trunks with a diameter of 100 to 200 mm went to the frame supports. Then branches were woven into the crossbars to make a kind of “basket”. After that, the frame was coated. Used clay-straw mixture, the amount of straw ranged from 10 to 70% by weight.
The advantage of the hut was that it could be made in one season, because. it dries much faster than ordinary clay. In the manufacture of huts, adobe was also used, but much less.
In the northern versions, the mud hut was carried out along a frame for 3-4 crowns, which was coated with kaolin clay. This method simultaneously solved the problem of caulking seams and gave the traditional white color.
Until now, mud huts are built according to traditional technology using modern hardening solutions and a wide range of wood.
As a rule, a strip foundation is performed under the hut. Then proceed to the construction of the supporting frame. The wooden frame on the basis of which the wall of the hut is built is usually made of pine or oak wood. The walls of the house, in addition to the traditional method on plows (framework), are usually made on the basis of specially made adobe blocks or are made of raw bricks.
|
|
|
|
|
|

Along the longitudinal axis of the house, there was a main beam - swine. Svolok was considered the abode of a brownie. The girders were supported on this beam, on which clay was thrown. Where boards were used as purlins, the ceiling now has the appearance of a bubble hanging into the room (partly because the board lay flat). Where unskinned round timber was used, repairs were required because the ceiling had long since fallen off along with the bark. The load was also taken by eye, because the deformation of the ceiling (partly again due to raw wood) was a constant phenomenon. The attic has always been used for drying and storage. From that, sometimes a weak overlap in some places could give uneven shrinkage, which could cause waves.
This article is about traditional huts middle lane, a little about the technologies of their construction, about why they are in poor condition today. We continue the series of articles “Good do-it-yourself house". In the future, articles such as "Traditional Frames" will be published, in which we will talk about English oak, German fachwerk, Japanese frames. We think, in general terms, in the article "World Experience of Folk Construction Using Clay" to talk about how they built in a world where adobe is known and how it was used.
A bit of history
Let's look at the period of the last 50-60 years. In 1945 the Great Patriotic War ended. People returned to normal life.
There were no villages and villages as such, houses were destroyed and burned. It was necessary to quickly solve the problem of housing. They built quickly and from what is under their feet and catches the eye.
In the course there were several options for houses, technologies inherited from parents: adobe-block hut, adobe-cast ( adobe) and mud hut(there are actually many types of mud huts). Let me remind you that we are considering the steppe and forest-steppe, where clay is in abundance, and there is little or no construction timber.
If the hut was built on the site of an old burnt one, then the removed clay was sorted into good and bad (the one in which there was a lot of wood chips or the one that was baked from the fire was considered unsuitable).
Cob-block hut
First method - adobe blocks.
Why blocks and how did it happen? There are two approaches here. First: old unusable adobe hut with strong walls, for one reason or another, sawn into transportable blocks. They sawed with a string saw made of barbed wire with handles. After the material was prepared, laying began on clay mortar.
The second option was the manufacture of new blocks. Immediately in the post-war period, it was not very popular, since this method assumed the presence of a place where you can survive a season or two. During the first construction season, the family worked on making blocks. It was necessary to get clay (to dig a well and a cellar or get it in a quarry located near the village). It is worth noting that clay has better properties if it is frozen (perhaps it was stored on the site for the winter). Then the clay was kneaded with straw or hay (sometimes wood chips), but more often with the floor (grain milking waste) and blocks were formed. They dried, then they were stored for the winter. They stacked the blocks in a stack and be sure to cover from the rain.
On the territory of Ukraine until the collapse of the USSR, rural factories for the production of adobe. Now there are only a few such factories, their products continue to be in demand among the villagers.
This technology is characterized by convenient and fast construction, it was very easy to work at height without serious scaffolding. Walls were built very quickly from blocks on clay mortar. But often the villagers forgot to bandage the seams or the walls were made too thin, because of this, such houses easily fell apart into “cubes” over time. But at the same time, the walls could turn into a monolith, which is very difficult to disassemble or destroy. Perhaps there was a technology for quick masonry, when the blocks, after drying for a week (grasping), went into the walls. (Assumption of the authors)
Cob-cast (adobe) hut
Another construction method was adobe. To this day, such huts are highly valued. Their walls are durable and require minimal maintenance. Clay technology requires strong arms, legs and hardy hooves. The clay was soaked and kneaded next to the future house. One or more pits were dug in which there was a clay-sand mixture. Kneading could be carried out with the help of horses, oxen (but the animal is not bad and always wants to leave), with the help of a wheel from a cart or tractor, or specially made. Again, it was common to use the help of the legs of relatives and friends (Toloka).
It must be said that, in fact, there is a nuanced division into clay stone and clay stone. How do they differ? Claystone- This is a technology for laying plastic clay in a formwork in which straw already lies. adobe- this is a mixture of clay and straw with less water, also placed in the formwork. In both cases, the mixture is carefully compacted.
Hut It was erected according to the principle of climbing formwork. This process was quite difficult and lengthy. It was necessary to prepare the mixture, install the formwork, lay the mixture with layer-by-layer compaction, wait for the structural strength to set, after which the formwork was removed, the scaffolds were placed and everything happened again. Filling height at a time -300-400mm. Up to 20 people, or even more, could work on one house at the same time.
It is difficult to say how quickly the house was built. Construction is both convenient and problematic. It was difficult to feed the mixture to a height higher than human height. With this technology, it was necessary to follow a number of rules for the dressing device. Again, houses using this technology are very durable and least affected by time (if everything is done wisely).
Mazanka
Mazanka. There is a lot of talk about this technology, but few people have thought about what it is. Often, when they want to make an attack on Ukrainian traditional housing, they mention “ mud hut». Mazanka- is the warmest hut of all the huts that are built of clay. It is the fastest in construction, but no less labor-intensive. In Europe, huts have been known since before the Middle Ages. This technology is used by the British, known as the English oak frame filled with clay and straw, by the Germans and the French, known as fachwerk, even in Italy and Spain, outbuildings are made using this technology. And about the Near and Far East, about buildings in Africa, India, China, the author is modestly silent, because huts are still being built there today. So, mud hut- this is a wooden frame, usually made of white acacia (in Ukraine), filled with clay.
If in argillite and adobe blocks the foundation was rather an accident, then stones or burnt tree trunks could be placed under the main supports, or they could simply dig in the supports. The branches of a felled acacia served as the crossbars of the frame, it must be said that they entered the slotted holes in the posts, the frame was without nails. When a large tree was cut down, one trunk with a diameter of 300-400 mm was pricked into 2 or 4 parts and used as supports at angles. If younger trees were used, then trunks from 100 to 200 mm were used for supports. Then branches were woven into the crossbars to make a kind of “basket”. After all these not cunning operations, the frame was smeared. Used clay-straw mixture, the amount of straw ranged from 10 to 70% by weight. It is possible that there were cases when the frame could first be covered, and then the walls were finished, which makes the construction process more convenient, but requires more skilled work on the frame. The advantage of the hut is also that it dries much faster than the usual adobe, it consumes less adobe, which facilitates construction. In more northern versions, a frame was made from logs with a diameter of 150-200 mm, and then coated with kaolin clay. This method simultaneously solved the problem of caulking seams and gave the traditional white color.
Additives
In this article, we will not consider in detail the technology for adding organic binders, stabilizers, and hardeners. Let's dispel the myth a little about the use of dung, or rather horse manure. Horse dung was used as a crushed fiber to "ironing" the walls in the final stages of finishing. To reinforce the clay mixture in the southern regions, the descendants of nomads could use manure instead of straw, since it is still more profitable to give hay and straw to livestock first. And grains were not grown much in these regions. AT adobe mixtures they could add whey, blood, dung - to improve the properties of adobe. They not only increased the strength of adobe, but also increased its moisture resistance and durability.
Error Analysis
We allow ourselves to note that after the war, the Soviet government actively spread tacit propaganda that the countryside is hard work, the horror of modern Soviet man, and the city is a bright future and excellent prospects. This subconscious "zombification" led to the outflow of the most intelligent and skilled people to the cities for factories. And those who remained were herded into collective farms.
The younger generation in the village needed housing. And because the construction of past materials was still relevant. All the same principles were used. Only more and more often thought about the foundations. So how was it done? Basically, as it should, in a hurry without thinking about the consequences, without wasting time on quality (there were many reasons for this, not only carelessness). Often, such a laid foundation could stand from one to twenty years before at least something was started to be built on it. To this day, you can see the foundations laid back in the 80s, they are both the pride of the owners and the collapse of their hopes, overgrown with shrubs and trees. Why was the foundation not given importance, although it was clear from experience that it was necessary. Firstly, few people knew what the technology and design of the simplest foundation and the principle of its operation should be, therefore the technology was developed by the method of folk experience and on the advice of neighbors and godfathers (in each village there was a specialist builder who supervised all construction projects, it was traditionally invited, but at this time he was involved in the construction of cowsheds and other collective farm buildings). Secondly, high-quality building materials were not always available. Thirdly, very little time was allotted for the foundation, since it was necessary to manage the household.
It is worth saying that the older generations had an advantage, the places for houses were more or less carefully selected, and the youth were already built where their parents would give them. Here we come to the problems and errors.
The first mistake and the key to problems with the house is a place for construction with all its characteristics (for details, see the article “Selecting a site” and “A good home with your own hands”). It was rarely chosen specially and according to the traditions that were known to our ancestors. From this, perhaps, such a problem as capillary suction of moisture from wet soils. Those houses that were built without a foundation on such soils ceased to exist. Others are more fortunate. The foundation of rubble, slag, pile stumps (waste of reinforced concrete products) and other improvised materials solved many problems. In addition, it has already become possible to get a couple of packs of bricks. But there are very few examples when a brick was used for laying a basement. As a rule, they were surrounded by a basement and a wall (where horizontal waterproofing was not performed). But this is in regions close to brick factories. The problem of soiling the basement caused a lot of trouble for the residents of such houses. Solved it before the annual repair. But our man is lazy. It was decided to cut the foundation of the house and make a concrete base. This decision became disastrous, first of all, for block-adobe and clay-cast huts, while mud huts have survived to this day (but in very poor condition). Most likely they survived, because the supports were filled with concrete and did not allow them to disperse. Then the concrete base was coated with bitumen. In order not to whitewash the walls and repair them every year, cement-sand tiles were invented and facades were clad with them. Tiles were nailed with 100-150mm nails on 300-400mm walls. Thus significantly worsening the heat resistance of the wall. And the cyclic freezing of sections of the wall did not have the most positive effect on the structure of the walls as a whole.
Over time, the walls began to slide from the plinths, the plinth began to turn inside out, water began to flow there. Tiles peel off near plinths. Rodents have trampled their way into the voids that have appeared over time. By itself, they do not sharpen the clay, but the gaps formed between the frame and the clay interested them very much, they expanded them and built nests in them. Over time, many walls in houses (especially non-residential or where there is no master relationship) have turned into a kind of Swiss cheese. Also, cracks were formed due to the use of raw wood. For 10-20 years, the trunk completely dried up, a cavity was formed between the adobe and the support, the size of a finger, or even two. Worse when using dead wood, usually affected by shishel. For 20 years, only dust remained from a full-fledged trunk.
If you look closely at the monuments of folk architecture exhibited in open-air museums, you can see how large the overhang of the roof was made by our great-grandfathers. The overhang of the huts built in the XX century. rarely more than 300mm. Hence the jets of water running along the walls, the need for frequent repairs and whitewashing.
So far, we have only touched the walls. How were the covers done? The technology was simple. Along the longitudinal axis of the house, there was a main beam - swine. Svolok was considered the abode of a brownie. The girders were supported on this beam, on which clay was thrown. Where boards were used as girders, the ceiling now has the appearance of a bubble hanging into the room (in part because the board lay flat). Where unskinned round timber was used, repairs were required because the ceiling had long since fallen off along with the bark. The load was also taken by eye, because the deformation of the ceiling (partly again due to raw wood) was a constant phenomenon. The attic has always been used for drying and storage. From that, sometimes a weak overlap in some places could give uneven shrinkage, which could cause waves.
In general, quite often thieves did not enter through a window or door, but through a punched hole in the ceiling. But this is in those regions where the entrance to the attic was from the yard, and not from the house.
Wings of the house in the XX century. asbestos fiber, bituminous, steel slates, less often tiles. In the west and north with shingle and board. In other matters, traditional straw and reeds were also used (each region had its own traditional roofs, but for the most part it was straw). Even today it is possible, by picking many slate roofs, to find straw or shingles under them. I think it could be said that the heat resistance of a house covered with slate is many times less, and therefore the ceiling dries up and cracks in summer, and in winter the hut cools down faster.
But the problem of reed and thatched roofs, in addition to the fire hazard, is that it needs constant care, and only then it will last a long time.
So, work on the bugs
1. adobe house needs a good strip foundation (a base that can even be a clay pillow). Not overly powerful, but just well-made. You can use both traditional rubble masonry and embankments in trenches, as well as modern reinforced concrete tapes.
2.Adobe must be protected from capillary moisture suction by a plinth and a steep blind area (it can also be made of gravel with water drainage).
3. Walls must have a thickness of at least 500, and preferably 800 mm, or have a special design (combination of different adobes according to saturation with vegetable fillers). Upon completion of the walls, it is necessary to tie the walls with any kind of belts (wooden or monolithic, but do not overdo it with weight). The walls themselves in their construction must be tied up, even a monolith.
4. The attic must be insulated. A warm attic is a guarantee of warmth in the house.
5. The overhang of the roof to the height of the floor must be at least 600-800mm. Proper collection and disposal of water must be organized.
6. The house needs care and attention. adobe house only then will it serve as well as possible if you follow it, look after it.
These findings will help make your home durable and reliable. I would like to add that you can meet clay walls standing without a roof for more than 10 years. They still hold the structural load. Ordinary red brick after the third winter already needs to be removed, although this is not difficult - it crumbles.
Those huts that we see today stood for more than 20-80 years without a master's attitude towards them. Despite all the mistakes made, their modest dilapidated appearance, they stand and perform their function remarkably. Not a single house can boast of the fact that “it was built if only how” and it stood for so long, well, perhaps, large-panel ones.
Conclusion
We do not call for living in an old housing model that does not meet modern requirements for comfort and lifestyle. We try to pay attention to technologies and mistakes made in order to use the experience of our ancestors, proven over the centuries, to build modern, comfortable, affordable housing. If you take into account and avoid all of the above mistakes, then you can get a high-quality, warm, environmentally friendly, humane, durable house, which you will not be ashamed to leave to your great-great-grandchildren.
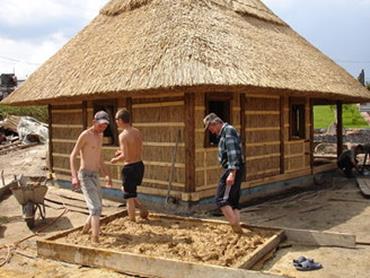
Everyone who wants to leave civilization first of all thinks about where he will live, sleep, escape from bad weather, and people are usually afraid that they will not be able to put up a log house for the season and prepare for winter, since this can be problematic, they choose as an option for living in a hastily made dugout or hut, but all this temporary housing is not entirely suitable for life, but rather as an extreme survival, depending of course how to build - but still.
Here, for example, we can consider such a compromise option that people with modest physical abilities and even women can build, since there are no heavy, heavy logs and you don’t need to dig a hole for it, like for a dugout. This house is a frame with walls sewn from logs of small diameter, and the roof, ceiling and floor are also made.
>
>
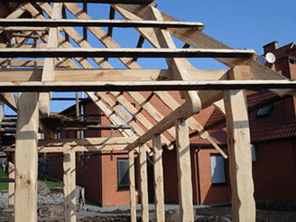
Further about the design of such a house and how to build it
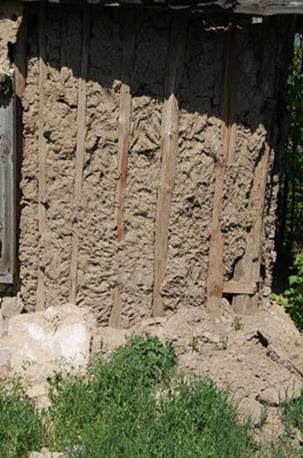
After the place is marked out, planned out, and cleared, according to pre-planned marks, you need to drop columns according to the markings. If the house is small, then four columns are enough, and if more, then it is better to add another column to each wall for reinforcement. After the pillars are evenly dug into the ground, you can start tying the longitudinal and transverse beams, you need to skip the logs under the logs on the floor and ceiling more often, a step of about 60 cm, and the walls will be strengthened when you sew the logs on them one to one, the logs need to be denser to each other, so that there would be no large lye left, they need to be adjusted with an ax, cutting off the excess.Further, when the entire frame and walls of the house, including the attic and roof, are assembled, we begin to insulate the walls. With the help of a wire or rope on the walls, we tie rods crosswise in several layers 20-30cm thick, we need them as reinforcement so that the clay does not fall off the walls because the clay layer is very thick.
Then, with a prepared solution based on clay and sand or loam or the soil that is contained under the upper fertile layer of the earth, we apply a protective insulating layer on the walls and then we also insulate the ceiling with a thick layer, about 15-20 cm. Before filling the ceiling with soil, you need lay something for additional sealing, for example, a film or roofing material, but if not, then you can use straw and grass. After, when the house is almost ready, it remains only to fill up the mound for additional insulation.
And so, after the main work, we are left with the most difficult thing to manufacture, this is a door and a window. If there are no special tools or ready-made boards, then you can assemble the door jamb and the door with an ax, of course, the work is painstaking, but you need to fit everything as tightly as possible so that the heat does not come out, and then sheathe the door with something - for example, with a cloth, or unnecessary clothes.
With a window, everything is exactly the same as with a door, we drive everything with an ax, the glass must be set at least double, but if it is not there, then it can be a film, but it must be put into three or four threads, with at least a centimeter distance between them, to create several layers of "air cushion". A tree for such a house can also be used freshly cut, without prior drying, since it is of small diameter and therefore dries quickly, and it will not lead, since you will already fix it, and it will not go anywhere. The diameter is not necessarily too thick, tree trunks with a diameter of 10-15 cm are suitable for logs.
It is better to use not nails for tying and fastening the entire structure, but to tighten it on a wire, or you can use ropes. Soil suitable for mortar for application to walls can be dug on the spot or right inside the house, at the same time the underground will be deeper, and then when laying the floor you will make a hatch and you will climb into the underground through it and store your supplies there.
Even simple earth can be used as a soil, but clay-containing soil is better. Of course, such walls will constantly crack, and they will need to be greased every year, but it will be warm and dry. Such a frame house, plastered with a thick layer of clay, is suitable for the first time, while the main, more comfortable housing is being built, and then the hut can be used as a barn, warehouse, dig a cellar there, or simply use it as a warehouse.
With a log house, everything is much more complicated, you need logs two or three times thicker, and each log needs to be carefully processed and adjusted, it’s a very difficult undertaking alone, whatever one may say, and you can’t make it in a season if you don’t have experience in building log houses and knowledge. As an option, of course, you can also cut down a small house about 3/4 m, it’s possible for one, but it will be cramped for a long-term, long-term residence, although this is probably like Kama.
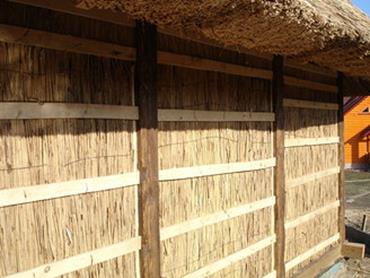
Reinforcement of walls with wooden rods and poles
Reinforcement allows a thick layer of clay soil to hold firmly on the walls and not fall out. For reinforcement, the first layer of poles is nailed or wired to the walls, and subsequent layers of poles are tied to the previous ones.The thickness of the reinforcement layer depends on the expected thickness of the walls, and the thickness of the walls must be done depending on the climate of the region where the house will be built, it can be 10 cm. and 40cm. Also, for the insulation of such walls, instead of reinforcement and coating, adobe blocks can be used.
Cob or soil blocks are made in molds, grass is added to the solution for the strength of the blocks for reinforcement, this makes the soil blocks stronger. The blocks are laid like brickwork, that is, the house is simply lined with blocks.
The roof frame must be strong enough to withstand the roof itself along with the roof and the snow load in the winter season, especially in those regions where there is a large amount of precipitation. You can cover the roof with roofing felt, and soft roofing, and tin, or just straw, in general, what will be available.  >
>
 >
>
Production of soil blocks, clay, adobe
Cob or soil blocks are made quite simply and quickly. Clay or clay-containing soil is kneaded directly in the pit, where the soil is located. It is more convenient to stir the soil by laying a film or tarpaulin, you can stir it in a bucket, basin, or not a sheet of tin.Water is added to the clay, and everything is thoroughly mixed and pounded with feet, then straw, or hay, or grass is added to it, even twigs of shrubs are possible, in general, everything that is suitable for reinforcing the block.
Then everything is again thoroughly mixed and laid in wooden molds, the solution is compacted and left to dry. When the clay dries and sets, the blocks can be removed from the molds and laid out for further drying.
It is necessary to dry for 10-15 days, periodically turning the blocks over for uniform drying, that is, a couple of days on one side, a couple on the next, and so on until completely dry. When the blocks dry, you can start laying walls out of them. Blocks are placed with dressing, that is, so that the vertical joints of the blocks do not coincide with each other between the rows, so that the upper block covers the junction of the lower blocks.
After masonry, the walls are plastered and whitewashed with whitewash (slaked lime), lime protects against moisture and precipitation, and gives an aesthetic appearance. Cob blocks hold heat well, do not like moisture and dampness, because of this they lose their strength and collapse (crumble). Such a hut must be greased again every year, all cracks and places where plaster and clay fall out must be plastered. The walls are plastered with ordinary clay with the addition of sand.  >
>
 >
>