This electrical appliance is very popular and often indispensable in everyday life. When the hair dryer breaks, you can contact the service center, and you can try to repair the hairdryer on your own. The accumulated repair experience suggests that breakdowns are most often eliminated without serious cash costs. To repair a hair dryer with your own hands, you need to know how it is arranged and correctly disassembled.
How the device is arranged
Any hairdryer has an engine with an impeller and heater. The impeller sucks the air on one side of the hair dryer, after which it blows the heater and is already hot on the other side. Also, the hairdryer has a switch mode switch and elements to protect the heater from overheating.
For household hairdryers, the fan is assembled on a direct current collector electric motor, designed for voltage 12, 18, 24 or 36 volts (sometimes there are electric motors operating on an alternating voltage of 220 volts). To power the electric motor uses a separate helix. The constant voltage is obtained from a diode bridge mounted on the outputs of the electric motor.
The heater of the hair dryer is a frame, assembled from non-combustible and non-conductive plates current on which the nichrome spiral is wound. The spiral consists of several sections, depending on how many modes of operation is hairdryer.
That's how it looks like:
The hot heater must constantly cool the passing air flow. If the helix overheats, it can overcome or fire can happen. Therefore, the hairdryer is designed to automatically turn off when overheating. This uses a thermostat. This is a pair of normally closed contacts placed on a bimetallic plate. The thermostat is located on the heater closer to the outlet of the hair dryer and constantly blows up with hot air. If the air temperature exceeds the permissible, the bimetallic plate opens the contacts and the heating stops. After a few minutes, the thermostat cools and closes the chain again.
Sometimes there is also a thermal configuration as additional protection. It is disposable and when a certain temperature is exceeded, burns out, after which it needs to be changed.
To better understand the principle of the hair dryer, you can watch these two videos (see the first video from the 6th minute):
Video: How is a hairdryer
Video: What inside the hair dryer
Schematic scheme
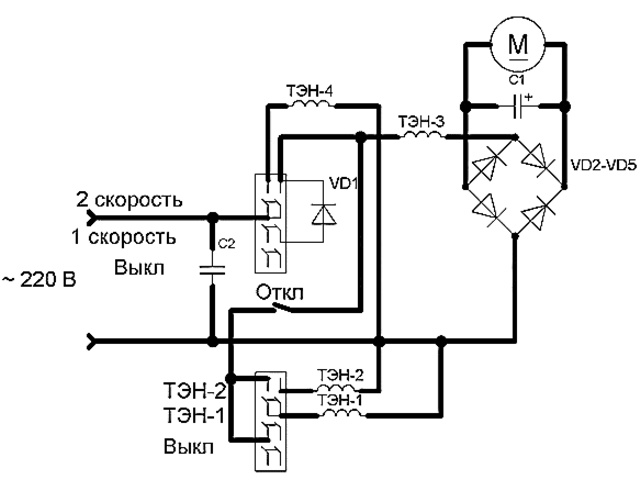
The diagram of most domestic hairdryes is close to the above. Consider it in more detail. The heater is three spirals: H1, H2 and H3. Through the helix H1 serves power to the engine, the helix H2, H3 serve only for heating. In this case, the hair dryer has three modes of operation. In the upper position SW1, the scheme is de-energized. Pregnant<<1>\u003e Hair dryer works at minimum power: Power is supplied through a VD5 diode, which cuts out one half-wave of alternating voltage, only one heating helix H2 is turned on (not at full power), the motor rotates on low revs. Pregnant<<2>\u003e Hair dryer works at medium power: the VD5 diode is shorted, both half-wave voltage are received into the scheme, the H2 helix operates at full power, the motor rotates on the nominal turnover. Pregnant<<3>\u003e Hair dryer works at the maximum possible power, as the helix H3 is connected. When pressing the button<
How to disassemble hair dryer
Attention! Before disassembling, pull the plug of the hair dryer from the outlet!
Parts of the body of the hair dryer are attached to each other with screws (screws) and special snacks. Screws often have a non-standard form: stars, plusies, forks. Therefore, you may need the appropriate bipores. The latches, in turn, are sometimes very difficult to disconnect and even the craft masters sometimes sometimes shake them. Sometimes the recesses under the fastening screws are closed with stickers, plastic lining or plastic plugs. Plugs are retrieved using an acute object - for example, a knife or needle. At the same time, the likelihood of a little to melt the housing and plugs a bit. True, the hairdryer does not work much from this. Sometimes half the housing glue together. In this case, it is necessary to cut them with a knife or scalpel, and after repair, glue (for example, epoxy glue).
An example of disassembling a hair dryer you can see in this video:
Video: how to disassemble and repair hair dryer Scarlet
Typical malfunctions: do-it-yourself repair
Consider the most common faults of the hair dryer:
Cold air drives
Possible malfunctions: overwhelmed spiral
What to do:
As a rule, the break is visible to the naked eye, even without a multimeter. There are several ways to repair Spirals:
- You can put the torn ends of the spiral into a thin brass or copper tube and enhance the pliers.
- The spiral keeps on the frame of heat-resistant, non-current plates. In such a plate, it is necessary to make a round hole with a diameter of about 2-3 millimeters, to make a round hole in a diameter of about 2-3 millimeters, insert a short bolt with a washer, to fill the crawled knuckles under the washer and tighten.
- Sketch one torn end to another.
- Rumbled ends can be simply twisted together. It should be noted that the third and fourth ways are less reliable than the first two. The fact is that when connecting the resulting ends with a sketch and twist, the renovated portion of the helix has increased resistance and therefore overheats and soon burns out in the same place.
- Disassemble a hairdryer (understandable thing, if you have it) and take from there.
- (not for everyone): You can wind the spiral yourself. Where to get nichrome? For example, order in China.
- you can buy a ready-made spiral. To find the desired, enter in the search string of your browser<<спираль электрическая для бытовых электроприборов купить>\u003e. Spirals are of different power and sold in bags of several pieces.
View examples of repair spirals in these videos:
Video: Viconte VC-372 hair dryer repair (overwhelmed spiral)
Video: where you can buy nichrome
Does not turn on, i.e. does not heat and the fan does not spin
Possible malfunctions: no voltage is served, that is, the problem with the power cable
How to repair:
First carefully view the cable from the network plug to the housing: there are no obvious damage. If you are, remove the damaged area and smear the cable ends. Perhaps this is all malfunctions and hair dryer will work. An example of a cable repair is in the above video: How to disassemble and repair hair dryer scarlet.
The impeller does not spin or spinning on low revs
Possible malfunctions: The engine is faulty or its shaft wound hair.
If the hair was wound on the axis of the electric motor to remove them, they will have to dismantle the impeller. You will also need to remove the impeller if you are going to lubricate the engine shaft or replace it. How to do it, you can see in these two videos:
Video: Remove the impeller with a hair dryer
Video: how to remove the fan with a motor hair dryer
In some cases, you can grab your fingers for the base of the impeller and pulling it off.
Regarding the inspection of the electric motor, the author believes that the best way - in terms of security - is the engine dismantling and connecting it to the appropriate power supply unit with a short circuit protection. If the engine does not rotate, you need to check the integrity of the windings by a multimeter. When the winding breaks, you will have to buy a new engine (although you can rewind old, but it probably makes sense only as entertainment). If the engine is very sparking, you will also have to buy a new one. Wipe the alcohol in this case, if it helps, it's not for long. One of the options where you can purchase a new engine: order in China (Looking for<
Hair dryers with air ionization and infrared apparatus
Hair dryers with ionization - When the mode is turned on, there are many negative ions, neutralizing a positive hair charge, which they become smooth and are not overwhelmed. To create negative ions, uses a special module placed in the handle of the hair dryer. The wire leaving this module is located in the heater area. The air is ionized, in contact with this conductor.
Diagnose the serviceability of the ionization module without special devices is possible by indirect features. If you stopped feeling the difference when you enabled and disabled ionization module - and you made sure that a normal supply voltage arrives on the module - therefore, the module is faulty. Next, you will need to find the module for the desired voltage and suitable in dimensions. Look, again, in China.
Photo Gallery: Approximate view of ionization modules
Infrared hair dryers Dry hair not hot air, but infrared radiation. They are pretty expensive, belong to the category of professional and dried hair much faster than ordinary hairdryers. Instead of nichrome spirals, an infrared heating element is used in them (as in infrared heaters). Otherwise, their design is similar to the design of the usual hair dryer.
Video: Infrared Hair Dryer H2D
To disassemble and repair the hairdryer, you do not need to be a graduate specialist. Enough knowledge of the course of high school physics and the presence of direct hands growing from the right place. Dare and everything will turn out!
Hair dryer is an electrical device that is a segment of a pipe through which a stream of air heated to 60 ° C is supplied at a given direction at a given direction. Often, for ease of use, the pipe is equipped with a pistol handle.
The photo shows the Melissa Magic brand with a capacity of 1600 W. The handle placed a switch of modes of operation, with which you can turn on the hair dryer and stepwise change the temperature of the outgoing air nozzle.

The construction hairdryer in appearance, the principle of operation, the device and the electrical circuit is practically no different from the hair dryer. Only in it the air flow is heated to 600 ° C.
Device and principle of the hair dryer
When the hairdryer is turned on, then the cold air from the room is suused in its pipe with a rotating impeller, planted on the DC motor shaft. Next, the air flow passes through a tetrahedral heat-resistant frame from mica or ceramics, which is wound to warm spiral from nichrome. Cooling the helix, the air flow is heated to a temperature of 60 ° C, and in a construction to 600 ° C, after which it comes out of the pipe.

On the body of the hair dryer, there is usually a switch combined with a stepped setting of the mode of operation, allowing you to turn on the hair dryer to a complete or half-power mode.

The photo shows the appearance of the typical engine switch mode switch.
To exclude the skin burn when drying the hair and destruction of the body of the hair dryer when the engine is impaired, thermal protection in the form of a bimetallic plate is installed on the frame.

When the air is heated above the specified temperature, the bimetallic plate bends up the arrow in the drawing and opens the contacts. The heating spiral is de-energized, and air heating stops. After cooling, the bimetallic plate is returned to its original position, and the contacts are re-closed.
As can be seen, the principle of operation and the device of the hair dryer is not much different from other heating household appliances and to repair the hairdryer can any domestic master.
Electrical diagram of a hair dryer
Most construction hairdels and drying hair have below the electrical circuit. The supply voltage is supplied through a C6 type fork with a flexible cord. The C1 condenser serves to suppress the interference emitting the brush node of the engine. The R1 resistor serves to discharge the C1 capacitor after disconnecting the plug from the socket to eliminate the shock of the human current when the plug is touched. In some models, the elements C1 and R1 are not installed.

Managing the performance of the hair dryer is performed using the S1 switch. In its position shown in the diagram, the hair dryer is in the off state.
When moving the switch motor to one step to the right, its movable contact closes the conclusions 1-2 and the supply voltage through the rectifier diode VD1 enters through the current-limiting helix H1 on the engine and the heating helix H2. The diode cuts half sinusoids and thus reduces the speed of rotation of the impeller, and the heating power of the helix H2 half.
When moving the engine is still one step, contacts 1-2-3 are closed, all the voltage of the network is supplied to the heating element and the engine and the hair dryer works at full power.
Usually, DC motors, calculated on the supply voltage of 9-12 V, are installed in the phenomena, the helix H1 is used to reduce the voltage. To convert an AC to the constant, the diode bridge VD2-VD5 serves. Electrolytic capacitor C4 smoothes ripples. C2-C3 sparkling capacitors perform the task of the sparks in the brush collector assembly of the engine and the suppression of radio interference.
The S2 button is used to switch the performance of the hair dryer to the cool air mode. When you click on it, the helix H2 stops warm.
To protect the hair dryer from overheating, which can occur due to reducing the inclination of the impeller in the event of a motor malfunction, serves the hermal protection element ST, which opens the supply voltage supply circuit to the heater H2 when the maximum allowable air flow temperature is exceeded.
How to repair hairdryer with your own hands
Attention! In the repair of the electric hairdryer, caution should be taken. The touch to the bare sections of the circuit connected to the electrical network can lead to electric shock. Do not forget to remove the plug of the hair dryer from the outlet!
If a broken hairdryer got into repair, then first of all it is necessary to find out for what external signs of the hair dryer was recognized as defective. By them, using the table below, immediately assume in which place to seek a malfunction.
| External manifestation, reasons and ways to troubleshoot fane | ||
|---|---|---|
| External manifestation | Probable reason | Remedy |
| When drying hair, the hair dryer is periodically disconnected | Passing the power cord at the exit place from the body of the hair dryer or fork | Repair or replace network cord or plug |
| The air from the hair dryer goes hot with the smell of Gary | Insufficient speed of rotation of the impeller as a result of the navigation on the hair motor shaft between the impeller and its housing | |
| Hairdryer after short work turns off | Thermal protection works due to insufficient speed of rotation or stopping the impeller as a result of the navigation on the hair motor shaft between the impeller and its housing | Remove with sharp hair tool with shaft |
| Hair dryer does not turn on | In the cutting cord or defective mode switch | Repair or replace a power cord or switch |
| Cold air goes from the hair dryer | Faulty Heating Disconnection Button, Spiral Operations, Contacts were oxidized in the thermal protection element | Ring details multimeter faulty repair or replace |
| The hairdryer works only in one of the position switch positions. | Faulty mode switch, one of the helix or diode VD1 | Cut the multimeter switch, diode and spiral, faulty parts to repair or replace |
How to disassemble a hairdryer
Disassemble the hairdryer is more difficult than repaired, since parts of the body are usually connected inside with the help of latches, the location of which is not visible from the outside.

But always on the handle in the field of entry into the housing of the network cord, there is a self-tapping screw, usually closed with a decorative plug or a stabbed label. Due to the different color of the body parts of the BRAUN hair dryer, shown in the photo, it can be seen on what line to disassemble it.

This is what the decorative plastic plug looks like in the body of the hair dryer. Since it is one color with a handle, it is difficult to notice it. To remove the plug, you need to be a sharp object, for example, a seboard or a knife with a sharp end of the blade to pry it over the edge.

After removing the plug, the screw head became visible, but it turned out that the slot on it is triangular, and the face is made in such a way that the self-tapping screw can be screwed only clockwise. The manufacturer provided that at home the hairdryer for repairing to disassemble without breakdowns the case was impossible.

To unscrew the screw with such a head, first with the help of a heated electric soldering iron, it was heated. To do this, just press the sting of the soldering iron to the head and hold for a couple of minutes. From the heating of the plastic self-reserves around the thread softened. Next, while the plastic has not cooled, with a screwdriver with a flat stale width equal to the length of the verge of a triangle of the Slice Selflessness without difficulties was unscrewed.
In order to avoid difficulties in the need for a hair dryer, the solemnosis was replaced with the same size, but with a slot in the head under the crusade.

The removable part of the housing was additionally held on four latches. Two of them were on the sides of the pipe. To disassemble, it was necessary to squeeze them through the resulting slot using a flat screwdriver simultaneously with the dilution.

After the discharge of the side latches, the top was released themselves. The latches were shallow, so they managed to disassemble the hair dryer without breaking them.

In this box, the network cord was faulty, and therefore it was not necessary for its disassembly, since the cord connection site to the electrical circuit was affordable.
Examples of repair of a fane
Most often, the hair dryers are broken due to the laptus of the network cord or disruption of the electric motor with the impeller. In modern hair dryers, due to the presence of thermal protection and use of thick wire for winding the spiral, it burns very rarely. From a dozen renovated by me, hairdresses with a distilled helix did not see.
Repair of a network cord hairdryer
When drying hair dryer, the hair dryer moves intensively and the power cord is constantly bent. Although the wires in the cord are copper and multi-core, but from the multiple gerbins over time are round. A sign of the beginning of the cliff of the wires is the periodic temporary termination of the hair dryer during drying hair.
Therefore, half of the breakdown is associated with the laptop of the network cord at the exit of the housing, less often at the plug. The first sign of such a breakdown is interruptions in the hair dryer during drying hair. At this stage it is easy to find out the place of the cord defect. It is enough to fix it in the middle and move the cord at first at the entrance to the body of the fork, and then at the entrance to the body of the hair dryer. If the hairdryer will work stably, it means that the cord is in order and the malfunction must be sought elsewhere.
If the wires in the cord rushed at the place of exit from the fork, then you can repair the hair dryer without disassembling it. About how to replace the plug is described in the article "Electric fork, how to connect, repair".

Usually, the cord wires inside the hair dryer are soldered to the printed circuit board or join with the help of the clad terminals, as on the photo above.
To check the cord, you need to ring the wires, touched by one probe of the tester or the multimeter to one of the plug pins. The second probe multimeter alternately touch the ends of the wires. One of the wires should show zero resistance. Between the remaining wire and the second pin should also be zero resistance.

If the wires are nicknamed, then the mechanical cord can be accurately determined at this time, in which place the wire is pulled. In the repaired product, the cord was torn off at the input site in a hairdryer.
If the cord wires are soldered to the printed circuit board, then they can not be squeezed, connecting the probe to the instrument to the plugs. The dryer switch must be set to maximum power mode. The heating spiral has a resistance of about 30 ohms. Therefore, if the cord wires are working, the multimeter should show the same resistance.
With the help of an online calculator, you can accurately calculate the resistance value of the nichrome spiral of the hair dryer, based on its maximum power.

In a repaired hairdryer, the cord break was at the injection site into the case. To restore work, you need a defective area of \u200b\u200bthe wires to cut off and remount the capel terminals. To remove the terminals from the wires, you first need to spend a knife to break up the mustache, fixing the wires, as shown in the photo.


In the next step, the looting section of the wire is cut off and insulation is removed from the cord and wires. The length of the cord will decrease on a tet of centimeters, which will not affect the performance characteristics.

It remains to start the wires and terminals with the help of a solder with an electric soldering iron and solder them together. After putting on the terminals, assembly and checking a hair dryer, repair can be considered complete.
If there is not at hand of the soldering iron, then in this case the wires are cut off at a distance of 3-5 cm. From the connection location to the electrical diagram of the hair dryer and the segment of the defective cord is removed. Then the wires are connected by one of the mechanical methods, depending on the inner free space in the handle of the hair dryer.
Engine power supply chain repair
He fell into repair of a hair dryer Melissa-1600, with a complaint that the air flow from it became weak with the smell of Gary. When checking it turned out that the impeller rotated with insufficient speed. Immediately suggested that the hair between the impeller and the body was hung. Usually in most cases, with such signs, this happens.

But after dismantling the hair dryer, it turned out that one of the rectifier diodes installed on the engine was ripped in half. The sound of the rest of the diodes showed their serviceability. Therefore, the engine and worked, but only one half-wave of straightened voltage was served on it.

The faulty diode was falling and in its place, with the observance of polarity, the first-type KD105 type was smeared. The engine power supply is usually 9-12 V at a current of not more than 0.5 A. Such parameters will provide almost any rectifier diode.
At the same time with the shaft of the motor, woven hair were removed and the bearings were smeared with machine oil. To do this, it is enough to apply a drop of oil to the point of fixing the shaft in the motor housing and turn several times the shaft for the impeller.

Before installing the engine in a hairdryer, it is desirable to check it. For motor operation, a constant voltage of 9-12 V. is required, but since the voltage is fed to the diode bridge, you can save the engine from both the constant and alternating current source. Even the simplest adapter from any device, outstanding the corresponding voltage and current to 0.5 A.
It is necessary to feed the voltage to the inlet of the diode bridge, the points of its solder to the electrical diagram of the hair dryer. If the engine connects to a constant voltage source, then you need to check first at one polarity of the connection, and then change the connected wires by places. It is necessary to check all the diodes of the bridge.

The engine tests after prevention and repair showed that its impeller when scrolling the hand rotated easily and when the voltage is supplied from an external voltage source with sufficient speed.
Checking the hair dryer after assembly showed that it is fully restored. The impeller rotated at high speed, and the smell of Gary disappeared.
Repair switch and cold air turning buttons
If the hairdryer cannot be enabled, and the network cord is working, the reason, as a rule, is a violation of contacts in the modes switch. And if all the dimensions of the hair dryer, but the air does not heat up, then the heating, heat shut off or burned, is faulty.

Switches of operating modes in the hairdryer are usually falling into a small printed circuit board, which is fixed in the guides or fastened with self-drawers. The photo shows the conclusions of the switch, charged in the printed circuit board. On the left side, the hot air feed switch is visible.

If the mode switch is not called, you can try to try to clean the internal contacts through the hole located next to its engine. It happens that only the contact of one of the modes of operation burned down, and the rest in working condition. In this case, you can sacrifice the rarely used feature of the hair dryer and switch the switch to a good contact.
It happens that due to the burnt contacts as a result of heating, the case of the switch is deformed and the engine is jammed. In the absence of a switch on the replacement, you can connect the wires directly by leaving only one hair dryer mode. In this case, the hair dryer will have to connect its plug to the outlet.
If the off button of the turning off of the warm air flow is faulty, and it has nothing to replace it, then it is enough to root its conclusions. In this case, this feature will not work anymore, and the rest of the hair dryer will work, as before.
Repair of thermal protection
Thermal protection is two contact contacts, one of which is fixed on the bimetallic plate. When the plate is heated above the desired temperature, it bends upwards, as the arrow shows on the photo. As a result, contacts are blocked, and the power supply circuit of the heating spiral is broken.
If the shutdown button of hot air is fine and the spiral is a whole, it is obvious that contacts in the thermal protection relay were oxidized. To restore, it is enough in the gap between the contacts to introduce a folded twice-grained sandpaper and pressing the bimetallic plate from the top of the finger several times to stretch the paper.
Faults of the heating element - Spiral
If the air flow from the hair dryer is cold when the engine running, a good shutdown button and thermal protection, then the breakage is associated with the nichrome spiral.
The spiral break is easy to detect an external inspection. A contact disorder in compounds in the form of hollow rivets on the frame of the hair dryer of the ends of the nichrome wire with wires, running from the operating mode switch, can not be determined in appearance. If rivets do not have spontaneity, then only a multimeter sounder will help.

To restore contact in the rivet connection, it is necessary using the pliers to additionally enable it. Work should be done carefully, so as not to break the fragile mica or ceramic frame.
Blizzard or broken spiral in modern hair dryers is practically not happening, but if such a refusal happened, the helix will need to replace the new one. The splicing of wire spirals with a twist or compression in the segment of an aluminum or brass tube will not lead to long-term success. If the spiral was worn out, then after such a repair, it will soon overrigent in another place.
Nichrome spiral, taking into account the power of the hair dryer, you can purchase a new or co over from your nichrome wire, calculating its diameter and length on the table.
Removal of hair and lubrication shaft engine hair dryer
Another common malfunction of the hair dryer, which can be eliminated independently, having only a standard tool set at hand, it's when the hairdryer works, but the outgoing air jet is very hot with the smell of Gary from behind the winding on the hair engine tree or poor engine bearings.
Hair removal from the engine shaft Babyliss hair dryer
I got to repair the Babyliss hairdryer, shown in the photo, with a complaint that the outgoing jet of air became weak and very hot.

When checking, for the sound of the fan, it became clear that the frequency of its revolutions is underestimated, and the cause of the malfunction lies in the engine operation. To eliminate the fault, the hair dryer had to disassemble.

In order to disassemble the Babyliss hairdryer, you first need to remove the nozzle by unscrewing two screws. Next, with a screwdriver with a flat sting, a locking ring is removed from the output side of the heated air. It can be easily.


It remains to disconnect the halves of the case, which are held on two latches from each side. In the photo, due to the translucentness of plastic, the latches are clearly visible, as in the photo in the form of light strips.

The hairdryer was disassembled and left to get to the place of the shaft, where the hair was wound. The engine is fixed inside the plastic housing, which is a pipe in such a way that it is necessary to remove the fan impeller to remove it. And the impeller, as a rule, is attached to the shaft tightly and here usually there are great difficulties, because it is impossible for the impeller with a standard tool, and it is easy to break it easily.

To solve such tasks, I have made from Chinese wall-building Special tool - light-bottomed at the right angle ends of the sponges. With the help of the tisces, the ends easily bent, because they were not hardened.
With this climb, I also successfully repair the slots of the serpent and lightning, in case the links cease to be closed. Ordinary pliers often do not get there. And thanks to the curved ends of the sponges in any cases, it is easy to squeeze the closing links part of the slider.
In addition to the upgraded pliers-water-in-room, it is convenient to hold the axles and shafts, nuts and other items of different forms - do not slide, like a pliers with flat sponges.

After removal from the shaft of the engine, the impeller has access to the winding hair. In this model, a hair dryer puts a brass sleeve on the engine shaft, and the impeller is hoping. It is usually planted directly on the engine shaft.
It remains only to a sharp object, such as a knife, seer or needle, remove hair and collect a hairdryer in the reverse order. So that it does not have difficulty assembling a hair dryer, while disassembling I advise you to make some photos.
Hair removal and lubrication shaft engine Viconte hair dryer
At the Viconte Hair dryer, the external manifestation of a malfunction was the same as in Babyliss, but in addition the air proceeded to the smell of Gary and the fan worked with a spray. This testified that the engine bearings were produced.

The sequence and technology of disassembling a hair dryer is similar as a Babyliss hair dryer, so it is not necessary to describe it.

The supply voltage using two wires was fed to the diode bridge, sprinkled on the engine outputs. For the convenience of repairing the wires were squeezed with a soldering iron. The colors of the wires can not be memorized, since alternating voltage is fed to the bridge, and the values \u200b\u200bof the wire connection is not.

An attempt to remove the impeller from the engine shaft using the above-described walls was not crowned with success, even with a large muscular power. I had to invent, how to remove your hair and lubricate the bearing, without removing the impeller.

The idea came that you can not suffer with removing the impeller, and drill a hole in the engine holder housing, which was done.

The location of the hole must be measured, not to get into the engine body or the base of the impeller. At first, a hole with a diameter of three millimeters was drilled, and then twisted to five. Plastic housing is soft and thin, so the hole can be made and the end of a pointed knife.

To remove hair from the engine shaft from the stationery clips, a hook was made. To make such a tool, you need to bend the end of the clips, on the sandpaper it to sharpen it and the tip of two millimeters long. During the minute, all the hair was removed.

For lubrication of the bearing had to take advantage of the medical syringe. It is enough to apply one drop of the oil to the engine of the shaft into the engine. In order for the oil to fall into the bearing, you need to take the impeller, move the shaft several times along the axis, scrolling it.
It is necessary to smear the bearing on the opposite side of the shaft. Any machinery is suitable for lubrication, for example, to fill in the car engine. If there is no oil at hand, then you can remove the inconscepiece of the oil level from the engine from which to take some dripping drops.

To test the fan operation, a voltage of 10 V from the DC power supply was supplied to the diode bridge. The engine will work at voltage from 5 to 12 V, so even the charger is suitable from any phone. This check is not necessary, but if possible, it is better to make sure that the fan earned as it should be.

The check showed the normal operation of the engine, without outsiders and sufficient air flow head. You can not close the hole and not close, as it fits tightly to the body of the hair dryer. If not so, then you can take it with scotch.
As you can see, the most common fence breaks to eliminate is not at all difficult and such a job, if desired to any home master. In any case, it is before buying a new hair dryer to try to repair the failed hairdryer.
Recently, a hair dryer was brought to me not from the most old-fashioned, but the times are now other who repairs a hairdryer for $ 10, and sometimes it's easier to buy a new, taking into account that the entire market is literally clogged with cheap Chinese hair dryers. So taking this opportunity, consider the design and work of hair hairdryers.
The hairdryer works from a network of 220 V, 50 Hz. Any hair dryer has two main parts - heating element and electric motor.
As a heating element, the nichrome spiral is usually used, it is it that provides warm air. In the phenols, the DC electric motors with a capacity of up to 50 watts are mainly used, there are exceptions.

Passing through the spiral, the current loses its initial force, since the spiral has a certain resistance, it is this current that it is straightened by a diode bridge and is fed to the electric motor.

Electric motors in the hair dryers are designed for voltage 12, 24 and 36 volts, only in very rare models are used electric motors with 220 volts nutrition, in this case, the voltage from the network is directly fed to the electric motor. A screw (propeller) is strengthened to the engine rotor, which ensures the heat of heat from the spiral, it is due to this that it turns out a fairly strong directional flow of warm air. The power of the hair dryer depends on the thickness of the used helix and the power of the installed motor.

The brought a hair dryer was disassembled, it turned out that the problem was in the torn path on the board with switches. After the fill with its solder - the device has earned normally.

But most often, the main reasons for the inoperability are a torn spiral, a non-working engine that melted from heat controls of the switches, torn off the power wire or fork.

Elements in the Scheme: 1 - nozzle-diffuser, 2 - housing, 3 - air duct, 4 - handle, 5 - fuse from twisting cord, 6 - Cold air mode button, 7 - Air flow temperature switch, 8 - flow rate switcher Air, 9 - turbo mode button - maximum air flow, 10 - loop for hanging the hair dryer.

A DC voltage obtained by a diode bridge consisting of four diodes (or simply from one diode) is supplied to the electric motor.

We highlight the two elements of the chain, which are consumers (loads), it is a spiral and diode bridge (do not consider the engine, because it is the load of the bridge). In the circuit, the elements are sequentially (one by one), it means that the voltage drop on each of them will depend on its resistance and their sum will be equal to the network voltage at the third position of the switch.

Most of the initial levels have the simplest electrical system, in such hair dryers, only one switch, which turns on the fan and TEN. Heaters can be performed in various modifications, but in all hair dryers, they are made of nichrome, pig in the spring.

However, almost all simple modern hair dryers have 2-3 levels of power adjustment and air flow.
More advanced hair dryers have smooth regulators of the velocity of the blowing and temperature of the air flow.


Recommended maximum work hours - 5 minutes. Upon completion of the operation, the temperature regulator is removed at a minimum, leave on a cold picture to half a minute, and only then turn off the hairdryer. Try not to take it with wet hands, otherwise it is possible to enter moisture on the internal elements of the scheme, which can lead to a closure.
The electric hairdryer is the most important accessory in the life of a woman. In many ways, thanks to this device, the woman is always attractive and desirable for a man. Hair dryer can not only dry hair, but also make beautiful styling, emphasizing the natural beauty of a woman. Hair dryer is also the first item in the hands of the makeup artist in presenting the life of a modern woman without a hair dryer is almost impossible. But, like any other device, it is prone to breakdowns. On how to determine the malfunction, how to disassemble the hairdryer and repair, if possible, and will be discussed in this article.
Total device of a hairdryer
Due to the widespread, regardless of the manufacturer, most of the phenomena have a similar design. The main elements are the heating element and the electric fan. The heating element is the usual spiral that is made of high electrical alloys. Due to this, the helix can heat up to high temperatures and not burn. In the electrical hair dryers, nichrome wire is used as the heating element. Even having very high resistance, the spiral will certainly burn, if there is no cooling.
Cooling in airy hairdryers, that is, the heating element is cooled with a strong flow of air. The stream strength is designed to prevent the spiral burnout. The main element in the cooling unit is an electric motor. Power can be different and fluctuated from the class of the hair dryer and from its manufacturer. The higher the class of the hair dryer, the greater its power. Engines of high power put on the Rowenta hair dryer. How to disassemble it, we will explain below. Engines for hair dryers are produced in low-voltage performance. The supply voltage, as a rule, does not exceed 12 volts. It is necessary to ensure the compactness of the hairdresses and their safe operation. To lower the voltage to the reduced helix, which is built into the heating element, is included in the diagram. In addition, the hairdryer has a power button, which can also be the power regulator.
Tools for repair

Regardless of the manufacturer or class of hair dryer, the following tools and consumables will be needed by the home master:
- screwdriver;
- passatia;
- soldering iron;
- tweezers;
- glue;
- soldering paste or flux;
- tin;
- pieces of wire of various sections;
- multimeter.
Disassembly of the fane
As a rule, the hull of the phenomenes is made of plastic, which are bonded by self-draws. You need to unscrew them with a curly screwdriver. Next, you need to push the halves of the housing, bring the latch from the engagement. Latches are very fragile and important to act with caution, so as not to break them. Especially if you want to disassemble the Rowenta hair dryer. How to do it right? The main thing to unscrew all the screws. It happens that in the hair dryers, depending on their design, hidden self-tapping screws are used. They can be under stickers or manufacturer logos. If you do not unscrew them, then with further disassembly you have every chance to break the latches.

There is one more feature if you do not know how to disassemble the brush of the hair dryer - such devices consist of several parts and have a rotating head. When disassembling such a device, you need to carefully remember, in what order, and how the details are attached to each other. It is very important and necessary for the subsequent proper assembly of the hair dryer.
Finding a fault
We learned how to disassemble a hairdryer. Now you need to find and eliminate the malfunction so that they can use for a long time. If the hair dryer does not want to turn on at all, then the first thing you need to check the integrity of the electric cord and forks. Film service will help determine the visual inspection. If the traces of burning or melting are visible during inspection, then such a plug must be replaced. Often, the electric fork and cord make up one whole, then the replacement of the entire cord is necessary.

To protect the hair dryer from overheating, the thermal switch and the thermal stitch are used. The first is the contact plates, which, when reaching a certain temperature, operate and break the chain. The thermal stitch also protects the hair dryer from overheating. With a strong overheating, the fuse burns and unlocks the chain. Also, the malfunction may include a non-working engine. Often it can happen with how to disassemble it is written above.
If the cord is detected, then it is replaced. The integrity of the cord can be checked by a multimeter. Turn on your multimeter to measure the resistance, in turn, measure the resistance of the cord lived. A good live will show zero, and burnt endless resistance.
The thermal stitch is a solid element. It is short-closed, when the critical temperature is reached, it simply burns out. This can also be checked by a multimeter if such a defect is present, then the fuse must be replaced. In this case, you will need a soldering iron and a new fuse.

A malfunction can be wounded in the thermal switch. - The basis of this device, due to the high temperature it can lose its properties and stop working. Then such a switch is also subject to replacement, as it will not be possible to restore it.
Another reason for repair can serve as the heating element. This most often happens to the "Scarlet" hairdryer (how to disassemble it and repaired, you can learn from the article). Spiral burning can occur for two reasons: non-protection of protection and a long service life. In this case, you need to replace the spiral, pre-restoring protection. Disabled motor is subject to replacement.
Prevention
To avoid unnecessary spending on repairs, it is advisable to carry out the prevention of the device. To do this, it will also be necessary to disassemble a hairdryer. How to make prevention? First of all, this is a visual inspection. Examine a hairdryer, which uses for external damage: the integrity of the cord, forks, possible refueling on the case. If there are such damage, then the hairdryer needs to be repaired or replaced. Important! It is impossible to operate a damaged hairdryer, it can lead to injury or fire.

From time to time you need to clean the hair dryer. During the operation of the hair dryer is clogged with dust and short hair. To clean it removes the back cover with a protective grid. Through the opening opening, you can get to the heating element. Soft tassel gently wrap the dirt and hair from the grid, and also clean the spiral. Here you learned how to disassemble the hair dryer to repair it. Let's summarize.
Conclusion
Electric hairdryer is a rather simple household appliance. But, like all devices that feed on the 220 volts network need constant care and prevention. You learned how to disassemble a hairdryer for drying and styling hair. But there are also technical hair dryers that are used in construction. As a rule, they are very powerful, used for soldering, tinnitus, removal of paints and varnishes, adhesive plastics and much more. Despite the greater power and other applications, such hair dryers are similar in design, their disassembly and repair are similar to hair hair dryers.
Any hairdryer consists of a motor, fan, heating elements and an electrical circuit that makes these elements work consistently.
Depending on the number of modes and manufacturer's firms, element base, appearance, the composition of the switches can be different. But nothing more complicated than a thyristor, inside will not be. Therefore, it is quite possible to repair hair hairdryers with your own hands.
Briefly about the design
The housing is kept on screws. Their heads can be - and often there are a non-standard sample. It is a plus sign, an asterisk, forks.
Therefore, first of all before repairing the hair dryer, take care of the instrument capable of cope with such a task.
Sometimes the housing sash is additionally attached to each other with special latches.
 Boldly cut the wire And prepare it to install.
Today, the popularity of independent repairs is increasingly increasing. In addition, there are different situations. For example, you need to urgently disassemble the Bosch, Philips or Rowenta hair dryer, but there is no instruction at hand. What is in this case to do? Today we will try to tell you more about it.
How to disassemble a hair dryer Philips?
Sometimes after an unsuccessful fall or after another mechanical impact, this device stops working. A wonderful way out of this difficult situation will be the full disassembly of the hair dryer. Do you want to know how to disassemble a hairdryer? There is nothing difficult in this, the main thing is to follow the steps of the instruction.
The first step is the disassembly of the case. Most models (for example, Rowenta Pro 2300 and Braun 3536) is revealed to two identical halves. To comply with safety rules before unscrewing screws, it is necessary to remove the electrical cord from the outlet.
Typically, the body of the device is kept on simple metal screws. They can be with non-standard heads in the form of plus signs, forks or asterisks. Therefore, before making a hair dryer, Philips will need to take care of the presence of the necessary tool.
After opening the device, you will find internal mechanisms of the device that are responsible for its uninterrupted operation. If the hair dryer broke, then the reason for the breakdown will be hidden in these details. In addition, some models have additional fastenings in the form of latches and hidden screws hidden under decorative lining.
Do you want to know how to disassemble the hair dryer Philips Salondry Control? To do this, you need to get acquainted with its internal device and thoroughly examine all the details. The most frequent breakdown of many devices is a damaged power cord. In the presence of burner pieces or fesoms, it will be necessary to overpass it.
The main internal element of any hair dryer is a fan. It is driven by an electric motor and performs air drawing through a special hole with grille. In some cases, the breakdown of the device is associated with its pollution, so if there is a dust, it should be cleaned carefully.
Air passes through the heating element - wire, which is wound on the thermostat. It should have a one-way view. If you have breaks, the parts of the helix should be twisted or soldered. Some models (for example, Babyliss Pro) are equipped with another limiter, which does not allow the facility to suck along with the air long hair and other veins. It can also clog the device in improper operation.

If, when the device is turned on, cracking is heard and sparks are seen, then it indicates the engine breakdown. This problem can be solved by replacing copper windings and a diode bridge. However, to complete this repair at home is difficult, so in this case you should contact the workshop.
Do you want to know how to disassemble the hair dryer brush Rowenta Brush Activ 1000? The design of this device has several nuances compared to the usual hairdryer. In order to inspect the internal elements and mechanisms in case of failure, you must perform a few simple actions:
- Remove the plastic nozzle from the front of the device, as it will prevent disassembly in the future. To do this, it must be smoothly moving to the right - left until it is completely disconnected from the device;
- When removing the plastic ring, it is not recommended to use screwdrivers and another tool, as they can damage the case and leave visible scratches on it;
- After you need to remove the rear mesh nozzle, which interferes with the disassembly of the device. It should not be made a lot of effort, because it can lead to its breakdown;
- Modern models of phenomena of many brands (Roven, Remington, Scarlet and others) do not have metal bolts on the housing. Fastening two parts of the hair dryer is made using latches. For their separation, two half of the housing should be pulled from each other, simultaneously rotating.
So that you do not have to repair household appliances independently need to buy from the variety in the market? Before buying, it is necessary to pay attention to the reputation of the trademark, since only well-known manufacturers are engaged in the production of quality products. Other selection criteria are power, the number of operation modes, the function of the cold air supply.

We told you about the main features of the internal device of the hair dryer, so you should not have questions, how to disassemble the hair dryer Rovent Bras an asset and other brands. However, remember that when we need to repair small household appliances, security rules should be followed and be sure to get the power cord from the outlet.
As a rule, hair dryers are quite often susceptible to various breakdowns, and you have to buy a new one. The device is not the most expensive, of course, it is quite possible to purchase another hair dryer, but at the same time it is quite simple, and quite many will be able to restore its performance without much effort.
Principle of operation
All hair dryers, regardless of the brand and type of hull, have the same principle of operation - the electric motor leads to a motion of a fan that drives air through heating spirals. Typically, the hair dryer has a heating level switch, providing various thermal modes, the switch commutes the sequential connection of the desired number of spirals - the less they are in the chain - the greater the current current - the greater the heating. Also, hair dryers are also equipped with thermal protection that turns off the device when the permissible temperature of the helix is \u200b\u200bexceeded. If such protection worked - be sure to turn off the hairdryer from the network, because when the thermostat is reduced, the thermostat will restore the electrical circuit - and the hair dryer will work.
Major faults
Troubleshooting provides for disassembly. It is usually bonded by a pair of self-tapping and latches on the halves of the hull, which is quite easy to break, so you need to act carefully. Although there will be no special tragedy with a broken latch - the body can well hold on to self-drawing, or you can apply the glue in several places when assembling, but quite a bit - suddenly you have to disassemble.
The smell of burning - Quite often occurs when the hair dryer is working, since the fan sucks through the air intake not only the air, but also the hair, which then falls on the hot spiral and, burning, cause the appearance of an unpleasant odor.

Another reason is also possible - an insufficient air flow passing through the fan. This can be caused by the overlap of the ventilation gratings with hand, or clogging the filter, if it is provided in this model, with hair, octo, dust, etc. The weak flow can be caused by slow fan turns.
Slow fan rotation - Usually the reason for this is to wind up the hair engine shaft, which prevents its rotation. As a rule, the fan is naked on the shaft tightly, and it is not possible to remove it for the convenience of removing the hair, because it is easy to make a big effort - a fragile plastic easily can be broken. Therefore, it is convenient to apply tweezers - gradually pressing them wounded hair to complete removal.
It is found (much less frequently) and the inverse situation - the fan is sitting on the shaft not tightly, as a result, the engine works with normal revolutions, but the shaft is scrolled in the fan housing. The output is simple - to plant the fan on the shaft with a suitable glue.
The air goes cold - In this case, there may be several reasons:
- Bad contact in the mode switch - elimination depends on the design of the switch. Flexible elastic contact strips of an open type are often used - enough to adjust them to correctly or clean the contact location. If the closed type switch is to replace it - it is inexpensive.
- Cutting the wiring - it may be completely broken or disappear in the site of the solder, the conductor going to the spirals or switch.
- Open the heating spiral. Just so it will not turn around - most likely it is brave. You can restore just a twist, but such a connection will not be durable - bad contact will gradually provoke a nagar, which will further increase the resistance at this point, - as a result, it is sooner or later again will have to be repaired. It is better to make the same twist, but then it is to put it with a copper or brass tube of a suitable diameter (a thin tube with a refrigerator compressor) is well suited. The soldering in this case is useless - the heating temperature of the helix melts the solder.

- the reasons can be a lot and almost all of them are easily eliminated - a break in the power cord, the lack of contact in the sliding contact pair at the point of entering the cord into the case, breaking the inner wiring, the lack of contact in the switch, etc. The worst thing that can happen, - This is the combustion of the engine. If there is something to replace - well (so do not throw away the old faulty hair dryers - the spare parts are still), but not - then you need a new hair dryer - the engine is fixed little chance.