At the moment, there are a huge number of different types of fences: with decorative elements or simple fences. One of the decorative types of fence is a wattle fence (in Ukrainian it sounds like "tyn"). It is not difficult to make such a fence with your own hands, although it is somewhat time consuming.
Do-it-yourself wicker fences. Photo
The main advantage of a wicker fence is not in its size (it can be anything: high or low, just like any other type of fencing), but in its appearance. So there are two main types of weaving:
- Vertical... The twigs (vines) are intertwined from bottom to top, which allows you to make a really tall and unusual fence of the desired size. In addition, there are craftsmen who not only weave standard patterns, but also make unique and original braids, patterns, and designs.
- Horizontal... The vine can also be woven to any height. But most often the horizontal type of weaving is used for low decorative fences. For example, for flower beds.
In these photos you will see what kind of wattle fence (wicker fence) you can make with your own hands on the site of your house.


In addition to the standard vine (grape, willow, rod or reed), they often use wooden flexible slats... A fence made of this type of wood turns out to be solid, dense, with practically no gaps, which makes it a good external fence for the perimeter of the site. The most important thing is that any wicker fence looks the same from the outside and from the inside.
Among modern materials, there are also polyvinyl chloride (PVC) panels designed for weaving hedges. The advantage of artificial material is that it is the most durable, copes well with the aggressive effects of natural anomalies (whether it be bright sun, or prolonged rain, snow, wind), and is not susceptible to the appearance of pests.
In addition, it is several times easier to install than a natural wood vine or lath.
How to make a wicker fence with your own hands
 How to weave a wattle fence with your own hands? First of all, you need to decide on what type of material will be used. So PVC vines can be mounted at any time of the year, without prior preparation. If the choice fell on a natural material: willow, reeds, grapes, a rod, then it must be carefully prepared.
What is needed:
- Stakes with a diameter of 5-7 cm. Budgetary option - pine. But according to its properties, this is not the most durable type of wood. Oak is a durable but financially costly material. Regardless of the type of stakes, they must be treated with a special compound for wood (from bark beetles, mold, and also fireproof).
- Rods for weaving with a small diameter (3-4 cm) even and smooth. It is better to harvest them in autumn, when the growth of plants has already stopped, but the tree sap is still preserved in them. Such rods will be flexible and durable, will not break during installation, and will provide easy weaving. They also need to be treated with a special compound.
Regardless of the type of weaving (it is horizontal or vertical), it is required to drive in the stakes correctly. If artificial material is used, then the stakes are simply driven in or dug into the ground in increments of half a meter. If the stakes are made of natural wood, then it is advisable to drain the soil in advance.
Drainage under the stakes of a wicker fence:
- Dig holes 40 cm deep under the stakes.
- Add some loose dry sand.
 This will keep the wood from rotting quickly. Why is it better to use a half-meter step between the stakes? This is optimal distance, since this way the fence will not sag, they will tilt. In addition, it is easier to weave the vine this way, creating any ornament and pattern.
After the stakes are dug in, you can start weaving the rods. To make them more flexible, their ends can be dipped in salted water for a few minutes. For horizontal weaving, simply weave the rods between the stakes. For a vertical one, it is required to weave several rods horizontally at an equal distance, and then proceed to weaving vertically.
It is desirable that the ends of the rods did not touch the ground(retreat at least 1-3 cm). So they will be less susceptible to rotting.
If a dense fence is required, then the rods should be pressed against each other as much as possible. So they will not let in a lot of excess light, providing a strong fence. The uneven ends sticking out behind the stakes can be trimmed evenly with a pruner or with a small hacksaw.
For braiding from the twigs, it is better to opt for a reed vine, since it is the thinnest and most flexible. A small diameter willow vine is also suitable for these purposes. A braid can be woven with one, two, three or more twigs, depending on the skill. It is recommended to first weave the braid and then weave it between the stakes.
In this video you will see how to weave a wattle fence with your own hands.
Further finished hedge can be painted in any desired color. For example, wood varnish or facade paint. But more often than not, the natural look is the most acceptable.
The varnish will create additional protection against aggressive natural influences, as well as add additional shine to the structure.
How to make a wicker fence in the country with your own hands
A wicker fence is a very interesting fence of a plot or a decorative front garden inside a backyard or summer cottage space. The technology of making wicker fences has been preserved since ancient times, when wattle fence was the most common type of household fences.
A traditional wicker fence is made from improvised means - available branches, vines, sticks... In modern landscape design, wicker fence is regarded as environmentally friendly and natural, meeting the requirements of aesthetics and satisfying the artistic taste of the gardener. It is a subject of national Slavic flavor, a fashionable element of the garden, and a fence available for execution.
How to make a wattle fence in the country with your own hands? What technological features do you need to know and take into account for high-quality work performance? Let us dwell in more detail on the traditional technology of weaving from branches and vines cut from trees and shrubs.
Weaving material: selection and preparation of rods
For the manufacture of wattle, it is necessary to prepare two groups of raw materials: supports and rods. Wooden poles, thick branches (6-8 cm in diameter), metal pipes can be used as supports.... Long flexible branches are needed for twigs diameter from 1 to 3 cm(the higher the fence, the larger the diameter of the intertwined vines).
Species of fast-growing flexible branches of willow or pussy willow are traditionally used as raw materials for weaving; poplar, maple, birch are also suitable.
In the garden or in the country, you can use the trimmed branches of flexible fruit trees: mulberry, sweet cherry, cherry, nut, apple (if they are sufficient), such raw materials are growth barren branches of one to two years of age. The time for harvesting branches for twigs is spring, before the start of sap flow. You can cut branches in summer, in dry hot weather, when the movement of juices slows down due to lack of moisture. Cutting direction - oblique, under 40-60º.

In the photo - a wicker fence made of vine
It is best to weave tyn from freshly cut vines, they remain flexible for a week after cutting. You can try to soak old, long-cut branches in a container with hot water (for example, heat the water in an outdoor pool in the sun) or steam it in a bath. You can prepare a vine for future use for future weaving, for this it is kept in thick slices in water for 1 week, after which the bark is removed with a special tool (pinch grinder) and the branches are dried. After drying, the raw material treated with stain and varnish.
If you plan to wicker from reeds or reed mace, its color can be formed by the conditions of preliminary drying: when drying reed raw materials in the sun, the stems acquire a golden hue; when kept in the shade, they retain their light green color.
Installation of the base for the wicker fence
Wooden supports are necessary treat with impregnation, burn, tar, especially those ends that will dig into the ground. The ideal wood supports are larch pillars, which do not rot even in water. It is a well-known fact: medieval Venice was built on larch.
The depth of the embedment of the supports depends on the planned height of the fence and is 50 cm for a fence of 1.5 m or 30 cm for a 1-meter fence. Low decorative wattle fences can be driven into the ground by 15-20 cm.
The distance between the supports in the wattle usually corresponds to 40-50 cm (depending on the thickness of the rods), the thicker the rod, the more the inter-support distance can be left. It is advisable to place the supports at the same distance, or all 40 cm, or all 50 cm. Along the edges of the planned wattle fence, the last three supports are located at a short distance: 20-25 cm. Such a seal will help to fix the vines during further weaving.

Weaving rods
The harvested rods are woven into the fence between the supports in turn. The lower vine is fixed at the beginning of the weaving in one of two ways: either with a wire around the frame, or by deepening into the ground by 10-15 cm (for this, the edge of the branch is vertically stuck into the ground). Subsequent vines, especially the upper ones, are fastened only with wire around the frame.
Typically, each vine has a thicker edge (the one closest to the trunk) and a thinner tip. The laying of branches must be started from the thick end, then the remaining branch at the end is imperceptibly tucked along the support between the already laid vines.
When weaving vines every 3-4 rows, they are compacted by tapping a hammer.
If weaving is done from cattail (reed), you can lay not just one stem at once, but an armful of 5-6 stems. In this case, the panicles are pre-cut. 
All edges and cuts are left on the inside of the wattle fence. To increase durability, the finished wicker can be varnished.
Wicker fence decoration
The wattle itself is a good decoration of the site, but if you wish, you can additionally decorate it.
- You can enhance the country style by hanging clay pots and dried peppers, ripe ears of corn, a beautiful orange pumpkin, as well as over-sowing sunflowers (sparsely, randomly).
You can fix a wooden wheel from an old cart near the tyna or put a house made of dried pumpkin with windows and doors. - You can enhance romance by hanging baskets with fresh flowers (petunias, violets, marigolds, border chrysanthemums). The existing plastic pot is placed inside the wicker basket and suspended from the fence post from the outside or inside.
Another option for picturesque flower decoration would be planting small curly flowers along the fence: bells, large clematis or climbing roses. - You can expand the rockery by figuratively laying stones along the tyna.

Types of wicker structures for fencing a site
The traditional construction of a wattle fence made of supports and intertwined branches can be varied by the shape of the weaving and the material of the vines.
- Chess... Horizontal rods are stacked not one by one, but in a group. With this weaving, a checkerboard pattern is formed.

- Vertical braiding... For such a fence, three or four horizontal strips of a wooden bar or tree branch with a diameter of 5-6 cm are rigidly attached to the installed supports. The rods are stacked in a vertical direction, intertwining between the horizontal strips.

- Diagonal checkerboard... This version of the fence is more difficult to manufacture, you will need the skills of weaving and screwing screws into the wood material. On the upper wooden frames, fixed between the supports, rods with a diameter of 4-5 cm, with a distance of 10-15 cm, are attached to self-tapping screws. The fixed rods are turned diagonally. Between them, in the direction of the opposite diagonal, other rods are intertwined.

- Weaving from veneer... Most often it is performed as a prefabricated panel structure. In each block (shield) four frames are twisted, on which the supports are attached. The veneer trims go around the installed supports, forming a wattle fence. The veneer is fixed with metal clips or short nails.

- Reed wattle... It is a vertical picket fence made of bunches of reeds or reed mace. There is no weaving in it, there are vertical supports, horizontal cross-beams and bundles of reeds, tightly reinforced with wire to the horizontal cross-beams. Before fastening, the reed or cattail is cut and knitted into sheaves with a diameter of 4-5 cm.

- Wicker from boards... For such a fence, long boards with the minimum possible thickness are used, unedged can be used. The supports are installed at a great distance: if in a regular wattle fence, half a meter is observed between the supports, then for a wattle fence made of boards, the supports are 1-1.5 m apart from each other. The existing boards are stacked upside down between the vertical supports.

The wicker fence will become the most original visiting card of the suburban area. If necessary, it can be a decorative decoration of a concrete slab or old brickwork.
The speed at which a wattle fence is built can affect its durability. The rough tyn, made in haste, will require repair in 1.5-2 years. Correctly made wicker from tree branches, covered with varnish or other protective coating, can last up to 10 years.
The fortress of wicker fences is inferior to stone fences, but it gives extraordinary beauty and the feeling of something unusual, old, kind.
Video on the construction of wicker fences
The video shows how to quickly and correctly make a wicker fence on your own:
- Blanks for weaving
- Reed and cattail
- Vine
- Hazel
- detailed instructions
- Necessary accessories
- Austrian or wicker from the board
Wicker fences are included in their projects by landscape designers, creating a cozy retro style in the courtyard. A wicker fence can be called a tynom, hedge, palisade or wattle fence. It's pretty easy to make. Almost any material at hand can be used, including modern high-density synthetic bases. Lovers of natural, environmentally friendly materials prefer to weave a fence from vines, boards, reeds, branches and other plastic raw materials. Any flexible material that is resistant to the harmful effects of the environment is suitable for weaving.
Blanks for weaving
The most suitable materials from which to make a decorative wattle.
Willow
Wicker from branches is durable and flexible, provided that dry material was used in the process. Each willow species is suitable for such purposes. If desired, you can make living or inanimate fences from willow... In the first case, we are talking about young shoots planted in the ground, from which they form a wicker fence in the process of their growth. A dead hedge is a wicker made of willow branches cut in advance.
It is best to use freshly cut willow shoots for weaving hedges. The material is harvested from early autumn to early spring. If the branches were cut in advance and became brittle from long-term storage, they are soaked in boiling water for several hours to give flexibility.

Reed and cattail
These very common plants are not very durable, have a fragile structure, so they are unlikely to be able to fence off the entire summer cottage. Even if you decide to build such a fence around the house, it will have to be changed in a couple of years. It is advisable to weave a miniature low fence from reeds or cattails for edging a flower bed or landscape zoning.
Vine
The vine wicker fence is easy to make, thanks to the flexible and long twigs that can be rolled up to the desired shape. The vine is resistant to temperature extremes and high humidity, so a wicker fence made of it will last for more than one year.
Hazel
In order to get a beautiful and high-quality fence from, you need to worry about harvesting the material in early spring until the first buds appear on the plant. At this time, young shoots of hazel are the most flexible, which means they will not break during the weaving process.

Materials and tools for horizontal tyn
If you decide to weave a fence from willow rods, then you will need the following materials and accessories to make it:
- branches, the diameter of which can be 1-3 cm;
- manual or gasoline drill;
- sharp pruning shears for cutting twigs;
- wire with which stiffeners are formed;
- galvanized self-tapping screws;
- screwdriver or screwdriver for screwing self-tapping screws;
- long blade knife;
- awl;
- a hammer.
After you have collected everything you need, you can proceed to the phased implementation.

detailed instructions

When weaving a fence from twigs, the vine can be laid one by one or in bundles, which will give a different effect. The bundle version will add monumentality to the fence, and in the case of a single weaving, you will get a lightweight openwork pattern.
At the ends of the fence, the branches are cut so that they do not stick out chaotically due to the posts, and the fence has acquired a complete look. If you live in a climatic zone with frequent and strong winds, screw each shoot to the supports with self-tapping screws or secure them with wire.
Like the side branches, the tops of the supports are cut so that they do not stick out over the spans. If the vine is flexible enough, it can be folded down and passed through the woven fabric.
When the weaving of the fence is completed, you should worry about its safety and attractiveness. For this, the product is treated with stain or impregnated with special protective equipment. Work is done with a brush or spray gun.

Necessary accessories
There is an equally interesting way of weaving, which is characterized by a vertical arrangement of branches. A wicker fence made of birch branches looks very unusual, which will protect the courtyard from intruders, because a high structure with a sharp top is difficult to overcome.

The work will come in handy:
- bars for vertical supports;
- laths of 25x45 mm for transverse veins;
- birch branches, the diameter of which is at least 3 cm, and the length depends on the height of the fence (on average 170-190 cm);
- hammer, screws and screwdriver;
- pegs and sturdy line for marking.

- A selection of branches of the same length, from which a wicker palisade will be assembled - birch poles with good flexibility. In the process of preparing the poles, it is necessary to remove the side branches.
- Installation of vertical wooden supports. The bars are pretreated with antiseptic agents, and then dug into the ground with a step of 2.5-3 meters to a depth of about 50 cm.
- On self-tapping screws, transverse strips are fixed to the posts, in length by 10-12 cm exceeding the step between the vertical elements. You should get three rows of transverse segments: top, bottom and middle.
- Between the horizontal supports we pass birch poles from top to bottom, while gently bending them in the process of weaving. Each next branch bends opposite to the previous one. And so on until the end of the fence. Periodically the rows are compacted with a hammer to reduce gaps. The raw material will dry out and the woven fence will gain strength.

On a hunt, a do-it-yourself wattle fence in the country will become a real decoration of the yard and hide your personal family space from prying eyes.
Austrian or wicker from the board
A wicker made from a board largely outperforms the more common picket fence, while its manufacture is not particularly difficult. Real aesthetes choose such a fence for summer cottages, attracting attention to it and arousing the admiration of others. Instead of wood, MDF panels, plastic siding or rotary cut veneer can be used here. But what can compare with natural material? How to assemble a wicker fence from boards, and what is needed for this.

For a fence from boards, you will need:
- timber with a section of 10x10 cm, the length of which depends on the same parameter of the wooden wicker fence;
- planed boards 150x20x2100 mm;
- bars for vertical strapping, the length of which is equal to the length of the support bars at the rate of 1 piece per one canvas;
- saw;
- self-tapping screws and screwdriver;
- bituminous mastic;
- antiseptic;

- The marking and installation of vertical supports is carried out at a distance of 2 m from each other, between which auxiliary posts are fixed. For greater strength, before weaving the fence, the supports in the lower part are treated with bitumen and concreted.
- Cut the lumber. In this case, all elements must have identical dimensions.
- The boards are laid horizontally, bending around the timber, with the ends on the supports. They are tightly screwed to them, with each subsequent element bending in the opposite direction relative to the previous one.
- When the wicker fence made of boards is completely assembled, it is treated with an antiseptic or varnish intended for outdoor use. So the Austrian wicker will last much longer, and the person who made the wicker will be able to admire his creation for more than one year.

The video shows the process of making a fence from edged boards for a summer cottage.
Ever since then, when a person acquired his own territory, he tried to protect it from the invasion of unauthorized persons. He did this by erecting stone walls, installing wooden palisades. Gradually, the housing was improved, and with it the fence. In addition to the protective function, it also acquired an aesthetic function.
One of the ways to fence and decorate the territory, which has survived to this day, is a wattle fence. A hedge often adorns summer cottages and country houses. Consider its features, varieties, as well as the technology of how to build a wicker fence with your own hands.
Hedges: advantages and disadvantages
The tyna installation has undoubted advantages:
- environmental friendliness;
- colorful appearance;
- the possibility of building a structure with your own hands;
- low cost.
But the hedge also has disadvantages:
- performs mainly a decorative function, does not provide reliable protection of the site from the penetration of third parties;
- short service life;
- the complexity of repair and replacement of worn out sections.
Despite the presence of shortcomings, hedges are installed quite often, because this is a great way to give your site a special flavor.
Varieties of tynov
To size
Hedges come in a variety of sizes. Self-made low fences are mainly used to decorate flower beds, in landscape design. A wattle fence up to 1 m high is used for zoning the territory within the site, and high fences up to 2 m - for fencing the house and the surrounding area.

By manufacturing method
There is a vertical wicker fence, consisting of horizontal rods of the base, perpendicular to which the wattle is fixed. This method of making a tyna is interesting in that the rods can be deepened in the ground, thus, they will begin to grow, forming a beautiful green fence.

But more common are wicker fences with horizontal rods. This arrangement of the vine makes it possible to form various patterns from it.

There is also an oblique weaving, in which the fabric rods are fastened diagonally between the base stakes. In this case, the vine can be directed in one direction, or in different directions, forming rhombuses. Such wicker fences look very chic.

By materials of manufacture
For the manufacture of wicker fences, flexible material is used - vine, hazel, willow. She allows you to form openwork canvases, all kinds of braids with her own hands. All types of vines are used for the manufacture of hedges, but the most suitable are benotal and krasnotal (willow).

A wicker fence can also be made from cattail, or reeds. The stems of these plants are attached vertically in bunches. Therefore, before the formation of such a fence, the stalks of the reeds / cattails are cut and knitted into small sheaves 4-5 cm thick.
note: Reed and cattail fences are the most short-lived. Their service life is maximum 3-4 years.

For the manufacture of a do-it-yourself fence, you can also use boards, veneer. They can be mounted vertically or horizontally, forming dense canvases with practically no gaps. Such a tyn is double-sided and is used only for fencing the site.

Since the wooden elements of the base of a wicker fence tend to rot over time, they can be replaced with more durable materials - stone, iron. They are perfectly combined with wood and give the building reliability and monumentality.

Recently, PVC wicker fences have become popular. They are more durable than wooden ones, because they are not afraid of bad weather, pests. The PVC fence consists of separate sections that you can simply assemble with your own hands.

Wicker fence manufacturing technology
To make a do-it-yourself tyna, you need a minimum of materials:
- vine;
- stakes;
- wire;
- a hammer;
- shovel;
- sand.
Before building a wicker fence, you must first prepare the twigs of a vine or willow with your own hands. It is better to do this in late autumn, when the plants stop growing, but the movement of their juices still continues. Vines of the same thickness should be selected - 2-3 cm. Shoots are cut at an oblique angle using a sharp knife.
Attention: the more complex the wattle pattern is, the thinner the rods should be. It is preferable to choose annual branches that bend well.

Site marking
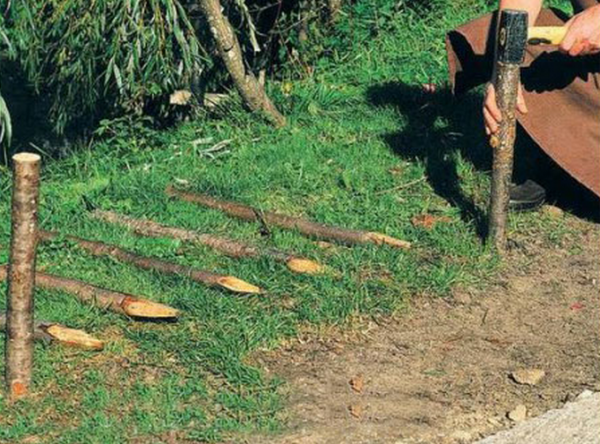
To prevent wood from rotting, it is better to make drainage before weaving the fence - dig a trench up to 50 cm deep with your own hands and cover it with sand. Further along the perimeter of the structure, vertical posts - stakes - are hammered. They are placed at a distance of 0.5 m from each other, digging in to a depth of 0.3-0.4 m. Previously, the lower ends of the stakes should be treated with an antiseptic to protect them from decay.
Important: the stakes of the base must withstand the weight of the wicker cloth, therefore, the thicker the vine, the thicker and stronger the support posts should be.
Weaving cloth
15 minutes before the construction of the wicker fence, the rods should be soaked in warm water. This will make them more flexible and malleable. You can also give them different shades. To do this, they should be cleaned of bark and treated with hydrogen peroxide (to whiten the rods), stain (gives a shade of wenge oak), potassium permanganate (gives a brownish-red tint), a solution of ferrous sulfate (creates a gray-brown tone).
Next, you should decide on the weaving pattern for the fence. It can be performed staggered, diagonally, vertically. The vine in the canvas can be located freely (tyn with a gap), or tightly (blind weaving).

Do-it-yourself weaving of a tyna begins from the bottom. Alternately, row by row, the rods are laid behind the pegs of the base. Along the edges of the tyna, the vine can either be cut evenly, or the last peg can be braided with it, leading to the next row.
Tip: The woven fabric can be additionally reinforced with wire.

So that the ends of the twigs can be accurately cut, they are released at a distance of 15-20 cm and the vine is cut with a sharp knife. Having formed several rows of wattle fence, they can be slightly compacted by tapping with a hammer. If the vine is not cut off at the edges, but braids the pillar, then the last rod should be carefully twisted around the peg and hidden in the previous rows, fixing it with wire. The finished tyn can be painted or coated with a special compound that will protect the structure from environmental influences, so your wicker fence will last much longer.

Hedge decoration
Having built a tyn with your own hands, you will give originality to your site. You can add a special flavor to it with the help of various decorations. You can use clay pots and jugs to decorate a wicker fence. They are put on top of the stakes.
Such elements of landscape design as a decorative cart or a wheel from it, cut stumps, stones, pumpkins, sunflowers or other tall flowers are very beautifully combined with such a fence built by your own hands. Climbing plants (clematis, petunias), beautifully braiding the tyn, will add romance to the structure. The garden plot, fenced with a tynom, can be decorated with sculptures, an imitation of a bird's nest can be created, and a gazebo can be built. This will complete the landscape.

A wicker fence can be an excellent fence and decoration for a summer cottage, a country house. It will allow you to refine the courtyard, give it a special flavor. For the construction of the fence, a minimum of materials are required. In a few years, the building can be renovated, and the decorative tyn will delight you with its beauty even further.
Recently, the rustic style has gained great popularity in the exterior of country landscape design. In this regard, many craftsmen began to make wicker fences, wooden arbors, benches and much more with their own hands. Quite often, in order to get the effect of natural naturalness, a wattle fence is used when decorating a summer cottage. Making it yourself is quite simple. To do this, just look at the proposed photo examples of various wicker fences and carefully study the master class.
Varieties of wicker hedges
The eye of any summer resident will be pleased with a decorative wattle made with his own hands in one summer. The main value of such a fence is that it can be done practically from any available material... To make a wicker fence, you can use:
Wicker fences differ not only in the material of manufacture, but also in the method of weaving.
The classic way of weaving a decorative hedge is horizontal stacking of branches between the supports. However, for making with your own hands a more unusual fence in the country, you can use other types of weaving.
All types of wicker fences can be seen in the photo.
The choice of material for a wicker fence
The service life of the fence will depend on the correctly selected material. So, for example, if the fence will be built from reeds, then you need to be prepared for the fact that it will last no more than four years. A more durable wattle fence for giving will turn out from vine, hazel or willow... It can stand for more than 10 years, especially if the material is treated with antiseptic compounds.
The vine can be purchased at nurseries. For the manufacture of an openwork hedge, thin branches with a diameter of up to one centimeter are best suited.
The material for the decorative fence can be prepared with your own hands, keeping the flexible bending branches after pruning the trees in the garden. For work, you can use rods of chokeberry, cherry, plum, pear, apple. It is best if they are up to two centimeters in diameter. In this case, the weaving will turn out to be tight, and the fence will be without gaps.
Particular attention should be paid to the base of the hedge, which should consist of from stakes with a diameter of over five centimeters... If you plan to install a high wattle fence, then you will need to take steel supports as a basis.
Features of the preparation of rods
 To make a wicker fence with your own hands, long, even branches are prepared. They need to be dried and tied into bundles.
To make the branches more flexible, they can be boiled in water or steamed. In addition to flexibility, "digestion" will give the branches of the vine a brown tint. To obtain a brighter saturated color, potassium permanganate crystals are added to the water.
If possible, the rods can be barked and treated with hydrogen peroxide. As a result of using this material, you will get a very beautiful white fence.
With the help of iron sulfate, branches can be given greyish brown, and stain can be used to paint a fence in almost any color.
In order to remove the bark from the twigs, you can use wire cutters or a special tool - a pinch grinder. It is very easy to remove the bark from branches that have stood for about a week in the water.
Removing the bark with your own hands is a long and laborious process, therefore it is recommended to prepare a comfortable workplace in advance.
How to make a wattle fence with your own hands?
Having selected and prepared the material for the wicker fence, you can proceed to its construction.
First of all, supports are dug in, which can serve as stakes, metal pipes or wooden posts. The stakes should be deepened into the ground by 30-40 cm.If the prepared rods are very thick, then the hole should be at least 50 cm deep. Step between supports must be done at 50-60 cm.
To keep the fence level during operation, the support pillars in the upper part are fixed with flat strips, which are removed after the weaving is completed.
Weaving starts from the bottom row and gradually rises upward. It is recommended to place the first row 5-10 cm above the ground. This will relieve the wattle from putrefactive processes, and it will last longer. The branches are alternately drawn between the supports so that the result is the number 8.
The ends of the rods are fixed with a wire prepared in advance, and the tails are cut off with a knife. In the last row, the ends of the branches are tucked along the stakes.
To make the appearance of the fence attractive, the ends of the blanks need only be positioned on the inside of the fence.
You can decorate your hand-made wattle fence with faux sunflowers, clay pots, or other items that go with a rustic style.
How to make a hedge?
 Summer cottages, fenced with ornamental shrubs, look beautiful. However, they require careful care, which includes crown formation and an annual haircut.
A "live" hedge can be made of willow, which is unpretentious and responsive to care. To do this, in early spring, the rods are cut and placed in water. Within 3-4 weeks, the cuttings should give roots and they can be planted. This is best done in May, when the weather is favorable.
To mark the place for the wattle, it is recommended use pegs and twine... Since willow is a moisture-loving plant, the best option for planting petioles is a groove from which water will not go to the side. At the same time, during the entire summer season, it will be necessary to ensure that the soil is always moist, but not swampy.
When planting rods, they need to be woven together in the form of a mesh net. Such a "live" fence will delight its owners with its appearance all year round.
A do-it-yourself wicker fence will become the pride of the owner and the hallmark of the suburban area. Of course, such a fence is more decorative, and its fortress is inferior to brick fences, but it gives the feeling of something unusual, kind, old.