Sooner or later, the time comes to make changes to the interior, perhaps it becomes necessary to replace the doors if they are categorically not suitable for the chosen new style. And then the question arises of how to independently install an interior door in order to save a round sum on calling the master. This event is quite accessible to anyone who knows how to work with construction tools, has carpentry skills and knows step-by-step instructions for carrying out work.
No residential building can do without. If the wooden frame in which the old door is installed is in good condition, then only the door leaf and facing panels (platbands) can be changed. This process is much easier to perform than to completely change the door frame along with the door leaf. However, even such a large-scale alteration, with the replacement of the box, is quite feasible.
Tools for the job
To carry out any carpentry work, you must have the following tools on hand:
- Planer for leveling end surfaces. You may need a manual one, for small delicate works, and an electric one - if the fit is voluminous enough.
- Joiner's square - the longer, the more accurate the markings will be.
- Building level, plumb line.
- Screwdriver with a set of bits (bits).
- An extended screwdriver - may be needed with both a straight blade and a curly blade, so it is better to have a set.
- One type of saw can be a hand saw or an electric circular saw.
- Roulette, pencil.
- A miter box for the correct sawing of corners when adjusting wooden parts.
 A miter box with a hacksaw - essential for precise fitting of wooden parts
 - Construction knife.
- Hammer.
- Chisel, chisel for removing layers of wood when making grooves for hinges and lock.

- Hole saw for cutting large round holes.
 "Crowns" or hole saws - for cutting even large diameter holes
 - Electric drill.
In addition to tools, you will need auxiliary materials and consumables:
- Wooden wedges for door frame spacers.
- Stain and varnish, primer and paint.
- Self-tapping screws, dowels and anchors.
- Polyurethane foam.
Door drawing
It is recommended to draw up a drawing before starting work, on which it is necessary to accurately put down all the dimensions taken from the opening, door frame and door leaf. Such a scheme will help to quickly carry out work without being distracted by the measurement of every detail during the installation process.

To get an accurate picture, it is necessary to measure the height and width of the installed old door, and the thickness of interior doors is usually standard and is 40 mm. Modern doors sometimes differ somewhat from old models, in which case it will be necessary to adjust the door leaf or completely change the door block.
Whatever decision is made - to replace the entire block or only the door leaf, you still need to start by removing the old door from the hinges.
Replacing only the door leaf
Removing the door leaf
The hinges installed on the interior door can have different designs, which means that the door can be removed in different ways. However, all methods are not difficult.
As you know, door hinges consist of two parts, one of which is attached to the door, and the second to the door frame. In some models, the axle rod is permanently fixed inside the element, which is attached to the vertical post of the jamb, and in the other part, installed on the door leaf, there is a hole where the rod should enter. When removing a door hung on such hinges, you need to put a pry bar under its lower edge and apply a little effort to lift the canvas. It is best if there is a second worker who will support the door in an upright position and then help remove it completely.

Another type of awning, in which the axial bar is inserted from above and passes through both parts of the hinge. In order to dismantle the door hung on such hinges, it is enough to pull out the rods installed in them, which have a kind of mushroom head on top. A reliable wide screwdriver is substituted under it, and, tapping on its handle, pull the pin out of the loop. You need to start the process from the bottom hinge in order to avoid overturning the door, which with its weight can easily tear out part of the hinge installed on the jamb, damaging its surface. This is especially undesirable if the door frame is in good condition and will be used for a new door.
After dismantling the door from the opening, it is necessary to remove hinges, handles, locks from it.
Fitting a new door
Provided that only the door leaf is replaced, the new door will have to be adjusted to the existing opening, based on the dimensions of the old one. You need to remove the exact dimensions from it and transfer them to a new canvas.

You can act differently - the new door is laid on a flat surface, and the old dismantled door leaf is placed on top of it. The canvases are aligned on top and along the vertical edge of the door on the side where the handle will be installed. If the new canvas is larger than the old one, it will need to be adjusted. With the help of a pencil, lines are drawn on it, along which an extra fragment is sawn off from the new canvas.

It must be remembered that a gap is left for the interior door, 5 mm between the door leaf and the jamb on all its sides, and a little more distance can be left below - 10 ÷ 12 mm.
Further, the excess part is cut off from the new canvas. The saw cut should be perfectly flat and smooth, and this can only be done with a sharp and precise tool, which can be a hand-held circular saw. The cut is made under a special ruler, which is designed for use with just such a cutting tool.

The saw is set to the desired notch height (usually - with an exit of 45 mm) and the door is sawed off exactly according to the markings. If there is no special guide ruler, then you can carefully cut off with a circular and without it, leaving an allowance of approximately 1 ÷ 2 mm - this will be necessary in order to then completely fit the canvas with an electric plane.
Installation of hinges
When it is adjusted in size, you need to mark the places where the hinges will be attached. To carry out this process accurately, you need to put the old door on a new canvas and very accurately align them with each other. At the end of the new door, marks are made of the areas where the hinges will be installed, focusing on the old canvas.

In this case, the marking of the location of the loops is first done with a pencil, and then with a construction knife. The lines from the knife are clear, and it will be easy to make a sample along them when cutting the grooves necessary for installing the loops.

Next, the door leaf is placed on the end, so that the side on which the hinges will be inserted is on top. With the help of a chisel (chisels), the depth of the future groove is marked. The tool is installed on the lines marked with a knife, and they hit it with a hammer from above, observing how deep the cutting edge goes into the wood - it should go deeper by 2 ÷ 4 mm, depending on the thickness of the hinge metal (this can be measured in advance with a ruler or caliper) ...
It is recommended to divide the plot designated for sampling into several fragments, for the convenience of extracting wood. Further, the chisel is installed at a slight angle to the end of the door, with the beveled part down. and, striking it with a hammer, an extra layer of wood is knocked out, forming the necessary depression.

The next step is to install hinges in the prepared grooves. They must be installed so that the plane of the metal plate is flush with the surface of the door end. If the hinge metal rises above the surface, then the notch needs to be deepened a little. If by chance the depression turned out to be slightly larger than necessary, then a piece of thick cardboard can be laid under the loop.
When it is achieved that the loop has entered the recess intended for it, as if "poured", right through its holes with a thin drill drilled sockets into which it will be convenient to screw the self-tapping screws. Further, the hinges are tightly screwed to the door, and then the canvas is tried on in the opening of the door frame. This fitting will show the presence of gaps and their size, as well as how accurately, without distortions, the canvas fits into the doorway.
If you have a hand router at your disposal, then very carefully the grooves for the hinges (and for the lock) can be selected with it.
Video: cutting hinges on the door leaf using a router
Installing a lock or door latch
- When the hinges fit well, you can move on to the device for the holes and the handle.
- Location the castle is also marked by the old door. It is very important to measure the exact distance from the edge of the door to drill the hole. If it is not performed accurately, and because of this it will have to be postponed, then the view of the door may be hopelessly spoiled.
- If a new lock is installed, then a special stencil is often included in its kit, through which the size and exact relative position of all holes is transferred, but it is still necessary to take measurements for control.
- If an old lock is used for a new door, then all parameters can be taken from the old door leaf.
- On the front side of the door, where the latch will come out, the hole is drilled with a chisel drill ("feather"), and on the main plane of the door, this is usually done with a hole saw of the appropriate diameter.

- After drilling the holes, the door leaf, if necessary, is decorated with the chosen method - it can be staining or staining with subsequent varnishing.
- When the paint (varnish) is dry and the place for installing the elements of the lock is ready, first established and the internal mechanism with a latch is screwed on, and then the handles are mounted and fixed.
Video: an example of a lock in an interior door
Installing the door to its original place
To make it easier to place, it must be lifted from the floor to the desired height and a board (or several planks) of the appropriate thickness installed under it.

- Then, the hinges must be carefully combined with each other and the lubricated rods must be carefully threaded into them, first into the upper loop, then into the lower one. The rods can be tapped lightly from above with a hammer, if necessary.
- If a different type of hinge is used, the door suspension will be carried out in a slightly different way. It is best to do this together, since at the same time you need to hit the rods of that part of the hinges that are installed on the box into the holes located on the "mating" halves screwed to the door leaf.
Find out how to do it with step by step instructions in our new article.
Complete door replacement - complete with door frame
If during the overhaul of the apartment it turned out that it was necessary to replace not only the door, but also the door frame, then you need to start dismantling the old door set. This task can become even less difficult than replacing only the door leaf, since the purchased new door is usually already perfectly fitted to its frame.
 How do you install a door from scratch?
 There are certain standards according to which interior doors are produced, single or double. True, no one canceled the possibility of individual ordering of doors for openings of a different size or shape.
| Standards for the dimensions of the door leaf and the dimensions of the opening for the door. | |||||||
|---|---|---|---|---|---|---|---|
| Door leaf size in mm. | The size of the doorway in mm. | ||||||
| Width | Height I | Height II | Height III | Width | Height I | Height II | Height III |
| 550 | 2000 | 2100 | 2200 | from 630 to 650 | from 2060 to 2090 | from 2160 to 2190 | from 2260 to 2290 |
| 600 | from 680 to 700 | ||||||
| 700 | from 780 to 800 | ||||||
| 800 | from 880 to 900 | ||||||
| 900 | from 980 to 1000 | ||||||
| 1200 (600+600) | from 1280 to 1300 | ||||||
| 1400 (600+800) | from 1480 to 1500 | ||||||
| 1500 (600+900) | from 1580 to 1600 | ||||||
Dismantling the old door and frame
Dismantling the old kit is done as follows:

- As in the first case, the door leaf is removed from the hinges.
- Further, the platbands are removed as accurately as possible.
- The box is dismantled last. To make it easier to remove the bars of the box, a through cut is made approximately in the middle of one of the sides. At the same time, the structure of the box loses tension, the given dimensions, deforms, and it can be easily dismantled in parts.
- Provided that the box must be kept intact, the installed wedges are knocked out of the gaps between the wall and the jamb with the help of a chisel and a hammer. This also relieves the thrust stress. If the bars of the jamb are fixed to the wall with nails (anchors, etc.), then you should try to carefully pull them out, and if it does not work, cut them with a hacksaw blade or in another way, thereby freeing the box.
- The box is gently loosened with a pry bar and removed from the opening.
- After dismantling the box, the opening must be cleaned of old polyurethane foam, if it is present there, from dust and dirt accumulated during the operation of the door.
Manufacturing and installation of the box
Starting to assemble the box, you first need to install hinges on one of its sides; this process is carried out simultaneously with their installation on the door leaf. The hinges are attached in the same way as in the first case, which was described above. After that, they begin to assemble the door frame.

The joints of the box elements can have different joints - straight lines with one bar overlaid on another, or butt-joint at an angle of 45 degrees.

The box is assembled according to the measurements taken, which can, for example, be taken from an old kit. Using a square to control the straightness of the corners, the elements of the box are exposed, marks are made if corners of 45 degrees are cut. Then, using a miter box, the corners are sawed off, after which the box is laid out on the floor and knocked down with nails or fastened with self-tapping screws.
 Arrangement of parts of the box "overlap", at a right angle
 Prices for popular models of screwdrivers
Screwdrivers
If the elements of the box are connected to the lining at a right angle, then they can also be knocked down with nails or twisted with self-tapping screws.
Both in the first and in the second case, the connection must be made very carefully, since the nails can inadvertently come out in a completely undesirable place.
When the box is assembled, and the hinges are screwed to it and to the door, and the lock is installed, you can go in two ways. So, you can put the door on the hinges right away, and then, together with the frame, install it in the doorway. Another option is to first install the box and then hang the door.
Video: Installing the door step by step, with all the details
- If the first option is chosen, then the door must be closed with a key so that it does not open. Then carefully, without distortions, install the entire set in NS oem, set it using a level and vertically in the longitudinal and transverse planes, and horizontally, carefully driving wooden wedges into the gaps between the wall and the box to fix it.

Then, it is necessary to fix the box to the wall using anchors, drilling through holes for them in several places, two on each side.
The holes are drilled “under sweep”So that the screw heads are recessed into the wood of the box. Then they can be disguised with special decorative covers, choosing them according to the color of the wood, or they can be covered with a composition made of wood glue and sawdust.

The resulting gaps must be filled with polyurethane foam, wait for the expansion and complete drying of the polyurethane foam, after which surplus composition protrude from the gaps, it will be necessary to carefully cut.
- In the second case, only a new box is fixed in the opening, it is also set according to the level, fastened with wedges and anchor elements, but at the same time it is necessarily wedged with a wooden beam in the center - so that the vertical posts do not bend in one direction or another.
Then, the gaps are also filled with polyurethane foam and left until the composition is completely cured. After that, the door is installed on the hinges on the box.
Now it remains to carry out the final event - to install the platbands.

The joining of platbands at the corners of the door can also be of two types - end-to-end (used very infrequently) or at an angle of 45 degrees. The correct angle on the cladding panels is also cut out with a miter box and they are precisely matched to each other.
Prices for interior doors
Interior doors
It should be noted that you can save yourself from unnecessary problems with fitting the box and the door to it by ordering the entire set in the assembly, that is, with the hinges and the lock already installed, as well as the canvas fixed in the door frame. Before making a purchase, you need to take accurate measurements from the old kit, and according to them you can make an individual order or purchase a ready-made model. The kit usually includes trims of the required height and with correctly fitted joints.

Find out the easy way how to do it in our new article.
You need to know that it is quite difficult to independently adjust all the elements of the door without proper experience, and the mistake made in this matter is sometimes very difficult to be corrected in any way.
11 best manufacturers of interior doors
| Photo | Name | Rating | Price | |
|---|---|---|---|---|
| #1 |
|
EL "PORTA | ⭐ 100 / 100 | |
| #2 |
|
TRIADOORS | ⭐ 99 / 100 | |
| #3 |
|
STATUS | ⭐ 98 / 100 | |
| #4 |
|
SOFIA | ⭐ 97 / 100 | |
| #5 |
|
ART DECO | ⭐ 96 / 100 | |
| #6 |
|
PROFILDOORS | ⭐ 95 / 100 | |
| #7 |
|
ONYX | ⭐ 94 / 100 | |
| #8 |
|
BELWOODDOORS | ⭐ 93 / 100 | |
| #9 |
|
MATADOOR | ⭐ 90 / 100 | |
| #10 |
|
VOLKHOVETS | ⭐ 91 / 100 | |
| #11 |
|
ALVERO | ⭐ 90 / 100 | |


El'PORTA doors
El'PORTA doors- these are doors with Italian architecture, made in Russia. Models of modern design and trendy colors, materials of the highest quality. El'PORTA interior doors are manufactured using modern Italian and German equipment. Various decorative door coatings allow you to choose the best option in terms of price and performance.
 EL'PORTA doors
 Specifications:
- 3D-Graf is a high density structural decorative material. Differs in a pronounced texture, average wear resistance;
- eco-veneer is an anti-vandal decorative material that imitates a cut of a real tree. High wear resistance, resistance to mechanical damage, fading, moderate resistance to moisture;
- aqua doors - doors that are not afraid of moisture;
- enamel is a multilayer material that imitates enamel, but has higher levels.
EL'PORTA doors
- each product is an effective combination of the priorities of modern materials, reliable fittings, successful construction and design solutions. Such doors are very appropriate in rooms decorated in modern high-tech or minimalist styles.
Specifications:
- modern innovative coating Renolit (Germany) stands out for its strength, durability and environmental safety;
- undemanding care. It is enough just to wash it occasionally with ordinary furniture care products (not containing abrasives);
- doors can be installed in any room, even with high humidity;
- convenient in operation, as well as durable and reliable.
- stylish minimalistic design will appeal to the modern city dweller. A wide choice of textures and finishing options allows these doors to harmoniously fit into the new, as well as into the already finished interior. Telescopic door molding is a constructive solution of a door frame that allows you to fit to a wall of any thickness.
Specifications:
- Due to the telescopic effect, the structure is suitable for walls of any thickness. Thanks to a tighter fit to the wall, the box does not warp over time;
- harmless material based on polypropylene;
- a spliced massif of Angarsk pine is used in order to ensure the stability of the frame, low weight of the canvas, as well as the environmental safety of consumers.
- Sofia doors are an author's, designer's product, impeccable European quality and prompt service. The Sofia factory carries out a full cycle of product creation, from the development of the design of each door collection with Italian designers, and the development of manufacturing technologies with German engineers.
Specifications:
- door painting based on safe acrylic-based components used in the medical industry;
- absolute precision of execution of all joints in the most unusual collections;
- careful selection and research of the materials used;
- ecological, strong and durable in operation.
- The Design by ARTDEKO direction is interior doors for true connoisseurs of beauty and comfort. Warm shades of natural wood, exquisite shapes, luxurious decor of classic doors will become a real decoration of the interior. The technological effectiveness and laconic forms of doors in a modern style are an example of high design for adherents of minimalism.
Specifications:
- veneer is used from valuable wood species, such as oak or ash;
- inserts made of transparent, frosted, colored or patterned glass;
- are manufactured on high-tech equipment by qualified specialists using high-quality raw materials and materials.
- this type of door construct is a collapsible structure of separate elements (tsarg). The main advantages of this construct are its high maintainability, due to the ability to replace any part of the door during operation and a huge range of different models, both in modern and classic style.

Specifications:
- resistance to chemical and physical influences;
- a feature of the coating is its pronounced deep "brushed" structure with a glossy lacquered monochromatic surface or a matte lacquered monochromatic surface;
- complete with German Simonswerk hinges and German KFV lock.
- door factory "Onyx" has been producing interior doors for almost 20 years. During this time, the products managed to take a confident position in the market, due to high-quality materials, modern equipment and an individual approach to customers.
Specifications:
- products are made from materials tested and proven in the market: veneer and enamel;
- doors are manufactured using modern German and Italian equipment. Thanks to this, the output products meet European standards.
- large-scale production of a full cycle and high capacities of the BELWOODDOORS factory make it possible to produce interior doors of a wide price range using various technologies: paneled, frame-panel, single-piece assembly, molded.
Specifications:
- all materials used for the production of BELWOODDOORS interior doors are carefully selected and tested for intensive use;
- applying a protective layer of Italian-made polyurethane varnish on veneered doors is a guarantee that the doors will serve for many years;
- thanks to multilayer varnishing, the coating is highly durable.
- door manufacturing - the main activity of the Matador company. At every stage of production, special attention is paid to product quality. For this, a special department was created that monitors all processes - from checking raw materials at the entrance to measuring the thickness of the surface decorative layer.
Specifications:
- doors are manufactured using the latest equipment;
- fittings insertion is carried out at the factory;
- high performance characteristics.
- in 2018 the company celebrated its 25th anniversary! During this time, a long way has been passed from a small factory to a huge company with two production sites and 300 showrooms throughout Russia. We have become laureates of the "Brand No. 1 in Russia" award three times, and our products and services are constantly being improved. Only one mission has remained unchanged: to help customers create stylish, personalized interiors.

Specifications:
- entrance doors, interior doors in classic, neoclassical and modern style;
- doors made of solid wood, natural wood veneer, finished with enamel or Ciplex laminate;
- doors up to 3 m high, hidden doors;
- sliding doors in a pencil case, along the wall, a book-door and other design options for the opening.
ALVERO doors
ALVERO doors- factory "Alvero" - a manufacturer of solid wood doors. The collections of interior doors "Alvero" and "Viporte" include more than 50 models in 60 finishes. We create stylish high-quality doors that will decorate any interior and fill your home with the warmth of natural wood.

Specifications:
- in production, time-tested carpentry traditions are used in combination with modern technologies and equipment.
Buying and installing new windows is not a cheap pleasure, and a significant part of the costs falls on installation costs. You can reduce costs by doing this part of the work yourself. We will tell you how to install a plastic window yourself, giving step-by-step instructions with a photo.
Measurements required for the manufacture of a plastic window
The ease with which you will succeed or not will subsequently depends on how correctly you make the measurements. After all, having made a larger window block, you will have to increase the opening, and if you make a mistake with the dimensions downward, you will have to increase it.
It is necessary to determine the dimensions of the future frame based on the type of windows, which are:
- with a quarter, that is, with a ledge in a half-brick, which is located outside the opening and against which the window box rests. Such windows are present in almost all typical buildings;
- conventional, that is, without protrusions. This design is used in custom-built buildings.
Measurements of a regular window
Measure the length and width of the window opening with a tape measure, add 5 cm to these indicators (for mounting foam) and write down the data obtained. In addition to the dimensions of the window box, you need to measure the depth of the slopes, as well as the depth and length of the window sill. The last parameter is calculated based on the distance between the boundaries of the vertical slopes, to which 8-10 cm are added.
Window measurements with a quarter
In this case, you will have to measure the distance between the horizontal and vertical edges of the protrusion and add 5 cm to the resulting figures on the mounting foam.
The video will tell you more about the nuances of measurements:
When ordering a plastic window, do not forget to discuss with the manufacturer the number of glass units and the size of the profile, as well as the list and quantity of fittings and fasteners. If the climate of your area is not harsh, and the windows do not overlook the roadway, feel free to order two double-glazed windows and a 6 cm wide profile. The lower the temperature outside the window and the more noise on the street, the greater the number of double-glazed windows and the size of the profile.
The procedure for dismantling the old frame
To install the plastic window yourself, you need to get rid of its wooden predecessor. Dismantling should be done carefully so as not to turn half of the wall, which will then have to be restored, wasting time, money and effort. At the same time, remember about safety precautions, because working with glass is very traumatic, and the slightest mistake can lead to a hospital bed.
First, remove the opening parts of the windows from the hinges. Remove the glasses after removing the glazing beads. Using a grinder or a hacksaw, make cuts of the box and the rest of the window block.
Using a pry bar, remove the elements of the old structure from the opening, which is then thoroughly cleaned of construction debris and dust.
Now it's time to learn how to install a plastic window yourself.
Do-it-yourself plastic window installation: instructions
To install a plastic window yourself, prepare the tools and materials that will be needed during installation:
- self-tapping screws (4x35 mm, 4x25 mm);
- screws (5x60 mm, 3.8x25 mm, 3.9x25 mm);
- anchor plates;
- polyurethane foam;
- waterproofing and vapor barrier tapes;
- mounting wedges;
- ebb tides;
- windowsill;
- plumb line;
- level;
- PSUL;
- puncher;
- screwdriver;
- screwdrivers;
- a hacksaw with a fine tooth for trimming the window sill;
- metal scissors to cut the ebb.
Remove the sashes from the window block before installation.

Install the mounting plates. The procedure is as follows: place the plate along the end of the window block, then turn it with the other end towards the room, fix it with a self-tapping screw (4x35 mm).
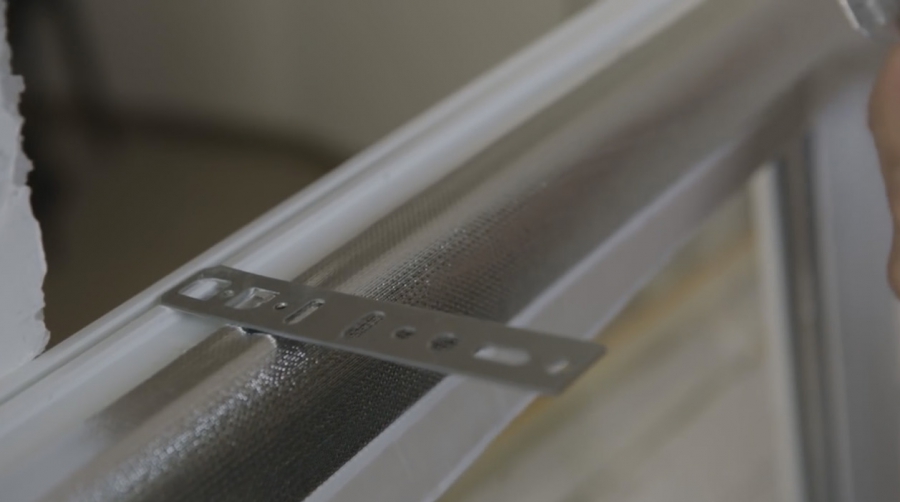
Please note: the distance between the plates must not exceed 600 mm.

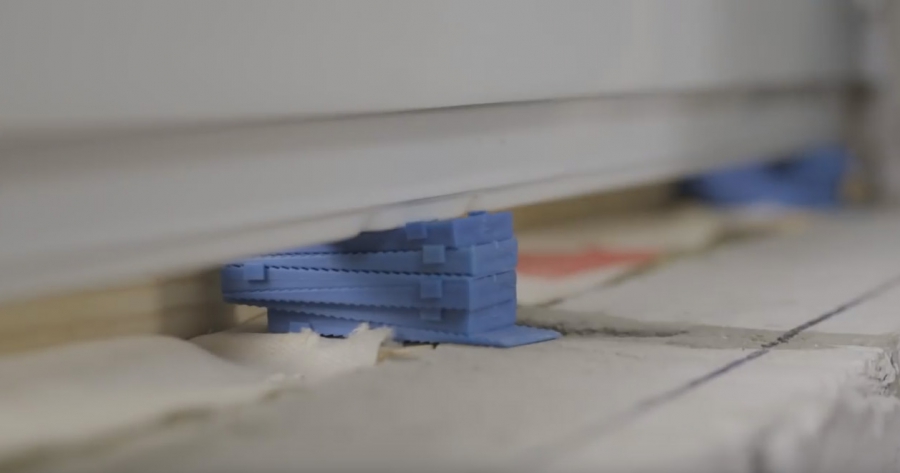
Before proceeding with the installation of the structure in the opening, you need to apply marks for the fasteners and PSUL. Align the position of the structure in the opening (this is why a plumb line and a level are needed), taking into account the following: the maximum deviation from the horizontal or vertical should not be within 1.5 mm per 1 m of the structure, but not exceed 3 mm for the entire length or width of the product. Secure the frame using the mounting wedges.
Bend the plates and mark with a pencil the places on the slope where they will be attached.

If your window is a quarter, then on the outside of the frame, mark the outline of the adjacent opening.

Remove the frame, and drill holes in the places you marked, where the anchor wedges will then be inserted.

Drive dowels into the holes.

Remove dust with a brush and vacuum cleaner. Stick the sealing tape on the frame. In the case when you are dealing with a window with a quarter, the tape is glued to the outer part of the frame at a distance of 3-5 mm from the previously marked contour of the opening.

In windows without a quarter, the outer seam is insulated using special moisture-proof sealants after the structure has been installed.
Fasten the window unit in the opening using mounting wedges and remember to check the correct position.

Fix one top side plate and measure the diagonals of the window unit. Their difference should be within the following limits:

Screw on the remaining plates and remove the wedges, leaving only the lower and diagonal ones, then proceed to foaming.

Cut off excess foam and apply vapor barrier tape from the side of the room, making an overlap of 10-20 mm on the wall.

Attach waterproofing tape to the outside.

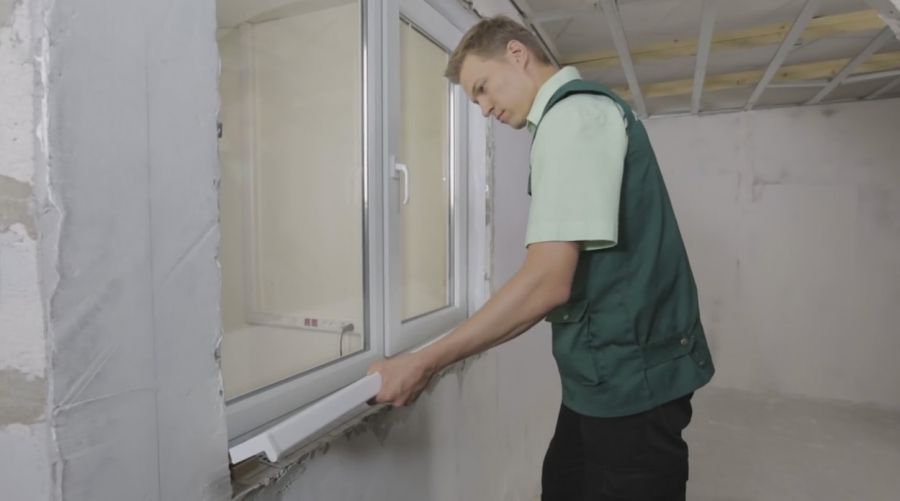
Install low tide. Insert it into the groove and screw it using self-tapping screws (4x25 mm).
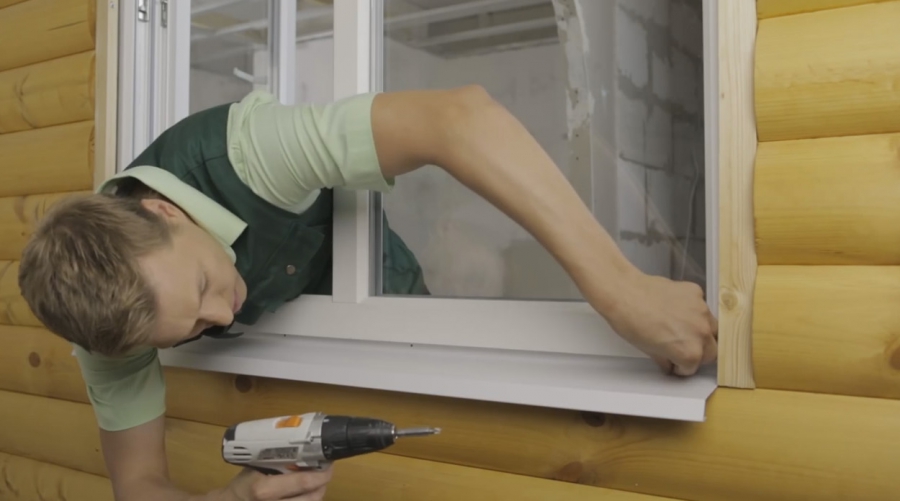
Hang the sashes, then install the window sill. Adjust the knobs if necessary.
You see install the plastic window yourself not that difficult. The main thing is to be willing and follow our advice.
Pain of a different nature in the spine, both radiating to various parts of the body, or not, causes numerous questions for the sufferers and worries. Back pain between the shoulder blades is a frequent occurrence, and its causes can be very different.
Description
Severe back pain between the shoulder blades when inhaling, raising the arms up, stiffness of movements in the upper spine after sleep, burning sensation in the chest area - these and some other signs should not be ignored, since symptoms can be very serious signals for the development of dangerous diseases ...
Most patients report discomfort in the upper spine in several cases:
- During pregnancy (especially in the third trimester).
- After sleep.
- When inhaling or exhaling.
- After hard physical labor.
- After being in an uncomfortable position for a long time.
In this case, the nature of back pain can be completely different and it depends on what causes the pain and burning sensation.
The nature of the pain:
- Aching;
- Sharp pain (with lumbago);
- Severe pain or bearable.

Usually, aching back pain is accompanied by a burning sensation in a certain place of the spine, as a rule, at one point, there is a desire to knead, press, in order to finally remove the annoying sensation. A sharp pain in the back is accompanied by lumbago when inhaling and exhaling, turning the body and head.
Causes of pain between the shoulder blades
Questions why the top of the spine hurts, what are the causes of back pain, what to do if the back hurts between the shoulder blades, and how to treat are the most frequently asked questions to traumatologists.
So, let's figure out why the top of the spine hurts, namely between the shoulder blades.
- Sedentary lifestyle, being in one position for a long time.
- Neuralgia, that is, pinching of the nerve roots of the spine, occurring under certain conditions: "blew", turned sharply.
- Curvature of the spine (scoliosis).

- Postponed back injuries, displacement of the vertebrae.
- Cardiological, neurological, urological and other diseases.
- Osteochondrosis and other diseases of the spine.
- Intervertebral hernia.
- Kyphosis and kyphoscoliosis of the spine.
- Spondyloarthrosis and humeroscapular periarthrosis.
- Various infectious diseases.
- Pleurisy, pneumonia, bronchitis.
Additional symptoms for pain between the shoulder blades
In addition, each specific cause of pain in the spine is accompanied by additional symptoms indicating that it was this fact that became the reason for the pain in the upper back.

Additional symptoms may include the following:
- Crunch in the vertebrae of the thoracic spine;
- Spread of pain (giving to the arm, leg, neck, etc.);
- Numbness;
- Catching breath;
- Arrhythmia;
- Wheezing in the chest;
- High blood pressure;
- Heat;
- Pain in the internal organs;
- Shortness of breath and shortness of breath;
- Hemoptysis;
- Seizures;
- Difficulty urinating
- Thoracic pain.

Diagnostics
Since the causes of back pain can be very different, it is difficult to give answers to the questions why the upper spine hurts, what to do, and what treatment should be.
Diagnosis of diseases consists of several stages:
- Examination by a doctor who conducts a survey, examines and prescribes tests.
- Delivery of tests, among which there may be blood, urine, sputum, X-ray, fluorography, ultrasound, EchoEG, ECG and a number of others.
Back pain between the shoulder blades during pregnancy
If the back hurts between the shoulder blades during pregnancy, then, as a rule, this phenomenon is temporary and is associated with the following factors:
- The weight increases and, accordingly, the pressure and load on all parts of the spinal column;
- The center of gravity is shifted due to the rapidly increasing uterus;
- The load on all muscle groups increases, including the back muscles.

More details
There is no need to start treatment in such cases, since after the end of pregnancy all unpleasant symptoms in the back area should go away.
A pregnant woman can be advised on the following:
- Rest as much as possible.
- Wear comfortable shoes and clothing.
- Wear a prenatal (and postpartum) bandage.
- Perform a daily set of exercises aimed at relaxing the back muscles.
- Distribute physical activities evenly.
- Get enough sleep.
- Dress for the weather.
- More outdoor activities.
- Avoid sudden movements, drafts.
- Eat properly.
- Use orthopedic mattresses and pillows.

If all of the above does not help and your back still hurts, then you should consult a doctor. Moreover, pregnancy is not a time when you can do anything on your own.
Treatment of back pain between the shoulder blades
After the test results are received, the doctor (and you probably first contact a therapist) determines on the basis of them which highly specialized doctor you should be sent to (urologist, cardiologist, infectious disease specialist, endocrinologist, traumatologist, etc.). It is only on the basis of the results of the examination that a diagnosis is made and treatment is prescribed.

Treatment depends on what caused the back pain. Of course, by all means they will try to solve the problem in a conservative way, resorting to drug treatment, massage, physiotherapy. However, there are a number of diagnoses, the treatment of which consists only in the method of surgical intervention. If the cause of pain in the spine is an infectious process, then a long course of antibiotics is prescribed.

For orthopedic, rheumatological problems that lead to back pain, after the diagnosis is made, treatment is prescribed, consisting of several long stages and aimed at:
- Removal of back pain;
- Removal of the inflammatory process in the vertebrae and tissues;
- Elimination of the cause of back pain;
- Consolidation of the result;
- Carrying out a set of preventive measures to prevent recurrence of pain in the back and shoulder blades.
- Lifestyle changes (nutrition in accordance with a therapeutic diet, drinking plenty of fluids, physical activity, daily regimen).

Treatment of back pain between the shoulder blades for musculoskeletal problems
Pain relievers for back and joint pain in various dosage forms used to relieve pain:
- Injections;
- Pills;
- Ointments;
- Plasters (Baralgin, Kapsikam, Fastum-gel, Bystrum gel, Voltaren, pepper plaster).
Many of these drugs have, in addition to pain relief, a warming effect, which has a beneficial effect on the affected area of the back: mobility improves, blood flow increases, and the feeling of stiffness and numbness after sleep decreases.

The inflammatory process that occurs in the muscles, vertebrae and tissues is stopped by the course of using non-steroidal anti-inflammatory drugs, or NSAIDs. In the acute course of the disease, several dosage forms of one drug can be prescribed simultaneously, for example, it is possible to simultaneously administer injections (injections) and the use of ointments, gels, or the use of tablets and a patch. It is not uncommon for a 10-14 day course of injections to continue a long course of taking pills of the same drug. The most popular non-steroidal anti-inflammatory drugs prescribed for pain between the shoulder blades, which are caused by diseases of the joints and the spinal column, are:
- Diclofenac.
- Indomethacin.
- Ortofen.
- And their more expensive counterparts (Ketoprofen, Voltaren).

The causes of pain in the back and shoulder blades are eliminated with the help of drugs that restore nutrition and metabolic processes in tissues and vertebrae. For this, corticosteroids and chondroprotectors are prescribed. Chondroprotectors are a substance similar in composition to the structure of tissue and intervertebral fluid, vaccines with this substance (most often the composition is based on hyaluronic acid) are injected into the joint or spine. Corticosteroids, which are based on hormones, help to improve metabolism, thereby eliminating the causes of disorders in the spine and shoulder girdle.
The result is fixed:
- Remedial gymnastics;
- Swimming;
- Physiotherapy;
- Therapeutic massage;
- Vitamin and mineral courses;
- Prophylactic courses of non-steroidal anti-inflammatory drugs during exacerbation seasons (spring and autumn).
In the process of treatment, one should not ignore the therapeutic diet, which provides for the rejection of spicy, salty, smoked, flour and sweet, alcohol and tobacco. Eating a lot of raw or steamed vegetables, drinking plenty of water, fresh fruits and berries can not only replenish the missing vitamins and minerals, but also reduce weight, the excess of which puts an undesirable additional load on the spine and joints.
The complex of all these procedures, performed in a timely manner, will make it possible to achieve great success in treatment.
Conclusion
Thus, pain between the shoulder blades is far from a harmless phenomenon, the causes of its occurrence can be very serious and can lead to death or disability. Therefore, you should not postpone the visit to the doctor and treatment.
Joint treatment More >>
Why there was pain in the spine and what to do, what treatment to prescribe, can only be determined by experienced specialists. Treatment depends on the diagnosis, solutions to non-orthopedic diagnoses can be both conservative and operational.
Treatment for orthopedic problems consists of taking NSAIDs and procedures that eliminate the causes that led to the appearance of pain between the shoulder blades and back and consolidate the result.

Pain in the spine between the shoulder blades that a pregnant woman has is a natural phenomenon in her position, although a visit to a doctor in this situation is mandatory.
Summing up, we can say one thing: when wondering why the back between the shoulder blades hurts, look for an answer from qualified specialists who will help you understand the problem, eliminate the cause and prescribe effective treatment.
Dear readers, everyone for today, leave your opinion about today's article in the comments, share your advice with other readers.
Spine surgery for the installation of metal structures
Spinal column injuries are not uncommon in our time. Both older and very young people have various kinds of problems with the spine. Modern medicine has long been armed with effective methods for the treatment of fractures and injuries to the spine. One of the methods is an operation to install a metal structure directly on the bone of the spine. This is practiced in case of damage to the spinal column.
- Why can the spinal column be damaged?
- In what cases is an operation to install a metal structure necessary?
- Classification of steel structures
- Rehabilitation Tips
- Contraindications to the removal of the structure
Today we will tell you how such an attitude can shorten the period of rehabilitation after injuries and how wearing it affects a person's everyday life.
Why can the spinal column be damaged?
There are many reasons why your back can be injured. As a rule, this happens with excessive exposure to one or another part of the spine. Common reasons include:
- falling from a great height;
- impacts upon collapse;
- car accident.
The most fragile parts of the spine are most affected by trauma:
- lumbar;
- cervical.
This can lead to death or life-long immobility. But in order to understand the nature of spinal injuries, you need to know their classification.
By nature, it is such damage:
- slight bruises that do not require surgery, since they do not leave behind severe clinical manifestations;
- injuries that occur due to dystrophic processes of the intervertebral discs or ligamentous apparatus. Operation is required - the damaged structure is restored or changed;
- fractures of the vertebral bodies, arches or processes;
- fractures or dislocations;
- dislocations and subluxations.
In what cases is an operation to install a metal structure necessary?
The cervical and lumbar spine are subject to the following pathological processes in trauma:
- reduction in the diameter of the spinal canal;
- changes in the ligamentous apparatus and intervertebral disc of a degenerative-dystrophic nature;
- intervertebral hernia.
 In these cases, a prosthetics operation is prescribed. The patient is fitted with special plates that stabilize the specified section of the spine, immobilize the section or segment.
This method of treatment is widely used for various spinal injuries. Such an operation minimizes the rehabilitation period, and soon the patient can return to his usual way of life.
Classification of steel structures
Thanks to modern technologies, metal structures used for operations of this kind can have different sizes and shapes. They are classified as follows:
- when installing structures inside the bone canal (intramedullary osteosynthesis), solid or hollow rods are used, as well as intramedullary rods both with and without locking;
- for extramedullary osteosynthesis (placing structures on the bone), braces, screws and plates are used.
Compared to previous years, rehabilitation after such operations is rather quick.
Rehabilitation after surgery and its features
 With any injury, the body needs to recover, and this time is highly dependent on many different factors.
Spine surgeries are classified as the most difficult and traumatic ones, as they protect another important organ - the spinal cord. The period of rehabilitation after spinal injuries can range from 2-3 days (surgery to remove a hernia) and up to several years (paresis, organ paralysis or spinal cord injury).
And the wider the area of fixation of the vertebral bodies, the longer the rehabilitation period, including bed rest, will be. During these operations, the dynamics of the body's recovery is monitored by means of X-ray, pictures are taken every week. In the same period, the specialist is engaged in physiotherapy exercises with the patient, bringing the recovery period closer. In addition to physical education, the patient is prescribed physiotherapy procedures and massage of the limbs. Soon the person will be able to get out of bed and start walking. If your back hurts after the operation, you should inform your doctor. There is probably a need to change the way you relieve pain.
To alleviate the patient's condition after the operation, to learn to walk with metal structures (the period of fusion is on average 3-4 months), he needs to wear a special medical corset. It will need to be worn for about a year, and the process of adaptation to an extraneous structure can take up to 2 years.
The already listed measures for the rehabilitation of the spine improve blood circulation and develop ligaments and joints:
- Do physical therapy exercises every day. They help not only to restore the former functions of the back, but also to strengthen the muscles, and this, in turn, helps to significantly relieve the load on the vertebrae by wearing a muscle corset;
- massage your back regularly. This procedure will increase the blood flow to the area of injury, and the more blood circulates in this area, the faster the spine will recover;
- a fairly popular and relatively old method of rehabilitation is physiotherapy. This method works through natural factors such as laser, ultrasound, cold, heat and magnets. This treatment helps to improve blood microcirculation, develops the regenerative abilities of the body and has a positive effect in every possible way;
- reflexology is a controversial method of spinal rehabilitation after surgery. It involves the impact on some points on the body and allows you to tone the muscles and increase blood flow.
It is very important not to forget to look after the stitches after the operation. If you do not observe hygiene, then the suture material will become an entrance gate for infection. This can provoke inflammatory changes and the rejection of the established material will begin. In such cases, lethal outcomes are not excluded. If the suture material becomes infected, the patient is assigned a small operation, in which case the old material should be removed, the wound should be reprocessed and sutured.
Why is metalwork sometimes removed?
The reasons why metal structures must be removed are absolute and relative.
The absolute reasons include:

There are fewer relative reasons for removing the implant:
- psychological factor or the desire of the patient. Not everyone can calmly relate to the presence of a foreign body in the body;
- physical discomfort when the design interferes with doing certain actions or wearing clothes.
Contraindications to the removal of the structure
If the patient asks the doctor to remove the structure, then he must weigh the pros and cons of the repeated operation. Contraindications in this case are as follows:

After a period of rehabilitation, the restoration of the lost functions begins, and in severe cases, they can be restored at least partially. But remember that if repeated trauma occurs in the affected area, it can cause more serious complications, which will have to be treated for a longer time.
The older a person gets, the more problems he has with joints. Perhaps the first places that make themselves felt by pain are the knees. In their entire life, they have one of the highest loads, except for the spine. Although, for the sake of justice, it is worth noting that in many ways, a person's lifestyle also plays a decisive role. For example, athletes also often suffer from joint soreness. But in any case, everyone is interested if the knee joints hurt, how can they be treated?
What provokes the problem and how can you deal with it?
Knee pain never just comes on, it needs a trigger. Depending on what caused the development of discomfort, the method of treatment will be selected. Therefore, in each case, when the knee joints hurt, the patient needs to undergo diagnostics to clarify the situation.
Problems with knee joints can occur of the following nature:
- Osteoarthritis. This disease entails the destruction of the cartilage tissue in the joint. In addition to the knees, it can also affect the feet, hip joints and hands. At the initial stages of the disease, they hurt with low intensity, and the pain appears from time to time, but gradually it becomes stronger, while the patient may notice that during such attacks, a crunching clicking sound appears in the knee joints. The problem is treated with pain relievers, a course of massage, physiotherapy, swimming and a set of special gymnastic exercises.
- Rheumatoid arthritis. With such a disease, in addition to the fact that the knee joint hurts, there are swelling and redness in the area of the affected joints, while they lose their mobility, which makes it difficult for a person to move. Unfortunately, in modern medicine, a method has not yet been invented that will fully cure rheumatoid arthritis. Therefore, therapy will be aimed at relieving pain and preventing deformation of the joints, as well as the patient is prescribed anti-inflammatory drugs. If for this reason the joints of the knees hurt, and the treatment was not carried out on time, then conservative methods will no longer help, here you have to seek help from surgery.
- Gout. This ailment of the knee joints develops against the background of the accumulation of uric acid in the body. It is because of her that the knee joints hurt. Therefore, here the treatment is primarily based on adherence to a diet, which is supplemented with anti-inflammatory and non-steroidal analgesic drugs and drugs that help control the concentration of uric acid.
- Rheumatism. Such a problem with the knee joints develops against the background of untreated sore throat caused by streptococci. If the knee area hurts for this reason, treatment requires qualified supervision, since in some cases, patients are prescribed for 5 years, every six months to undergo antibiotic therapy.
- Osteoporosis of the knee joint.

And this is not the whole list of diseases that can provoke a condition in which the knee joints hurt. That is why it is so important to listen to the sensations of your body in time and seek help from a doctor. It is one thing when these are the consequences of an injury and pain can be easily dealt with with a cooling compress, and a completely different question is when an infection or a virus in the body became the cause. Here, adequate therapy is already required, which will help to avoid consequences and complications.
What can you do at home?
How to treat knee pain when there is no way to see a doctor? There are several universal recommendations that will temporarily help alleviate the condition. BUT! They should not be performed regularly instead of visiting a specialist. In some cases, if your knees hurt, this can signal a serious disturbance in the body. My patients use a proven remedy that can relieve pain in 2 weeks without much effort.
If you feel uncomfortable in the knee joint, you should try the following:
- to provide maximum rest of the limb, and to get rid of pain it is worth using an elastic bandage;
- it is strictly forbidden to make warming compresses without first figuring out why the knee area hurts, since heat can serve as a catalyst for the development of complications;
- taking painkillers in the form of tablets or injections is allowed;
- when the diagnosis is known, pain relievers and anti-inflammatory ointments or gels for the knee joints can be used;
- many doctors recommend to their patients with knee pain recipes from traditional medicine, for example, bay leaf tincture, which is intended for internal use.

Firstly, he will help determine the true cause of knee pain, and secondly, he will prescribe an integrated approach that will help solve the problem much more efficiently and faster.
What will save you from knee pain?
Treatment is started only when an accurate diagnosis has been made of why the knee joints hurt. The doctor prescribes the type and dose of the drug in each case individually. Based on the results of the analyzes obtained, the specialist can judge the patient's health, the degree of the existing knee joint disease.
It is worth returning to the topic of traditional medicine. There are several recipes that can help relieve knee pain. But their use should be an addition to traditional medicine, and not be the main one, otherwise the knee joints will stop hurting only for a while. Despite the fact that folk recipes give a positive result, they will not be able to completely cure the disease. That is why they should always be used along with drug therapy.
There are several ways to help solve the problem of sore knees:

- Vinegar and vodka are mixed in proportions 1 to 1 and the resulting product is used in the form of compresses.
- Also, if the knee area hurts, you can prepare an ointment based on thyme, ginger and lard (1: 1: 1) and use it at the time of the attack.
- In order to get rid of salt deposits, a remedy is prepared from iodine (50 ml) and ammonia (50 ml). The glass container is removed for 24 hours in a warm place so that the liquid is infused, after which it is used for rubbing. In no case is such a remedy used in compresses for the knee area.
- Raw potatoes are rubbed on a fine grater together with the peel, after which aviation kerosene (1 tablespoon) is added to it. When the knee joints hurt, the compress is placed at night for 15 minutes. On top it is covered with a film and woolen cloth.
- For the next recipe, you need to build grated potatoes (100 g), which are mixed with grated horseradish root (100 g). The fresh mixture is spread on a sore spot with a layer of 1 cm, a film and a warm cloth are wrapped over it. The time of the procedure if the knee area hurts is 30-40 minutes. After that, the mixture is not thrown out, but folded into glassware and placed in the refrigerator. It can be reused by preheating it in a water bath. But after the second time, they prepare a new gruel.
- You can make your own warming ointment to help if your knee hurts. For her you need yolk (1pc), turpentine (1 tsp), apple cider vinegar (1 tbsp). The ingredients are kneaded one at a time, gradually adding them to the bowl in the order in which they are listed. Apply the product to the knee joints at night.
- Here you need vodka (100 ml), valerian (1 bottle), analgin tablets (10 pcs), triple cologne (1 bottle). All components are mixed in one glass container and removed for 72 hours. In this case, the container must be shaken daily. The finished product is used as a rub for the knee joints.

- Herbs will also help with knee pain. 75 grams of elderberry and chamomile are poured with boiling water (150 ml), after which they are allowed to brew for 15-20 minutes. Next, the liquid is filtered and the herbal collection itself is used. It is laid out on gauze and, in the idea of a compress, they wrap the leg that hurts.
- For the next tincture, you need elecampane (100 g), which is poured with vodka or moonshine (250 ml). The container is insisted for 2-3 days, after which the tissue is moistened with the medicine and applied to the knee. It is recommended to lubricate the skin with sunflower oil beforehand.
- Horse chestnut (300 gr) is finely chopped and poured with a liter of vodka. The container is removed to a dark, cool place for 14 days; at the end of the time, the liquid does not need to be filtered. The medicine is used as a rub in the place where the knee joint hurts.
- Upon the arrival of autumn, yellow wedge leaves (270 pcs) are collected on the street. They are well washed and dried. As soon as they become brittle, then the following remedy can be prepared from them: 6 leaves are poured with cold water (1 liter). Next, the container must be put on fire and brought to a boil, after which the saucepan is immediately removed and cooled. The medicine is filtered and taken internally when the knee area hurts, 3 times a day, 100 ml half an hour before meals.
Each of these recipes has a different effectiveness, so the treatment will take quite a long time. If a knee joint hurts, how to treat it, and what cannot be used, only a specialist will tell you. And this also applies to traditional medicine. Do not neglect your health and postpone going to the doctor.
Sometimes, in the manufacture of various packaging boxes and bags, it becomes necessary to make holes in the paper, for example, in order to insert the handles into the paper bag. In order for these holes to look neat and beautiful, as well as to increase their service life, metal rings - eyelets are inserted into them. There are various special tools for installing eyelets, which are sold in specialized stores. In this article, I will tell you how to install eyelets with your own hands at home using materials at hand.
Eyelets come in different sizes and diameters depending on where you will be using it. But they all consist of two parts - a cap and a leg. The length of the leg (L) depends on the thickness of the paper - the thicker the paper or the more sheets you join, the longer the leg should be. d - diameter of the eyelet leg.
The mechanism for installing the eyelets is very simple.
1. On paper we outline the place of installation of the eyelet.
2. Make a hole in the paper.
3. Insert the grommet into the hole made.
4.Using the tools, flatten the foot of the eyelet, thereby securing it to the paper.
With the help of special professional tools, the installation of eyelets is done very quickly and accurately. But it is not always possible to purchase such tools, and they are not cheap. Therefore, we will look for workarounds.
How to install eyelets with your own hands
Step 1. With the help of a pencil and a ruler (if necessary), we make markings and mark the place of installation of the eyelet.
Step 2. If a hole needs to be made at the edge of the paper, it can be punctured with a hole punch. But be careful, compare the diameters of the hole in the hole punch and in the head of the eyelet. If the grommet is too small, then it is best to make a hole with a thin, sharp end of a clerical knife, turning it slightly in the intended place.

Step 3. We carefully insert the eyelet into the hole made so that the cap is on the front side, and the leg is on the wrong side.

Step 4. For this step we need the following tools and accessories.
- a rubber mat or a piece of linoleum;
- an iron ruler or a small piece of any other iron cloth;
- a small hammer;
- and the most important tool is something for flattening the foot of the eyelet. In my home arsenal, among all the bolts and nuts, I found such a "stud" (to be honest, I don’t know what it is for).

You can pick up something of your own, but with such a condition - so that its end is tapered, and the thickness of the rod is greater than the diameter of the eyelet leg. If the rod is smaller, then it will simply fall through the foot of the eyelet, and you cannot flatten anything with it.
So, on a rubber mat (or on another substrate) I put an iron ruler, on it the paper with the grommet inserted inside out. I insert the matched "carnation" into the foot of the eyelet perpendicularly and tap it several times with a hammer.

In my case, the leg of the rod is not much larger than the diameter of the eyelet, so at first I "open" the eyelet a little, and then turn the "carnation" over and put it on the eyelet with a hat and use a hammer to finish the job.
This is how the installed grommet looks like from the front and the wrong side.
Almost every novice craftsman wants to know how to install a plastic window yourself. The advantages of such windows include not only operational characteristics, but also ease of installation. These structures are equipped with fasteners and additional parts, so even a novice master will be able to install windows with his own hands. However, to do everything right, you should take into account the existing nuances. First of all, it is worth noting that it is very difficult to perform work alone, therefore it is recommended to involve an assistant.
Elements that will be needed in order to carry out the installation of plastic windows:
- screwdriver;
- pliers;
- polyurethane foam;
- self-tapping screws;
- anchor;
- building level;
- plumb line;
- slopes;
- windowsill;
- ebb.
Before purchasing windows, you will need to make measurements of the opening, taking into account what the design is. It can be with or without a quarter. Openings with a quarter are characteristic of a building made of foam blocks. It is worth knowing that such designs significantly reduce heat loss.
In the opening without a quarter, it will be necessary to order windows, the length of which is 5 cm less than the length of the window opening. The width should be less than the corresponding indicator of the opening by 3 cm. Along the contour, 1.5 cm slots should be provided, which will need to be sealed with foam in the future. From the bottom, you will need to leave 3.5 cm for the windowsill.
Quarter and quarter windows
Windows must be ordered by adding 3 cm to the width. The length remains unchanged. Insulating tapes will need to be applied not to the plastic frame, but to the place of contact of the quarters with the PVC window. The frame should be pressed against the quarters.
In the opening without a quarter, external and internal slopes will be used as protective and decorative elements that can prevent the influence of external factors on the technical properties of the polyurethane foam.
It should be borne in mind that the larger the gap, the greater the consumption of expensive foam. If you want to save money, gaps larger than 4 cm can be partially filled with expanded polystyrene or bricks. Slots from 1 to 4 cm are blown out exclusively with foam.
In most cases, windows are placed not in the middle of the opening, but retreating from the outer base by 1/3 inward.
However, those who wish to mount a window with their own hands can use options with an offset in the direction they need. This must be taken into account when buying a window sill and related accessories. Approximately 5 cm will need to be added to the width, which will be calculated based on the placement of the windows.

Existing methods of fixing the frame
The window installation technology will depend on the material from which the walls of the structure are erected, as well as on the dimensions of the windows. Based on these factors, you need to choose a method for fixing the elements.
You can fix the structures as follows:
- Fixing with dowels, which are inserted into the wall through the prepared holes in the profile.
- Plates with teeth, which will need to be pressed into the profile. The elements are not mounted in the wall, but are installed with a rasp and fixed with screws. When the installation is done, we foame the installation seams and install the slopes, under which it will be possible to hide the anchor plates. The space between the opening plane and the slope must be filled with foam. To reduce the consumption of foam, part of which will go for additional leveling, a recess can be made under the plate.
The first method is considered the most reliable. It is used in most cases for the installation of heavy window structures. If the fastening is through, the window will resist various shock loads that may arise, for example, when using windows with sashes that open in several directions. Anchors that pass through the frame will allow vertical and horizontal adjustment of the structure.

Fixing the frame during window installation
For people who are interested in the self-installation of small plastic windows with deaf double-glazed windows, the method of fixing with anchor plates is suitable.
It is recommended to prepare small recesses for the installation of plates in an opening made of concrete or brick so that you do not need to apply an extra layer for leveling before installing the slopes.
In some cases, wizards use both methods. The anchors are immersed in the walls through the side parts of the frame and the base of the structure, and the upper part is fixed with plates. Galvanized self-tapping screws are sometimes used instead of anchors.
Preparation of the window and opening
The opening must be cleaned of dust, debris and paint residues. If the installation of plastic windows will be carried out in the existing opening, then the top layer must be planed. The foam will have to adhere firmly to this layer.
The gaps between the frame and the opening can only be filled with foam.
To prepare a window, you need to do the following:
- We release the frame from the sash. To do this, you need to remove the pin, which is mounted in the upper hinge. Next, it must be carefully picked up at the bottom. The element must be lifted and removed from the lower hinge. Double-glazed windows must be removed from the blind windows. To do this, you will first need to remove the longitudinal, and then the transverse glazing beads. To remove the glazing beads, you need to insert a knife or spatula into the gap, and then slowly move. It is worth noting that a small window can be installed even without dismantling the sashes.
- The double-glazed window must be leaned against the wall at an angle, then placed on a flat base, which is covered with cardboard. It is not allowed to install the window flat, as cracks may appear due to the ingress of stones.
- Remove the protective film from the outer base of the frame. It will be much more difficult to do this in the future, so it is recommended to remove it at this stage.
- Finally, you need to place a place for mounting the fasteners. The recommended installation pitch for these devices is 40 cm. If you plan to use mounting plates, you will need to pre-attach them to the frame with self-tapping screws. Holes must be made for the anchor or self-tapping screws, while the drill should be placed on the outside of the frame.

Window structure after installation
The sequence of actions for installing windows
The frame will need to be inserted into the opening. First, you need to lay plastic corners or small bars around the perimeter. These elements will be needed to provide a technological gap. The blades need to be slightly moved in order to be able to clearly position the frame horizontally and vertically with the same slots. It is recommended to check the location with a building level. The blades should be placed close to the fixing point with screws or anchors.
Speaking about how to install plastic windows, it is worth knowing that installation can be done in several ways. Therefore, at this stage, there will be differences. The sequence of actions will be as follows:
- A self-tapping screw must be screwed into the opening of a wooden house through the recesses in the frame. In this case, you do not need to screw in the fasteners all the way.
- On the foam concrete or brick walls, through the recesses in the frame, points should be marked, then remove the frame, drill the holes with a drill that matches the material. Then we put the frame in place and install the fastener.
- You do not need to perform any complicated steps when installing on the anchor plates. They will need to be bent so that they adjoin the place that is intended for their attachment.
- The final fixation is carried out after checking the contours and verticals with a plumb line. It is not necessary to tighten the elements strongly, as the frame can bend. The screwing must be completed when the cap is flush with the frame.
- Parts that have been removed will need to be returned to their place in the reverse order, and then check the functionality of the product.
- The cracks must be filled with construction foam. Seams are closed with protective tape. From the outside, the insulation tape must be drowned.
- The foam should be used to fill the gap under the drain.
- At the next stage, the window sill is mounted. A few centimeters of plastic construction will need to be brought under the sweet clover.
