Have you decided to replace your old wooden windows with plastic ones? Of course, it is better to entrust this matter to professionals, since the installation of plastic windows carries many nuances, if not observed, the windows may not retain heat, be not airtight, close poorly and fog up. If you are sure that you can cope with this task, then we will tell you about the nuances of installing PVC windows in this article.
The content of the article:
Organizational matters
The advantage of self-installation of plastic windows is that you yourself will do it much more scrupulously than most assembly teams, who sin by non-compliance with GOST when installing windows. But again, we repeat that if you have never seen clearly and are not familiar with the process of installing plastic windows, order the installation from specialists.When is it better to install plastic windows
It is best to replace windows in the warm season, from May to September. Perform installation work in dry weather; in rainy weather, this is highly discouraged. Many people are interested in the question: are plastic windows installed in winter? It is possible to install plastic windows in winter, but this is not recommended for a number of reasons. If you bought a new apartment and plan to move into it as soon as possible, or you are doing repairs in the apartment in which you live, then it is illogical to delay repairs solely because of the windows, making repairs now and installing windows in six months is even more illogical, since part of what has been done repairs will go down the drain, and leaving old windows while doing repairs is wrong. The installation of windows in winter is allowed at a temperature not lower than -5 degrees. In addition, it is also not recommended to install plastic windows in very hot weather. An important aspect when replacing windows is not only their installation, but also the correct measurement and the right choice.
Measurement of plastic windows
Before you go to buy a window, you need to measure the window opening, based on these dimensions, place an order or buy a finished window. The advantage of ordering a window is that a window will be made to your size, as for the purchase of ready-made windows, they are made according to standard sizes, which do not always fit perfectly into specific window openings.So, the window must be measured as follows. To begin with, the window opening is measured from the inside in width, from the base of the wall, so if you have slopes on your windows, then they must be dismantled in order to make an accurate measurement. Then it is necessary to measure the height of the window opening, taking into account the type of window sill. If the house is panel, then in such houses the window sill, as a rule, is part of the slab, so a new window will be installed on it, if the window sill is removable, then it is necessary to measure from the base of the slab itself. After that, you need to try to measure the depth of the window opening, for this, you may need to beat off some of the plaster or remove the wooden plank from the side parts of the window.
As for measurements from the outside, here we first measure the width and height of the window opening, then again you will need to beat off some of the plaster or cement in order to measure the depth of the opening between the window and the wall with a knife. If possible, also remove the ebb: check if there is a border at the bottom of the window opening or if the surface is solid.
As you can imagine, the window itself cannot fit right into the window opening, since it needs space to narrow and expand, depending on temperature fluctuations. As for the gaps, their minimum size should be as follows:
- For windows up to 1m 20cm - 15mm indent;
- For windows up to 2m 20cm - 20mm;
- For windows up to 3m - 25mm.

When measuring, take into account also the fact that the window itself should go into the window opening only a few centimeters, that is, so that there is at least 4 cm from the edges of the glass unit and the sash, so that the glass unit is not in the wall, and slopes can be made normally. Having received the dimensions of the window and the so-called window edging, we take into account the indicated nuances and obtain the size of the window profile. After that, make an order for the manufacture of a window, or buy ready-made, also order along with this: a handle, a mosquito net (fasteners), a window sill and an ebb.
Dismantling the old window and preparing the opening
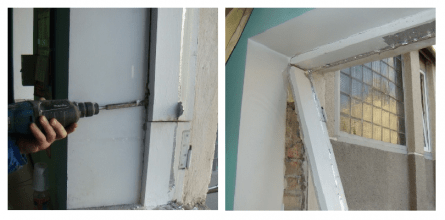
When you have purchased a window and the weather is good outside - let's get down to work. Please note that all work will be very dusty, so either remove all things from the room, or cover them with film. We start work by dismantling old windows, for this use a hammer, pry bar and chisel. First you need to remove the window or the smaller sash, after which the large sash is dismantled. Next, using a hacksaw or jigsaw, you need to cut the partition between the doors in half and pull it out of the frame. Then we cut a part of the frame in half from the bottom, after which we make its further dismantling.When the frame is dismantled, using a hammer and a chisel or using a puncher, knock down irregularities and make grooves on the sides so that the window sill goes a little into the wall. Immediately before installing the plastic window, you need to thoroughly clean the window opening from debris and slightly moisten it. After that, we proceed to the preparation of the window profile and to its installation.
Installation of plastic windows
Before installing the profile, you need to remove the sashes and pull the double-glazed windows out of the blind parts of the window. We remove the protective tapes from the outer part of the profile and put on the decorative caps in the drain holes. Using self-tapping screws, we fix the fasteners for the mosquito net.In many old sources this is not mentioned, but today the technology of installing plastic windows has changed a little, one more item has been added to it: profile insulation. These actions were included in the process of installing plastic windows due to the fact that most people, even with correct installation in compliance with all the rules, formed moisture (condensation) and fungus on the windows, as a result of which the profile froze. Thanks to this action, all the negative consequences that were observed earlier should not appear.
For a tighter and more tight fit of the profile to the window opening, the perimeter of the profile from the outside is pasted over with a vapor-tight self-expanding sealing tape. Then the side parts of the profile from all sides (closer to the inside of the window) are pasted over with vapor barrier tapes based on butyl. From above, on the side of the profile, you can stick a seal made of self-expanding tape, after which, if necessary, a starting or expansion profile is attached. After the insulation work, we proceed to the installation of the profile.

What to attach the plastic window to: mounting plates or anchors
There are two options for fixing PVC windows when installing them: on anchors and on plates. It is impossible to say specifically and unequivocally which of these two types of fastening is the best, since each of them has its own advantages and disadvantages. In view of the fact that fastening is the most important component of installing a plastic window, and the fact that beginners who want to install plastic windows with their own hands are interested in this issue, we will consider this issue in more detail, with your permission.
So, first of all, when choosing the type of fastening of plastic windows, it is necessary to focus on the type of walls. That is, if you have a panel or brick house, then you are not limited in the choice of the type of window fastening, but if you want to install plastic windows in a new building or in a country house, which are built from foam blocks or aerated blocks, then the windows must be fastened exclusively to assembly plates.
The biggest disadvantage of fastening windows to anchors is the so-called depressurization of the profile. As you know, there are several chambers inside the profile, which are separated from each other. Thanks to these chambers, the profile "keeps" the temperature, since, for example, in winter the coldest chamber is located on the outside of the window, and in each subsequent chamber the temperature is slightly higher. In the outermost chamber, which is located on the inner side, the temperature is several degrees higher in winter than in the first chamber, due to which there is no temperature difference in the profile. In principle, the meaning is clear that due to this structure and the tightness of the chambers, they retain heat in the profile.
When the profile is attached with anchors, it is drilled through, resulting in depressurization of the chambers. Also, fastening plastic windows to anchors requires more time, accuracy and skill, so this is not the best fastening option for beginners. If the profile is incorrectly fixed, it can lead, and if this happens, the window will be largely damaged, since this is fraught with gaps between the glass unit and the profile, and loose closing of the window sash. The advantage of fastening plastic windows with anchors is that the structure will be more durable, that is, strong winds will not cause the profile to vibrate, and the likelihood of the structure sagging strongly after installation is reduced.
As for the fastening of plastic windows to the mounting plates, it is much easier, moreover, it will save a lot of time and the cameras in the profile will not be depressurized, which is very important. The disadvantage of fastening windows to mounting plates is insufficient structural strength, that is, the window may shake slightly, but this will be insignificant. However, mounting plates are the easiest way for beginners to mount a plastic window.
Some installers, when installing plastic windows, use both of these types of fasteners at the same time. What type of window fastening to use is up to you. If you decide to fasten the profile to the mounting plates, then we attach them to the profile with self-tapping screws, but if it is decided to fasten the profile with anchors - with a drill or a perforator, then first make holes in the profile.
From each corner, at a distance of 120-150mm, the first fasteners are made, then subsequent fasteners are made with a step of 700mm. There must be at least 3 fasteners on each side.

Profile attachment
Before placing the profile in the window opening with a level, check the planes of all sides of the opening. Then, using hardwood blocks or plastic liners, we lift the profile and adjust it vertically. Vertical adjustment is made from the top of the window opening, that is, from the bottom you need to raise the profile using the named materials. Then we align the profile horizontally. Pre-fix the profile in the window opening on the sides and on top using wooden blades. When the profile is leveled from all sides, inspect it to see if everything is correct, and proceed to fix it.
To fix the profile to the mounting plates, first use one snipe-nail at a time. Then again check the evenness of the profile using a level and then fix each mounting plate with a second dowel-nail. If you fix the window on the anchor, then through the holes made in advance, using a perforator, make holes in the wall, screw the anchor, but do not tighten them, firstly, you need to check the level of the window with a level, and secondly, tighten the anchor slowly so that do not violate the geometry of the profile. When the profile is fixed, we take out the wooden blades from the sides and upper part, the lower ones remain - they are the basis of the profile.
Low tide
The next stage of work is the installation of the low tide. We measure the ebb and use metal scissors to adjust it to the desired size. Then a vapor-proof tape is glued from the bottom of the frame, which will protect the seam between the wall and the bottom of the window, under the ebb. When the tape is glued, we apply a layer of polyurethane foam on top of it, and another layer on the edge of the board to ensure the sealing and soundproofing of the ebb. The ebb fits into the grooves of the profile and is fixed with special self-tapping screws.
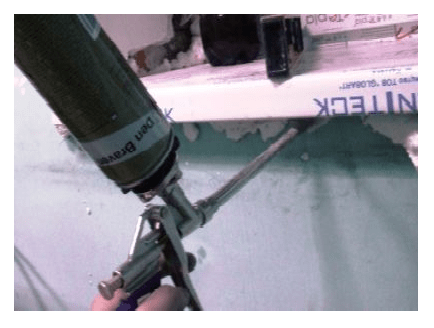
Sealing of seams
Next, with the help of special foam for installing windows, we blow out the assembly seam between the wall and the profile: first from the left side, then from the right, then - at the top. The peculiarity of this polyurethane foam is the absence of expansion, which is very convenient for installation - the foam fills in the cracks, but does not bloat unnecessarily. Beforehand, the wall surface can be slightly moistened. After a few minutes, when the foam has dried up a little and expanded, we glue the second part of the insulation tape on top of it on the wall.

Installation of sashes and double-glazed windows
Remove the protective tape from the inside of the window first. When installing a double-glazed window, use special pads so that it evenly covers the opening. Then, using the strips, fix the glass unit, you can hammer the fixing strips into the grooves using a rubberized hammer. After installing the sash and fixing it in the awnings, fix the handle and adjust the sash itself vertically and horizontally. At the very end, a mosquito net is installed.
Windowsill
Then we move on to the pre-final part - the installation of the window sill. Foam well the lower assembly seam and glue a vapor barrier tape over it. The next thing to do is to install wooden blocks on which the window sill will be laid. The pads must be at least 10cm in length. The level of the blocks should be such that the window sill is firmly pressed against the bottom of the profile. One more nuance - the window sill should have an inclination towards the room of no more than 5 degrees. Please note that the window sill should not cover the battery, otherwise the heat from it will not spread to the window. It is unnecessary to fasten the window sill to the mounting plates, as well as to special clips: the method proposed by us will ensure a strong and reliable fastening of the window sill. Check if the window sill is tightly held, and then sing it from below, preferably with foam, which expands. At the end of this stage of work, place 5-liter bottles of water on the windowsill to fix it.
Video instruction for self-assembly of plastic windows
In order for you to clearly see the process of installing a plastic window, we recommend watching the videos below.
This video briefly describes what you need to pay attention to when installing plastic windows.
To independently install a plastic window in your apartment or house, you do not need to have special skills and special tools. Even a self-taught installer is able to correctly insert it into the opening and secure with anchor bolts. It is enough to be able to handle a building level and a hammer drill. Only the installation must be carried out clearly according to the rules prescribed in GOSTs and the instructions of manufacturers of PVC window products. Otherwise, this transparent construction will not last long.
Required tools and materials
Installation of a plastic window is carried out in five stages:
- Dismantling the old window frame.
- Opening preparation.
- Installation and leveling of a new frame with sashes.
- Drainage attachment from the outside of the window.
- Foaming of installation gaps and installation of a window sill with slopes.
In addition to a punch and a level, to install a window from tools, you will also need a hammer, a screwdriver, a water spray, a spatula, metal scissors and a pry bar. From consumables, you must in advance purchase mounting foam, silicone, anchor bolts or metal plates with self-tapping dowels and plastic construction wedges (or prepare small pieces of wood).

Required tools for installation
You will also need a vapor-permeable self-adhesive and waterproofing tape. Plus, the set of PVC windows should include slopes, a support profile, a window sill and a metal ebb. If all this is available, then you can proceed with the installation.

Window construction
Dismantling of the old PVC window and preparation of the opening
To get rid of an old wooden or plastic window, you need to remove the sashes and make a saw cut on the side of its frame with a hacksaw. Then, with a pry bar, one of the resulting parts is pulled back and by the force of the hands it is pulled out of the wall together with fasteners. After that, the procedure is repeated with all the remaining fragments of the window to be deleted. Then the insulation is removed from the opening (if it is there) and everything that can fall off (for example, solution).

Sectional construction of plastic windows
As a result, only bare and even ends of walls made of brick, concrete or wood should remain. If there are chips, cracks or potholes on these surfaces with a depth and size of more than 1 cm, then they must be repaired with concrete mortar. Nothing is required here to align especially for a new plastic window, anyway, then small cracks and recesses will be filled with polyurethane foam. However, it is not worth leaving deep noticeable defects without sealing.
Possible measurement errors
Before you continue to work and put a plastic window with your own hands, dirt, dust and oil stains must be removed from the surfaces in the opening. If you have to insert a window structure in winter, then you also need to remove snow and frost, and then warm up the ends of the wall with a construction hairdryer to remove moisture.
Window installation
Installation of PVC windows with fixation in the opening can be done in two ways:
- Anchor bolts through the frame profile.
- Plates fixed to the side of the frame with self-tapping dowels.
The first option is more reliable. However, with this technology of installing plastic windows, the frame profile is drilled through. As a result, its thermal insulation efficiency decreases. If the window unit needs to be installed in a building erected in a region with a cold climate, then it would be most correct to refuse this method.
The second option for fastening plastic windows is considered less reliable and is not recommended in the presence of strong wind loads. But in winter, heat through the holes in the profile from the house in this case will definitely not go out into the street.
Installation of windows with different slope options
Holes for fasteners of PVC windows are drilled in the wall with a distance of 15-25 cm from the corners of the opening. Plus one or two holes on the sides, bottom and top are made in the middle with a step of no more than 70 cm between them.
Directly placing a new window in the opening is made on the support profile and adjusting wedges. Plus, in advance, it will be necessary to glue a vapor-permeable gasket (PSUL) around the outer side of the frame. And you should not tighten the bolts or self-tapping screws to the stop immediately after leveling the structure in the opening using a level. First, you still need to fix the ebb for drainage of rainwater and waterproofing.

How to position the window frame correctly
Drainage
The next step in installing a plastic window with your own hands is to mount the drainage system. It must be put in any case. Without this external window block, all the rain will fall on the foam and under the frame. The inevitable result will be the destruction of the assembly seam and the formation of gaps between the profile and the wall.
The ebb is fastened with self-tapping screws not to the window itself, but to the support profile under the frame. In this case, the waterproofing tape is first laid. And then a drain is placed on top of it and fixed in place. Then, polyurethane foam is sprayed under this metal strip.

How to properly position the drain
Assembling a plastic window
Before installing a plastic window in the opening, you have to remove all the opening sashes from it so that they do not interfere with the installation work. Plus and the double-glazed window from the blind part of the structure is also removed. To do this, pry the plastic glazing beads with a spatula and knock them out of the groove.
Reinstallation of sashes and double-glazed windows in plastic windows is carried out before foaming the gaps around the frame. If they are not installed back in place, then it is impossible to blow out the polyurethane foam. After spraying, the polyurethane foam expands 1.5–2 times. Moreover, this happens with the creation of a sufficiently strong pressure on the frame profile. It can be easily bent so that it is simply not possible to insert the sashes back.
Installation of a window sill
Installation on a window sill in many respects repeats the installation of drainage technology. Only instead of a waterproofing tape, a vapor barrier is used inside the room. If waterproofing on the outside prevents moisture from entering the assembly seam, then the vapor barrier on the inside is intended to evaporate it into the house.

Installation of a window with and without waterproofing
The foam in the gap should not get wet and freeze in any way, this will instantly destroy it. the window sill is laid on wooden support-guides, located perpendicular to the window and along its entire length from steps of 30–40 cm. In this case, a slope inside the room of 2–3 degrees must be observed. This is necessary so that the resulting condensation drains from the window sill plate, and does not stagnate in the corners.

Waterproofing joints
After aligning and leveling the window sill, it is inserted with pressure under the bottom edge of the frame. Then the gap is foamed from below and weight is set on top of the plastic plate. Once the foam has set, it is firmly in place.
Plastic window constructions are rapidly replacing their wooden counterparts from the market. If you also decided to replace the old windows with more modern designs, it would not hurt to familiarize yourself with the instructions for self-installation of new PVC windows. Professional installers charge quite a lot of money for such work. Does it make sense to overpay if you can handle all the tasks yourself?
It is assumed that before starting installation, you have already decided what size of windows will suit you, what configuration new systems should have, what accessories you will order, etc. Deal with the solution of these issues on your own or with the help of a consultant of the company, which you decided to entrust the production of plastic windows.
Immediately before starting the installation, you need to decide whether you will fasten the windows through the frame or use a method that involves the use of special fastening "ears".

The first option is more common. However, it may seem inconvenient to you for the reason that before starting installation, you will need to remove the swing doors from the frame, and get double-glazed windows from the blind doors.
The second option is more convenient for self-installation - you don't have to disassemble anything, therefore, the risk of damage to the structure and violation of its tightness is minimized.
When choosing the second method, find yourself an intelligent assistant in advance. The assembled window weighs a lot, and it is incredibly difficult to install it yourself.

Preparatory work
Immediately before the installation of PVC windows, you have to complete a number of important preparatory work.
Site preparation

When ordering windows, specify when they will be delivered to you. Start preparing the site shortly before the delivery of the windows.
First step. Set aside all furniture and appliances from the window opening.
Second step. Cover the floor and radiators with a protective film or thick cloth.
Third step. Organize your workplace so that nothing bothers you, and everything you need to complete the installation of the window is at hand.

First step. Remove the sashes and dismantle the double-glazed windows if you prefer the fixing method through the frame.
To remove the glass unit, gently pry the fastening glazing bead using a simple chisel and carefully hit the same chisel with the fasteners out of the groove. Pull out the vertical fixing glazing beads first. Then, in the same order, get rid of the horizontal fasteners.
To avoid confusion in the future, be sure to label the fasteners. Their size may differ slightly, but even a fraction of a millimeter difference will be enough for gaps to appear.
Second step. Tilt the window frame. The glass unit will independently come out of the fastening grooves. Carefully place the removed glass unit against a wall or other stable surface at a certain angle.

Third step. Remove the plugs from the sash canopies and unscrew the fastening bolts. Next, you need to free the upper part of the hinged casement. To do this, turn the knob "for ventilation". Remove the hook located in the lower canopy.

As a result, you will end up with a “bare” frame with jumpers.
Fourth step. Prepare anchor holes from the inside of the window frame. Place the holes around the perimeter of the product so that there are at least 3 attachment points on each side, and at least two at the bottom and top.
The diameter of the window anchors is 0.8-1 cm. Use a drill of the same diameter to create the holes.
If the plastic window will be fixed using special "ears", the disassembly of the structure can be ignored. In such a situation, all preparation comes down to fixing the fasteners from the kit to the frame with screws.
Video - How to remove glass from a PVC window
Window dismantling instructions


First step. Remove or tear out the sashes, depending on the design of the window.
Second step. File the box and frame at several points.
Third step. Pry each part of the structure with a crowbar and remove the frame from the opening. In some situations, it is more convenient to immediately find two hundred nails, due to which the window is held, and pull them out.
Fourth step. Remove any insulation and sealing materials that appear under the box.

Fifth step. Dismantle old slopes with a hammer drill. If the slopes are in good condition, you can leave them alone. At this point, be guided by your plans for the further design of the slopes.
Sixth step. Pry up and dismantle the old window sill.
Seventh step. Get rid of the cement backing under the windowsill and at the bottom of the window opening. A puncher will help you with this.

Eighth step. Collect the debris in suitable containers and dispose of in the trash can. Take the remains of the dismantled window there.
Ninth step. Align the ends of the opening, clean them from dirt. Prime the surfaces.

Tenth step. Relevant only for residents of old wooden houses. Lay waterproofing material around the opening. In some situations, it is required to additionally install a wooden reinforcing box.
If necessary, the dimensions of the opening can be reduced using a cement screed. At this point, focus on the conditions of your specific situation.
Setting up and pinning a new window
Proceed with the installation of the pre-prepared window.

First step. Place special plastic underlays or wooden blocks on the bottom end of the opening. Select the dimensions of the substrates so that their upper edges are connected in a straight horizontal line.
The underlays are laid in the corners and in the center of the opening.
Second step. Install the “bare” or assembled frame on the substrates, depending on the method of window installation you have chosen. It is not necessary to dismantle the substrates, they will continue to fulfill their supporting function.
Without substrates, the window can simply fall out. Anchors, no matter how often you check and tighten them, will still loosen under the weight of the structure. Therefore, for additional strengthening of the system, the substrates must be placed not only at the bottom, but also along the side faces, closer to the top of the opening.
Third step. Check the horizontal placement of the window structure using an ordinary water level.

If deviations are found, pick up the pegs or get rid of unnecessary elements of the substrate.
Fourth step. Check the vertical position of the window. The detected deviations are eliminated as in the previous step.


Fifth step. Proceed with anchoring the window according to the chosen fixing method.
Fastening by the method "through the frame"
First step. Take a punch and straight through the holes prepared in advance in the frame, drill similar holes for fasteners in the wall.
Second step. Secure the bottom of the structure on both sides. To do this, you need to insert and fix the anchor, but you do not need to complete the fastening immediately to the end.
Third step. Make sure the window is placed vertically. Correct the deviations immediately using the pattern you are already familiar with. If everything is ok, use a punch to drill holes in the center and top of the window frame. Insert and tighten the anchor. Information on the required number of fasteners was given earlier.
Fourth step. Recheck the alignment of the window. Get rid of deviations immediately if they are found.
Fifth step. Tighten the anchor all the way. Do not overtighten them as the frame can be deformed from excessive tension.
Video - How to install a PVC window
Plate fixing
In this case, special plates will be used to fix the window. They are placed on one or two sides of the window block. The plates are made of thick metal and look like "ears". Holes for anchors are initially provided in such elements.
With this installation method, you need to bend the mounting plate into a step. The “eyelet” of the plate should fit as tightly as possible to the wall surface. The second part of the plate is bolted to the frame.
Fastening is done with the same anchors. The window is fixed in the same order: bottom first, then top and middle. At each stage of installation, be sure to check the evenness of the placement of the structure. Without observing the vertical and horizontal levels, your window will simply deform over time.

Assembly and final check of the window
After fixing all the anchors, go to the assembly of the window, if you originally disassembled it. The process is carried out in the reverse order of disassembly.
First step. Insert double-glazed windows into the window frame and fix them with glazing beads, first at the top, then at the bottom, and finally at the sides. A rubber mallet will help you to snap the glazing beads.
Second step. Reattach and secure the swing leaves accordingly. Adhere to the reverse order of dismantling them.
Make sure the flaps move normally. In its normal state, the sash does not make any unauthorized movements when it is opened at 45 degrees and 90 degrees.
Third step. Complete the test and seal the existing gaps between the walls and the newly installed window. Fill the gaps with special polyurethane foam in cylinders.
On this, the main work on the hand-made installation of PVC windows is considered complete. In the end, you just have to install a plumb line, a window sill, a mosquito net and make slopes at your discretion.
Installing a window sill (Read the article about installing a window sill with your own hands). Wetting with water. Dedusting

Installation of a window sill Laying out cement mortar

Installation of a window sill. Wetting with water. Dedusting

Installation of a window sill. Alignment. Grout

Installation of a window sill. Drying

Installation of a window sill. Finished work
Successful installation work!
In this article, I will tell you in detail how to install plastic windows with your own hands. I will give a semblance of instructions for installing windows, which includes dismantling the old window and all the subtleties of how to properly install plastic windows in an old or new window opening.
Does it make sense to install plastic windows with your own hands?
I will say right away that there is nothing complicated in how to install a plastic window yourself. This does not require special skills or expensive professional equipment. The technology for installing plastic windows is quite simple and consists of dismantling the old window and installing a new one. In terms of time, dismantling the old window takes from 30 to 90 minutes, and the installation of a new plastic window in its place takes an average of 2 hours (average window, up to 2x2 m in size). In total, it will take you 2.5-3.5 hours to replace one window. Agree, this is not a lot. So, if you wish, approximately in one weekend, you can independently replace the windows with your own hands, changing 2-3 windows a day. The savings will be about $ 40-60 per window. That is how much window replacement services cost today. Sometimes the price for installation is set as a percentage of the cost of new windows and in various regions and firms is from 10 to 40% of the cost of new metal-plastic windows. Dismantling of an old window and delivery of a new one, as well as finishing of slopes, if you order the installation of new windows from them, are most often done free of charge.
If you nevertheless decide to entrust the installation of windows to builders, then below I will list the guarantees that you have the right to demand:
- if you buy windows on your own not from an installation organization, then you will be able to provide a guarantee only for: seams, their filling (foam, silicone), verticality and horizontality of the corresponding parts and the operability of the window for about a year after installation;
- if you buy windows in the same place where you order installation work, then you will also be provided with a guarantee for fittings, on average it is 1 year, maximum 3-5 years for elite expensive windows.
When you do the installation of windows with your own hands, then you have the right to demand a guarantee for the fittings from the organization where you buy the windows. And the responsibility for the seams and their filling remains with you.
I will say one thing for sure, if you have one free weekend, hard work and a desire to save money, then following the recommendations that I will describe below, you can replace windows in your house no worse than any assembly team. Moreover, the word "team" is applicable to the installation of windows, very conditional. Since, in fact, the installation is carried out by 1 person, and another person simply delivers the tools and holds the window at the right time.
Correct measurement of a plastic window
To order plastic windows from the seller, you need to make preliminary measurements.
To do this, you must first determine what kind of window opening you have - with a quarter or without. For clarity, in the figure below I give a schematic view of the opening with a quarter (A) and without (B).
Window opening scheme with a quarter and without a quarter
We measure windows without a quarter
Installing windows without a quarter is as follows. If your house is new, then the windows are mounted in an empty window opening. And in order to order a window, you need to subtract 5 cm from the vertical opening size - this will be the height of your window. And subtract 3 cm from the size of the opening horizontally - this will be the width of your window. Subsequently, when self-installing the window, these 3 cm will be filled with foam (1.5 cm on each side of the window). And 5 cm is 1.5 cm from the top of the window for filling with foam and 3.5 cm for the window sill under the window.
You also need to measure the length and width of the window sill and the external ebb and add at least 5 cm to these dimensions so that the window sill "bumps" a little on the right and left into the wall. For an inexperienced installer, you can take 20-30 cm in stock, the excess is cut off during installation. In general, window sills and ebb tides come in a unified width (10, 20, 30, 40, 50, 60 cm) and length (up to 6 m), but in any case, you must provide the minimum dimensions so that you can be brought the most suitable window sill and ebb from available.
We measure windows with a quarter
We measure the size of the window opening horizontally between the quarters at the narrowest point. Add 3 cm to this size (1.5 cm on each side of the window). This will be the width of our window. And vertically we simply measure the distance from the bottom of the opening to the upper quarter, we do not add or subtract anything to it. This will be the vertical size of our window. We measure the window sill and low tide in the same way as in the quarter-opening version.
Thus, we get 6 sizes:
- window height;
- window width;
- sill length;
- window sill width;
- low tide length;
- low tide width.

Dimensions of the plastic window
If your house is not new, and an old window is still installed in the window opening, then measurements are taken in the same way. Only for the window opening, you take the outer dimensions of the window frame, since it will need to be dismantled.
When ordering a window, be sure to check if the kit includes:
- windowsill;
- plugs are intended for plastic window sills. When ordering them, you must inform what the width of the window sill will be (overhang from the wall). There are 300 and 600 mm, but this is the total length, this includes two ends on one leg, and if, for example, the total length of the overhangs does not exceed 300 mm, then a plug is suitable for you - a 300 mm plug;
- installation profile (it is also a mounting profile, sweet clover, heel, window sill profile, etc.);
- fasteners for the window - anchor plates.
If not, they must be ordered separately.
Also, when ordering a window, in addition to its size, you will also be asked such important characteristics as:
- type of window profile: 3, 4 or 5-chamber;
- type of glass unit: 1, 2, 3-chamber;
- window opening method: deaf, with opening, swing-out with ventilation, swing-out with ventilation and micro-ventilation.
Methods for installing plastic windows, their pros and cons
Today, there are two ways to install metal-plastic windows: installation of windows with unpacking and installation without unpacking the window.
.png)
Diagram of a plastic window device
So, the method of installing a window with unpacking assumes preliminary disassembly of the window: the glazing beads are removed, the double-glazed windows are removed from the frame and set aside during the installation of the window frame, then the frame is attached to the wall with dowels, after which the double-glazed windows and glazing beads are installed back.

Installation of a window with "unbuckling"
Installation without unpacking does not require the removal of double-glazed windows and glazing beads, since the frame is not attached to the wall through and through, but with the help of fasteners previously fixed on its outer surface.

Installing a window without "unpacking"
At the same time, the method of installing a window with unpacking has several disadvantages.
For example, installation with unpacking sometimes leads to fogging of the glass unit during operation. Removal and re-installation of glazing beads, especially without such experience, often affects their appearance (visible scratches, chips). During the installation of windows, double-glazed windows must be placed in a place safe for their integrity, otherwise they can be accidentally broken, especially if left near the installation site. The installation method itself is more laborious and takes longer than installation without unpacking (on average, installation of each window will take 30 minutes longer, and if you are installing plastic windows for the first time, then about 60 minutes).
Installation of plastic windows without unpacking is devoid of the above disadvantages, since the glass unit does not need to be removed from the frame.
Now, with regard to the strength of the fastening. The unpacking method is considered to be more durable, especially if the frame is fixed to the wall with large long anchors. Therefore, it is worth stopping at it if:
- You are planning to fix windows on the 15th floor of a multi-storey building and above. On such high floors, there is a lot of wind and wind gusts, especially if the house is bordered by a lower building. You can not unpack windows below 15 floors.
- Your windows are very large (2x2 m and more), then it is better to choose the mounting method with unpacking or combined. The balcony unit can be fixed without unpacking.
In private houses, where windows are usually installed in standard medium sizes, and the number of storeys rarely exceeds 4 floors, of course, it is better to choose the method of installing metal-plastic windows without unpacking. The fastening strength without unpacking will be more than enough.
And given that our site is dedicated to the issues of private construction, further we will analyze in detail the method of fastening a plastic window, which is more suitable for low-rise construction - without unpacking.
Window Installation Tool
- screwdriver;
- level;
- gun for polyurethane foam;
- polyurethane foam at the rate of 1-3 cylinders per 1 window (it is difficult to say for sure, since it depends on the size of the window and the filling of the cylinder);
- puncher;
- silicone gun;
- set of hexagons;
- jigsaw;
- stationery knife;
- pencil;
- roulette.
Sequence of installation of plastic windows
In order to understand how to properly install the window, go to I will briefly list the main stages of installation, after which we will dwell in detail on the main stages:
- dismantle the old window (with a window sill, if necessary);
- preparing a new plastic window for installation;
- we apply markings to the window frame in the places of subsequent fastening;
- we attach fasteners to the window frame;
- we make recesses in the window opening in the places where the fasteners will be attached;
- we expose the plastic window by level;
- we attach the window to the window opening;
- we fix the ebb (it can also be mounted at the very end);
- pre-adjust window fittings;
- foaming up the cracks between the frame and the window opening;
- we install the window sill;
- we carry out the final adjustment of the window fittings.
Dismantling an old window
- We take out the glazing beads on the blind windows, then the glass. On the opening windows, remove the sash from the hinges. If the glass in the sashes is held firmly, then the sashes can be removed directly from them. If the windows are very old, the frames are movable diagonally, then for the sake of safety, it is better to remove the glass from the sashes first.
- We make cuts in several places of the frame. It is better to use a regular saw for this. Sometimes a grinder with a circle on concrete is used for such purposes (there will be a lot of smoke). Very important! In this case, it is absolutely impossible to cut with an ordinary circle for metal, since it can jam, or even break. And given that the disc spins at an average speed of about 7000 rpm, this is very, very dangerous. It is also categorically impossible to insert a disc with teeth on wood into the grinder.

Making cuts when dismantling an old wooden window frame
Then we take it out in parts with a crowbar, a hammer drill with a "spatula" attachment or other handy tools.
Dismantling the old wooden frame with a hammer drill and scrap
Sometimes a wooden frame is left in good condition. But it is better to dismantle it and attach it to the wall material. Then the size of the light window will be larger, and the fastening is more reliable than to a tree, and the wooden frame will not rot over time.
- We dismantle the old window sill. If it is wooden, then we do with it the same way as with a wooden frame: we make a cut and take it out in parts with a crowbar. If it is concrete, then we break it with a jackhammer, if there is such a tool, if not, then with a hammer and a crowbar or, again, a grinder with a circle on concrete. If your windowsills are concrete, in good condition, and they suit you, you can leave them. But it is important to remember that the plastic window sill is "warmer". Also, if you leave the old window sill, then almost always there is a large gap between it and the window frame, and even if it is repaired with a mixture using a mesh, then cracks are inevitable. In this case, there is only one way out - to glue the window sill on top with tiles.
- We clean the window opening from debris and dust.
Preparing a plastic window for installation
If the window is openable (not blind), then during installation, the window must be in the closed position. This is very important, because if the window is open, for example, for ventilation, then the foam, which we will later fill the space between the frame and the window opening, will bend the frame in a semicircle. In the closed position, the window must be at least 12 hours after foaming. Then you can open it. In order for the window to be closed, it is advisable simply not to install the handle until the window is installed. Otherwise, someone from your household will be able to unknowingly open the window when you walk away for a couple of minutes. If there is no pen, then there will be simply nothing to worry about.
Do not remove the protective tape from the window surface until the end of the window installation process, and if you finish the slopes, then until the finishing work is completed.
Installation of a plastic window
- We apply markings to the window frame in the places of subsequent fastening. Fastening is carried out from all 4 sides of the window frame every 70 cm. Sometimes they are fastened less often, but we do not recommend it more than 100 cm. The distance of the extreme fasteners from the corner of the window frame is usually made in the range of 5-15 cm.The only thing is that you do not need to attach the frame from below if you have a window with a support profile.

Scheme and photo of the appearance of the stand profile
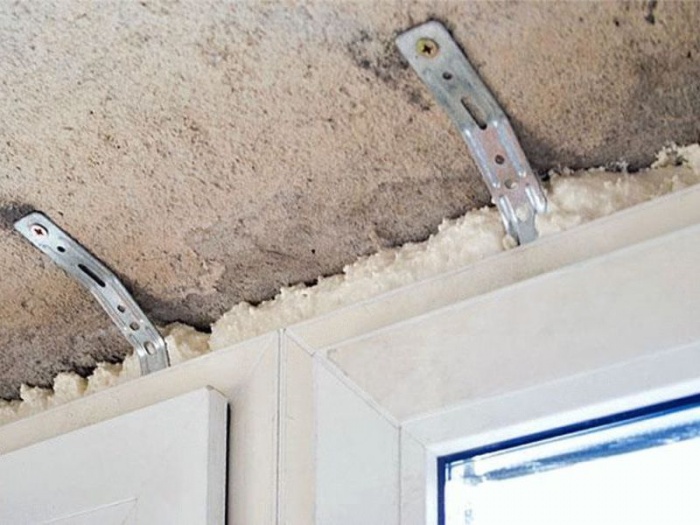
- We attach fasteners to the window frame. Fasteners are attached to the window frame in such a way that the self-tapping screw is fixed in the metal located inside the frame (metal bent channel). For this, it is better to take special screws - for metal (diameter 4 mm). They come straight away with a drill at the end. If you use ordinary screws, then first you need to make a hole in the frame with a drill with a diameter of 4 mm (length 4-5 cm), and only then you can fix the fastener using a regular self-tapping screw with a diameter of 5 mm.If the windows are large (2x2 m and more), then a drill with a diameter of 8 mm, and a self-tapping screw with a diameter of 12 mm.Special anchor plates can be used as fasteners. Sometimes they are also attached to U-shaped plasterboard suspensions.
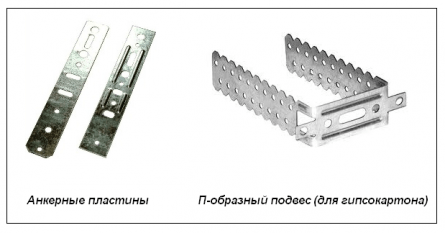
Fasteners for mounting a window in a window opening
But their cost is about the same - from $ 0.05 (for wholesale purchase) to $ 0.15, and the thickness of the metal, at the same time, is often different: the anchor plate usually comes with a thickness of 1.1-1.5 mm, and the U-shaped suspension from 0.5 to 1 mm. The thicker the metal, the better, of course.

Fasteners for a plastic window made of U-shaped hangers
- We make recesses in the window opening in the places where the fasteners will be attached. To do this, we insert the frame with fasteners already fixed to its surface into the window opening. In those places where the fasteners will be attached to the opening, we knock out indentations according to the size of the fasteners and to a depth of 2-4 cm (to the wall - brick or stone). We will sink the fasteners in them. We do this in order to make it easier to finish the slopes later. You don't need to throw in an extra layer of plaster to hide the fasteners.

Embossed recesses in the window opening for fasteners
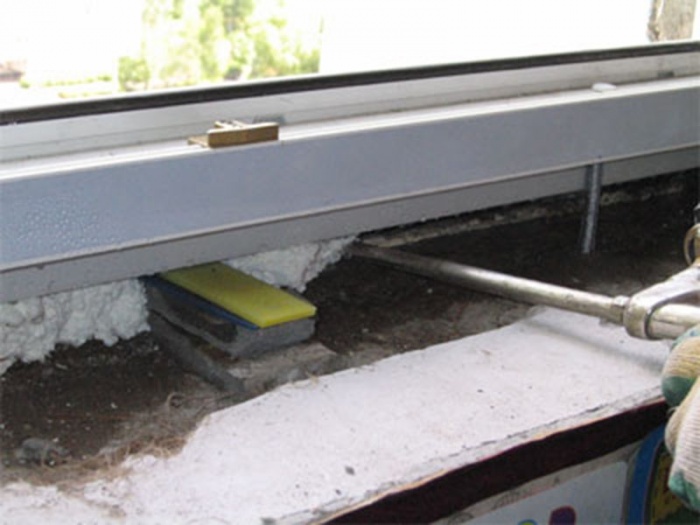
Important: if you have a window without a mounting strip, then when inserting it into the opening, it must be raised to the height of the window sill, so that later the window sill can be brought under the frame, and not fastened to the joint with the window frame. To do this, place blocks of wood, pieces of foam or brick under the frame. If the window has a mounting plate, then this is not necessary. The mounting plate just raises the window frame to the height of the window sill. It is not necessary to attach the mounting strip to the frame, it is usually supplied already fixed.
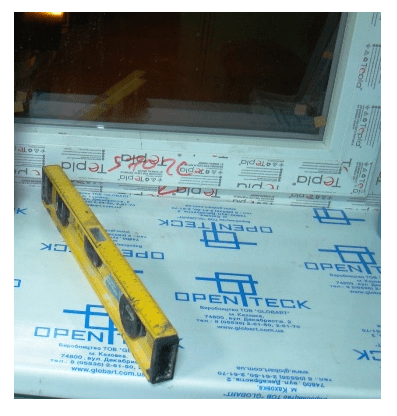
- We set the window by level. To do this, in the right places we put under the frame, for example, wooden wedges (blocks of the right size). Wedges are always located strictly under the transverse parts of the frame: under the horizontal part along the vertical line, and vice versa. We set the wedges in the following sequence: First, the lower two, which will expose the lower edge and, accordingly, the upper one to the horizon.At this stage, it is convenient to temporarily secure the top anchor plate to keep the window from dangling. Then there are two on top that will secure the frame up and down. And only then, the remaining wedges left and right, and always on both sides and below and above the window. If there is an impost, then it is also necessary to wedge it, and it is also necessary to control that all vertical posts stand in the same plane. The longest time in the installation is the setting of the wedges. As a result, the frame should be aligned both vertically and horizontally. This work is easier to do together: one holds the window, the other puts wedges under the frame.

Setting the window by level
- We attach the window to the window opening. After our window is perfectly aligned, we can finally fix it in the window opening. Windows are usually fastened with dowels, sometimes with anchors. Anchoring is considered to be more durable, but also more expensive. So the choice is yours. I will say one thing - a dowel hammered into concrete can withstand a load of 60 kilograms. So in this case, as for me, it is more than enough. Dowels are used with a diameter of 6-8 mm, a length of 75-80 mm. For fastening to wall materials such as hollow bricks, shell rock and foam concrete, anchors with a diameter of 6-8 mm are used. For fastening to a tree - screws with a diameter of 8 mm.
- We fix the ebb (it can also be mounted at the very end). It is advisable to install the ebb under the window in order to exclude water seepage at the junction of the ebb with the window frame. But if there is no possibility to fix the ebb under the frame, then we attach the ebb to the window frame with self-tapping screws for metal with a diameter of 4 mm and a length of 9 mm.
- We pre-adjust the window fittings. The adjustment of the windows is done using hexagons in the area of the window hinges. As a result, the sash should open and close freely without touching the rest of the window. Plus, if you opened the flap, then it should not close itself (as usually happens with the refrigerator door) or open, but should remain in the position in which you left it. Sometimes the window, when closing / opening, can strike in the places where the locking fittings are installed. To fix this, you just need to unscrew the self-tapping screw on this element and move the element itself 0.5-1 cm higher or lower.
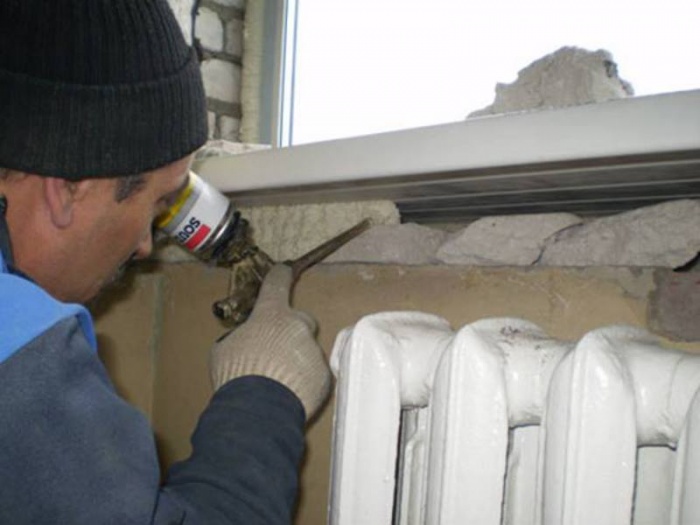
- We fill in the gaps between the frame and the window opening.
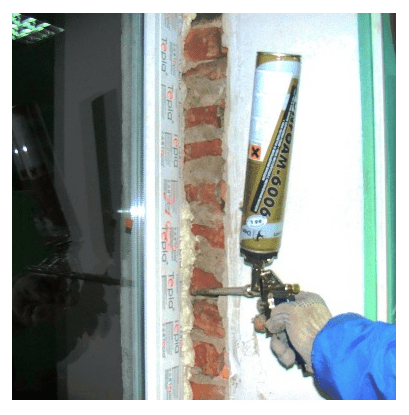
Filling the space between the frame and the window opening with construction foam
It is very important here that the filling is 100%, without voids and interruptions. Moreover, if the gap between the window and the opening is more than 2 cm, then it is advisable to foam it several times with a break of 1-2 hours. Then the expansion of the foam is not a "fatal" factor. And it saves foam that would have to be cut off. If the installation of windows is carried out at a temperature lower than +5 degrees, then the polyurethane foam must be used winter or all-season. If the temperature is above + 5 degrees, then ordinary summer polyurethane foam will do.
After the foam hardens, it must be closed from ultraviolet radiation. Since this can already be called part of the slope finishing work, this work can be postponed until the slopes are finished. But if you do not plan to finish them at all, or, you are planning, but later than in a month, then it is better to close the foam right away, since under the open rays of the sun the foam will become unusable. We close it either with a strong cement-sand mortar (cement: sand - 1: 2), or with tile adhesive (for example, Ceresit CM 11), or with a special tape PSUL(vapor-permeable self-expanding sealing tape). The only thing is that the tape is so expensive (about $ 3 per meter), so the first two options are more often used.
Installation of a window sill
- Usually window sills come in standard lengths and widths, i.e. with a margin of length and width. Therefore, first you need to cut it off. To do this, you can use an electric jigsaw, grinder, saw with small teeth.

Cutting the sill to the desired level
- Then we move the window sill to the support profile (it should be). Then we expose the window sill by level, placing wooden blocks, pieces of epps, bricks or even scraps of laminate under it.
Installation of a window sill by level
It is better to install the plugs so that they go into the wall. And it is advisable to stick them on super-glue, since acrylic and silicone do not stick them.
As a result, your window sill should be leveled in two horizontal directions and not sag anywhere (check by pressing with your hand). Sometimes the window sill is installed with a slight slope "from the window". This is done so that condensation that may form on the window does not drain under the window. And if you do such a slope, then it is very small, only about 3 degrees.

Loading a plastic window sill with a heavy object
If the window sill is not loaded, the foam will bend it up.
Blowing out the cavity under the plastic window sill with construction foam
- 24 hours after foaming, the remaining foam protruding from the cavity under the windowsill is cut off with an ordinary clerical knife.
- Sometimes, due to the unevenness of the window sill, after its installation, a small gap remains between the top of the window sill and the window frame. It needs to be filled with silicone. Wipe off any remaining silicone immediately with a rag. But given that silicone sometimes turns black over time from the fungus, and spoils the appearance of the window and sill, it is better to prevent the appearance of such a gap. This can be done by screwing Z-shaped galvanized plates to the window sill profile before installing the window sill. Having rehearsed with the trimming of the window sill, you can achieve a snug fit of the window sill. Also, such plates make it easier to expose the window sill.

Z-shaped galvanized steel plates for a snug fit of the window to the frame
Final window adjustment
Now you can screw the handle to the window and remove the protective tape from its surface. If the finishing of the slopes is still to be done, then it is better to remove the protective tape after they have been finished.
The most common mistakes when installing windows
There are not many of them, but they all ultimately affect the service life of the window, as well as the convenience of its operation:
- The window is mounted with glazing beads outward. Such a mistake leads to the fact that you can easily and silently enter the house by simply removing the glazing beads from the window and taking out the double-glazed windows.
- The window is not leveled. As a result, the window does not open and close well.
- The polyurethane foam is not covered with anything and is left open under the influence of ultraviolet radiation. As a result, the foam becomes unusable.

Open polyurethane foam
- Measurements are made incorrectly, or the window is simply fixed low, and the window sill, as a result, does not fit under the window. It has to be docked to the window frame.
- The window is not secured with anything, simply blowing out the space between the window frame and the opening with mounting foam. If the opening is with a quarter, then this leads, at most, to the appearance of cracks on the slopes, since the fastening "on the foam" can not even be called fastening. Such a connection is flexible, especially over time. If the window is a quarter, then as a result the window may simply fall out, I am personally familiar with one such example. So it's important to remember that foam is not a fastener. The window must be able to withstand the load without foam.
I hope that this article will help you save on the installation of plastic windows in the house, as well as do this simple work correctly and without mistakes so that your windows will serve you for a long time. If you decide to turn to the services of an installation organization, then it will be easier for you to understand what the builders are doing at each stage of installation, which will allow you to control the process competently.
Note: All prices are for 2011.
Plastic windows are increasingly being installed by owners of country houses, as they have many advantages over wooden products. They also differ in acceptable cost. But before installing, you need to carefully prepare for such work. To do everything yourself, you need to know the specifics of performing all operations.
All plastic products are completed with installation parts, so with proper preparation, you can install the window without outside help. It is worth performing all actions very carefully so as not to damage the structure. In order to secure the windows in the opening more accurately, it is worthwhile to carry out work with an assistant. In some cases, before carrying out work, it is necessary to reinforce the opening.
Materials required for work
Before starting the installation, you need to prepare the following materials:
- wedges inserted for correct positioning of windows;
- polyurethane foam;
- sealant;
- hydro-vapor barrier material required to protect joints from moisture;
- anchor bolts.
Wedges are used during the installation process to more accurately position the plastic profile. It is much more difficult to follow without these materials. Construction foam is an insulating material that fills the space between the wall and the frame. When choosing the foam, it must be borne in mind that it must correspond to the temperature at which the work will be performed. If you purchase a material intended for use in the summer, its use in the winter can lead to the creation of a poor-quality insulation layer.
Also, during work, a self-expanding sealing tape will be required. This material is glued along the perimeter of the window from the outside, after which it expands. Sealant is used to fill the space between the slopes and the window sill.
How to determine the correct position of a plastic window
Before carrying out installation work, it is important to correctly determine the position of the frame relative to the wall thickness. The plastic window should go inside from the street side by about a third. This rule is optional, but when shifting the window in any direction relative to the specified distance, it should be borne in mind that the length of the ebb and sills must correspond to the project.
It is important to consider the size of the radiator and its position. The window sill should not overlap it by more than ½ the width. If the radiator is completely shut off, this can negatively affect the temperature in the room in winter, as well as the condition of the window. If installed incorrectly, plastic windows tend to fog up.
The length of the window sill should be about 15 cm larger than the window opening. Thanks to this, the edges of the window sill can be processed when finishing the slopes. The window sill comes with side caps, which should also be fixed after installing the window.
Methods for fixing plastic windows
The choice of a particular fastening method depends on parameters such as the size of the window opening and the material of the walls. This should be taken into account when choosing fasteners for plastic structures.

Fixation of plastic windows can be done in several ways:
- With dowels or anchor bolts. They are fixed in the holes pre-created in the wall.
- Serrated plates that are located outside the window profile. They are installed on a spacer and secured with self-tapping screws.
The first described method is considered more reliable. That is why, with the help of dowels, plastic structures, which are large in size, are fixed. The fastener passing through the window unit is more reliable and able to withstand impacts.
If you decide to install a small plastic window, you can secure them using anchor plates. These fasteners can be hidden by slopes and finishing materials. But before carrying out the work, you should prepare small indentations for them. This will avoid problems with plane alignment.
It is worth noting that when installing plastic windows, professionals combine the above methods. In this case, anchor bolts are used to secure the base of the profile and its vertical parts. The upper part is fixed with plates.
Basic rules for installing plastic windows
To properly install windows, you should follow a few basic rules:
- Installation of plastic double-glazed windows should be carried out using polyurethane foam. This material allows you to give the structure additional rigidity. It also acts as a retainer and heat insulator.
- To protect the space between the window and the wall, it is necessary to fix a waterproofing material on the outside, and a vapor barrier on the inside.
- You can install windows at any time of the year. Many professionals recommend carrying out work in the winter, as this will allow you to immediately see if mistakes have been made.
- Before purchasing foam, you must carefully study the features of the composition. Such materials differ in several ways. One of them is the solidification temperature. The instructions on the cylinder indicate the most favorable conditions for using the foam. If you ignore them, the material can begin to deteriorate during the operation of the structure.
- When foaming the gaps between plastic windows and walls, it is necessary to fill in small portions. This allows less foam to be consumed.
- If the opening is crumbling, it is necessary to clean the surface of old materials and reinforce it.
Observing the described rules, you can install windows with your own hands, without making mistakes that people who have no experience of such work make. The technology for installing plastic windows in a brick house is quite simple, but it is important to carefully follow each action so as not to make a mistake.
How is the preparation of the opening
Before carrying out work on the installation of windows, it is necessary to thoroughly clean the opening from dirt and dust. It is important to remove all residues of paint and building materials. It is also important to compare the dimensions of the opening and the plastic frame before installation. If the gap is more than 4 cm, it is necessary to use more than foam. This is due to the fact that when using it, it will not be possible to create an even and high-quality seam. In addition, a lot of foam will go away.

Before installation, it is necessary to remove the sashes from the frame. To do this, simply pull the pin out of the hinges. If it is necessary to get the glass unit out of the frame, the glazing beads holding the glass are removed. Perform these steps very carefully so as not to scratch the glass.
After removing the sash and glass units, place them on a soft mat and lean against the wall so that they are in a stable position. Double-glazed windows do not fit flat, as this can lead to scratches on the glass surface.
After that, the protective film is removed and markings are applied to the places where the fasteners will be located. The distance between them should be about 40 cm.It is important to take into account that the indents from the corners should be more than 15 cm.
Installation process
After carrying out the described actions, spacers should be inserted into the window opening in the brick wall in order to create the necessary gap. Frame alignment should be done using a building level. It is also important to control the side clearances.

In the openings of brick houses, it is necessary to mark the installation locations of the anchors. After this, holes are created in the walls. If fastening is done with anchor plates, it is necessary to bend them so that they fit well on the wall.
The next step is to install the frame. It is important to check the horizontal and vertical structure of the structure before proceeding. How it will be finally fixed. After that, the bolts are finally tightened until the head protrudes above the surface by no more than 1 mm.
After all the described work, the doors and glass units are installed, as well as the functionality of the entire structure is checked. If you installed the products with your own hands for the first time, you should carefully inspect the opening and make sure that no mistakes were made during the work.
Installation of slopes
Before installing the outer slopes, measure the width and length of the opening. Cutting plastic slopes is done with a circular saw.
Important! It is necessary to fix the slopes only on clean and leveled surfaces.
At the first stage, the upper horizontal part is fixed. It needs to be drowned as deep as possible, and the space should be filled with polyurethane foam. It's worth remembering. That it should not be produced too much, since when solidified, the material can change the shape of plastic products.

After this, the installation of vertical slopes takes place. During these works, it is important to check the verticality of the elements. The installation of the lower slope takes place in the same way. It is important to ensure that all elements are correctly docked, and there are no gaps between them. The corners between the plastic slopes are closed with a special piece.

Installation of internal slopes should be done only after careful preparation of the surface. If the opening is crumbling, it is better to clean it up to the main wall and only then carry out further work. After that, the opening is leveled and filled with insulation. If necessary, the window opening is reinforced.